使用 Socket.io、Express、React.js 和 Chakra UI 构建实时聊天应用程序(Vite 设置)
在本篇博文中,我们将构建一个实时聊天应用程序,使用Socket.io进行双向通信,Express.js用于服务器,React.js用于前端,Chakra UI用于样式设计。为了快速开发,我们将使用Vite来搭建项目。
主要特点:
- 基于用户 ID 的聊天:生成一个随机用户 ID 并存储在会话存储中。
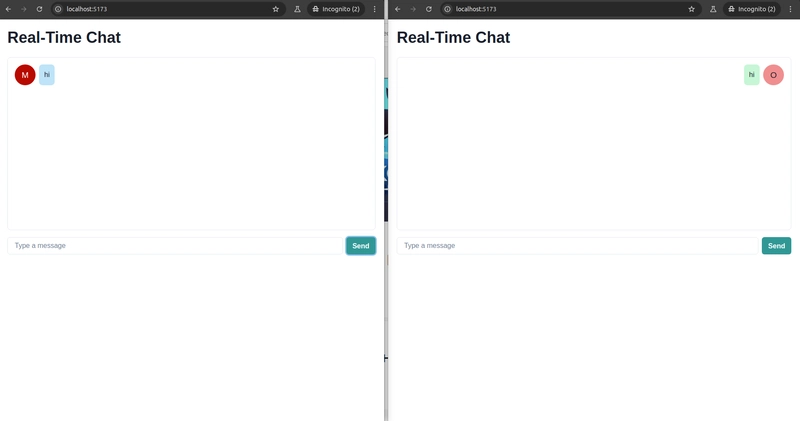
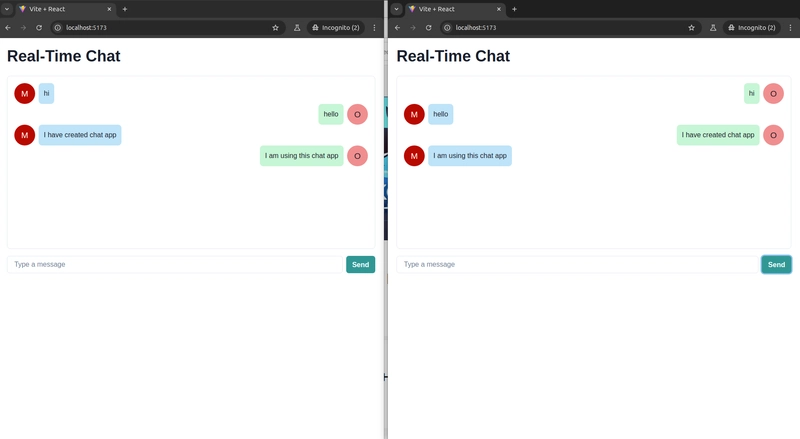
- 消息显示:我们的消息显示在左边,其他人的消息显示在右边,每个消息都有一个图标。
以下是该项目的演示:
让我们开始吧!
1. 设置项目
创建一个包装文件夹 chat-app,其中包含我们的前端和后端:
mkdir chat-app
cd chat-app
后端设置:带有 Socket.io 的 Express.js
首先,为您的后端创建一个文件夹并使用 npm init -y 初始化它:
mkdir chat-backend
cd chat-backend
npm init -y
现在安装必要的软件包:
npm install express socket.io
为后端创建以下文件结构:
chat-backend/
│
├── server.js
└── package.json
server.js - Express 和 Socket.io以下是使用Socket.io
设置 Express 服务器的方法:
const express = require('express');
const http = require('http');
const { Server } = require('socket.io');

const app = express();
const server = http.createServer(app);
const io = new Server(server, {
  cors: {
    origin: 'http://localhost:5173',
    methods: ['GET', 'POST']
  }
});

io.on('connection', (socket) => {
  console.log('A user connected:', socket.id);

  socket.on('sendMessage', (message) => {
    io.emit('receiveMessage', message);
  });

  socket.on('disconnect', () => {
    console.log('A user disconnected');
  });
});

server.listen(4000, () => {
  console.log('Server listening on port 4000');
});
此代码创建一个 Express 服务器,用于监听端口4000并设置Socket.io处理实时通信。当用户发送消息(sendMessage 事件)时,该消息会被广播给所有连接的客户端。
前端设置:带有 React 和 Chakra UI 的 Vite
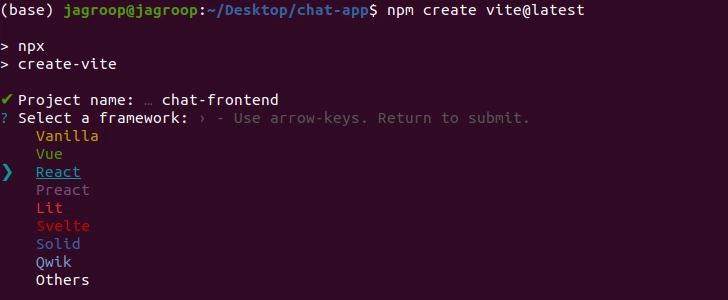
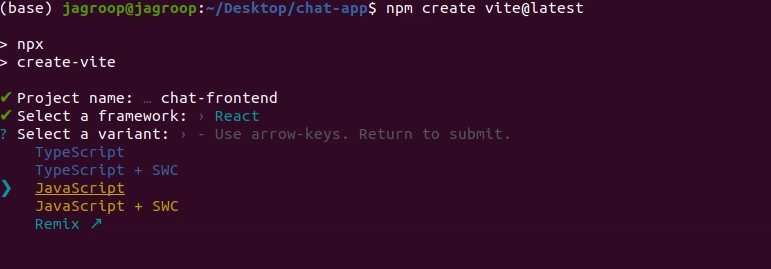
创建一个 Vite React 项目并按照以下屏幕截图进行操作(在chat-app和不在 中创建项目chat-backend):
npm create vite@latest
导航到项目文件夹并安装必要的依赖项:
cd chat-frontend
npm install socket.io-client @chakra-ui/react @emotion/react @emotion/styled framer-motion
现在,让我们为我们的聊天应用程序创建一个基本结构。
2. 实现聊天前端
前端的结构如下:
chat-frontend/
│
├── src/
│   ├── components/
│   │   └── ChatBox.jsx
│   ├── App.jsx
│   └── main.jsx
├── index.html
└── package.json
App.jsx
在 中App.jsx,设置 Chakra UI 并渲染 ChatBox 组件:
import { ChakraProvider, Box, Heading } from "@chakra-ui/react";
import ChatBox from "./components/ChatBox";

function App() {
  return (
    <ChakraProvider>
      <Box p={5}>
        <Heading as="h1" mb={6}>
          Real-Time Chat
        </Heading>
        <ChatBox />
      </Box>
    </ChakraProvider>
  );
}

export default App;
ChatBox.jsx
这是主要的聊天逻辑所在。我们将用它来Socket.io监听消息并处理实时更新。我们会生成一个随机的userId并将其存储在会话存储中,并使用 构建聊天 UI Chakra UI。
import React, { useState, useEffect } from "react";
import { Box, Input, Button, HStack, VStack, Text, Avatar } from "@chakra-ui/react";
import { io } from "socket.io-client";

const socket = io("http://localhost:4000");

const ChatBox = () => {
  const [messages, setMessages] = useState([]);
  const [input, setInput] = useState("");
  const [userId, setUserId] = useState(null);

  useEffect(() => {
    // Generate or get userId from session storage
    let storedUserId = sessionStorage.getItem("userId");
    if (!storedUserId) {
      storedUserId = Math.random().toString(36).substring(7);
      sessionStorage.setItem("userId", storedUserId);
    }
    setUserId(storedUserId);

    // Listen for messages
    socket.on("receiveMessage", (message) => {
      setMessages((prevMessages) => [...prevMessages, message]);
    });

    return () => {
      socket.off("receiveMessage");
    };
  }, []);

  const sendMessage = () => {
    if (input.trim()) {
      const message = {
        userId,
        text: input,
      };
      socket.emit("sendMessage", message);
    //   setMessages((prevMessages) => [...prevMessages, message]);
      setInput("");
    }
  };

  return (
    <VStack spacing={4} align="stretch">
      <Box h="400px" p={4} borderWidth={1} borderRadius="lg" overflowY="auto">
        {messages.map((msg, index) => (
          <HStack key={index} justify={msg.userId === userId ? "flex-start" : "flex-end"}>
            {msg.userId === userId && <Avatar name="Me" />}
            <Box
              bg={msg.userId === userId ? "blue.100" : "green.100"}
              p={3}
              borderRadius="lg"
              maxW="70%"
            >
              <Text>{msg.text}</Text>
            </Box>
            {msg.userId !== userId && <Avatar name="Other" />}
          </HStack>
        ))}
      </Box>

      <HStack>
        <Input
          value={input}
          onChange={(e) => setInput(e.target.value)}
          placeholder="Type a message"
        />
        <Button onClick={sendMessage} colorScheme="teal">
          Send
        </Button>
      </HStack>
    </VStack>
  );
};

export default ChatBox;
工作原理:
-
随机 userId:我们生成一个随机字符串作为 userId 并将其存储在 中
sessionStorage。这样可以确保即使您重新加载页面,会话中的 userId 也会保持不变。 -
使用 Socket.io 进行消息传递:该应用监听来自服务器的receiveMessage
Socket.io事件并显示收到的消息。当用户发送消息时,它会通过 发出,并且 UI 会实时更新。 -
Chakra UI 风格:消息显示在方框中,我们的消息在左侧对齐(蓝色背景),其他人的消息在右侧对齐(绿色背景)。每条消息都配有一个头像,打造简洁、个性化的聊天界面。
3.运行应用程序
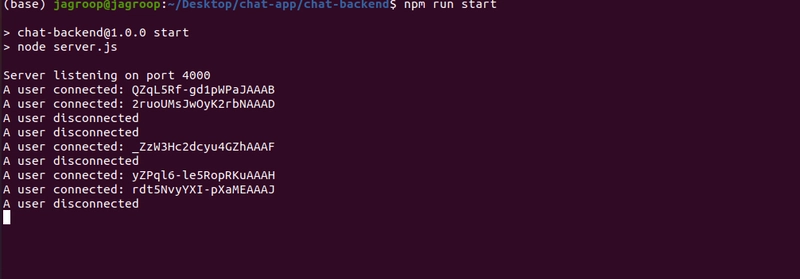
启动后端:
cd chat-backend
node server.js
启动前端:
cd chat-frontend
npm run dev
现在,http://localhost:5173在多个浏览器窗口中打开以测试实时聊天功能。您将看到每个用户的消息都以其唯一的 形式显示userId。
您已成功使用Socket.io、Express、React.js和Chakra UI构建了一个实时聊天应用程序,并通过Vite设置了项目!🎉
此应用程序展示了 Socket.io 在实时通信💬方面的强大功能以及 Chakra UI 在简洁、响应迅速的界面📱方面的强大功能。
您可以通过添加聊天室🏠、消息持久性💾和用户身份验证🔒等功能来扩展此项目。
这篇博客就到这里!敬请期待更多更新,继续构建精彩的应用!💻✨
祝你编程愉快!😊
 后端开发教程 - Java、Spring Boot 实战 - msg200.com
