让我们一起构建:使用 Ruby on Rails – 带有 Stripe Connect 的 Marketplace 应用
入门
创建项目
更多建模
订阅/支持
福利订阅
欢迎阅读我的“Let's Build:使用 Ruby on Rails”系列的又一期。本系列重点介绍如何使用 Stripe Connect 构建一个市场应用。用户可以注册、购买和出售自己的商品和服务,应用会从每笔交易中抽取一定比例。
支持我的想法
我们虚构的市场应用名为“Back My Idea”。Back My Idea 是一款类似于 GoFundMe 和 Kickstarter 的应用,用户可以通过众筹/众筹的方式实现他们的下一个伟大创意。企业家/设计师/开发者可以提出他们的应用构想,并寻求捐款来资助他们的开发过程。
核心要求:
- 用户必须登录才能操作平台的任何部分。
- 用户可以拥有两个角色(如果算上管理员,则为三个)。这两个角色分别是创客和支持者。支持者通过支付表单(例如 Stripe)为创客的项目提供资金。创客可以直接从支持者那里获得资金,并预留一部分资金用于应用程序的提成。任何支持者都可以成为创客,反之亦然。
- Maker 可以发布自己的项目,并将其保存为草稿或公开。公开后,该项目即可获得 Backer 的支持。
- 用户不能直接支持自己的项目,但可以编辑内容。
- 所有项目的有效期为 30 天。
- 除非项目是支持者自己的,否则支持者不能编辑该项目。
- Maker 和 Backer 都可以对项目进行评论。
- 项目可以拥有作为堆叠支持金额的福利。
- 奖励可以是制造商指定的任意数字
- 每个 Perk 代表一次交易
堆
- Ruby on Rails
- 刺激JS
- Tailwind CSS
造型:
- 用户
- 角色:管理员、创客、支持者
- 用户名
- 姓名
- 电子邮件
- 密码
- 项目
- 标题
- 描述
- 捐款目标
- 可评论类型
- 可评论ID
- 用户身份
- 福利– 与项目相关但又相互独立(嵌套属性?)
- 标题
- 数量
- 描述
- 可用金额
- 项目 ID
- 注释– 多态
- 身体
第 1 部分
第 2 部分
第 3 部分
第 4 部分
第 5 部分
第 6 部分
第 7 部分
第 8 部分
入门
本教程假设您已掌握一些使用 Ruby on Rails 创建应用的知识。如果没有,强烈建议您查看我其他一些更适合初学者的“Let's Builds”教程。随着您的学习进度,每次构建都会变得更具挑战性。还在为如何使用 Ruby on Rails 而苦恼吗?我制作了一个完整的 90 节视频课程,帮助您在https://hellorails.io上“解开”困境。
工具
我将使用 Ruby、Rails、rbenv、VS Code 和 iTerm 来编写本教程。您可以根据自己的喜好自定义这些工具。我不会让它变得过于复杂或具有挑战性。
为了进一步帮助实现这一点(并节省我大量的时间),我制作了一个名为Kickoff Tailwind 的Rails 应用程序模板。您可以将其作为起点,快速启动并运行新的 Rails 应用。该模板利用了 GitHub 仓库中的 Devise、Tailwind CSS、Friendly Id、Sidekiq 和自定义模板视图。它适用于 Rails 5.2+ 版本。查看GitHub 仓库了解更多信息。
建议的数据架构
经过快速的头脑风暴,我确定了可能需要哪些类型的数据,并整理了一份大致的清单。这份清单很可能会随着我的进展而改变。我更喜欢在不接触代码的时候提前做这件事。这能让我以不同的方式思考,最终意味着以后可以减少反复试验。
- 用户 – 脱离 Devise 的模型
- 角色:管理员、创客、支持者
- 用户名(可从我的启动顺风模板中免费获得)
- 姓名(可从我的启动顺风模板中免费获得)
- 电子邮件(无需设计)
- 密码(Devise 免费)
- 项目
- 标题 –字符串
- 描述 – rich_textarea(操作文本)
- 承诺目标 –字符串
- 承诺目标结束于 – 日期时间
- 可注释类型 –字符串
- 可注释 ID – bigint
- 用户 ID –整数
- 福利– 与项目相关但相互独立(嵌套属性?)
- 标题 –字符串
- 金额 –小数
- 描述 – rich_textarea(操作文本)
- 可用金额 –整数
- 项目 ID –整数
- 注释– 多态
- 身体
创建项目
首先,我将生成包含标题、捐赠目标和用户关联的项目模型脚手架。稍后,我们将在 Rails 6 中添加描述字段作为操作文本功能。此外,我们还将添加多态注释,以便您在将来需要注释时使用。
$ rails g scaffold Project title:string donation_goal:decimal user:references

Running via Spring preloader in process 31754
      invoke active_record
      create db/migrate/20190829024529_create_projects.rb
      create app/models/project.rb
      invoke test_unit
      create test/models/project_test.rb
      create test/fixtures/projects.yml
      invoke resource_route
       route resources :projects
      invoke scaffold_controller
      create app/controllers/projects_controller.rb
      invoke erb
      create app/views/projects
      create app/views/projects/index.html.erb
      create app/views/projects/edit.html.erb
      create app/views/projects/show.html.erb
      create app/views/projects/new.html.erb
      create app/views/projects/_form.html.erb
      invoke test_unit
      create test/controllers/projects_controller_test.rb
      create test/system/projects_test.rb
      invoke helper
      create app/helpers/projects_helper.rb
      invoke test_unit
      invoke jbuilder
      create app/views/projects/index.json.jbuilder
      create app/views/projects/show.json.jbuilder
      create app/views/projects/_project.json.jbuilder
      invoke assets
      invoke scss
      create app/assets/stylesheets/projects.scss
      invoke scss
      create app/assets/stylesheets/scaffolds.scss
上面的命令会生成大量文件。我会删除该scaffold.scss文件以及project.scss生成的文件,因为我们不需要它们。本教程不包含测试驱动。虽然我知道尽可能地实践 TDD 很重要,但本指南的范围是教你如何使用实用的 Rails 概念来构建这个想法。之后,测试可以而且应该成为重点。
我description稍后会通过操作文本添加一个字段。评论功能也稍后添加!
db/让我们迁移一下。注意,当你执行此操作时,会生成一个名为 的新文件schema.rb。
$ rails db:migrate

== 20190829024529 CreateProjects: migrating ===================================
-- create_table(:projects)
   -> 0.0046s
== 20190829024529 CreateProjects: migrated (0.0049s) ==========================
感谢我们的user:references选项,我们现在在文件belongs_to :user内app/model/project.rb(Ruby 类内)建立了关联。这会告诉 ActiveRecord 如何将我们的User模型关联到其他Project模型。通过使用我的启动模板和 Devise,我们User免费获得了模型。如果您没有使用这些模板(没关系),则需要生成一个新的用户模型并安装 Devise 才能继续下一步。
# app/models/project.rb

class Project < ApplicationRecord
  belongs_to :user
end
我们仍然需要has_many在用户模型上声明关联才能使这一切正常工作。
# app/models/user.rb

class User < ApplicationRecord
  # Include default devise modules. Others available are:
  # :confirmable, :lockable, :timeoutable, :trackable and :omniauthable
  devise :database_authenticatable, :registerable,
         :recoverable, :rememberable, :validatable
  has_many :projects, dependent: :destroy # add this line
end
这里发生的事情是,我们期望用户能够创建并将自己关联到多个项目。这样做是在Project模型上进行的。当我运行时,user:references数据库中添加了一个新列。如果您查看生成的迁移,您将看到以下内容:
# db/migrate/20190829024529_create_projects.rb
class CreateProjects < ActiveRecord::Migration[6.0]
  def change
    create_table :projects do |t|
      t.string :title
      t.string :donation_goal
      t.references :user, null: false, foreign_key: true

      t.timestamps
    end
  end
end
该t.references方法是对一些 SQL 语句的包装,它将在数据库的表user_id中生成一个列projects。由于我们已经迁移了新的数据类型,您可以参考该schema.rb文件以更好地了解新增的内容。请记住不要直接编辑此文件。
# db/schema.rb
ActiveRecord::Schema.define(version: 2019_08_29_024529) do
    ... # code omitted for clarity sake

  create_table "projects", force: :cascade do |t|
    t.string "title"
    t.string "donation_goal"
    t.integer "user_id", null: false # added thanks to user:references
    t.datetime "created_at", precision: 6, null: false
    t.datetime "updated_at", precision: 6, null: false
    t.index ["user_id"], name: "index_projects_on_user_id" # added thanks to user:references
  end

  create_table "users", force: :cascade do |t|
    t.string "email", default: "", null: false
    t.string "encrypted_password", default: "", null: false
    t.string "reset_password_token"
    t.datetime "reset_password_sent_at"
    t.datetime "remember_created_at"
    t.string "username"
    t.string "name"
    t.boolean "admin", default: false
    t.datetime "created_at", precision: 6, null: false
    t.datetime "updated_at", precision: 6, null: false
    t.index ["email"], name: "index_users_on_email", unique: true
    t.index ["reset_password_token"], name: "index_users_on_reset_password_token", unique: true
  end

  add_foreign_key "projects", "users"
end
更新路线
由于此应用的重点是项目,因此将项目索引路径设为应用的根路径可能是合理的。可以通过将config/routes.rb文件更新为以下内容来实现:
# config/routes.rb

require 'sidekiq/web'

Rails.application.routes.draw do
  resources :projects
    authenticate :user, lambda { |u| u.admin? } do
      mount Sidekiq::Web => '/sidekiq'
    end

  devise_for :users
  root to: 'projects#index' # changed from 'home#index'
end
现在,根路径应该更新为一个丑陋的项目表列表。点击后New Project会跳转到localhost:3000/projects/new表单所在的位置。您可以User Id完全删除该字段。
一些初始的 UI 爱好
我添加了一些基本样式,让它看起来更美观一些。我选择了深色背景来展现笑容。您可以随意修改样式。如果您按照我的步骤操作并使用我的 Kickoff Tailwind 模板,那么下一部分将直接适用于您。
/* app/javascript/stylesheets/components/_forms.scss */
.input {
  @apply appearance-none block w-full bg-white text-gray-800 rounded py-3 px-4 leading-tight;

  &.input-with-border {
    @apply border;
  }
}

.input:focus {
  @apply outline-none bg-white;
}

.label {
  @apply block text-white font-bold mb-2;
}

.select {
  @apply appearance-none py-3 px-4 pr-8 block w-full bg-white text-gray-800
   rounded leading-tight border-2 border-transparent;
  -webkit-appearance: none;
}

.select:focus {
  @apply outline-none bg-white;
}
按钮也得到了一点喜爱。
/* app/javascript/stylesheets/components/_buttons.scss */

/* Buttons */

.btn {
  @apply font-semibold text-sm py-2 px-4 rounded cursor-pointer no-underline inline-block;

  &.btn-sm {
    @apply text-xs py-1 px-3;
  }

  &.btn-lg {
    @apply text-base py-3 px-4;
  }

  &.btn-expanded {
    @apply block w-full text-center;
  }
}

.btn-default {
  @apply bg-blue-600 text-white;

  &:hover,
  &:focus {
    @apply bg-blue-500;
  }

  &.btn-outlined {
    @apply border border-blue-600 bg-transparent text-blue-600;

    &:hover,
    &:focus {
      @apply bg-blue-600 text-white;
    }
  }
}

.btn-white {
  @apply bg-white text-blue-800;

  &:hover,
  &focus {
    @apply bg-gray-300;
  }
}

.link {
  @apply no-underline text-white;

  &:hover,
  &:focus {
    @apply text-gray-100;
  }
}
我添加了一个新文件来调整标题颜色h1-h6。这需要导入到我们的application.scss文件中。
/* app/javascript/stylesheets/components/_typography.scss */
h1,
h2,
h3,
h4,
h5,
h6 {
  @apply text-white;
}


/* app/javscript/stylesheets/application.scss */

@tailwind base;
@tailwind components;

// Custom SCSS
@import "components/buttons";
@import "components/forms";
@import "components/typography"; /* Add this line */

@tailwind utilities;
最后,主application.html.erb布局仅对主体类进行了轻微的调整:
<!DOCTYPE html>
<html>
  <head>
    <title>Back My Idea</title>
    <%= csrf_meta_tags %>
    <%= csp_meta_tag %>

    <meta name="viewport" content="width=device-width, initial-scale=1">
    <%= stylesheet_link_tag 'application', media: 'all', 'data-turbolinks-track': 'reload' %>
    <%= stylesheet_pack_tag 'application', media: 'all', 'data-turbolinks-track': 'reload' %>
    <%= javascript_pack_tag 'application', 'data-turbolinks-track': 'reload' %>

  </head>

 <body class="bg-blue-800 text-blue-100">
 <!-- a ton more code below: Find this in my kickoff tailwind rails application template (linked in this post) -->
项目表格和索引
通过调整我们的新表单类别以匹配较深的配色方案,我们可以直接更新模板以适应。
<!-- app/views/projects/_form.html.erb-->

<%= form_with(model: project, local: true) do |form| %>
  <% if project.errors.any? %>
    <div id="error_explanation" class="bg-white p-6 rounded text-red-500 mb-5">
      <h2 class="text-red-500 font-bold"><%= pluralize(project.errors.count, "error") %> prohibited this project from being saved:</h2>

      <ul>
        <% project.errors.full_messages.each do |message| %>
          <li><%= message %></li>
        <% end %>
      </ul>
    </div>
  <% end %>

  <div class="mb-6">
    <%= form.label :title, class: "label" %>
    <%= form.text_field :title, class: "input" %>
  </div>

  <div class="mb-6">
    <%= form.label :donation_goal, class: "label" %>
    <%= form.text_field :donation_goal, class: "input" %>
  </div>

  <div class="mb-6">
    <%= form.submit class: "btn btn-default" %>
  </div>
<% end %>
我们的项目脚手架目前在两者中共享此表单部分projects/new.html.erb,projects/edit.html.erb因此我将更新它们以使它们看起来更美观。
这是/new模板:
<!-- app/views/projects/new.html.erb -->
<div class="max-w-lg m-auto">
  <h1 class="text-3xl font-bold mb-6">Create a Project</h1>
  <%= render 'form', project: @project %>
</div>
以及/edit:
<!-- app/views/projects/edit.html.erb -->
<div class="max-w-lg m-auto">
  <h1 class="text-3xl font-bold mb-6">Edit Project</h1>
  <%= render 'form', project: @project %>
</div>
注意:/new和/edit路由都要求用户登录才能查看。我们稍后会讨论这个问题。
处理错误/身份验证
尝试创建新项目会导致错误,因为我们user_id在搭建项目资源时移除了对 的引用。我们可以将用户关联到控制器端来解决这个问题。目前,您无法创建新项目。
在实际应用中,我需要访问创建项目的用户。我需要这些数据,以便我们能够将该用户与项目关联起来。这意味着用户必须在创建新项目之前登录。我们可以在控制器中解决这个问题,并处理错误。
projects_controller.rb因此我将更新以下内容:
# app/controllers/projects_controller.rb
class ProjectsController < ApplicationController
  before_action :set_project, only: [:show, :edit, :update, :destroy]
  before_action :authenticate_user!, except: [:index, :show]

  def index
    @projects = Project.all
  end

  def show
  end

  def new
    @project = Project.new
  end

  def edit
  end

  def create
    @project = Project.new(project_params)
    @project.user_id = current_user.id

    respond_to do |format|
      if @project.save
        format.html { redirect_to @project, notice: 'Project was successfully created.' }
        format.json { render :show, status: :created, location: @project }
      else
        format.html { render :new }
        format.json { render json: @project.errors, status: :unprocessable_entity }
      end
    end
  end

  def update
    respond_to do |format|
      if @project.update(project_params)
        format.html { redirect_to @project, notice: 'Project was successfully updated.' }
        format.json { render :show, status: :ok, location: @project }
      else
        format.html { render :edit }
        format.json { render json: @project.errors, status: :unprocessable_entity }
      end
    end
  end

  def destroy
    @project.destroy
    respond_to do |format|
      format.html { redirect_to projects_url, notice: 'Project was successfully destroyed.' }
      format.json { head :no_content }
    end
  end

  private
    def set_project
      @project = Project.find(params[:id])
    end

    def project_params
      params.require(:project).permit(:title, :donation_goal)
    end
end
因此,当前登录用户的id属性将作用域限定在项目范围内。另外,请务必调整before_action类顶部的 。我们添加了一个名为 的设计选项authenticate_user!,它允许您锁定类中的任何操作。在本例中,我将其列入白名单index,show因为任何浏览网站的人无需登录即可看到这些操作。
现在尝试创建一个新项目。您应该会被重定向到登录页面。如果是这样,并且您还没有登录,请创建一个帐户并创建一个新项目。我们可以使用日志和/或 Rails 控制台来验证一切是否正常。
Running via Spring preloader in process 45423
Loading development environment (Rails 6.0.0)
irb(main):001:0> Project.last
   (0.6ms) SELECT sqlite_version(*)
  Project Load (0.1ms) SELECT "projects".* FROM "projects" ORDER BY "projects"."id" DESC LIMIT ? [["LIMIT", 1]]
=> #<Project id: 1, title: "First Project", donation_goal: "$1000", user_id: 1, created_at: "2019-08-30 19:15:13", updated_at: "2019-08-30 19:15:13">
注意,当我输入时,Project.last我们返回了一个项目。该user_id列有1一个值。由于只有一个账户(至少在我的机器上是这样),所以可以肯定地说,我们的工作是成功的。
项目索引
index.html.erb此时,文件会显示所有项目。您需要创建一些虚拟项目才能显示所有数据。我将使用卡片组件将其设置为网格布局。以下是初始标记:
<!-- app/views/projects/index.html.erb -->

<div class="flex flex-wrap items-start justify-start">
  <% @projects.each do |project| %>
    <div class="relative w-full p-6 border-2 border-blue-700 rounded-lg lg:w-1/4 lg:mr-8">
      <%= image_tag project.thumbnail.variant(resize_to_limit: [600, 400]), class: "rounded" if project.thumbnail.present? %>
      <h3 class="mb-2 text-2xl font-bold"><%= project.title %></h3>
      <div class="my-1"><%= truncate(strip_tags(project.description.to_s), length: 140) %></div>
      <p>Donation goal: <%= project.donation_goal %></p>
      <p class="text-sm italic opacity-75">Created by: <%= project.user.name %> </p>
      <%= link_to "View project", project, class: "btn btn-default inline-block text-center my-2" %>
      <% if author_of(project) %>
      <div class="absolute top-0 right-0 mt-2 mr-2">
        <%= link_to edit_project_path(project) do %>
          <svg class="w-6 h-6 text-white opacity-75 fill-current" xmlns="http://www.w3.org/2000/svg" width="24" height="24" viewBox="0 0 24 24"><title>edit</title><path d="M3 17.25V21h3.75L17.81 9.94l-3.75-3.75L3 17.25zM20.71 7.04c.39-.39.39-1.02 0-1.41l-2.34-2.34c-.39-.39-1.02-.39-1.41 0l-1.83 1.83 3.75 3.75 1.83-1.83z"></path></svg>
        <% end %>
      </div>
      <% end %>
    </div>
  <% end %>
</div>
如果你仔细观察,你会看到一个名为 的新助手author_of。我添加它是为了从视图中提取逻辑。该逻辑现在位于app/helpers/application_helper.rb
# app/helpers/application_helper.rb

def author_of(resource)
  user_signed_in? && resource.user_id == current_user.id
end
我选择添加这个,application_helper.rb因为我们几乎会在任何地方使用它。这个助手首先检查用户是否已登录,以及传入的对象是否具有与user_id匹配的属性current_user id。这实际上意味着,只有创建此项目的登录用户才能编辑它。我们admin在 User 模型中也有一个默认属性。最好也允许管理员编辑此资源。我们app/helpers/application_helper.rb也可以在文件中创建一个新的助手。
# app/helpers/application_helper.rb

def author_of(resource)
  user_signed_in? && resource.user_id == current_user.id
end

def admin?
  user_signed_in? && current_user.admin?
end
登录的作者将获得一个新的编辑图标,该图标链接到编辑路径。用户界面现在如下所示:
扩展项目
让我们来处理项目模型的描述字段。传统上,您可能会将text数据类型添加到数据库的新列中。随着 Rails 6 的正式发布,我们现在可以使用Action Text,这是一款出色的富文本编辑器,旨在与 Ruby on Rails 应用等配合使用。我们可以使用一个简单的命令安装 Action Text 依赖项:
$ rails action_text:install
这会安装一些依赖项并创建两个新的迁移。Action Text 使用 Active Storage,因此也会安装它。
接下来我们要迁移这些迁移文件:
$ rails db:migrate
这些本质上会为操作文本字段和活动存储字段创建单独的表。最终,这意味着我们不需要在其他表上添加专用属性。相反,我们在模型中定义所需的属性,Rails 会像魔术一样处理剩下的事情。
让我们更新Project模型:
# app/models/project.rb

class Project < ApplicationRecord
  belongs_to :user
  has_rich_text :description
end
此行has_rich_text表示与操作文本的特定关联。您可以随意命名。我选择了:description。
添加完成后,保存文件并前往表单部分。现在我们可以将新的文本区域添加到表单中:
<!-- app/views/projects/_form.html.erb-->

<%= form_with(model: project, local: true) do |form| %>
  <% if project.errors.any? %>
    <div id="error_explanation" class="bg-white p-6 rounded text-red-500 mb-5">
      <h2 class="text-red-500 font-bold"><%= pluralize(project.errors.count, "error") %> prohibited this project from being saved:</h2>

      <ul>
        <% project.errors.full_messages.each do |message| %>
          <li><%= message %></li>
        <% end %>
      </ul>
    </div>
  <% end %>

  <div class="mb-6">
    <%= form.label :title, class: "label" %>
    <%= form.text_field :title, class: "input" %>
  </div>

  <div class="mb-6">
    <%= form.label :donation_goal, class: "label" %>
    <%= form.text_field :donation_goal, class: "input" %>
  </div>

  <div class="mb-6">
    <%= form.label :description, class: "label" %>
    <%= form.rich_text_area :description, class: "input" %>
  </div>

  <div class="mb-6">
    <%= form.submit class: "btn btn-default" %>
  </div>
<% end %>
添加完这些之后,我们可以检查一下表单了。目前我们的 CSS 加载不正确,而且也不符合我们的设计。我不会直接使用trix安装时从 node 包导入的默认 CSS,而是会完全自定义 CSS。
Action Text 安装完成后,它会将actiontext.scss文件添加到app/assets/stylesheets/。我们应用的 CSS 将保存在 中app/javascript/stylesheets。我将搜索名为 trix 的 Node 模块,并从中导入 CSS 文件。
/* app/javascript/stylesheets/actiontext.scss */

@import "trix/dist/trix.css";

trix-toolbar {
  .trix-button {
    @apply bg-white border-0;
  }

  .trix-button-group {
    border: 0;
  }

  .trix-button--icon-bold {
    @apply rounded-tl rounded-bl;
  }

  .trix-button--icon-redo {
    @apply rounded-tr rounded-br;
  }
}

.trix-button--icon-attach,
.trix-button-group-spacer,
.trix-button--icon-decrease-nesting-level,
.trix-button--icon-increase-nesting-level,
.trix-button--icon-code {
  display: none;
}

.trix-content {
  .attachment-gallery {
    > action-text-attachment,
    > .attachment {
      flex: 1 0 33%;
      padding: 0 0.5em;
      max-width: 33%;
    }

    &.attachment-gallery--2,
    &.attachment-gallery--4 {
      > action-text-attachment,
      > .attachment {
        flex-basis: 50%;
        max-width: 50%;
      }
    }
  }

  action-text-attachment {
    .attachment {
      padding: 0 !important;
      max-width: 100% !important;
    }
  }
}
application.scss我们现在需要将其导入到我们的主文件中:
/* app/javascript/stylesheets/application.scss */

@tailwind base;
@tailwind components;

// Custom SCSS
@import "components/buttons";
@import "components/forms";
@import "components/actiontext";
@import "components/typography";

@tailwind utilities;
虽然一切看起来都正常,但我们还有几个任务要处理。我们需要在控制器层面允许这个新字段。前往projects_controller.rb
在文件底部,您应该看到一个名为的私有方法project_params
# app/controllers/projects_controller.rb
...
private
...

def project_params
  params.require(:project).permit(:title, :donation_goal)
end
我们需要添加:description到permit方法中。
# app/controllers/projects_controller.rb
...
private
...

def project_params
  params.require(:project).permit(:title, :donation_goal, :description)
end
这告诉 Rails 将新字段列入白名单,从而允许数据保存到数据库。我们可以更新索引视图来验证输出:
<!-- app/views/projects/index.html.erb-->
<div class="flex flex-wrap items-center justify-between">
  <% @projects.each do |project| %>
    <div class="border-2 border-blue-700 rounded-lg p-6 lg:w-1/4 w-full relative">
      <h3 class="font-bold text-2xl mb-2"><%= project.title %></h3>
      <div class="my-1"><%= truncate(strip_tags(project.description.to_s), length: 140) %></div>
      <!-- more code below omitted for brevity-->
这里我们显示project.description。操作文本以 HTML 形式返回,因此我们需要一种方法来:
- 清理数据(删除标签、html 等)
- 截断新清理的数据,使其在索引视图上不会太长。您可以设置 length 属性来执行此操作。
添加图像
让我们为每个项目添加缩略图和徽标支持。我们还可以为每个项目的作者添加 Gravatar 支持。我们将利用 Active Storage 来添加这些缩略图,并使用一个助手来添加 Gravatar 支持。
前往你的project.rb模型文件。我将在其中添加以下内容:
# app/models/project.rb

class Project < ApplicationRecord
  belongs_to :user
  has_rich_text :description
  has_one_attached :thumbnail # add this line
end
这行新代码与 Rails 主动存储挂钩。我们用has_one前缀表示只需要一个附件。您也可以添加前缀has_many_attached来表示多个附件。
接下来,我将更新项目表单以包含文件字段,并标记表单以接受多部分数据。
<%= form_with(model: project, local: true, multipart: true) do |form| %>
  <% if project.errors.any? %>
    <div id="error_explanation" class="bg-white p-6 rounded text-red-500 mb-5">
      <h2 class="text-red-500 font-bold"><%= pluralize(project.errors.count, "error") %> prohibited this project from being saved:</h2>

      <ul>
        <% project.errors.full_messages.each do |message| %>
          <li><%= message %></li>
        <% end %>
      </ul>
    </div>
  <% end %>

  <div class="mb-6">
    <%= form.label :thumbnail, "Project thumbnail", class: "label" %>
    <%= form.file_field :thumbnail %>
  </div>

  <!-- code omitted for brevity -->
在表单选项中,我传递了一个multipart: true选项。它告诉表单我们期望文件数据作为结果。我还file_field为表单:thumbnail本身添加了 new 。接下来我们需要在控制器中允许这个字段。
让我们尝试附加一个缩略图:https://unsplash.com/photos/cXkrqY2wFyc
如果您更新现有项目或添加新项目,您可能会看到一些粗糙的日志记录。这意味着我们的工作确实值得:
 ActiveStorage::Blob Create (1.0ms) INSERT INTO "active_storage_blobs" ("key", "filename", "content_type", "metadata", "byte_size", "checksum", "created_at") VALUES (?, ?, ?, ?, ?, ?, ?) [["key", "txcaum3pyrdvejhw0km0ul2wib99"], ["filename", "kelly-sikkema-cXkrqY2wFyc-unsplash.jpg"], ["content_type", "image/jpeg"], ["metadata", "{\"identified\":true}"], ["byte_size", 82684], ["checksum", "rJPItH/glusRYq0Q5+iOSg=="], ["created_at", "2019-08-31 13:28:19.543763"]]
  ↳ app/controllers/projects_controller.rb:36:in `block in update'
  ActiveStorage::Attachment Create (0.4ms) INSERT INTO "active_storage_attachments" ("name", "record_type", "record_id", "blob_id", "created_at") VALUES (?, ?, ?, ?, ?) [["name", "thumbnail"], ["record_type", "Project"], ["record_id", 1], ["blob_id", 1], ["created_at", "2019-08-31 13:28:19.546513"]]
  ↳ app/controllers/projects_controller.rb:36:in `block in update'
  Project Update (0.1ms) UPDATE "projects" SET "updated_at" = ? WHERE "projects"."id" = ? [["updated_at", "2019-08-31 13:28:19.547959"], ["id", 1]]
  ↳ app/controllers/projects_controller.rb:36:in `block in update'
   (3.0ms) commit transaction
  ↳ app/controllers/projects_controller.rb:36:in `block in update'
  Disk Storage (1.3ms) Uploaded file to key: txcaum3pyrdvejhw0km0ul2wib99 (checksum: rJPItH/glusRYq0Q5+iOSg==)
[ActiveJob] Enqueued ActiveStorage::AnalyzeJob (Job ID: cdcf68f0-4d73-429c-9af5-7604645e8f40) to Sidekiq(active_storage_analysis) with arguments: #<GlobalID:0x00007fea5296a048 @uri=#<URI::GID gid://back-my-idea/ActiveStorage::Blob/1>>
Redirected to http://localhost:3000/projects/1
回到索引,我们仍然看不到图像。让我们解决这个问题。
我会将其添加到我们现有的卡片标记中:
<%= image_tag project.thumbnail.variant(resize_to_limit: [600, 400]) %>
不幸的是,这仍然行不通。Active Storage 需要另一个依赖项才能像我这里一样动态处理图像变体。我们可以通过简单的 gem install 来解决这个问题。
我们需要取消注释image_processing其中的 gem ,然后Gemfile运行bundle install。
# Gemfile
# Use Active Storage variant
gem 'image_processing', '~> 1.2' # uncomment this line
保存该文件然后运行
$ bundle install
如果您的服务器正在运行,请重新启动它。
成功!
评论
我们无需搭建完整的项目逻辑,就可以着手处理应用程序的其他方面。几乎所有面向用户的应用程序中都有注释。我们不妨将它们添加到项目中。我们可以使用多态性以可扩展的方式实现这一点。这实际上意味着我们可以根据需要为任何内容添加注释。
生成评论模型和资源:
$ rails g model Comment commentable_type:string commentable_id:integer user:references body:text

      invoke active_record
      create db/migrate/20200123193236_create_comments.rb
      create app/models/comment.rb
      invoke test_unit
      create test/models/comment_test.rb
      create test/fixtures/comments.yml
添加此模型会创建一个新的迁移,本质上是comments在数据库中创建一个表。我们可以在模型层将其扩展为多态,并实现某种has_many :through关联。结果如下:
# app/models/comment.rb
class Comment < ApplicationRecord
  belongs_to :user
  belongs_to :commentable, polymorphic: true
end


# app/models/project.rb
class Project < ApplicationRecord
  belongs_to :user
  has_rich_text :description
  has_one_attached :thumbnail
  has_many :comments, as: :commentable
end
如果我们想向其他模型添加评论,现在我们完全可以做到这一点,这要归功于关联的建立方式和多态性。
评论控制器
comments_controller.rb为了使我们的评论响应周期井然有序,我们需要在应用程序中添加一个。
$ rails g controller comments create
这将创建一个控制器和create.html.erb视图以及一些其他文件,如果愿意,您可以丢弃它们。
commentable我们还需要一个在项目内对命名空间有意义的实例。我们可以通过在名为projectsall inside的文件夹中生成一个新的控制器来实现。app/controllers
$ rails g controller projects/comments
该文件包含以下内容:
# app/controllers/projects/comments_controller.rb

class Projects::CommentsController < CommentsController
  before_action :set_commentable

  private

    def set_commentable
      @commentable = Project.find(params[:project_id])
    end
end
我们正在抓取手头项目的实例并将其赋值给 ,以便@commentable在 中访问它comments_controller.rb。如果您拥有多个资源,可以重复此概念。我的意思是,您不仅限于Project资源。请注意该类是如何CommentsController直接继承自 的。这是有意为之!
在评论控制器中我添加了以下代码:
# app/controllers/comments_controller.rb

class CommentsController < ApplicationController
  before_action :authenticate_user!

  def create
    @comment = @commentable.comments.new comment_params
    @comment.user = current_user
    @comment.save
    redirect_to @commentable, notice: "Your comment was successfully posted."
  end

  private

    def comment_params
      params.require(:comment).permit(:body)
    end
end
我们要求用户在第 2 行登录才能发表评论。在create操作内部,我们创建了一个@comment实例变量。它访问@commentable从文件中的控制器继承的实例变量app/controllers/projects/comments_controller.rb。我们可以创建该类的新实例,并将comment_params文件底部private声明下方的定义传入。最后,我们将对象赋值给评论用户current_user并保存。如果一切顺利,我们将重定向回项目或 (@commentable) 并显示成功通知。
稍微清理一下
- 我删除了
comments在app/views/projects - A删除了
create.html.erb里面的文件app/views/comments - 我在
app/views/comments/_comments.html.erb&中创建了两个新的部分_form.html.erb
在我们的项目show视图中,我稍微更新了标记。其中有一些虚拟数据,我们稍后会处理。我们现在想添加评论提要:
<!-- app/views/projects/show.html.erb (WIP) -->
<div class="container relative p-6 mx-auto text-gray-900 bg-white rounded-lg lg:p-10">
  <div class="flex flex-wrap items-center justify-between w-full pb-4 mb-8 border-b-2 border-gray-200">
    <div class="flex flex-wrap items-start justify-between w-full pb-4 mb-4 border-b-2 border-gray-200">
      <div class="flex-1">
        <h1 class="text-3xl font-bold leading-none text-gray-800"><%= @project.title %></h1>
        <p class="text-sm italic text-gray-500">Created by <%= @project.user.name ||=
      @project.user.username %></p>
      </div>

      <% unless author_of(@project) %>
        <%= link_to "Back this idea", "#", class: "btn btn-default btn-lg lg:w-auto w-full lg:text-left text-center" %>
      <% end %>
    </div>

    <div class="w-full mb-4 lg:w-1/5 lg:mb-0">
      <p class="m-0 text-xl font-semibold leading-none"><%# @project.pledged_amount %>1000</p>
      <p class="text-sm text-gray-500">pledged of <%= number_to_currency(@project.donation_goal) %></p>
    </div>

    <div class="w-full mb-4 lg:w-1/5 lg:mb-0">
      <p class="m-0 text-xl font-semibold leading-none">200</p>
      <p class="text-sm text-gray-500">backers</p>
    </div>

    <div class="w-full mb-4 lg:w-1/5 lg:mb-0">
      <p class="m-0 text-xl font-semibold leading-none">20</p>
      <p class="text-sm text-gray-500">days to go</p>
    </div>
  </div>

  <div class="flex flex-wrap items-start justify-between mb-6">
    <div class="w-full lg:w-3/5">
     <% if @project.thumbnail.present? %>
       <%= image_tag @project.thumbnail, class: "rounded" %>
       <% else %>
      <div class="flex items-center justify-center p-8 text-center bg-gray-100 rounded">
        <div class="">
          <p class="text-xs font-bold text-gray-600 uppercase">PROJECT</p>
          <h3 class="text-2xl text-black"><%= @project.title %></h3>
        </div>
      </div>
    <% end %>
    </div>
    <div class="w-full mt-6 lg:pl-10 lg:w-2/5 lg:mt-0">
      <p class="text-sm font-semibold text-gray-500 uppercase">Description</p>
      <%= @project.description %>
    </div>
  </div>

  <div class="w-full lg:w-3/5">
    <%= render "comments/comments", commentable: @project %>
    <%= render "comments/form", commentable: @project %>
  </div>

  <% if admin? || author_of(@project) %>
    <div class="absolute top-0 right-0 mt-4 mr-4">
      <%= link_to 'Edit', edit_project_path(@project), class: "btn btn-sm btn-outlined btn-default" %>
    </div>
  <% end %>
</div>
部分评论(循环显示每条评论)
<!-- app/views/comments/_comments.html.erb -->
<p class="text-sm font-semibold text-gray-500 uppercase">Comments</p>
<% commentable.comments.each do |comment| %>
  <%= comment.body %>
<% end %>
评论表
<!-- app/views/comments/_form.html.erb -->
<%= form_for [commentable, Comment.new] do |f| %>
  <div class="mb-6">
    <%= f.text_area :body, class: "input input-with-border", placeholder: "Add a comment", required: true %>
  </div>
  <%= f.submit class: "btn btn-default" %>
<% end %>
评论路由
将我们的评论嵌套在项目中是合理的,不是吗?实际上,我们可以很容易地做到这一点config/routes.rb
# config/routes.rb
require 'sidekiq/web'

Rails.application.routes.draw do
  authenticate :user, lambda { |u| u.admin? } do
    mount Sidekiq::Web => '/sidekiq'
  end

  resources :projects do
    resources :comments, module: :projects
  end

  devise_for :users
  root to: 'projects#index'
end
我在里面resources :projects添加了一个包含新resources:comments行的块。我们使用module:声明来使其projects不存在于 中url。
此时你可能需要重启服务器
$ CTRL + C
$ rails db:migrate
$ rails server
现在,您应该能够在项目显示视图中创建和渲染评论了。如果您希望能够编辑或删除评论,可以扩展评论控制器,使其包含update、edit和destroy操作。由于我在其他系列中已经介绍过这部分内容,因此我暂时不会在本教程中介绍它。
进一步扩展项目
处理完评论后,我们可以把注意力转回到项目上。你可能会注意到,我还没有在数据层中映射出一些需求。我们仍然需要以下内容:
- 表示当前认捐金额的字段。我们将使用它来确定在任何特定时刻需要多少金额才能达到认捐目标。
- 每个项目都有一个有效期。初始期限为 30 天。我们需要
datetime在数据库中盖章 - 我们需要一种方法来统计每个项目有多少支持者承诺捐款。这可能只是我们在用户层查询的一些逻辑。如果用户支持了某个想法,我们可以查找与该项目相关的费用。
- 我们需要一个状态列来表示项目是否处于活跃状态或是否已超过其 30 天的承诺窗口。
我们可以使用这些字段创建一个迁移。如有需要,我们可以稍后添加。
$ rails g migration add_fields_to_projects current_donation_amount:integer expires_at:datetime status:string
该迁移生成此文件:
class AddFieldsToProjects < ActiveRecord::Migration[6.0]
  def change
    add_column :projects, :current_donation_amount, :integer, default: 0
    add_column :projects, :expires_at, :datetime, default: DateTime.now + 30.days
    add_column :projects, :status, :string, default: "active"
  end
end
够简单吧?
current_donation_amount我的想法是,每次有支持者“支持”一个项目时就更新。我们会将该列默认为0“全额”。我们或许应该将该donation_goal列也设为整数,但目前这没什么大不了的。接下来我们需要将字符串转换为整数。
我们expires_at可以每次创建新项目时创建一个 30 天的默认 DateTime。我将使用 传递当前时间的默认值default: DateTime.now。
项目的“活跃”或“不活跃”状态status。活跃状态表示在30天的有效期内,超过该期限则为不活跃状态。
$ rails db:migrate
现在每个项目都有“活跃”状态、到期开始时间、
处理项目到期
有几种方法可以动态地“过期”一个项目。Cron 作业和 Active Jobs 可能是最常见的。在这种情况下,Active Jobs 似乎对我来说更有吸引力(主要是因为我很少做 Cron 作业的工作),但您可以自由选择您喜欢的武器。
我想要做的是,一旦 DateTime 达到当前日期,就自动将活跃项目的状态更改为“非活跃” expires_at。手动执行此操作似乎很荒谬,所以我们可以创建一个作业,每次创建新项目时都会将其加入队列。首先,我们需要一个作业:
$ rails generate job ExpireProject
Running via Spring preloader in process 47618
      invoke test_unit
      create test/jobs/expire_project_job_test.rb
      create app/jobs/expire_project_job.rb
运行该生成会创建几个文件。主要的文件是文中提到的实际作业类:
# app/jobs/expire_project_job.rb
class ExpireProjectJob < ApplicationJob
  queue_as :default

  def perform(*args)
    # Do something later
  end
end
我们将在 perform 方法中添加我们的逻辑,这是一个非常简单的改变。
# app/jobs/expire_project_job.rb
class ExpireProjectJob < ApplicationJob
  queue_as :default

  def perform(project)
    @project = project

    return if project_already_inactive?

    @project.status = "inactive"
    @project.save!
  end

  private

  def project_already_inactive?
    @project.status == "inactive"
  end
end
我们将在初始化 Job 时直接传入项目对象。如果项目状态已经为“inactive”,则直接返回。如果项目状态为“active”,则更新其状态为“inactive”,并保存对象。通知项目作者他们的项目已过期或许是个好主意。我们也可以向项目作者发送邮件。邮件内容可能如下所示:
# app/jobs/expire_project_job.rb
class ExpireProjectJob < ApplicationJob
  queue_as :default

  def perform(project)
    @project = project

    return if project_already_inactive?

    @project.status = "inactive"
    @project.save!

    UserMailer.with(project: @project).project_expired_notice.deliver_later
  end

  private

  def project_already_inactive?
    @project.status == "inactive"
  end
end
让我们来创建那个邮件程序和方法。我们可以从命令行进行操作(我有没有告诉过你我有多喜欢 Rails?)
$ rails g mailer User project_expired_notice
这将生成一些文件:
app/mailers/user_mailer.rbapp/views/user_mailer/project_expired_notice.html.erbapp/views/user_mailer/project_expired_notice.text.erb– 我已经删除了test/mailers/previews/user_mailer_preview.rbtest/mailers/user_mailer_test.rb
我们来看看第一个文件:
# app/mailers/user_mailer.rb
class UserMailer < ApplicationMailer
  def project_expired_notice
    @project = params[:project]

    mail to: @project.user.email, subject: "Your project has expired"
  end
end
这里我添加了一些逻辑,用于向创建项目的用户发送到期通知。注意我们如何使用从原始后台作业传递下来的实例变量。这个变量一直延伸到视图层!
<!-- app/views/user_mailer/project_expired_notice.html.erb -->
<h1>Hi <%= @project.user.name ||= @project.user.username %>,</h1>

<p>We wanted to inform you that the project <strong><%= @project.title %></strong> has met its expiration and is no longer active. <%= link_to "View your project", project_url(@project), target: "_blank" %>.</p>
这里我们向用户显示一条简短消息,并提供一个行动号召来查看项目。请注意,URL 助手是 ,project_url而不是project_path。这对于电子邮件来说是必要的,因为我们需要绝对路径。正如你所知,人们可以从任何地方查看电子邮件。
test/mailers/previews/user_mailer_preview.rb然后,我们可以使用该文件并访问 来预览电子邮件localhost:3000/rails/mailers。您可能会看到错误,因为从技术上讲,我们没有所需的正确数据。这是生成的文件。
# test/mailers/previews/user_mailer_preview.rb

# Preview all emails at http://localhost:3000/rails/mailers/user_mailer
class UserMailerPreview < ActionMailer::Preview

  # Preview this email at http://localhost:3000/rails/mailers/user_mailer/project_expired_notice
  def project_expired_notice
    UserMailer.project_expired_notice
  end

end
之后:
# test/mailers/previews/user_mailer_preview.rb

class UserMailerPreview < ActionMailer::Preview
  def project_expired_notice
    UserMailer.with(project: Project.first).project_expired_notice
  end
end
我将数据库中的第一个项目作为虚拟项目传入,以查看邮件程序http://localhost:3000/rails/mailers/user_mailer/project_expired_notice
这封邮件看起来不太好,但它确实渲染成功了,并且包含了我们想要的链接和项目信息。太酷了!
有了电子邮件之后,我们需要讨论一下后台工作。
配置后台作业
正在运行的作业通常在后台进行。如果您使用我的 kickoff_tailwind 模板,我已经提供了我最喜欢的后台作业配置工具Sidekiq。
如果你没有使用我的模板,也不用担心,设置 sidekiq 非常简单。这个 gem 使用一个适配器,可以挂载到 ActiveJob 中,而 ActiveJob 默认已经包含在 Rails 中。
请务必先安装 gem!
如果你仔细查看,config/application.rb应该会看到启动所需的主要配置。如果没有,请安装 gem 并复制以下代码:
# config/application.rb
require_relative 'boot'

require 'rails/all'

# Require the gems listed in Gemfile, including any gems
# you've limited to :test, :development, or :production.
Bundler.require(*Rails.groups)

module BackMyIdea
  class Application < Rails::Application
    config.active_job.queue_adapter = :sidekiq
    # Initialize configuration defaults for originally generated Rails version.
    config.load_defaults 6.0

    # Settings in config/environments/* take precedence over those specified here.
    # Application configuration can go into files in config/initializers
    # -- all .rb files in that directory are automatically loaded after loading
    # the framework and any gems in your application.
  end
end
我们需要的主线是config.active_job.queue_adapter = :sidekiq。
我的 kickoff_tailwind 模板也为 Sidekiq 添加了一些路由。假设只有管理员才能始终看到 GUI 界面。这是我routes.rb目前的文件:
# config/routes.rb
require 'sidekiq/web'

Rails.application.routes.draw do
  authenticate :user, lambda { |u| u.admin? } do
    mount Sidekiq::Web => '/sidekiq'
  end

  resources :projects do
    resources :comments, module: :projects
  end

  devise_for :users
  root to: 'projects#index'
end
测试一切
我们需要在后台运行sidekiq 。您可以在 Rails 服务器实例旁边打开一个新的终端实例并输入。您可能还需要安装 Redis ( brew install redis)。
$ bundle exec sidekiq -q default -q mailers
通过运行,我们最终可以在项目控制器中触发作业。
# app/controllers/projects_controller.rb
class ProjectsController < ApplicationController
...
 def create
    @project = Project.new(project_params)
    @project.user_id = current_user.id

    respond_to do |format|
      if @project.save
        ExpireProjectJob.set(wait_until: @project.expires_at).perform_later(@project)
        format.html { redirect_to @project, notice: 'Project was successfully created.' }
        format.json { render :show, status: :created, location: @project }
      else
        format.html { render :new }
        format.json { render json: @project.errors, status: :unprocessable_entity }
      end
    end
  end
...
end
我们补充道:
ExpireProjectJob.set(wait_until: @project.expires_at).perform_later(@project)
这会调用我们之前创建的作业,并特别等待直到满足项目 expires_at 列,然后将其与 Sidekiq 排队。
现在您可以创建一个新的虚拟项目。现在就这么做。
现在,我不希望你等 30 天才能知道这是否有效,哈哈。相反,我们可以先检查一下 Rails 日志:
[ActiveJob] Enqueued ExpireProjectJob (Job ID: 1fcc879f-139a-40c0-bf72-7e5b3dc1f0ef) to Sidekiq(default) with arguments: #<GlobalID:0x00007fd18f040700 @uri=#<URI::GID gid://back-my-idea/Project/3>>
Redirected to http://localhost:3000/projects/3
很好,作业成功入队了,但我们不确定作业中的代码是否也能正常工作。一种验证方法是将作业的初始等待时间修改为零。我们来试试:
ExpireProjectJob.perform_now(@project)
注意,如果您愿意,也可以从 Rails 控制台执行此操作。不过您需要手动创建一个项目。
使用 UI 创建另一个项目并查看会发生什么。
目前我还没有办法查看项目是否inactive在rails 控制台内,所以一个快速的检查方法是:active
$ rails c
Project.last
=> <Project id: 2, title: "test", donation_goal: 0.22222e5, user_id: 1, created_at: "2020-01-24 21:17:27", updated_at: "2020-01-24 21:17:27", current_donation_amount: 0, expires_at: "2020-02-22 22:51:44", status: "inactive">
irb(main):003:0>
成功!状态为inactive。请记住,我们已将此列设置active为新项目创建时的默认设置。
现在我们可以修改视图,使其与状态关联起来。这是一个非常简单的条件判断,我会将其提取到部分代码和一些辅助方法中:
# app/models/project.rb

class Project < ApplicationRecord
...
  def active?
    status == "active"
  end

  def inactive
    status == "inactive"
  end
 end
主要展示视图:
<!-- app/views/projects/show.html.erb -->
<% if @project.active? %>
  <%= render "active_project", project: @project %>
<% else %>
  <%= render "inactive_project", project: @project %>
<% end %>
活动项目视图部分(已通过统计数据进行了更新):
<div class="container relative p-6 mx-auto text-gray-900 bg-white rounded-lg lg:p-10">
  <div class="flex flex-wrap items-center justify-between w-full pb-4 mb-8 border-b-2 border-gray-200">
    <div class="flex flex-wrap items-start justify-between w-full pb-4 mb-4 border-b-2 border-gray-200">
      <div class="flex-1">
        <h1 class="text-3xl font-bold leading-none text-gray-800"><%= project.title %></h1>
        <p class="text-sm italic text-gray-500">Created by <%= project.user.name ||=
      project.user.username %></p>
      </div>
    </div>

    <div class="w-full mb-4 lg:w-1/5 lg:mb-0">
      <p class="m-0 text-xl font-semibold leading-none"><%= number_to_currency(project.current_donation_amount) %>/mo</p>
      <p class="text-sm text-gray-500">pledged of <%= number_to_currency(project.donation_goal) %>/mo</p>
    </div>

    <div class="w-full mb-4 lg:w-1/5 lg:mb-0">
      <p class="m-0 text-xl font-semibold leading-none">200</p>
      <p class="text-sm text-gray-500">backers</p>
    </div>

    <div class="w-full mb-4 lg:w-1/5 lg:mb-0">
      <p class="m-0 text-xl font-semibold leading-none"><%= distance_of_time_in_words_to_now(project.expires_at) %></p>
      <p class="text-sm text-gray-500">to go</p>
    </div>
  </div>

  <div class="flex flex-wrap items-start justify-between mb-6">
    <div class="w-full lg:w-3/5">
    <% if project.thumbnail.present? %>
      <%= image_tag project.thumbnail, class: "rounded" %>
    <% else %>
      <div class="flex items-center justify-center p-8 text-center bg-gray-100 rounded">
        <div class="">
          <p class="text-xs font-bold text-gray-600 uppercase">PROJECT</p>
          <h3 class="text-2xl text-black"><%= project.title %></h3>
        </div>
      </div>
    <% end %>
    </div>
    <div class="w-full mt-6 lg:pl-10 lg:w-2/5 lg:mt-0">
      <p class="text-sm font-semibold text-gray-500 uppercase">Description</p>
      <%= project.description %>
    </div>
  </div>

  <div class="w-full lg:w-3/5">
    <%= render "comments/comments", commentable: project %>
    <%= render "comments/form", commentable: project %>
  </div>

 <% if admin? || author_of(project) %>
    <div class="absolute top-0 right-0 mt-4 mr-4">
      <%= link_to 'Edit', edit_project_path(project), class: "btn btn-sm btn-outlined btn-default" %>
      <%= link_to 'Delee', project_path(project), method: :delete, class: "btn btn-sm btn-outlined btn-default", data: { confirm: "Are you sure?" } %>
    </div>
  <% end %>
</div>
最后是非活动视图,只有细微的变化:
<div class="container relative p-6 mx-auto text-gray-900 bg-white border-2 border-red-500 rounded-lg lg:p-10">
  <div class="flex flex-wrap items-center justify-between w-full pb-4 mb-8 border-b-2 border-gray-200">
    <div class="flex flex-wrap items-start justify-between w-full pb-4 mb-4 border-b-2 border-gray-200">
      <div class="flex-1">
        <span class="px-2 py-1 text-xs font-semibold text-white bg-red-500 rounded-lg">Inactive</span>

        <h1 class="mt-4 text-3xl font-bold leading-none text-gray-800"><%= project.title %></h1>
        <p class="text-sm italic text-gray-500">Created by <%= project.user.name ||=
      project.user.username %></p>
      </div>
    </div>

    <div class="w-full mb-4 lg:w-1/5 lg:mb-0">
      <p class="m-0 text-xl font-semibold leading-none"><%= number_to_currency(project.current_donation_amount) %></p>
      <p class="text-sm text-gray-500">pledged of <%= number_to_currency(project.donation_goal) %></p>
    </div>

    <div class="w-full mb-4 lg:w-1/5 lg:mb-0">
      <p class="m-0 text-xl font-semibold leading-none">200</p>
      <p class="text-sm text-gray-500">backers</p>
    </div>

    <div class="w-full mb-4 lg:w-1/5 lg:mb-0">
      <p class="m-0 text-xl font-semibold leading-none">Expired</p>
      <p class="text-sm text-gray-500"><%= time_ago_in_words(@project.expires_at) %> ago</p>
    </div>
  </div>

  <div class="flex flex-wrap items-start justify-between mb-6">
    <div class="w-full lg:w-3/5">
    <% if project.thumbnail.present? %>
      <%= image_tag project.thumbnail, class: "rounded" %>
    <% else %>
      <div class="flex items-center justify-center p-8 text-center bg-gray-100 rounded">
        <div class="">
          <p class="text-xs font-bold text-gray-600 uppercase">PROJECT</p>
          <h3 class="text-2xl text-black"><%= project.title %></h3>
        </div>
      </div>
    <% end %>
    </div>
    <div class="w-full mt-6 lg:pl-10 lg:w-2/5 lg:mt-0">
      <p class="text-sm font-semibold text-gray-500 uppercase">Description</p>
      <%= project.description %>
    </div>
  </div>

  <div class="w-full lg:w-3/5">
    <%= render "comments/comments", commentable: project %>
    <p>Comments are closed for inactive projects</p>
  </div>

  <% if admin? || author_of(project) %>
    <div class="absolute top-0 right-0 mt-4 mr-4">
      <%= link_to 'Edit', edit_project_path(project), class: "btn btn-sm btn-outlined btn-default" %>
      <%= link_to 'Delee', project_path(project), method: :delete, class: "btn btn-sm btn-outlined btn-default", data: { confirm: "Are you sure?" } %>
    </div>
  <% end %>
</div>
如果您返回项目索引,我们仍然可以看到所有项目,无论其状态如何。仅输入active项目可能更合理。我们可以在模型中添加一个范围来解决这个问题。
# app/models/project.rb

class Project < ApplicationRecord
  ...
  scope :active, ->{ where(status: "active") }
  scope :inactive, ->{ where(status: "inactive") }
  ...
 end
然后在我们的控制器中index通过active范围更新操作。
# app/controllers/projects_controller.rb
class ProjectsController < ApplicationController
  before_action :set_project, only: [:show, :edit, :update, :destroy]
  before_action :authenticate_user!, except: [:index, :show]

  def index
    @projects = Project.active # swap from all to active
  end
  ...
end
太好了,现在只有“活跃”的项目才会出现在我们的提要中!
使用 Stripe 设置付款
Stripe 连接 oAuth 策略
我们需要一些宝贵的资源来简化与 Stripe 的合作。我们将特别使用Stripe Connect,它是一个连接所有用户支付交易的平台。该平台可以从每笔交易中赚取一定比例的佣金,这正是平台的真正价值所在!
# Gemfile

gem 'stripe'
gem 'omniauth', '~> 1.9'
gem 'omniauth-stripe-connect'
安装这些:
$ bundle install
利用omniauth-stripe-connect gem,我们只需进行少量配置即可轻松连接到 Devise。(如果您使用我的模板,Devise 已安装并配置完毕。如果没有,您需要自行安装才能快速上手。)
更多建模
更新用户模型
我们需要为每个决定启动项目的用户存储一些 Stripe 信息。这意味着数据库中会添加一些新字段。
$ rails g migration add_stripe_fields_to_users uid:string provider:string access_code:string publishable_key:string
这些字段应该足以通过 Stripe Connect 创建 Stripe 帐户,并在用户通过 OAuth 进行身份验证后开始处理交易
这是迁移过程。我们应该可以顺利迁移了!稍后您将看到我们将在哪里使用这些字段。
# db/migrate/XXXX_add_stripe_fields_to_users.rb
class AddStripeFieldsToUsers < ActiveRecord::Migration[6.0]
  def change
    add_column :users, :uid, :string
    add_column :users, :provider, :string
    add_column :users, :access_code, :string
    add_column :users, :publishable_key, :string
  end
end
$ rails db:migrate
oAuth 流程
要连接到 Stripe Connect,我们需要一种方式来区分商家和客户。每个用户都需要一个对应的 Stripe 客户 ID,该 ID 在 oAuth 重定向回我们的应用时返回。我们可以借助一个与 Devise 完美兼容的便捷 Gem 来帮助实现这一点。
这个 gemomniauth-stripe-connect您应该已经在上一步中安装过了。
声明提供商 – Stripe Connect
为了将 Gem 与 Devise 集成,我们重点关注config/initializers/devise.rb。我们需要声明新的提供商(您可以拥有多个提供商,例如 Twitter、Facebook、Google 等等)。该文件中会有大量注释和设置。我在末尾添加了以下内容。
# config/initializers/devise.rb
Devise.setup do |config|
  ...
  config.omniauth :stripe_connect,
  Rails.application.credentials.dig(:stripe)[:connect_client_id], Rails.application.credentials.dig(:stripe)[:private_key],
  scope: 'read_write',
  stripe_landing: 'login'
end
此文件指向我们尚未添加到应用中的键。您可以随意命名它们。
要添加密钥,您需要从 Stripe 帐户中获取它们。出于测试目的,我建议您设置一个新的测试帐户。您应该可以在dashboard.stripe.com/account/applications/settingsclient_id中找到您的连接密钥。
向您的应用添加测试密钥
如果您是 Rails 新手,加密凭证值得您谷歌一下,了解一下它背后的原理和工作原理。至于为什么这个主题没有收录在 Rails 主文档中,我倒是不太清楚。或许我会创建一个拉取请求来添加它。
最简单的形式是 Rails 5.2+ 附带一个命令,我们可以运行该命令来解密/生成 YAML 文件的凭证文件。
$ rails credentials:edit
运行此命令可能会引发如下错误:
No $EDITOR to open file in. Assign one like this:

EDITOR="mate --wait" bin/rails credentials:edit

For editors that fork and exit immediately, it's important to pass a wait flag,
otherwise, the credentials will be saved immediately with no chance to edit.
这意味着我们需要传递一个代码编辑器,以便我们打开生成的解密文件。我使用的是 VS Code,因此我将传递以下内容:
$ EDITOR="code --wait" rails credentials:edit
这会在 Visual Studio Code 中打开一个新窗口,其中包含一些 YAML 代码。您可以在这里添加密钥。我相信您可以将密钥添加export EDITOR="code --wait到您的.bash_profile.or.zshrc文件,以便将来自动执行此操作。
打开的文件将被视为您的“生产”凭据文件。这意味着,如果您将代码发送到实时服务器,Rails 会假设它处于生产模式,并在此处进行查找。如果您希望分别生成开发密钥和生产密钥,完全可以。事实上,在本教程中,我就是这么做的。为此,您需要使用一个标志来提供所需的适当环境。
$ EDITOR="code --wait" rails credentials:edit --environment=development
您可以在此处传递任何您想要的环境。不传递任何环境则默认为生产环境。
我将传递以下内容:
$ EDITOR="code --wait" rails credentials:edit --environment=development
在打开的文件中,您可能会看到一些虚拟的 yaml:
# aws:
# access_key_id: 123
# secret_access_key: 345
我们将在这里遵循相同的格式并添加我们的 Stripe 凭证(测试凭证,而不是正式版)。从你的账户中获取这些凭证并将它们放在这里。
stripe:
  connect_client_id: ca_xxxxxxxxxxxxxxxxxxxxxxxxxxxxxx
  publishable_key: pk_test_xxxxxxxxxxxxxxxxxxxxxxxxxxxxxx
  private_key: sk_test_xxxxxxxxxxxxxxxxxxxxxxxxxxxxxx
截至 2020 年:
- 您可以在帐户设置中找到您的 Stripe Connect 客户端 ID
您可以在开发者区域找到您的可发布密钥和私钥
保存这些密钥后,关闭文件将加密代码,使其更加安全。创建凭证 YAML 文件时,master.key会创建一个文件,您只需将其共享给您信任的人即可。他们可以使用该密钥解密初始凭证文件。这适用于每个环境。因此,在我们的示例中,我们有一个development.key在 中生成的文件config/credentials。
这一切看起来很复杂,但经过几次使用后我终于习惯了。
配置 Stripe gem
我们安装了 Stripe gem,但还没有真正授权。由于我们刚刚添加了凭证,所以添加起来很简单。接下来,你将创建一个名为stripe.rbwithin 的新初始化程序config/initializers/。
# config/initializers/stripe.rb
Rails.configuration.stripe = {
  :publishable_key => Rails.application.credentials.dig(:stripe, :public_key),
  :secret_key => Rails.application.credentials.dig(:stripe, :private_key)
}
Stripe.api_key = Rails.application.credentials.dig(:stripe, :private_key)
使用户模型可全权认证
幸运的是,Devise 已经制定了 OmniAuth 集成方案。我们只需要像下面这样声明上一步添加的提供程序即可。
# app/models/user.rb
class User < ApplicationRecord
  # Include default devise modules. Others available are:
  # :confirmable, :lockable, :timeoutable, :trackable and :omniauthable
  devise :database_authenticatable, :registerable,
         :recoverable, :rememberable, :validatable, :omniauthable, omniauth_providers: [:stripe_connect]
  has_many :projects, dependent: :destroy
end
自定义 omniauth 回调
为了添加 Stripe 成功连接到我们的应用程序所需的路由和控制器,我们需要提供一个具有新控制器和路由选项的游戏计划。
从路由开始,我们devise_for通过明确为 omniauth_callback 控制器声明一个新的控制器来扩展我们现有的方法。
# config/routes.rb
# change this `devise_for` line to the following

devise_for :users, controllers: { omniauth_callbacks: "omniauth_callbacks" }
这里我们告诉 Devise 需要哪个控制器。这意味着我们需要omniauth_callbacks_controller.rb在app/controllers
根据请求,我们可以提取参数并更新给定用户帐户的属性。现在我们需要定义这些参数,以使 Stripe Connect 能够正常运行。我们在users数据库表中添加了一些字段,您可能之前在下方看到过。下面是它们发挥作用的地方。
# app/controllers/omniauth_callbacks_controller.rb
class OmniauthCallbacksController < Devise::OmniauthCallbacksController

  def stripe_connect
    auth_data = request.env["omniauth.auth"]
    @user = current_user
    if @user.persisted?
      @user.provider = auth_data.provider
      @user.uid = auth_data.uid
      @user.access_code = auth_data.credentials.token
      @user.publishable_key = auth_data.info.stripe_publishable_key
      @user.save

      sign_in_and_redirect @user, event: :authentication
      flash[:notice] = 'Stripe Account Created And Connected' if is_navigational_format?
    else
      session["devise.stripe_connect_data"] = request.env["omniauth.auth"]
      redirect_to root_path
    end
  end

  def failure
    redirect_to root_path
  end
end
这解决了请求逻辑,但我们仍然需要一个地方来引导那些想要首先使用 Stripe Connect 进行身份验证的用户。这意味着我们需要根据我们自己的 Stripe Connect 帐户的一些参数定义一个动态 URL。我将添加一个新的辅助函数来封装这个逻辑:
# app/helpers/application_helper.rb
module ApplicationHelper
  def stripe_url
    "https://connect.stripe.com/oauth/authorize?response_type=code&client_id=#{Rails.application.credentials.dig(:stripe)[:connect_client_id]}&scope=read_write"
  end
end
另一个是检查用户是否可以收到付款,我们将添加到用户模型中:
class User < ApplicationRecord
  ...
    def can_receive_payments?
    uid? && provider? && access_code? && publishable_key?
  end

end
这将检查每个字段是否存在,如数据库中的名称所示。
添加视图层
有了这个逻辑,我们就可以开始塑造使用 Stripe Connect 进行 oAuth 的用户流程。
为了使我们在视图层的工作更加轻松,我添加了几个助手来提取一些逻辑:
module ApplicationHelper
  ...
  def stripe_url
    "https://connect.stripe.com/oauth/authorize?response_type=code&client_id=#{Rails.application.credentials.dig(:stripe)[:connect_client_id]}&scope=read_write"
  end

  def stripe_connect_button # add this method
    link_to stripe_url, class: "btn-stripe-connect" do
      content_tag :span, "Connect with Stripe"
    end
  end
end
devise我使用了views 文件夹中的 view,registrations/edit.html.erb作为 Stripe 身份验证按钮的主视图。它的 UI 略显平淡,但足以支撑你的后续开发。
<!-- app/views/devise/registration/edit.html.erb -->
<div class="container flex flex-wrap items-start justify-between mx-auto">
  <div class="w-full lg:w-1/2">
  <h2 class="pt-4 mb-8 text-4xl font-bold heading">Account</h2>

  <%= form_for(resource, as: resource_name, url: registration_path(resource_name), html: { method: :put }) do |f| %>

    <%= render "devise/shared/error_messages", resource: resource %>

    <div class="mb-6">
      <%= f.label :username, class:"label" %>
      <%= f.text_field :username, autofocus: true, class:"input" %>
    </div>

    <div class="mb-6">
      <%= f.label :name, class:"label" %>
      <%= f.text_field :name, class:"input" %>
    </div>

    <div class="mb-6">
      <%= f.label :email, class:"label" %>
      <%= f.email_field :email, autocomplete: "email", class:"input" %>
    </div>

    <div class="mb-6">
      <% if devise_mapping.confirmable? && resource.pending_reconfirmation? %>
        <div>Currently waiting confirmation for: <%= resource.unconfirmed_email %></div>
      <% end %>
    </div>

    <div class="mb-6">
      <%= f.label :password, class:"label" %>
      <%= f.password_field :password, autocomplete: "new-password", class:"input" %>
      <p class="pt-1 text-sm italic text-grey-dark"> <% if @minimum_password_length %>
        <%= @minimum_password_length %> characters minimum <% end %> (leave blank if you don't want to change it) </p>

    </div>

    <div class="mb-6">
      <%= f.label :password_confirmation, class: "label" %>
      <%= f.password_field :password_confirmation, autocomplete: "new-password", class: "input" %>
    </div>

    <div class="mb-6">
      <%= f.label :current_password, class: "label" %>
      <%= f.password_field :current_password, autocomplete: "current-password", class: "input" %>
      <p class="pt-2 text-sm italic text-grey-dark">(we need your current password to confirm your changes)</p>
    </div>

    <div class="mb-6">
      <%= f.submit "Update", class: "btn btn-default" %>
    </div>
    <% end %>

    <hr class="mt-6 mb-3 border" />

    <h3 class="mb-4 text-xl font-bold heading">Cancel my account</h3>

    <div class="flex items-center justify-between">
      <div class="flex-1"><p class="py-4">Unhappy?</p></div>

      <%= button_to "Cancel my account", registration_path(resource_name), data: { confirm: "Are you sure?" }, method: :delete, class: "btn btn-default" %>
    </div>
  </div>

<div class="w-full text-left lg:pl-16 lg:w-1/2">
  <div class="p-6 mt-10 text-gray-900 bg-white rounded shadow-lg">
    <% unless resource.can_receive_payments? %>
      <h4 class="mb-6 text-xl font-semibold leading-none text-gray-900">You wont be able to sell items until you register with Stripe!</h4>
      <%= stripe_button %>
    <% else %>
      <h4 class="mb-6 text-xl font-semibold leading-none text-gray-900">Successfully connected to Stripe ✅</h4>
    <% end %>
  </div>
</div>
我通常在模板中使用 content_for 块,但决定稍微自定义一下这个视图。底部是需要注意的主要区域。在这里,我们添加了一个条件判断,判断用户是否已经连接到 Stripe。如果是,则显示一条简单的成功消息。
为了保持品牌形象,我添加了一个 Stripe 风格的按钮,这样 Stripe 用户更容易产生共鸣,而不是像其他通用按钮那样。这在用户体验方面增强了信任感。实现这一点需要一些 CSS,我已将其添加到我们的_buttons.scss部分模板(kickoff_tailwind 的一部分)中。
/* app/javascript/stylesheets/components/_buttons.scss */
.btn-stripe-connect {
  display: inline-block;
  margin-bottom: 1px;
  background-image: -webkit-linear-gradient(#28A0E5, #015E94);
  background-image: -moz-linear-gradient(#28A0E5, #015E94);
  background-image: -ms-linear-gradient(#28A0E5, #015E94);
  background-image: linear-gradient(#28A0E5, #015E94);
  -webkit-font-smoothing: antialiased;
  border: 0;
  padding: 1px;
  height: 30px;
  text-decoration: none;
  -moz-border-radius: 4px;
  -webkit-border-radius: 4px;
  border-radius: 4px;
  -moz-box-shadow: 0 1px 0 rgba(0, 0, 0, 0.2);
  -webkit-box-shadow: 0 1px 0 rgba(0, 0, 0, 0.2);
  box-shadow: 0 1px 0 rgba(0, 0, 0, 0.2);
  cursor: pointer;
  -moz-user-select: none;
  -webkit-user-select: none;
  -ms-user-select: none;
  user-select: none;
}
.btn-stripe-connect span {
  display: block;
  position: relative;
  padding: 0 12px 0 44px;
  height: 30px;
  background: #1275FF;
  background-image: -webkit-linear-gradient(#7DC5EE, #008CDD 85%, #30A2E4);
  background-image: -moz-linear-gradient(#7DC5EE, #008CDD 85%, #30A2E4);
  background-image: -ms-linear-gradient(#7DC5EE, #008CDD 85%, #30A2E4);
  background-image: linear-gradient(#7DC5EE, #008CDD 85%, #30A2E4);
  font-size: 14px;
  line-height: 30px;
  color: white;
  font-weight: bold;
  font-family: "Helvetica Neue", Helvetica, Arial, sans-serif;
  text-shadow: 0 -1px 0 rgba(0, 0, 0, 0.2);
  -moz-box-shadow: inset 0 1px 0 rgba(255, 255, 255, 0.25);
  -webkit-box-shadow: inset 0 1px 0 rgba(255, 255, 255, 0.25);
  box-shadow: inset 0 1px 0 rgba(255, 255, 255, 0.25);
  -moz-border-radius: 3px;
  -webkit-border-radius: 3px;
  border-radius: 3px;
}
.btn-stripe-connect span:before {
  content: '';
  display: block;
  position: absolute;
  left: 11px;
  top: 50%;
  width: 23px;
  height: 24px;
  margin-top: -12px;
  background-repeat: no-repeat;
  background-size: 23px 24px;
}
.btn-stripe-connect:active {
  background: #005D93;
}
.btn-stripe-connect:active span {
  color: #EEE;
  background: #008CDD;
  background-image: -webkit-linear-gradient(#008CDD, #008CDD 85%, #239ADF);
  background-image: -moz-linear-gradient(#008CDD, #008CDD 85%, #239ADF);
  background-image: -ms-linear-gradient(#008CDD, #008CDD 85%, #239ADF);
  background-image: linear-gradient(#008CDD, #008CDD 85%, #239ADF);
  -moz-box-shadow: inset 0 1px 0 rgba(0, 0, 0, 0.1);
  -webkit-box-shadow: inset 0 1px 0 rgba(0, 0, 0, 0.1);
  box-shadow: inset 0 1px 0 rgba(0, 0, 0, 0.1);
}
.btn-stripe-connect:active span:before {} .btn-stripe-connect.light-blue {
  background: #b5c3d8;
  background-image: -webkit-linear-gradient(#b5c3d8, #9cabc2);
  background-image: -moz-linear-gradient(#b5c3d8, #9cabc2);
  background-image: -ms-linear-gradient(#b5c3d8, #9cabc2);
  background-image: linear-gradient(#b5c3d8, #9cabc2);
  -moz-box-shadow: 0 1px 0 rgba(0, 0, 0, 0.1);
  -webkit-box-shadow: 0 1px 0 rgba(0, 0, 0, 0.1);
  box-shadow: 0 1px 0 rgba(0, 0, 0, 0.1);
}
.btn-stripe-connect.light-blue span {
  color: #556F88;
  text-shadow: 0 1px rgba(255, 255, 255, 0.8);
  background: #f0f5fa;
  background-image: -webkit-linear-gradient(#f0f5fa, #e4ecf5 85%, #e7eef6);
  background-image: -moz-linear-gradient(#f0f5fa, #e4ecf5 85%, #e7eef6);
  background-image: -ms-linear-gradient(#f0f5fa, #e4ecf5 85%, #e7eef6);
  background-image: linear-gradient(#f0f5fa, #e4ecf5 85%, #e7eef6);
  -moz-box-shadow: inset 0 1px 0 #fff;
  -webkit-box-shadow: inset 0 1px 0 #fff;
  box-shadow: inset 0 1px 0 #fff;
}
.btn-stripe-connect.light-blue:active {
  background: #9babc2;
}
.btn-stripe-connect.light-blue:active span {
  color: #556F88;
  text-shadow: 0 1px rgba(255, 255, 255, 0.8);
  background: #d7dee8;
  background-image: -webkit-linear-gradient(#d7dee8, #e7eef6);
  background-image: -moz-linear-gradient(#d7dee8, #e7eef6);
  background-image: -ms-linear-gradient(#d7dee8, #e7eef6);
  background-image: linear-gradient(#d7dee8, #e7eef6);
  -moz-box-shadow: inset 0 1px 0 rgba(0, 0, 0, 0.05);
  -webkit-box-shadow: inset 0 1px 0 rgba(0, 0, 0, 0.05);
  box-shadow: inset 0 1px 0 rgba(0, 0, 0, 0.05);
}
.btn-stripe-connect.dark {
  background: #252525;
  background: rgba(0, 0, 0, 0.5) !important;
}
/* Images*/

.btn-stripe-connect span:before,
.btn-stripe-connect.blue span:before {
  background-image: url("data:image/png;base64,iVBORw0KGgoAAAANSUhEUgAAABcAAAAYCAYAAAARfGZ1AAAKRGlDQ1BJQ0MgUHJvZmlsZQAASA2dlndUFNcXx9/MbC+0XZYiZem9twWkLr1IlSYKy+4CS1nWZRewN0QFIoqICFYkKGLAaCgSK6JYCAgW7AEJIkoMRhEVlczGHPX3Oyf5/U7eH3c+8333nnfn3vvOGQAoASECYQ6sAEC2UCKO9PdmxsUnMPG9AAZEgAM2AHC4uaLQKL9ogK5AXzYzF3WS8V8LAuD1LYBaAK5bBIQzmX/p/+9DkSsSSwCAwtEAOx4/l4tyIcpZ+RKRTJ9EmZ6SKWMYI2MxmiDKqjJO+8Tmf/p8Yk8Z87KFPNRHlrOIl82TcRfKG/OkfJSREJSL8gT8fJRvoKyfJc0WoPwGZXo2n5MLAIYi0yV8bjrK1ihTxNGRbJTnAkCgpH3FKV+xhF+A5gkAO0e0RCxIS5cwjbkmTBtnZxYzgJ+fxZdILMI53EyOmMdk52SLOMIlAHz6ZlkUUJLVlokW2dHG2dHRwtYSLf/n9Y+bn73+GWS9/eTxMuLPnkGMni/al9gvWk4tAKwptDZbvmgpOwFoWw+A6t0vmv4+AOQLAWjt++p7GLJ5SZdIRC5WVvn5+ZYCPtdSVtDP6386fPb8e/jqPEvZeZ9rx/Thp3KkWRKmrKjcnKwcqZiZK+Jw+UyL/x7ifx34VVpf5WEeyU/li/lC9KgYdMoEwjS03UKeQCLIETIFwr/r8L8M+yoHGX6aaxRodR8BPckSKPTRAfJrD8DQyABJ3IPuQJ/7FkKMAbKbF6s99mnuUUb3/7T/YeAy9BXOFaQxZTI7MprJlYrzZIzeCZnBAhKQB3SgBrSAHjAGFsAWOAFX4Al8QRAIA9EgHiwCXJAOsoEY5IPlYA0oAiVgC9gOqsFeUAcaQBM4BtrASXAOXARXwTVwE9wDQ2AUPAOT4DWYgSAID1EhGqQGaUMGkBlkC7Egd8gXCoEioXgoGUqDhJAUWg6tg0qgcqga2g81QN9DJ6Bz0GWoH7oDDUPj0O/QOxiBKTAd1oQNYSuYBXvBwXA0vBBOgxfDS+FCeDNcBdfCR+BW+Bx8Fb4JD8HP4CkEIGSEgeggFggLYSNhSAKSioiRlUgxUonUIk1IB9KNXEeGkAnkLQaHoWGYGAuMKyYAMx/DxSzGrMSUYqoxhzCtmC7MdcwwZhLzEUvFamDNsC7YQGwcNg2bjy3CVmLrsS3YC9ib2FHsaxwOx8AZ4ZxwAbh4XAZuGa4UtxvXjDuL68eN4KbweLwa3gzvhg/Dc/ASfBF+J/4I/gx+AD+Kf0MgE7QJtgQ/QgJBSFhLqCQcJpwmDBDGCDNEBaIB0YUYRuQRlxDLiHXEDmIfcZQ4Q1IkGZHcSNGkDNIaUhWpiXSBdJ/0kkwm65KdyRFkAXk1uYp8lHyJPEx+S1GimFLYlESKlLKZcpBylnKH8pJKpRpSPakJVAl1M7WBep76kPpGjiZnKRcox5NbJVcj1yo3IPdcnihvIO8lv0h+qXyl/HH5PvkJBaKCoQJbgaOwUqFG4YTCoMKUIk3RRjFMMVuxVPGw4mXFJ0p4JUMlXyWeUqHSAaXzSiM0hKZHY9O4tHW0OtoF2igdRzeiB9Iz6CX07+i99EllJWV75RjlAuUa5VPKQwyEYcgIZGQxyhjHGLcY71Q0VbxU+CqbVJpUBlSmVeeoeqryVYtVm1Vvqr5TY6r5qmWqbVVrU3ugjlE3VY9Qz1ffo35BfWIOfY7rHO6c4jnH5tzVgDVMNSI1lmkc0OjRmNLU0vTXFGnu1DyvOaHF0PLUytCq0DqtNa5N03bXFmhXaJ/RfspUZnoxs5hVzC7mpI6GToCOVGe/Tq/OjK6R7nzdtbrNug/0SHosvVS9Cr1OvUl9bf1Q/eX6jfp3DYgGLIN0gx0G3QbThkaGsYYbDNsMnxipGgUaLTVqNLpvTDX2MF5sXGt8wwRnwjLJNNltcs0UNnUwTTetMe0zg80czQRmu836zbHmzuZC81rzQQuKhZdFnkWjxbAlwzLEcq1lm+VzK32rBKutVt1WH60drLOs66zv2SjZBNmstemw+d3W1JZrW2N7w45q52e3yq7d7oW9mT3ffo/9bQeaQ6jDBodOhw+OTo5ixybHcSd9p2SnXU6DLDornFXKuuSMdfZ2XuV80vmti6OLxOWYy2+uFq6Zroddn8w1msufWzd3xE3XjeO2323Ineme7L7PfchDx4PjUevxyFPPk+dZ7znmZeKV4XXE67m3tbfYu8V7mu3CXsE+64P4+PsU+/T6KvnO9632fein65fm1+g36e/gv8z/bAA2IDhga8BgoGYgN7AhcDLIKWhFUFcwJTgquDr4UYhpiDikIxQODQrdFnp/nsE84by2MBAWGLYt7EG4Ufji8B8jcBHhETURjyNtIpdHdkfRopKiDke9jvaOLou+N994vnR+Z4x8TGJMQ8x0rE9seexQnFXcirir8erxgvj2BHxCTEJ9wtQC3wXbF4wmOiQWJd5aaLSwYOHlReqLshadSpJP4iQdT8YmxyYfTn7PCePUcqZSAlN2pUxy2dwd3Gc8T14Fb5zvxi/nj6W6pZanPklzS9uWNp7ukV6ZPiFgC6oFLzICMvZmTGeGZR7MnM2KzWrOJmQnZ58QKgkzhV05WjkFOf0iM1GRaGixy+LtiyfFweL6XCh3YW67hI7+TPVIjaXrpcN57nk1eW/yY/KPFygWCAt6lpgu2bRkbKnf0m+XYZZxl3Uu11m+ZvnwCq8V+1dCK1NWdq7SW1W4anS1/+pDa0hrMtf8tNZ6bfnaV+ti13UUahauLhxZ77++sUiuSFw0uMF1w96NmI2Cjb2b7Dbt3PSxmFd8pcS6pLLkfSm39Mo3Nt9UfTO7OXVzb5lj2Z4tuC3CLbe2emw9VK5YvrR8ZFvottYKZkVxxavtSdsvV9pX7t1B2iHdMVQVUtW+U3/nlp3vq9Orb9Z41zTv0ti1adf0bt7ugT2ee5r2au4t2ftun2Df7f3++1trDWsrD+AO5B14XBdT1/0t69uGevX6kvoPB4UHhw5FHupqcGpoOKxxuKwRbpQ2jh9JPHLtO5/v2pssmvY3M5pLjoKj0qNPv0/+/tax4GOdx1nHm34w+GFXC62luBVqXdI62ZbeNtQe395/IuhEZ4drR8uPlj8ePKlzsuaU8qmy06TThadnzyw9M3VWdHbiXNq5kc6kznvn487f6Iro6r0QfOHSRb+L57u9us9ccrt08rLL5RNXWFfarjpebe1x6Gn5yeGnll7H3tY+p772a87XOvrn9p8e8Bg4d93n+sUbgTeu3px3s//W/Fu3BxMHh27zbj+5k3Xnxd28uzP3Vt/H3i9+oPCg8qHGw9qfTX5uHnIcOjXsM9zzKOrRvRHuyLNfcn95P1r4mPq4ckx7rOGJ7ZOT437j154ueDr6TPRsZqLoV8Vfdz03fv7Db56/9UzGTY6+EL+Y/b30pdrLg6/sX3VOhU89fJ39ema6+I3am0NvWW+738W+G5vJf49/X/XB5EPHx+CP92ezZ2f/AAOY8/wRDtFgAAADQklEQVRIDbWVaUiUQRjHZ96dXY/d1fYQj1U03dJSw9YkFgy6DIkILRArQSSC7PjQjQQqVH7oQ0GHQUWgpQhKHzoNSqiUwpXcsrwIjzVtPVrzbPV9Z6bZhYV3N3WXYAeGmWeeZ37z8J95GEgpBf5oeXn1Es4fYAdzPDlM6je4RBYhR+LMU89UxiCBGiCgkUwsBYSA+SlPKLQBQAYEAZm+3j42K96z3NyOF7VOeMrp62opRcacjPW5+43rDTpNSKQ8QKZAEg7xmPCTs/O27uGJgXuNbW0pxyvLfTmAEBzthEsFZLxRvPdi5rpYo2cmUiQJDA4IVeo0obGdlvGfXUPj0Sym2zPuHxvzcWjDyVupJ/YYizKTGNjLw/HiduNTAqIRIUJ6Vpp+ky8bCSFgwQ2xgkGxFi1ioNWEBGuJB31gbLIv/2pd7SpFoGxtpCYkLSEq4ptlzIYFO7tc7w0TKkeEYg5ADnrWkkYhD8s26GPq3nW0WKxTptftPYBI4Mj3O2fHvKNZBMVSDmMwarXNjDkSF3d5kExZeiCr8M2VI+VFu9IvsPcYtzAvkfoEZkEEE45jMppq3ppbCNPFIY1nD1cpo07lbMmvOXeoDCF8BLKy9uUAAjDkBh+c6bz78mNtVVP7MwET7JBnqb4xXpdWVpC1OVzWn+ELHLCsneX/s7rkRWl1463cy1U3WroG21jhCGKJXPOtKQnpAuENvsAppgDB3TcDVIrpDHbK5Kd+y7W8iodNybHh22rOHyxUK+UaMYjZaoyp25rYL54TSihSKmwZ14v3lc3ZFxdbeywjn/tGJnkmzrydX1ApxOEACKymmXLYfXVpi1JMEOGxPi1ep18doY4r2J7uFumQQ9yGf01bMcZW8dpyc0oIjxxpuC5wuUDX+ovWrnYeg3aXvdLIqnmOvXPsfH6uA5YbTb1DX8ofvTLzTy6ZV4K6fAw+gXiATfdffmjeaUgc1UdpdWplsCooQBrEnqUw82dhdnjit/Vxc4f59tP3DRjzJvYteqrl4rmNlJIfrOwpgNklesDRNQBCHYtQAQqD2CgACNjHAJnG1EyfV/S67fZiJB5t2OGEe4n7L3fS4fpEv/2hUEATfoPbuam5v8N7nps70YTbAAAAAElFTkSuQmCC");
}
.btn-stripe-connect.light-blue span:before {
  background-image: url("data:image/png;base64,iVBORw0KGgoAAAANSUhEUgAAABcAAAAYCAYAAAARfGZ1AAAKRGlDQ1BJQ0MgUHJvZmlsZQAASA2dlndUFNcXx9/MbC+0XZYiZem9twWkLr1IlSYKy+4CS1nWZRewN0QFIoqICFYkKGLAaCgSK6JYCAgW7AEJIkoMRhEVlczGHPX3Oyf5/U7eH3c+8333nnfn3vvOGQAoASECYQ6sAEC2UCKO9PdmxsUnMPG9AAZEgAM2AHC4uaLQKL9ogK5AXzYzF3WS8V8LAuD1LYBaAK5bBIQzmX/p/+9DkSsSSwCAwtEAOx4/l4tyIcpZ+RKRTJ9EmZ6SKWMYI2MxmiDKqjJO+8Tmf/p8Yk8Z87KFPNRHlrOIl82TcRfKG/OkfJSREJSL8gT8fJRvoKyfJc0WoPwGZXo2n5MLAIYi0yV8bjrK1ihTxNGRbJTnAkCgpH3FKV+xhF+A5gkAO0e0RCxIS5cwjbkmTBtnZxYzgJ+fxZdILMI53EyOmMdk52SLOMIlAHz6ZlkUUJLVlokW2dHG2dHRwtYSLf/n9Y+bn73+GWS9/eTxMuLPnkGMni/al9gvWk4tAKwptDZbvmgpOwFoWw+A6t0vmv4+AOQLAWjt++p7GLJ5SZdIRC5WVvn5+ZYCPtdSVtDP6386fPb8e/jqPEvZeZ9rx/Thp3KkWRKmrKjcnKwcqZiZK+Jw+UyL/x7ifx34VVpf5WEeyU/li/lC9KgYdMoEwjS03UKeQCLIETIFwr/r8L8M+yoHGX6aaxRodR8BPckSKPTRAfJrD8DQyABJ3IPuQJ/7FkKMAbKbF6s99mnuUUb3/7T/YeAy9BXOFaQxZTI7MprJlYrzZIzeCZnBAhKQB3SgBrSAHjAGFsAWOAFX4Al8QRAIA9EgHiwCXJAOsoEY5IPlYA0oAiVgC9gOqsFeUAcaQBM4BtrASXAOXARXwTVwE9wDQ2AUPAOT4DWYgSAID1EhGqQGaUMGkBlkC7Egd8gXCoEioXgoGUqDhJAUWg6tg0qgcqga2g81QN9DJ6Bz0GWoH7oDDUPj0O/QOxiBKTAd1oQNYSuYBXvBwXA0vBBOgxfDS+FCeDNcBdfCR+BW+Bx8Fb4JD8HP4CkEIGSEgeggFggLYSNhSAKSioiRlUgxUonUIk1IB9KNXEeGkAnkLQaHoWGYGAuMKyYAMx/DxSzGrMSUYqoxhzCtmC7MdcwwZhLzEUvFamDNsC7YQGwcNg2bjy3CVmLrsS3YC9ib2FHsaxwOx8AZ4ZxwAbh4XAZuGa4UtxvXjDuL68eN4KbweLwa3gzvhg/Dc/ASfBF+J/4I/gx+AD+Kf0MgE7QJtgQ/QgJBSFhLqCQcJpwmDBDGCDNEBaIB0YUYRuQRlxDLiHXEDmIfcZQ4Q1IkGZHcSNGkDNIaUhWpiXSBdJ/0kkwm65KdyRFkAXk1uYp8lHyJPEx+S1GimFLYlESKlLKZcpBylnKH8pJKpRpSPakJVAl1M7WBep76kPpGjiZnKRcox5NbJVcj1yo3IPdcnihvIO8lv0h+qXyl/HH5PvkJBaKCoQJbgaOwUqFG4YTCoMKUIk3RRjFMMVuxVPGw4mXFJ0p4JUMlXyWeUqHSAaXzSiM0hKZHY9O4tHW0OtoF2igdRzeiB9Iz6CX07+i99EllJWV75RjlAuUa5VPKQwyEYcgIZGQxyhjHGLcY71Q0VbxU+CqbVJpUBlSmVeeoeqryVYtVm1Vvqr5TY6r5qmWqbVVrU3ugjlE3VY9Qz1ffo35BfWIOfY7rHO6c4jnH5tzVgDVMNSI1lmkc0OjRmNLU0vTXFGnu1DyvOaHF0PLUytCq0DqtNa5N03bXFmhXaJ/RfspUZnoxs5hVzC7mpI6GToCOVGe/Tq/OjK6R7nzdtbrNug/0SHosvVS9Cr1OvUl9bf1Q/eX6jfp3DYgGLIN0gx0G3QbThkaGsYYbDNsMnxipGgUaLTVqNLpvTDX2MF5sXGt8wwRnwjLJNNltcs0UNnUwTTetMe0zg80czQRmu836zbHmzuZC81rzQQuKhZdFnkWjxbAlwzLEcq1lm+VzK32rBKutVt1WH60drLOs66zv2SjZBNmstemw+d3W1JZrW2N7w45q52e3yq7d7oW9mT3ffo/9bQeaQ6jDBodOhw+OTo5ixybHcSd9p2SnXU6DLDornFXKuuSMdfZ2XuV80vmti6OLxOWYy2+uFq6Zroddn8w1msufWzd3xE3XjeO2323Ineme7L7PfchDx4PjUevxyFPPk+dZ7znmZeKV4XXE67m3tbfYu8V7mu3CXsE+64P4+PsU+/T6KvnO9632fein65fm1+g36e/gv8z/bAA2IDhga8BgoGYgN7AhcDLIKWhFUFcwJTgquDr4UYhpiDikIxQODQrdFnp/nsE84by2MBAWGLYt7EG4Ufji8B8jcBHhETURjyNtIpdHdkfRopKiDke9jvaOLou+N994vnR+Z4x8TGJMQ8x0rE9seexQnFXcirir8erxgvj2BHxCTEJ9wtQC3wXbF4wmOiQWJd5aaLSwYOHlReqLshadSpJP4iQdT8YmxyYfTn7PCePUcqZSAlN2pUxy2dwd3Gc8T14Fb5zvxi/nj6W6pZanPklzS9uWNp7ukV6ZPiFgC6oFLzICMvZmTGeGZR7MnM2KzWrOJmQnZ58QKgkzhV05WjkFOf0iM1GRaGixy+LtiyfFweL6XCh3YW67hI7+TPVIjaXrpcN57nk1eW/yY/KPFygWCAt6lpgu2bRkbKnf0m+XYZZxl3Uu11m+ZvnwCq8V+1dCK1NWdq7SW1W4anS1/+pDa0hrMtf8tNZ6bfnaV+ti13UUahauLhxZ77++sUiuSFw0uMF1w96NmI2Cjb2b7Dbt3PSxmFd8pcS6pLLkfSm39Mo3Nt9UfTO7OXVzb5lj2Z4tuC3CLbe2emw9VK5YvrR8ZFvottYKZkVxxavtSdsvV9pX7t1B2iHdMVQVUtW+U3/nlp3vq9Orb9Z41zTv0ti1adf0bt7ugT2ee5r2au4t2ftun2Df7f3++1trDWsrD+AO5B14XBdT1/0t69uGevX6kvoPB4UHhw5FHupqcGpoOKxxuKwRbpQ2jh9JPHLtO5/v2pssmvY3M5pLjoKj0qNPv0/+/tax4GOdx1nHm34w+GFXC62luBVqXdI62ZbeNtQe395/IuhEZ4drR8uPlj8ePKlzsuaU8qmy06TThadnzyw9M3VWdHbiXNq5kc6kznvn487f6Iro6r0QfOHSRb+L57u9us9ccrt08rLL5RNXWFfarjpebe1x6Gn5yeGnll7H3tY+p772a87XOvrn9p8e8Bg4d93n+sUbgTeu3px3s//W/Fu3BxMHh27zbj+5k3Xnxd28uzP3Vt/H3i9+oPCg8qHGw9qfTX5uHnIcOjXsM9zzKOrRvRHuyLNfcn95P1r4mPq4ckx7rOGJ7ZOT437j154ueDr6TPRsZqLoV8Vfdz03fv7Db56/9UzGTY6+EL+Y/b30pdrLg6/sX3VOhU89fJ39ema6+I3am0NvWW+738W+G5vJf49/X/XB5EPHx+CP92ezZ2f/AAOY8/wRDtFgAAADIElEQVRIDbWVTWgTQRTHZ2Z3s5vdpsm2aZp+iKKNCgZsK4iWik0tClqwHozS9iYo4nfw0KNU8ebBm+JNESktBfEgWg+KB0FbiqhFMS1SKyk0lTY1zcd+jG82TSkNoXtoXngk+2bm92b/780EU0pRKWxwcJAjpQAzZrKqSigZ3G3ISsnguka8/FpZWrrOtwi8cI4jpJkiuodgTKAkhqbrC9lM5ms6o936/ObJ+7Vriv3GHFe/Cm8LX76nejwR2elEgsOBOI5DGD6UmpyuG750OtWuZbNLALMFp4axzYK3h690V6oVkXJ3ORJF0QITDIphQMHWTdNEqZSE3IroK7bT9XFMSG7n1T7vDaXMhWRZRhBcPw8ReAuHYVhJCwaLBGBPOc1FSdopSU4Lwuay3ve45FTfhdMfE8ll4U8srkxMTquLC4s/irAKwvDSiiWLw+HgeB40xkyHHHwu/lfouXZ7ePjhnafVlWptczAQhKFfbNyWYZTrc9XtikFjIOiOFSfIoAjyCfeP9kR+tp662AXAZ+AfbIFhEqUrAu8LNjw32SMksJLAwWVd4/V6UW1Njeqv9vW3n7n6JRQKrXbXRkkwMrE1OXyi7YFJcWDs29RxaBGetSDhCQKtkCiJVqHhOzhLyGOAdm8Ezo/ndxI923m4f3/jru8v346GpmPzTXCd5ZJA9/AcD8W2ZGPy2LY8nC0Y217vj17q7Xw3HZs79Gjg9c2sbkACMA4jSZJQRnJK7NGOUUSoBT/WG+mDWv4jFI8ih/ip4+DeqK5p16HpeVYDZjwkYBLZNYypacHravzhjKY3GXBQTPDxiSnkUVWkyMpqe0L9kbtMztiFw3TNgleoHqdOWRmhxtREBHR2CIKlM4sxM0yKAlv9UbtwqFnSggsAEggPx9t6LFgPlxfyV7oTvSc77hYMFgmAzHGLdqBp94vZ+aWFxUSyPpXRVN0wnHAEsMARw6VI6WBgS6yjpXEIOANFWAVhapozeOU/dAeMNoDXgXvAneCt4Anw3+CvwEfAbdvQyPiRvA6TsIr5phnc5zOF9+sm4XnBjJcMvsgtJ/8DyYLwNvinaNYAAAAASUVORK5CYII=");
}
/* Retina support */

@media only screen and (-webkit-min-device-pixel-ratio: 1.5),
only screen and (min--moz-device-pixel-ratio: 1.5),
only screen and (min-device-pixel-ratio: 1.5) {
  .btn-stripe-connect span:before,
  .btn-stripe-connect.blue span:before {
    background-image: url("data:image/png;base64,iVBORw0KGgoAAAANSUhEUgAAAC4AAAAwCAYAAABuZUjcAAAKRGlDQ1BJQ0MgUHJvZmlsZQAASA2dlndUFNcXx9/MbC+0XZYiZem9twWkLr1IlSYKy+4CS1nWZRewN0QFIoqICFYkKGLAaCgSK6JYCAgW7AEJIkoMRhEVlczGHPX3Oyf5/U7eH3c+8333nnfn3vvOGQAoASECYQ6sAEC2UCKO9PdmxsUnMPG9AAZEgAM2AHC4uaLQKL9ogK5AXzYzF3WS8V8LAuD1LYBaAK5bBIQzmX/p/+9DkSsSSwCAwtEAOx4/l4tyIcpZ+RKRTJ9EmZ6SKWMYI2MxmiDKqjJO+8Tmf/p8Yk8Z87KFPNRHlrOIl82TcRfKG/OkfJSREJSL8gT8fJRvoKyfJc0WoPwGZXo2n5MLAIYi0yV8bjrK1ihTxNGRbJTnAkCgpH3FKV+xhF+A5gkAO0e0RCxIS5cwjbkmTBtnZxYzgJ+fxZdILMI53EyOmMdk52SLOMIlAHz6ZlkUUJLVlokW2dHG2dHRwtYSLf/n9Y+bn73+GWS9/eTxMuLPnkGMni/al9gvWk4tAKwptDZbvmgpOwFoWw+A6t0vmv4+AOQLAWjt++p7GLJ5SZdIRC5WVvn5+ZYCPtdSVtDP6386fPb8e/jqPEvZeZ9rx/Thp3KkWRKmrKjcnKwcqZiZK+Jw+UyL/x7ifx34VVpf5WEeyU/li/lC9KgYdMoEwjS03UKeQCLIETIFwr/r8L8M+yoHGX6aaxRodR8BPckSKPTRAfJrD8DQyABJ3IPuQJ/7FkKMAbKbF6s99mnuUUb3/7T/YeAy9BXOFaQxZTI7MprJlYrzZIzeCZnBAhKQB3SgBrSAHjAGFsAWOAFX4Al8QRAIA9EgHiwCXJAOsoEY5IPlYA0oAiVgC9gOqsFeUAcaQBM4BtrASXAOXARXwTVwE9wDQ2AUPAOT4DWYgSAID1EhGqQGaUMGkBlkC7Egd8gXCoEioXgoGUqDhJAUWg6tg0qgcqga2g81QN9DJ6Bz0GWoH7oDDUPj0O/QOxiBKTAd1oQNYSuYBXvBwXA0vBBOgxfDS+FCeDNcBdfCR+BW+Bx8Fb4JD8HP4CkEIGSEgeggFggLYSNhSAKSioiRlUgxUonUIk1IB9KNXEeGkAnkLQaHoWGYGAuMKyYAMx/DxSzGrMSUYqoxhzCtmC7MdcwwZhLzEUvFamDNsC7YQGwcNg2bjy3CVmLrsS3YC9ib2FHsaxwOx8AZ4ZxwAbh4XAZuGa4UtxvXjDuL68eN4KbweLwa3gzvhg/Dc/ASfBF+J/4I/gx+AD+Kf0MgE7QJtgQ/QgJBSFhLqCQcJpwmDBDGCDNEBaIB0YUYRuQRlxDLiHXEDmIfcZQ4Q1IkGZHcSNGkDNIaUhWpiXSBdJ/0kkwm65KdyRFkAXk1uYp8lHyJPEx+S1GimFLYlESKlLKZcpBylnKH8pJKpRpSPakJVAl1M7WBep76kPpGjiZnKRcox5NbJVcj1yo3IPdcnihvIO8lv0h+qXyl/HH5PvkJBaKCoQJbgaOwUqFG4YTCoMKUIk3RRjFMMVuxVPGw4mXFJ0p4JUMlXyWeUqHSAaXzSiM0hKZHY9O4tHW0OtoF2igdRzeiB9Iz6CX07+i99EllJWV75RjlAuUa5VPKQwyEYcgIZGQxyhjHGLcY71Q0VbxU+CqbVJpUBlSmVeeoeqryVYtVm1Vvqr5TY6r5qmWqbVVrU3ugjlE3VY9Qz1ffo35BfWIOfY7rHO6c4jnH5tzVgDVMNSI1lmkc0OjRmNLU0vTXFGnu1DyvOaHF0PLUytCq0DqtNa5N03bXFmhXaJ/RfspUZnoxs5hVzC7mpI6GToCOVGe/Tq/OjK6R7nzdtbrNug/0SHosvVS9Cr1OvUl9bf1Q/eX6jfp3DYgGLIN0gx0G3QbThkaGsYYbDNsMnxipGgUaLTVqNLpvTDX2MF5sXGt8wwRnwjLJNNltcs0UNnUwTTetMe0zg80czQRmu836zbHmzuZC81rzQQuKhZdFnkWjxbAlwzLEcq1lm+VzK32rBKutVt1WH60drLOs66zv2SjZBNmstemw+d3W1JZrW2N7w45q52e3yq7d7oW9mT3ffo/9bQeaQ6jDBodOhw+OTo5ixybHcSd9p2SnXU6DLDornFXKuuSMdfZ2XuV80vmti6OLxOWYy2+uFq6Zroddn8w1msufWzd3xE3XjeO2323Ineme7L7PfchDx4PjUevxyFPPk+dZ7znmZeKV4XXE67m3tbfYu8V7mu3CXsE+64P4+PsU+/T6KvnO9632fein65fm1+g36e/gv8z/bAA2IDhga8BgoGYgN7AhcDLIKWhFUFcwJTgquDr4UYhpiDikIxQODQrdFnp/nsE84by2MBAWGLYt7EG4Ufji8B8jcBHhETURjyNtIpdHdkfRopKiDke9jvaOLou+N994vnR+Z4x8TGJMQ8x0rE9seexQnFXcirir8erxgvj2BHxCTEJ9wtQC3wXbF4wmOiQWJd5aaLSwYOHlReqLshadSpJP4iQdT8YmxyYfTn7PCePUcqZSAlN2pUxy2dwd3Gc8T14Fb5zvxi/nj6W6pZanPklzS9uWNp7ukV6ZPiFgC6oFLzICMvZmTGeGZR7MnM2KzWrOJmQnZ58QKgkzhV05WjkFOf0iM1GRaGixy+LtiyfFweL6XCh3YW67hI7+TPVIjaXrpcN57nk1eW/yY/KPFygWCAt6lpgu2bRkbKnf0m+XYZZxl3Uu11m+ZvnwCq8V+1dCK1NWdq7SW1W4anS1/+pDa0hrMtf8tNZ6bfnaV+ti13UUahauLhxZ77++sUiuSFw0uMF1w96NmI2Cjb2b7Dbt3PSxmFd8pcS6pLLkfSm39Mo3Nt9UfTO7OXVzb5lj2Z4tuC3CLbe2emw9VK5YvrR8ZFvottYKZkVxxavtSdsvV9pX7t1B2iHdMVQVUtW+U3/nlp3vq9Orb9Z41zTv0ti1adf0bt7ugT2ee5r2au4t2ftun2Df7f3++1trDWsrD+AO5B14XBdT1/0t69uGevX6kvoPB4UHhw5FHupqcGpoOKxxuKwRbpQ2jh9JPHLtO5/v2pssmvY3M5pLjoKj0qNPv0/+/tax4GOdx1nHm34w+GFXC62luBVqXdI62ZbeNtQe395/IuhEZ4drR8uPlj8ePKlzsuaU8qmy06TThadnzyw9M3VWdHbiXNq5kc6kznvn487f6Iro6r0QfOHSRb+L57u9us9ccrt08rLL5RNXWFfarjpebe1x6Gn5yeGnll7H3tY+p772a87XOvrn9p8e8Bg4d93n+sUbgTeu3px3s//W/Fu3BxMHh27zbj+5k3Xnxd28uzP3Vt/H3i9+oPCg8qHGw9qfTX5uHnIcOjXsM9zzKOrRvRHuyLNfcn95P1r4mPq4ckx7rOGJ7ZOT437j154ueDr6TPRsZqLoV8Vfdz03fv7Db56/9UzGTY6+EL+Y/b30pdrLg6/sX3VOhU89fJ39ema6+I3am0NvWW+738W+G5vJf49/X/XB5EPHx+CP92ezZ2f/AAOY8/wRDtFgAAAIbklEQVRoBdVZa5BURxU+fZ9z57mzs7PvF4i7srAQSCifMVDERC0jYlzUlJalKeGPlCnL/NEfywpWacoiVZRVJIYfGjGUu5bxj5qHFSAYyQOBEsJzYSHDvnd2dp535j66PX1vNgsULDPs1cr2Vs+9e7v79NfnnnP663MJYwwWYxEWI2iOedEClxabxgkBwjEvOuA9PQOOlSw64JMr4vK8GidYYMcOES4tVSEAAZ8FAUqon1GiAJEEEG0CjFB8cTaxZUMAo1gEqQA0UABprAjPbrUwXnkesgqKP8CBk5vDIenrE+BKmwI+MawA1MbCkdV10cBDflXuVmSxQRbFkCAQZ9U2ZTaONyxKcyXDHjMs83ImV3rz6njmDRPMUZB80zAJOuvvsflkXpTP7DrWyeXcYCqk75AEieawrEoty1vrvlcV0ja3VQdb1rVUQVd9EFqqNIj5ZfDJooPBsCnohq2ldDMynC42XZnW7z09lu25lMxDMl34y0gyvTsBwyewc84Z4MEPpWIzF/MBcLLtNzJISmxZU+PmWETbtqGzfvVja5uguyF02+kCIEJUk6Ex4oMV9XP9ZnQT/nZ24it7XrtoJ5LZ7SjAM+Bg2+0ckAOcbBkQIaZFVzY1bGurjezYfn87PNQZ5+13ZaQRXMzH26Lg8ymfUokQdAR59INOc53GQ6q/Jiiua6oJ7+h9uAPua47cHeLrwHEmQRmTGLHV6x4v+JYwWsOFCGRDn6RKem1rPPrkN9Y0uqAXLN4VwCgjYGEE8rBgMAjwKsF9S9WgLa9qjYcf+Po9jXdlGrfC5Wj8Vg0Lf+ZENAFmpGB9TWTLhmUxUD1UDg/gtudRnK+a4RtkgqQyO+RT5LVrmiLgJcN19gcGNojUWriS5yRQm7pcBTc/vyCKdW1RrWwzOTiYhGf+dRUmcgZosgDVfgWaMCS2V2tO+OzG0MiVjdUwiFiYm9a7O4kJAoZEooV9H4T0O0ofODkKr5+6+nY6V3heVZQpv6ZWaz55qSJJnXjtUBW5pT7k8xeK5u+B0PQdBVbQgTLq9HbQYthyNVSmTT6A/nB0aGpF0K99+trY1F7TNI9PZGXkKUVRtYjGZCIOV1dHR4Ynz8FSLV8BrjK6uiAlpLcmco1ipmgpAaU8rfesboCuumBg31uJbx6+qH0uX9D/em0i85xFhaslKZKA8/82RtYDhd/1MkCuBnjxrLgKB0EQSb5oWO+9O1bZrsy3+Kc3dcH+b99b07NuyXe6P9r8z/am+C9lkuqCjo4qGGkQES76qJcuz/2GOlUoFuVsQS+98frlaSeq8Gkqqctrg7Dz853wwrfugUfXtj3W3tJ8oCletRUEXy1SCSSYHhdu41gFqILcZCrzwkvnJmE0U3JtHefiL7eS2l7th11f7IQ9j65aVh+r+nlzbd2TELJrHPLmIXZX3wyBX8MTQMm8PJ0u9Pe9chGQYy9omvXouHu/thJqI+Ef1sZDm0AMBmfPiQsSPDuY2zhWwSH5ISU5Pjm98x9nRo7+7JVBB3wl5nJz35Vo/z/esBQUVf2+QlkD9Aw42/Ts3Au7ushdAhQ5UzJoOjE+OrV9/1tDR7cNnIax7N2bDX9nm1bUQXdz9Rp/MLwRoqAtDOzcaO7rvDrAWW8vhcatWVNjF6cmJre9embkz1947h3YfXgIUgVzblQldxgFH0ZOr/qULwM15k4Zlci4Vd9ZU5ltY71oObHBnBFQBidmUk8kEsOP7Hntwqsb974NfS8PAh7LKoo23Hw+2R4FQcSzKlDPgFOEyf8kx3HW94kQ7xJgRRdAJG7CyIWxgiXNUN0+k5nJLN83k3n8D8eHN3+1ux5+8uBHIKiWt1G1Rn3IJkiUCcQzU3G0h9qWHMeJdoSrwtr9dl6I6DNjFwRRyxiKnStSqkPJPsGSmZ+mp1P9z2dzOy3Klj31yMdmX9S8V75APEsomMZwT9fz9i6vkW9AvEgQyqrBQM2Dq9rrD0gCgXfHA0jpjIRm2Zcw+3CR2tZl27SnMZFSZ1lWcRwZITeDckresAEXaoKwwBh7/WQubgTOQj5BVjdv7KiBJz7bztMNcHIk03JiONNyfiK/ntv2VMHAMx6BjpoA/Gj9Emdjul7W7e6TeQNDK9WJLRm361P5c1drEmAaymaYoXpfjZoiOk7FHWuh5dxEHmzLHiXM9oyTz9FawRZw65f5yyzXBMpd0JGhFKB5nSwRMVvumDv2cxm4m1f5X4AuWhRePDUOtqEPQJVVGfWcBz1ahmPlTlxzqaJLquYZU1HTvjcTMD6dOULM0n+g5nKposHzdWbo7FgEkDBviWlYx++53XtQ33kvDU8dHAJm6L8usdwEZn09S3qiPed5lcCSLUpI0eEA8620zLbDl6bh8T+egkI+/7Rl6kegcTSPst1QUKaM+brhrjnF2yUQJNxnrGMnR7KbTw5nYFVjyAl98w2+VdvVlA67Dw3BgROjAKa+yyrpz0BKTbJnez1NT6AKrrnA1bEi1av2v3xaiL90dnxL2Kc0rsXc4WpcQEc8AEtiGrRiejmK6WWeMDIxtVwwKExijB5KFuBYIg1cy8dx0dTQ/yQVc78yBXMIqJ5i/VvvkqHdSjXuM/THKy7w2LQJ6fpJms38QiHGvlzBt+RwJv2JQ2elbjyRtjIi1AIRMAsKPuQduHVzr2YW+kIBE5BTwOzzxLKOiMX8QVuWh00IpqD+S0WHtLlzefpLBOZo/IYvEqQPnTX5dxmy4xookqaCjRuT4mMi8g3bxs2KCkj3GFj4+QSzA0RkeskU8iCJeUiBDv09Jt8OPEV6k7DlP3gxxh/dAPymPh/Kf5d897dIOd9P7H8oEd4G1JV8wPGbRadx52sgLmrRAZ99EZ5+LZgV+v+4Llrg/wX6HRCxgvzAAwAAAABJRU5ErkJggg==");
  }
  .btn-stripe-connect.light-blue span:before {
    background-image: url("data:image/png;base64,iVBORw0KGgoAAAANSUhEUgAAAC4AAAAwCAYAAABuZUjcAAAKRGlDQ1BJQ0MgUHJvZmlsZQAASA2dlndUFNcXx9/MbC+0XZYiZem9twWkLr1IlSYKy+4CS1nWZRewN0QFIoqICFYkKGLAaCgSK6JYCAgW7AEJIkoMRhEVlczGHPX3Oyf5/U7eH3c+8333nnfn3vvOGQAoASECYQ6sAEC2UCKO9PdmxsUnMPG9AAZEgAM2AHC4uaLQKL9ogK5AXzYzF3WS8V8LAuD1LYBaAK5bBIQzmX/p/+9DkSsSSwCAwtEAOx4/l4tyIcpZ+RKRTJ9EmZ6SKWMYI2MxmiDKqjJO+8Tmf/p8Yk8Z87KFPNRHlrOIl82TcRfKG/OkfJSREJSL8gT8fJRvoKyfJc0WoPwGZXo2n5MLAIYi0yV8bjrK1ihTxNGRbJTnAkCgpH3FKV+xhF+A5gkAO0e0RCxIS5cwjbkmTBtnZxYzgJ+fxZdILMI53EyOmMdk52SLOMIlAHz6ZlkUUJLVlokW2dHG2dHRwtYSLf/n9Y+bn73+GWS9/eTxMuLPnkGMni/al9gvWk4tAKwptDZbvmgpOwFoWw+A6t0vmv4+AOQLAWjt++p7GLJ5SZdIRC5WVvn5+ZYCPtdSVtDP6386fPb8e/jqPEvZeZ9rx/Thp3KkWRKmrKjcnKwcqZiZK+Jw+UyL/x7ifx34VVpf5WEeyU/li/lC9KgYdMoEwjS03UKeQCLIETIFwr/r8L8M+yoHGX6aaxRodR8BPckSKPTRAfJrD8DQyABJ3IPuQJ/7FkKMAbKbF6s99mnuUUb3/7T/YeAy9BXOFaQxZTI7MprJlYrzZIzeCZnBAhKQB3SgBrSAHjAGFsAWOAFX4Al8QRAIA9EgHiwCXJAOsoEY5IPlYA0oAiVgC9gOqsFeUAcaQBM4BtrASXAOXARXwTVwE9wDQ2AUPAOT4DWYgSAID1EhGqQGaUMGkBlkC7Egd8gXCoEioXgoGUqDhJAUWg6tg0qgcqga2g81QN9DJ6Bz0GWoH7oDDUPj0O/QOxiBKTAd1oQNYSuYBXvBwXA0vBBOgxfDS+FCeDNcBdfCR+BW+Bx8Fb4JD8HP4CkEIGSEgeggFggLYSNhSAKSioiRlUgxUonUIk1IB9KNXEeGkAnkLQaHoWGYGAuMKyYAMx/DxSzGrMSUYqoxhzCtmC7MdcwwZhLzEUvFamDNsC7YQGwcNg2bjy3CVmLrsS3YC9ib2FHsaxwOx8AZ4ZxwAbh4XAZuGa4UtxvXjDuL68eN4KbweLwa3gzvhg/Dc/ASfBF+J/4I/gx+AD+Kf0MgE7QJtgQ/QgJBSFhLqCQcJpwmDBDGCDNEBaIB0YUYRuQRlxDLiHXEDmIfcZQ4Q1IkGZHcSNGkDNIaUhWpiXSBdJ/0kkwm65KdyRFkAXk1uYp8lHyJPEx+S1GimFLYlESKlLKZcpBylnKH8pJKpRpSPakJVAl1M7WBep76kPpGjiZnKRcox5NbJVcj1yo3IPdcnihvIO8lv0h+qXyl/HH5PvkJBaKCoQJbgaOwUqFG4YTCoMKUIk3RRjFMMVuxVPGw4mXFJ0p4JUMlXyWeUqHSAaXzSiM0hKZHY9O4tHW0OtoF2igdRzeiB9Iz6CX07+i99EllJWV75RjlAuUa5VPKQwyEYcgIZGQxyhjHGLcY71Q0VbxU+CqbVJpUBlSmVeeoeqryVYtVm1Vvqr5TY6r5qmWqbVVrU3ugjlE3VY9Qz1ffo35BfWIOfY7rHO6c4jnH5tzVgDVMNSI1lmkc0OjRmNLU0vTXFGnu1DyvOaHF0PLUytCq0DqtNa5N03bXFmhXaJ/RfspUZnoxs5hVzC7mpI6GToCOVGe/Tq/OjK6R7nzdtbrNug/0SHosvVS9Cr1OvUl9bf1Q/eX6jfp3DYgGLIN0gx0G3QbThkaGsYYbDNsMnxipGgUaLTVqNLpvTDX2MF5sXGt8wwRnwjLJNNltcs0UNnUwTTetMe0zg80czQRmu836zbHmzuZC81rzQQuKhZdFnkWjxbAlwzLEcq1lm+VzK32rBKutVt1WH60drLOs66zv2SjZBNmstemw+d3W1JZrW2N7w45q52e3yq7d7oW9mT3ffo/9bQeaQ6jDBodOhw+OTo5ixybHcSd9p2SnXU6DLDornFXKuuSMdfZ2XuV80vmti6OLxOWYy2+uFq6Zroddn8w1msufWzd3xE3XjeO2323Ineme7L7PfchDx4PjUevxyFPPk+dZ7znmZeKV4XXE67m3tbfYu8V7mu3CXsE+64P4+PsU+/T6KvnO9632fein65fm1+g36e/gv8z/bAA2IDhga8BgoGYgN7AhcDLIKWhFUFcwJTgquDr4UYhpiDikIxQODQrdFnp/nsE84by2MBAWGLYt7EG4Ufji8B8jcBHhETURjyNtIpdHdkfRopKiDke9jvaOLou+N994vnR+Z4x8TGJMQ8x0rE9seexQnFXcirir8erxgvj2BHxCTEJ9wtQC3wXbF4wmOiQWJd5aaLSwYOHlReqLshadSpJP4iQdT8YmxyYfTn7PCePUcqZSAlN2pUxy2dwd3Gc8T14Fb5zvxi/nj6W6pZanPklzS9uWNp7ukV6ZPiFgC6oFLzICMvZmTGeGZR7MnM2KzWrOJmQnZ58QKgkzhV05WjkFOf0iM1GRaGixy+LtiyfFweL6XCh3YW67hI7+TPVIjaXrpcN57nk1eW/yY/KPFygWCAt6lpgu2bRkbKnf0m+XYZZxl3Uu11m+ZvnwCq8V+1dCK1NWdq7SW1W4anS1/+pDa0hrMtf8tNZ6bfnaV+ti13UUahauLhxZ77++sUiuSFw0uMF1w96NmI2Cjb2b7Dbt3PSxmFd8pcS6pLLkfSm39Mo3Nt9UfTO7OXVzb5lj2Z4tuC3CLbe2emw9VK5YvrR8ZFvottYKZkVxxavtSdsvV9pX7t1B2iHdMVQVUtW+U3/nlp3vq9Orb9Z41zTv0ti1adf0bt7ugT2ee5r2au4t2ftun2Df7f3++1trDWsrD+AO5B14XBdT1/0t69uGevX6kvoPB4UHhw5FHupqcGpoOKxxuKwRbpQ2jh9JPHLtO5/v2pssmvY3M5pLjoKj0qNPv0/+/tax4GOdx1nHm34w+GFXC62luBVqXdI62ZbeNtQe395/IuhEZ4drR8uPlj8ePKlzsuaU8qmy06TThadnzyw9M3VWdHbiXNq5kc6kznvn487f6Iro6r0QfOHSRb+L57u9us9ccrt08rLL5RNXWFfarjpebe1x6Gn5yeGnll7H3tY+p772a87XOvrn9p8e8Bg4d93n+sUbgTeu3px3s//W/Fu3BxMHh27zbj+5k3Xnxd28uzP3Vt/H3i9+oPCg8qHGw9qfTX5uHnIcOjXsM9zzKOrRvRHuyLNfcn95P1r4mPq4ckx7rOGJ7ZOT437j154ueDr6TPRsZqLoV8Vfdz03fv7Db56/9UzGTY6+EL+Y/b30pdrLg6/sX3VOhU89fJ39ema6+I3am0NvWW+738W+G5vJf49/X/XB5EPHx+CP92ezZ2f/AAOY8/wRDtFgAAAHH0lEQVRoBdVZ628UVRS/857dme3strvblpaXCiI+WkCkpFAoECAgr0oqxASjiAZMiF9MiI80/AfqB+WD3/xABOMrKCgRJCBSLCACQUEIEai8ywJ97GNm/J3ZbizM7C7trpG9m7N39t5z7/2dM+eec+5dzrZtVoqFL0XQhLlkgYulpnGOYxxhLjngW7Zsdayk5IB3RyJSSWrcMP1aSQJPJfnwoIA3LFhTy3hrAdx+IzbIOMbsGkQAR3pM1Icdcxv1ZZtxf+D5OGPm3vbJo4/YbW0WLVSswglCLc3F5QtAzyx6ZbbA7Hc5jp8hCAIj4nmecTy2NyRwCqShOEZzWZbFTMtkpmky27Ku2Da36cC2j9vSjIV/b93RsZpmybo5n2htlct6yz6SReFlWZaZIitMURRGz6IkMoEXHPAOFAewnQacSrFkMsUSiTgoEU0kk4vBUzTgHM87GvcE3traKgTjxleyT5mvaTrTdY2pqo9JBNjReBp0v0sFLtI4tA2ClqFtIpPF43EIEdcd4Yr0hSWy23hnIvi2T/PPDwaDLBAIMFVRmSACbMY0XCDSImTCsOOvYDr0hqxUQnGxF9AA4/T2Ks2LXwsD9Iby8nIWNIJMVmTGZwWcAwFW4AWIYmfEycE7mC6OZfHjqviCYZT5gobhaIw24VALjRz6aO9Vsdm9I6eu6XN1mIcC8+ALAO0sS28qvY43iiG0csxydOHanJqm1ZFNk8vLp67hVeHjLfMbvx9ZHY7Fbvco17pi2vlL1youXemKXLh8Y8SV610jelPJIcDLP8QFXJHlELm77BsxPaltW6xx4vgDo2uiN6klZOh9RGNG1VzHz1Ogn6j99LkLcaqLXVzA4acRnIS82k6lTLbjx/aqhgmPvglQMZAMItcXAkVAw4nGjKq9hbroxQVcVeVenuN9//po7zUpQp44ffbZOSvWb48nEhv3fr5pBzhJu6TxP0E/g6iUpavifrt8VUXIuEC27eyrHDVFTtoLiqo2SKK4vem5tQebWl5dwW3ceO+c/4nG712EwUaPIhDmRU5RtMwoY5FwhIXg83VNmyxJ6uamY5ePNbWsXVFc/bpncwFfMnvqN4oi3iRTyfXh+zVO0bUyGmXRykpWXkEC6ONlWdo8c/m6L+atWpXJHt0rF9jiAq7rvpPzGuu/hqlYjjskr5mFKDiRB/Ijtw8FQywaibJKCEBvwOf3L032lf0wbcnqQIEYPYe7gIPrRPPU+kONk8Z/jVAPb38fH0gpiiLA+lgwaDgCRMJhJGf6FFXV3vNcucBGL+Am5ty2dM6UjkWzp3ziU+Vb+TZqpp9yGhLADwFCoXKYTgVD3vPSrBXr6wrE6RruBZyYzoK+nT7psdMb1rS8P+Hxh3bKstiT19X0S4CcGSmDzAzkO9gDHHL5510rF9jg8uMD5juC55jfry5aubBpb+xOz8Fd+3+rO3bqr6ndvX0VA/i8HyEEHT4CeoAl4/GFYHrLm3Fordk0npmNNP8haJeh+7uWzW04+M665R9MmzT+S0kU+jImkq2mJE1RFab6fA9nJixWnUvjmTUoS6K84xfQU0i+piya9fRhjrftfR2/L3M8TobToxYFEScnqehu0QW8ufX1eoGXJPNy6Mju3W2pAVgSeO4AHQLV+SR5pIVES+CQ1+QolPeoqlr0RMsFXJTkpXDbbVxVV/eclW+04wjTDod4HGe907aQuiImOV7RfbXVVdWNeqCMCUpu4ORM4Zl6csg2pC4X8GHRsNbdl6BrBs1MpWbh4DuLrhvoEGzZODVJHA7GPOuLJ5iG0ELAchUcn5mh63/n4hlKnwt4bW11uCvW65x+cLXAkgkQDgMpXDtQRkhAydXRKQnJVTqq5liZTv/V0dDJHCyD6rIZT5mU+15Fgk36/X7n/oQ0beGawQTgtMZxT4UP2a1zt4I6n8bxPlLNU+u+GxS6HMwch43lBZzu+tHpXPaIPDRKWi2gPDKi6sDo2sqjBUxx91CbOWdBN6r+hCqfJu+ezfuXEfCdX7lw+k70nvDmGHwr7KSbRrmA9+POa7v5lgwHA2debJn5KSIvxQBnsXxj7qcfwe4a8bmAD4tWnLp6s7uzN2lWw33kdhkeK/lUpat+3Kg9C2ZMPIzuC6A9HmxDbsJeozndwNesXLCf2mO376gnz3TW4Jph2I3Y7cidnr7ynt54MJky/ZZli8jFTZHnE7Ikdmt+9Ua0wjg/bvSwM0+OHXER0ZV2PqULn4EGBjH8LKzgJH+OZnBpHG3kczuNgF7dUD/2DJ6JBlO6wLwP9OtgBt0vr22a3hrHBHQnQkSXlTWgahBlg+WgIMgHIoEpb6cdTvZ7A3QRRFruBDm+FnXRiyhZ3jY+YCXKLwgI0QNTYkKPt1d5YBBmAaJdver48bx/pWQZ/781wx06nq7kgGc0lu8ElOF74OqSBf4P9hj31KSAw4AAAAAASUVORK5CYII=");
  }
}
您可以直接从 Stripe 获取此代码。
添加重定向 URI
在 Stripe 端完成集成后,我们需要一种方法将用户跳转回我们的应用。Stripe 在您的 Connect 设置面板中提供了此功能。请确保您正在查看测试数据,并在“重定向”区域中添加以下 URI:
http://localhost:3000/users/auth/stripe_connect/callback
由于我们安装的 gem、devise 以及我们之前设置的初始控制器逻辑,这个 URL 目前存在于我们的应用程序中。
在设置中,最好也提供一些品牌信息,以免造成混淆。我将我们的应用程序命名为“Back My Idea”。
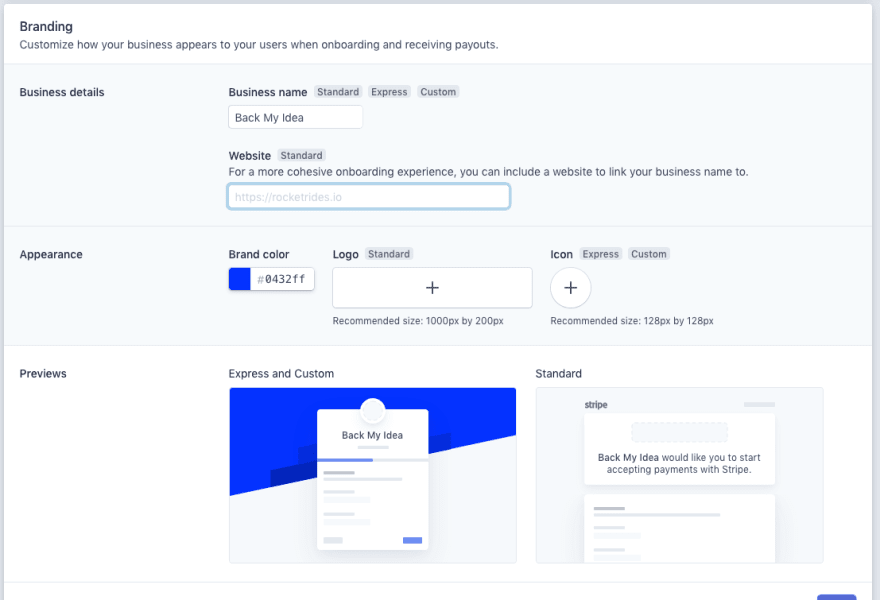
Stripe Connect 按钮位于视图中后,点击它即可进入如下所示的页面。我建议在应用中创建一个新的用户帐户,这样您就可以根据需要将其绑定到新帐户,而不是现有帐户。如果您一开始没有这样做,也没什么大不了的。
以下视图假设您在访问时已退出任何 Stripe 帐户。如果您的帐户是 Stripe 主帐户(包含 的帐户client_id),系统将提示您注销或切换用户。
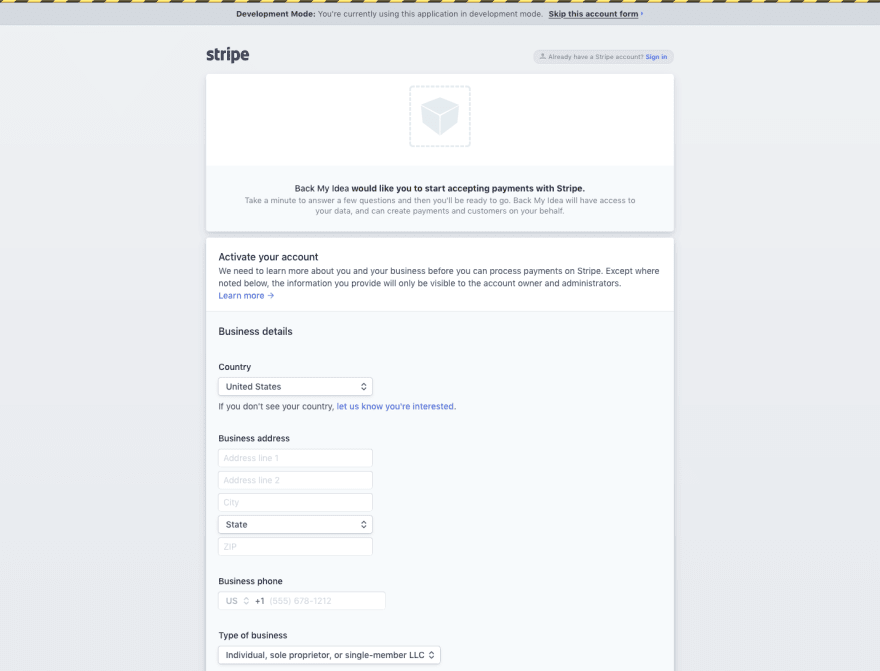
在这里,您可以填写有关您帐户的巨型表单的详细信息,但由于我们处于开发模式,请注意页面顶部的号召性用语。我们可以完全绕过表单。
如果你跳过表单,一切顺利的话,你应该会被重定向回应用程序,并收到一条成功消息!太棒了!
以下是控制台日志作为证明。为了安全起见,我省略了一些键。
Started GET "/users/auth/stripe_connect/callback?scope=read_write&code=ac_XXXXXXXXXXXXXXXXXXXXXXXX" for 127.0.0.1 at 2020-01-28 16:26:39 -0600
I, [2020-01-28T16:26:39.694445 #32159] INFO -- omniauth: (stripe_connect) Callback phase initiated.
Processing by OmniauthCallbacksController#stripe_connect as HTML
  Parameters: {"scope"=>"read_write", "code"=>"ac_XXXXXXXXXXXXXXXXXXXX"}
  User Load (0.1ms) SELECT "users".* FROM "users" WHERE "users"."id" = ? ORDER BY "users"."id" ASC LIMIT ? [["id", 1], ["LIMIT", 1]]
  ↳ app/controllers/omniauth_callbacks_controller.rb:4:in `stripe_connect'
   (0.1ms) begin transaction
  ↳ app/controllers/omniauth_callbacks_controller.rb:10:in `stripe_connect'
  User Update (0.4ms) UPDATE "users" SET "provider" = ?, "uid" = ?, "access_code" = ?, "publishable_key" = ?, "updated_at" = ? WHERE "users"."id" = ? [["provider", "stripe_connect"], ["uid", "acct_XXXXXXXXXXXXXX"], ["access_code", "sk_test_XXXXXXXXXXXXXXXXXXXXXXXX"], ["publishable_key", "pk_test_XXXXXXXXXXXXXXXXXXXXXXXX"], ["updated_at", "2020-01-28 22:26:41.139168"], ["id", 1]]
  ↳ app/controllers/omniauth_callbacks_controller.rb:10:in `stripe_connect'
   (1.0ms) commit transaction
  ↳ app/controllers/omniauth_callbacks_controller.rb:10:in `stripe_connect'
Redirected to http://localhost:3000/
Completed 302 Found in 7ms (ActiveRecord: 1.4ms | Allocations: 3826)

Started GET "/" for 127.0.0.1 at 2020-01-28 16:26:41 -0600
Processing by ProjectsController#index as HTML
  Rendering projects/index.html.erb within layouts/application
导航到您的帐户设置,您应该会看到我们为已连接帐户添加的更新消息。
订阅/支持
在前端,我们需要一种让项目可支持的方式。这需要每个方案的底层某种订阅逻辑。我们将为特定用户添加一种配置方式,让他们能够配置自己可以提供的层级以及费用(类似 Patreon)。
我们将为nested_attributes新项目启用该策略,并将其与一个名为 的新模型绑定Perk。每个项目Perk都将拥有价格、标题和描述。尚未托管该项目的用户可以订阅相应的福利。
创建 Perk 模型
我们将从以下字段开始:
titleamountdescriptionquantity– 提供限量通常可以带来更高的购买量project_id– 每个特权都需要一个父项目来关联
$ rails g model Perk title:string amount:decimal description:text quantity:integer project:references
一旦生成了新的迁移,我们需要对其进行一些修改。amount由于我们处理的是货币,因此该列需要一些约束和合理的默认值。
class CreatePerks < ActiveRecord::Migration[6.0]
  def change
    create_table :perks do |t|
      t.decimal :amount, precision: 8, scale: 2, default: 0
      t.text :description
      t.integer :quantity
      t.references :project, null: false, foreign_key: true

      t.timestamps
    end
  end
end
- 精度是指允许的数字数量。在本例中,精度可以是 (999,999.99),但您可以自行调整。
- 小数位数是指小数点右边应有多少位数字。大多数货币的小数位数为2位。
$ rails db:migrate
向项目模型添加福利
我们需要将福利与项目关联起来,并定义关联的嵌套特性。这样做会在project.rb文件中生成以下内容:
# app/models/project.rb
class Project < ApplicationRecord
  belongs_to :user
  has_rich_text :description
  has_one_attached :thumbnail
  has_many :comments, as: :commentable

  # add the two lines below
  has_many :perks, dependent: :destroy
  accepts_nested_attributes_for :perks, allow_destroy: true, reject_if: proc { |attr| attr['title'].blank? }
  ....

end
这里我们说一个项目可以有多个特权。这个dependent: :destroy声明的意思是,如果一个项目被删除,那么它的特权也会被删除。
这accepts_nested_attributes_for条线表示我们的福利现在可以融入到我们的项目结构中了。我们需要扩展项目表单,以包含我们在生成模型时添加的字段。福利可以通过allow_destroy: true声明单独销毁,最后,如果每个新福利的标题字段为空,我们通过不保存来验证福利。
福利模型
由于我们运行了生成器,perk 模型的复杂工作基本上已经完成了。Rails 已belongs_to :project自动添加到perk.rb文件中。
# app/models/perk.rb
class Perk < ApplicationRecord
  belongs_to :project
end
将新的特权字段列入白名单
在 Projects 控制器中,我们需要将刚刚创建的新字段列入白名单,以便保存所有字段。我们可以很容易地做到这一点:
# app/controllers/projects_controller.rb

class ProjectsController < ApplicationController
  ...

  private
    ...
    def project_params
      params.require(:project).permit(:title, :donation_goal, :description, :thumbnail, perks_attributes: [:id, :_destroy, :title, :description, :amount, :quantity])
    end
end
这里我添加了一个perks_attributes指向附加字段数组的新参数。:_destroy也请注意方法。这将允许我们根据需要删除单个特权。
更新视图
我们的新项目表单目前如下所示:
<!-- app/views/projects/_form.html.erb-->
<%= form_with(model: project, local: true, multipart: true) do |form| %>
  <% if project.errors.any? %>
    <div id="error_explanation" class="bg-white p-6 rounded text-red-500 mb-5">
      <h2 class="text-red-500 font-bold"><%= pluralize(project.errors.count, "error") %> prohibited this project from being saved:</h2>

      <ul>
        <% project.errors.full_messages.each do |message| %>
          <li><%= message %></li>
        <% end %>
      </ul>
    </div>
  <% end %>

  <div class="mb-6">
    <%= form.label :thumbnail, "Project thumbnail", class: "label" %>
    <%= form.file_field :thumbnail %>
  </div>

  <div class="mb-6">
    <%= form.label :title, class: "label" %>
    <%= form.text_field :title, class: "input" %>
  </div>

  <div class="mb-6">
    <%= form.label :donation_goal, class: "label" %>
    <%= form.text_field :donation_goal, class: "input" %>
  </div>

  <div class="mb-6">
    <%= form.label :description, class: "label" %>
    <%= form.rich_text_area :description, class: "input" %>
  </div>

  <div class="mb-6">
    <%= form.submit class: "btn btn-default" %>
  </div>
<% end %>
没什么异常吧?
为了让它更具动态性,我想使用Stimulus.js,这是一个很好的 JavaScript 库,它不会接管你的整个前端,而是在你需要的地方添加更多动态的 JavaScript 位。
我想介绍的总体思路是,每次我们需要超过 1 个时,在点击时添加一个新的嵌套特权。JavaScript 是相当必要的,有助于使这种类型的用户体验更容易被接受。
安装 Stimulus JS
由于 Rails 已经附带 Webpacker,因此我们可以非常轻松地安装 Stimulus。
$ bundle exec rails webpacker:install:stimulus
这条命令应该能完成我们想要的繁重工作。完成后,你应该会得到一个新controllers目录,app/javascript并且文件里会有一些新增内容application.js。
我们只会用到一点点 Stimulus,但我鼓励你进一步探索。它是一个非常棒的库,与 Rails 配合得非常好。
让我们创建第一个控制器。我将删除hello_controller.js所有已创建的。
// app/javascript/controllers/nested_form_controller.js

import { Controller } from "stimulus"

export default class extends Controller {
  static targets = ["add_perk", "template"]

  add_association(event) {
    event.preventDefault()
    var content = this.templateTarget.innerHTML.replace(/TEMPLATE_RECORD/g, new Date().valueOf())
    this.add_perkTarget.insertAdjacentHTML('beforebegin', content)
  }

  remove_association(event) {
    event.preventDefault()
    let perk = event.target.closest(".nested-fields")
    perk.querySelector("input[name*='_destroy']").value = 1
    perk.style.display = 'none'
  }
}
这里我们定义了一个新的控制器,并添加了一些目标和方法。我不会深入讲解 Stimulus 的细节,但这应该足够让我们开始工作了。
- 目标:指您想要瞄准的事物……
- 您可以使用对象表示法中的关键字来访问目标
this。在我们的例子中,关键字可能是this.add_perkTarget。
在我们的部分视图中,我们可以像这样扩展形式:
<!-- app/views/projects/_form.html.erb-->
<%= form_with(model: project, local: true, multipart: true) do |form| %>
  <% if project.errors.any? %>
    <div id="error_explanation" class="p-6 mb-5 text-red-500 bg-white rounded">
      <h2 class="font-bold text-red-500"><%= pluralize(project.errors.count, "error") %> prohibited this project from being saved:</h2>

      <ul>
        <% project.errors.full_messages.each do |message| %>
          <li><%= message %></li>
        <% end %>
      </ul>
    </div>
  <% end %>

  <div class="mb-6">
    <%= form.label :thumbnail, "Project thumbnail", class: "label" %>
    <%= form.file_field :thumbnail %>
  </div>

  <div class="mb-6">
    <%= form.label :title, class: "label" %>
    <%= form.text_field :title, class: "input" %>
  </div>

  <div class="mb-6">
    <%= form.label :donation_goal, class: "label" %>
    <%= form.text_field :donation_goal, class: "input" %>
  </div>

  <div class="mb-6">
    <%= form.label :description, class: "label" %>
    <%= form.rich_text_area :description, class: "input" %>
  </div>

  <div class="my-10">
    <h3 class="text-2xl">Perks</h3>

    <div data-controller="nested-form">
      <template data-target='nested-form.template'>
        <%= form.fields_for :perks, Perk.new, child_index: 'TEMPLATE_RECORD' do |perk| %>
          <%= render 'perk_fields', form: perk %>
        <% end %>
      </template>

      <%= form.fields_for :perks do |perk| %>
        <%= render 'perk_fields', form: perk %>
      <% end %>

      <div data-target="nested-form.add_perk">
        <%= link_to "Add Perk", "#", data: { action: "nested-form#add_association" }, class: "btn btn-white" %>
      </div>
    </div>
  </div>

  <div class="mb-6">
    <%= form.submit class: "btn btn-default" %>
  </div>
<% end %>
我们的表单现在增加了一些逻辑,使用了 Stimulus + Rails 使其更加动态。只需单击一下,即可创建任意数量的新 Perk。我创建了第二个部分,以帮助渲染 Perk 的子字段。
<!-- app/views/projects/_perk_fields.html.erb -->
<div class="p-6 mb-4 border rounded nested-fields">

  <%= form.hidden_field :_destroy %>

  <div class="mb-6">
    <%= form.label :title %>
    <%= form.text_field :title, class: "input" %>
  </div>

  <div class="mb-6">
    <%= form.label :description %>
    <%= form.text_area :description, class: "input" %>
  </div>

  <div class="mb-6">
    <%= form.label :amount %>
    <%= form.text_field :amount, placeholder: "0.00", class: "input" %>
  </div>

  <div class="mb-6">
    <%= form.label :quantity %>
    <%= form.text_field :quantity, placeholder: "10", class: "input" %>
  </div>

  <%= link_to "Remove", "#", data: { action: "click->nested-form#remove_association" }, class: "text-white underline text-sm" %>
</div>
如果一切顺利,您应该能够创建一个包含额外福利的新项目并保存它。我们仍然需要在项目展示视图中渲染项目额外福利,所以接下来让我们更新它。
项目展示视图
根据我们之前设置的状态,项目的显示视图可以是活动的,也可以是非活动的。主显示模板包含一些简单的代码来实现这一点:
<!--app/views/projects/show.html.erb-->
<% if @project.active? %>
  <%= render "active_project", project: @project %>
<% else %>
  <%= render "inactive_project", project: @project %>
<% end %>
活跃项目将拥有更多数据,因为大多数用户都会与之交互。
活动视图
<!-- app/views/projects/active_project.html.erb-->
<div class="container relative p-6 mx-auto text-gray-900 bg-white rounded-lg lg:p-10">
  <div class="flex flex-wrap items-center justify-between w-full pb-4 mb-8 border-b-2 border-gray-200">
    <div class="flex flex-wrap items-start justify-between w-full pb-4 mb-4 border-b-2 border-gray-200">
      <div class="flex-1">
        <h1 class="text-3xl font-bold leading-none text-gray-800"><%= project.title %></h1>
        <p class="text-sm italic text-gray-500">Created by <%= project.user.name ||=
      project.user.username %></p>
      </div>

    <div class="w-full mb-4 lg:w-1/5 lg:mb-0">
      <p class="m-0 text-xl font-semibold leading-none"><%= number_to_currency(project.current_donation_amount) %></p>
      <p class="text-sm text-gray-500">pledged of <%= number_to_currency(project.donation_goal) %></p>
    </div>

    <div class="w-full mb-4 lg:w-1/5 lg:mb-0">
      <p class="m-0 text-xl font-semibold leading-none">200</p>
      <p class="text-sm text-gray-500">backers</p>
    </div>

    <div class="w-full mb-4 lg:w-1/5 lg:mb-0">
      <p class="m-0 text-xl font-semibold leading-none"><%= distance_of_time_in_words_to_now(project.expires_at) %></p>
      <p class="text-sm text-gray-500">to go</p>
    </div>
  </div>

  <div class="flex flex-wrap items-start justify-between w-full mb-6">
    <div class="w-full lg:w-3/5">
    <% if project.thumbnail.present? %>
      <%= image_tag project.thumbnail, class: "rounded" %>
    <% else %>
      <div class="flex items-center justify-center p-8 text-center bg-gray-100 rounded">
        <div class="">
          <p class="text-xs font-bold text-gray-600 uppercase">PROJECT</p>
          <h3 class="text-2xl text-black"><%= project.title %></h3>
        </div>
      </div>
    <% end %>
      <div class="my-6">
        <%= render "comments/comments", commentable: project %>
        <%= render "comments/form", commentable: project %>
      </div>
    </div>

    <div class="w-full mt-6 lg:pl-10 lg:w-2/5 lg:mt-0">
      <div class="mb-6">
        <p class="text-sm font-semibold text-gray-500 uppercase">Description</p>
        <%= project.description %>
      </div>

      <h3 class="text-2xl text-gray-900">Back this idea</h3>

      <% project.perks.each do |perk| %>
        <div class="p-4 mb-6 bg-gray-100 border rounded">
          <h4 class="text-lg font-bold text-center text-gray-900"><%= perk.title %></h4>
          <p class="pb-2 mb-2 text-sm italic text-center border-b"><%= perk.quantity %> left</p>
          <div class="py-2 text-gray-700">
            <%= simple_format perk.description %>
          </div>

          <% if user_signed_in? && perk.project.user_id == current_user.id %>
            <em class="block text-sm text-center">Sorry, You can't back your own idea</em>
          <% else %>
          <%= link_to "Back this idea for #{number_to_currency(perk.amount)} /mo", new_subscription_path(amount: perk.amount, project: project), class: "btn btn-default btn-expanded" %>
          <% end %>
        </div>
      <% end %>
    </div>
  </div>

 <% if admin? || author_of(project) %>
    <div class="absolute top-0 right-0 mt-4 mr-4">
      <%= link_to 'Edit', edit_project_path(project), class: "btn btn-sm btn-outlined btn-default" %>
      <%= link_to 'Delete', project_path(project), method: :delete, class: "btn btn-sm btn-outlined btn-default", data: { confirm: "Are you sure?" } %>
    </div>
  <% end %>
</div>
目前,我们已经完成了与福利和项目相关的 UI。还有一些地方需要改进,但我们稍后会集中精力进行改进。
非活动视图:
我们不会以任何方式支持该项目并表现出明显的不活动迹象。
<!-- app/views/projects/inactive_project.html.erb-->
<div class="container relative p-6 mx-auto text-gray-900 bg-white border-2 border-red-500 rounded-lg lg:p-10">
  <div class="flex flex-wrap items-center justify-between w-full pb-4 mb-8 border-b-2 border-gray-200">
    <div class="flex flex-wrap items-start justify-between w-full pb-4 mb-4 border-b-2 border-gray-200">
      <div class="flex-1">
        <span class="px-2 py-1 text-xs font-semibold text-white bg-red-500 rounded-lg">Inactive</span>

        <h1 class="mt-4 text-3xl font-bold leading-none text-gray-800"><%= project.title %></h1>
        <p class="text-sm italic text-gray-500">Created by <%= project.user.name ||=
      project.user.username %></p>
      </div>
    </div>

    <div class="w-full mb-4 lg:w-1/5 lg:mb-0">
      <p class="m-0 text-xl font-semibold leading-none"><%= number_to_currency(project.current_donation_amount) %></p>
      <p class="text-sm text-gray-500">pledged of <%= number_to_currency(project.donation_goal) %></p>
    </div>

    <div class="w-full mb-4 lg:w-1/5 lg:mb-0">
      <p class="m-0 text-xl font-semibold leading-none">200</p>
      <p class="text-sm text-gray-500">backers</p>
    </div>

    <div class="w-full mb-4 lg:w-1/5 lg:mb-0">
      <p class="m-0 text-xl font-semibold leading-none">Expired</p>
      <p class="text-sm text-gray-500"><%= time_ago_in_words(@project.expires_at) %> ago</p>
    </div>
  </div>

  <div class="flex flex-wrap items-start justify-between mb-6">
    <div class="w-full lg:w-3/5">
    <% if project.thumbnail.present? %>
      <%= image_tag project.thumbnail, class: "rounded" %>
    <% else %>
      <div class="flex items-center justify-center p-8 text-center bg-gray-100 rounded">
        <div class="">
          <p class="text-xs font-bold text-gray-600 uppercase">PROJECT</p>
          <h3 class="text-2xl text-black"><%= project.title %></h3>
        </div>
      </div>
    <% end %>
    <div class="my-6">
      <%= render "comments/comments", commentable: project %>
      <p>Comments are closed for inactive projects</p>
    </div>
    </div>
    <div class="w-full mt-6 lg:pl-10 lg:w-2/5 lg:mt-0">
      <p class="text-sm font-semibold text-gray-500 uppercase">Description</p>
      <%= project.description %>
    </div>
  </div>

  <% if admin? || author_of(project) %>
    <div class="absolute top-0 right-0 mt-4 mr-4">
      <%= link_to 'Edit', edit_project_path(project), class: "btn btn-sm btn-outlined btn-default" %>
      <%= link_to 'Delee', project_path(project), method: :delete, class: "btn btn-sm btn-outlined btn-default", data: { confirm: "Are you sure?" } %>
    </div>
  <% end %>
</div>
福利订阅
为每个 Perk 添加订阅应该是相当标准的,但使用 Stripe Connect 则需要更多步骤和关注。
订阅控制器和路由
我们需要一种方法来传递一些包含必要数据的请求,以确保我们的收费按计划进行。将这些数据放入带有路由的订阅控制器中是合理的。
# config/routes.rb

resource :subscription # add this anywhere
您可能需要重新启动服务器才能使这些更改生效。
我们可以在下一步中添加一个“views”文件夹app/views/subscriptions。里面我们需要一些视图。
back-my-idea/app/views/subscriptions
.
├── _form.html.erb
├── new.html.erb
└── show.html.erb
控制器是许多神奇事情发生的地方。在这里,我们需要访问当前用户、项目数据和客户数据(Back My Idea)
使用 Pay 插件,我们可以非常轻松地创建订阅。在每个新的付款表单中,我们都会传递创建初始扣款和启动订阅所需的参数。
这是控制器的当前状态。我们需要一种方法来获取在视图中点击“支持此项目”按钮时通过请求传递的信息。
# app/controllers/subscriptions_controller.rb
class SubscriptionsController < ApplicationController
  def new
    @project = Project.find(params[:project])
  end

  def create
  end

  def destroy
  end
end
在请求中,我们可以通过参数访问项目,这要归功于将它们传递给每个 Perk 的按钮:
<!-- app/views/projects/_active_project.html.erb-->

<!-- omitted code--->

<h3 class="text-2xl text-gray-900">Back this idea</h3>

<% project.perks.each do |perk| %>
  <div class="p-4 mb-6 bg-gray-100 border rounded">
    <h4 class="text-lg font-bold text-center text-gray-900"><%= perk.title %></h4>
    <p class="pb-2 mb-2 text-sm italic text-center border-b"><%= perk.quantity %> left</p>
    <div class="py-2 text-gray-700">
      <%= simple_format perk.description %>
    </div>
    <%= link_to "Back this idea for #{number_to_currency(perk.amount)} /mo", new_subscription_path(amount: perk.amount, project: project), class: "btn btn-default btn-expanded" %>
  </div>
<% end %>

<!-- omitted code--->
使用 link_to 方法,我们可以通过 URL 传递信息,因此这可能相当于:
http://localhost:3000/subscription/new?amount=10.0&project=4
这样,我们就可以在控制器中抓取它并执行任何操作了。真是太棒了!
首先,我们将表单添加到订阅视图中,这样我们就可以开始操作了。app/views/subscriptions/new.html.erb我将在里面添加以下内容:
<div class="w-1/2 mx-auto">
  <h3 class="mb-2 text-2xl font-bold text-center">You're about to back <em><%= @project.title %> </em></h3>

  <div class="p-6 border rounded">
    <%= render "form" %>
  </div>
</div>
并在表单部分中:
<!-- app/views/subscriptions/_form.html.erb-->
<%= form_with model: current_user, url: subscription_url, method: :post, html: { id: "payment-form" } do |form| %>
  <div>
    <label for="card-element">
      Credit or debit card
    </label>
    <div id="card-element">
      <!-- A Stripe Element will be inserted here. -->
    </div>

    <!-- Used to display Element errors. -->
    <div id="card-errors" role="alert"></div>
  </div>

  <button>Submit Payment</button>
<% end %>
我们稍后会对此进行改进,但首先,我们需要将一些 JavaScript 绑定到它
JavaScript
我们仍然需要在前端捕获 Stripe 令牌并将其传递给服务器,因此我们也将实现 Stripe 元素。让我们从这里开始:
首先,我们需要将 JS 库添加到应用中。我会将其添加到应用布局文件中。
<!-- app/views/layouts/application.html.erb-->
<!DOCTYPE html>
<html>
  <head>
    <title>Back My Idea</title>
    <%= csrf_meta_tags %>
    <%= csp_meta_tag %>

    <meta name="viewport" content="width=device-width, initial-scale=1">

    <%= stylesheet_link_tag 'application', media: 'all', 'data-turbolinks-track': 'reload' %>
    <%= stylesheet_pack_tag 'application', media: 'all', 'data-turbolinks-track': 'reload' %>
    <%= javascript_pack_tag 'application', 'data-turbolinks-track': 'reload' %>
    <%= javascript_include_tag 'https://js.stripe.com/v3/' %>

    <!-- tons more code -->
接下来,我们需要一些 JavaScript 代码来阻止默认表单提交并标记费用。我们还需要传递给定用户的可发布密钥。我会创建一个新stripe.js文件,作为我们实现这些功能的地方。它可以优化为 Stimulus Controller 或更可复用的 JavaScript 组件,但目前我并不完全担心这些。
我将以面向对象的方式来解决这个问题,我们可以创建一个 ES6 类,以允许将给定项目所有者的可发布 Stripe 密钥作为参数传入。
class StripeCharges {
  constructor({ form, key }) {
    this.form = form;
    this.key = key;
    this.stripe = Stripe(this.key)
  }

  initialize() {
    this.mountCard()
  }

  mountCard() {
    const elements = this.stripe.elements();

    const style = {
      base: {
        color: "#32325D",
        fontWeight: 500,
        fontSize: "16px",
        fontSmoothing: "antialiased",

        "::placeholder": {
          color: "#CFD7DF"
        },
        invalid: {
          color: "#E25950"
        }
      },
    };

    const card = elements.create('card', { style });
    if (card) {
      card.mount('#card-element');
      this.generateToken(card);
    }
  }

  generateToken(card) {
    let self = this;
    this.form.addEventListener('submit', async (event) => {
      event.preventDefault();

      const { token, error } = await self.stripe.createToken(card);

      if (error) {
        const errorElement = document.getElementById('card-errors');
        errorElement.textContent = error.message;
      } else {
        this.tokenHandler(token);
      }
    });
  }

  tokenHandler(token) {
    let self = this;
    const hiddenInput = document.createElement('input');
    hiddenInput.setAttribute('type', 'hidden');
    hiddenInput.setAttribute('name', 'stripeToken');
    hiddenInput.setAttribute('value', token.id);
    this.form.appendChild(hiddenInput);

    ["brand", "last4", "exp_month", "exp_year"].forEach(function (field) {
      self.addCardField(token, field);
    });
    this.form.submit();
  }

  addCardField(token, field) {
    let hiddenInput = document.createElement('input');
    hiddenInput.setAttribute('type', 'hidden');
    hiddenInput.setAttribute('name', "user[card_" + field + "]");
    hiddenInput.setAttribute('value', token.card[field]);
    this.form.appendChild(hiddenInput);
  }
}

// Kick it all off
document.addEventListener("turbolinks:load", () => {
  const form = document.querySelector('#payment-form')
  if (form) {
    const charge = new StripeCharges({
      form: form,
      key: form.dataset.stripeKey
    });
    charge.initialize()
  }
})
我将导入application.js这个文件:
// This file is automatically compiled by Webpack, along with any other files
// present in this directory. You're encouraged to place your actual application logic in
// a relevant structure within app/javascript and only use these pack files to reference
// that code so it'll be compiled.

require("@rails/ujs").start()
require("turbolinks").start()
require("@rails/activestorage").start()
require("channels")

require("trix")
require("@rails/actiontext")

import "stylesheets/application"
import "controllers"
import "components/stripe";
最后,在视图中我将添加对表单部分和新视图的更新。
<!-- app/views/subscriptions/new.html.erb-->
<%= form_with model: current_user, url: subscription_url, method: :post, html: { id: "payment-form", class: "stripe-form" }, data: { stripe_key: project.user.publishable_key } do |form| %>
  <div>
    <label for="card-element" class="label">
      Credit or debit card
    </label>

    <div id="card-element">
      <!-- A Stripe Element will be inserted here. -->
    </div>

    <!-- Used to display Element errors. -->
    <div id="card-errors" role="alert" class="text-sm text-red-400"></div>
  </div>

  <button>Back <%= number_to_currency(params[:amount]) %> /mo toward <em><%= project.title %></em></button>
<% end %>
这应该使用项目所有者文件上的用户可发布密钥来挂载表单。我们将向此表单添加字段,以便通过网络发送我们需要的数据,例如金额和客户 ID。
我还添加了一些样式,让它看起来更加美观:
/* app/javascript/stylesheets/components/_forms.scss */

// Stripe form
.stripe-form {
  @apply bg-white rounded-lg block p-6;

  * {
    @apply font-sans text-base font-normal;
  }

  label {
    @apply text-gray-900;
  }

  .card-only {
    @apply block;
  }

  .StripeElement {
    @apply border px-3 py-3 rounded-lg;
  }

  input, button {
    -webkit-appearance: none;
    -moz-appearance: none;
    appearance: none;
    outline: none;
    border-style: none;
    color: #fff;
  }

  input:-webkit-autofill {
    transition: background-color 100000000s;
    -webkit-animation: 1ms void-animation-out;
  }

  input {
    -webkit-animation: 1ms void-animation-out;
  }

  input::-webkit-input-placeholder {
    @apply text-gray-400;
  }

  input::-moz-placeholder {
    @apply text-gray-400;
  }

  input:-ms-input-placeholder {
    @apply text-gray-400;
  }

  button {
    @apply bg-indigo-500 rounded mt-4 text-white cursor-pointer w-full block h-10;
  }

  button:active {
    @apply bg-indigo-600;
  }

  .error {
    svg {
      .base {
        fill: #e25950;
      }

      .glyph {
        fill: #f6f9fc;
      }
    }

    .success {
      .icon .border {
        stroke: #ffc7ee;
      }

      .icon .checkmark {
        @apply bg-indigo-500;
      }

      .title {
        color: #32325d;
      }

      .message {
        color: #8898aa;
      }

      .reset path {
        @apply bg-indigo-500;
      }
    }
  }
}
到目前为止,我的应用中还有一些演示内容。我宁愿从头开始,所以我会重置数据库,并删除之前在 Stripe Connect 测试数据区中创建的 Stripe 账户。
$ rails db:reset
确保创建项目的用户拥有 Stripe 密钥
强制用户使用 Stripe 进行身份验证的一个好方法是,在用户注册并创建新项目时使用一些条件逻辑。我projects/new.html.erb稍微修改了视图,以便 Stripe 按钮能够完美地呈现。
<!-- app/projects/new.html.erb-->
<div class="max-w-lg m-auto">
 <% if current_user.can_receive_payments? %>
    <h1 class="mb-6 text-3xl font-bold">Create a Project</h1>
    <%= render 'form', project: @project %>
  <% else %>
  <div class="p-6 bg-white rounded-lg">
    <h1 class="text-3xl font-bold text-gray-900">Authorize Stripe</h1>
    <p class="mb-6 text-gray-900">Before you can configure a new project we need you to connect to Stripe</p>
    <%= stripe_connect_button %>
  </div>
  <% end %>
</div>
登录/注册修复
您可能会在访问注册或登录路径时注意到一个新的“使用 Stripe Connect 登录”链接。我们并不希望 Stripe Connect 出现这个链接,所以应该有一个条件来完成这项工作。Devise 有一个名为“_links.html.erb您可以修改”的部分。查找下面的代码块并添加unless provider == :stripe_connect逻辑。
<!- app/views/devise/_links.html.erb-->
<!-- .. more code here.. -->
<%- if devise_mapping.omniauthable? %>
  <%- resource_class.omniauth_providers.each do |provider| %>
    <%= link_to "Sign in with #{OmniAuth::Utils.camelize(provider)}", omniauth_authorize_path(resource_name, provider), class: "link link-grey block py-2" unless provider == :stripe_connect %>
  <% end -%>
<% end -%>
控制器逻辑
我们的前端运行正常,但我们仍然需要服务器端组件才能成功向 Stripe 提交费用。在POST请求中,我们将完善文件create中的方法subscriptions_controller.rb,以完成整个流程。
为了使用 Stripe Connect 的订阅,我们还需要根据每个给定项目的层级通过 Stripe 动态创建计划。
执行此操作需要一些后台逻辑,通过 Stripe API 动态生成每个层的计划。我会另找一个作业来执行此操作,以便我们以更高效的方式将它们排队。
$ rails g job create_perk_plans
这将创建一个新的作业文件。我在里面添加了以下逻辑:
class CreatePerkPlansJob < ApplicationJob
  queue_as :default

  def perform(project)
    key = project.user.access_code
    Stripe.api_key = key

    project.perks.each do |perk|
      Stripe::Plan.create({
        id: "#{perk.title.parameterize}-perk_#{perk.id}",
        amount: (perk.amount.to_r * 100).to_i,
        currency: 'usd',
        interval: 'month',
        product: { name: perk.title },
        nickname: perk.title.parameterize
      })
    end
  end
end
此作业设置 Stripe API 以使用创建项目的用户信息。创建新计划时,我们会在 each 循环中传入每个福利的信息。我们需要一个唯一的 ID,以便稍后在订阅设置期间检索该计划。
为了启动它,我们需要在项目控制器中调用该类。
# app/controllers/projects_controller.rb
class ProjectsController < ApplicationController
  ...
  def create
    @project = Project.new(project_params)
    @project.user_id = current_user.id

    respond_to do |format|
      if @project.save
        if @project.perks.any? && current_user.can_receive_payments?
          CreatePerkPlansJob.perform_now(@project) # you can also perform later if you like
        end
        ExpireProjectJob.set(wait_until: @project.expires_at).perform_later(@project)
        format.html { redirect_to @project, notice: 'Project was successfully created.' }
        format.json { render :show, status: :created, location: @project }
      else
        format.html { render :new }
        format.json { render json: @project.errors, status: :unprocessable_entity }
      end
    end
  end
  ...
end
我在控制器中添加了一个新的条件,用于确保项目拥有福利(应该有),并且当前用户可以实际收到付款。考虑到他们目前已经完成了这一步,应该已经可以接受付款了,但我想更加确定。
亲自测试一下
如果您在应用程序中验证了一个新的 Stripe 帐户,创建了一个具有一两个额外福利的新项目,然后前往您的 Stripe 仪表板,您应该会看到一个包含定价和其他信息的新产品。
订阅用户
每个用户都需要一个与其关联的客户 ID,以便 Stripe 引用。该 ID 将在收费时使用或添加。因此,我们需要在数据库的用户表中添加一列。我还将添加一个 subscribed 布尔属性,用于指示用户是否确实已订阅。
$ rails g migration add_subscription_fields_to_users stripe_id:string stripe_subscription_id:string subscribed:boolean current_plan:string card_last4:string card_exp_month:string card_exp_year:string card_type:string
$ rails db:migrate
现在我们可以动态地为用户添加计划,接下来就可以初始化订阅了。初始化操作将在 内部进行subscriptions_controller.rb。我们需要一些值,这些值将作为请求传递的参数。看起来我们仍然需要一个基于特定用户想要支持的福利的计划 ID。我们可以更新福利按钮参数以包含它。
<!-- app/views/projects/_active_project.html.erb-->
<!-- ... more code... -->
<h3 class="text-2xl text-gray-900">Back this idea</h3>

<% project.perks.each do |perk| %>
    <div class="p-4 mb-6 bg-gray-100 border rounded">
      <h4 class="text-lg font-bold text-center text-gray-900"><%= perk.title %></h4>
      <p class="pb-2 mb-2 text-sm italic text-center border-b"><%= perk.quantity %> left</p>
      <div class="py-2 text-gray-700">
        <%= simple_format perk.description %>
      </div>

      <% if user_signed_in? && perk.project.user_id == current_user.id %>
        <em class="block text-sm text-center">Sorry, You can't back your own idea</em>
      <% else %>
      <%= link_to "Back this idea for #{number_to_currency(perk.amount)} /mo", new_subscription_path(amount: perk.amount, project: project, plan: "#{perk.title.parameterize}-perk_#{perk.id}"), class: "btn btn-default btn-expanded" %>
      <% end %>
    </div>
  <% end %>
 <!-- ... more code... -->
link_to传递了一个新参数,其plan值perk.title.parameterize将与我们在创建新项目时为每个 Stripe 计划指定的昵称相匹配。记住,我们在后台运行该作业来动态执行这些任务。
订阅逻辑
我很想在这里使用支付功能,但文档中不太清楚它是否支持 Stripe Connect。为了安全起见,我们还是参考Stripe 文档吧。
class SubscriptionsController < ApplicationController
  before_action :authenticate_user!

  def new
    @project = Project.find(params[:project])
  end

  # Reference:
  # https://stripe.com/docs/connect/subscriptions
  def create
    @project = Project.find(params[:project])
    key = @project.user.access_code
    Stripe.api_key = key

    plan_id = params[:plan]
    plan = Stripe::Plan.retrieve(plan_id)
    token = params[:stripeToken]

    customer = if current_user.stripe_id?
                Stripe::Customer.retrieve(current_user.stripe_id)
              else
                Stripe::Customer.create(email: current_user.email, source: token)
              end

    subscription = Stripe::Subscription.create({
      customer: customer,
      items: [
        {
          plan: plan
        }
      ],
      expand: ["latest_invoice.payment_intent"],
      application_fee_percent: 10,
    }, stripe_acccount: key)

    options = {
      stripe_id: customer.id,
      subscribed: true,
    }

    options.merge!(
      card_last4: params[:user][:card_last4],
      card_exp_month: params[:user][:card_exp_month],
      card_exp_year: params[:user][:card_exp_year],
      card_type: params[:user][:card_brand]
    )

    current_user.update(options)

    redirect_to root_path, notice: "Your subscription was setup successfully!"
  end

  def destroy
  end
end
这是我目前为止的进展。我们需要一些来自不同地方的变量。
- 我们自己的内部 API 密钥是在应用程序范围内设置的,因此我们可以
Stripe毫无问题地访问该类。 - 我们还需要给定项目作者的 API 密钥。
- 其
plan值源自此时应该已经创建的福利标题和动态 Stripe 计划。我们需要添加一个隐藏字段,用于在POST请求参数时添加此值。 token表单提交时,前端会触发该事件。我们添加的 Stripe JavaScript 会处理该事件。
我们首先检查数据库中是否存在客户,如果存在,则使用其客户 ID 来创建订阅,而不是每次都创建一个全新的客户。如果不存在客户,则使用 Stripe API 动态创建一个。我们传递用户的邮箱地址和 token。
最后,订阅需要项目作者的客户 ID、计划类型和 Stripe 帐户密钥。我们的平台会从每个月的定期费用中抽取一定比例,在本例中为 10%。
我们将隐藏字段添加到表单中,以便我们可以在提交表单期间访问它们。
<!-- app/views/subscriptions/_form.html.erb-->
<%= form_with model: current_user, url: subscription_url, method: :post, html: { id: "payment-form", class: "stripe-form" }, data: { stripe_key: project.user.publishable_key } do |form| %>
  <div>
    <label for="card-element" class="label">
      Credit or debit card
    </label>

    <div id="card-element">
      <!-- A Stripe Element will be inserted here. -->
    </div>

    <!-- Used to display Element errors. -->
    <div id="card-errors" role="alert" class="text-sm text-red-400"></div>
  </div>

  <input type="hidden" name="plan" value="<%= params[:plan] %>">
  <input type="hidden" name="project" value="<%= params[:project] %>">

  <button>Back <%= number_to_currency(params[:amount]) %> /mo toward <em><%= project.title %></em></button>
<% end %>
试驾!
让我们看看是否能使事情顺利进行。
我的控制台输出了我想要的另一个用户
<User card_type: "Visa", id: 2, email: "jsmitty@gmail.com", username: "jsmitty", name: "John Smith", admin: false, created_at: "2020-01-30 20:46:18", updated_at: "2020-01-30 20:50:58", uid: nil, provider: nil, access_code: nil, publishable_key: nil, stripe_id: "cus_Ge21Ymdr4iI9q5", subscribed: true, current_plan: "perky-perk_1", card_last4: "4242", card_exp_month: "4", card_exp_year: "2024">
irb(main):006:0>
此用户仅为订阅者。他们尚未通过 Stripe Connect 进行身份验证,也未发布任何项目,因此值为 nil。
我们可以在 Stripe 中验证这笔费用。这个 Stripe 账户就是创建该项目的用户。

在一个新的隐私浏览窗口中,我打开了我的主 Connect 帐户,并前往该Collected Fees区域。我们设定了每月 10% 的费用,因此在这种情况下,我们的费用为 2 美元。
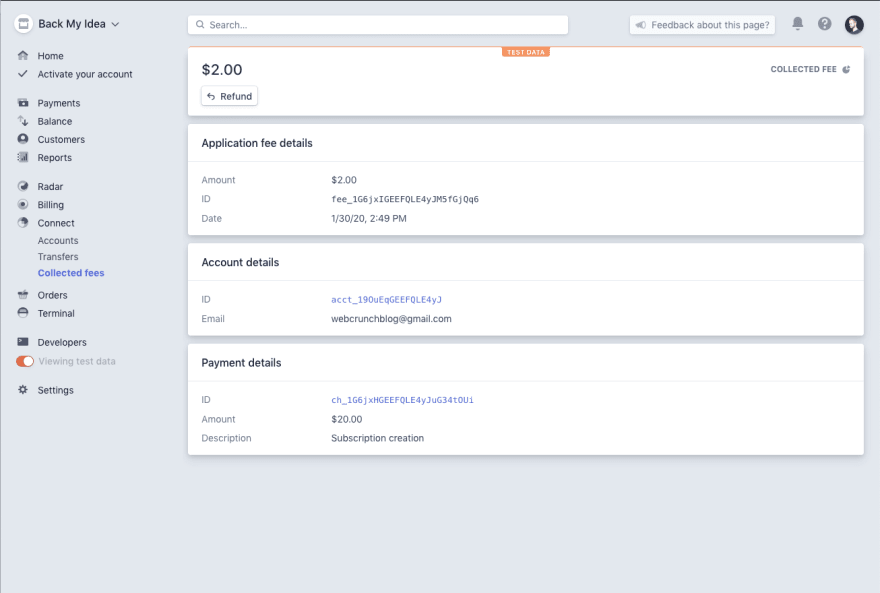
成功!
销毁订阅
赋予用户取消订阅的功能绝对是必要的。我们可以在账户区域执行此操作,并重用订阅控制器来实现该逻辑。我们本质上就是撤销之前在create方法上所做的操作。
class SubscriptionsController < ApplicationController
  ...
  def destroy
    subscription_to_remove = params[:id]
    customer = Stripe::Customer.retrieve(current_user.stripe_id)
    customer.subscriptions.retrieve(subscription_to_remove).delete
    current_user.subscribed = false

    redirect_to root_path, notice: "Your subscription has been canceled."
  end
end
由于我们现在可以访问 Stripe 的客户 ID,因此主要逻辑已经到位。我们可以检索他们的订阅,取消他们的计划,并将他们的记录更新为未订阅。
让我们在账户设置中渲染用户当前的订阅以及取消订阅的链接。请参阅代码片段底部的最新添加内容。
<!-- app/view/devise/registrations/edit.html.erb-->
<div class="container flex flex-wrap items-start justify-between mx-auto">
  <div class="w-full lg:w-1/2">
  <h2 class="pt-4 mb-8 text-4xl font-bold heading">Account</h2>

  <%= form_for(resource, as: resource_name, url: registration_path(resource_name), html: { method: :put }) do |f| %>

    <%= render "devise/shared/error_messages", resource: resource %>

    <div class="mb-6">
      <%= f.label :username, class:"label" %>
      <%= f.text_field :username, autofocus: true, class:"input" %>
    </div>

    <div class="mb-6">
      <%= f.label :name, class:"label" %>
      <%= f.text_field :name, class:"input" %>
    </div>

    <div class="mb-6">
      <%= f.label :email, class:"label" %>
      <%= f.email_field :email, autocomplete: "email", class:"input" %>
    </div>

    <div class="mb-6">
      <% if devise_mapping.confirmable? && resource.pending_reconfirmation? %>
        <div>Currently waiting confirmation for: <%= resource.unconfirmed_email %></div>
      <% end %>
    </div>

    <div class="mb-6">
      <%= f.label :password, class:"label" %>
      <%= f.password_field :password, autocomplete: "new-password", class:"input" %>
      <p class="pt-1 text-sm italic text-grey-dark"> <% if @minimum_password_length %>
        <%= @minimum_password_length %> characters minimum <% end %> (leave blank if you don't want to change it) </p>

    </div>

    <div class="mb-6">
      <%= f.label :password_confirmation, class: "label" %>
      <%= f.password_field :password_confirmation, autocomplete: "new-password", class: "input" %>
    </div>

    <div class="mb-6">
      <%= f.label :current_password, class: "label" %>
      <%= f.password_field :current_password, autocomplete: "current-password", class: "input" %>
      <p class="pt-2 text-sm italic text-grey-dark">(we need your current password to confirm your changes)</p>
    </div>

    <div class="mb-6">
      <%= f.submit "Update", class: "btn btn-default" %>
    </div>
    <% end %>

    <hr class="mt-6 mb-3 border" />

    <h3 class="mb-4 text-xl font-bold heading">Cancel my account</h3>

    <div class="flex items-center justify-between">
      <div class="flex-1"><p class="py-4">Unhappy?</p></div>

      <%= button_to "Cancel my account", registration_path(resource_name), data: { confirm: "Are you sure?" }, method: :delete, class: "btn btn-default" %>
    </div>
  </div>
<div class="w-full text-left lg:pl-16 lg:w-1/2">
  <div class="p-6 mt-10 text-gray-900 bg-white rounded shadow-lg">
    <% unless resource.can_receive_payments? %>
      <h4 class="mb-6 text-xl font-semibold leading-none text-gray-900">You wont be able to sell items until you register with Stripe!</h4>
      <%= stripe_connect_button %>
    <% else %>
      <h4 class="mb-6 text-xl font-semibold leading-none text-gray-900">Successfully connected to Stripe ✅</h4>
    <% end %>
  </div>

  <% if resource.subscribed? %>
   <% customer = Stripe::Customer.retrieve(current_user.stripe_id) %>
    <% if customer.subscriptions.any? %>
    <div class="p-6 mt-10 text-gray-900 bg-white rounded shadow-lg">
      <h4 class="font-bold text-gray-900">Active subscriptions</h4>
      <ul>
        <% customer.subscriptions.list.data.each do |sub| %>
        <li class="flex items-center justify-between py-4 border-b">
          <div><%= sub.plan.nickname %></div>
          <%= link_to "Cancel Subscription", subscription_path(id: sub.id), method: :delete, data: { confirm: "Are you sure?" } %>
        </li>
        <% end %>
      </ul>
    </div>
    <% end %>
   <% end %>
</div>
是的,这段代码很糟糕。我们在视图中写了太多逻辑,但这只是为了演示功能。我强烈建议将其中一些逻辑移到控制器中。我们本质上是根据用户的 查询 Stripe API 来获取当前用户的订阅列表stripe_id。这样,我们就可以链接到新的destroy操作,并将订阅 ID 作为参数传递给控制器,以完成订阅取消请求。
项目清理
随着新订阅者支持新想法,我们需要对项目进行一些分析。目前,我们的支持数量完全是静态的。我们需要添加一个字段,并为每个新订阅者动态显示该字段。
$ rails g migration add_backings_count_to_projects backings_count:integer
我们将默认值设置为 0
class AddBackingsCountToProjects < ActiveRecord::Migration[6.0]
  def change
    add_column :projects, :backings_count, :integer, default: 0
  end
end
$ rails db:migrate
在订阅控制器内部,一旦出现新的订阅,我们可以很快地更新计数。
# app/controllers/subscriptions_controller.rb
...

# Update project attributes
project_updates = {
  backings_count: @project.backings_count.next,
  current_donation_amount: @project.current_donation_amount + (plan.amount/100).to_i,
}
@project.update(project_updates)
redirect_to root_path, notice: "Your subscription was setup successfully!"
....
这样我们就有 1 名支持者,并将每月金额添加到每月支持目标中。
_active_project.html.erb我们可以更新和中的视图inactive_project.html.erb。
<!-- app/views/
<!-- more code -->
<div class="w-full mb-4 lg:w-1/5 lg:mb-0">
  <p class="m-0 text-xl font-semibold leading-none"><%= project.backings_count %></p>
  <p class="text-sm text-gray-500">backers</p>
</div>
<!-- more code -->
防止用户重复订阅
目前我们还没有很好的方法来判断用户是否订阅了特定的福利。可能有更好的方法来追踪这个问题,但我暂时会使用一个简单的数组。使用 Postgresql 会更容易,所以我实际上打算放弃目前的数据,转而使用 Postgresql(无论如何,你最终都需要在某个时候部署它)。
$ rails db:system:change --to=postgresql
如果您收到有关覆盖文件的警告database.yml,只需键入Y即可继续。这会将pgGem 添加到您的文件中Gemfile并更新您的config/database.yml文件。此操作会清除您的所有数据,因此我们需要创建更多数据。在此之前,我想在用户表中添加一个字段,用于存储一个数组,其中包含用户订阅的计划。
$ rails g migration add_perk_subscriptions_to_users perk_subscriptions:text
然后我们将修改该文件:
class AddPerkSubscriptionsToUsers < ActiveRecord::Migration[6.0]
  def change
    add_column :users, :perk_subscriptions, :text, array:true, default: []
  end
end
$ rails db:create
$ rails db:migrate
订阅 perk_subscriptions 逻辑
perk_subscriptions一旦用户购买了计划,我们就需要将其添加到数组中。这可以在订阅控制器中进行。
class SubscriptionsController < ApplicationController
  ...
  options = {
      stripe_id: customer.id,
      subscribed: true,
    }

    options.merge!(
      card_last4: params[:user][:card_last4],
      card_exp_month: params[:user][:card_exp_month],
      card_exp_year: params[:user][:card_exp_year],
      card_type: params[:user][:card_brand]
    )

    current_user.perk_subscriptions << plan_id # add this line
    current_user.update(options)
  ...

end
我们将标识符添加到数组中。我的日志通过 Rails 控制台返回如下结果,确认一切正常!
irb(main):001:0> User.last
  User Load (0.4ms) SELECT "users".* FROM "users" ORDER BY "users"."id" DESC LIMIT $1 [["LIMIT", 1]]
=> #<User id: 2, email: "jsmitty@gmail.com", username: "jsmitty", name: "John Smith", admin: false, created_at: "2020-01-31 19:35:13", updated_at: "2020-01-31 19:41:28", uid: nil, provider: nil, access_code: nil, publishable_key: nil, stripe_id: "cus_GeO35Z7cUaFle0", subscribed: true, card_last4: "4242", card_exp_month: "4", card_exp_year: "2024", card_type: "Visa", perk_subscriptions: ["totes-cool-perk-perk_1"]>
请注意,该perk_subscriptions列现在包含数组内的条目!
为什么我们需要这个?因为我们不希望同一个用户两次订阅同一项福利,除非他们先取消订阅。我们可以添加一个辅助函数来查询福利标识符。如果在数组中找到,我们就不会显示订阅按钮。
<!-- app/views/projects/_active_project.html.erb-->
<!-- a bunch more code-->

<% project.perks.each do |perk| %>
  <div class="p-4 mb-6 bg-gray-100 border rounded">
    <h4 class="text-lg font-bold text-center text-gray-900"><%= perk.title %></h4>
    <p class="pb-2 mb-2 text-sm italic text-center border-b"><%= perk.quantity %> left</p>
    <div class="py-2 text-gray-700">
      <%= simple_format perk.description %>
    </div>

    <% if user_signed_in? && perk.project.user_id == current_user.id %>
      <em class="block text-sm text-center">Sorry, You can't back your own idea</em>
    <% else %>
     <% if purchased_perk(perk) %>
        <p class="text-sm">You're already subscribed to this perk. <%= link_to "Manage your subscriptions in your account settings", edit_user_registration_path, class: "text-blue-500 underline" %>.</p>
      <% else %>
       <%= link_to "Back this idea for #{number_to_currency(perk.amount)} /mo", new_subscription_path(amount: perk.amount, project: project, plan: "#{perk.title.parameterize}-perk_#{perk.id}"), class: "btn btn-default btn-expanded" %>
      <% end %>
    <% end %>
  </div>
<% end %>

<!-- a bunch more code-->
我把逻辑提取到了一个名为的辅助程序中purchased_perk(perk)。它被提取到了我们的projects_helper.rb文件中。
module ProjectsHelper
  def purchased_perk(perk)
    user_signed_in? && current_user.perk_subscriptions.include?("#{perk.title.parameterize}-perk_#{perk.id}")
  end
end
这就是我最终的结果。我们将相同的标识符传递给include?方法,这对于查找数组值来说简直是 Ruby 的福音。
如果订阅被取消怎么办?
我们需要在文件destroy内部的方法中执行相反的操作subscriptions_controller.rb。现在就来解决这个问题。
def destroy
    subscription_to_remove = params[:id]
    plan_to_remove = params[:plan_id] # add this line
    customer = Stripe::Customer.retrieve(current_user.stripe_id)
    customer.subscriptions.retrieve(subscription_to_remove).delete
    current_user.subscribed = false
    current_user.perk_subscriptions.delete(plan_to_remove) # add this line
    current_user.save
    redirect_to root_path, notice: "Your subscription has been cancelled."
  end
我们需要访问计划 ID,因此需要更新编辑帐户视图。这是一个非常简单的更改:
<!-- app/views/devise/registrations/edit.html.erb-->
<!-- more code -->
<% if resource.subscribed? %>
   <% customer = Stripe::Customer.retrieve(current_user.stripe_id) %>
    <% if customer.subscriptions.any? %>
    <div class="p-6 mt-10 text-gray-900 bg-white rounded shadow-lg">
      <h4 class="font-bold text-gray-900">Active subscriptions</h4>
      <ul>
        <% customer.subscriptions.list.data.each do |sub| %>
        <li class="flex items-center justify-between py-4 border-b">
          <div><%= sub.plan.nickname %></div>
          <%= link_to "Cancel Subscription", subscription_path(id: sub.id, plan_id: sub.plan.id), method: :delete, data: { confirm: "Are you sure?" } %>
        </li>
        <% end %>
      </ul>
    </div>
    <% end %>
   <% end %>
<!-- more code -->
注意,我们现在plan_id通过“取消订阅”链接传递了参数。该参数会传递给控制器,然后再传递给 Stripe。太棒了!
现在,当您以客户身份订阅一项福利时,一旦计划生效,您应该会看到一条通知,而不是订阅按钮。如果您取消订阅,该按钮将恢复。
总结和展望
这款应用还有很多需要改进的地方,但我希望它能让你更全面地了解如何使用 Stripe 构建电商平台解决方案。Stripe Connect 功能强大,而且集成起来也相当容易。你需要一个电商平台的两端,中间是你自己平台。从这方面来看,可能性是无穷无尽的。
此应用程序执行以下操作:
- 为创意提供支持的平台
- 任何用户都可以连接他们的 Stripe 帐户并开始新项目
- 任何用户都可以支持项目
- 经过身份验证的用户可以对项目发表评论
- 由于后台作业,项目在 30 天期限后自动过期
- 一旦新项目完成,就会动态地将福利添加到项目中,并且会动态地添加新的 Stripe 订阅计划。
我们可以改进什么?
- 测试,测试,测试!(我没时间了,所以没把精力放在测试上)
- 拥有明确的订阅模型,用于跟踪应用内的客户和订阅。
- 当用户的 Stripe 商家帐户需要更多信息或有需要更新的内容时,连接到 Stripe 的 webhook 以获取实时更新。
- 围绕变更/订阅/条纹事件添加交易电子邮件。
- 更动态的支持状态。您可能会注意到,一旦客户取消订阅,我们的指标就不会恢复。这虽然不是什么大问题,但或许应该得到解决。
- 用户界面很差劲,但功能正常
文章《让我们一起构建:使用 Ruby on Rails – 使用 Stripe Connect 的 Marketplace 应用》首先出现在Web-Crunch上。
链接链接 https://dev.to/justalever/let-s-build-with-ruby-on-rails-marketplace-app-with-stripe-connect-3iml