如何使用 Context 编写高性能 React 应用程序
最初发表于https://www.developerway.com。该网站还有更多类似的文章 😉
如果没有一两篇关于 Context 的文章,就不可能讨论如何编写高性能的 React 代码。而且这是一个极具争议的话题!围绕着它,有太多的偏见和谣言。Context 简直是魔鬼!当你使用 Context 时,React 会无缘无故地重新渲染所有内容!有时我感觉开发者们把 Context 当作一个神奇的小精灵,它会为了自娱自乐而随意地重新渲染整个应用程序。
在本文中,我无意说服任何人放弃我们挚爱的状态管理库,转而使用 Context。它们的存在是有原因的。本文的主要目标是揭开 Context 的神秘面纱,并提供一些有趣的编码模式,这些模式可以帮助最大限度地减少与 Context 相关的重新渲染,并提升 React 应用的性能。此外,这样做的额外好处是,代码看起来会更简洁易懂。
让我们从实现一些真实的应用程序开始调查,看看这将带给我们什么。
让我们在 React 中实现一个表单
我们的表格将会非常复杂,首先它由以下内容组成:
- “个人信息”部分,人们可以在其中设置一些个人信息,例如姓名,电子邮件等
- “价值计算”部分,人们可以设置他们的货币偏好、他们喜欢的折扣、添加一些优惠券等
- 所选折扣应以表情符号的形式在“个人”部分突出显示(别问,设计师的幽默感很奇怪)
- 带有操作按钮的“操作”部分(例如“保存”、“重置”等)
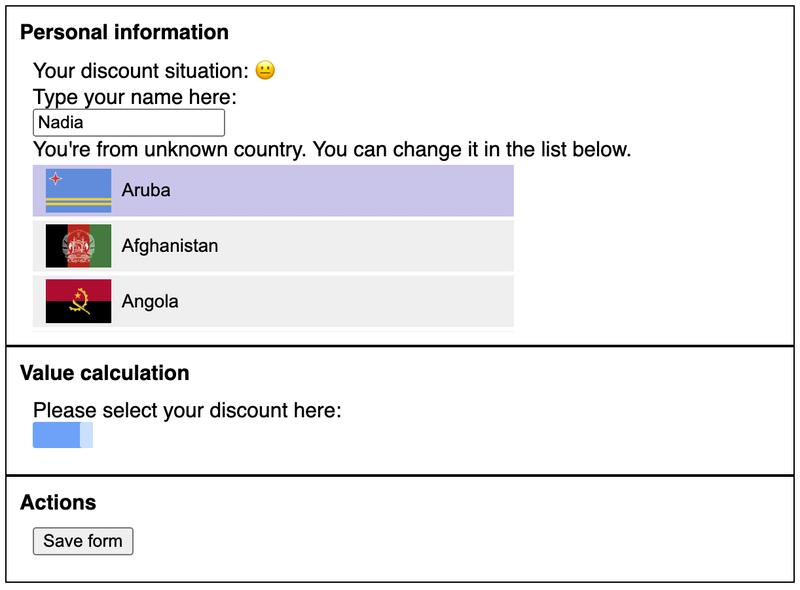
“设计”如下:
为了让事情更有趣,我们还将把“选择国家/地区”和“拖动栏”组件假设为我们以包形式安装的“外部”库。这样我们只能通过 API 使用它们,而无法影响它们内部的功能。此外,我们将使用之前性能调查中实现的“慢速”版本国家/地区选择组件。
现在该写点代码了。我们先从应用的组件结构开始。我知道这个表单很快就会变得相当复杂,所以我想立即把它拆分成更小、更简洁的组件。
在根目录下我将有我的主要Form组件,它将呈现三个必需的部分:
const Form = () => {
  return (
    <>
      <PersonalInfoSection />
      <ValueCalculationsSection />
      <ActionsSection />
    </>
  );
};
“个人信息”部分将呈现另外三个部分:折扣表情符号、姓名输入和国家选择
const PersonalInfoSection = () => {
  return (
    <Section title="Personal information">
      <DiscountSituation />
      <NameFormComponent />
      <SelectCountryFormComponent />
    </Section>
  );
};
这三个都将包含这些组件的实际逻辑(它们的代码将在下面),并且Section仅封装一些样式。
“价值计算”部分目前只有一个组件,即折扣栏:
const ValueCalculationSection = () => {
  return (
    <Section title="Value calculation">
      <DiscountFormComponent />
    </Section>
  );
};
并且“操作”部分现在也只有一个按钮:带有 onSave 回调的保存按钮。
const ActionsSection = ({ onSave }: { onSave: () => void }) => {
  return (
    <Section title="Actions">
      <button onClick={onClick}>Save form</button>
    </Section>
  );
};
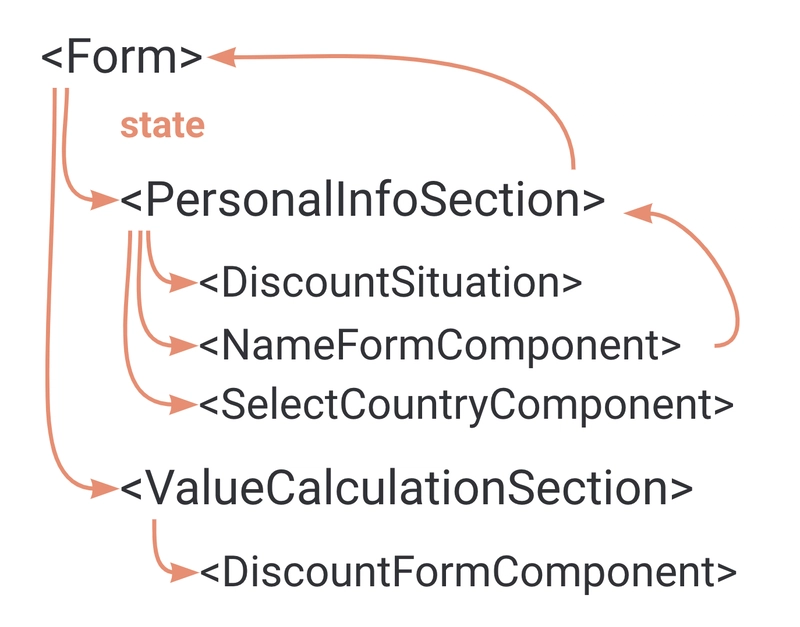
现在到了最有趣的部分:我们需要让这个表单具有交互性。考虑到整个表单只有一个“保存”按钮,而不同的部分又需要其他部分的数据,状态管理自然应该放在组件的根目录下Form。我们将在那里存储三部分数据:名称、国家/地区和折扣,并设置这三项数据的方法,以及“保存”这些数据的方法:
type State = {
  name: string;
  country: Country;
  discount: number;
};

const Form = () => {
  const [state, setState] = useState<State>(defaultState as State);

  const onSave = () => {
    // send the request to the backend here
  };

  const onDiscountChange = (discount: number) => {
    setState({ ...state, discount });
  };

  const onNameChange = (name: string) => {
    setState({ ...state, name });
  };

  const onCountryChange = (country: Country) => {
    setState({ ...state, country });
  };

  // the rest as before
};
现在我们需要将相关数据和回调传递给需要它的组件。在我们的PersonalInfoSection:
- 该
DiscountSituation组件应该能够根据discount值显示表情符号。 - 应该
NameFormComponent能够控制name价值 - 应该
SelectCountryFormComponent能够设置选定的country
考虑到这些组件不是Form直接渲染的,而是的子组件PersonalInfoSection,所以是时候进行一些 prop 钻研了😊
DiscountSituation将接受discount作为道具:
export const DiscountSituation = ({ discount }: { discount: number }) => {
  // some code to calculate the situation based on discount
  const discountSituation = ...;
  return <div>Your discount situation: {discountSituation}</div>;
};
NameFormComponent将接受name并onChange回调:
export const NameFormComponent = ({ onChange, name }: { onChange: (val: string) => void; name: string }) => {
  return (
    <div>
      Type your name here: <br />
      <input onChange={() => onChange(e.target.value)} value={name} />
    </div>
  );
};
SelectCountryFormComponent将接受onChange回调:
export const SelectCountryFormComponent = ({ onChange }: { onChange: (country: Country) => void }) => {
  return <SelectCountry onChange={onChange} />;
};
我们PersonalInfoSection必须将它们全部从其父Form组件传递给其子组件:
export const PersonalInfoSection = ({
  onNameChange,
  onCountryChange,
  discount,
  name,
}: {
  onNameChange: (name: string) => void;
  onCountryChange: (name: Country) => void;
  discount: number;
  name: string;
}) => {
  return (
    <Section title="Personal information">
      <DiscountSituation discount={discount} />
      <NameFormComponent onChange={onNameChange} name={name} />
      <SelectCountryFormComponent onChange={onCountryChange} />
    </Section>
  );
};
同样的情况ValueCalculationSection:它需要将值从组件传递onDiscountChange给discount其Form子组件:
export const ValueCalculationsSection = ({ onDiscountChange }: { onDiscountChange: (val: number) => void }) => {
  console.info('ValueCalculationsSection render');
  return (
    <Section title="Value calculation">
      <DiscountFormComponent onDiscountChange={onDiscountChange} />
    </Section>
  );
};
并且DiscountFormComponent只使用“外部”库DraggingBar来渲染栏并通过它提供的回调捕获更改:
export const DiscountFormComponent = ({ onDiscountChange }: { onDiscountChange: (value: number) => void }) => {
  console.info('DiscountFormComponent render');
  return (
    <div>
      Please select your discount here: <br />
      <DraggingBar onChange={(value: number) => onDiscountChange(value)} />
    </div>
  );
};
我们的组件渲染Form看起来是这样的:
const Form = () => {
  return (
    <div>
      <PersonalInfoSection onNameChange={onNameChange} onCountryChange={onCountryChange} discount={state.discount} name={state.name} />
      <ValueCalculationsSection onDiscountChange={onDiscountChange} />
      <ActionsSection onSave={onSave} />
    </div>
  );
};
代码有点多,但终于完成了😅 想看看结果吗?请参阅 codesandbox。
不幸的是,结果比你想象的要糟糕得多,毕竟它只包含几个组件和一个简单的状态 😕 试着在输入框里输入你的名字,或者拖动蓝色条——即使在速度很快的笔记本电脑上,它们都会卡顿。CPU 节流后,它们基本上无法使用。那么,发生了什么呢?
形式表现调查
首先,我们来看一下控制台的输出。如果我在Name输入框中输入一个键,就会看到:
Form render
PersonalInfoSection render
Section render
Discount situation render
NameFormComponent render
SelectCountryFormComponent render
ValueCalculationsSection render
Section render
DiscountFormComponent render
ActionsSection render
Section render
每次按键时,表单中的每个组件都会重新渲染!拖动也是如此——每次鼠标移动,整个表单及其所有组件都会重新渲染。我们已经知道,我们的程序SelectCountryFormComponent非常慢,而且我们无法改善其性能。所以我们唯一能做的就是确保它不会在每次按键或鼠标移动时重新渲染。
并且,正如我们所知,组件将在以下情况下重新渲染:
- 组件状态改变
- 父组件重新渲染
这正是这里发生的事情:当输入中的值发生变化时,我们Form通过回调链将该值传播到根组件,在那里我们改变根状态,从而触发Form组件的重新渲染,然后级联到该组件的每个子组件和子组件的子组件(即所有子组件)。
当然,为了解决这个问题,我们可以在关键位置添加一些useMemo和 ,useCallback然后就完事了。但这只是把问题掩盖起来,而不是真正解决问题。将来当我们引入另一个运行缓慢的组件时,这种情况还会重演。更不用说它会让代码变得更加复杂,更难维护。理想情况下,当我在组件中输入内容时Name,我希望只有NameFormComponent实际使用该name值的 和 组件重新渲染,其余的组件应该闲置在那里,等待轮到它们进行交互。
而 React 实际上为我们提供了一个完美的工具来实现这一点 - Context!
向表单添加上下文
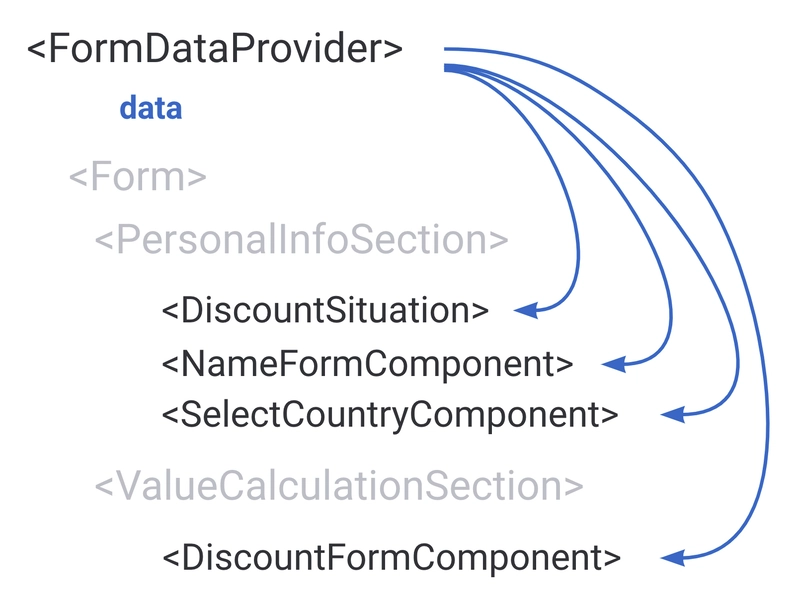
根据React 文档, context 提供了一种在组件树中传递数据的方法,而无需在每一层手动向下传递 props。例如,如果我们将 Form 状态提取到 Context 中,我们就可以摆脱所有通过中间部分传递的 props,例如 ,并直接在和 中PersonalInfoSection使用 state 。那么数据流将如下所示:NameFormComponentDiscountFormComponent
为了实现这一点,首先我们要创建它Context本身,它将具有我们的状态和用于管理此状态的 API(即我们的回调):
type State = {
  name: string;
  country: Country;
  discount: number;
};

type Context = {
  state: State;
  onNameChange: (name: string) => void;
  onCountryChange: (name: Country) => void;
  onDiscountChange: (price: number) => void;
  onSave: () => void;
};

const FormContext = createContext<Context>({} as Context);
然后,我们应该将 中的所有状态逻辑移到组件Form中FormDataProvider,并将状态和回调附加到新创建的Context:
export const FormDataProvider = ({ children }: { children: ReactNode }) => {
  const [state, setState] = useState<State>({} as State);

  const value = useMemo(() => {
    const onSave = () => {
      // send the request to the backend here
    };

    const onDiscountChange = (discount: number) => {
      setState({ ...state, discount });
    };

    const onNameChange = (name: string) => {
      setState({ ...state, name });
    };

    const onCountryChange = (country: Country) => {
      setState({ ...state, country });
    };

    return {
      state,
      onSave,
      onDiscountChange,
      onNameChange,
      onCountryChange,
    };
  }, [state]);

  return <FormContext.Provider value={value}>{children}</FormContext.Provider>;
};
然后暴露钩子,让其他组件可以使用这个 Context,而无需直接访问它:
export const useFormState = () => useContext(FormContext);
并将我们的Form组件包装到FormDataProvider:
export default function App() {
  return (
    <FormDataProvider>
      <Form />
    </FormDataProvider>
  );
}
之后,我们可以摆脱整个应用程序中的所有道具,并通过钩子直接在需要的组件中使用所需的数据和回调useFormState。
例如,我们的根Form组件将变成这样:
const Form = () => {
  // no more props anywhere!
  return (
    <div className="App">
      <PersonalInfoSection />
      <ValueCalculationsSection />
      <ActionsSection />
    </div>
  );
};
并且NameFormComponent可以像这样访问所有数据:
export const NameFormComponent = () => {
  // accessing the data directly right where it's needed!
  const { onNameChange, state } = useFormState();

  const onValueChange = (e: ChangeEvent<HTMLInputElement>) => {
    onNameChange(e.target.value);
  };

  return (
    <div>
      Type your name here: <br />
      <input onChange={onValueChange} value={state.name} />
    </div>
  );
};
完整代码请见codesandbox。别忘了欣赏一下现在的整洁程度,再也没有杂乱的道具了!
新形态的表现又如何呢?
从性能角度来看,我们还没有达到这个水平:输入名称并拖动进度条仍然很卡。但是,如果我开始输入NameFormComponent,控制台中就会显示以下内容:
Discount situation render
NameFormComponent render
SelectCountryFormComponent render
DiscountFormComponent render
ActionsSection render
Section render
现在有一半的组件(包括我们的父组件)不会重新渲染Form。这是由 Context 的工作机制决定的:当 Context 的值发生变化时,所有使用该上下文的组件都会重新渲染,无论它们是否使用了变化的值。而且,那些被 Context 忽略的组件根本不会重新渲染。我们的重新渲染流程现在如下所示:
现在,如果我们仔细观察组件的实现,特别是SelectCountryComponent,它是对缓慢的“外部”组件的包装,我们会发现它实际上并没有使用state本身。它所需要的只是一个onCountryChange回调:
export const SelectCountryFormComponent = () => {
  const { onCountryChange } = useFormState();
  console.info('SelectCountryFormComponent render');

  return <SelectCountry onChange={onCountryChange} />;
};
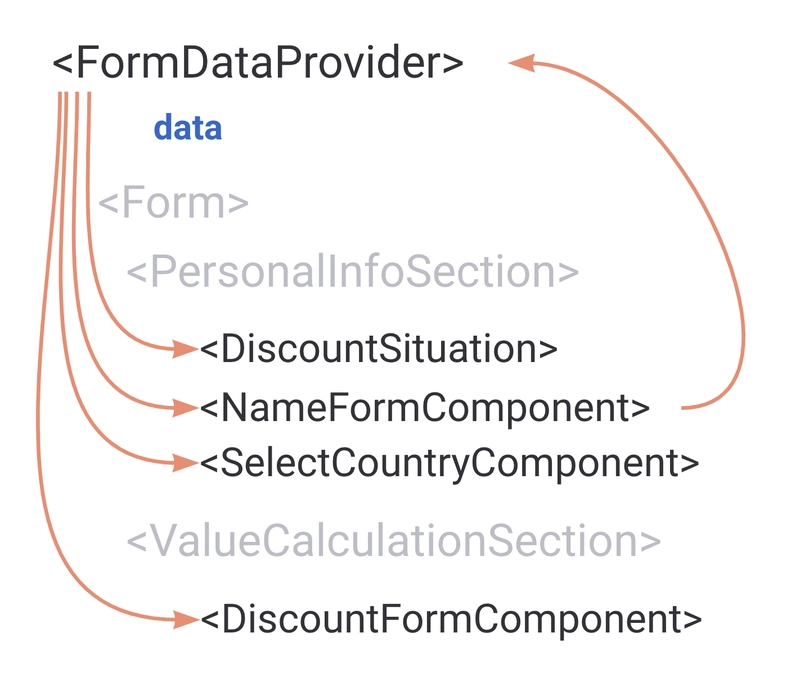
这给了我们一个机会来尝试一个非常酷的技巧:我们可以将state部分和API部分在我们之下分割FormDataProvider。
分离状态和 API
基本上,我们想要做的是将我们的“整体”状态分解为两个“微状态”😅。
我们不需要一个包含所有内容的上下文,而是需要两个上下文,一个用于数据,一个用于 API:
type State = {
  name: string;
  country: Country;
  discount: number;
};

type API = {
  onNameChange: (name: string) => void;
  onCountryChange: (name: Country) => void;
  onDiscountChange: (price: number) => void;
  onSave: () => void;
};

const FormDataContext = createContext<State>({} as State);
const FormAPIContext = createContext<API>({} as API);
我们的组件中不再只有一个上下文提供程序FormDataProvider,而是有两个,我们将状态直接传递给FormDataContext.Provider:
const FormDataProvider = () => {
  // state logic

  return (
    <FormAPIContext.Provider value={api}>
      <FormDataContext.Provider value={state}>{children}</FormDataContext.Provider>
    </FormAPIContext.Provider>
  );
};
现在是最有趣的部分,api价值。
如果我们只是保持原样,那么整个“分解”的想法就不会起作用,因为我们仍然必须依赖于钩子state中的依赖项useMemo:
const api = useMemo(() => {
  const onDiscountChange = (discount: number) => {
    // this is why we still need state here - in order to update it
    setState({ ...state, discount });
  };

  // all other callbacks

  return { onSave, onDiscountChange, onNameChange, onCountryChange };
  // still have state as a dependency
}, [state]);
这将导致api每次状态更新时值都会发生变化,从而导致FormAPIContext每次状态更新时都会触发重新渲染,从而使我们的拆分变得毫无意义。我们希望api无论 是什么, 的值都保持不变state,这样该提供程序的消费者就不会重新渲染。
幸运的是,我们可以在这里应用另一个巧妙的技巧:我们可以将状态提取到减速器中,而不是调用setState回调,而只需触发减速器动作。
首先,创建动作和减速器本身:
type Actions =
  | { type: 'updateName'; name: string }
  | { type: 'updateCountry'; country: Country }
  | { type: 'updateDiscount'; discount: number };

const reducer = (state: State, action: Actions): State => {
  switch (action.type) {
    case 'updateName':
      return { ...state, name: action.name };
    case 'updateDiscount':
      return { ...state, discount: action.discount };
    case 'updateCountry':
      return { ...state, country: action.country };
  }
};
使用 reducer 代替useState:
export const FormProvider = ({ children }: { children: ReactNode }) => {
  const [state, dispatch] = useReducer(reducer, {} as State);
  // ...
};
并将我们的迁移api到dispatch而不是setState:
const api = useMemo(() => {
  const onSave = () => {
    // send the request to the backend here
  };

  const onDiscountChange = (discount: number) => {
    dispatch({ type: 'updateDiscount', discount });
  };

  const onNameChange = (name: string) => {
    dispatch({ type: 'updateName', name });
  };

  const onCountryChange = (country: Country) => {
    dispatch({ type: 'updateCountry', country });
  };

  return { onSave, onDiscountChange, onNameChange, onCountryChange };
  // no more dependency on state! The api value will stay the same
}, []);
最后一步:不要忘记迁移所有曾经使用 和 的组件useFormState。useFormData例如useFormAPI,我们的将从钩子中SelectCountryFormComponent使用,并且永远不会在状态改变时重新渲染。onCountryChangeuseFormAPI
export const SelectCountryFormComponent = () => {
  const { onCountryChange } = useFormAPI();

  return <SelectCountry onChange={onCountryChange} />;
};
看看这个 codesandbox 中的完整实现。现在输入和拖动条的速度非常快,我们在输入时唯一能看到的控制台输出是这样的:
Discount situation render
NameFormComponent render
只有两个组件,因为只有这两个组件使用实际的状态数据。🎉
国家进一步分裂
现在,那些设计眼光敏锐或只是细心阅读的人可能会注意到我稍微作弊了。我们没有将选定的国家/地区传递给我们的“外部”SelectCountry组件,它卡在了列表的第一项上。实际上,选定的“淡紫色”颜色应该移动到您点击的国家/地区。而且该组件实际上允许我们通过 传递它activeCountry。从技术上讲,我可以做到这么简单:
export const SelectCountryFormComponent = () => {
  const { onCountryChange } = useFormAPI();
  const { country } = useFormData();

  return <SelectCountry onChange={onCountryChange} activeCountry={country} />;
};
但是有一个问题——只要我useFormData在组件中使用 hook,它就会随着状态变化而重新渲染,就像 一样NameFormComponent。在我们的例子中,这意味着我们将回到打字和拖动时的卡顿体验。
但现在,既然我们已经知道如何在不同提供商之间拆分数据,那就没有什么能阻止我们更上一层楼,将剩余的状态也拆分出来。更多提供商!😅
我们现在不再只有一个统一的上下文,而是State有三个:
const FormNameContext = createContext<State['name']>({} as State['name']);
const FormCountryContext = createContext<State['country']>({} as State['country']);
const FormDiscountContext = createContext<State['discount']>({} as State['discount']);
三个州的供应商:
<FormAPIContext.Provider value={api}>
  <FormNameContext.Provider value={state.name}>
    <FormCountryContext.Provider value={state.country}>
      <FormDiscountContext.Provider value={state.discount}>{children}</FormDiscountContext.Provider>
    </FormCountryContext.Provider>
  </FormNameContext.Provider>
</FormAPIContext.Provider>
并有三个钩子来使用状态:
export const useFormName = () => useContext(FormNameContext);
export const useFormCountry = () => useContext(FormCountryContext);
export const useFormDiscount = () => useContext(FormDiscountContext);
现在我们SelectCountryFormComponent可以使用useFormCountry钩子,它不会在国家本身以外的任何变化上重新渲染:
export const SelectCountryFormComponent = () => {
  const { onCountryChange } = useFormAPI();
  const country = useFormCountry();

  return <SelectCountry onChange={onCountryChange} activeCountry={country} />;
};
在 codesandbox 中查看一下:速度依然很快,而且国家/地区可选。当我们在 name 输入框中输入内容时,控制台输出中唯一能看到的内容是:
NameFormComponent render
奖励:外部状态管理
现在,有些人可能会想到,这个表单的状态是否应该立即用某个状态管理库来实现。也许你是对的。毕竟,如果我们仔细看看代码,就会发现我们只是重新发明了轮子,实现了一个简陋的状态管理库,它包含类似选择器的功能来控制状态,并提供了单独的操作来更改状态。
但现在你有了选择。Context 不再神秘,有了这些技术,如果有需要,你可以轻松地仅使用纯 Context 编写高性能应用程序;如果你想过渡到其他框架,只需对代码进行少量修改即可。当你在设计应用程序时考虑到 Context 时,状态管理框架实际上并不重要。
我们不妨现在就把它移到老旧的 Redux 上。我们唯一需要做的就是:摆脱 Context 和 Providers,将 React Reducer 转换为 Redux Store,并将我们的 hooks 转换为使用 Redux 的选择器和调度器。
const store = createStore((state = {}, action) => {
  switch (action.type) {
    case 'updateName':
      return { ...state, name: action.payload };
    case 'updateCountry':
      return { ...state, country: action.payload };
    case 'updateDiscount':
      return { ...state, discount: action.payload };
    default:
      return state;
  }
});

export const FormDataProvider = ({ children }: { children: ReactNode }) => {
  return <Provider store={store}>{children}</Provider>;
};

export const useFormDiscount = () => useSelector((state) => state.discount);
export const useFormCountry = () => useSelector((state) => state.country);
export const useFormName = () => useSelector((state) => state.name);

export const useFormAPI = () => {
  const dispatch = useDispatch();

  return {
    onCountryChange: (value) => {
      dispatch({ type: 'updateCountry', payload: value });
    },
    onDiscountChange: (value) => dispatch({ type: 'updateDiscount', payload: value }),
    onNameChange: (value) => dispatch({ type: 'updateName', payload: value }),
    onSave: () => {},
  };
};
其余一切保持不变,并完全按照我们的设计运行。请参阅 codesandbox。
这就是今天的全部内容,希望现在Context不是你应用程序中神秘自发重新渲染的根源,而是你编写高性能 React 代码库中的一个可靠工具✌🏼
...
最初发表于https://www.developerway.com。该网站还有更多类似的文章 😉
订阅时事通讯、在 LinkedIn 上联系或在 Twitter 上关注,以便在下一篇文章发布时立即收到通知。
文章来源:https://dev.to/adevnadia/how-to-write-performant-react-apps-with-context-24cp 后端开发教程 - Java、Spring Boot 实战 - msg200.com


