基于 ReactJS 设计,从头构建 UI
这是本Building a UI from scratch系列的第一篇文章:
- 第 1 部分:基于 ReactJS 的设计从头开始构建 UI。
- 第 2 部分:从头开始构建 UI、响应式侧边栏和标题。
- 第 3 部分:从头开始构建 UI、响应式内容。
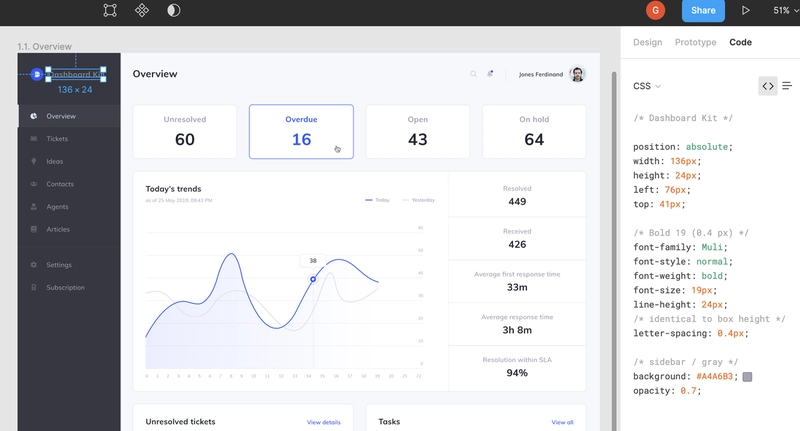
在本文中,我们将根据设计构建一个 UI。我们将使用它Figma来可视化设计,但也可以使用任何其他可以从元素中提取 CSS 代码的工具,例如invisionapp、zeplin等。
用西班牙语阅读
现场演示:https://llorentegerman.github.io/react-admin-dashboard/
存储库:https://github.com/llorentegerman/react-admin-dashboard
将设计上传到 Figma
我不会详细介绍该工具,我们只需要一个设计。
- 在https://www.figma.com创建一个帐户(免费)。
- 我从https://www.figmafreebies.com (免费)随机选择了一个Figma 文件。所选文件为:Figma Admin Dashboard UI Kit。我使用的是 Figma 的网页版,因此,您需要点击按钮,该设计才会添加到您的帐户中。
DOWNLOAD FREEBIES - 您可以双击每个元素,然后在
code右侧列的选项卡中查看与其相关的 CSS 代码。
创建应用程序
对于此步骤,我们将使用Create React App:
npx create-react-app react-admin-dashboard
我们将使用aphrodite作为样式并使用simple-flexbox进行布局。
yarn add aphrodite simple-flexbox或者npm install aphrodite simple-flexbox
文件夹结构:
对于这种情况,我们可以保留一个简单的结构:
/src
    /assets
    /components
    App.js
我们开始做吧
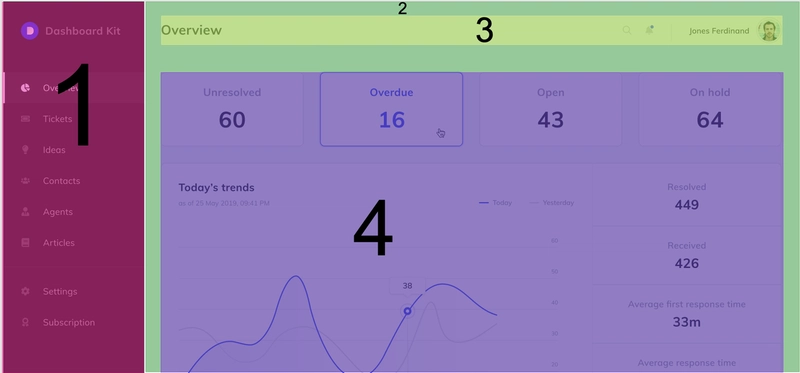
我们准备开始了,首先我们需要确定设计的主要模块。我决定将其分为以下四个主要模块:
1- Sidebar
2- Main Block
    3- Header
    4- Content
正如您在图像中看到的,块 3 和 4 位于块 2 内。
侧边栏
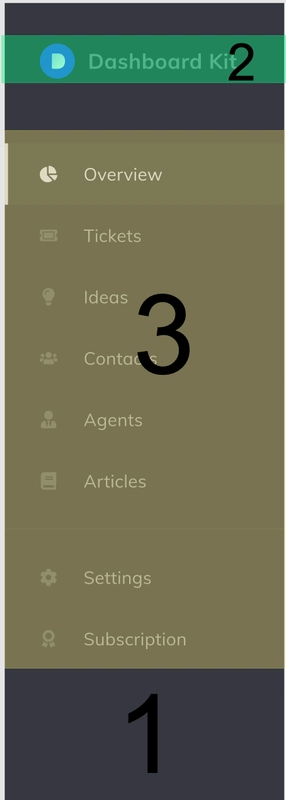
我们可以将侧边栏分为两个部分:Logo区块和MenuItem列表。
为此,我们需要 3 个组件:
1- SidebarComponent
    2- LogoComponent
    3- MenuItemComponent (list)
我们将开始定义徽标和菜单项
LogoComponent.js
首先,我们需要下载 Logo(双击 Logo,进入Design选项卡,然后点击下方的导出按钮)。我下载的是标准svg格式,并将其导入为 React 组件。要复制,请点击此处。
LogoComponent.js是Row垂直和水平居中,带有Logo和title。
| <Row className={css(styles.container)} horizontal="center" vertical="center"> | |
| <Logo /> | |
| <span className={css(styles.title)}>Dashboard Kit</span> | |
| </Row> |
| <Row className={css(styles.container)} horizontal="center" vertical="center"> | |
| <Logo /> | |
| <span className={css(styles.title)}>Dashboard Kit</span> | |
| </Row> |
对于样式,我们需要导入Muli字体系列,简单的方法是在App.css中包含此行(我们可以删除其余内容,我们不需要它):
@import url('https://fonts.googleapis.com/css?family=Muli');
container这些是和的风格title
container: {
    marginLeft: 32,
    marginRight: 32
},
title: {
    fontFamily: 'Muli',
    fontStyle: 'normal',
    fontWeight: 'bold',
    fontSize: 19,
    lineHeight: '24px',
    letterSpacing: '0.4px',
    color: '#A4A6B3',
    opacity: 0.7,
    marginLeft: 12 // <--- necessary to separate title and logo
}
菜单项组件.js
它代表菜单项,由icon、 和组成title,并根据其自身状态(active、unactive、hover)具有不同的样式。如果它处于活动状态,则左侧会有一个白色条。
如您所见,根据active属性的不同,有一些特殊的样式,例如,当为title时, 会有不同的颜色。对于图标,默认填充为,默认不透明度为,这些值会根据上述属性的状态而变化。 当项目为 时,会出现一个特殊元素,即左侧的白色条 ( )。activetrue#9FA2B41activeactiveBar
这些是样式:
activeBar: {
    height: 56,
    width: 3,
    backgroundColor: '#DDE2FF',
    position: 'absolute',
    left: 0
},
activeContainer: {
    backgroundColor: 'rgba(221,226,255, 0.08)'
},
activeTitle: {
    color: '#DDE2FF'
},
container: {
    height: 56,
    cursor: 'pointer',
    ':hover': {
        backgroundColor: 'rgba(221,226,255, 0.08)'
    },
    paddingLeft: 32,
    paddingRight: 32
},
title: {
    fontFamily: 'Muli',
    fontSize: 16,
    lineHeight: '20px',
    letterSpacing: '0.2px',
    color: '#A4A6B3',
    marginLeft: 24
}
SidebarComponent.js
正如我们对徽标所做的那样,我们需要下载将在此组件中使用的图标,可以从设计中进行下载,也可以单击此处assets从存储库文件夹中复制它们。
根据css从设计中提取的内容,我们可以用这 3 个类定义样式:
container: {
    backgroundColor: '#363740',
    width: 255,
    paddingTop: 32
},
menuItemList: {
    marginTop: 52
},
separator: {
    borderTop: '1px solid #DFE0EB',
    marginTop: 16,
    marginBottom: 16,
    opacity: 0.06
}
SidebarComponent准备好了,在存储库中我添加了一些onClick事件和一个state使其交互的事件,以便您可以选择不同的菜单项。
主组件(App.js)
现在我们只需要在 中工作App.js,正如我们所说,它具有以下结构:
1- Sidebar
2- Main Block
    3- Header
    4- Content
其定义如下:
| <Row className={css(styles.container)}> | |
| <SidebarComponent /> | |
| <Column flexGrow={1} className={css(styles.mainBlock)}> | |
| <HeaderComponent title="Title" /> | |
| <div className={css(styles.content)}> | |
| <span>Content</span> | |
| </div> | |
| </Column> | |
| </Row> |
| <Row className={css(styles.container)}> | |
| <SidebarComponent /> | |
| <Column flexGrow={1} className={css(styles.mainBlock)}> | |
| <HeaderComponent title="Title" /> | |
| <div className={css(styles.content)}> | |
| <span>Content</span> | |
| </div> | |
| </Column> | |
| </Row> |
样式:
container: {
    height: '100vh' // menu has to take all the height of the screen
},
content: {
    marginTop: 54
},
mainBlock: {
    backgroundColor: '#F7F8FC',
    padding: 30
}
HeaderComponent.js
最后,我们将定义标题,其结构如下。
1- Row ({ vertical: center, horizontal: space-between })
    2- Title
    3- Row ({ vertical: center })
        4- Icons
        5- Separator
        6- Row ({ vertical: center })
            7- Name
            8- Avatar
| <Row className={css(styles.container)} vertical="center" horizontal="space-between"> | |
| <span className={css(styles.title)}>{title}</span> | |
| <Row vertical="center"> | |
| <div className={css(styles.cursorPointer)}> | |
| <IconSearch /> | |
| </div> | |
| <div style={{ marginLeft: 25 }} className={css(styles.cursorPointer)}> | |
| <IconBellNew /> | |
| </div> | |
| <div className={css(styles.separator)}></div> | |
| <Row vertical="center"> | |
| <span className={css(styles.name, styles.cursorPointer)}>Germán Llorente</span> | |
| <img src="https://avatars3.githubusercontent.com/u/21162888?s=460&v=4" alt="avatar" className={css(styles.avatar, styles.cursorPointer)} /> | |
| </Row> | |
| </Row> | |
| </Row> |
标题样式:
avatar: {
    height: 35,
    width: 35,
    borderRadius: 50,
    marginLeft: 14,
    border: '1px solid #DFE0EB',
},
container: {
    height: 40
},
cursorPointer: {
    cursor: 'pointer'
},
name: {
    fontFamily: 'Muli',
    fontStyle: 'normal',
    fontWeight: 600,
    fontSize: 14,
    lineHeight: '20px',
    textAlign: 'right',
    letterSpacing: 0.2
},
separator: {
    borderLeft: '1px solid #DFE0EB',
    marginLeft: 32,
    marginRight: 32,
    height: 32,
    width: 2
},
title: {
    fontFamily: 'Muli',
    fontStyle: 'normal',
    fontWeight: 'bold',
    fontSize: 24,
    lineHeight: '30px',
    letterSpacing: 0.3
}
内容将在另一篇文章中解释
感谢阅读
鏂囩珷鏉ユ簮锛�https://dev.to/llorentegerman/building-a-ui-from-scratch-based-on-a-design-with-reactjs-3l1e 后端开发教程 - Java、Spring Boot 实战 - msg200.com


