创建二维码生成器
大家好,今天我们将学习如何使用开源库qrious.js创建二维码生成器。该库基于上一篇文章讨论的原理(模块、对齐标记、时序模式等),使用不同的算法生成二维码。我强烈建议您阅读上一篇文章,以便更好地理解二维码的工作原理:
我们走吧
首先要做的就是获取库。例如,您可以使用 CDN(内容分发网络),或者直接将其下载到您的计算机/服务器。
对于那些希望使用 CDN 的人,我建议将此链接包含在您的文档中:
<script src="https://cdnjs.cloudflare.com/ajax/libs/qrious/4.0.2/qrious.min.js"></script>
对于那些想要下载该库的人,你可以通过 NPM:$ npm install --save qrious或 Bower:$ bower install --save qrious或通过最新版本页面下载它。
一旦包含在您的文档中,我们将创建 HTML 结构:
<div>
  <h1>Are you ready to create your own Qr code?</h1>
  <div class="container-divided">
    <textarea placeholder="Type something" id="qrCodeTextArea"></textarea>
    <canvas id="qr"></canvas>
  </div>
</div>
qrious.js 库通过 html 元素生成二维码,如果没有这些元素,您将无法生成二维码。不过,您可以为<canvas>元素指定您选择的 id。
添加样式
现在我要为我的各种元素添加一些样式,当然,如果您愿意,也可以自定义 CSS。
@import url("https://fonts.googleapis.com/css2?family=Lato&display=swap");
@media (min-width: 545px) {
  html, body {
    height: 100%;
  }
}
body {
  background: url("https://i.ibb.co/f0sL4rx/t-l-chargement.jpg");
  background-size: cover;
  background-repeat: no-repeat;
  backdrop-filter: saturate(180%) blur(20px);
  -webkit-backdrop-filter: saturate(180%) blur(20px);
  margin: 0;
  position: relative;
  z-index: 1;
}
body h1 {
  color: white;
  font-family: "Lato", sans-serif;
  margin: 10px 25px;
  text-align: center;
}

div {
  display: flex;
  flex-direction: column;
  align-items: center;
  align-content: space-around;
  justify-content: center;
}
div .container-divided {
  flex-direction: row;
  flex-wrap: wrap;
  width: 900px;
  max-width: 95%;
  height: fit-content;
  justify-content: space-around;
  margin: 50px 0;
}
div .container-divided textarea {
  margin: 0 0 50px 0;
  background: #eaeaea;
  color: black;
  display: block;
  padding: 14px 10px;
  outline: none;
  border-radius: 4px;
  width: 300px;
  max-width: 95%;
  height: 250px;
  text-align: left;
  resize: vertical;
  text-indent: 10px;
  border: none;
  font-size: 15px;
}
div .container-divided textarea::-moz-selection {
  color: inherit;
  background-color: rgba(118, 199, 239, 0.54);
}
div .container-divided textarea::selection {
  color: inherit;
  background-color: rgba(118, 199, 239, 0.54);
}

input {
  font-size: 1rem;
  font-family: "Open Sans", sans-serif;
  text-align: center;
  margin-bottom: 4rem;
  border: none;
  border-bottom: 2px solid #fff;
  padding: 0.5rem;
  background-color: transparent;
  color: #fff;
  outline: none;
}
input::placeholder {
  color: #fff;
}
input::-moz-placeholder {
  color: #fff;
}
input:-ms-input-placeholder {
  color: #fff;
}

canvas {
  width: 200px;
  height: 200px;
}
设置图书馆
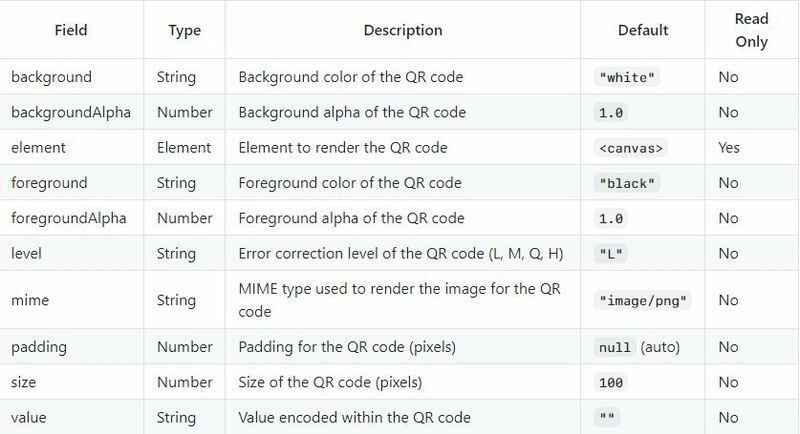
要设置这个库,您可以使用位于 github 上的文档,或者使用此表,它可以让您了解可以在这个库中设置的不同参数。
生成的 JS 代码如下所示:
// Our textarea
const input = document.querySelector("#qrCodeTextArea");
// Our canvas element with 'qr' id
const canvas = document.getElementById("qr");

// The various parameters
const createQR = v => {
  return new QRious({
    element: canvas,
    value: v,
    level: "L",
    size: 400,
    backgroundAlpha: 0,
    foreground: "white" });

};

// We create the qr code
const qr = createQR(input.value);

// If the text box changes, update the qr code.
input.addEventListener("input", () => {
  const qr = createQR(input.value);
});
经过几分钟的代码编写,您可以看到以下结果:
我希望你喜欢本教程,如果你有任何疑问,请随时在评论中问我。👍
文章来源:https://dev.to/clementgaudiniere/create-a-qr-code-generator-1b0p 后端开发教程 - Java、Spring Boot 实战 - msg200.com

