React 组件测试
在上一篇文章中,我们介绍了如何使用 Jest 测试 JavaScript 代码。本篇文章我们将进一步扩展这个主题,介绍如何使用 React 测试库和 Jest 来测试 React 组件。
React 测试库和 Jest 均提供开箱即用的支持create-react-app,无需单独安装。React 测试库 (RTL) 构建于 DOM 测试库之上,因此测试将与实际的 DOM 交互。这使得测试能够尽可能逼真地模拟用户与 DOM 的交互方式。它非常易于使用,提供了一系列断言方法(扩展自 Jest)、用户事件模拟等功能。
create-react-app使用 Jest 作为测试运行器。Jest 将按照以下命名约定(根据官方网站)查找测试文件的名称:
- __tests__ 文件夹中带有 .js 后缀的文件。
- 带有 .test.js 后缀的文件。
- 带有 .spec.js 后缀的文件。
今天我们将探索如何渲染待测试的组件,在组件中找到正确的元素,并执行快照测试。让我们开始创建一个新create-react-app项目:
npx create-react-app testing-react-demo
创建后,将目录更改为您创建的应用程序,然后在所需的代码编辑器中打开该目录。
您应该已经在src文件夹中看到App.test.js。
import { render, screen } from '@testing-library/react';
import App from './App';

test('renders learn react link', () => {
  render(<App />);
  const linkElement = screen.getByText(/learn react/i);
  expect(linkElement).toBeInTheDocument();
});
您可以删除此文件,也可以保留它。为了演示,我将删除它,因此您不会在测试套件中看到它。
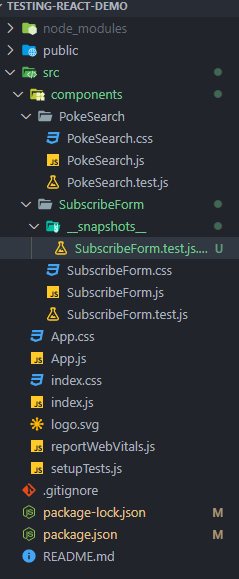
接下来我通常会创建一个components文件夹,并将属于该组件的文件(例如 css 文件和测试文件)都放进去。创建components文件夹后,再创建两个名为SubscribeForm和PokeSearch的文件夹。这两个就是我们今天要编写测试的组件。
让我们在 SubscribeForm 文件夹中创建第一个简单组件:
SubscribeForm.js
import React, { useState } from 'react';
import "./SubscribeForm.css";

const SubscribeForm = () => {

    const [isDisabled, setIsDisabled] = useState(true);
    const [email, setEmail] = useState("");

    function handleChange(e){
        setEmail(e.target.value);
        setIsDisabled(e.target.value === "");
    }

    return (
        <div className="container">
            <h1>Subscribe To Our Newsletter</h1>
            <form className="form">
                <label htmlFor="email">Email Address</label>
                <input onChange={handleChange} type="email" id="email" name="email" placeholder="Email Address" value={email} />
                <input type="checkbox" name="agreement_checkbox" id="agreement_checkbox" />
                <label htmlFor="agreement_checkbox">I agree to disagree whatever the terms and conditions are.</label>
                <button name="subscribe-button" type="submit" className="button" disabled={isDisabled} >Subscribe</button>
            </form>
        </div>
    );
};

export default SubscribeForm;
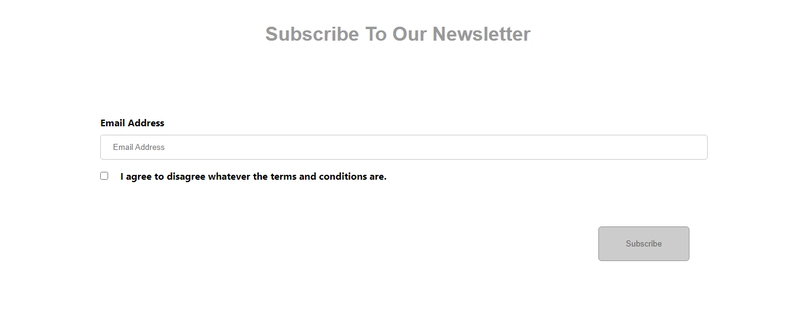
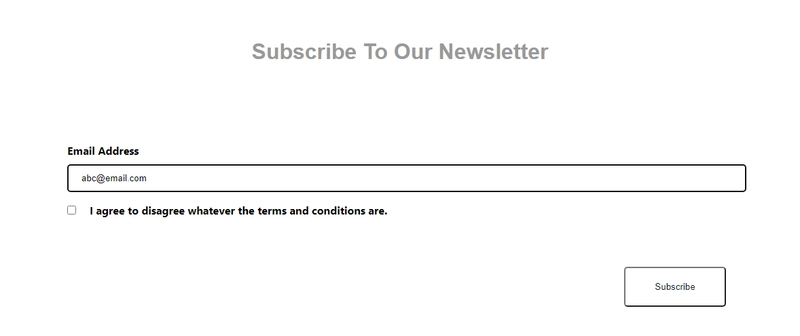
这是一个简单的组件,其中有一个用于输入电子邮件地址的输入框和一个用于点击“订阅”的按钮。在输入框中输入任何文本之前,该按钮首先被禁用,以防止点击。这个按钮似乎是我们可以创建的完美测试用例之一。
文本输入后按钮启用
接下来,我们将创建另一个名为 PokeSearch 的组件(我不是 Pokemon 的粉丝,但 Poke API 很适合演示)。另一个简单的例子是,我们有一个包含 useEffect hook 的组件,用于从 API 获取信息,并将其(Pokemon 名称)显示到屏幕上。在获取结果之前,我们会向用户显示“...正在加载...”的文本。
PokeSearch.js
import React, { useEffect, useState } from 'react';

const PokeSearch = () => {

    const [pokemon, setPokemon] = useState({});
    const [isLoading, setIsLoading] = useState(true);

    useEffect(() => {
        fetch(`https://pokeapi.co/api/v2/pokemon/bulbasaur`)
            .then((res) => res.json())
            .then((result) => {
                setPokemon(result);
                setIsLoading(false);
            })
            .catch((err) => console.log(err));
    }, [])

    return (
        <div>
            {isLoading
                ? <h3>...Loading...</h3>
                : <p>{pokemon.name}</p>
            }
        </div>
    );
}

export default PokeSearch;
让我们开始测试这两个组件。对于第一个组件 SubscribeForm ,我们创建一个名为SubscribeForm.test.js的新文件。我们遵循命名约定,以便测试运行器能够识别它。为了创建测试,我们需要来自Testing-library/reactrender的和,以及来自Testing-library/user-event 的用户事件。此外,请记住导入我们要测试的组件。screen
import React from 'react';
import { render, screen } from '@testing-library/react';
import userEvent from '@testing-library/user-event';
import SubscribeForm from './SubscribeForm';
我们可以首先创建一个测试,以确保在页面首次加载时我们的按钮被禁用,因为电子邮件地址字段中没有输入。
it("The subscribe button is disabled before typing anything in the input text box", () => {
    render(<SubscribeForm />);

    expect(screen.getByRole("button", {name: /subscribe/i})).toBeDisabled();
});
从上一篇文章中,我们知道我们将为我们的测试命名,并提供一个回调函数,其中包括断言。
首先,我们使用 render 方法将要测试的组件渲染到附加到 document.body 的容器中(顺便提一下,Jest 26 及之前的版本使用 jsdom 作为默认环境)。渲染完组件后,我们需要找到合适的元素(也就是按钮)进行测试。我们可以使用 RTL 中的查询方法来做到这一点。DOM 中的元素可以通过它们的可访问性角色和名称(稍后会详细介绍)、文本或我们赋予元素的测试 id 来找到。官方声明给出了优先级。他们建议通过角色或文本(所有人都可以访问)、语义 HTML(替代文本,例如 img、area 等)和测试 id(用户无法看到或听到这些,因此如果您无法理解使用以前的方法,请使用此方法)进行查询。
<div data-testid="test-element" />
screen.getByTestId('test-element')
您可以在此处找到有关优先级的更多信息:
关于 React Testing Library 的查询
您可以这样做来找出组件内的可访问角色:您只需screen.getByRole("")为该组件编写测试,它会失败但会为您提供可访问性信息和这些元素的名称。
Here are the accessible roles:

      heading:

      Name "Subscribe To Our Newsletter":
      <h1 />

      --------------------------------------------------
      textbox:

      Name "Email Address":
      <input
        id="email"
        name="email"
        placeholder="Email Address"
        type="email"
        value=""
      />

      --------------------------------------------------
      checkbox:

      Name "I agree to disagree whatever the terms and conditions are.":
      <input
        id="agreement_checkbox"
        name="agreement_checkbox"
        type="checkbox"
      />

      --------------------------------------------------
      button:

      Name "Subscribe":
      <button
        class="button"
        disabled=""
        name="subscribe-button"
        type="submit"
      />

      --------------------------------------------------
从这里我们知道我们有不同的可访问性角色,例如按钮、文本框、复选框和标题。为了定位我们的订阅按钮,我们需要定位角色“按钮”。定位角色后,我们具体需要具有可访问名称“订阅”的按钮,如提供的可访问性信息中所述(“名称“订阅”)。“名称”的值可以从元素的可见或不可见属性中派生出来,按钮中的文本就是其中之一。为了搜索它的名称,我们通常将不区分大小写的正则表达式放入 getByRole( {name: /subscribe/i}) 的第二个对象参数中。获取该按钮后,我们需要检查该按钮是否被禁用(它应该被禁用)。
接下来是第二个测试。在这个测试中,我们模拟用户在文本框中输入内容的事件,并启用按钮。
it("The subscribe button becomes enabled when we start typing in the input text box", () => {
    render(<SubscribeForm />);

    userEvent.type(screen.getByRole("textbox", {name: /email/i}), "abc@email.com");

    expect(screen.getByRole("button", {name: /subscribe/i})).toBeEnabled();
});
我们用同样的步骤将 SubscribeForm 渲染到文档中,并使用“type”用户事件在所需的元素上输入一些文本。在本例中,它是一个文本框,我们可以通过可访问角色和名称进行选择(请参阅我们刚才获取的可访问性信息)。第二个参数userEvent.type()是要输入的文本。文本输入完成后,我们就可以期待按钮被启用了。
最后,我们正在对 React 组件进行快照测试。我们需要使用 react-test-renderer 为快照渲染一个纯 JavaScript 对象(不依赖于 DOM)。
npm install react-test-renderer
安装并导入后,我们可以使用渲染器在 JavaScript 对象中创建 SubscribeForm 组件。最后,我们使用 Jest 的 toMatchSnapshot() 函数来启动快照测试。
it("Test to match snapshot of component", () => {
    const subscribeFormTree = renderer.create(<SubscribeForm />).toJSON();
    expect(subscribeFormTree).toMatchSnapshot();
})
当您第一次运行此测试时,它将在您的目录中创建一个新文件夹(运行测试后自动创建),名为__snapshots__,在本例中为 SubscribeForm 文件夹。
 PASS  src/components/PokeSearch/PokeSearch.test.js
 PASS  src/components/SubscribeForm/SubscribeForm.test.js
 › 1 snapshot written.

Snapshot Summary
 › 1 snapshot written from 1 test suite.

Test Suites: 2 passed, 2 total
Tests:       5 passed, 5 total
Snapshots:   1 written, 1 total
Time:        2.519 s
Ran all test suites.

Watch Usage: Press w to show more.
您可以在其中找到一个 snap 文档。
SubscribeForm.test.js.snap
// Jest Snapshot v1, https://goo.gl/fbAQLP

exports[`Test to match snapshot of component 1`] = `
<div
  className="container"
>
  <h1>
    Subscribe To Our Newsletter
  </h1>
  <form
    className="form"
  >
    <label
      htmlFor="email"
    >
      Email Address
    </label>
    <input
      id="email"
      name="email"
      onChange={[Function]}
      placeholder="Email Address"
      type="email"
      value=""
    />
    <input
      id="agreement_checkbox"
      name="agreement_checkbox"
      type="checkbox"
    />
    <label
      htmlFor="agreement_checkbox"
    >
      I agree to disagree whatever the terms and conditions are.
    </label>
    <button
      className="button"
      disabled={true}
      name="subscribe-button"
      type="submit"
    >
      Subscribe
    </button>
  </form>
</div>
`;
现在,测试套件已经记录了组件之前的快照。如果您再次运行测试,它将再次拍摄组件的快照,并与__snapshots__文件夹中的快照进行比较。如果它们不同,测试将失败。这有助于确保我们的 UI 组件没有被意外更改。让我们尝试更改 SubscribeForm 组件,然后再次运行测试。我们将把“订阅我们的新闻通讯”更改为“订阅他们的新闻通讯”。
<h1>Subscribe To Their Newsletter</h1>
然后我们再次运行测试。
 PASS  src/components/PokeSearch/PokeSearch.test.js
 FAIL  src/components/SubscribeForm/SubscribeForm.test.js
  ● Test to match snapshot of component

    expect(received).toMatchSnapshot()

    Snapshot name: `Test to match snapshot of component 1`

    - Snapshot  - 1
    + Received  + 1

    @@ -1,10 +1,10 @@
      <div
        className="container"
      >
        <h1>
    -     Subscribe To Our Newsletter
    +     Subscribe To Their Newsletter
        </h1>
        <form
          className="form"
        >
          <label

      22 | it("Test to match snapshot of component", () => {
      23 |     const subscribeFormTree = renderer.create(<SubscribeForm />).toJSON();
    > 24 |     expect(subscribeFormTree).toMatchSnapshot();
         |                               ^
      25 | })

      at Object.<anonymous> (src/components/SubscribeForm/SubscribeForm.test.js:24:31)

 › 1 snapshot failed.
Snapshot Summary
 › 1 snapshot failed from 1 test suite. Inspect your code changes or press `u` to update them.

Test Suites: 1 failed, 1 passed, 2 total
Tests:       1 failed, 4 passed, 5 total
Snapshots:   1 failed, 1 total
Time:        3.817 s
Ran all test suites.

Watch Usage: Press w to show more.
……测试失败了。如果这是我们预期的更改,我们可以按“u”键将快照更新到最新版本。这样一来,__snapshots__文件夹中的快照文件就会更新,所有测试都会重新运行,并且这次测试都会通过。这与我们上次使用的(酶库)非常相似。
 PASS  src/components/PokeSearch/PokeSearch.test.js
 PASS  src/components/SubscribeForm/SubscribeForm.test.js
 › 1 snapshot updated.

Snapshot Summary
 › 1 snapshot updated from 1 test suite.

Test Suites: 2 passed, 2 total
Tests:       5 passed, 5 total
Snapshots:   1 updated, 1 total
Time:        2.504 s
Ran all test suites.

Watch Usage: Press w to show more.
因此,这是测试我们的 SubscribeForm 组件的完整脚本。
import React from 'react';
import { render, screen } from '@testing-library/react';
import userEvent from '@testing-library/user-event';
import renderer from 'react-test-renderer';
import SubscribeForm from './SubscribeForm';

it("The subscribe button is disabled before typing anything in the input text box", () => {
    render(<SubscribeForm />);

    expect(screen.getByRole("button", {name: /subscribe/i})).toBeDisabled();
});

it("The subscribe button becomes enabled when we start typing in the input text box", () => {
    render(<SubscribeForm />);

    userEvent.type(screen.getByRole("textbox", {name: /email/i}), "abc@email.com");

    expect(screen.getByRole("button", {name: /subscribe/i})).toBeEnabled();
});

it("Test to match snapshot of component", () => {
    const subscribeFormTree = renderer.create(<SubscribeForm />).toJSON();
    expect(subscribeFormTree).toMatchSnapshot();
})
需要注意的是:每次测试后,Jest 都会自动执行清理过程afterEach(cleanup)(全局注入),以防止内存泄漏。
最后,我们还想异步测试我们的组件(PokeSearch)。
import React from 'react';
import { render,screen,waitForElementToBeRemoved } from '@testing-library/react';
import PokeSearch from './PokeSearch';

it("Loading is shown until the Pokemon is fetched", async () => {
    render(<PokeSearch />);

    expect(screen.getByText('...Loading...')).toBeInTheDocument();

    await waitForElementToBeRemoved(screen.queryByText('...Loading...'));
});
首先,我们可以测试“...Loading...”文本是否正确渲染到屏幕上。我们需要查询包含“...Loading...”的正确元素,并使用断言方法检查它是否在 DOM 中。然后,我们可以使用 RTL 提供的异步函数,解析加载文本元素,使其在获取结果后消失。此外,官方网站也推荐使用queryBy...断言方法查询元素是否从 DOM 中消失。
测试完“正在加载”文本后,我们就可以测试获取数据后的情况了。在这个测试用例中,我们不想使用真实的 API 进行测试(我们只是想确保组件运行正常),因此我们只需模拟获取函数即可。当 Promise 被解析后,我们会修复获取函数返回的数据。之后,我们将渲染 PokeSearch,并调用获取函数来获取我们模拟的数据。数据返回后,我们将尝试findBy...(findBy...用于异步情况)查找包含文本“bulbasaur”的元素,并检查该元素是否在 DOM 中。
it("The Pokemon name is displayed correctly after it has been fetched", async () => {
    // Mock the browser fetch function
    window.fetch = jest.fn(() => {
        const pokemon = { name: 'bulbasaur', weight: 69, height: 7 };

        return Promise.resolve({
          json: () => Promise.resolve(pokemon),
        });
    });
    render(<PokeSearch />);
    const pokemonName = await screen.findByText('bulbasaur');
    expect(pokemonName).toBeInTheDocument();
});
希望这能让您了解如何开始测试 React 组件。
请关注我,获取更多关于网页设计、编程和自我提升的文章😊
文章来源:https://dev.to/ohdylan/react-component-testing-54ie 后端开发教程 - Java、Spring Boot 实战 - msg200.com


