可重用组件简介以及如何创建排版组件
React 如此受欢迎的原因之一是其可复用的组件。在过去的几年里,设计系统的概念也在 Web 开发者中流行起来。
我发现很多人在学习 React 时都会犯一个错误:他们直接学习 Redux 并开始构建复杂的应用程序。他们忘记了学习基础知识。
因此,他们不知道为什么要使用 React。它真的有用吗?还是只是赶时髦?
在本文中,我们将探讨什么是可复用组件,以及为什么它们是入门 React 的最佳方式之一。最后,我们将一起构建一个排版组件。
什么是可重用组件?
当一个组件被多次使用时,它就是可复用的。例如,在列表中,我们不想让同一个列表项重复出现。所以我们必须让该组件可复用。
但可重用组件不仅仅是列表中的一个项目。按钮和输入框就是一些可重用组件的例子。它们是全局组件,可以在任何地方使用。
有些代码可以重复使用,但不一定非要在任何地方使用。例如,有些代码<tr>, <th>, <td>可以在某个地方重复使用,<table>但不能(也不应该)在其他任何地方使用。
您可能已经使用了可复用组件。例如,如果您使用 BEM 命名,则可以看到 Block 名称是全局组件,而 Element 名称是作用域组件。
当谈到 React 时,可重用组件变得更加令人兴奋。
为什么你应该关心他们
到这里,你可能已经看到了可复用组件的好处。不过,这里还有更多:
高效的
您无需再花时间思考像素并一遍又一遍地重复相同的操作。您可以依靠可复用组件来节省时间。这意味着您有更多时间来提升质量、更快地完成应用并降低成本。
持续的
保持应用程序的一致性比你想象的更重要。随着用户开始使用你的应用程序,他们会开始了解它。他们会开始发现其中的规律。
具有一致性的应用程序将帮助您的用户更快地找到信息,并且减少混淆。
可维护
假设你的设计师决定更改按钮的内边距。现在你必须搜索所有包含 的地方<button>,并进入每个 CSS 文件,尝试找到内边距的位置。
这需要大量工作。所以,如果你有可复用的组件,你只需要在一个地方进行修改即可。
避免重复代码
重复的代码并非坏事,因为它能让你的应用更加灵活。但重复编写超过三遍的代码就不是什么好事了。使用可复用组件可以帮助你避免每次都复制代码。
如何制作一个好的可重用组件
构建可复用组件可能比较棘手。以下是一些需要注意的事项:
组件应该是哑的
例如,Button 不应该知道当前的主题。相反,应用程序应该告诉 Button 它的主题是什么。
不正确
const Button = ({ children, ...props }) => {
  const { state } = useContext(AppContext);
  return (
    <button
      className={cn({
        "button--theme-dark": state.theme === "dark",
      })}
      {...props}
    >
      {children}
    </button>
  );
};
AppContext在此示例中,我们从组件中获取全局状态。这意味着我们在和 之间Button创建了依赖关系。因此,该组件只能在应用程序上下文中复用,而我们希望避免这种情况。ButtonApplication
正确的
const Button = ({  theme, children, ...props }) => {
  return (
    <button
      className={cn({
        "button--theme-dark": theme === 'dark',
      })}
      {...props}
    >
      {children}
    </button>
  );
};
本例中的按钮是独立的,可以在任何应用程序中使用。这正是我们想要的。
可扩展
该组件应该足够灵活,以便您以后可以轻松添加更多配置。
在这个例子中,hasPrimaryColor它不应该使用布尔值,而应该使用 prop: backgroundColor="primary"。其他一些 props 不应该boolean像这样:size, varient,...
不正确
const Button = ({ hasPrimaryColor, children, ...props }) => {
  return (
    <button
      className={cn({
        "button--color-primary": hasPrimaryColor,
      })}
      {...props}
    >
      {children}
    </button>
  );
};
正确的
const Button = ({ color, children, ...props }) => {
  return (
    <button
      className={cn({
        "button--color-primary": color === "primary",
      })}
      {...props}
    >
      {children}
    </button>
  );
};
简单的
组件越复杂,维护起来就越困难。你可能听说过“无状态组件”和“有状态组件”,但大多数情况下,无状态组件比有状态组件更简单。
但是它们之间有什么区别呢?嗯……这值得单独写一篇文章。不过,基本上,如果你能把逻辑移到组件外部,并且保持其简单,那么你应该这么做🙂
构建排版组件
用户故事
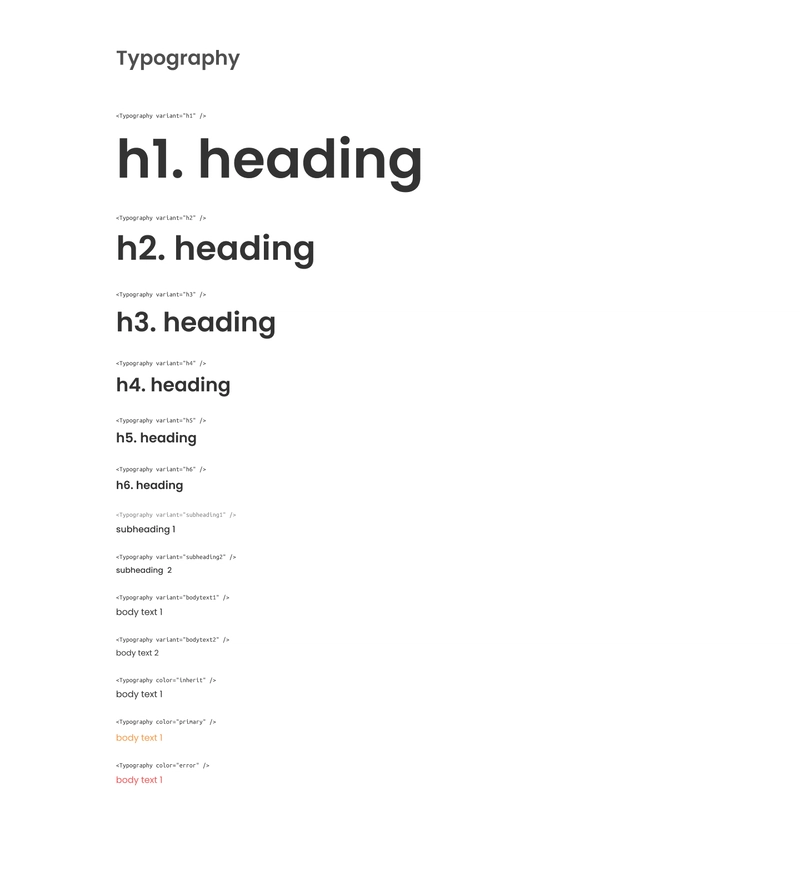
- 作为用户,我可以选择 10 个变体:h1、h2、h3、h4、h5、h6、副标题 1、副标题 2、正文 1 和正文 2
- 作为用户,我可以选择原色或错误颜色
步骤 1:创建 React 应用并安装类名
让我们创建一个 React 应用程序并安装类名。Classnames将允许您有条件地拥有多个类。
npx create-react-app typography
cd typography
npm i classnames
第 2 步:导入字体
你可以去Google Font选择你喜欢的字体。我们这里使用的是Ubuntu 字体。
您可以使用<link>内部标签导入<head>
<link href="https://fonts.googleapis.com/css2?family=Poppins:wght@400;500&family=Ubuntu+Mono&display=swap" rel="stylesheet">
或者你可以导入你的 css 文件
@import url('https://fonts.googleapis.com/css2?family=Poppins:wght@400;500&family=Ubuntu+Mono&display=swap');
步骤 3:使用字体并重置默认样式
让我们重置一些默认样式并使用我们的字体。通过重置默认值,我们可以自由地赋予它自己的样式,而无需知道默认值是什么。
为了我们的目的,我们删除默认的 padding 和 margin。其他一些组件可能有border、background-color、text-decoration、……
body {

  margin: 0;

  font-family: "Poppins", sans-serif;

  -webkit-font-smoothing: antialiased;

  -moz-osx-font-smoothing: grayscale;

}

,

::after,

*::before {

  box-sizing: inherit;

}

h1,

h2,

h3,

h4,

h5,

h6,

p {

  margin: 0;

  padding: 0;

}
步骤 4:创建排版组件
永远记得传递...props给你的组件,这样我们就不会丢失默认属性。
import React from "react";

import cn from "classnames";

import "./typography.css";

// Defining the HTML tag that the component will support

const variantsMapping = {

  h1: "h1",

  h2: "h2",

  h3: "h3",

  h4: "h4",

  h5: "h5",

  h6: "h6",

  subheading1: "h6",

  subheading2: "h6",

  body1: "p",

  body2: "p",

};

// Create a functional component that take

// variant: the selected html tag

// color: the selected color

// children: the node passed inside the Component

// ...props: the default attribute of the Component

const Typography = ({ variant, color, children, ...props }) => {

// If the variant exists in variantsMapping, we use it.

// Otherwise, use p tag instead.

  const Component = variant ? variantsMapping[variant] : "p";

return (

    <Component

      className={cn({

        [typography--variant-</span><span class="p">${</span><span class="nx">variant</span><span class="p">}</span><span class="s2">]: variant,

        [typography--color-</span><span class="p">${</span><span class="nx">color</span><span class="p">}</span><span class="s2">]: color,

      })}

      {...props}

    >

      {children}

    </Component>

  );

};

export default Typography;
步骤 5:为组件添加样式
最后一步是为组件添加样式。代码很简单,我们为每个变体选项和颜色选项添加不同的“font-size和”。font-weightcolor
.typography--variant-h1 {

  font-size: 6rem;

  font-weight: 500;

}

.typography--variant-h2 {

  font-size: 3.75rem;

  font-weight: 500;

}

.typography--variant-h3 {

  font-size: 3rem;

  font-weight: 500;

}

.typography--variant-h4 {

  font-size: 2.125rem;

  font-weight: 500;

}

.typography--variant-h5 {

  font-size: 1.5rem;

  font-weight: 500;

}

.typography--variant-h6 {

  font-size: 1.25rem;

  font-weight: 500;

}

.typography--variant-subheading1 {

  font-size: 1rem;

  font-weight: 500;

}

.typography--variant-subheading2 {

  font-size: 0.875rem;

  font-weight: 500;

}

.typography--variant-body1 {

  font-size: 1rem;

}

.typography--variant-body1 {

  font-size: 0.875rem;

}

.typography--color-primary {

  color: #f2994a;

}

.typography--color-error {

  color: #eb5757;

}
挑战
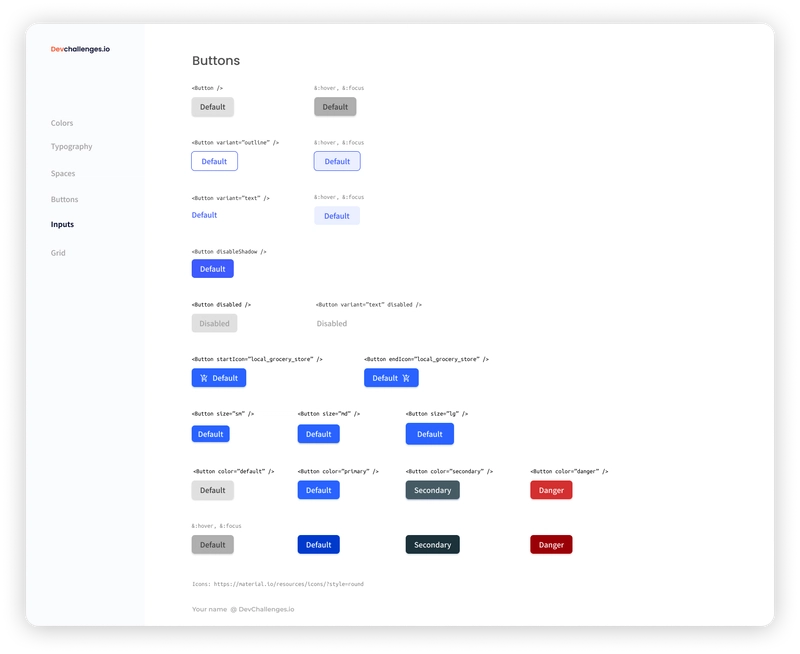
该组件尚未完全完成。我建议您添加更多道具,例如:align、、、……displaymarginButton
结果
如果您想查看,可以在这里找到源代码。
结论
在制作 Typography 组件之后,我们可以看到制作可复用组件的难度,但这通常会为你节省大量时间。这也是开始学习 React 或 Vue 的好方法。
下次使用 React 时,别偷懒,直接复制其他地方的代码。如果你觉得某个代码应该写成组件,那就直接写成组件吧。这会对你很有帮助。
以下是开始创建可重用组件和学习 React 的两个挑战:
有什么问题吗?欢迎留言给我😁
🐦 Thu Nghiem Twitter
🐦 Devchallenge.io Twitter
🔥 Devchallenges 网站
 后端开发教程 - Java、Spring Boot 实战 - msg200.com


