FastAPI 生产设置指南🏁⚡️🚀
GenAI LIVE! | 2025年6月4日
Python 中有很多流行的 API 构建框架,例如 Flask 和 Django,但我们将要介绍的FastAPI是过去 5 年中最流行的框架之一。FastAPI 内置了现代 Python 特性,例如使用事件循环的异步编程,利用Pydantic进行数据验证,并根据 Python 元数据生成标准的OpenAPI规范,从而让您能够快速构建一个文档齐全的生产级 API。让我们开始吧。
💡 本指南中引用的完整源代码可在 GitHub 上找到
https://github.com/dpills/fastapi-prod-guide
设置
确保您已安装 Python3 和Poetry,我们将使用它们进行包管理。
$ python3 --version
Python 3.11.4

$ poetry --version
Poetry (version 1.6.1)
创建您的项目文件夹并初始化项目。
$ poetry init

This command will guide you through creating your pyproject.toml config.

Package name [fastapi-quick-start-guide]:
Version [0.1.0]:
Description []:
Author [dpills, n to skip]:  dpills
License []:
Compatible Python versions [^3.11]:

Would you like to define your main dependencies interactively? (yes/no) [yes] no
Would you like to define your development dependencies interactively? (yes/no) [yes] no
Generated file

[tool.poetry]
name = "fastapi-quick-start-guide"
version = "0.1.0"
description = ""
authors = ["dpills"]
readme = "README.md"

[tool.poetry.dependencies]
python = "^3.11"

[build-system]
requires = ["poetry-core"]
build-backend = "poetry.core.masonry.api"

Do you confirm generation? (yes/no) [yes]
安装核心 FastAPI 依赖项。
$ poetry add fastapi 'uvicorn[standard]'
Creating virtualenv fastapi-quick-start-guide-KBe0UMIg-py3.11 in /Users/dpills/Library/Caches/pypoetry/virtualenvs
Using version ^0.103.2 for fastapi
Using version ^0.23.2 for uvicorn

Updating dependencies
Resolving dependencies... (1.1s)

Package operations: 18 installs, 0 updates, 0 removals

  • Installing idna (3.4)
  • Installing sniffio (1.3.0)
  • Installing typing-extensions (4.8.0)
  • Installing annotated-types (0.6.0)
  • Installing anyio (3.7.1)
  • Installing pydantic-core (2.10.1)
  • Installing click (8.1.7)
  • Installing h11 (0.14.0)
  • Installing httptools (0.6.0)
  • Installing pydantic (2.4.2)
  • Installing python-dotenv (1.0.0)
  • Installing pyyaml (6.0.1)
  • Installing starlette (0.27.0)
  • Installing uvloop (0.18.0)
  • Installing watchfiles (0.21.0)
  • Installing websockets (11.0.3)
  • Installing fastapi (0.103.2)
  • Installing uvicorn (0.23.2)

Writing lock file
每当我开始一个新项目时,我都希望保持质量标准,而使用自动化质量工具可以简化这项工作。让我们继续安装mypy进行静态类型检查、black进行格式化以及ruff进行代码检查。将它们添加到开发依赖项中。
$ poetry add -G dev ruff black mypy
Using version ^0.0.292 for ruff
Using version ^23.9.1 for black
Using version ^1.6.0 for mypy

Updating dependencies
Resolving dependencies... (0.3s)

Package operations: 7 installs, 0 updates, 0 removals

  • Installing mypy-extensions (1.0.0)
  • Installing packaging (23.2)
  • Installing pathspec (0.11.2)
  • Installing platformdirs (3.11.0)
  • Installing black (23.9.1)
  • Installing mypy (1.6.0)
  • Installing ruff (0.0.292)

Writing lock file
将这些质量工具的配置添加到pyproject.toml文件中,现在看起来应该类似于此。
📝 pyproject.toml
[tool.poetry]
name = "fastapi-quick-start-guide"
version = "0.1.0"
description = ""
authors = ["dpills"]
readme = "README.md"

[tool.poetry.dependencies]
python = "^3.11"
fastapi = "^0.103.2"
uvicorn = { extras = ["standard"], version = "^0.23.2" }

[tool.poetry.group.dev.dependencies]
ruff = "^0.0.292"
black = "^23.9.1"
mypy = "^1.6.0"

[tool.black]
line-length = 88

[tool.ruff]
select = ["E", "F", "I"]
fixable = ["ALL"]
exclude = [".git", ".mypy_cache", ".ruff_cache"]
line-length = 88

[tool.mypy]
disallow_any_generics = true
disallow_subclassing_any = true
disallow_untyped_calls = true
disallow_untyped_defs = true
disallow_incomplete_defs = true
check_untyped_defs = true
no_implicit_optional = true
warn_redundant_casts = true
warn_unused_ignores = true
warn_return_any = true
strict_equality = true
disallow_untyped_decorators = false
ignore_missing_imports = true
implicit_reexport = true
plugins = "pydantic.mypy"

[tool.pydantic-mypy]
init_forbid_extra = true
init_typed = true
warn_required_dynamic_aliases = true
warn_untyped_fields = true

[build-system]
requires = ["poetry-core"]
build-backend = "poetry.core.masonry.api"
现在我们已经安装了依赖项,添加主 python 文件和基本的 FastAPI 示例。
📝main.py
import uvicorn
from fastapi import FastAPI

app = FastAPI()

@app.get("/")
async def read_root() -> dict[str, str]:
    """
    Hello World
    """
    return {"Hello": "World"}

@app.get("/items/{item_id}")
async def read_item(item_id: str) -> dict[str, str]:
    """
    Get an Item
    """
    return {"item_id": item_id}

if __name__ == "__main__":
    uvicorn.run(
        "main:app",
        host="0.0.0.0",
        port=8000,
        log_level="debug",
        reload=True,
    )
使用 python 运行该文件并打开 Web 浏览器访问 http://localhost:8000/docs
$ poetry shell
Spawning shell within /Users/dpills/Library/Caches/pypoetry/virtualenvs/fastapi-quick-start-guide-KBe0UMIg-py3.11

$ python3 main.py
INFO:     Will watch for changes in these directories: ['/Users/dpills/articles/fastapi-quick-start-guide']
INFO:     Uvicorn running on http://0.0.0.0:8000 (Press CTRL+C to quit)
INFO:     Started reloader process [28609] using WatchFiles
INFO:     Started server process [28611]
INFO:     Waiting for application startup.
INFO:     Application startup complete.
INFO:     127.0.0.1:50323 - "GET /docs HTTP/1.1" 200 OK
INFO:     127.0.0.1:50323 - "GET /openapi.json HTTP/1.1" 200 OK
INFO:     127.0.0.1:50332 - "GET /items/test123 HTTP/1.1" 200 OK
ℹ️ FastAPI 从 python 元数据 自动生成OpenAPI规范,并运行Swagger UI 进行交互式文档制作。
恭喜,您刚刚创建了一个简单的 API!您应该会在 Web 浏览器中看到交互式文档,并且可以测试 API 调用。当我们修改代码并保存时,服务器会自动重新加载,但如果文档有变化,您可能需要刷新网页。

使用 MongoDB 进行 CRUD
现在我们已经设置好了环境并运行了 API,让我们通过创建一些基于 Mongo 数据库的 Todo API 来实现完整的 CRUD(创建、读取、更新、删除)功能。删除 initialread_root和read_itemexample 端点函数。
环境设置
💡有关 Docker 容器指南,请参阅《容器揭秘》🐳🤔
;有关 MongoDB 指南,请参阅《MongoDB 快速入门指南》🍃⚡️
创建一个.env文件来存储我们的秘密,以便它们不会在我们的源代码中暴露。
📝 .env
MONGO_INITDB_ROOT_USERNAME=root
MONGO_INITDB_ROOT_PASSWORD=mySecureDbPassword1
MONGO_URI=mongodb://root:mySecureDbPassword1@localhost:27017/
为 MongoDB 添加 docker compose 规范。
📝docker-compose.yml
services:
  db:
    image: mongo:7.0.1
    container_name: myAPIdb
    restart: always
    ports:
      - 27017:27017
    env_file:
      - .env
    volumes:
      - type: volume
        source: my_api_db_data
        target: /data/db

volumes:
  my_api_db_data:
使用 Docker Compose 运行 MongoDB。
$ docker-compose up -d
[+] Building 0.0s (0/0)                               docker-container:unruffled_shockley
[+] Running 3/3
 ✔ Network fastapi-quick-start-guide_default          Created
 ✔ Volume "fastapi-quick-start-guide_my_api_db_data"  Created
 ✔ Container myAPIdb                                  Started

$ docker ps
CONTAINER ID   IMAGE         COMMAND                  CREATED         STATUS         PORTS                      NAMES
dfa4bbee67d3   mongo:7.0.1   "docker-entrypoint.s…"   2 minutes ago   Up 2 minutes   0.0.0.0:27017->27017/tcp   myAPIdb
现在我们已经运行了 MongoDB,让我们添加 python 依赖项以使用环境变量并连接到 MongoDB。
$ poetry add python-dotenv pydantic-settings motor
Using version ^1.0.0 for python-dotenv
Using version ^2.0.3 for pydantic-settings
Using version ^3.3.1 for motor

Updating dependencies
Resolving dependencies... (0.1s)

Package operations: 4 installs, 0 updates, 0 removals

  • Installing dnspython (2.4.2)
  • Installing pymongo (4.5.0)
  • Installing motor (3.3.1)
  • Installing pydantic-settings (2.0.3)

Writing lock file

$ poetry add -G dev motor-types
Using version ^1.0.0b3 for motor-types

Updating dependencies
Resolving dependencies... (0.1s)

Package operations: 1 install, 0 updates, 0 removals

  • Installing motor-types (1.0.0b3)
使用 Pydantic 设置从环境变量中加载 Mongo URI .env,并使用异步驱动程序设置与 MongoDB 的连接,Motor因为我们将使用async函数。
📝main.py
import uvicorn
from fastapi import FastAPI
from motor.motor_asyncio import AsyncIOMotorClient
from pydantic_settings import BaseSettings, SettingsConfigDict

class Settings(BaseSettings):
    mongo_uri: str
    model_config = SettingsConfigDict(env_file=".env", extra="ignore")

settings = Settings()

db_client = AsyncIOMotorClient(settings.mongo_uri)
db = db_client.todoDb

app = FastAPI()

...
创造
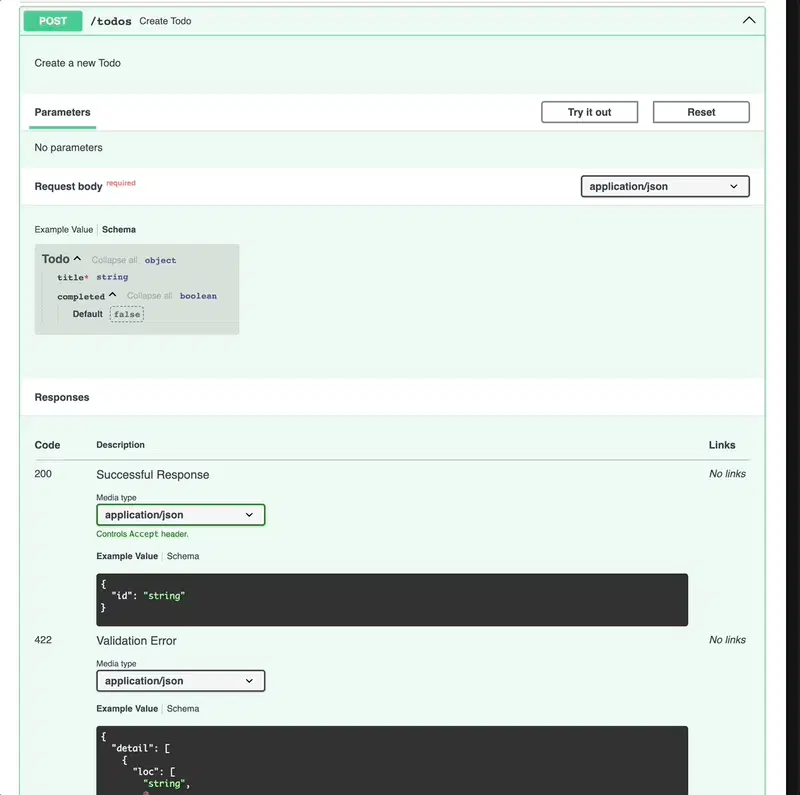
HTTP POST 方法用于指示用户正在创建某些内容。设置 POST 路由以创建新的待办事项。FastAPI 由模型驱动,并使用 Pydantic 模型 (Python 类)来定义和验证数据类型。
📝main.py
from datetime import datetime
from pydantic import BaseModel
...

class Todo(BaseModel):
    title: str
    completed: bool = False

class TodoId(BaseModel):
    id: str

@app.post("/todos", response_model=TodoId)
async def create_todo(payload: Todo) -> TodoId:
    """
    Create a new Todo
    """
    now = datetime.utcnow()
    insert_result = await db.todos.insert_one(
        {
            "title": payload.title,
            "completed": payload.completed,
            "created_date": now,
            "updated_date": now,
        }
    )

    return TodoId(id=str(insert_result.inserted_id))
在 Swagger 文档中,我们可以看到刚刚编写的新端点以及从 Pydantic 模型派生的模式。进行测试以确保待办事项已成功插入,并且我们应该在响应中看到返回的待办事项 ID。
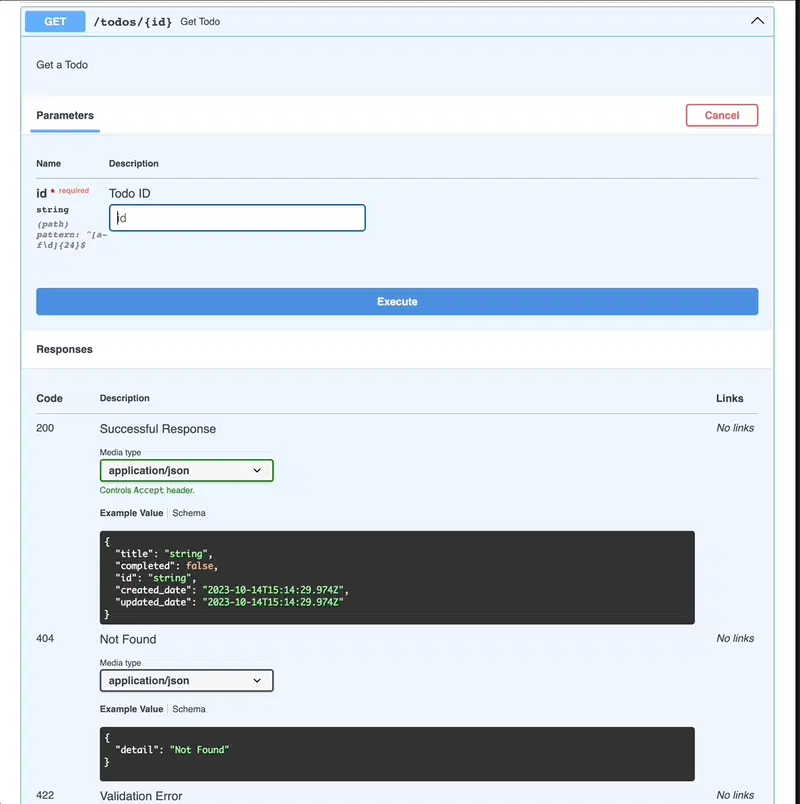
读
HTTP GET 方法用于指示用户正在向服务器请求数据。让我们设置两个 GET 路由,一个用于获取记录列表,另一个用于获取单个记录。对于响应数据模型,我们可以使用继承来使用和模型TodoRecord中的字段。TodoIdTodo
📝main.py
...
class Todo(BaseModel):
    title: str
    completed: bool = False

class TodoId(BaseModel):
    id: str

class TodoRecord(TodoId, Todo):
    created_date: datetime
    updated_date: datetime

@app.get("/todos", response_model=list[TodoRecord])
async def get_todos() -> list[TodoRecord]:
    """
    Get Todos
    """
    todos: list[TodoRecord] = []
    async for doc in db.todos.find():
        todos.append(
            TodoRecord(
                id=str(doc["_id"]),
                title=doc["title"],
                completed=doc["completed"],
                created_date=doc["created_date"],
                updated_date=doc["updated_date"],
            )
        )

    return todos
...

id 为了获取单条记录,我们需要从用户那里 获取待办事项 ,由于这是一个 MongoDBObjectId 对象,因此我们需要确保传入的待办事项有效。FastAPI 和 Pydantic 提供了一些字段类型对象,用于添加额外的元数据和验证。在本例中,我们可以使用 Path 它来提供描述,并添加正则表达式验证,以确保其 ObjectId 格式有效。
📝main.py
...
MONGO_ID_REGEX = r"^[a-f\d]{24}$"

@app.get("/todos/{id}", response_model=TodoRecord)
async def get_todo(
    id: str = Path(description="Todo ID", pattern=MONGO_ID_REGEX)
) -> TodoRecord:
    """
    Get a Todo
    """
    doc = await db.todos.find_one({"_id": ObjectId(id)})

    return TodoRecord(
        id=str(doc["_id"]),
        title=doc["title"],
        completed=doc["completed"],
        created_date=doc["created_date"],
        updated_date=doc["updated_date"],
    )
...
HTTP 具有明确定义的 响应代码 ,用于指示请求的状态。通常,200 以内的响应代码表示成功,400 以内的响应代码表示已处理的异常,500 以内的响应代码表示服务器端错误或未处理的异常。FastAPI 包含 HTTPException 捕获已知异常的功能,并向用户返回有效的状态代码和有用的错误消息。在这种情况下,如果提供了 ID 但在数据库中找不到,我们可以返回 HTTP 404 Not Found 状态,并附带一些详细信息,表明具有所提供 ID 的 Todo 不存在。
📝main.py
from fastapi import FastAPI, HTTPException, Path
...

class NotFoundException(BaseModel):
    detail: str = "Not Found"

MONGO_ID_REGEX = r"^[a-f\d]{24}$"

@app.get(
    "/todos/{id}",
    response_model=TodoRecord,
    responses={
        404: {"description": "Not Found", "model": NotFoundException},
    },
)
async def get_todo(
    id: str = Path(description="Todo ID", pattern=MONGO_ID_REGEX)
) -> TodoRecord:
    """
    Get a Todo
    """
    doc = await db.todos.find_one({"_id": ObjectId(id)})
    if not doc:
        raise HTTPException(status_code=404, detail="Not Found")

    return TodoRecord(
        id=str(doc["_id"]),
        title=doc["title"],
        completed=doc["completed"],
        created_date=doc["created_date"],
        updated_date=doc["updated_date"],
    )
使用有效 ID 和未知 ID 验证其是否按预期工作。
更新
HTTP PUT 和PATCH方法用于更新数据。PUT更新需要发送完整的有效负载记录,而 asPATCH允许部分更新。让我们添加PUT一条路由,将获取待办事项的功能(在路径中传递待办事项 ID)与创建待办事项的功能结合起来,在创建待办事项时,我们将更新内容作为有效负载传递。
📝main.py
@app.put(
    "/todos/{id}",
    response_model=TodoId,
    responses={
        404: {"description": "Not Found", "model": NotFoundException},
    },
)
async def update_todo(
    payload: Todo,
    id: str = Path(description="Todo ID", pattern=MONGO_ID_REGEX),
) -> TodoId:
    """
    Update a Todo
    """
    now = datetime.utcnow()
    update_result = await db.todos.update_one(
        {"_id": ObjectId(id)},
        {
            "$set": {
                "title": payload.title,
                "completed": payload.completed,
                "updated_date": now,
            }
        },
    )

    if update_result.matched_count == 0:
        raise HTTPException(status_code=404, detail="Not Found")

    return TodoId(id=id)

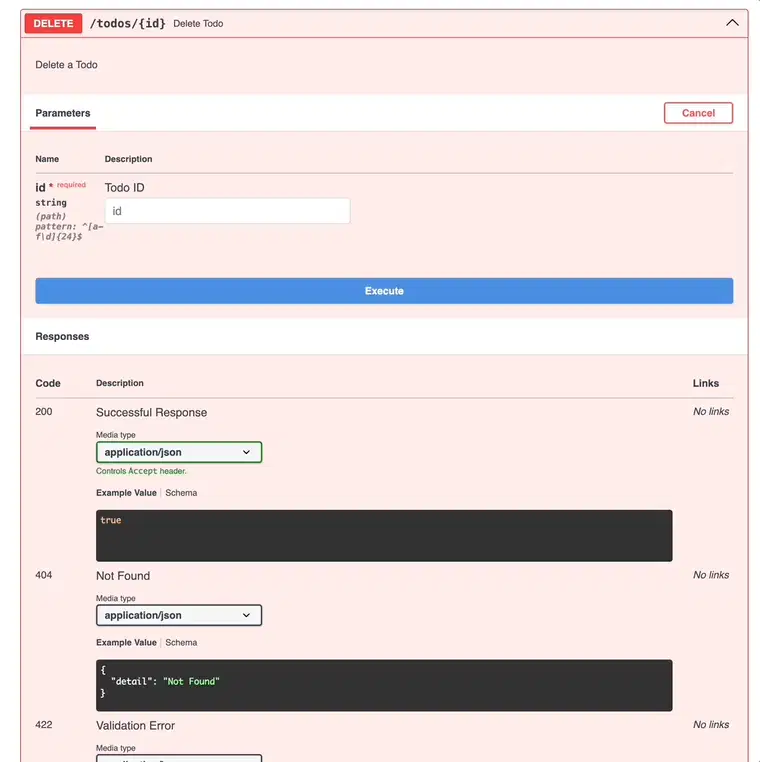
删除
HTTP DELETE 方法用于删除数据,并遵循与使用 URL 路径中的 ID 相同的模式。
📝main.py
@app.delete(
    "/todos/{id}",
    response_model=bool,
    responses={
        404: {"description": "Not Found", "model": NotFoundException},
    },
)
async def delete_todo(
    id: str = Path(description="Todo ID", pattern=MONGO_ID_REGEX),
) -> bool:
    """
    Delete a Todo
    """
    delete_result = await db.todos.delete_one({"_id": ObjectId(id)})

    if delete_result.deleted_count == 0:
        raise HTTPException(status_code=404, detail="Not Found")

    return True
完整的 CRUD 功能
这涵盖了处理我们的待办事项数据的完整 CRUD(创建、读取、更新、删除)功能,我们的 python 文件现在应该看起来像这样。
📝main.py
from datetime import datetime

import uvicorn
from bson import ObjectId
from fastapi import FastAPI, HTTPException, Path
from motor.motor_asyncio import AsyncIOMotorClient
from pydantic import BaseModel
from pydantic_settings import BaseSettings, SettingsConfigDict

class Settings(BaseSettings):
    mongo_uri: str
    model_config = SettingsConfigDict(env_file=".env", extra="ignore")

settings = Settings()

db_client = AsyncIOMotorClient(settings.mongo_uri)
db = db_client.todoDb
app = FastAPI()

MONGO_ID_REGEX = r"^[a-f\d]{24}$"

class Todo(BaseModel):
    title: str
    completed: bool = False

class TodoId(BaseModel):
    id: str

class TodoRecord(TodoId, Todo):
    created_date: datetime
    updated_date: datetime

class NotFoundException(BaseModel):
    detail: str = "Not Found"

@app.post("/todos", response_model=TodoId)
async def create_todo(payload: Todo) -> TodoId:
    """
    Create a new Todo
    """
    now = datetime.utcnow()
    insert_result = await db.todos.insert_one(
        {
            "title": payload.title,
            "completed": payload.completed,
            "created_date": now,
            "updated_date": now,
        }
    )

    return TodoId(id=str(insert_result.inserted_id))

@app.get(
    "/todos/{id}",
    response_model=TodoRecord,
    responses={
        404: {"description": "Not Found", "model": NotFoundException},
    },
)
async def get_todo(
    id: str = Path(description="Todo ID", pattern=MONGO_ID_REGEX)
) -> TodoRecord:
    """
    Get a Todo
    """
    doc = await db.todos.find_one({"_id": ObjectId(id)})
    if not doc:
        raise HTTPException(status_code=404, detail="Not Found")

    return TodoRecord(
        id=str(doc["_id"]),
        title=doc["title"],
        completed=doc["completed"],
        created_date=doc["created_date"],
        updated_date=doc["updated_date"],
    )

@app.get("/todos", response_model=list[TodoRecord])
async def get_todos() -> list[TodoRecord]:
    """
    Get Todos
    """
    todos: list[TodoRecord] = []
    async for doc in db.todos.find():
        todos.append(
            TodoRecord(
                id=str(doc["_id"]),
                title=doc["title"],
                completed=doc["completed"],
                created_date=doc["created_date"],
                updated_date=doc["updated_date"],
            )
        )

    return todos

@app.put(
    "/todos/{id}",
    response_model=TodoId,
    responses={
        404: {"description": "Not Found", "model": NotFoundException},
    },
)
async def update_todo(
    payload: Todo,
    id: str = Path(description="Todo ID", pattern=MONGO_ID_REGEX),
) -> TodoId:
    """
    Update a Todo
    """
    now = datetime.utcnow()
    update_result = await db.todos.update_one(
        {"_id": ObjectId(id)},
        {
            "$set": {
                "title": payload.title,
                "completed": payload.completed,
                "updated_date": now,
            }
        },
    )

    if update_result.matched_count == 0:
        raise HTTPException(status_code=404, detail="Not Found")

    return TodoId(id=id)

@app.delete(
    "/todos/{id}",
    response_model=bool,
    responses={
        404: {"description": "Not Found", "model": NotFoundException},
    },
)
async def delete_todo(
    id: str = Path(description="Todo ID", pattern=MONGO_ID_REGEX),
) -> bool:
    """
    Delete a Todo
    """
    delete_result = await db.todos.delete_one({"_id": ObjectId(id)})

    if delete_result.deleted_count == 0:
        raise HTTPException(status_code=404, detail="Not Found")

    return True

if __name__ == "__main__":
    uvicorn.run(
        "main:app",
        host="0.0.0.0",
        port=8000,
        log_level="debug",
        reload=True,
    )
实用工具
元数据
我们一直在使用的 Swagger OpenAPI 文档是用户在使用我们的 API 时会参考的内容,因此让它显示相关信息非常有用。使用基础 FastAPI 应用对象,我们可以设置 API 标题、版本和支持 Markdown 的描述,并更新文档位置(我们将该位置更改为基础路径)/。此外, root_path 如果您的 API 位于子路径(例如)的反向代理之后,则可以设置 。 /api 但在这种情况下,我们将直接运行 API,它将位于根路径。
📝main.py
...
class Settings(BaseSettings):
    mongo_uri: str
    root_path: str = ""
    model_config = SettingsConfigDict(env_file=".env", extra="ignore")

settings = Settings()

db_client = AsyncIOMotorClient(settings.mongo_uri)
db = db_client.todoDb

description = """
This is a fancy API built with [FastAPI🚀](https://fastapi.tiangolo.com/)

📝 [Source Code](https://github.com/dpills/fastapi-prod-guide)
🐞 [Issues](https://github.com/dpills/fastapi-prod-guide/issues)
"""
app = FastAPI(
    title="My Todo App",
    description=description,
    version="1.0.0",
    docs_url="/",
    root_path=settings.root_path,
)
...
打开浏览器访问http://localhost:8000/,因为我们更改了docs_url,现在我们可以看到元数据出现了!

日志记录
所有应用程序都需要日志记录才能正确解决问题,使用 Python 日志模块或日志库是个好主意。我们可以设置日志格式并使用日志级别,这些级别可以通过环境变量设置来设置,这样我们就可以在不更改源代码的情况下在不同环境中进行调整。
📝main.py
import logging
import sys
...
from pydantic_settings import BaseSettings, SettingsConfigDict

class Settings(BaseSettings):
    mongo_uri: str
    root_path: str = ""
    logging_level: str = "INFO"
    model_config = SettingsConfigDict(env_file=".env", extra="ignore")

settings = Settings()

logging.basicConfig(
    stream=sys.stdout,
    level=settings.logging_level,
    format="[%(asctime)s] %(levelname)s [%(name)s.%(funcName)s:%(lineno)d] %(message)s",  # noqa: E501
    datefmt="%d/%b/%Y %H:%M:%S",
)
logger = logging.getLogger("my-todos")
...
中间件
API 中的中间件有助于避免重复每个端点所需的逻辑,例如 CORS、性能元数据或请求日志记录。
当您希望允许托管在其他域名的网站直接从其网站调用您的 API 时,需要在 API 上启用 CORS(跨域资源共享)。例如,如果我在 my-app.com 上托管了一个前端 React Web 应用,并希望它调用托管在my-api.com上的 API ,那么我需要将 my-app.com 添加到 “允许的来源”中。幸运的是,这是一个非常常见的中间件,FastAPI 开箱即用地支持它。
📝main.py
from fastapi.middleware.cors import CORSMiddleware
...
app = FastAPI(
    title="My Todo App",
    description=description,
    version="1.0.0",
    docs_url="/",
    root_path=settings.root_path,
)
app.add_middleware(
    CORSMiddleware,
    allow_credentials=True,
    allow_methods=["*"],
    allow_headers=["*"],
    allow_origins=[
        "http://localhost:3000",
    ],
)
中间件还可以在 API 函数执行之前和之后运行,这使我们能够跟踪性能并将其返回到响应标头中,同时将请求信息记录到控制台,稍后可用于故障排除和指标。
📝main.py
import time
...
from typing import Any, Callable, TypeVar
...
from fastapi import FastAPI, HTTPException, Path, Request, Response
...

F = TypeVar("F", bound=Callable[..., Any])

@app.middleware("http")
async def process_time_log_middleware(request: Request, call_next: F) -> Response:
    """
    Add API process time in response headers and log calls
    """
    start_time = time.time()
    response: Response = await call_next(request)
    process_time = str(round(time.time() - start_time, 3))
    response.headers["X-Process-Time"] = process_time

    logger.info(
        "Method=%s Path=%s StatusCode=%s ProcessTime=%s",
        request.method,
        request.url.path,
        response.status_code,
        process_time,
    )

    return response
...
现在,我们在进行调用时可以看到中间件的日志记录。
INFO:     127.0.0.1:60005 - "GET /todos HTTP/1.1" 200 OK
[15/Oct/2023 09:31:52] INFO [my-todos.process_time_log_middleware:91] Method=GET Path=/todos StatusCode=200 ProcessTime=0.004
💡 请参阅如何使用 Redis 限制 FastAPI 的速率 📈 来了解如何添加速率限制中间件
带有实用程序的 CRUD API
📝main.py
import logging
import sys
import time
from datetime import datetime
from typing import Any, Callable, TypeVar

import uvicorn
from bson import ObjectId
from fastapi import FastAPI, HTTPException, Path, Request, Response
from fastapi.middleware.cors import CORSMiddleware
from motor.motor_asyncio import AsyncIOMotorClient
from pydantic import BaseModel
from pydantic_settings import BaseSettings, SettingsConfigDict

class Settings(BaseSettings):
    mongo_uri: str
    root_path: str = ""
    logging_level: str = "INFO"
    model_config = SettingsConfigDict(env_file=".env", extra="ignore")

settings = Settings()

logging.basicConfig(
    stream=sys.stdout,
    level=settings.logging_level,
    format="[%(asctime)s] %(levelname)s [%(name)s.%(funcName)s:%(lineno)d] %(message)s",  # noqa: E501
    datefmt="%d/%b/%Y %H:%M:%S",
)
logger = logging.getLogger("my-todos")

db_client = AsyncIOMotorClient(settings.mongo_uri)
db = db_client.todoDb

description = """
This is a fancy API built with [FastAPI🚀](https://fastapi.tiangolo.com/)

📝 [Source Code](https://github.com/dpills/fastapi-prod-guide)
🐞 [Issues](https://github.com/dpills/fastapi-prod-guide/issues)
"""
app = FastAPI(
    title="My Todo App",
    description=description,
    version="1.0.0",
    docs_url="/",
    root_path=settings.root_path,
)
app.add_middleware(
    CORSMiddleware,
    allow_credentials=True,
    allow_methods=["*"],
    allow_headers=["*"],
    allow_origins=[
        "http://localhost:3000",
    ],
)

MONGO_ID_REGEX = r"^[a-f\d]{24}$"
F = TypeVar("F", bound=Callable[..., Any])

class Todo(BaseModel):
    title: str
    completed: bool = False

class TodoId(BaseModel):
    id: str

class TodoRecord(TodoId, Todo):
    created_date: datetime
    updated_date: datetime

class NotFoundException(BaseModel):
    detail: str = "Not Found"

@app.middleware("http")
async def process_time_log_middleware(request: Request, call_next: F) -> Response:
    """
    Add API process time in response headers and log calls
    """
    start_time = time.time()
    response: Response = await call_next(request)
    process_time = str(round(time.time() - start_time, 3))
    response.headers["X-Process-Time"] = process_time

    logger.info(
        "Method=%s Path=%s StatusCode=%s ProcessTime=%s",
        request.method,
        request.url.path,
        response.status_code,
        process_time,
    )

    return response

@app.post("/todos", response_model=TodoId)
async def create_todo(payload: Todo) -> TodoId:
    """
    Create a new Todo
    """
    now = datetime.utcnow()
    insert_result = await db.todos.insert_one(
        {
            "title": payload.title,
            "completed": payload.completed,
            "created_date": now,
            "updated_date": now,
        }
    )

    return TodoId(id=str(insert_result.inserted_id))

@app.get(
    "/todos/{id}",
    response_model=TodoRecord,
    responses={
        404: {"description": "Not Found", "model": NotFoundException},
    },
)
async def get_todo(
    id: str = Path(description="Todo ID", pattern=MONGO_ID_REGEX)
) -> TodoRecord:
    """
    Get a Todo
    """
    doc = await db.todos.find_one({"_id": ObjectId(id)})
    if not doc:
        raise HTTPException(status_code=404, detail="Not Found")

    return TodoRecord(
        id=str(doc["_id"]),
        title=doc["title"],
        completed=doc["completed"],
        created_date=doc["created_date"],
        updated_date=doc["updated_date"],
    )

@app.get("/todos", response_model=list[TodoRecord])
async def get_todos() -> list[TodoRecord]:
    """
    Get Todos
    """
    todos: list[TodoRecord] = []
    async for doc in db.todos.find():
        todos.append(
            TodoRecord(
                id=str(doc["_id"]),
                title=doc["title"],
                completed=doc["completed"],
                created_date=doc["created_date"],
                updated_date=doc["updated_date"],
            )
        )

    return todos

@app.put(
    "/todos/{id}",
    response_model=TodoId,
    responses={
        404: {"description": "Not Found", "model": NotFoundException},
    },
)
async def update_todo(
    payload: Todo,
    id: str = Path(description="Todo ID", pattern=MONGO_ID_REGEX),
) -> TodoId:
    """
    Update a Todo
    """
    now = datetime.utcnow()
    update_result = await db.todos.update_one(
        {"_id": ObjectId(id)},
        {
            "$set": {
                "title": payload.title,
                "completed": payload.completed,
                "updated_date": now,
            }
        },
    )

    if update_result.matched_count == 0:
        raise HTTPException(status_code=404, detail="Not Found")

    return TodoId(id=id)

@app.delete(
    "/todos/{id}",
    response_model=bool,
    responses={
        404: {"description": "Not Found", "model": NotFoundException},
    },
)
async def delete_todo(
    id: str = Path(description="Todo ID", pattern=MONGO_ID_REGEX),
) -> bool:
    """
    Delete a Todo
    """
    delete_result = await db.todos.delete_one({"_id": ObjectId(id)})

    if delete_result.deleted_count == 0:
        raise HTTPException(status_code=404, detail="Not Found")

    return True

if __name__ == "__main__":
    uvicorn.run(
        "main:app",
        host="0.0.0.0",
        port=8000,
        log_level="debug",
        reload=True,
    )
组织
随着我们不断向 API 添加功能、函数和路由,单个main.py文件变得难以管理。代码的混乱和低质量标准使其难以长期维护,因此我们将研究如何为 API 增加更好的标准和组织方式。
API路由器
对于大型项目,FastAPI 引入了路由器的概念,用于创建 API 的各个部分。主要区别在于,在子部分中,您可以创建一个 router 对象,然后路由使用 @router.get 语法(而非 ) @app.get。之后,可以使用标签类别和前缀导入并添加到应用程序中。我们将使用此模式来重构我们的 API。
项目结构

将所有环境变量移动到中央配置文件。
📝应用程序/config.py
from pydantic_settings import BaseSettings, SettingsConfigDict

class Settings(BaseSettings):
    mongo_uri: str
    root_path: str = ""
    logging_level: str = "INFO"
    model_config = SettingsConfigDict(env_file=".env", extra="ignore")

settings = Settings()
添加可在 API 的多个位置重复使用的全局静态值。
📝 app/static_values.py
MONGO_ID_REGEX = r"^[a-f\d]{24}$"
将数据库连接对象创建和日志记录处理程序移动到 utilities 文件夹
📝应用程序/实用程序/db.py
from motor.motor_asyncio import AsyncIOMotorClient

from app.config import settings

db_client = AsyncIOMotorClient(settings.mongo_uri)
db = db_client.todoDb
📝应用程序/实用程序/logger.py
import logging
import sys

from app.config import settings

logging.basicConfig(
    stream=sys.stdout,
    level=settings.logging_level,
    format="[%(asctime)s] %(levelname)s [%(name)s.%(funcName)s:%(lineno)d] %(message)s",  # noqa: E501
    datefmt="%d/%b/%Y %H:%M:%S",
)
logger = logging.getLogger("my-todos")
将模型移动到相关 todos API 路由中的自己的文件中。
📝 app/routers/todos/models.py
from datetime import datetime

from pydantic import BaseModel

class Todo(BaseModel):
    title: str
    completed: bool = False

class TodoId(BaseModel):
    id: str

class TodoRecord(TodoId, Todo):
    created_date: datetime
    updated_date: datetime

class NotFoundException(BaseModel):
    detail: str = "Not Found"
将所有与待办事项相关的函数移到各自的路由器文件中。我们将切换到使用路由器的语法 @router ,并调整路径,以便 /v1/todos 在主应用程序中引入路由器时添加前缀。
📝 应用程序/路由器/todos/todos.py
from datetime import datetime

from bson import ObjectId
from fastapi import APIRouter, HTTPException, Path

from app.static_values import MONGO_ID_REGEX
from app.utilities.db import db

from .models import NotFoundException, Todo, TodoId, TodoRecord

router = APIRouter()

@router.post("", response_model=TodoId)
async def create_todo(payload: Todo) -> TodoId:
    """
    Create a new Todo
    """
    now = datetime.utcnow()
    insert_result = await db.todos.insert_one(
        {
            "title": payload.title,
            "completed": payload.completed,
            "created_date": now,
            "updated_date": now,
        }
    )

    return TodoId(id=str(insert_result.inserted_id))

@router.get(
    "/{id}",
    response_model=TodoRecord,
    responses={
        404: {"description": "Not Found", "model": NotFoundException},
    },
)
async def get_todo(
    id: str = Path(description="Todo ID", pattern=MONGO_ID_REGEX)
) -> TodoRecord:
    """
    Get a Todo
    """
    doc = await db.todos.find_one({"_id": ObjectId(id)})
    if not doc:
        raise HTTPException(status_code=404, detail="Not Found")

    return TodoRecord(
        id=str(doc["_id"]),
        title=doc["title"],
        completed=doc["completed"],
        created_date=doc["created_date"],
        updated_date=doc["updated_date"],
    )

@router.get("", response_model=list[TodoRecord])
async def get_todos() -> list[TodoRecord]:
    """
    Get Todos
    """
    todos: list[TodoRecord] = []
    async for doc in db.todos.find():
        todos.append(
            TodoRecord(
                id=str(doc["_id"]),
                title=doc["title"],
                completed=doc["completed"],
                created_date=doc["created_date"],
                updated_date=doc["updated_date"],
            )
        )

    return todos

@router.put(
    "/{id}",
    response_model=TodoId,
    responses={
        404: {"description": "Not Found", "model": NotFoundException},
    },
)
async def update_todo(
    payload: Todo,
    id: str = Path(description="Todo ID", pattern=MONGO_ID_REGEX),
) -> TodoId:
    """
    Update a Todo
    """
    now = datetime.utcnow()
    update_result = await db.todos.update_one(
        {"_id": ObjectId(id)},
        {
            "$set": {
                "title": payload.title,
                "completed": payload.completed,
                "updated_date": now,
            }
        },
    )

    if update_result.matched_count == 0:
        raise HTTPException(status_code=404, detail="Not Found")

    return TodoId(id=id)

@router.delete(
    "/{id}",
    response_model=bool,
    responses={
        404: {"description": "Not Found", "model": NotFoundException},
    },
)
async def delete_todo(
    id: str = Path(description="Todo ID", pattern=MONGO_ID_REGEX),
) -> bool:
    """
    Delete a Todo
    """
    delete_result = await db.todos.delete_one({"_id": ObjectId(id)})

    if delete_result.deleted_count == 0:
        raise HTTPException(status_code=404, detail="Not Found")

    return True
最后,我们将导入我们的 API 路由器并将其包含在我们的 FastAPI 应用程序中,并调整我们的 uvicorn 运行函数以指向我们的新应用程序路径app.main:app。
📝应用程序/main.py
import time
from typing import Any, Callable, TypeVar

import uvicorn
from fastapi import FastAPI, Request, Response
from fastapi.middleware.cors import CORSMiddleware

from app.config import settings
from app.routers.todos import todos
from app.utilities.logger import logger

description = """
This is a fancy API built with [FastAPI🚀](https://fastapi.tiangolo.com/)

📝 [Source Code](https://github.com/dpills/fastapi-prod-guide)
🐞 [Issues](https://github.com/dpills/fastapi-prod-guide/issues)
"""
app = FastAPI(
    title="My Todo App",
    description=description,
    version="1.0.0",
    docs_url="/",
    root_path=settings.root_path,
)
app.add_middleware(
    CORSMiddleware,
    allow_credentials=True,
    allow_methods=["*"],
    allow_headers=["*"],
    allow_origins=[
        "http://localhost:3000",
    ],
)

F = TypeVar("F", bound=Callable[..., Any])

@app.middleware("http")
async def process_time_log_middleware(request: Request, call_next: F) -> Response:
    """
    Add API process time in response headers and log calls
    """
    start_time = time.time()
    response: Response = await call_next(request)
    process_time = str(round(time.time() - start_time, 3))
    response.headers["X-Process-Time"] = process_time

    logger.info(
        "Method=%s Path=%s StatusCode=%s ProcessTime=%s",
        request.method,
        request.url.path,
        response.status_code,
        process_time,
    )

    return response

app.include_router(
    todos.router,
    prefix="/v1/todos",
    tags=["todos"],
)

if __name__ == "__main__":
    uvicorn.run(
        "app.main:app",
        host="0.0.0.0",
        port=8000,
        log_level="debug",
        reload=True,
    )
现在我们已经更新了项目结构,我们可以使用 -m python 标志从基础项目文件夹运行我们的应用程序。
$ python3 -m app.main
INFO:     Will watch for changes in these directories: ['/Users/dpills/articles/fastapi-quick-start-guide']
INFO:     Uvicorn running on http://0.0.0.0:8000 (Press CTRL+C to quit)
INFO:     Started reloader process [96492] using WatchFiles
INFO:     Started server process [96494]
INFO:     Waiting for application startup.
INFO:     Application startup complete.
由于路由器标签的存在,API 文档现在包含/v1/todos前缀和类别部分。todos

安全
到目前为止,我们的 API 尚未内置任何身份验证或授权机制,这使其存在安全隐患,所有使用操作均匿名,我们无法区分每个用户的操作。因此,构建现代身份验证机制至关重要,其中一种常见的选择是使用 Bearer 令牌的 Oauth2。市面上有许多不同的 Oauth2 身份提供商,您可以根据应用程序的部署方式,利用集成的身份验证服务。您可以在 API 前端使用像 NGINX 这样的反向代理来处理身份验证,也可以将身份验证直接构建到应用程序代码中。我们将利用 Github Oauth 和Authorization Code流程将身份验证直接构建到我们的 API 中。

GitHub Oauth 设置
导航到https://github.com/settings/developersOauth Apps上的GitHub开发者设置并创建一个新的 oauth 应用程序。

然后在创建应用程序后生成秘密。

将客户端 ID 和密钥添加到我们的.env文件中。
📝 .env
MONGO_INITDB_ROOT_USERNAME=root
MONGO_INITDB_ROOT_PASSWORD=mySecureDbPassword1
MONGO_URI=mongodb://root:mySecureDbPassword1@localhost:27017/
GITHUB_OAUTH_CLIENT_ID=0ec7d96992836a5fbb98
GITHUB_OAUTH_CLIENT_SECRET=e813b0cdb4d402d55d5d09cfd08dfd06xxxxxxxx
以及配置设置,以便我们可以在我们的 API 中使用它们。
📝应用程序/config.py
...
class Settings(BaseSettings):
    mongo_uri: str
    github_oauth_client_id: str
    github_oauth_client_secret: str
    root_path: str = ""
    logging_level: str = "INFO"
    model_config = SettingsConfigDict(env_file=".env", extra="ignore")
...
Oauth回调
我们需要向 Github 发起 HTTP 调用来获取用户访问令牌和用户名。最流行的 HTTP Python 库是 Requests,但由于我们使用异步函数,因此我们将使用支持异步的HTTPX库。
$ poetry add httpx
Using version ^0.25.0 for httpx

Updating dependencies
Resolving dependencies... (0.2s)

No dependencies to install or update

Writing lock file
添加一个新的 auth 路由器文件夹并设置 oauth 回调端点。

用户需要使用应用的客户端 ID 访问https://github.com/login/oauth/authorize?client_id=GITHUB_OAUTH_CLIENT_ID&redirect_uri=http://localhost:8000/v1/auth/callback,授权应用接收访问令牌并获取用户身份。应用会重定向回我们的终端,URL 参数中包含一个代码/v1/auth/callback?code=xxxx,我们可以使用此代码获取用户的访问令牌和用户名。之后,我们可以将用户添加到数据库中,并使用访问令牌的安全 SHA-256 哈希值,以便将来查找用户。
📝 app/routers/auth/models.py
from pydantic import BaseModel

class OauthException(BaseModel):
    detail: str

class OauthToken(BaseModel):
    access_token: str
Oauth 代码将发送回我们的端点
📝 应用程序/路由器/身份验证/身份验证.py
import hashlib
from datetime import datetime

import httpx
from fastapi import APIRouter, HTTPException, Query

from app.config import settings
from app.utilities.db import db

from .models import OauthException, OauthToken

router = APIRouter()

@router.get(
    "/callback",
    response_model=OauthToken,
    responses={
        400: {"description": "Oauth Error", "model": OauthException},
    },
)
async def oauth_callback(
    code: str = Query(description="Authorization Code"),
) -> OauthToken:
    """
    GitHub Oauth Integration Callback
    """
    async with httpx.AsyncClient() as client:
        token_result = await client.post(
            "https://github.com/login/oauth/access_token",
            json={
                "client_id": settings.github_oauth_client_id,
                "client_secret": settings.github_oauth_client_secret,
                "code": code,
                "redirect_uri": "http://localhost:8000/v1/auth/callback",
            },
            headers={"Accept": "application/json"},
        )
        data = token_result.json()
        error = data.get("error")
        if error:
            raise HTTPException(
                status_code=400,
                detail=f"{data.get('error')}: {data.get('error_description')}",
            )

        access_token: str = data.get("access_token")
        user_result = await client.get(
            "https://api.github.com/user",
            headers={"Authorization": f"Bearer {access_token}"},
        )
        user_data = user_result.json()
        user = user_data.get("login")

    await db.tokens.insert_one(
        {
            "user": user,
            "access_token_hash": hashlib.sha256(access_token.encode()).hexdigest(),
            "created_date": datetime.utcnow(),
        },
    )

    return OauthToken(access_token=access_token)
在我们的文件中包含新的身份验证路由器[main.py](http://main.py),并在我们的 API 描述中包含 Github 授权链接。
📝应用程序/main.py
...
from app.routers.auth import auth
...

description = f"""
This is a fancy API built with [FastAPI🚀](https://fastapi.tiangolo.com/)

Authorize to get an Access Token from GitHub at <https://github.com/login/oauth/authorize?client_id={settings.github_oauth_client_id}&redirect_uri=http://localhost:8000/v1/auth/callback>

📝 [Source Code](https://github.com/dpills/fastapi-prod-guide)
🐞 [Issues](https://github.com/dpills/fastapi-prod-guide/issues)
"""

...

app.include_router(
    auth.router,
    prefix="/v1/auth",
    tags=["auth"],
)
...
您现在可以测试导航到 API 描述中的 Github 授权链接并验证是否返回了访问令牌。

{
  "access_token": "gho_aBplc0MVRPFeeyE95UJPg209LRSp7V1xxxxx"
}
验证访问令牌
在 auth 文件中创建一个函数来接收访问令牌,如果我们知道用户,则检查我们的数据库缓存,否则根据 Github API 对其进行验证,如果仍然无效,则引发 401 错误。
📝 应用程序/路由器/身份验证/身份验证.py
from typing import Annotated
...
from fastapi import APIRouter, Depends, HTTPException, Query
from fastapi.security import HTTPAuthorizationCredentials, HTTPBearer
...

router = APIRouter()
security = HTTPBearer()
...

async def validate_access_token(
    access_token: Annotated[HTTPAuthorizationCredentials, Depends(security)]
) -> str:
    """
    Validate an access token
    Returns the username or raises a 401 HTTPException
    """
    access_token_hash = hashlib.sha256(access_token.credentials.encode()).hexdigest()
    cached_token = await db.tokens.find_one({"access_token_hash": access_token_hash})

    if cached_token:
        user: str | None = cached_token.get("user")
        if user:
            return user

    async with httpx.AsyncClient() as client:
        user_result = await client.get(
            "https://api.github.com/user",
            headers={"Authorization": f"Bearer {access_token.credentials}"},
        )

        if user_result.status_code == 200:
            user_data = user_result.json()
            user = user_data.get("login")
            if user:
                await db.tokens.insert_one(
                    {
                        "user": user,
                        "access_token_hash": access_token_hash,
                        "created_date": datetime.utcnow(),
                    },
                )
                return user

    raise HTTPException(
        status_code=401,
        detail="Unauthorized",
    )
由于我们将在 MongoDB 中查找访问令牌哈希,因此可以使用mongoshshell 为该字段添加唯一索引,以提高其性能。我们还可以添加 TTL 索引,以便我们仅缓存 24 小时的令牌。
> use todoDb
switched to db todoDb

> db.tokens.createIndex( { "access_token_hash": 1 }, { unique: true } )
access_token_hash_1

> db.tokens.createIndex( { "created_date": 1 }, { expireAfterSeconds: 86400 } )
created_date_1
💡 请参阅MongoDB 快速入门指南🍃⚡️获取 MongoDB 指南
向端点添加 Bearer Token 授权
将 Bearer 令牌身份验证和validate_access_token函数添加到 todos 端点。
📝 应用程序/路由器/todos/todos.py
...
from typing import Annotated
...
from fastapi import APIRouter, Depends, HTTPException, Path
from fastapi.security import (
    HTTPAuthorizationCredentials,
    HTTPBearer,
)

from app.routers.auth.auth import validate_access_token
from app.routers.auth.models import UnauthorizedException
...

security = HTTPBearer()

@router.post(
    "",
    response_model=TodoId,
    responses={
        401: {"description": "Unauthorized", "model": UnauthorizedException},
    },
)
async def create_todo(
    access_token: Annotated[HTTPAuthorizationCredentials, Depends(security)],
    user: Annotated[str, Depends(validate_access_token)],
    payload: Todo,
) -> TodoId:
...

@router.get(
    "/{id}",
    response_model=TodoRecord,
    responses={
        401: {"description": "Unauthorized", "model": UnauthorizedException},
        404: {"description": "Not Found", "model": NotFoundException},
    },
)
async def get_todo(
    access_token: Annotated[HTTPAuthorizationCredentials, Depends(security)],
    user: Annotated[str, Depends(validate_access_token)],
    id: str = Path(description="Todo ID", pattern=MONGO_ID_REGEX),
) -> TodoRecord:
...

@router.get(
    "",
    response_model=list[TodoRecord],
    responses={
        401: {"description": "Unauthorized", "model": UnauthorizedException},
    },
)
async def get_todos(
    access_token: Annotated[HTTPAuthorizationCredentials, Depends(security)],
    user: Annotated[str, Depends(validate_access_token)],
) -> list[TodoRecord]:
...

@router.put(
    "/{id}",
    response_model=TodoId,
    responses={
        401: {"description": "Unauthorized", "model": UnauthorizedException},
        404: {"description": "Not Found", "model": NotFoundException},
    },
)
async def update_todo(
    access_token: Annotated[HTTPAuthorizationCredentials, Depends(security)],
    user: Annotated[str, Depends(validate_access_token)],
    payload: Todo,
    id: str = Path(description="Todo ID", pattern=MONGO_ID_REGEX),
) -> TodoId:
...

@router.delete(
    "/{id}",
    response_model=bool,
    responses={
        401: {"description": "Unauthorized", "model": UnauthorizedException},
        404: {"description": "Not Found", "model": NotFoundException},
    },
)
async def delete_todo(
    access_token: Annotated[HTTPAuthorizationCredentials, Depends(security)],
    user: Annotated[str, Depends(validate_access_token)],
    id: str = Path(description="Todo ID", pattern=MONGO_ID_REGEX),
) -> bool:
...
验证授权是否正常工作。
$ curl -v http://localhost:8000/v1/todos
< HTTP/1.1 403 Forbidden
{
  "detail": "Not authenticated"
}

$ curl -v http://localhost:8000/v1/todos -H 'Authorization: Bearer BAD_TOKEN'
< HTTP/1.1 401 Unauthorized
{
  "detail": "Unauthorized"
}

$ curl -v http://localhost:8000/v1/todos -H 'Authorization: Bearer gho_aBplc0MVRPFeeyE95UJPg209LRSp7V1xxxxx'
< HTTP/1.1 200 OK
[
  {
    "title": "Create CRUD APIs",
    "completed": true,
    "id": "652bddc9a09fc3e748c3d5e7",
    "created_date": "2023-10-15T12:40:41.191000",
    "updated_date": "2023-10-15T12:42:19.153000"
  }
]
现在,todo 端点也会在 swagger 中显示一个锁定图标。

整合用户信息
到目前为止,我们存储的待办事项记录都没有用户名,这对于单个用户来说还好,但为了支持多个用户,我们需要追踪哪个用户拥有该记录。然后,我们还可以在读取、更新和删除端点中添加逻辑,允许用户仅获取、修改和删除自己的待办事项。
📝 app/routers/todos/models.py
...
class TodoRecord(TodoId, Todo):
    user: str
    created_date: datetime
    updated_date: datetime
...
📝 应用程序/路由器/todos/todos.py
...
async def create_todo(
...
    insert_result = await db.todos.insert_one(
        {
            "title": payload.title,
            "completed": payload.completed,
            "user": user,
            "created_date": now,
            "updated_date": now,
        }
    )
...

async def get_todo(
...
    doc = await db.todos.find_one({"_id": ObjectId(id), "user": user})
        ...
    return TodoRecord(
        id=str(doc["_id"]),
        title=doc["title"],
        completed=doc["completed"],
        user=doc["user"],
        created_date=doc["created_date"],
        updated_date=doc["updated_date"],
    )
...

async def get_todos(
...
    async for doc in db.todos.find({"user": user}):
        todos.append(
            TodoRecord(
                id=str(doc["_id"]),
                title=doc["title"],
                completed=doc["completed"],
                user=doc["user"],
                created_date=doc["created_date"],
                updated_date=doc["updated_date"],
            )
        )
...

async def update_todo(
...
    update_result = await db.todos.update_one(
        {"_id": ObjectId(id), "user": user},
        {
            "$set": {
                "title": payload.title,
                "completed": payload.completed,
                "updated_date": now,
            }
        },
    )
...

async def delete_todo(
...
    delete_result = await db.todos.delete_one({"_id": ObjectId(id), "user": user})
...
从数据库中删除所有现有的待办事项条目,并测试创建和获取新的待办事项记录。

由于我们使用新字段进行 Mongo 查找user,因此为该字段添加索引以提高性能。
> use todoDb
switched to db todoDb

> db.todos.createIndex( { "user": 1 })
user_1

> db.todos.createIndex( { "_id": 1, "user": 1 })
_id_1_user_1
测试
测试对于确保您的 API 或应用程序正常运行至关重要,在合并或部署更新之前设置自动化测试可以让您确信没有任何问题,从而可以更频繁地发布版本。测试有很多不同的类别,但我们将介绍如何实施单元测试和集成测试,以及如何验证代码覆盖率。
测试环境设置
添加测试、覆盖和模拟库。
$ poetry add -G dev pytest coverage mongomock-motor pytest_httpx pytest-asyncio
Using version ^7.4.2 for pytest
Using version ^7.3.2 for coverage
Using version ^0.0.21 for mongomock-motor
Using version ^0.21.1 for pytest-asyncio

Updating dependencies
Resolving dependencies... (0.3s)

Package operations: 9 installs, 0 updates, 0 removals

  • Installing iniconfig (2.0.0)
  • Installing pluggy (1.3.0)
  • Installing sentinels (1.0.0)
  • Installing mongomock (4.1.2)
  • Installing pytest (7.4.2)
  • Installing coverage (7.3.2)
  • Installing mongomock-motor (0.0.21)
  • Installing pytest-asyncio (0.21.1)
testing在设置中添加一个布尔值,以便我们可以指示我们正在应用程序内运行测试。
📝应用程序/config.py
from pydantic_settings import BaseSettings, SettingsConfigDict

class Settings(BaseSettings):
    mongo_uri: str
    github_oauth_client_id: str
    github_oauth_client_secret: str
    root_path: str = ""
    logging_level: str = "INFO"
    testing: bool = False
    model_config = SettingsConfigDict(env_file=".env", extra="ignore")

settings = Settings()
更新数据库文件以使用testing设置来指示我们是否应该加载模拟内存 MongoDB 或实际的 MongoDB 连接。
📝应用程序/实用程序/db.py
from motor.motor_asyncio import AsyncIOMotorClient, AsyncIOMotorDatabase

from app.config import settings

def get_db() -> AsyncIOMotorDatabase:
    """
    Get MongoDB
    """
    if settings.testing:
        from mongomock_motor import AsyncMongoMockClient

        mock_db: AsyncIOMotorDatabase = AsyncMongoMockClient().todoDb
        return mock_db
    else:
        return AsyncIOMotorClient(settings.mongo_uri).todoDb

db = get_db()
添加一个用于全局测试配置的conftest.py文件,我们将设置事件循环,实例化我们的测试客户端并将测试用户添加到我们的模拟数据库,以便我们可以正确测试经过身份验证的端点。
📝 app/conftest.py
import asyncio
import hashlib
from datetime import datetime
from typing import Any, Generator

import pytest
from httpx import AsyncClient

from app.main import app
from app.utilities.db import db

async def add_db_test_user() -> None:
    """
    Add test user to Database
    """
    await db.tokens.update_one(
        {"user": "tester"},
        {
            "$set": {
                "access_token_hash": hashlib.sha256("GOOD_TOKEN".encode()).hexdigest(),
                "created_date": datetime.utcnow(),
            }
        },
        upsert=True,
    )

    return None

@pytest.fixture(scope="session")
def event_loop() -> Generator[asyncio.AbstractEventLoop, Any, None]:
    """
    Override Event Loop
    """
    try:
        loop = asyncio.get_running_loop()
    except RuntimeError:
        loop = asyncio.new_event_loop()

    # Add test user to DB
    loop.run_until_complete(add_db_test_user())

    yield loop
    loop.close()

@pytest.fixture()
def test_client() -> AsyncClient:
    """
    Create an instance of the client
    """
    return AsyncClient(app=app, base_url="http://test", follow_redirects=True)
添加测试
我们现在可以将测试添加到我们的待办事项端点。
📝 应用程序/路由器/todos/test_todos.py
import pytest
from httpx import AsyncClient

pytestmark = pytest.mark.asyncio
AUTH_HEADER = {"Authorization": "Bearer GOOD_TOKEN"}

async def test_create_todo(test_client: AsyncClient) -> None:
    """
    Test Creating a todo
    """
    # No Bearer Token
    r = await test_client.post("/v1/todos", json={"title": "test", "completed": False})
    assert r.status_code == 403

    # Invalid Bearer Token
    r = await test_client.post(
        "/v1/todos",
        json={"title": "test", "completed": False},
        headers={"Authorization": "Bearer BAD_TOKEN"},
    )
    assert r.status_code == 401

    # Valid Bearer Token
    r = await test_client.post(
        "/v1/todos",
        json={"title": "create_test", "completed": False},
        headers=AUTH_HEADER,
    )
    assert r.status_code == 200
    assert r.json().get("id")

async def test_get_todos(test_client: AsyncClient) -> None:
    """
    Test Fetching todos
    """
    # Get all Todos
    r = await test_client.get("/v1/todos", headers=AUTH_HEADER)
    assert r.status_code == 200
    results = r.json()
    assert results

    # Get single Todo
    todo_id = results[0].get("id")
    r = await test_client.get(f"/v1/todos/{todo_id}", headers=AUTH_HEADER)
    assert r.status_code == 200

    # Unknown Todo ID
    r = await test_client.get("/v1/todos/652d729bb8da04810695a943", headers=AUTH_HEADER)
    assert r.status_code == 404

async def test_update_todo(test_client: AsyncClient) -> None:
    """
    Test updating a todo
    """
    # Get all Todos
    r = await test_client.get("/v1/todos", headers=AUTH_HEADER)
    assert r.status_code == 200
    results = r.json()
    assert results

    # Update a Todo
    todo_id = results[0].get("id")
    r = await test_client.put(
        f"/v1/todos/{todo_id}",
        json={"title": "update_test", "completed": True},
        headers=AUTH_HEADER,
    )
    assert r.status_code == 200

    # Unknown Todo ID
    r = await test_client.put(
        "/v1/todos/652d729bb8da04810695a943",
        json={"title": "update_test", "completed": True},
        headers=AUTH_HEADER,
    )
    assert r.status_code == 404

async def test_delete_todo(test_client: AsyncClient) -> None:
    """
    Test deleting a todo
    """
    # Get all Todos
    r = await test_client.get("/v1/todos", headers=AUTH_HEADER)
    assert r.status_code == 200
    results = r.json()
    assert results

    # Delete a Todo
    todo_id = results[0].get("id")
    r = await test_client.delete(
        f"/v1/todos/{todo_id}",
        headers=AUTH_HEADER,
    )
    assert r.status_code == 200

    # Unknown Todo ID
    r = await test_client.delete(
        "/v1/todos/652d729bb8da04810695a943",
        headers=AUTH_HEADER,
    )
    assert r.status_code == 404
使用 coverage 和 pytest 命令运行测试套件,以生成覆盖率输出。请确保TESTING在开始时设置环境变量。
$ export TESTING=true && poetry run coverage run --source ./app -m pytest --disable-warnings
==================================================== test session starts =====================================================
platform darwin -- Python 3.11.4, pytest-7.4.2, pluggy-1.3.0
rootdir: /Users/depillsb/articles/fastapi-quick-start-guide
plugins: httpx-0.26.0, asyncio-0.21.1, anyio-3.7.1
asyncio: mode=Mode.STRICT
collected 4 items

app/routers/todos/test_todos.py ....                                                                                   [100%]

================================================ 4 passed, 1 warning in 1.23s ================================================

$ poetry run coverage html
Wrote HTML report to htmlcov/index.html
在 Web 浏览器中打开生成的文件htmlcov/index.html会显示应用程序的覆盖率百分比,并且我们的待办事项端点现在应该被 100% 覆盖!

生产部署
在开发过程中,我们一直使用 uvicorn 单实例 API,但在生产环境中,如果我们运行多个实例并针对它们进行负载均衡,则可以处理更多负载,这就是 gunicorn 我们能够做到的。我们可以 gunicorn 指定要运行的 Worker 数量,并告诉它 uvicorn 为这些 Worker 分配多少个 Worker。
安装 gunicorn 并向gunicorn_conf.py项目添加文件。
$ poetry add gunicorn
Using version ^21.2.0 for gunicorn

Updating dependencies
Resolving dependencies... (0.2s)

Package operations: 1 install, 0 updates, 0 removals

  • Installing gunicorn (21.2.0)

Writing lock file
📝 gunicorn_conf.py
import json
import multiprocessing
import os

workers_per_core_str = os.getenv("WORKERS_PER_CORE", "1")
max_workers_str = os.getenv("MAX_WORKERS", "10")
use_max_workers = None

if max_workers_str:
    use_max_workers = int(max_workers_str)

web_concurrency_str = os.getenv("WEB_CONCURRENCY", None)
host = os.getenv("HOST", "0.0.0.0")
port = os.getenv("PORT", "8000")
bind_env = os.getenv("BIND", None)
use_loglevel = os.getenv("LOG_LEVEL", "info")

if bind_env:
    use_bind = bind_env
else:
    use_bind = f"{host}:{port}"

cores = multiprocessing.cpu_count()
workers_per_core = float(workers_per_core_str)
default_web_concurrency = workers_per_core * cores

if web_concurrency_str:
    web_concurrency = int(web_concurrency_str)
    assert web_concurrency > 0
else:
    web_concurrency = max(int(default_web_concurrency), 2)
    if use_max_workers:
        web_concurrency = min(web_concurrency, use_max_workers)

accesslog_var = os.getenv("ACCESS_LOG", "-")
use_accesslog = accesslog_var or None
errorlog_var = os.getenv("ERROR_LOG", "-")
use_errorlog = errorlog_var or None
graceful_timeout_str = os.getenv("GRACEFUL_TIMEOUT", "60")
timeout_str = os.getenv("TIMEOUT", "60")
keepalive_str = os.getenv("KEEP_ALIVE", "5")

# Gunicorn config variables
worker_class = "app.workers.ConfigurableWorker"
loglevel = use_loglevel
workers = web_concurrency
bind = use_bind
errorlog = use_errorlog
worker_tmp_dir = "/tmp/shm"
accesslog = use_accesslog
graceful_timeout = int(graceful_timeout_str)
timeout = int(timeout_str)
keepalive = int(keepalive_str)

# For debugging and testing
log_data = {
    "loglevel": loglevel,
    "workers": workers,
    "bind": bind,
    "graceful_timeout": graceful_timeout,
    "timeout": timeout,
    "keepalive": keepalive,
    "errorlog": errorlog,
    "accesslog": accesslog,
    # Additional, non-gunicorn variables
    "workers_per_core": workers_per_core,
    "use_max_workers": use_max_workers,
    "host": host,
    "port": port,
}

print(json.dumps(log_data))
使用 Gunicorn 运行应用程序会运行 10 个 API 实例并在它们之间进行负载平衡。
$ gunicorn -k uvicorn.workers.UvicornWorker -c gunicorn_conf.py app.main:app
{"loglevel": "info", "workers": 10, "bind": "0.0.0.0:8000", "graceful_timeout": 60, "timeout": 60, "keepalive": 5, "errorlog": "-", "accesslog": "-", "workers_per_core": 1.0, "use_max_workers": 10, "host": "0.0.0.0", "port": "8000"}
[2023-10-15 14:51:23 -0400] [37562] [INFO] Starting gunicorn 21.2.0
[2023-10-15 14:51:23 -0400] [37562] [INFO] Listening at: http://0.0.0.0:8000 (37562)
[2023-10-15 14:51:23 -0400] [37562] [INFO] Using worker: uvicorn.workers.UvicornWorker
[2023-10-15 14:51:23 -0400] [37563] [INFO] Booting worker with pid: 37563
[2023-10-15 14:51:23 -0400] [37566] [INFO] Booting worker with pid: 37566
[2023-10-15 14:51:23 -0400] [37567] [INFO] Booting worker with pid: 37567
[2023-10-15 14:51:23 -0400] [37568] [INFO] Booting worker with pid: 37568
[2023-10-15 14:51:23 -0400] [37569] [INFO] Booting worker with pid: 37569
[2023-10-15 14:51:23 -0400] [37570] [INFO] Booting worker with pid: 37570
[2023-10-15 14:51:23 -0400] [37571] [INFO] Booting worker with pid: 37571
[2023-10-15 14:51:23 -0400] [37572] [INFO] Booting worker with pid: 37572
[2023-10-15 14:51:24 -0400] [37573] [INFO] Booting worker with pid: 37573
[2023-10-15 14:51:24 -0400] [37574] [INFO] Booting worker with pid: 37574
[2023-10-15 14:51:24 -0400] [37563] [INFO] Started server process [37563]
[2023-10-15 14:51:24 -0400] [37563] [INFO] Waiting for application startup.
[2023-10-15 14:51:24 -0400] [37563] [INFO] Application startup complete.
[2023-10-15 14:51:24 -0400] [37567] [INFO] Started server process [37567]
[2023-10-15 14:51:24 -0400] [37567] [INFO] Waiting for application startup.
[2023-10-15 14:51:24 -0400] [37567] [INFO] Application startup complete.
[2023-10-15 14:51:24 -0400] [37566] [INFO] Started server process [37566]
[2023-10-15 14:51:24 -0400] [37566] [INFO] Waiting for application startup.
[2023-10-15 14:51:24 -0400] [37566] [INFO] Application startup complete.
[2023-10-15 14:51:24 -0400] [37569] [INFO] Started server process [37569]
[2023-10-15 14:51:24 -0400] [37569] [INFO] Waiting for application startup.
[2023-10-15 14:51:24 -0400] [37569] [INFO] Application startup complete.
[2023-10-15 14:51:24 -0400] [37568] [INFO] Started server process [37568]
[2023-10-15 14:51:24 -0400] [37568] [INFO] Waiting for application startup.
[2023-10-15 14:51:24 -0400] [37568] [INFO] Application startup complete.
[2023-10-15 14:51:24 -0400] [37570] [INFO] Started server process [37570]
[2023-10-15 14:51:24 -0400] [37570] [INFO] Waiting for application startup.
[2023-10-15 14:51:24 -0400] [37570] [INFO] Application startup complete.
[2023-10-15 14:51:25 -0400] [37571] [INFO] Started server process [37571]
[2023-10-15 14:51:25 -0400] [37571] [INFO] Waiting for application startup.
[2023-10-15 14:51:25 -0400] [37571] [INFO] Application startup complete.
[2023-10-15 14:51:25 -0400] [37572] [INFO] Started server process [37572]
[2023-10-15 14:51:25 -0400] [37572] [INFO] Waiting for application startup.
[2023-10-15 14:51:25 -0400] [37572] [INFO] Application startup complete.
[2023-10-15 14:51:25 -0400] [37574] [INFO] Started server process [37574]
[2023-10-15 14:51:25 -0400] [37574] [INFO] Waiting for application startup.
[2023-10-15 14:51:25 -0400] [37574] [INFO] Application startup complete.
[2023-10-15 14:51:25 -0400] [37573] [INFO] Started server process [37573]
[2023-10-15 14:51:25 -0400] [37573] [INFO] Waiting for application startup.
[2023-10-15 14:51:25 -0400] [37573] [INFO] Application startup complete.
[2023-10-15 14:51:26 -0400] [37562] [INFO] Handling signal: winch
集装箱化
现在让我们将这个应用程序容器化,使其更易于使用,并可以部署到云环境中。 Dockerfile 在基础项目文件夹中添加一个文件,我们将使用 Python 3.11 版本,使用多阶段构建来忽略诗歌依赖项,复制代码,安装所需的依赖项,并使用 10 个工作进程运行 API 或 8000 端口。
📝 Dockerfile
FROM python:3.11-slim-bookworm as requirements-stage

RUN pip install poetry
COPY ./pyproject.toml ./poetry.lock /
RUN poetry export -f requirements.txt --output requirements.txt --without-hashes --without=dev

FROM python:3.11-slim-bookworm

COPY --from=requirements-stage /requirements.txt /requirements.txt
COPY ./pyproject.toml ./gunicorn_conf.py /
COPY ./app /app

RUN python3 -m pip install --no-cache-dir --upgrade -r requirements.txt

RUN mkdir -p /tmp/shm && mkdir /.local

ENV PORT 8000
EXPOSE 8000

ENTRYPOINT ["gunicorn", "-k", "uvicorn.workers.UvicornWorker", "-c", "gunicorn_conf.py", "app.main:app"]
构建容器镜像
$ docker build . -t fastapi-todos:1.0.0
[+] Building 29.1s (14/14) FINISHED                                                                                                       docker:desktop-linux
 => [internal] load build definition from Dockerfile                                                                                                      0.0s
 => => transferring dockerfile: 614B                                                                                                                      0.0s
 => [internal] load .dockerignore                                                                                                                         0.0s
 => => transferring context: 2B                                                                                                                           0.0s
 => [internal] load metadata for docker.io/library/python:3.11-slim-bookworm                                                                              1.8s
 => [auth] library/python:pull token for registry-1.docker.io                                                                                             0.0s
 => [internal] load build context                                                                                                                         0.0s
 => => transferring context: 132.09kB                                                                                                                     0.0s
 => [requirements-stage 1/4] FROM docker.io/library/python:3.11-slim-bookworm@sha256:fda05d00fc47a4133a1b65bdd89007facf4ec0fa5fb737a35652699b18029830     3.5s
 => => resolve docker.io/library/python:3.11-slim-bookworm@sha256:fda05d00fc47a4133a1b65bdd89007facf4ec0fa5fb737a35652699b18029830                        0.0s
 => => sha256:5f658eaeb6f6b3d1c7e64402784a96941bb104650e33f18675d8a9aea28cfab2 3.33MB / 3.33MB                                                            0.3s
 => => sha256:3a21992ae6ea870866a08c3130aeedc758053117776270e79ce8f50c2d5ecb36 12.81MB / 12.81MB                                                          0.7s
 => => sha256:fda05d00fc47a4133a1b65bdd89007facf4ec0fa5fb737a35652699b18029830 1.65kB / 1.65kB                                                            0.0s
 => => sha256:b26e46d3c77da193a5057346b362bcb1db25ea53fda4e66c34655c1e7c838984 1.37kB / 1.37kB                                                            0.0s
 => => sha256:e35901feb1c144a36a7e654cb313632ff45bb290a031fd98a41845722872b86e 6.95kB / 6.95kB                                                            0.0s
 => => sha256:1bc163a14ea6a886d1d0f9a9be878b1ffd08a9311e15861137ccd85bb87190f9 29.18MB / 29.18MB                                                          1.0s
 => => sha256:94f5f9f3c96b32388cb097a0adee2086ff4e0a298e5812c4389265c6eaac9bae 244B / 244B                                                                0.5s
 => => sha256:82d03286152357f66ff0e02abec8a43980f8f73065d8ea9d122de8fa46e1e31a 3.39MB / 3.39MB                                                            0.8s
 => => extracting sha256:1bc163a14ea6a886d1d0f9a9be878b1ffd08a9311e15861137ccd85bb87190f9                                                                 1.5s
 => => extracting sha256:5f658eaeb6f6b3d1c7e64402784a96941bb104650e33f18675d8a9aea28cfab2                                                                 0.1s
 => => extracting sha256:3a21992ae6ea870866a08c3130aeedc758053117776270e79ce8f50c2d5ecb36                                                                 0.5s
 => => extracting sha256:94f5f9f3c96b32388cb097a0adee2086ff4e0a298e5812c4389265c6eaac9bae                                                                 0.0s
 => => extracting sha256:82d03286152357f66ff0e02abec8a43980f8f73065d8ea9d122de8fa46e1e31a                                                                 0.2s
 => [requirements-stage 2/4] RUN pip install poetry                                                                                                      12.9s
 => [requirements-stage 3/4] COPY ./pyproject.toml ./poetry.lock /                                                                                        0.0s
 => [requirements-stage 4/4] RUN poetry export -f requirements.txt --output requirements.txt --without-hashes --without=dev                               0.6s
 => [stage-1 2/5] COPY --from=requirements-stage /requirements.txt /requirements.txt                                                                      0.0s
 => [stage-1 3/5] COPY ./pyproject.toml ./gunicorn_conf.py /                                                                                              0.0s
 => [stage-1 4/5] COPY ./app /app                                                                                                                         0.0s
 => [stage-1 5/5] RUN python3 -m pip install --no-cache-dir --upgrade -r requirements.txt                                                                 9.8s
 => exporting to image                                                                                                                                    0.3s
 => => exporting layers                                                                                                                                   0.3s
 => => writing image sha256:a6b09ad14d165189a8c9cbdb9b1dfffc525907ff71c053af60b37701852138c2                                                              0.0s
 => => naming to docker.io/library/fastapi-todos:1.0.0                                                                                                    0.0s
测试在本地运行镜像
$ docker run -p 8000:8000 --env-file .env fastapi-todos:1.0.0
[2023-10-15 19:02:23 +0000] [1] [INFO] Starting gunicorn 21.2.0
[2023-10-15 19:02:23 +0000] [1] [INFO] Listening at: http://0.0.0.0:8000 (1)
[2023-10-15 19:02:23 +0000] [1] [INFO] Using worker: uvicorn.workers.UvicornWorker
[2023-10-15 19:02:23 +0000] [7] [INFO] Booting worker with pid: 7
[2023-10-15 19:02:23 +0000] [8] [INFO] Booting worker with pid: 8
[2023-10-15 19:02:23 +0000] [9] [INFO] Booting worker with pid: 9
[2023-10-15 19:02:23 +0000] [10] [INFO] Booting worker with pid: 10
[2023-10-15 19:02:23 +0000] [11] [INFO] Booting worker with pid: 11
[2023-10-15 19:02:23 +0000] [12] [INFO] Booting worker with pid: 12
[2023-10-15 19:02:23 +0000] [13] [INFO] Booting worker with pid: 13
[2023-10-15 19:02:23 +0000] [7] [INFO] Started server process [7]
[2023-10-15 19:02:23 +0000] [7] [INFO] Waiting for application startup.
[2023-10-15 19:02:23 +0000] [7] [INFO] Application startup complete.
[2023-10-15 19:02:23 +0000] [15] [INFO] Booting worker with pid: 15
[2023-10-15 19:02:23 +0000] [8] [INFO] Started server process [8]
[2023-10-15 19:02:23 +0000] [8] [INFO] Waiting for application startup.
[2023-10-15 19:02:23 +0000] [8] [INFO] Application startup complete.
[2023-10-15 19:02:23 +0000] [17] [INFO] Booting worker with pid: 17
[2023-10-15 19:02:23 +0000] [18] [INFO] Booting worker with pid: 18
[2023-10-15 19:02:23 +0000] [9] [INFO] Started server process [9]
[2023-10-15 19:02:23 +0000] [9] [INFO] Waiting for application startup.
[2023-10-15 19:02:23 +0000] [9] [INFO] Application startup complete.
[2023-10-15 19:02:23 +0000] [10] [INFO] Started server process [10]
[2023-10-15 19:02:23 +0000] [10] [INFO] Waiting for application startup.
[2023-10-15 19:02:23 +0000] [10] [INFO] Application startup complete.
[2023-10-15 19:02:23 +0000] [11] [INFO] Started server process [11]
[2023-10-15 19:02:23 +0000] [11] [INFO] Waiting for application startup.
[2023-10-15 19:02:23 +0000] [11] [INFO] Application startup complete.
[2023-10-15 19:02:23 +0000] [12] [INFO] Started server process [12]
[2023-10-15 19:02:23 +0000] [12] [INFO] Waiting for application startup.
[2023-10-15 19:02:23 +0000] [12] [INFO] Application startup complete.
[2023-10-15 19:02:23 +0000] [13] [INFO] Started server process [13]
[2023-10-15 19:02:23 +0000] [13] [INFO] Waiting for application startup.
[2023-10-15 19:02:23 +0000] [13] [INFO] Application startup complete.
[2023-10-15 19:02:24 +0000] [15] [INFO] Started server process [15]
[2023-10-15 19:02:24 +0000] [15] [INFO] Waiting for application startup.
[2023-10-15 19:02:24 +0000] [15] [INFO] Application startup complete.
[2023-10-15 19:02:24 +0000] [17] [INFO] Started server process [17]
[2023-10-15 19:02:24 +0000] [17] [INFO] Waiting for application startup.
[2023-10-15 19:02:24 +0000] [17] [INFO] Application startup complete.
[2023-10-15 19:02:24 +0000] [18] [INFO] Started server process [18]
[2023-10-15 19:02:24 +0000] [18] [INFO] Waiting for application startup.
[2023-10-15 19:02:24 +0000] [18] [INFO] Application startup complete.
{"loglevel": "info", "workers": 10, "bind": "0.0.0.0:8000", "graceful_timeout": 60, "timeout": 60, "keepalive": 5, "errorlog": "-", "accesslog": "-", "workers_per_core": 1.0, "use_max_workers": 10, "host": "0.0.0.0", "port": "8000"}
[17/Oct/2023 19:02:46] INFO [my-todos.process_time_log_middleware:51] Method=GET Path=/ StatusCode=200 ProcessTime=0.002
192.168.65.1:20858 - "GET / HTTP/1.1" 200
[17/Oct/2023 19:02:47] INFO [my-todos.process_time_log_middleware:51] Method=GET Path=/openapi.json StatusCode=200 ProcessTime=0.026
192.168.65.1:20859 - "GET /openapi.json HTTP/1.1" 200
该镜像可以推送到 DockerHub 等中央容器存储库,以便任何服务器都可以将其拉下。
$ docker image tag fastapi-todos:1.0.0 dpills/fastapi-todos:1.0.0

$ docker push dpills/fastapi-todos:1.0.0
The push refers to repository [docker.io/dpills/fastapi-todos]
28d44516d23e: Pushed
d3adbb568b7a: Pushed
7690ae0fc4d3: Pushed
1e5a71ad08c2: Pushed
e3f2fdf4ed2c: Pushed
801b21c3331c: Mounted from library/python
e02fcdad509e: Mounted from library/python
4e7e2e312a26: Mounted from library/python
fd887e1d7390: Mounted from library/python
32f2ee38f285: Mounted from library/python
1.0.0: digest: sha256:f346ee76439cc1ca8dfed2e5d369be855ced730b7542fb2c663e1c3454757976 size: 2412
Docker Compose
我们已经在使用 Compose 规范来运行我们的本地 mongo 数据库,但现在我们可以更新它以运行我们的 API。
📝docker-compose.yml
services:
  db:
    image: mongo:7.0.1
    container_name: myAPIdb
    restart: always
    ports:
      - 27017:27017
    env_file:
      - .env
    volumes:
      - type: volume
        source: my_api_db_data
        target: /data/db
  api:
    image: dpills/fastapi-todos:1.0.0
    container_name: fastapi-todos
    restart: always
    ports:
      - 8000:8000
    env_file:
      - .env
    depends_on:
      - db

volumes:
  my_api_db_data:
在使用 Docker Comose 运行时,您需要更新 .env 文件中的 mongo URI 以使用 Compose 服务名称而不是localhost 。
📝 .env
...
MONGO_URI=mongodb://root:mySecureDbPassword1@db:27017/
...
$ docker-compose up

[+] Building 0.0s (0/0)                                             docker-container:unruffled_shockley
[+] Running 3/3
 ✔ Network fastapi-quick-start-guide_default  Creat...                                             0.0s
 ✔ Container myAPIdb                          Created                                              0.0s
 ✔ Container fastapi-todos                    Created                                              0.0s
Attaching to fastapi-todos, myAPIdb
如果您只想在启用 HTTPS 的单个节点上运行此服务,可以使用 NGINX 终止 HTTPS 连接并反向代理到 API。需要预置证书并将其添加到/etc/ssl/certs目录中才能正常工作。
📝 nginx.conf
worker_processes 3;
error_log /dev/stdout info;
events {
    worker_connections 2048;
}
http {
    include /etc/nginx/mime.types;

    server {
        listen 443 ssl;
        server_name todo.com;

        ssl_certificate /etc/ssl/certs/todos.pem;
        ssl_certificate_key /etc/ssl/certs/todos.key;

        location / {
            proxy_pass http://api:8000;
        }
    }
}
📝docker-compose.yml
services:
  db:
    image: mongo:7.0.1
    container_name: myAPIdb
    restart: always
    ports:
      - 27017:27017
    env_file:
      - .env
    volumes:
      - type: volume
        source: my_api_db_data
        target: /data/db
  api:
    image: dpills/fastapi-todos:1.0.0
    container_name: fastapi-todos
    restart: always
    ports:
      - 8000:8000
    env_file:
      - .env
    depends_on:
      - db
  server:
    image: nginx:1.25-alpine
    container_name: nginx
    restart: always
    ports:
      - 443:443
    volumes:
      - type: bind
        read_only: true
        source: /host/path/nginx.conf
        target: /etc/nginx/nginx.conf
      - type: bind
        read_only: true
        source: /etc/ssl/certs
        target: /etc/ssl/certs
    depends_on:
      - api

volumes:
  my_api_db_data:
现在,这是一个安全的单节点容器化 API 设置!🎉
Kubernetes
请参阅Kubernetes 快速入门指南☁️⚡️🚀, 了解深入的 Kubernetes 教程
如果您需要处理大规模请求,则需要使用在多个节点上运行的多个容器实例。Kubernetes 是大规模容器编排的行业标准。MongoDB 可以通过数据库即服务 (DBaaS) 产品(例如Mongo Atlas )进行设置,也可以使用 Helm Chart(例如Bitnami MongoDB Helm Chart)部署到 Kubernetes集群。为了将 API 部署到 Kubernetes 环境,需要具有部署、服务和密钥,以便将环境变量映射到容器。
📝deployment.yaml
apiVersion: apps/v1
kind: Deployment
metadata:
  labels:
    app: my-todos-api
  name: my-todos-api
spec:
  replicas: 3 # Scale up to 3 instances of the container
  selector:
    matchLabels:
      app: my-todos-api
  template:
    metadata:
      labels:
        app: my-todos-api
    spec:
      containers:
        - name: my-todos-api
          image: dpills/fastapi-todos:1.0.0
          imagePullPolicy: IfNotPresent
          ports:
            - containerPort: 8000
              protocol: TCP
          envFrom:
            - secretRef:
                name: my-todos-api-secret
          resources:
            limits:
              cpu: "2"
              memory: 2Gi
            requests:
              cpu: "1"
              memory: 1Gi
📝service.yaml
apiVersion: v1
kind: Service
metadata:
  labels:
    app: my-todos-api
  name: my-todos-api-svc
spec:
  ports:
    - name: http
      port: 8000
      protocol: TCP
      targetPort: 8000
  selector:
    app: my-todos-api
kubectl可以使用该文件创建 Kubernetes 机密.env。删除--dry-run=client -o yaml末尾的部分即可在集群上实际创建机密。
$ kubectl create secret generic my-todos-api-secret --from-env-file=.env --dry-run=client -o yaml

apiVersion: v1
data:
  GITHUB_OAUTH_CLIENT_ID: MGVjN2Q5Njk5MjgzNmE1ZmJiOTc=
  GITHUB_OAUTH_CLIENT_SECRET: ZTgxM2IwY2RiNGQ0MDJkNTVkNWQwOWNmZDA4ZGZkMDZjZjVmYzZlYw==
  MONGO_INITDB_ROOT_PASSWORD: bXlTZWN1cmVEYlBhc3N3b3JkMQ==
  MONGO_INITDB_ROOT_USERNAME: cm9vdA==
  MONGO_URI: bW9uZ29kYjovL3Jvb3Q6bXlTZWN1cmVEYlBhc3N3b3JkMUBkYjoyNzAxNy8=
kind: Secret
metadata:
  creationTimestamp: null
  name: my-todos-api-secret
我们现在拥有高度可扩展的云原生 API 设置!🎉
鏂囩珷鏉ユ簮锛�https://dev.to/dpills/fastapi-development-setup-guide-1hhh