让我们用 Python 制作一个 Twitch 机器人!
本教程将帮助您启动并运行 Twitch 频道的简单聊天机器人。
本教程适合哪些人?
编码初学者和刚接触 Python 的经验丰富的编码人员。
内容
我们将首先设置账户、获取密钥并安装软件。然后,我们将设置并编写机器人代码。在本教程结束时,您应该可以开始添加自己的自定义命令了。
但首先...我们需要确保我们的凭证齐全。👏
请出示证件!
📢荣耀归于 Arstotzka!
- 在Twitch上注册一个账号(用于你的机器人),或者使用你直播用的账号。可以尝试一些很酷的玩意儿,比如
RealStreamer69😎 - 请求 OAuth 代码。您需要登录并授予应用生成该代码的权限。
- 使用 Twitch dev 注册您的应用并请求客户端 ID(以便您可以与 Twitch 的 API 交互)
请将 OAuth 和客户端 ID 保存在方便获取的地方,但不要公开。稍后您将需要它们来配置机器人。
💡专业提示™ ——保密。确保安全。
安装所有内容!🧹
为机器人创造一个舒适的家
虚拟环境需要一些额外的步骤来设置,但可以简化 Python 应用的开发。在本教程中,我们将使用PIPENV,它将 pip 和 venv 整合到一个包中。
- 在控制台中,导航到您的工作目录
- 运行⇒
pipenv --python 3.6或pipenv --python 3.7- 这将创建
pipfile和piplock。它们保存 venv 信息,例如 Python 版本和你安装的库。
- 这将创建
- 然后运行⇒
pipenv install twitchio
配置和授权机器人
在工作目录中创建两个文件。一个名为bot.py,另一个名为.env(没有文件名,只有扩展名——我知道这很奇怪)。
/.env
您的机密信息将存储在该文件中。请在文件.env末尾添加上面的 oauth 令牌和客户端 ID 。并填写其他变量。=
# .env
TMI_TOKEN=oauth:
CLIENT_ID=
BOT_NICK=
BOT_PREFIX=!
CHANNEL=
/bot.py
在里面bot.py,导入我们需要的库并创建我们将在下一步启动的机器人对象。
# bot.py
import os # for importing env vars for the bot to use
from twitchio.ext import commands

bot = commands.Bot(
    # set up the bot
    irc_token=os.environ['TMI_TOKEN'],
    client_id=os.environ['CLIENT_ID'],
    nick=os.environ['BOT_NICK'],
    prefix=os.environ['BOT_PREFIX'],
    initial_channels=[os.environ['CHANNEL']]
)
💡 PROTIP™ —— 当我们使用 PIPENV 运行时
bot.py,它首先将文件中的变量加载.env到虚拟环境中,然后运行bot.py。因此,在这个 venv 中,我们可以(基于实例)访问这些变量。我们将使用 Python 的os模块来导入它们,就像在原生环境中导入环境变量一样。
在文件底部,我们需要确保当我们bot.py直接使用if __name__ == "__main__":
# bot.py
if __name__ == "__main__":
    bot.run()
唤醒机器人(唤醒里面的机器人!)
让我们测试机器人并确保它可以连接到 Twitch。
- 在控制台中运行⇒
pipenv run python bot.py
如果它有效,您就不会收到任何错误 - 这意味着环境变量已正确加载并且您的机器人已成功连接到 Twitch!
如果遇到错误,请在继续之前查看下一部分。
错误:无法醒来。[救救我]
野性Request to join the channel has timed out. Make sure the channel exists.出现。你躲避……
-
确保 .env 文件中有正确的令牌(oauth 和 client-id),并且它们位于同一目录/文件夹中
bot.py -
此时您的目录结构应如下所示...
工作目录/
.env
─ bot.py
pip文件
└─ Pipfile.lock
-
如果这仍然不能解决问题,请在下面发表评论,我们会为您解决!
为机器人添加一些功能
欢迎来到聊天室!
回到bot.py……在机器人对象下方,让我们创建一个event_ready使用装饰器调用的函数@bot.event。此函数将在启动机器人时运行一次。然后,它会向终端和聊天室报告已成功连接到 Twitch。
# bot.py, below bot object
@bot.event
async def event_ready():
    'Called once when the bot goes online.'
    print(f"{os.environ['BOT_NICK']} is online!")
    ws = bot._ws  # this is only needed to send messages within event_ready
    await ws.send_privmsg(os.environ['CHANNEL'], f"/me has landed!")
继续再次测试机器人。现在它上线时应该会主动问候聊天。
回复聊天消息
接下来,我们将添加一个函数,该函数会在每次频道发送消息时运行。您可以稍后在此处添加各种逻辑,但我们首先要确保机器人能够忽略自身发送的消息。
# bot.py, below event_ready
@bot.event
async def event_message(ctx):
    'Runs every time a message is sent in chat.'

    # make sure the bot ignores itself and the streamer
    if ctx.author.name.lower() == os.environ['BOT_NICK'].lower():
        return
之后,我们会添加一行代码,烦人地回显聊天中发送的每条消息。ᴷᵃᵖᵖᵃ
# bot.py, in event_message, below the bot-ignoring stuff
await ctx.channel.send(ctx.content)
重新启动机器人并检查!
💡 PROTIP™ ——现在注释掉那一行,因为它实际上真的很烦人。
发出聊天命令
您所做的任何命令在定义时都需要遵循这种格式。
- 装饰有
@bot.command(name='whatever') name是异步函数,其名称与装饰器中的变量匹配- 通过函数传递消息上下文
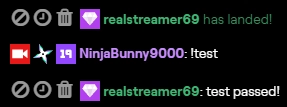
该函数的工作原理和功能完全由您决定。在本例中,我们将创建一个名为的命令,调用该命令时会在聊天框中!test显示内容。test passed!
# bot.py, below event_message function
@bot.command(name='test')
async def test(ctx):
    await ctx.send('test passed!')
在这项工作开始之前,我们需要确保机器人知道监听传来的命令。
在忽略机器人代码下方添加此代码event_message:
    #bot.py, in event_message, below the bot ignore stuffs
    await bot.handle_commands(ctx)
好了!测试一下吧。重启机器人,发送!test聊天消息!
回复特定消息
告诉我的机器人我说......“你好。”
你也可以在聊天中回复特定消息,不必一定如此!commands。让我们编写一些代码,当有人打招呼时,它也回复你。
    # bot.py, at the bottom of event_message
    if 'hello' in ctx.content.lower():
        await ctx.channel.send(f"Hi, @{ctx.author.name}!")
快来测试一下吧!你已经拥有了构建机器人和添加命令的框架。
完成后你应该看到以下内容
/bot.py
import os
from twitchio.ext import commands

# set up the bot
bot = commands.Bot(
    irc_token=os.environ['TMI_TOKEN'],
    client_id=os.environ['CLIENT_ID'],
    nick=os.environ['BOT_NICK'],
    prefix=os.environ['BOT_PREFIX'],
    initial_channels=[os.environ['CHANNEL']]
)

@bot.event
async def event_ready():
    'Called once when the bot goes online.'
    print(f"{os.environ['BOT_NICK']} is online!")
    ws = bot._ws  # this is only needed to send messages within event_ready
    await ws.send_privmsg(os.environ['CHANNEL'], f"/me has landed!")


@bot.event
async def event_message(ctx):
    'Runs every time a message is sent in chat.'

    # make sure the bot ignores itself and the streamer
    if ctx.author.name.lower() == os.environ['BOT_NICK'].lower():
        return

    await bot.handle_commands(ctx)

    # await ctx.channel.send(ctx.content)

    if 'hello' in ctx.content.lower():
        await ctx.channel.send(f"Hi, @{ctx.author.name}!")


@bot.command(name='test')
async def test(ctx):
    await ctx.send('test passed!')


if __name__ == "__main__":
    bot.run()
当然,你也.env有你的秘密和pipfile和Piplock。
如果您愿意的话,我也已将文件上传到github repo 。
恭喜!!🥳🎉
你已经走到这一步了……你知道这意味着什么吗?是时候庆祝一下了,点击这个 GitKraken 推荐链接注册,这样我就能免费获得袜子(或者特斯拉?😎)。
另外,欢迎随时查看我们开发本教程的实时编码流程回顾。感谢所有参与聊天的朋友们!
您下一步想做什么?
有问题?评论?或者有什么想法?请在下方评论区留言告诉我!
我很快会跟进这篇文章,提供一些关于如何充分利用 TwitchIO 库的提示——更多内容并没有很好的记录下来,而且很难弄清楚,比如如何获取作者、使用徽章获取权限等。
鏂囩珷鏉ユ簮锛�https://dev.to/ninjabunny9000/let-s-make-a-twitch-bot-with-python-2nd8 后端开发教程 - Java、Spring Boot 实战 - msg200.com


