在 React 中使用 context api 创建自己的 react-redux
你好👋,
在本文中,我们将react-redux借助contextapi构建自己的
为什么我们需要在 React 中使用 redux?
在 React 中,我们需要在组件之间共享数据。使用 React State 来实现这一点会非常困难,但借助 Redux,我们可以简化这个过程。
这是一个例子。
const Root = () => {
  const [label, setLabel] = useState()
  return <div>
   <p>{label}</p>
   <Parent setLabel={setLabel}/>
  </div>
};

const Parent = props => {
  return <Child {...props} />;
};

const Child = props => {
  return <Subchild {...props} />;
};

const Subchild = ({ children, setLabel }) => {
  return <div>
   <button onClick={() => setLabel('Hello')}>Set Label</button>
   <p>{children}</p>
  </div>
};
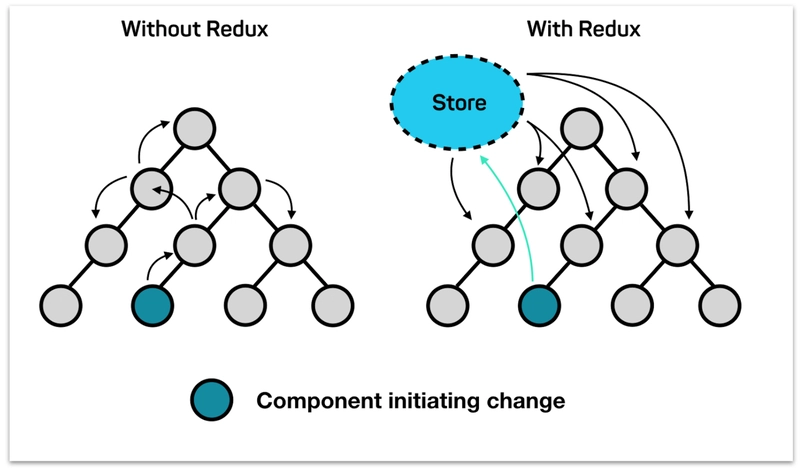
在上面的示例中,应用程序有多个层级,Root -> Parent -> Child -> Subchild我们在层级中显示标签Root,并在子层级中进行设置label。为此,我们需要将setLabel回调从根层级传递到子层级,这很不必要。父级和子级都有setLabel函数,但这些组件并没有处理这些函数。这只是一个小例子,所以不妨想想如何在大型实时应用程序中管理这些事情🤔
解决方案
REDUX
redux 有何帮助?
Redux 将独立维护一个存储(全局状态)。我们可以直接从组件访问和修改 Redux 数据。为了解决上述问题,我们将Root和Subchild组件与 Redux 关联起来,这样这两个组件就可以访问全局存储,这样Root组件就可以同时访问标签,而Subchild无需传递任何内容。ParentChild
让我们进入开发部分🚀
首先,我们需要为全局状态创建上下文
const {
  createContext,
} = require("react");

const context = createContext();

const { Provider, Consumer } = context;
我们成功创建了上下文,现在让我们combineReducers与虚拟减速器一起创建
const reducer1 = (state, action) => {
  switch (action.type) {
    case "INSERT_X":
      return { ...state, x: action.data };
    case "DELETE_X":
      return { ...state, x: null };
    default:
      return { ...state };
  }
};

const reducer2 = (state, action) => {
  switch (action.type) {
    case "INSERT_Y":
      return { ...state, y: action.data };
    case "DELETE_Y":
      return { ...state, y: null };
    default:
      return { ...state };
  }
};

// zip is util function
const zip = (list1, list2) => {
  var obj = {};
  for (let i = 0; i < list1.length; i++) {
    obj[list1[i]] = list2[i];
  }
  return obj;
};

const combineReducers = (reducers) => {
  return (state, action) => {
    const _reducers = Object.keys(reducers);
    const _state = Object.keys(reducers).map((reducer) => {
      return reducers[reducer](state[reducer], action);
    });

    return zip(_reducers, _state);
  };
};
接下来我们需要创建Provider方法来初始化 App 中的存储,以及connect在组件上使用它的方法
const StoreProvider = ({ children }) => {
  const rootReducer = combineReducers({ reducer1, reducer2 });

  const [state, dispatch] = useReducer(rootReducer, {});

  return <Provider value={{ state, dispatch }}>{children}</Provider>;
};


 const connect = (mapStateTopProps, mapDispatchToProps) => {
  return (Component) => (props) => {
    return (
      <Consumer>
        {({ state, dispatch }) => {
          const dispatchProps = mapDispatchToProps(dispatch);
          const stateProps = mapStateTopProps(state);
          return <Component {...props} {...stateProps} {...dispatchProps} />;
        }}
      </Consumer>
    );
  };
};
钩子方法来改变和访问状态
const useSelector = (fn) => {
  const { state } = useContext(context);
  return fn(state);
};

const useDispatch = (fn) => {
  const { dispatch } = useContext(context);

  return dispatch;
};
最后的代码将是这样的
const {
  useContext,
  createContext,
  useReducer,
  useState,
  useEffect
} = require("react");

const context = createContext();

const { Provider, Consumer } = context;

const reducer1 = (state, action) => {
  switch (action.type) {
    case "INSERT_X":
      return { ...state, x: action.data };
    case "DELETE_X":
      return { ...state, x: null };
    default:
      return { ...state };
  }
};

const reducer2 = (state, action) => {
  switch (action.type) {
    case "INSERT_Y":
      return { ...state, y: action.data };
    case "DELETE_Y":
      return { ...state, y: null };
    default:
      return { ...state };
  }
};

const zip = (list1, list2) => {
  var obj = {};
  for (let i = 0; i < list1.length; i++) {
    obj[list1[i]] = list2[i];
  }
  return obj;
};

const combineReducers = (reducers) => {
  return (state, action) => {
    const _reducers = Object.keys(reducers);
    const _state = Object.keys(reducers).map((reducer) => {
      return reducers[reducer](state[reducer], action);
    });

    return zip(_reducers, _state);
  };
};

const Store = ({ children }) => {
  const rootReducer = combineReducers({ reducer1, reducer2 });

  const [state, dispatch] = useReducer(rootReducer, {});

  return <Provider value={{ state, dispatch }}>{children}</Provider>;
};

export const connect = (mapStateTopProps, mapDispatchToProps) => {
  return (Component) => (props) => {
    return (
      <Consumer>
        {({ state, dispatch }) => {
          const dispatchProps = mapDispatchToProps(dispatch);
          const stateProps = mapStateTopProps(state);
          return <Component {...props} {...stateProps} {...dispatchProps} />;
        }}
      </Consumer>
    );
  };
};

export const useSelector = (fn) => {
  const { state } = useContext(context);
  return fn(state);
};

export const useDispatch = (fn) => {
  const { dispatch } = useContext(context);

  return dispatch;
};

export default Store;
我们已经完成了 redux 部分👏🏻
要在您的应用中使用它,请包装您的根组件,并在您想要使用状态的组件中StoreProvider使用connect
这是带有示例的沙盒链接
谢谢你!!!!
🚨🚨⚠️⚠️ :请勿在生产环境中使用此代码。本代码仅用于教育目的。
您现在可以通过给我买一杯咖啡来表达您的支持。
鏂囩珷鏉ユ簮锛�https://dev.to/sakethkowtha/creating-own-react-redux-using-context-api-in-react-52am 后端开发教程 - Java、Spring Boot 实战 - msg200.com

