让我们构建并部署一个全栈 MERN Web 应用程序
我相信,当你第一次学习使用 MERN 技术栈进行全栈 Web 开发时,你肯定会有这样的疑问:“构建一个全栈应用程序是什么样的?前端和后端到底是什么?我们如何连接它们?有什么秘诀吗?等等。所以我写了这个教程来解答你的疑问,并向你展示如何构建一个全栈 Web 应用程序。
注意
本教程的目标是为您提供构建全栈应用程序的高级概述,而不是对 MERN 堆栈技术的详细解释。
让我们开始吧
先决条件
项目
为了简化流程并涵盖更多概念,我们将创建一个简单的迷你项目。我们将创建一个简单的生产力跟踪器应用程序,用于记录您一天中完成的活动以及花费的时间。这样我们就可以了解自己的时间分配情况。我们还可以在主页上查看所有内容。
这是如何运作的?
- 您输入一项活动以及您花在该活动上的时间。
- 然后将数据提交到 NodeJs 后端。
- 该信息将存储在 MongoDB 数据库中。
- 所有活动均显示在主页上。

我们知道我们需要做什么;现在让我们想想如何去做。
前端/客户端
什么是前端/客户端应用程序?
客户端应用程序是指全栈应用程序的前端部分。客户端向服务器发送请求并接收响应。该请求可以是客户端向服务器发送信息,也可以是请求获取信息。客户端是全栈应用程序的可见部分。
让我们从创建客户端开始。
- 创建一个新文件夹并将其标记为“productivity-app”。
-
使用create-react- app 创建一个名为“client”的反应应用程序。
npx create-react-app client -
启动您的编码编辑器/IDE 并打开项目。
-
您的文件夹结构将会如下所示。
. ├── README.md ├── package-lock.json ├── package.json ├── public │ ├── favicon.ico │ ├── index.html │ ├── logo192.png │ ├── logo512.png │ ├── manifest.json │ └── robots.txt └── src ├── App.css ├── App.js ├── App.test.js ├── index.css ├── index.js ├── logo.svg ├── reportWebVitals.js └── setupTests.js -
目前,我们只对
App.js和App.css文件感兴趣。 -
App.js从和文件中删除所有现有代码App.css。
让我们创建一个 React 组件。 -
将App组件添加到
App.js文件中。import "./App.css"; const App = () => { return <div>My App</div>; } export default App; -
上面的代码创建并渲染了App组件。
-
在终端中运行以下命令并导航到http://localhost:3000。
npm start

设计应用程序。
- 我们希望用户输入活动名称以及活动所用的时间。然后,我们会在主页上显示所有活动。
-
将此 HTML 代码复制并粘贴到 App 组件中。
... <div className="app"> <header className="app-header"> <h1>Productivity Tracker</h1> <form> <div> <label htmlFor="activity">Activity:</label> <input type="text" id="activity" name="activity" autoComplete="off" /> </div> <div> <label htmlFor="time">Time Taken:</label> <input type="text" id="time" name="time" autoComplete="off" /> </div> <button type="submit">Add</button> </form> </header> <main className="app-main"> <h2>Today</h2> <ol> <li> Activity 1 - 3 hours</li> <li> Activity 2 - 10 min</li> <li> Activity 3 - 2 hours and 25 min</li> </ol> </main> </div> ... -
我们的应用程序现在看起来像这样。

-
现在让我们添加一些 CSS。将此文件中的 CSS 代码复制并粘贴到
App.css文件中。 -
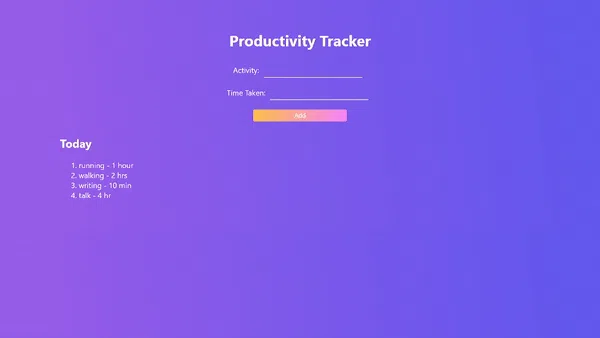
我们的应用程序现在显示如下。

添加逻辑。
-
这些活动目前都是硬编码的。因此,让我们保存并在状态中使用活动。
... const [activities, setActivities] = useState([]); ... ... <main className="app-main"> <h2>Today</h2> {activities && activities.length > 0 ? ( <ol> {activities.map((activity) => ( <li key={activity._id}> {activity.name} - {activity.time} </li> ))} </ol> ) : ( <p>No activities yet</p> )} </main> ... -
但是,我们从哪里获取活动?如何将活动添加到列表中?
-
需要一个后端来处理所有这些。
后端/服务器
全栈应用程序的后端组件通常被称为服务器。服务器的工作是持续监听请求,实现一些业务逻辑,并返回结果。
数据库
在创建服务器之前,我们先创建一个数据库。为了记录和添加我们的活动,我们需要一个数据库。我们可以使用云数据库,而不是托管数据库。MongoDB 提供了一个免费的云数据库 (atlas),可用于小型/业余项目。
- 登录您的MongoDB帐户。
- 创建一个项目。

- 然后前往“浏览集合”并创建数据库。集合名称填写“activities”。

-
点击“概览”,然后在概览选项卡中点击“连接”->“连接您的应用程序”。复制连接字符串。您的连接字符串应该如下所示。
mongodb+srv://<username>:<password>@<clusterUrl>/<databaseName>?retryWrites=true&w=majority -
将此字符串保存在安全的地方。
服务器
我们现在有了一个数据库。现在让我们构建我们的应用程序逻辑并将其连接到数据库。
- 在您的项目文件夹中创建一个名为“Server”的文件夹。
- 在终端中,打开文件夹并输入
npm init。填写所有详细信息。 -
安装以下软件包。
npm i express mongoose dotenv- express:用于创建服务器。
- mongoose:用于与 MongoDB 数据库配合使用
- dotenv:用于加载环境变量。
-
创建一个
.env文件并将连接字符串保存在名为“MONGODB URI”的变量中。MONGODB_URI=yourconnectionstring -
创建一个
server.js文件并粘贴此代码。const express = require("express"); const mongoose = require("mongoose"); const app = express(); /* Loading the environment variables from the .env file. */ require("dotenv").config(); const PORT = process.env.PORT || 5000; const MONGODB_URI = process.env.MONGODB_URI || "mongodb://localhost/todoapiDB"; /* Telling the application to use the express.json() middleware. This middleware will parse the body of any request that has a Content-Type of application/json. */ app.use(express.json()); /* This is a route handler. It is listening for a GET request to the root route of the application. When it receives a request, it will send back a response with the string "Hello World!". */ app.get("/", (req, res) => { res.send("Hello World!"); }); /* Connecting to the database and then starting the server. */ mongoose .connect(MONGODB_URI, { useNewUrlParser: true }) .then(() => { app.listen(PORT, console.log("Server stated on port 5000")); }) .catch((err) => { console.log(err); }); -
运行以下命令,并在浏览器中访问http://localhost:5000。您将看到类似以下内容。(请确保您已全局安装nodemon 。 )
npm run dev

这表示服务器运行成功。
-
创建一个模式模型来存储活动。
- 创建一个名为“models”的文件夹,并在该文件夹中创建一个文件
activity.model.js。复制并粘贴以下代码。
const mongoose = require("mongoose"); const Schema = mongoose.Schema; /* Creating a new schema for the activity model. */ const activitySchema = new Schema({ name: { type: String, required: true, }, time: { type: String, required: true, }, }); module.exports = mongoose.model("Activity", activitySchema); - 创建一个名为“models”的文件夹,并在该文件夹中创建一个文件
-
在控制器中实现应用程序逻辑。
- 创建一个名为“controllers”的文件夹,并在该文件夹中创建一个文件
activity.controller.js。 - 我们需要实现两件事 - 1)让所有活动显示在主页上和 2)添加一项活动。
const Activity = require("../models/activity.model"); /** * It's an async function that uses the Activity model to find all activities and then returns a status of 200 with the activities in the response body. */ const getActivities = async (req, res) => { try { const activities = await Activity.find(); res.status(200).json(activities); } catch (err) { res.status(500).json({ message: err.message }); } }; /** * It creates a new activity and saves it to the database. */ const addActivity = async (req, res) => { const activity = new Activity(req.body); try { const newActivity = await activity.save(); res.status(201).json(newActivity); } catch (err) { res.status(400).json({ message: err.message }); } }; module.exports = { getActivities, addActivity, }; - 创建一个名为“controllers”的文件夹,并在该文件夹中创建一个文件
-
注册路由来处理请求。
- 创建一个名为“routes”的文件夹,并在该文件夹中创建一个文件
activity.route.js。复制并粘贴以下代码。
const express = require("express"); const { getActivities, addActivity, } = require("../controllers/activity.controller"); const router = express.Router(); /* Creating a route for the get request. */ router.get("/activities", getActivities); /* Creating a route for the post request. */ router.post("/activity", addActivity); module.exports = router; - 创建一个名为“routes”的文件夹,并在该文件夹中创建一个文件
-
最终的文件夹结构将是这样的。
. ├── controllers │ └── activity.controller.js ├── models │ └── activity.model.js ├── routes │ └── activity.route.js ├── package-lock.json ├── package.json └── server.js -
在应用程序中使用上述路线。
- 打开
server.js文件并使用注册的路线。
... const ActivityRouter = require("./routes/activity.route"); ... ... /* Telling the application to use the ActivityRouter for any requests that start with "/api". */ app.use("/api", ActivityRouter); ... - 打开
-
我们的后端现已完全正常运行;我们可以添加和检索数据。让我们看看如何将后端连接到前端。
连接客户端和服务器
连接客户端和服务器并不困难,只需添加一个URL即可。
-
导航到客户端文件夹并创建一个
.env.local文件。将后端 URL 粘贴到变量中。REACT_APP_BACKEND_URL=http://localhost:5000/api -
导航到客户端文件夹并打开
App.js。当用户单击“添加”按钮时,我们必须通过路由向服务器发出 POST 请求/api/activity。- 创建一个名为的函数
handleSubmit()并将onSubmit属性添加到表单元素。 -
在这个函数中,我们必须向服务器发送一个请求,通过主体传递活动名称和时间。
...
const addActivity = async (event) => {
event.preventDefault();

const newActivity = {
  name: event.target.activity.value,
  time: event.target.time.value,
};

await fetch(`${process.env.REACT_APP_BACKEND_URL}/activity`, {
  method: "POST",
  headers: {
    "Content-Type": "application/json",
  },
  body: JSON.stringify(newActivity),
});

event.target.activity.value = ""; // sets input empty after clicking submit
event.target.time.value = ""; // sets input empty after clicking submit
window.location.reload(); // reloads the window after sending request
};
...

...
 <form onSubmit={addActivity}>
...
- 创建一个名为的函数
-
输入活动名称和时间,然后提交。(确保服务器也已启动并运行。)
-
浏览器控制台中会出现一条错误消息。

-
CORS(跨域资源共享)策略禁止访问服务器,这意味着您的服务器不允许访问其资源。我们可以通过使用cors npm 包来避免此问题。
- 打开服务器文件夹并安装 cors 包。
npm i cors- 然后在 中使用此包
server.js。
... const cors = require("cors"); ... ... /* Allowing the frontend to access the backend. */ app.use(cors()); ...- 重新启动服务器。
-
尝试添加活动。这次应该会成功。
-
可以看到已经添加到数据库的数据。

-
现在我们必须显示新添加的活动列表。
- 我们必须让组件渲染后立即显示活动。我们可以通过使用
useEffect()钩子来实现这一点。从服务器获取数据并将其保存到状态中。
... /* Fetching the data from the backend and setting the state of activities to the data. */ useEffect(() => { const fetchData = async () => { const result = await fetch( `${process.env.REACT_APP_BACKEND_URL}/activities` ); const data = await result.json(); setActivities(data); }; fetchData(); }, []); ...- 现在您可以在主页上看到所有活动。
- 我们必须让组件渲染后立即显示活动。我们可以通过使用

托管全栈应用程序
在托管之前,我们必须保证秘密的安全并避免提交不必要的文件/文件夹。
- 打开服务器文件夹。
- 初始化 git,创建一个
.gitignore文件并粘贴以下内容。
node_modules
.env
后端
Heroku 将用作后端。
- 为服务器应用程序创建一个 GitHub 存储库并将服务器代码推送到其中。
- 访问Heroku。
- 选择“新建”->“创建新应用程序”。
- 为您的应用命名,选择区域,然后单击“创建应用”。
- 导航至设置->配置变量->显示配置变量->在此处添加环境变量。
- 前往“概览”,选择“GitHub”作为部署机制。如果您尚未注册 GitHub,请先注册。
- 选择您的存储库。
- 如果您希望每次提交到代码库时都创建部署,请选择“启用自动部署”。最后,点击“部署分支”。
- 记下已部署站点的 URL。
前端
Netlify 将托管我们的客户端/前端部分。
- 为客户端应用程序创建一个 GitHub 存储库并将客户端代码推送到其中。
- 登录Netlify。
- 选择“添加站点”。
- 选择“GitHub”。

- 授予 GitHub 权限。
-
选择您的存储库。
-
在“基本构建设置”中,
- 对于基本目录 - 留空。
- 对于构建命令 -
npm run build - 对于发布目录 - “build”
-
选择“显示高级”->“新变量”,在键字段中输入,
REACT_APP_BACKEND_URL并在值字段中输入之前复制的后端URL。在URL末尾加上/api。 -
选择“部署站点”。
-
就这样!在浏览器中打开网址,尽情享受吧🎉🎉。
添加您自己的功能并在评论中分享 URL。
另请阅读:
希望本文能帮助您了解如何开发全栈 MERN 应用程序。关注我了解更多🚀🚀🚀。
别忘了订阅我的时事通讯。
谢谢你!
文章来源:https://dev.to/itsrakesh/lets-build-and-deploy-a-full-stack-mern-web-application-1p5