如何使用 Material Angular 创建响应式侧边栏和迷你导航
介绍
先决条件
步骤 1:设置 Angular
第 2 步:添加 Angular Material
步骤3:导入所需组件
步骤 4:实现组件
步骤 5:增加响应能力
步骤 6:切换菜单
步骤 7:折叠导航
奖励步骤:条件类
目录
- 先决条件
- 步骤 1:设置 Angular
- 第 2 步:添加 Angular Material
- 步骤3:导入所需组件
- 步骤 4:实现组件
- 步骤 5:增加响应能力
- 步骤 6:切换菜单
- 步骤 7:折叠导航
- 奖励:有条件的课程
介绍
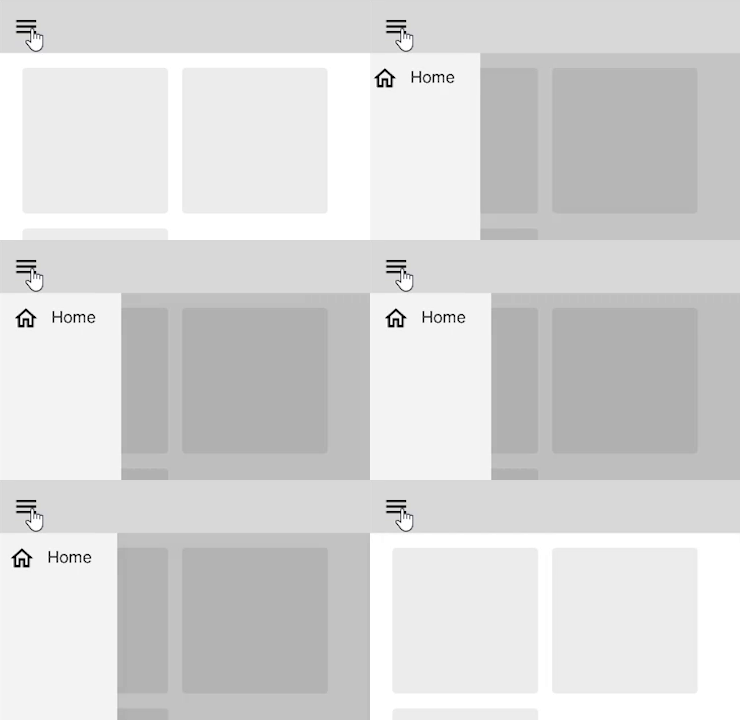
由于我正在使用Angular Material 框架进行Angular入门,和许多之前的开发者一样,我开始思考如何创建一个响应式侧边导航。这种导航应该在桌面端将主要内容推到侧边,但在移动分辨率下与侧边重叠。
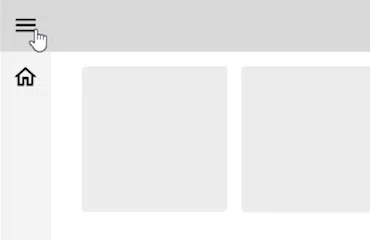
虽然这个任务看起来相当简单,但我还是想确保侧边栏在平板电脑和桌面分辨率下不会完全消失。相反,我希望只使用图标来显示折叠版本。
移动行为
桌面/平板电脑行为
这个延伸目标启发了我写这篇文章。我不仅想分享我提出的解决方案,还因为一些排名靠前的解决方案似乎已经过时或不够优雅,因为它们有时严重依赖于覆盖 UI 组件库的类。
存储库/现场演示您可以在我的Github 个人资料
中找到并分叉我的示例存储库,或者在 Netlify 上现场试用。
先决条件
在本教程中,您应该准备好创建和开发 Angular 应用程序所需的一切。更多信息,请访问Angular 文档。我还建议您对现代 Angular 应用程序架构有基本的了解,因为我不会深入探讨所用指令和组件的具体细节,而是提供文档链接。
步骤 1:设置 Angular
创建一个新的 Angular 应用程序
ng new material-responsive-sidenav
虽然对于本次演示来说这并不是特别重要,但我还是选择包含Angular routing并选择使用SCSS。
第 2 步:添加 Angular Material
安装所有 npm 软件包后,我们可以通过导航到新创建的应用程序目录将 Material 框架添加到我们的 Angular 应用程序中
ng add @angular/material
确认后,您可以自由选择预设主题或创建自定义主题。由于本指南不侧重于 Angular 中的主题设置,因此我选择了预建主题。此外,我还设置了global typography styles和included & enabled animations。
导入完成后,您可以使用
ng serve
该应用程序将默认在http://localhost:4200/
步骤3:导入所需组件
由于我们将使用 Angular 组件,因此让我们清理app.component.htmlapp-root 目录中的文件并修改该app.module.ts文件以包含所需的 Material 组件。
import { NgModule } from '@angular/core';
import { MatButtonModule } from '@angular/material/button';
import { MatIconModule } from '@angular/material/icon';
import { MatSidenavModule } from '@angular/material/sidenav';
import { MatToolbarModule } from '@angular/material/toolbar';
import { BrowserModule } from '@angular/platform-browser';
import { BrowserAnimationsModule } from '@angular/platform-browser/animations';
import {MatListModule} from '@angular/material/list';

import { AppRoutingModule } from './app-routing.module';
import { AppComponent } from './app.component';

@NgModule({
  declarations: [
    AppComponent
  ],
  imports: [
    BrowserModule,
    AppRoutingModule,
    BrowserAnimationsModule,
    MatIconModule,
    MatButtonModule,
    MatToolbarModule,
    MatSidenavModule,
    MatListModule
  ],
  providers: [],
  bootstrap: [AppComponent]
})
export class AppModule { }
这里发生了什么:
由于我们使用来自 Angulars Material 框架的组件,
因此需要进行以下导入:
Material Toolbar用于顶部的应用栏Material Icon对于Material Button菜单图标按钮,我们将实现Material Sidnav用于我们的侧边栏。Material List很好地包装我们的导航项目。
通过在全局中添加导入app.module.ts,它们将在以后的每个(非独立)组件中可用,而无需单独导入它们。由于本教程中我们不会添加其他组件,因此我选择这种方法是为了简单起见。不过,值得注意的是,如果需要,您也可以为侧边栏和应用栏创建单独的组件。
步骤 4:实现组件
目前导入所有必需的 Angular Material 组件后,我们可以通过编辑 app.component.html 文件开始构建模板。
添加工具栏
<mat-toolbar color="primary">
  <button mat-icon-button aria-label="Menu icon">
    <mat-icon>menu</mat-icon>
  </button>
  <h1>Responsive Material Sidenavigation</h1>
</mat-toolbar>
我选择实现一个简单的Material 工具栏,其中只有一个按钮用于切换菜单以及应用程序标题。
添加侧边导航
<mat-sidenav-container autosize>
  <mat-sidenav [opened]="true" mode="side">
    <mat-nav-list>
      <a mat-list-item>
        <span class="entry">
          <mat-icon>house</mat-icon>
          <span>Dashboard</span>
        </span>
      </a>
    </mat-nav-list>
  </mat-sidenav>
  <mat-sidenav-content>
    <h2>Content</h2>
    <router-outlet></router-outlet>
  </mat-sidenav-content>
</mat-sidenav-container>
对于Material Sidenavigation,我启用了autosize在切换时调整容器大小的功能。这将确保主要内容能够相应地移动。
[opened]="true" 和 mode="side" 暂时用作占位符,因为我们后续会添加相关功能。如果您对方括号感兴趣,可以在此处找到更多关于Angular 属性绑定的信息。
在组件内部mat-sidenav,我创建了一个 a元素mat-nav-list,并将其添加mat-list-item到导航链接中。这种包装有助于构建布局,并在点击时利用漂亮的悬停和点击涟漪效果。a 链接本身由另一个 Material Icon 和一个菜单文本组成。
该mat-sidenav-content组件包含一个占位符h2,并利用 Angularrouter-outlet为可能路由到不同的页面/组件做准备。
如果你跟着我一起写代码,你会发现结果还不太令人满意。让我们通过编辑app.component.scss文件来增强视觉效果。
h1 {
    padding: 0 1rem;
}

h2 {padding: 1rem;}

mat-toolbar{
    position:fixed;
    top:0;
    z-index: 2;
}

mat-sidenav-container {
    height:100%;
}

// Move the content down so that it won't be hidden by the toolbar
mat-sidenav {
    padding-top: 3.5rem;
    @media screen and (min-width: 600px) {
      padding-top: 4rem;
    }

    .entry{
        display: flex;
        align-items: center;
        gap: 1rem;
        padding:0.75rem;
    }
  }

// Move the content down so that it won't be hidden by the toolbar
mat-sidenav-content{
    padding-top: 3.5rem;
    @media screen and (min-width: 600px) {
        padding-top: 4rem;
    }
}
这里发生了什么
由于我使用的是 Material 的默认行为toolbar,因此需要注意的是,它的高度会根据 而变化screen size,无论它是宽于还是小于 600px。因此,为了让我们的 appbar 固定在顶部,我根据屏幕尺寸padding分别在sidenav和部分添加了 。content
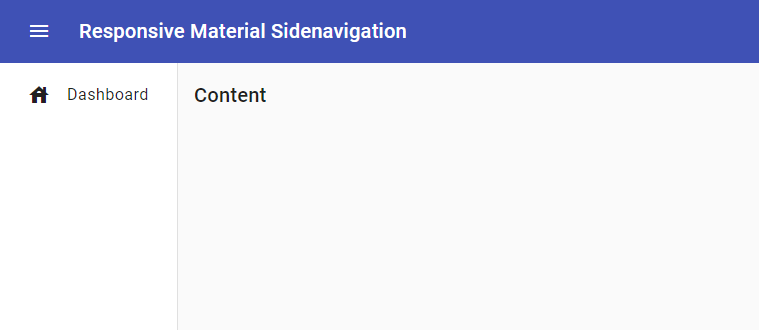
在此阶段,我们的 Angular 应用程序如下所示:
步骤 5:增加响应能力
让我们回到sidenav之前为打开状态及其使用的模式添加占位符的组件。
由于我们想要根据屏幕尺寸更改模式,我们将替换app.component.html文件中的占位符并实现一个,这是Material 组件开发工具包BreakpointObserver的一个便捷功能。为此,我们将按如下方式修改文件:app.component.ts
import { BreakpointObserver } from '@angular/cdk/layout';
import {
  Component,
  ViewChild,
} from '@angular/core';
import { MatSidenav } from '@angular/material/sidenav';

@Component({
  selector: 'app-root',
  templateUrl: './app.component.html',
  styleUrls: ['./app.component.scss']
})
export class AppComponent {
  title = 'material-responsive-sidenav';
  @ViewChild(MatSidenav)
  sidenav!: MatSidenav;
  isMobile= true;


  constructor(private observer: BreakpointObserver) {}

  ngOnInit() {
    this.observer.observe(['(max-width: 800px)']).subscribe((screenSize) => {
      if(screenSize.matches){
        this.isMobile = true;
      } else {
        this.isMobile = false;
      }
    });
  }
}
这里发生了什么:
一开始,我们导入BreakpointObserver以及ViewChild和MatSidenav模块,因为我们需要这些来实现观察者。
在组件类中,我们引入ViewChild 属性并将其赋值给侧边栏。此步骤用于监视侧边栏导航的行为。
在声明 sidenav 并创建一个指示是否正在使用移动分辨率的变量(我们稍后会重新讨论这一点)之后,我们使用构造函数初始化 BreakpointObserver 服务。
接下来,我们利用NgOnInit 生命周期钩子来影响侧边栏组件的行为,并在 true 和 false 之间切换 isMobile 状态。
在继续下一步之前,我们需要app.component.html使用条件属性绑定来处理文件中所需的更改:
 <mat-sidenav [mode]="isMobile ? 'over' : 'side'" [opened]="isMobile ? 'false' : 'true'">
    // ...
  </mat-sidenav>
步骤 6:切换菜单
继续编辑app.component.ts,我们继续创建一个名为的函数,toggleMenu我们将在其中使用该isMobile变量。
  toggleMenu() {
    if(this.isMobile){
      this.sidenav.toggle();
    } else {
      // do nothing for now
    }
  }
为了最终在移动分辨率上打开和关闭导航,我们修改app.component.html并向应用栏中的按钮添加事件监听器。
<button mat-icon-button aria-label="Menu icon" (click)="toggleMenu()">
    <mat-icon>menu</mat-icon>
  </button>
此时,我们的appbar按钮将使用Material组件的内置方法sidnav打开和关闭侧边导航。
步骤 7:折叠导航
剩下的唯一任务就是为我们的组件添加折叠行为sidenav。为此,我们将在app.component.ts文件中初始化另一个名为 的变量isCollapsed,并将其合并到我们的toggle function.
添加变量
isCollapsed = true;
完成切换功能
  toggleMenu() {
    if(this.isMobile){
      this.sidenav.toggle();
      this.isCollapsed = false; // On mobile, the menu can never be collapsed
    } else {
      this.sidenav.open(); // On desktop/tablet, the menu can never be fully closed
      this.isCollapsed = !this.isCollapsed;
    }
  }
app.component.html为了完成这一步,最后的任务是在我们的模板中实现条件渲染。
添加条件渲染
<a mat-list-item>
   <span class="entry">
      <mat-icon>house</mat-icon>
      <span *ngIf="!isCollapsed">Dashboard</span>
   </span>
</a>
这里发生了什么:
我们已经成功实现了响应式菜单的交互功能。我们决定仅在移动设备屏幕上启用切换功能。在高分辨率下,我们确保菜单保持打开状态,但会使用一个变量来切换,该变量用于隐藏文本,仅显示图标。
奖励步骤:条件类
如果您想根据侧边导航在更大的分辨率下是折叠还是展开来实现特定的样式,使用 ngClass 您可以利用Angular 的另一个内置指令来应用不同的样式,例如特定的宽度。
应用 ngClass 指令
  <mat-sidenav [ngClass]="!isCollapsed ? 'expanded' : ''" [mode]="isMobile ? 'over' : 'side'" [opened]="isMobile ? 'false' : 'true'">
    // ...
  </mat-sidenav>
修改样式表
.expanded {
    width: 250px;
}
 后端开发教程 - Java、Spring Boot 实战 - msg200.com


