Shopify + Next.js + Tailwind CSS:现代电子商务
在过去的几年里,我们都对网上购物习以为常。这促使电商品牌大力投资提升在线购物体验。Shopify 商家在 2020 年和 2021 年实现了创纪录的增长,推动了对 Shopify 开发人员的需求。许多 Shopify 商家正在放弃使用主题,开始尝试无头电商解决方案。
在本文中,我将向您展示使用 Shopify GraphQL Storefront API 设置无头电子商务商店的基础知识,其中使用 Next.js 作为前端框架并使用 tailwind CSS 进行样式设置。
Next.js 允许我们使用静态站点生成来创建速度极快的商店,这非常适合电子商务。
让我们开始吧:
1. 使用 Tailwind CSS 设置 Next.js 项目
有很多方法可以设置 Next.js 项目,但对于我们的项目来说,这是最快的。
npx create-next-app -e with-tailwindcss build-next-shop
cd build-next-shop
2. 设置 Shopify Partners 帐户并创建新商店
导航至Shopify Partners并创建您的 Shopify Partners 帐户(如果您还没有)。
然后,导航到左侧的“商店”选项卡并创建一个新商店。
除其他好处外,合作伙伴帐户还允许您轻松管理商店,并在转移给客户之前拥有无限的时间来处理它们。
3. 将 Shopify 商店连接到 Next.js 应用
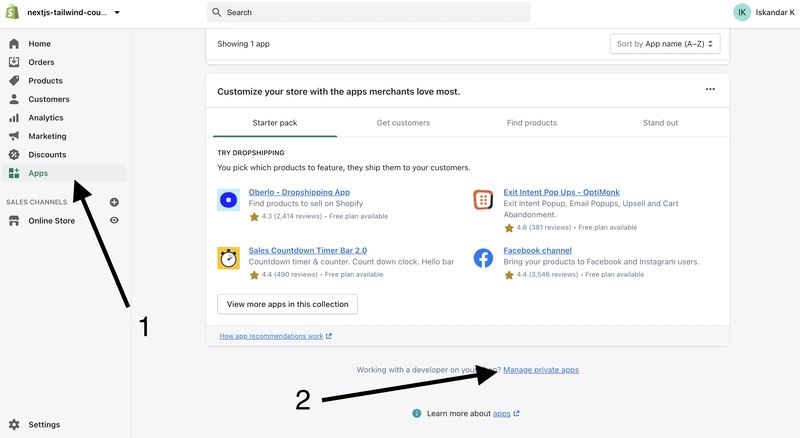
导航到商店中的“应用程序”选项卡,然后点击底部的“管理私人应用程序”链接:
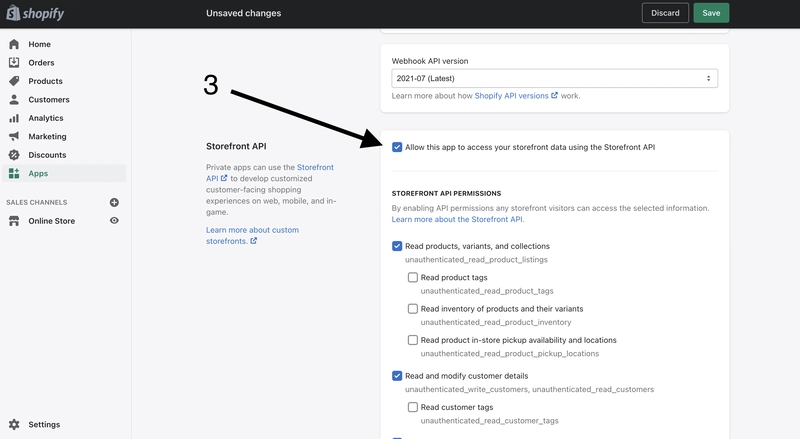
接受条款和条件,将您的私人应用命名为“Next.js Connection”,并输入您的电子邮件地址。然后向下滚动并勾选“允许此应用使用 Storefront API 访问您的店面数据”。
在 Next.js 应用程序的根文件夹中创建 .env.local 文件并添加以下变量:
SHOPIFY_STOREFRONT_ACCESSTOKEN='storefront api access token'
SHOPIFY_STORE_DOMAIN='yourstore.myshopify.com'
(未显示所有文件/文件夹)
build-next-shop
 ┣ node_modules
 ┣ pages
 ┣ public
 ┣ .env.local *
 ┗ package.json
....
4.安装 Shopify GraphiQL 应用程序
导航到Shopify GraphiQL App,滚动到底部,点击“全选”范围以访问 Storefront API,然后安装 Shopify GraphiQL 应用程序,该应用程序将帮助您在应用程序中使用查询之前对其进行测试。
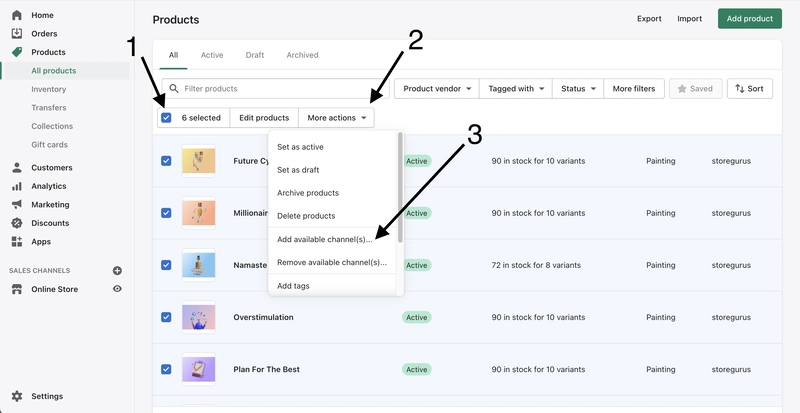
(在继续此步骤之前,请将一些样品产品添加到您的商店并确保它们可用于 GraphiQL App 销售渠道)。
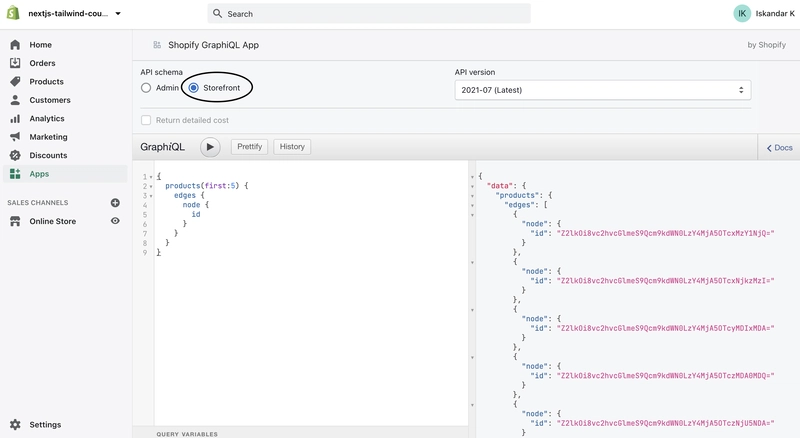
现在打开 GraphiQL 应用程序,选择 Storefront API 模式并将其粘贴到查询字段中:
{
  products(first:5) {
    edges {
      node {
        id
      }
    }
  }
}
恭喜!您已成功完成第一个 Storefront API 查询!
5. 在 Next.js Storefront 中获取产品
在您的 Next.js 应用程序中,在根目录中创建一个 lib 文件夹,并在其中创建一个 shopify.js 文件。
(未显示所有文件/文件夹)
build-next-shop
 ┣ lib
 ┃ ┗ shopify.js *
 ┣ node_modules
 ┣ pages
 ┣ public
 ┣ .env.local
 ┗ package.json
....
填写shopify.js:
const domain = process.env.SHOPIFY_STORE_DOMAIN
const storefrontAccessToken = process.env.SHOPIFY_STOREFRONT_ACCESSTOKEN

async function ShopifyData(query) {
  const URL = `https://${domain}/api/2021-07/graphql.json`

  const options = {
    endpoint: URL,
    method: "POST",
    headers: {
      "X-Shopify-Storefront-Access-Token": storefrontAccessToken,
      "Accept": "application/json",
      "Content-Type": "application/json",
    },
    body: JSON.stringify({ query })
  }

  try {
    const data = await fetch(URL, options).then(response => {
      return response.json()
    })

    return data
  } catch (error) {
    throw new Error("Products not fetched")
  }
}

export async function getAllProducts() {
  const query = `
  {
  products(first: 25) {
    edges {
      node {
        id
        title
        handle
        priceRange {
          minVariantPrice {
            amount
          }
        }
        images(first: 5) {
          edges {
            node {
              originalSrc
              altText
            }
          }
        }
      }
    }
  }
}
`

  const response = await ShopifyData(query)

  const allProducts = response.data.products.edges ? response.data.products.edges : []

  return allProducts
}
我们在这里做的事情:
- 创建一个名为 ShopifyData 的函数来接受查询。
- ShopifyData 将使用设置的标头向 Shopify Storefront GraphQL API 发出 POST 请求并返回 json 响应。
- ShopifyData 函数将数据返回给 getAllProducts 函数,该函数将数据设置为等于 allProducts 变量。
6. 在主页上显示产品
在你的 index.js 文件中:
import { getAllProducts } from "../lib/shopify"

export default function Home({ products }) {

  return (
    <div className="bg-white">
      <div className="max-w-2xl mx-auto py-16 px-4 sm:py-24 sm:px-6 lg:max-w-7xl lg:px-8">
        <h2 className="text-2xl font-extrabold text-gray-900 mb-6">
          Products
        </h2>
        <div className="grid grid-cols-1 gap-y-10 gap-x-6 sm:grid-cols-2 lg:grid-cols-3 xl:grid-cols-4 xl:gap-x-8">
         {
            products.map(product => (
              <ProductCard key={product.node.id} product={product} />
            ))
          }
       </div>
      </div>
    </div>
  )
}

export async function getStaticProps() {
  const products = await getAllProducts()

  return {
    props: { products }, // will be passed to the page component as props
  }
}
在名为 components 的新文件夹中创建一个 ProductCard.js 组件:
build-next-shop
 ┣ components
 ┃ ┗ ProductCard.js *
 ┣ lib
 ┣ node_modules
 ┣ pages
 ┣ public
 ┣ .env.local
 ┗ package.json
....
然后在 ProductCard.js 里面
import Link from 'next/link'
import Image from 'next/image'
import { formatter } from '../utils/helpers'

const ProductCard = ({ product }) => {
  const { handle, title } = product.node

  const { altText, originalSrc } = product.node.images.edges[0].node

  const price = product.node.priceRange.minVariantPrice.amount

  return (
    <Link
      href={`/products/${handle}`}
    >
      <a className="group">
        <div className="w-full bg-gray-200 rounded-3xl overflow-hidden">
          <div className="relative group-hover:opacity-75 h-72">
            <Image
              src={originalSrc}
              alt={altText}
              layout="fill"
              objectFit="cover"
            />
          </div>
        </div>
        <h3 className="mt-4 text-lg font-medium text-gray-900">{title}</h3>
        <p className="mt-1 text-sm text-gray-700">{formatter.format(price)}</p>
      </a>
    </Link>
  )
}

export default ProductCard
这里发生了什么:
-
我们正在使用Next.js 提供的getStaticProps函数从我们的 shopify.js 文件的 getAllProducts 函数中预取所有产品。
-
将产品作为道具传递给我们的主页功能。
-
创建 ProductCard.js 来显示单个产品卡。
-
映射产品并显示每个产品的 ProductCard.js。
恭喜!您刚刚创建了基本的 Shopify Next.js 店面。
后续步骤:
- 使用getStaticPaths Next.js 函数的动态产品页面。
- 使用 React Context 创建添加到购物车功能以进行购物车状态管理。
- 部署到 Vercel。
示例启动项目:https://github.com/iskurbanov/shopify-next.js-tailwind
查看BuildNextShop.com上的示例网站和完整教程,我们在其中使用 Next.js 创建了一个完全可以投入生产的 Shopify Headless 商店!
鏂囩珷鏉ユ簮锛�https://dev.to/iskurbanov/shopify-next-js-tailwind-css-modern-ecommerce-4475 后端开发教程 - Java、Spring Boot 实战 - msg200.com


