如何使用 React 和 Sanity 创建单页应用程序
GenAI LIVE! | 2025年6月4日
介绍
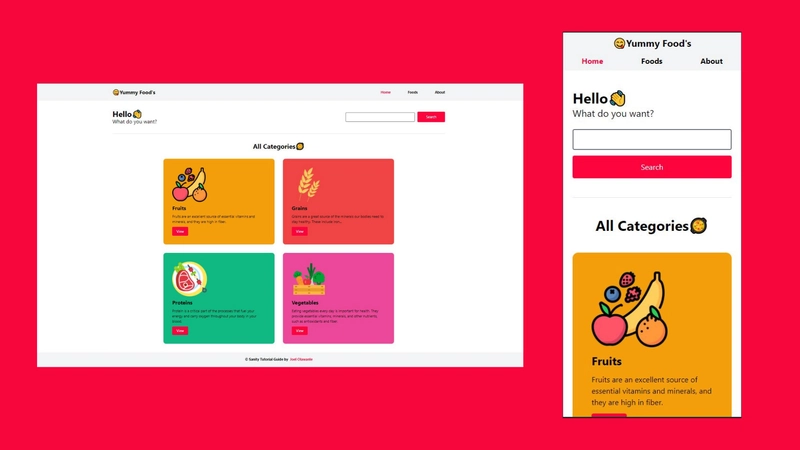
你有没有想过用 React 和 Sanity 构建一个单页应用 (SPA)?在本指南中,我将带你踏上一段激动人心的旅程,用 React 和 Sanity 构建你的第一个 SPA 应用。我们将创建一个“食品目录”应用,其中包含各种食品商品和类别,以便用户自行组织它们。所有这些类别和食品信息都将从 Sanity 中获取。
这是项目的GitHub 仓库;您可以克隆或下载完整的项目。您也可以在这里查看已部署的应用程序。
注意:这是一篇“跟着做”的文章。只要你跟着做,你一定会得到很好的结果。
要求/先决条件
要理解本指南和代码,您应该具备:
什么是 React?
React 是一个开源 JavaScript 库,用于为 Web 和移动应用程序构建快速且交互式的用户界面。它由 Facebook 以及由个人开发者和公司组成的社区维护。React 可用于开发单页应用程序或移动应用程序。
React 是一个基于组件的框架,这意味着我们将以小的、可重复使用的片段编写代码,然后将它们组合在一起以构建我们的网站。
理解 SPA
SPA 是单页面应用(Single Page Application)的缩写。它是一种通过动态重写当前页面(而非从服务器加载整个新页面)与用户交互的 Web 应用或网站。简而言之,它是一种在浏览器内部运行的应用,使用过程中无需重新加载页面。我们还将介绍 React 中的路由机制,并学习如何将网站的不同部分映射到不同的视图。
设置 React 应用
在本指南中,我们将使用 create-react-app——React 推荐的创建单页应用的方法。要使用 create-react-app create-react-app,您的计算机上需要安装 Node >= 14.0.0 和 npm >= 5.6 的版本。
要安装,请运行以下命令:
npx create-react-app food-catalog-app
安装完成后,您可以进入项目的根目录来启动开发服务器。
cd food-catalog-app
npm start
当开发服务器准备就绪后,您可以在浏览器中通过http://localhost:3000/查看您的项目。
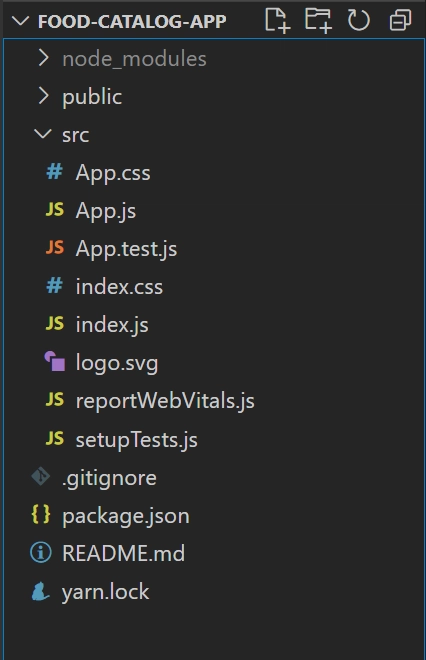
设置完成后,您的项目目录应如下所示。
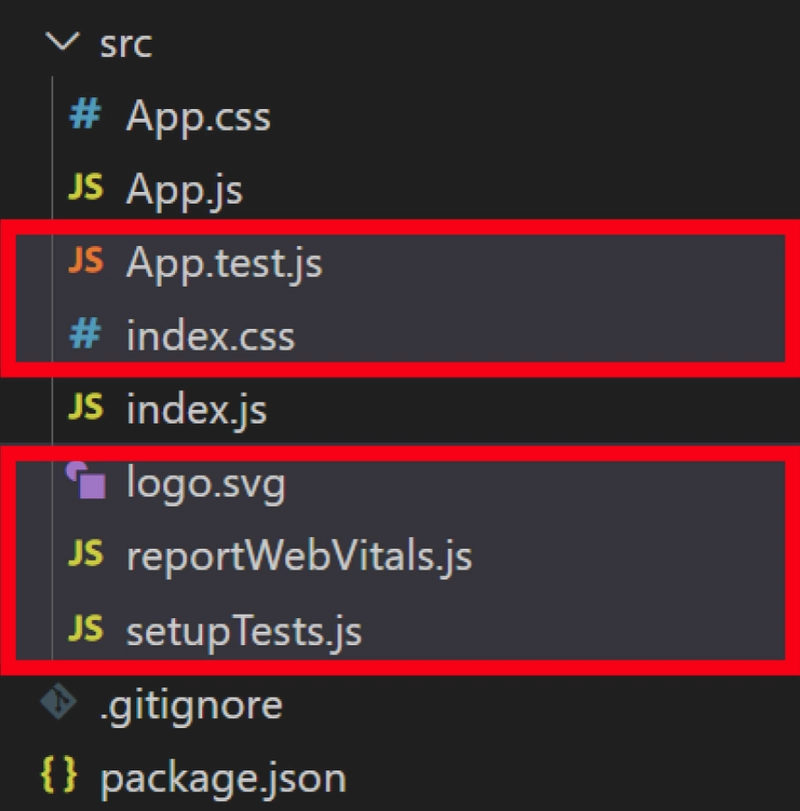
让我们清理一下应用,删除一些不需要的文件,这样我们就可以开始构建应用了。您可以删除以下突出显示的文件。
注意:这可能会引发错误,因此请确保删除
logo.svg从 导入App.css和从index.css导入。reportWebVitals.jsindex.js
为了确保您的文件与我的完全一样,我将我的安装文件推送到这个 GitHub 存储库,您可以克隆它或进行交叉检查。
使用 Tailwind CSS
TailwindCSS 是一个实用优先的 CSS 框架,用于构建前端应用程序。使用 TailwindCSS,您无需在代码中添加晦涩难懂的 CSS 类,而是使用实用类来创建组件,并根据需要控制每个样式。所有这些都无需编写任何 CSS 代码。
在React和其他框架中,有很多方法可以使用 Tailwind CSS ,但在本指南中,我们将使用CDN。
在/src文件夹中,将以下 CDN 导入添加到App.css文件。
@import url('https://unpkg.com/tailwindcss@^2/dist/tailwind.min.css');
一旦完成,我们现在就可以着手建立我们的理智工作室。
什么是理智?
Sanity 是一个内容平台,它将您的结构化内容视为数据。它捆绑了一个开源的实时无头 CMS,可以使用 JavaScript 进行自定义。我们将使用 Sanity Studio 来管理我们的内容,并通过 Sanity 的“开箱即用” API 在前端访问它。
Sanity 的一大优势在于其内容管理界面(或称“工作室”)是开源的,并且易于构建。如果您了解 React,您可以根据自己的喜好进行扩展和自定义。
开始使用 Sanity/setup
要使用 Sanity 启动新项目,我们需要全局安装Sanity CLI。为此,您需要安装 Node 和 npm。
npm install -g @sanity/cli
CLI 安装完成后,您就可以使用它创建一个新项目。在刚刚创建的 React 项目(即 food-catalog-app)的目录中运行以下命令。
sanity init
如果这是您第一次,这将使您登录到 Sanity,然后您将能够创建一个项目,设置一个数据集,并生成在本地运行编辑环境所需的文件。
注意:如果您没有账户,Sanity 会指导您如何注册。或者,您可以访问 Sanity 的网站并创建一个账户。
完成后,系统将提示您创建一个新项目,点击Enter。将您的项目命名为food-catalog-studio,然后输入 选择默认数据集配置Y。
最后,确认项目路径并为您的工作室选择一个架构。在本演示中,您需要从“清理没有预定义架构的项目”选项开始。
要启动工作室,请在终端中运行以下命令移动到该文件夹:
cd studio
现在,您可以使用以下命令启动工作室:
sanity start
编译后,工作室将在http://localhost:3333打开,并且我们将显示类似这样的内容,因为我们在设置工作室时选择了“没有预定义模式的清理项目”。
Sanity工作室
Sanity Studio是一个基于 React.js 构建的开源 CMS,允许用户使用工具包和插件来创建优化内容处理方式的工作流程。它提供快速配置和自由表单定制。
从头开始创建食品目录模式
架构 (Schema) 描述了文档中不同的字段类型。您可以选择不同类型的架构。
在本指南中,我们将创建两个架构:一个用于食物类别,另一个用于食物项目。食物架构将包含食物名称、食物描述、食物图片及其类别等属性;而类别架构将包含名称、图片、描述以及用于创建动态样式的十六进制代码字段。
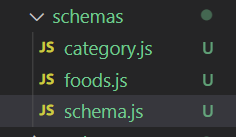
Studio 启动时,会在项目文件夹schema.js中查找该文件schemas。目前,由于我们没有任何架构,因此您会在schema.js文件中找到类似以下内容。
// First, we must import the schema creator
import createSchema from "part:@sanity/base/schema-creator";
// Then import schema types from any plugins that might expose them
import schemaTypes from "all:part:@sanity/base/schema-type";
// Then we give our schema to the builder and provide the result to Sanity
export default createSchema({
  // We name our schema
  name: "default",
  // Then proceed to concatenate our document type
  // to the ones provided by any plugins that are installed
  types: schemaTypes.concat([
    /* Your types here! */
  ]),
});
types通过定义模式的标题、名称、类型以及字段,所有模式都会被放入数组中。对于我们的foods模式,我们将使用类似下面的代码。
types: schemaTypes.concat([
    /* Your types here! */
    {
  title: 'Foods',
  name: 'foods',
  type: 'document',
  fields: [{
      title: 'Food Name',
      name: 'foodName',
      type: 'string',
      validation: Rule => Rule.required()
    },
    {
      title: 'A little description',
      name: 'foodDesc',
      type: 'text',
      options: {
        maxLength: 200,
      },
      validation: Rule => Rule.required()
    },
    {
      title: "Food Image",
      name: "foodImage",
      type: "image",
      options: {
        hotspot: true,
      },
    }
  ]
},

//Category schema goes here

]),
完成这些后,保存,现在让我们更深入地看一下上面的代码,每个对象代表一个字段,并且必须有标题、名称和类型。
- 标题:此字段的显示名称
- 名称:API 中使用的此字段的标识符
- 类型:此字段的类型,例如字符串、图像等。您可以在此处找到内置类型的完整列表。
要创建的第二个模式是category我们将添加到食物模式对象下方的模式。
{
  name: "category",
  title: "Category",
  type: "document",
  fields: [{
      title: "Title",
      name: "title",
      type: "string",
    },
    {
      title: "Slug",
      name: "slug",
      type: "slug",
      options: {
        source: "title",
        maxLength: 96,
      },
    },
    {
      title: "Description",
      name: "description",
      type: "text",
    },
    {
      title: "Image",
      name: "image",
      type: "image",
      options: {
        hotspot: true,
      },
    },
    {
      title: "Hex Code",
      name: "hexCode",
      type: "string",
    },
  ],
}
保存文件,你会看到如下内容:
最后一件事是在我们的foods架构中添加一个类别。它会在您填写食物时显示从类别架构中获取的类别。为此,我们将在数组中希望此字段所在的任何位置创建一个新字段
{
  name: "category",
  title: "Category",
  type: "reference",
  to: {
    type: "category"
  }
},
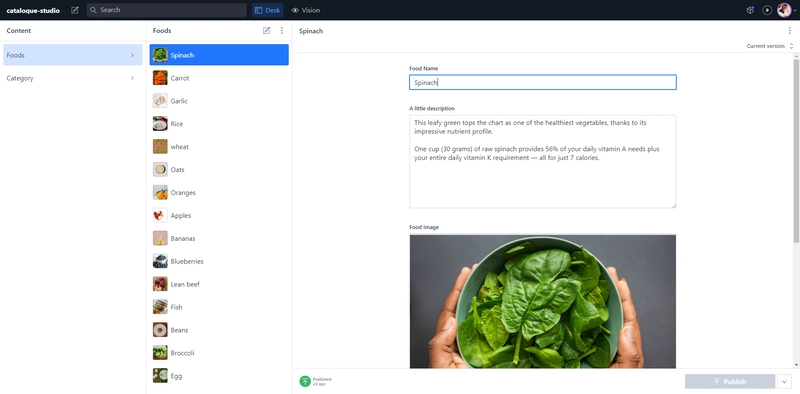
保存代码并food在工作室中创建新类型的文档后,您应该会看到该categories字段按预期显示。
组织我们的模式
在加载食物和类别之前,我们先来整理一下 Schema。将所有 Schema 放在一个文件中总是可行的,但 Schema 数量越多,维护起来就越困难。
建议在单独的文件中描述每种文档类型,然后schema.js像这样导入它们:
// First, we must import the schema creator
import createSchema from 'part:@sanity/base/schema-creator'

// Then import schema types from any plugins that might expose them
import schemaTypes from 'all:part:@sanity/base/schema-type'

import foods from "./foods";
import category from "./category";

// Then we give our schema to the builder and provide the result to Sanity
export default createSchema({
  // We name our schema
  name: 'default',
  // Then proceed to concatenate our document type
  // to the ones provided by any plugins that are installed
  types: schemaTypes.concat([
    foods,
    category
  ]),
})
深入研究上面的代码,我们导入了两个导出模式的文件,并在 types 数组中调用它们。此时,你的目录将如下所示:
最后一步是,我们将把工作室的内容上传到应用中。这完全取决于你;你可以从Unsplash获取精美的图片。
将 Sanity 与 React App 连接起来
让我们允许前端查询并接收来自 Sanity 的数据。
将 React 与 Sanity 连接起来
通过在 React 项目中安装sanity 客户端包来实现。然后运行以下命令:
npm install @sanity/client @sanity/image-url
- @sanity/client — Sanity Client 是 Sanity 的官方 JavaScript 客户端,可以在 Node.js 和现代浏览器中使用。
- @sanity/image-url — 一个辅助库,用于生成图片 URL,并通过 Sanity 资源管道执行有用的图片转换。点击此处了解更多官方文档。
安装这些包后,我们将client.js在src目录中创建一个名为的新文件,并将以下代码添加到该client.js文件中。
import sanityClient from "@sanity/client";

export default sanityClient({
  projectId: "Your Project ID Here", // find this at manage.sanity.io or in your sanity.json
  dataset: "production", // this is from those question during 'sanity init'
});
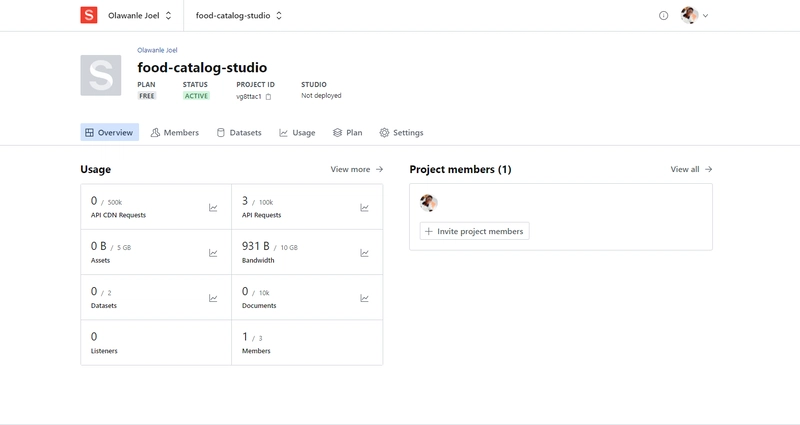
注意:要获取您的项目 ID,请访问https://www.sanity.io/manage,单击该项目,这样它会显示有关该项目的完整信息,包括项目 ID。
确保保存该文件。
将 Sanity 连接到 React
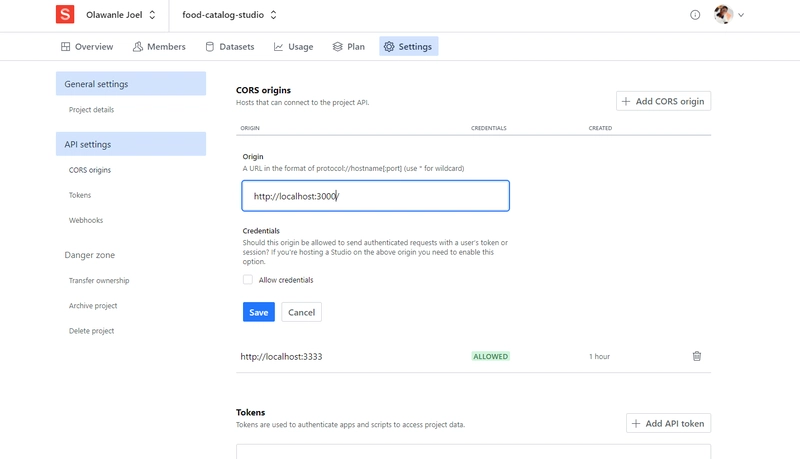
最后,您还需要将 React 开发服务器运行的端口添加到 Sanity 项目的 CORS 源。访问https://www.sanity.io/manage并点击您的 Sanity 项目。
在项目的仪表板上,单击设置 → API 设置,然后将http://localhost:3000/添加到 CORS 来源字段(如果未自动添加)。
一旦你保存了,那将是我们的 Sanity Studio 的全部内容;我们现在可以开始构建我们的应用程序的前端来使用来自 Sanity Studio 的数据。
构建食品目录应用程序
首先要处理的是路由,这通常在App.js文件中处理。我们将使用react-router-domSwitch 和 Route 组件来实现它。
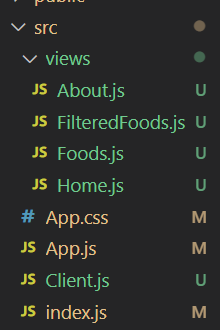
我们将在目录中创建一个新文件夹,/src用于存放此应用中的所有路由。我们将有四条路由:
views/Home.js- 主索引是我们将列出从 Sanity 工作室获取的所有类别的地方。views/Foods.js- 这将包含从 Sanity 工作室获取的所有食物的随机列表。views/About.js- 这是应用程序的关于页面。views/FilteredFoods.js- 这是一个包含与特定类别相关的食品的单独页面。
让我们创建上述文件,我们的文件目录现在看起来像这样:
现在让我们在App.js文件中处理路由。在这个文件中,我们将使用 React 路由器处理路由。这使得能够在 React 应用程序中的各个组件的视图之间导航。
首先要使用以下命令安装 React Router 包:
npm install react-router-dom --save
安装完成后react-router-dom,将其组件(BrowserRouter、Route、Switch)添加到App.js文件中。现在您可以继续定义路线了。
在下面的代码中,您会注意到所有路由都包裹在Switch和BrowserRouter组件中。Switch组件用于仅渲染与位置匹配的第一个路由,而不是渲染所有匹配的路由;是一个路由器实现,它使用 HTML5 history API 来保持 UI 与 URL 同步。 它是用于存储所有其他组件的父组件。点击此处BrowserRouter了解更多关于 React 路由的信息。
import { BrowserRouter, Route, Switch } from "react-router-dom";

// views
import Home from "./views/Home";
import About from "./views/About";
import Foods from "./views/Foods";
import FilteredFoods from "./views/FilteredFoods";

// styles
import "./App.css";

function App() {
    return (
        <BrowserRouter>
            <Switch>
                <Route component={Home} exact path="/" />
                <Route component={About} path="/About" />
                <Route component={Foods} path="/Foods" />
                <Route component={FilteredFoods} path="/FilteredFoods/:slug" />
            </Switch>
        </BrowserRouter>
    );
}

export default App;
您可以确认路线是否正常工作,并访问路径。接下来就是处理NavBar我们的应用程序。
现在,让我们创建一个文件夹,并在/src目录中为其组件命名,以存放所有可重用组件。这将有助于组织我们的应用程序。在这个文件夹中,我们大约有五个不同的组件,但我们先从应用程序的 Header 部分开始。
构建页眉和页脚部分
页眉部分将包含应用程序的徽标和导航链接,而页脚部分将包含页脚文本。我们之前提到过,React 的核心是组件,所以让我们来制作一些组件吧!
components/Header.js- 这将是容纳导航栏的整体容器。
import React from "react";
import NavBar from "./NavBar";

const Header = () => {
    return (
        <header>
            <div className="bg-gray-100">
                <NavBar />
            </div>
        </header>
    );
};

export default Header;
在上面的代码中,我们创建了一个功能组件,然后导入Navbar.js。
components/NavBar.js- 这将包含徽标和所有导航链接。
import React from "react";
import { NavLink } from "react-router-dom";

const Header = () => {
    return (
        <nav className="container lg:px-0 px-5 py-2 lg:py-0 lg:w-3/4 w-full mx-auto flex flex-col lg:flex-row justify-between h-20 items-center font-bold">
            <NavLink to="/">
                <p className="text-xl lg:text-2xl">😋Yummy Food's</p>
            </NavLink>
            <div className=" lg:block">
                <ul className="flex gap-x-20">
                    <li>
                        <NavLink
                            to="/"
                            exact
                            className="nav-link"
                            activeClassName="active-link"
                        >
                            Home
                        </NavLink>
                    </li>
                    <li>
                        <NavLink
                            to="/foods"
                            className="nav-link"
                            activeClassName="active-link"
                        >
                            Foods
                        </NavLink>
                    </li>
                    <li>
                        <NavLink
                            to="/about"
                            className="nav-link"
                            activeClassName="active-link"
                        >
                            About
                        </NavLink>
                    </li>
                </ul>
            </div>
        </nav>
    );
};

export default Header;
为了使我们声明的链接App.js能够工作,我们需要NavLink从中导入,然后在导航栏中react-router-dom使用。NavLink
components/Footer.js- 这将包含页脚文本,非常简单。
import React from "react";
const Footer = () => {
return (
<div className="bg-gray-100 flex justify-center font-bold p-5">
<p>
© Sanity Tutorial Guide by
<a href="https://joel-new.netlify.app/" style={{ color: "#FE043C" }}>
Joel Olawanle
</a>
</p>
</div>
);
};
export default Footer;
最后一件事是将文件添加Header.js到Footer.js我们的App.js文件中,使 app.js 文件现在看起来像这样
import { BrowserRouter, Route, Switch } from "react-router-dom";

// views
import Home from "./views/Home";
import About from "./views/About";
import Foods from "./views/Foods";
import FilteredFoods from "./views/FilteredFoods";

// components
import Header from "./components/Header";
import Footer from "./components/Footer";

// styles
import "./App.css";

function App() {
    return (
        <BrowserRouter>
            {/* Header Area */}
            <div className="max-w-full">
                <Header />
            </div>
            {/* Route Area */}
            <Switch>
                <Route component={Home} exact path="/" />
                <Route component={About} path="/About" />
                <Route component={Foods} path="/Foods" />
                <Route component={FilteredFoods} path="/FilteredFoods/:slug" />
            </Switch>
            {/* Footer Area */}
            <div className="max-w-full">
                <Footer />
            </div>
        </BrowserRouter>
    );
}

export default App;
在此阶段,当您保存时,应用程序将如下所示
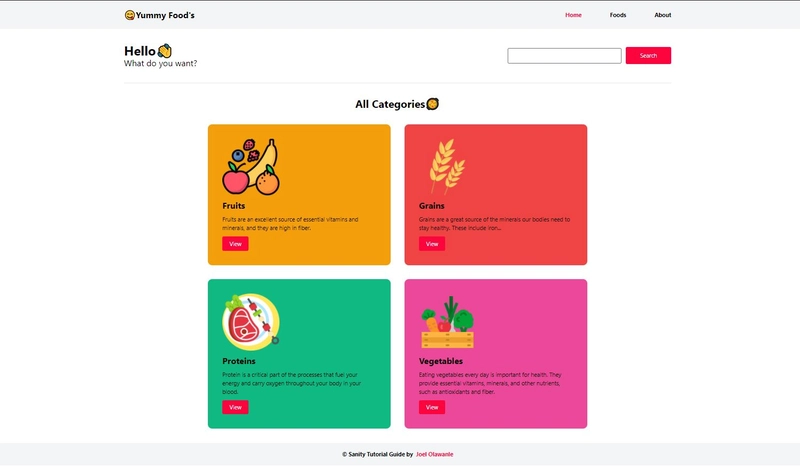
你会注意到我们有 aHeader和 a Footer,但没有内容!现在让我们处理索引页,以便它显示来自 Sanity 的所有类别。
在首页显示所有食品类别
import React from "react";

import Categories from "../components/Categories";

const Home = () => {
    return (
        <section className="container w-full lg:px-0 px-5 lg:w-3/4 mx-auto">
            <div className="flex lg:flex-row flex-col my-10 justify-between">
                <div className="">
                    <h2 className="text-3xl lg:text-4xl font-bold">Hello👋</h2>
                    <p className="text-xl lg:text-2xl">What do you want?</p>
                </div>
                <div className="flex items-center lg:mt-0 mt-5 gap-3 lg:flex-row flex-col">
                    <input
                        type="text"
                        className="w-full lg:w-80 p-2 border-2 border-gray-500 rounded focus:outline-none"
                    />
                    <button
                        style={{ backgroundColor: "#FE043C" }}
                        className="rounded w-full lg:w-auto px-10 py-3 text-white"
                    >
                        Search
                    </button>
                </div>
            </div>
            <hr className="my-10" />
            <Categories />
        </section>
    );
};

export default Home;
在上面的代码中,我们有一个div包含欢迎信息和搜索栏,然后,我们导入了一个名为categories“components”的组件文件夹。
要继续,您需要创建一个组件并在文件夹Categories.js中命名它/components。我们将在这里从 Sanity 获取所有食品类别,可以使用 GROQ 或 GraphQL。在本指南中,我们将使用 GROQ。
请将以下代码粘贴到Categories.js文件中:
import React, { useState, useEffect } from "react";
import sanityClient from "../Client";

import Category from "./Category";

const Categories = () => {
    const [categories, setCategories] = useState(null);

    useEffect(() => {
        sanityClient
            .fetch(
                `*[_type == "category"]{
      title,
      slug,
      description,
      image{
        asset->{
          _id,
          url
        },
      },
      hexCode,
    }`
            )
            .then((data) => setCategories(data))
            .catch(console.error);
    }, []);

    return (
        <div className="">
            <h3 className="text-3xl font-bold text-center my-10 lg:my-5">
                All Categories🥘
            </h3>

            <div className="flex flex-col lg:flex-row lg:justify-center flex-wrap w-full gap-10 my-10">
                {categories &&
                    categories.map((category) => (
                        <Category key={category._id} category={category} />
                    ))}
            </div>
        </div>
    );
};

export default Categories;
上面的代码可能看起来很棘手,因为我们现在正在从 Sanity 获取数据,但我会解释一下。让我们首先了解一下 GROQ 是什么。
GROQ(图形关系对象查询)是一种声明性语言,旨在查询大量无模式的 JSON 文档集合。
注意:如果您还不熟悉用于查询 Sanity 数据的 GROQ,请查看此处的官方文档。
解释代码...
我们做的第一件事是导入我们之前安装的 Sanity Client。
import sanityClient from "../Client";
在 React 中,我们使用一些 hooks 来查询数据。在本指南中,我们将使用useState()和useEffect()。useState()是一个 Hook,它允许你在函数组件中使用状态变量,而 则useEffect()允许你在函数组件中执行副作用。
要使用这两个钩子,你必须从 react 中导入它们,这就是我们在第一行中与 react 一起做的事情,这是必要的。
import React, { useState, useEffect } from "react";
我们现在可以设置我们的状态
const [categories, setCategories] = useState(null);
注意:这遵循一个常见的模式,其中
categories是我们访问特定状态的当前值的地方,而是setCategories我们设置或更改它的方法。
要从 Sanity Studio 获取数据/信息,您可以使用 GROQ,现在让我们探索我们的 Groq 查询:
useEffect(() => {
        sanityClient
            .fetch(
                `*[_type == "category"]{
      title,
      slug,
      description,
      image{
        asset->{
          _id,
          url
        },
      },
      hexCode,
    }`
            )
            .then((data) => setCategories(data))
            .catch(console.error);
    }, []);
此查询将在您的 Sanity 数据存储或Content Lake_type中搜索具有的模式category(这是模式的) ,name然后获取title、、等slugdescription
进一步阅读我们的代码,您会注意到我们正在循环遍历我们的类别数组并将每个项目映射到我们的类别组件的一个实例。
{categories &&
    categories.map((category) => (
        <Category key={category._id} category={category} />
    ))}
在category.js文件中,粘贴以下代码并保存
import React from "react";
import { Link } from "react-router-dom";

import sanityClient from "../Client";
import imageUrlBuilder from "@sanity/image-url";

const builder = imageUrlBuilder(sanityClient);

function urlFor(source) {
    return builder.image(source);
}

const Category = ({ category }) => {
    return (
        <div
            className="bg-gray-100 rounded-xl p-10 w-full lg:w-1/3"
            style={{ backgroundColor: `#${category.hexCode}` }}
        >
            <img
                src={urlFor(category.image).url()}
                alt={category.title}
                className="w-40"
            />
            <h4 className="text-2xl py-3 font-bold capitalize">{category.title}</h4>
            <p>{category.description}</p>
            <Link to={"/filteredfoods/" + category.slug.current}>
                <button
                    style={{ backgroundColor: "#FE043C" }}
                    className="rounded mt-3 px-5 py-2 text-white"
                >
                    View
                </button>
            </Link>
        </div>
    );
};

export default Category;
在上面的代码中,我们导入了imageUrlBuilderfrom ,并通过创建一个名为的方法并在模板中使用它@sanity/image-url来生成图片的 URL 。这有助于我们获得与上传到 Sanity 的常规图片大小相比缩略图大小的图片。UrlFor()
注意: 可以做很多事情imageUrlBuilder,例如指定宽度和高度。您可以imageUrlBuilder在此处阅读更多相关信息。
保存后,您会注意到主页/索引页现在看起来像这样,具体取决于您在工作室中输入的数据。
显示食物页面上的所有食物
就像我们能够在主页上显示所有类别一样,我们也将使用相同的方法在食品页面上显示所有食品。粘贴/views/Foods.js以下代码:
import React, { useState, useEffect } from "react";
import { Link } from "react-router-dom";
import sanityClient from "../Client";
import imageUrlBuilder from "@sanity/image-url";

const builder = imageUrlBuilder(sanityClient);

function urlFor(source) {
    return builder.image(source);
}

// import foodImage from "../images/protein/001.jpg";

const Foods = () => {
    const [foods, setFoods] = useState(null);

    useEffect(() => {
        sanityClient
            .fetch(
                `*[_type == "foods"]{
                    _id,
      foodName,
      foodDesc,
      foodImage{
        asset->{
          _id,
          url
        },
      },
      category->{
                title
            }
    }`
            )
            .then((data) => setFoods(data))
            .catch(console.error);
    }, []);

    return (
        <section className="container w-full lg:px-0 px-5 lg:w-3/4 mx-auto min-h-screen">
            <div className="flex lg:flex-row flex-col my-10 justify-center">
                <div className="flex items-center lg:mt-0 mt-5 gap-3 lg:flex-row flex-col">
                    <input
                        type="text"
                        className="w-full lg:w-80 p-2 border-2 border-gray-500 rounded focus:outline-none"
                    />
                    <button
                        style={{ backgroundColor: "#FE043C" }}
                        className="rounded w-full lg:w-auto px-10 py-3 text-white"
                    >
                        Search
                    </button>
                </div>
            </div>
            <hr className="my-10" />
            <div className="my-5">
                <h3 className="text-3xl font-bold text-center my-10 lg:my-5">
                    All Foods🥗
                </h3>
                <div className="grid grid-cols-1 lg:grid-cols-3 gap-8">
                    {foods &&
                        foods.map((food) => (
                            <div
                                className="bg-gray-100 rounded shadow-xl p-5 std-border"
                                key={food.foodName}
                            >
                                <div className="flex flex-col items-center">
                                    <img
                                        src={urlFor(food.foodImage).width(200).url()}
                                        alt={food.title}
                                        className="rounded-full object-cover w-40 h-40 border-4 shadow-inner std-border"
                                    />
                                    <h4 className="text-2xl pt-3 font-bold capitalize">
                                        {food.foodName}
                                    </h4>
                                    <Link to={"/filteredfoods/" + food.category.title}>
                                        <small className="uppercase text-gray-400 font-semibold">
                                            {food.category.title}
                                        </small>
                                    </Link>
                                </div>
                                <p className="mt-5">{food.foodDesc}</p>
                            </div>
                        ))}
                </div>
            </div>
        </section>
    );
};

export default Foods;
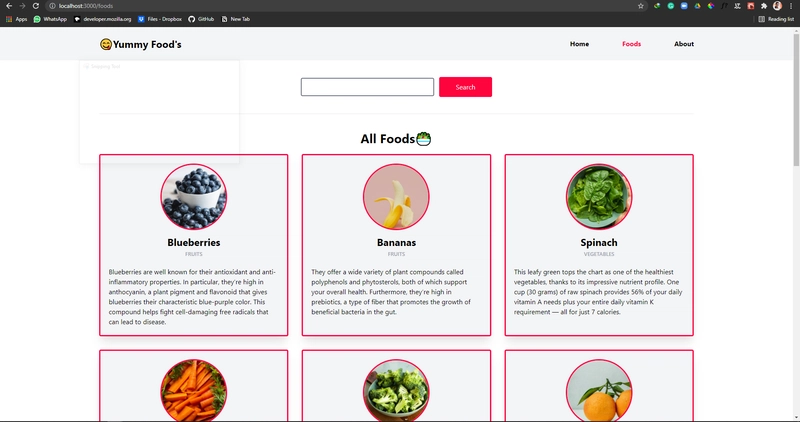
在上面的代码中,我们只是从foodsSanity Studio 的架构中获取了所有食物。保存后,您将获得类似以下内容的结果,具体取决于您的 Sanity Studio 中的内容。
最后,我们来看看一个非常重要的点:你会注意到美食页面和主页上有一些链接,它们会把我们带到一个动态路由。现在我们来看看它是如何工作的。
为每个类别创建动态路线
要创建动态路由,我们需要使用一个组件。我们将使用FilteredFoods.js页面,如果你还记得的话,我们在声明路由时,为该页面的路由添加了一个 slug。
<Route component={FilteredFoods} path="/FilteredFoods/:slug" />
useParams我们将获取要导入到此组件的slug 。在FilteredFoods.js组件中,粘贴以下代码:
import React, { useState, useEffect } from "react";
import { useParams, Link } from "react-router-dom";
import sanityClient from "../Client";
import imageUrlBuilder from "@sanity/image-url";

const builder = imageUrlBuilder(sanityClient);
function urlFor(source) {
    return builder.image(source);
}

const Foods = () => {
    const [filteredFoods, setFilteredFoods] = useState(null);
    const { slug } = useParams();

    useEffect(() => {
        sanityClient
            .fetch(
                ` *[_type == "foods" && category._ref in *[_type=="category" && title=="${slug}"]._id ]{
          _id,
              foodName,
              foodDesc,
              foodImage{
                asset->{
                  _id,
                  url
                },
              },
              category->{
                title
              }
        }`
            )
            .then((data) => setFilteredFoods(data))
            .catch(console.error);
    }, [slug]);

    return (
        <section className="container w-full lg:px-0 px-5 lg:w-3/4 mx-auto min-h-screen">
            <div className="flex lg:flex-row flex-col my-10 justify-center">
                <div className="flex items-center lg:mt-0 mt-5 gap-3 lg:flex-row flex-col">
                    <input
                        type="text"
                        className="w-full lg:w-80 p-2 border-2 border-gray-500 rounded focus:outline-none"
                    />
                    <button
                        style={{ backgroundColor: "#FE043C" }}
                        className="rounded w-full lg:w-auto px-10 py-3 text-white"
                    >
                        Search
                    </button>
                </div>
            </div>
            <hr className="my-10" />
            <div className="my-5">
                <h3 className="text-3xl font-bold text-center my-10 lg:my-5">
                    All Foods🥗
                </h3>
                <div className="grid grid-cols-1 lg:grid-cols-3 gap-8">
                    {filteredFoods &&
                        filteredFoods.map((food) => (
                            <div
                                className="bg-gray-100 rounded shadow-xl p-5 std-border"
                                key={food.foodName}
                            >
                                <div className="flex flex-col items-center">
                                    <img
                                        src={urlFor(food.foodImage.asset.url).width(200).url()}
                                        alt=""
                                        className="rounded-full object-cover w-40 h-40 border-4 shadow-inner std-border"
                                    />
                                    <h4 className="text-2xl pt-3 font-bold capitalize">
                                        {food.foodName}
                                    </h4>
                                    <Link to={"/filteredfoods/" + food.category.title}>
                                        <small className="uppercase text-gray-400 font-semibold">
                                            {food.category.title}
                                        </small>
                                    </Link>
                                </div>
                                <p className="mt-5">{food.foodDesc}</p>
                            </div>
                        ))}
                </div>
            </div>
        </section>
    );
};

export default Foods;
上面的代码可能比较复杂,但我将用通俗易懂的语言解释清楚。我们做的第一件事是导入,useParams这样我们就可以得到slug
const { slug } = useParams();
一旦成功,我们现在就可以查询我们的 Sanity Studio 了,但这次的查询方式完全不同。想要了解 GROQ 中的查询,可以在这里查看他们的速查表。
保存此代码后,您现在可以通过主页或食品页面中声明的链接访问动态路线
<Link to={"/filteredfoods/" + category.slug.current}>
    <button
        style={{ backgroundColor: "#FE043C" }}
        className="rounded mt-3 px-5 py-2 text-white"
    >
        View
    </button>
</Link>
到目前为止,整个应用程序应该可以正常工作并且快速运行,无需重新加载浏览器,我们还没有向“关于”页面添加任何信息,您可以粘贴下面的代码,这样我们就可以确保一切都完成了:
import React from "react";

import foodsAboutImg from "../images/foods-abt-img.jpg";

const About = () => {
    return (
        <section className="container w-full lg:px-0 px-5 lg:w-3/4 mx-auto min-h-screen">
            <div className="mt-16">
                <h3 className="text-3xl font-bold text-center my-10 lg:my-5">
                    About Us🦻
                </h3>
                <div className="flex gap-10 justify-center items-center flex-col lg:flex-row mt-10">
                    <div className="">
                        <img
                            src={foodsAboutImg}
                            className="w-96 rounded-xl lg:rounded-l-xl"
                            alt=""
                        />
                    </div>
                    <div className="w-full lg:w-1/3 flex gap-5 mb-10 lg:mb-0 flex-col">
                        ⭐⭐⭐
                        <p>
                            A healthy diet rich in fruits, vegetables, whole grains and
                            low-fat dairy can help to reduce your risk of heart disease by
                            maintaining blood pressure and cholesterol levels. High blood
                            pressure and cholesterol can be a symptom of too much salt and
                            saturated fats in your diet.
                        </p>
                        <p>
                            Many healthful foods, including vegetables, fruits, and beans, are
                            lower in calories than most processed foods.
                        </p>
                        <p>
                            Children learn most health-related behaviors from the adults
                            around them, and parents who model healthful eating and exercise
                            habits tend to pass these on.
                        </p>
                        ⭐⭐⭐
                    </div>
                </div>
            </div>
        </section>
    );
};

export default About;
这可能会由于导入的图像而引发错误。您可以随意使用其他图像或从此GitHub 仓库获取图像。
恭喜!我们的应用程序现在已在离线状态下顺利运行。您可以决定将应用程序部署到线上,以便其他人轻松访问。
结论
在本指南中,我们使用 React、Tailwind CSS 和 Sanity 构建了一个单页应用程序。本指南将帮助您设置此项目的您自己的版本。您还可以通过添加/实现某些特性和功能来改进它。
以下是一些可以帮助您入门的想法:
- 利用食物,在搜索字段中添加搜索功能。
- 使用Vuetify、BootstrapVue或标准 CSS等 UI 库来设计应用程序的样式。
- 使模式的某些字段成为必需的,并与其他字段类型一起使用。
有用的资源
编码愉快!
链接:https://dev.to/sanity-io/how-to-create-a-single-page-application-with-react-and-sanity-2ggl 后端开发教程 - Java、Spring Boot 实战 - msg200.com
