如何在 30 分钟内使用 React Native 构建地理定位天气预报应用程序
继我上一篇关于如何在 React Native 中创建图像识别应用程序的指南(https://dev.to/andrewsmith1996/how-to-build-an-image-recognition-app-in-react-native-m6g)之后,我将撰写一篇关于如何在 React Native 中构建简单的地理定位天气预报应用程序的指南(当然,在 30 分钟内)
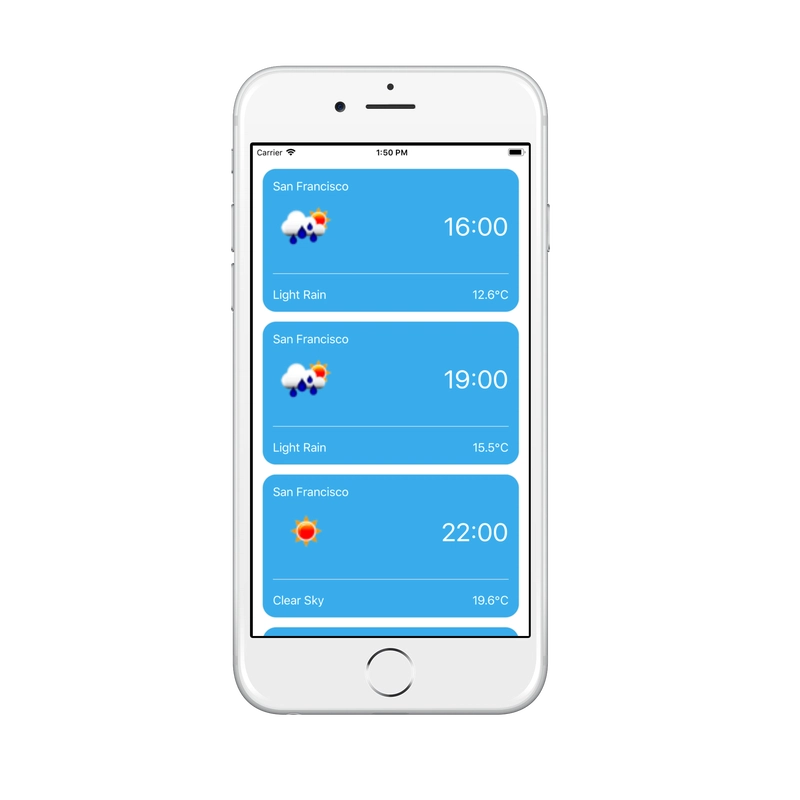
我们将构建一个简单的应用程序,使用手机的地理定位功能获取用户的位置,然后将该位置的经纬度传递给 Open Weather Map 的天气 API,这将为我们提供该位置 5 天的天气预报(分为 3 小时时段)。
天气 API 是免费的,您需要在https://openweathermap.org/api获取密钥才能使用该应用程序
本教程假设您已安装 NodeJS 和 React Native。如果没有,请前往https://facebook.github.io/react-native/docs/getting-started.html开始学习。本教程还假设您对 React 和 NodeJS 有基本的了解。
我们将构建什么
我们实际上只会在这里创建 1 个额外的 React 组件,这就是显示每 3 小时天气预报的实际卡片。
让我们开始吧
首先,您需要初始化一个新的 React Native 应用程序。
react-native init geolocationWeatherReactNative
然后 CD 进入新的 React Native 项目目录,并运行以下命令启动 iOS 模拟器。
cd geolocationWeatherReactNative
react-native run-ios
接下来,我们需要安装 React Native Elements,这是一个 React Native UI 工具包,它将为我们提供移动应用中常见的 Card 组件。我们还需要安装使用 Card 元素所需的矢量图标库。
npm install --save react-native-elements

npm install react-native-vector-icons --save
然后我们要链接我们的新图书馆
react-native link react-native-vector-icons
我们还需要在 Info.plist 文件中添加 NSLocationWhenInUseUsageDescription,否则应用会崩溃。这只是一个简短的描述,用于说明应用将如何使用位置服务。因此,请在项目的 iOS 文件夹中的 Info.plist 文件中添加以下内容。
<key>NSLocationWhenInUseUsageDescription</key>
<string>YOUR DESCRIPTION HERE</string>
出于同样的原因,我们还需要将以下内容添加到您的 AndroidManifest.xml 中
<uses-permission android:name="android.permission.ACCESS_FINE_LOCATION" />
现在您已基本完成所有设置。
首先,我们要构建我们的卡片组件,该组件将被重复使用以显示每 3 小时的天气预报详情。
ForecastCard.js
因此,创建一个名为“components”的文件夹,并在其中创建一个 ForecastCard.js 文件。
在页面顶部,我们需要导入 React,以及来自 React Native 的 StyleSheet、View 和 Image 模块,因为我们稍后会使用它们。
我们还需要从我们安装的 React Native Elements 库中导入 Card 组件。
import React, {Component} from 'react';
import { StyleSheet, View, Image } from 'react-native';
import { Text, Card, Divider } from 'react-native-elements';
首先我们需要设置 ForecastCard 的类
export default class ForecastCard extends Component {


}
我们没有在这个组件中使用任何状态,它只会渲染我们从 App 父组件传递给它的 props,所以不需要在这里添加构造函数。
在 ForecastCard 类的渲染函数中,我们需要添加以下代码来暂时渲染一张空白卡片。
return (
    <Card containerStyle={styles.card}>

    </Card>
);
然后将以下样式添加到卡片中,或者随意添加您自己的样式。
card:{
    backgroundColor:'rgba(56, 172, 236, 1)',
    borderWidth:0,
    borderRadius:20
}
App.js
现在让我们回到 App.js 并开始研究应用程序的功能。
因此让我们导入我们需要的所有模块:
import React, {Component} from 'react';
import { FlatList } from 'react-native';
注意,我们正在导入 FlatList,这是一个 React Native 组件,我们稍后会使用它来呈现项目列表(ForecastCards)
我们将使用 4 个状态变量:
- 用户所在位置的经度
- 用户所在位置的纬度
- API 返回的预测
- 指示 API 响应中是否存在错误的错误字符串
然后在类的构造函数中初始化这些
constructor(props){
    super(props);

    this.state = {
        latitude: 0,
        longitude: 0,
        forecast: [],
        error:''
    };
接下来,我们将创建一个函数,利用 Geolocation 返回用户的位置。因此,请使用以下代码设置 getLocation() 函数。
getLocation(){

    // Get the current position of the user
    navigator.geolocation.getCurrentPosition(
    (position) => {
        this.setState(
        (prevState) => ({
            latitude: position.coords.latitude,
            longitude: position.coords.longitude
            }), () => { this.getWeather(); }
        );
    },
        (error) => this.setState({ forecast: error.message }),
        { enableHighAccuracy: true, timeout: 20000, maximumAge: 1000 },
    );
}
这段代码只是使用内置的 Geolocation 服务来获取用户的当前位置,然后将经纬度状态设置为响应。由于 setState() 是一个异步操作,我们添加了一个回调函数来调用 getWeather() 函数,我们将在下文中进行设置。
现在我们已经将用户的位置存储在应用程序的状态中,我们将使用这些数据将其传递给天气 API 以获取该地区的天气预报。
因此设置一个 getWeather() 函数:
    getWeather(){

        // Construct the API url to call
        let url = 'https://api.openweathermap.org/data/2.5/forecast?lat=' + this.state.latitude + '&lon=' + this.state.longitude + '&units=metric&appid=YOUR API KEY HERE';

        // Call the API, and set the state of the weather forecast
        fetch(url)
        .then(response => response.json())
        .then(data => {
            this.setState((prevState, props) => ({
                forecast: data
        }));
        })
    }
在上面的代码中,我们构造了一个 URL 字符串,用于调用 Weather API 的预报服务,然后我们附加了存储在类状态中的经纬度。之后,我们附加了单位参数,以指定我们希望单位为公制,最后我们将 API 密钥附加到末尾。
现在我们已经有一个要调用的 URL,我们将使用 fetch() 方法调用它,并使用 JSON 数据来设置预测变量的状态。
这会将预测状态设置为包含该位置 5 天预测条目的数组。
接下来我们将使用 React Native 的 FlatList 组件在移动屏幕上渲染卡片列表:
render() {
    return (
        <FlatList data={this.state.forecast.list} style={{marginTop:20}} keyExtractor={item => item.dt_text} renderItem={({item}) => <ForecastCard detail={item} location={this.state.forecast.city.name} />} />
    );
}
FlatList 组件 ( https://facebook.github.io/react-native/docs/flatlist ) 接受多个 props。首先,我们为其提供 'data',也就是我们存储在 state 中的天气预报;然后,我们将 JSON 响应中的 'list' 部分指向它,因为它包含每 3 小时的天气预报。接下来,我们使用 style props 将列表向下移动 20px;最后,keyExtractor props 强制列表使用 id 作为键,而不是列表中默认的 'key' props(在本例中,我们将其设置为天气预报项的时间戳作为唯一标识符)。
下面这行代码实际上告诉了 React 我们想要 FlatList 渲染什么:
renderItem={({item}) => <ForecastCard detail={item} location={this.state.forecast.city.name} />}
这里我们告诉它使用我们创建的 ForecastCard 组件来呈现列表。
但是首先我们需要在 App.js 文件的顶部导入它:
import ForecastCard from './components/ForecastCard';
我们向它传递了两个 props:detail 和 location。detail 基本上是从 API 调用的 JSON 响应中获取的 3 小时天气预报的每次迭代,这意味着我们可以访问每张卡片中的每个数据块。location 是 JSON 响应中包含天气预报所在城市的部分。
现在我们已经有了 FlatList 设置,因此我们可以简单地将所有 props 传递给我们创建的 ForecastCard.js 组件。
ForecastCard.js
现在我们将为每张卡片添加一个包含位置的标题。为此,我们将使用 React Native 的文本元素,并显示传递给它的 props。
<Text style={styles.notes}>{this.props.location}</Text>
然后我们将使用 View 组件添加图像和时间,并使用 Flexbox 将它们定位在每一侧:
<View style={{flexDirection:'row', justifyContent:'space-between', alignItems:'center'}}>
    <Image style={{width:100, height:100}} source={{uri:"https://openweathermap.org/img/w/" + this.props.detail.weather[0].icon + ".png"}} />
    <Text style={styles.time}>{time}</Text>
</View>
请注意我们如何使用图像组件并将从 JSON 响应中挑选出的图像 URL 的 props 传递给它。
<Image style={{width:100, height:100}} source={{uri:"https://openweathermap.org/img/w/" + this.props.detail.weather[0].icon + ".png"}} />
为了显示时间,我们使用了一个变量。这样做是为了将日期戳转换为更方便用户理解的格式,并且只包含时间信息。因此,在 render 函数内部,return 语句之前,我们添加如下代码:
let time;

// Create a new date from the passed date time
var date = new Date(this.props.detail.dt*1000);

// Hours part from the timestamp
var hours = date.getHours();

// Minutes part from the timestamp
var minutes = "0" + date.getMinutes();

time = hours + ':' + minutes.substr(-2);
这只会将我们的日期戳格式化为易于阅读的小时格式。
接下来添加分隔线,我们将使用分隔线组件,并赋予它颜色和一点间距。
<Divider style={{ backgroundColor: '#dfe6e9', marginVertical:20}} />
然后,我们的 Card 组件的最后一部分将是描述和温度:
<View style={{flexDirection:'row', justifyContent:'space-between'}}>
<Text style={styles.notes}>{this.props.detail.weather[0].description}</Text>
<Text style={styles.notes}>{Math.round( this.props.detail.main.temp * 10) / 10 }℃</Text>
</View>
再次,我们将使用 flexDirection 和 justifyContent 来将它们在卡片的两侧隔开。我们将使用两个 Text 组件,第一个用于显示 JSON 响应中包含文本描述的部分,第二个 Text 元素包含 JSON 响应的温度部分,四舍五入到小数点后 1 位以获得格式良好的温度。然后,我们将添加 HTML 实体
℃
添加摄氏度符号。
然后为了设置它的样式,我们将添加以下内容:
const styles = StyleSheet.create({
    time:{
        fontSize:38
    },
    notes: {
        fontSize: 18,
        textTransform:'capitalize'
    }
});
总的来说,我们已经介绍了如何使用 FlatList 来呈现卡片列表,如何使用地理位置来获取坐标,以及如何将其与天气 API 一起使用以获取包含该位置天气预报的 JSON 响应。
我们还使用了许多新的 React Native 组件,例如 Images 和 FlatLists,以及 React Native Elements 库的介绍以及如何使用 Cards 和 Dividers。
因此,只需连接您的手机,然后在 Xcode 中打开 Xcode 项目即可将其放到您的设备上进行测试。
该应用程序的源代码可在 Github 上找到https://github.com/andrewsmith1996/geolocationWeatherReactNative,也可以在我的作品集上展示https://andrewsmithdeveloper.com
我希望你喜欢这篇文章,如果你对我的文章、代码或任何内容有任何问题或反馈,请告诉我!
文章来源:https://dev.to/andrewsmith1996/how-to-build-an-geolocation-weather-forecast-app-in-react-native-in-30-minutes-1kmo 后端开发教程 - Java、Spring Boot 实战 - msg200.com
