如何使用 Mantine 和 Strapi 构建 React 管理面板
作者:约瑟夫·马瓦
介绍
从零开始构建复杂、数据密集型的前端用户界面 (UI),例如管理面板、仪表盘和其他内部工具,可能是一个艰巨而费力的过程。React 框架(例如 refine)让这个过程变得更容易,因为这正是它们试图解决的问题。
refine是一个免费、开源且遵循 MIT 许可的 React 框架,用于构建 CRUD 应用。它集成了各种流行的 UI 框架和设计系统,例如 Material UI、Chakra UI、Ant Design 和 Mantine。您可以构建任何 CRUD 应用,例如 React 管理面板。
虽然 Refine 本身就自带一些功能,但它是可定制的。如果您不喜欢上述任何 UI 框架或设计系统,也可以使用“无头”Refine。
每个数据密集型前端应用程序都必须从某个地方获取数据。refine 集成了流行的内容管理系统和云数据库,例如 Strapi、Hasura 和 Firebase。
以上所有集成均为可选。本文将使用 Refine 构建一个简单的 React 管理面板。我们将使用 Mantine 作为 UI 组件库,并使用 Strapi 作为后端服务。
什么是 Strapi?
Strapi是一款使用 Node 构建的热门开源无头 CMS。它灵活且拥有直观的用户界面。Refine 生态系统拥有针对最热门内容管理系统(例如 Strapi)以及 Firebase 和 Supabase 等云数据库的数据提供商。
使用 Refine 命令行工具创建项目时,请选择 Strapi 作为后端服务。Refine 命令行工具将引导一个包含所有必需软件包和功能的 Refine 应用程序。
您无需 Strapi 实例即可学习如何将 Strapi 与 Refine 结合使用。Refine 生态系统提供了一个模拟的 Strapi API,您可以在学习如何将 Strapi 集成到 Refine 项目中时使用它。
@pankod/refine-strapi-v4在创建项目时,选择数据提供程序作为后端服务时,refine 命令行工具会安装它。然后,您可以像下面这样在应用程序中导入并使用它:
import { Refine } from "@pankod/refine-core";
import { DataProvider } from "@pankod/refine-strapi-v4";

function App() {
  return (
    <Refine
      ...
      dataProvider={DataProvider(`${process.env.API_URL}/api`, axiosInstance)}
    />
  );
}
什么是金刚鹦鹉?
Mantine 是一个免费的开源 React 组件库,遵循 MIT 许可证。Mantine 可以帮助您快速构建功能齐全且易于访问的 Web 应用程序。您可以将其与大多数现代 React 框架(例如 Next、Gatsby 和 Remix)一起使用。
如上所述,使用 Refine 的优势之一是它内置支持大多数流行的设计系统、UI 框架和组件库。Mantine 是 Refine 内置支持的组件库之一。
使用 创建 Refine 应用程序时create-refine-app,请在命令提示符中选择 Mantine 作为 UI 框架。Refine 命令行工具将引导 Refine 应用程序并安装必要的 Mantine 软件包。
然后,您可以从包中导入要使用的细化 Mantine 组件和钩子,@pankod/refine-mantine如下所示:
import {
  Edit,
  useForm,
  useSelect
} from "@pankod/refine-mantine";
Refine 生态系统包含多个 Mantine 钩子和组件。您可以阅读 Refine Mantine API 文档, 了解更多关于不同 Mantine 钩子和组件的信息,以及如何使用它们。
设置优化应用程序
在本文中,您将学习如何使用 Refine 和 Mantine 创建一个简单的 React 管理面板,并使用 Strapi 作为无头内容管理系统。请按照以下步骤使用 Refine 启动应用程序create-refine-app。我假设您已具备上面列出的必备工具。
步骤 1 — 创建优化应用程序
导航到您想要创建优化应用程序的目录并在终端上运行以下命令。
# Using npm
npm create refine-app@latest

# Using pnpm
pnpm create refine-app@latest
安装过程中,请务必响应命令行提示。选择refine-react作为项目模板,并选择 Strapi 版本 4 作为后端服务。其他选项可以选择默认设置。如果您不知道如何回答问题,请查看下方指南。
✔ Downloaded remote source successfully.
✔ Choose a project template · refine-react
✔ What would you like to name your project?: · refine-demo-app
✔ Choose your backend service to connect: · data-provider-strapi-v4
✔ Do you want to use a UI Framework?: · mantine
✔ Do you want to add example pages?: · no
✔ Do you want to add dark mode support?: · no
✔ Do you want a customized layout?: · no
✔ Do you need i18n (Internationalization) support?: · no
✔ Do you want to add kbar command interface support?: · no
✔ Choose a package manager: · npm
✔ Would you mind sending us your choices so that we can improve superplate? · yes
引导优化应用程序的简单方法
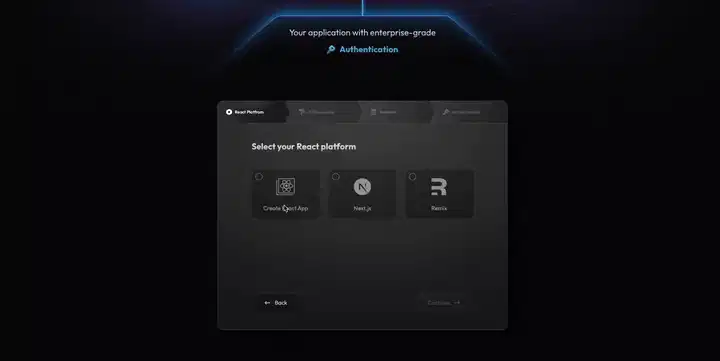
refine.new使您能够在浏览器中快速引导新的 refine 应用程序,这是一个基于 React 的开源无头 UI 库,用于创建企业应用程序,具有预览、调整和即时下载等功能。
要开始,请前往refine.new,向下滚动页面,然后单击“开始”按钮。

第 2 步 — 启动开发服务器
成功引导优化应用程序后,在 VS Code 等文本编辑器中打开项目目录并运行以下命令启动开发服务器。
# Using npm
npm run dev

# Using yarn
yarn run dev

# Using pnpm
pnpm run dev
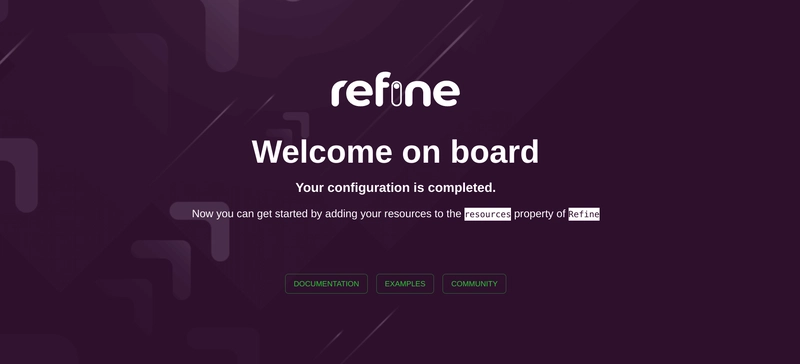
上述命令会在您的默认 Web 浏览器中,在本地主机的 3000 端口上启动开发服务器。登录页面应如下图所示。
如果您的落地页与上面的截图类似,则说明您已成功创建了一个 Refine 项目。我们将通过修改您刚刚创建的项目来构建一个 React 管理面板。
内置 Mantine 的改进钩子和组件
refine 内置了多个 Mantine 钩子和组件。大多数内置的 refine Mantine 钩子和组件直接导出或在内部使用其对应的核心 Mantine 钩子和组件。
useForm- 用于表单管理
本文中我们将频繁使用的钩子之一是useForm钩子。顾名思义,您可以在使用 Mantine 和 Refine 时使用它来管理表单。它基于 Mantine 和 Refine 核心useForm钩子,并具备其所有功能,此外还添加了其他功能。
Refine 的文档对这个钩子做了很好的解释useForm。查看它来useForm深入了解这个钩子以及如何使用它。
import { useForm } from "@pankod/refine-mantine"

const {
  saveButtonProps,
  getInputProps
} = useForm({
  initialValues: {
    title: "",
    status: "",
  },
  validate: {
    title: (value) => (value.length < 2 ? "Post title should be atleast 2 characters long" : null),
    status: (value) =>
      value.length <= 0 ? "Status is required" : null,
  },
})
useTable- 用于表管理
本文将使用的另一个钩子是hook。它是refine-react-tableuseTable包的一部分 。该包是TanStack Table的一个适配器 。它拥有TanStack Table包的所有开箱 即用功能 。此外,它还具有过滤、排序和分页功能。refine-react-table
同样,我们将使用基本的布局和 UI 组件,例如List、Create、Edit和Show。正如我上面提到的,Refine 文档对它们进行了很好的解释。如果您不熟悉某个组件,可以参考 Refine 文档中的相关章节来理解它。
如何使用 refine、Mantine 和 Strapi 构建 React 管理面板
在本节中,我们将使用 refine、Mantine 和 Strapi 构建一个具有 CRUD 功能的 React 管理面板。我们将使用一个模拟的Strapi 版本 4 API。如果您已经按照上面“创建 refine 应用程序”部分的步骤创建了一个 refine 项目,请按照以下步骤操作。
如何列出记录
如果您按照上一步操作,现在应该可以看到应用程序的身份验证页面了。但是,使用我提到的凭据登录会打开一个不存在的页面。
我们需要从 Strapi API 获取帖子列表,并在您登录时显示它。首先,创建一个用于处理 Strapi API 数据的接口。创建一个src/interfaces/index.d.ts文件。您可以将下面的代码复制并粘贴到其中。
// src/interfaces/index.d.ts

export interface ICategory {
  id: number;
  title: string;
}

export interface IPost {
  id: number;
  title: string;
  content: string;
  status: "published" | "draft" | "rejected";
  category: ICategory;
  createdAt: string;
}
上面的界面应该能让你大致了解 API 返回的数据结构。Strapi API 包含posts和categories集合。这两种集合类型之间存在关联。阅读 文档 以了解 Strapi 版本 4 数据提供程序的工作原理。
由于我们将处理博客文章,因此让我们创建一个posts目录并将所有组件文件保存在其中。创建一个src/pages/posts/list.tsx文件并将以下代码复制并粘贴到其中。
// src/pages/posts/list.tsx

import React from "react";
import { IResourceComponentsProps } from "@pankod/refine-core";
import { useTable, ColumnDef, flexRender } from "@pankod/refine-react-table";
import {
  List,
  Table,
  Pagination,
  DateField,
  CreateButton,
} from "@pankod/refine-mantine";

export const PostList: React.FC<IResourceComponentsProps> = () => {
  const columns = React.useMemo<ColumnDef<any>[]>(
    () => [
      {
        id: "id",
        accessorKey: "id",
        header: "Id",
      },
      {
        id: "title",
        accessorKey: "title",
        header: "Title",
        cell: function ({ getValue }) {
          return getValue();
        },
      },

      {
        id: "createdAt",
        accessorKey: "createdAt",
        header: "Created At",
        cell: function render({ getValue }) {
          return <DateField format="LL" value={getValue<any>()} />;
        },
      },
    ],
    []
  );

  const {
    getHeaderGroups,
    getRowModel,
    setOptions,
    refineCore: {
      setCurrent,
      pageCount,
      current,
      tableQueryResult: { data: tableData },
    },
  } = useTable({
    columns,
  });

  setOptions((prev) => ({
    ...prev,
    meta: {
      ...prev.meta,
    },
  }));

  return (
    <List createButtonProps={CreateButton}>
      <Table highlightOnHover striped withBorder withColumnBorders>
        <thead>
          {getHeaderGroups().map((headerGroup) => (
            <tr key={headerGroup.id}>
              {headerGroup.headers.map((header) => {
                return (
                  <th key={header.id}>
                    {!header.isPlaceholder &&
                      flexRender(
                        header.column.columnDef.header,
                        header.getContext()
                      )}
                  </th>
                );
              })}
            </tr>
          ))}
        </thead>
        <tbody>
          {getRowModel().rows.map((row) => {
            return (
              <tr key={row.id}>
                {row.getVisibleCells().map((cell) => {
                  return (
                    <td key={cell.id}>
                      {flexRender(
                        cell.column.columnDef.cell,
                        cell.getContext()
                      )}
                    </td>
                  );
                })}
              </tr>
            );
          })}
        </tbody>
      </Table>
      <br />
      <Pagination
        position="right"
        total={pageCount}
        page={current}
        onChange={setCurrent}
      />
    </List>
  );
};
在上面的组件中PostList,我们使用了包useTable中的钩子refine-react-table。该useTable钩子设计为无头钩子。因此,UI 的管理责任由您承担。
我们从包中导入了其他几个 UI 组件@pankod/refine-mantine。这里就不多解释了。请阅读 Refine Mantine 或核心 Mantine 文档。
创建一个src/pages/posts/index.tsx文件并向其中添加以下导出语句。
// src/pages/posts/index.ts

export * from "./list";
添加资源和连接页面以完善应用程序
现在我们准备通过向我们的应用程序添加资源来开始连接到我们的 API
最后,将PostList上面创建的组件导入到App.tsx组件中,并将其添加到组件resources的 prop中Refine,如下所示:
// src/App.tsx

...
//highlight-next-line
import { PostList } from "./pages/posts";

function App() {
  return (
    <MantineProvider theme={LightTheme} withNormalizeCSS withGlobalStyles>
      <Global styles={{ body: { WebkitFontSmoothing: "auto" } }} />
      <NotificationsProvider position="top-right">
        <Refine
          ...
          //highlight-start
          LoginPage={AuthPage}
          resources={[

            {
              name: "posts",
              list: PostList,
            },
          ]}
         //highlight-end
        />
      </NotificationsProvider>
    </MantineProvider>
  );
}
设置 AuthProvider
类似地,create-refine-app使用 default 来引导一个 refine 应用程序。如果您按照上述步骤创建了应用程序,AuthProvider则应该拥有该文件。src/authProvider.tscreate-react-app
特别值得关注的是 的登录方法authProvider。我们将使用电子邮件和密码登录我们的应用程序。请确保登录方法包含以下代码。
// src/authProvider.ts

export const authProvider: AuthProvider = {
  //highlight-start
  login: async ({ email, password }) => {

    const { data, status } = await strapiAuthHelper.login(email, password);
    //highlight-end
    if (status === 200) {
      localStorage.setItem(TOKEN_KEY, data.jwt);

      // set header axios instance
      axiosInstance.defaults.headers.common = {
        Authorization: `Bearer ${data.jwt}`,
      };

      return Promise.resolve();
    }
    return Promise.reject();
  },
  ...
};
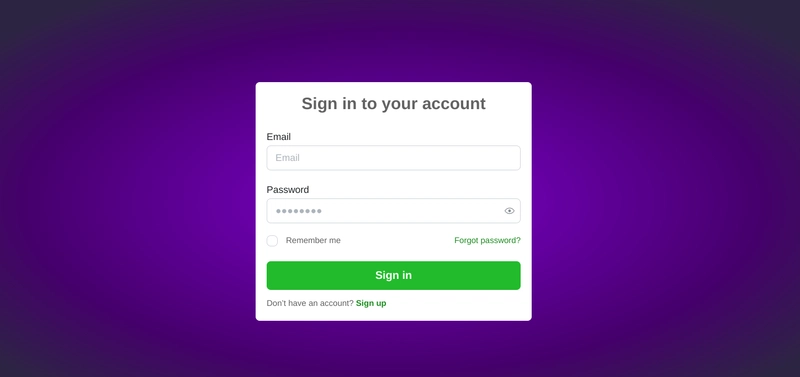
按照上述步骤设置好资源和提供商后,登录页面会将您重定向到登录页面。登录页面如下图所示。
在本演示中,请使用以下凭证登录现有帐户。这是一个为开发而设置的虚拟 Strapi 实例。请务必谨慎使用。
电子邮件:demo@refine.dev
密码:demodemo
当你登录到你的 Refine 应用程序时,你应该会看到一个类似下图的表格。虽然还不完整,但它已经是一个简单的 React 管理面板了。
如何处理关系数据
如上一节所述,我们的 Strapi API 具有posts包含categories关系字段的集合。但是,Strapi 版本 4 在获取集合中的条目时不会立即填充关系数据。
因此,为了让我们的数据提供者返回每个帖子的类别,我们需要使用传递给钩子的对象中的属性populate字段进行指定。metaDatauseTable
// src/pages/posts/list.tsx

...
import { useTable } from '@pankod/refine-react-table';

const {
    getHeaderGroups,
    getRowModel,
    setOptions,
    refineCore: {
      setCurrent,
      pageCount,
      current,
      tableQueryResult: { data: tableData },
    },
  } = useTable({
    columns,
    //highlight-start
    refineCoreProps: {
      metaData: {
        populate: ["category"],
      },
    },
    //highlight-end
  });
...
修改代码后,如上例所示,数据提供者还会获取每篇文章的类别。useTable钩子返回的数组中的每个文章对象都将包含类别字段。
由于每个帖子对象现在都有一个类别字段,我们需要在表中添加一个类别列。修改传递给钩子的列数组,useTable使其包含该Category列,如下例所示。
// src/pages/posts/list.tsx

...
 const columns = React.useMemo<ColumnDef<any>[]>(
  () => [
    ...
    //highlight-start
    {
      id: "category",
      header: "Category",
      accessorFn: ({ category }) => {
        return category?.title;
      },
    },
    //highlight-end
    ...
  ],
  []
);
...
上面的代码应该修改您的表格以包含如下图所示的类别列。
如何创建记录
在前面的部分中,你学习了如何在用户登录时从 Strapi API 获取帖子列表。然而,在 React 管理面板中,你也应该能够创建新记录。这就是你将在本节中学习的内容。
默认情况下,Refine 会在List组件中添加一个“创建”按钮。您应该在右上角看到它。但是,点击“创建”按钮会打开一个不存在的页面。
我们需要创建一个组件,当用户点击“创建”按钮时,该组件会渲染。该组件将包含我们用于创建新帖子的表单。创建src/pages/posts/create.tsx文件。您可以将下面的代码复制并粘贴到其中。
// pages/posts/create.tsx

import {
  Create,
  useForm,
  TextInput,
  useSelect,
  Select,
} from "@pankod/refine-mantine";

import { ICategory } from "interfaces";

export const PostCreate = () => {
  const {
    getInputProps,
    saveButtonProps,
    refineCore: { formLoading },
  } = useForm({
    initialValues: {
      title: "",
      category: {
        id: "",
      },
      status: "",
    },
    validate: {
      title: (value) =>
        value.length < 5 ? "Title should be atleast 5 characters long" : null,
      category: {
        id: (value) => (value.length <= 0 ? "Title is required" : null),
      },
      status: (value) => (value.length <= 0 ? "Status is required" : null),
    },
  });

  const { selectProps } = useSelect<ICategory>({
    resource: "categories",
  });

  return (
    <Create isLoading={formLoading} saveButtonProps={saveButtonProps}>
      <TextInput
        mt="sm"
        required={true}
        label="Title"
        {...getInputProps("title")}
      />
      <Select
        mt={8}
        label="Status"
        required={true}
        placeholder="Pick one"
        {...getInputProps("status")}
        data={[
          { label: "Published", value: "published" },
          { label: "Draft", value: "draft" },
          { label: "Rejected", value: "rejected" },
        ]}
      />
      <Select
        mt={8}
        label="Category"
        required={true}
        placeholder="Select category"
        {...getInputProps("category.id")}
        {...selectProps}
      />
    </Create>
  );
};
在上面的例子中,我们使用了useForm钩子来管理表单。我们将初始输入值和字段验证方法传递给了useForm钩子。
打开src/pages/posts/index.tsx您在前面的一个小节中创建的文件并添加下面的导出语句。
// pages/posts/index.tsx
...
//highlight-next-line
export * from "./create";
您现在可以将PostCreate组件导入App.tsx文件并将其添加到资源列表中,如下所示:
...
import {
  ...
  //highlight-next-line
  PostCreate,
} from "./pages/posts";

function App() {
  return (
    <MantineProvider theme={LightTheme} withNormalizeCSS withGlobalStyles>
      <Global styles={{ body: { WebkitFontSmoothing: "auto" } }} />
      <NotificationsProvider position="top-right">
        <Refine
          ...
          resources={[
            {
              name: "posts",
              list: PostList,
              //highlight-next-line
              create: PostCreate,
            },
          ]}
        />
      </NotificationsProvider>
    </MantineProvider>
  );
}
点击“创建”按钮后,您将进入该/posts/create页面。/posts/create页面如下图所示。您可以使用它来创建新帖子。填写并提交帖子详细信息后,该帖子应该出现在所有帖子列表中。
如何编辑记录
在上一节中,我们学习了如何创建新帖子。现在我们也可以编辑现有记录。为了编辑表格中的记录,我们需要添加一Actions列。该列将包含一个按钮,用于编辑表格中每一行的内容。
要向表中添加新列,请将列对象添加到columns我们在组件中创建的数组中PostList。我们将EditButton在新列中渲染一个。
// pages/posts/list.tsx

import {
  ...
  //highlight-start
  EditButton,
  Group,
  //highlight-end
} from "@pankod/refine-mantine";

const columns = React.useMemo<ColumnDef<any>[]>(
    () => [
      ...
      //highlight-start
      {
        id: "actions",
        accessorKey: "id",
        header: "Actions",
        cell: ({ getValue }) => {
          return (
            <Group>
              <EditButton
                hideText
                size="xs"
                recordItemId={getValue() as number}
                variant="subtle"
              />
            </Group>
          );
        },
      },
      //highlight-end
    ],
    []
);
添加上述代码后,您的表格应该包含该Actions列。此时点击编辑按钮将再次重定向到不存在的页面。
让我们创建一个当用户点击编辑按钮时渲染的组件。该组件将包含一个用于编辑集合中特定记录内容的表单。
创建src/pages/posts/edit.tsx文件,将下面的代码复制并粘贴到其中。
// pages/posts/edit.tsx

import {
  Edit,
  useForm,
  TextInput,
  Select,
  useSelect,
} from "@pankod/refine-mantine";

import { ICategory } from "interfaces";

export const PostEdit = () => {
  const {
    getInputProps,
    saveButtonProps,
    refineCore: { queryResult },
  } = useForm({
    initialValues: {
      id: "",
      title: "",
      category: {
        id: "",
      },
    },
    refineCoreProps: {
      metaData: {
        populate: ["category"],
      },
    },
    validate: {
      title: (value) =>
        value.length < 5 ? "Title should be atleast 5 characters long" : null,
      category: {
        id: (value) => (value.length <= 0 ? "Title is required" : null),
      },
    },
  });

  const postData = queryResult?.data?.data;
  const { selectProps } = useSelect<ICategory>({
    resource: "categories",
    defaultValue: postData?.category?.id,
  });

  return (
    <Edit saveButtonProps={saveButtonProps}>
      <TextInput mt="sm" disabled label="Id" {...getInputProps("id")} />
      <TextInput mt="sm" required label="Title" {...getInputProps("title")} />
      <Select
        mt={8}
        label="Category"
        required
        placeholder="Select category"
        {...selectProps}
        {...getInputProps("category.id")}
      />
    </Edit>
  );
};
将下面的导出语句添加到src/pages/posts/index.tsx文件中。
// pages/posts/index.tsx

//highlight-next-line
export * from "./edit";
最后,将PostEdit组件添加到组件resources的 prop中Refine。
...
import {
  ...
  //highlight-next-line
  PostEdit
} from "./pages/posts";

function App() {
  return (
    <MantineProvider theme={LightTheme} withNormalizeCSS withGlobalStyles>
      <Global styles={{ body: { WebkitFontSmoothing: "auto" } }} />
      <NotificationsProvider position="top-right">
        <Refine
          ...
          resources={[
            {
              name: "posts",
              list: PostList,
              create: PostCreate,
              //highlight-next-line
              edit: PostEdit,
            },
          ]}
        />
      </NotificationsProvider>
    </MantineProvider>
  );
}
点击编辑按钮后,您将跳转到编辑特定记录内容的页面。编辑页面如下图所示。
如何删除记录
您可以使用两种方法删除集合中的记录。这些方法是:
- 使用每个表行上的删除操作按钮
- 使用编辑页面上的删除按钮
如何在每个表行上添加删除操作按钮
list.tsx在目录中的文件顶部添加以下导入语句src/pages/posts。
// pages/posts/list.tsx

import {
 ...
 //highlight-next-line
  DeleteButton,
} from "@pankod/refine-mantine";
我们将把DeleteButton上面导入的 添加到表格中该列下的每一行Actions。我们在上一节创建表格时声明的 columns 数组包含一个 id 为 的对象actions。该对象定义了我们的Actions列。我们将 添加DeleteButton到它。
列对象的 cell 方法Actions返回GroupMantine UI 组件。添加 ,DeleteButton使其成为该组件的子项,Group如下所示:
// pages/posts/list.tsx

...

const columns = React.useMemo<ColumnDef<any>[]>(
    () => [
      ...
      {
        id: "actions",
        accessorKey: "id",
        header: "Actions",
        cell: ({ getValue }) => {
          return (
            <Group noWrap>
              <EditButton
                hideText
                size="xs"
                recordItemId={getValue() as number}
                variant="subtle"
              />
              //highlight-start
              <DeleteButton
                hideText
                size="xs"
                recordItemId={getValue() as number}
                variant="subtle"
              />
              //highlight-end
            </Group>
          );
        },
      },
    ],
    []
  );
完成上述更改后,您的表格将出现如下图所示的删除操作按钮。单击删除按钮即可删除特定记录。
如何在编辑页面添加删除按钮
除了在表格的每一行添加删除按钮之外,您还可以将其添加到编辑页面。这次,我们将修改组件resources的 prop Refine。将canDeleteprop 添加到posts资源中,如下所示:
// src/App.tsx

...

function App() {
  return (
    <MantineProvider theme={LightTheme} withNormalizeCSS withGlobalStyles>
      <Global styles={{ body: { WebkitFontSmoothing: "auto" } }} />
      <NotificationsProvider position="top-right">
        <Refine
          ...
          resources={[
            {
              name: "posts",
              list: PostList,
              create: PostCreate,
              edit: PostEdit,
              //highlight-next-line
              canDelete: true,
            },
          ]}
        />
      </NotificationsProvider>
    </MantineProvider>
  );
}
您的编辑页面现在应该在右下角包含一个删除按钮。
如何实现变异模式
变异模式是 Refine 中执行副作用时的一个便捷功能。它可以帮助您为客户提供更好的用户体验。您可以配置您的 Refine 应用以使用以下三种变异模式中的任意一种。
- 悲观
- 乐观的
- 可撤消
悲观突变模式
在悲观突变模式下,refine 会立即启动突变。突变更新成功返回后,它会应用 UI 更新并进行重定向。悲观模式是默认突变模式。
乐观变异模式
使用乐观突变模式时,refine 会在本地应用突变,并立即更新 UI 和重定向,而无需等待服务器响应。如果出现错误,它会相应地更新 UI。
可撤消突变模式
使用可撤消突变模式,Refine 会在本地应用突变,更新 UI 并进行重定向。然后,它会等待一个可自定义的超时时间,然后再执行突变。您可以在超时时间内取消突变更新。如果突变更新返回错误,它还会更新 UI。
options您可以使用组件的 prop配置变异模式Refine。
// src/App.tsx

...
function App() {
  return (
    <MantineProvider theme={LightTheme}>
      <Global styles={{ body: { WebkitFontSmoothing: "auto" } }} />
      <NotificationsProvider position="top-right">
        <Refine
          ...
          //highlight-next-line
          options = {{ mutationMode: "optimistic"}}

        />
      </NotificationsProvider>
    </MantineProvider>
  );
}
如何使用过滤器共享当前页面
使用 refine 可以将 URL 与页面内容同步。假设posts页面包含一个按升序排列的多页表格,您可以使用查询参数在 URL 中显示当前活动页面及其排序顺序。
syncWithLocation您可以通过将 prop的属性设置options为 来激活此功能true。
...
function App() {
  return (
    <MantineProvider theme={LightTheme}>
      <Global styles={{ body: { WebkitFontSmoothing: "auto" } }} />
      <NotificationsProvider position="top-right">
        <Refine
          ...
          //highlight-next-line
          options = {{ syncWithLocation: true}}

        />
      </NotificationsProvider>
    </MantineProvider>
  );
}
使用精炼 Mantine 推理器
在前面的部分中,我们通过从头构建组件来执行 CRUD 操作。Refine 生态系统包含 Inferencer 包,可根据 API 的响应生成 CRUD 页面。
Inferencer 的唯一目的是帮助您生成 CRUD 页面。之后,您可以根据自己的需求自定义组件。根据您的设计系统或组件库,从@pankod/refine-inferencer包中导入 Inferencer。
由于我们使用 Mantine 作为我们的组件库,因此请像这样导入并添加MantineInferencer到组件resources的 prop中Refine:
// src/App.tsx

...
//highlight-next-line
import { MantineInferencer } from "@pankod/refine-inferencer/mantine";

function App() {
  return (
    <MantineProvider theme={LightTheme} withNormalizeCSS withGlobalStyles>
      <Global styles={{ body: { WebkitFontSmoothing: "auto" } }} />
      <NotificationsProvider position="top-right">
        <Refine
          ...
          //highlight-start
          resources={[
            {
              name: "posts",
              list: MantineInferencer,
              create: MantineInferencer,
              show: MantineInferencer,
              edit: MantineInferencer,
              canDelete: true
            },
            {
              name: "categories",
              list: MantineInferencer,
              create: MantineInferencer,
              show: MantineInferencer,
              edit: MantineInferencer,
            },
          ]}
          //highlight-end
        />
      </NotificationsProvider>
    </MantineProvider>
  );
}
上面的代码将为您生成开箱即用的 CRUD 页面。其他每个支持 refine 的设计系统或组件库都有其对应的推理器。<Refine>按照上面的示例导入并添加到您的组件中。
结论
在构建 React 管理面板时,Refine 是值得探索的 React 框架之一。如上所述,它支持大多数流行的设计系统和 UI 框架,例如 Material UI、Ant Design、Chakra UI 和 Mantine。
此外,Refine 还提供了对身份验证、国际化、路由和状态管理的开箱即用支持。Refine 命令行工具可以立即启动并运行一个基础的 Refine 项目所需的所有配置。您可以根据自己的需求修改默认设置。
我上面强调的所有改进功能将显著提高您的开发速度,改善您的开发体验并缩短生产时间,尤其是在构建复杂的前端应用程序时。
文章来源:https://dev.to/refine/how-to-build-a-react-admin-panel-with-mantine-and-strapi-58i9 后端开发教程 - Java、Spring Boot 实战 - msg200.com


