我创建了一个倒计时器,没有使用任何 JS、CSS 或 HTML 😲??[电子邮件营销动态 GIF 教程]
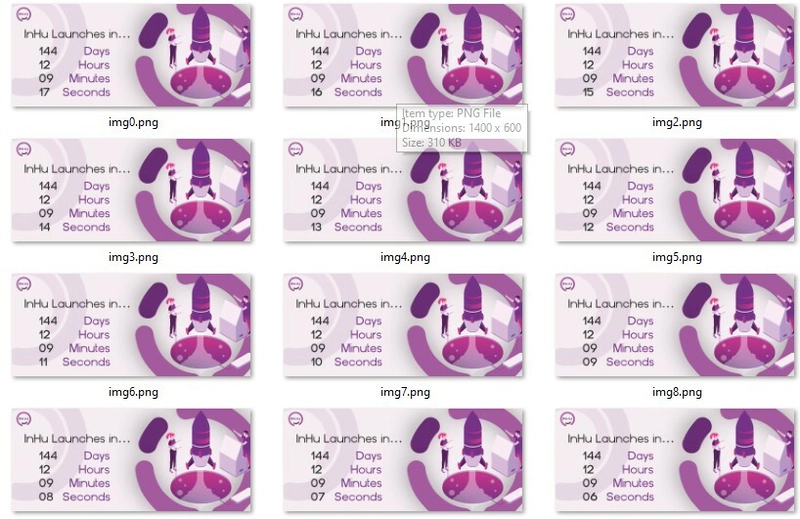
下方动图显示,倒计时截止时间为 2022 年 1 月 3 日 09:00(格林威治标准时间)。
如果 GIF 无法加载,您可以在此处查看旧版本的 GIF。
我认为在接下来的 200 多天里(在撰写本文时),Gif 将始终与实际倒计时器相差一两分钟,这非常酷!
事实上,您可以在此处检查 timeanddate.com 以了解我的计时器的准确性,当您第一次加载此页面时,它应该在一分钟之内!
显然它不是一个庞大的文件(它需要2600 万帧!所以它会相当大)那么我该怎么做呢?
在本文中,我将介绍如何:
附加信息:
正如@baboon12在评论中指出的那样,这对于倒计时器来说需要付出很多努力!
用例是用于电子邮件营销,我们不能使用 JavaScript 创建倒计时,甚至不能(可靠地)使用视频,所以动画 GIF 是我们唯一的选择!
请勿在您的网站上使用它!
下载 4mb GIF 来显示倒计时器对于性能来说将是一个巨大的错误,请改用 JavaScript(而且它更容易)!
最后 - 如果您返回页面,图片可能无法显示。如果发生这种情况,请刷新页面。我觉得我无法解决这个问题,因为似乎是 dev.to 缓存指向了旧图片!
(如果发生这种情况,您可以在此处查看 GIF 的旧版本)。
好了,事情都解决了,我们开始吧!
生成带有文本的图像序列。
谜题的第一部分是创建一个图像序列,然后我可以将其转换为 GIF。
但在创建一系列图像之前,我们必须先弄清楚如何制作一张图像!
创建带有文本的图像!
现在安装了 GD 图像库,这实际上并不像最初看起来那么困难。
大多数 PHP 托管和环境都安装了 GD 图像库,因此即使在共享托管上您也应该能够执行此操作!
首先,我们抓取源图像(我们要在其上书写文本的背景)。
imagecreatefromjpeg('img/inhu-countdown.jpg');
我创建了一个超级简单的图像,左侧有一个很大的“空白”。
这是我们要处理的“画布”。它还创建了我们可以操作的图像对象。
接下来我们需要做的是添加文本。
为此我们使用imagettftext。
我们需要传递它:
- 图像对象
- 字体大小(无单位)
- 我们希望文本的角度(以度为单位)
- x 位置(以左侧像素为单位);
- y 位置(以距离顶部的像素为单位);
- 文本的颜色(RGB 格式 - 稍后详细介绍)
- 字体系列(所选字体的路径)
- 文本(我们想表达的意思!)
现在唯一有点令人困惑的是如何将 RGB 颜色传递给函数。
为此,我们必须使用另一个函数:imagecolorallocate。
这个函数需要我们传递:
- 图像对象
- 红色通道值(0-255)
- 绿色通道值(0-255)
- 蓝色通道值(0-255)
好的,很好,但是在处理颜色时我更喜欢十六进制值。
没问题,我的库中有一个用于将 Hex 转换为 RGB 数组的代码片段!
function hexToRGB($colour) {
        if ($colour[0] == '#') {
            $colour = substr($colour, 1);
        }
        if (strlen($colour) == 6) {
            list( $r, $g, $b ) = array($colour[0] . $colour[1], $colour[2] . $colour[3], $colour[4] . $colour[5]);
        } elseif (strlen($colour) == 3) {
            list( $r, $g, $b ) = array($colour[0] . $colour[0], $colour[1] . $colour[1], $colour[2] . $colour[2]);
        } else {
            return false;
        }
        $r = hexdec($r);
        $g = hexdec($g);
        $b = hexdec($b);
        return array('r' => $r, 'g' => $g, 'b' => $b);
    }
是的,所以这个过程很简单。
- 将十六进制颜色转换为 RGB
- 将我们的 RGB 颜色设置
imagecolorallocate为图像调色板 - 使用创建我们的文本
imagettftext并传递相关值。
总而言之,一个简单的例子可能如下所示:
// our hex to RGB function
function hexToRGB($colour) {
        if ($colour[0] == '#') {
            $colour = substr($colour, 1);
        }
        if (strlen($colour) == 6) {
            list( $r, $g, $b ) = array($colour[0] . $colour[1], $colour[2] . $colour[3], $colour[4] . $colour[5]);
        } elseif (strlen($colour) == 3) {
            list( $r, $g, $b ) = array($colour[0] . $colour[0], $colour[1] . $colour[1], $colour[2] . $colour[2]);
        } else {
            return false;
        }
        $r = hexdec($r);
        $g = hexdec($g);
        $b = hexdec($b);
        return array('r' => $r, 'g' => $g, 'b' => $b);
    }

//create the image object
$image = imagecreatefromjpeg('img/inhu-countdown.jpg');

// convert our Hex to RGB
$textColour = $this->hexToRGB('#333333');
$textColourImage = imagecolorallocate($image,
                                      $textColour['r'],
                                      $textColour['g'],
                                      $textColour['b']);

// finally create our image
imagettftext($image,
             24,                   // font size
             0,                    // angle
             150,                  // x coord (150px from left)
             220,                  // y coord (220px from top)
             $textColourImage,     // colour we allocated earlier
             'fonts/arial.ttf',    // font path
             "Hello Text!");       // the text we want
然后我们要做的就是将图像保存为我们选择的文件类型。
imagepng($image, "image-with-text");
调整代码,以便我们可以创建多个图像并在不同位置添加文本。
好了,我们已经知道如何创建带有文本的图片了,但那只是一段文本而已。我们还硬编码了所有值,但如果我们想动态生成倒计时,这显然毫无用处。
是时候将其转变为我们可以使用的类了。
namespace GifMake;

class gifMake {

    private $image;
    public $texts = array();

    function hexToRGB($colour) {
        if ($colour[0] == '#') {
            $colour = substr($colour, 1);
        }
        if (strlen($colour) == 6) {
            list( $r, $g, $b ) = array($colour[0] . $colour[1], $colour[2] . $colour[3], $colour[4] . $colour[5]);
        } elseif (strlen($colour) == 3) {
            list( $r, $g, $b ) = array($colour[0] . $colour[0], $colour[1] . $colour[1], $colour[2] . $colour[2]);
        } else {
            return false;
        }
        $r = hexdec($r);
        $g = hexdec($g);
        $b = hexdec($b);
        return array('r' => $r, 'g' => $g, 'b' => $b);
    }

    function createImg() {
        $this->image = imagecreatefromjpeg('img/inhu-countdown.jpg');

        foreach ($this->texts AS $item) {

            $fontSize = $item[0];
            $angle = $item[1];
            $x = $item[2];
            $y = $item[3];
            $textColourHex = $item[4];
            $fontFamily = $item[5];
            $text = $item[6];

            $textColourRGB = $this->hexToRGB($textColourHex);
            $textColourImg = imagecolorallocate(
                                    $this->image,
                                    $textColourRGB['r'],
                                    $textColourRGB['g'],
                                    $textColourRGB['b']);


            //add the text
            imagettftext($this->image,
                         $fontSize,
                         $angle,
                         $x,
                         $y,
                         $textColor,
                         $fontFamily,
                         $text);
        }
        return true;
    }

    function saveAsPng($fileName = 'text-image', $location = '') {
        $fileName = $fileName . ".png";
        $fileName = !empty($location) ? $location . $fileName : $fileName;
        return imagepng($this->image, $fileName);
    }

    function saveAsJpg($fileName = 'text-image', $location = '') {
        $fileName = $fileName . ".jpg";
        $fileName = !empty($location) ? $location . $fileName : $fileName;
        return imagejpeg($this->image, $fileName);
    }

    function showImage() {
        header('Content-Type: image/png');
        return imagepng($this->image);
    }

}
大部分代码与以前相同,但这次我们进行了调整,以便我们可以通过想要添加的“文本”数组传递值。
另外添加的是三种返回图像的方法(savePng(),saveJpg()和show()),将图像保存为 PNG,或将其保存为 JPG,或仅输出图像以在浏览器中查看(这对于测试很有用)。
另外需要注意的是,我们在类的开头声明了一个名为 的数组$texts。我们将在这里存储想要绘制到图像上的每条文本。
这样,我们可以设置然后循环遍历一系列指令,以foreach ($this->texts AS $item) {在多个位置设置文本以及多种颜色、大小等。
需要注意的一点是,如果我们想让它真正可重复使用,则需要在外部设置图像路径,但这是一个快速项目,因此现在硬接线就可以了!
使用我们的新课程!
首先,我们将其包含在脚本中并设置命名空间
namespace GifMake;
include 'gifmake.php';
现在我们可以轻松创建包含多个文本块的图像:
$img = new gifMake;
$img->texts[] = array(52, 0, 75, 200, "#333333", "font/inhu.ttf", "InHu Launches in...");
$img->texts[] = array(52, 0, 160, 300, "#333333", "font/inhu.ttf", "144");
$img->texts[] = array(52, 0, 426, 300, "#763289", "font/inhu.ttf", "Days");
$img->texts[] = array(52, 0, 160, 380, "#333333", "font/inhu.ttf", "12");
$img->texts[] = array(52, 0, 394, 380, "#763289", "font/inhu.ttf", "Hours");
$img->texts[] = array(52, 0, 160, 460, "#333333", "font/inhu.ttf", "09");
$img->texts[] = array(52, 0, 338, 460, "#763289", "font/inhu.ttf", "Minutes");
$img->texts[] = array(52, 0, 160, 540, "#333333", "font/inhu.ttf", "17");
$img->texts[] = array(52, 0, 300, 540, "#763289", "font/inhu.ttf", "Seconds");

$img->createImg();
$fileName = "img/test";
$img->saveAsPng($fileName);
现在需要花一点时间来放置文本,但除此之外一切都很顺利!
图像序列的最后一步
现在我们有了一个可行的设计,我们现在要做的就是创建一个图像序列,其中每个图像都删除 1 秒。
我花了一分钟(60 张图像)来在文件大小和人们看到循环之间取得良好的平衡。
因此,我们只需要抓住目标日期和现在之间的差异,将其转换为天、小时、分钟和秒,然后将这些值输入到我们之前设计的模板中。
下面的代码有点混乱,但这是我最终得到的:-
namespace GifMake;
use \GifCreator;
use \Datetime;

include 'giflib.php';
include 'gifcreator.php';

// get our current time and our target time then find the difference.
$now = new DateTime();
$ends = new DateTime('Jan 3, 2022, 09:00:00');
$left = $now->diff($ends);

// grab the days, hours, minutes and seconds DIFFERENCE between our two dates
$days = $left->format('%a');
$hours = $left->format('%h');
$minutes = $left->format('%i');
$seconds = $left->format('%s');

// loop 60 times subtracting a second each time and drawing our text
for ($x = 0; $x < 60; $x++) {

    if ($seconds < 0) {
        $seconds = 59;
        $minutes--;
    }
    if ($minutes < 0) {
        $minutes = 59;
        $hours--;
    }
    if ($hours < 0) {
        $hours = 23;
        $days--;
    }

    // we have a check to ensure our countdown date hasn't passed. Useful to add an "else" clause later with a different image for "countdown over"
    if ($now < $ends) {

        $img = new gifMake;
        $img->texts[] = array(26, 0, 38, 100, "#333333", "font/inhu.ttf", "InHu Launches in...");
         // we use str_pad to make sure our days, minutes etc. have at least 2 figures
        $img->texts[] = array(26, 0, 80, 150, "#333333", "font/inhu.ttf", str_pad($days, 2, "0", STR_PAD_LEFT));
        $img->texts[] = array(26, 0, 213, 150, "#763289", "font/inhu.ttf", "Days");
        $img->texts[] = array(26, 0, 80, 190, "#333333", "font/inhu.ttf", str_pad($hours, 2, "0", STR_PAD_LEFT));
        $img->texts[] = array(26, 0, 197, 190, "#763289", "font/inhu.ttf", "Hours");
        $img->texts[] = array(26, 0, 80, 230, "#333333", "font/inhu.ttf", str_pad($minutes, 2, "0", STR_PAD_LEFT));
        $img->texts[] = array(26, 0, 169, 230, "#763289", "font/inhu.ttf", "Minutes");
        $img->texts[] = array(26, 0, 80, 270, "#333333", "font/inhu.ttf", str_pad($seconds, 2, "0", STR_PAD_LEFT));
        $img->texts[] = array(26, 0, 150, 270, "#763289", "font/inhu.ttf", "Seconds");

        // call our build function to add the text and then save it
        $img->createImg();
        $fileName = "img/sequence/img" . $x;
        $img->savePng($fileName);

    }
    $seconds --;
}
瞧!60 张图片,每张比上一张少 1 秒
创建 GIF
现在我可能已经创建了自己的用于添加文本的小类,但我不会编写用于创建 GIF 的类——有太多东西需要完善!
我发现Sybio 的这个很棒的 GIF 创建库看起来非常简单。
以下是创建 GIF 所需的全部代码:
$frames = array();
for($x = 0; $x < 60; $x++){
    $frames[] = "img/sequence/img" . $x . ".png";
    $durations[] = 100;
}
// Initialize and create the GIF !
$gc = new GifCreator\GifCreator();
$gc->create($frames, $durations, 10);
$gifBinary = $gc->getGif();
file_put_contents("img/countdown.gif", $gifBinary);
它的关键部分是$gc->create功能。
它预计
- 一组图像(我使用了相对路径,但它也可以处理文件)
- 持续时间数组,每帧 1 个
- 重复的次数。
我发现的一个怪癖是,持续时间 100 是一秒,而我预计 1000 是一秒。
把所有这些放在一起,我们就得到了 GIF
更新 dev.to 文章
现在这个也相当直接。
要更新 dev.to 文章,您需要文章 ID。
获取此信息的正确方法是查询文章的 API 或在我们创建文章时存储文章 ID。
但这又是一个一次性项目,所以我需要做的就是获取 ID 并将其硬连线进去。
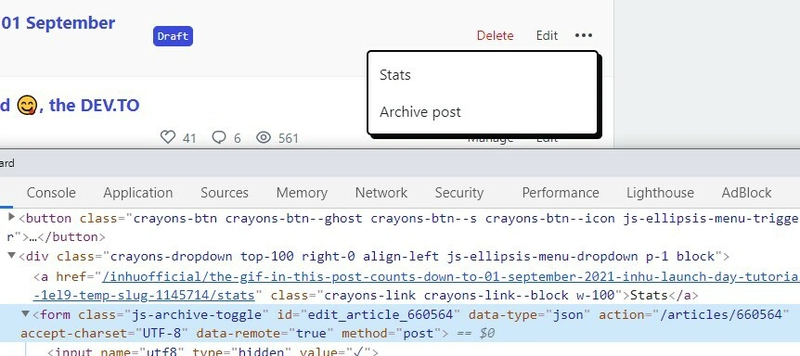
幸运的是,您可以:
- 创建包含标题等基本信息的文章(我们可以更改)
- 保存到草稿箱
- 进入仪表板并找到您刚刚创建的文章
- 单击 3 个点以获取更多选项,然后右键单击“存档帖子”->检查。
<form>您将在“存档帖子”按钮周围的中找到您文章的 ID id="edit_article_[the ID of your article]"。
一旦我们有了该 ID,我们所要做的就是发送带有以下参数的PUT请求:https://dev.to/api/articles/{our-article-id-we-found-earlier}
- title - 文章标题
- 已发布- 文章是否已发布(真/假)
- body_markdown——我们的文章内容!
- tags - 与文章相关的标签数组
$vars = array();
$vars['article'] = array();
$vars['article']['title'] = "Your Article Title";
$vars['article']['published'] = false; //set to true to publish
$vars['article']['body_markdown'] = '##Your article markdown';
$vars['article']['tags'] = array('up to', 'four', 'related', 'tags');

$vars_send = json_encode($vars); // convert to JSON

$ch = curl_init();
curl_setopt($ch, CURLOPT_URL,"https://dev.to/api/articles/{your-article-id}");
curl_setopt($ch, CURLOPT_CUSTOMREQUEST, "PUT");
curl_setopt($ch, CURLOPT_POSTFIELDS,$vars_send);  //Post Fields

$headers = [
    'api-key: {Your API key - found under settings -> account}',
    'Content-Type: application/json;'
];

curl_setopt($ch, CURLOPT_HTTPHEADER, $headers); // add the headers to the request

curl_exec ($ch);// go go go!
对于大多数用途来说这应该足够了。
但是我希望文章封面图片是我的倒计时 GIF。
不幸的是,这意味着我们不能将数据作为 JSON 编码的变量数组发送,而是必须只发送 Markdown 并包含一些称为“front matter”的内容。
前言基本上只是关于文章的元数据。
它的格式非常简单:
---
title: our article title
published: true of false
tags: up to 4 tags that are relevant
description: for twitter cards and open graph (social sharing)
cover_image: URL of the cover image (this is what we need!)
---
**All of our article content**
一旦我们构建好了,我们就可以只发送主体标记(现在我们的前言已经添加到开头):
    $vars = array();
    $vars['article'] = array();
    $vars['article']['body_markdown'] = $bodyMarkdownIncludingFrontMatter;

    $vars_send = json_encode($vars);
    [....same as before]
一切顺利,没有错误。
如果你确实遇到了错误,大多数情况下 API 都会给出一个有意义的错误信息,这样你就知道在尝试解决问题时该修复什么/搜索什么!我遇到过几次 Markdown 文件被弄乱的情况,但除此之外一切都很顺利……除了一个你在正常使用下可能不会遇到的问题……
意外的“捉鬼”
我完成了上述所有工作,然后运行了几次更新脚本。
它生成了一张新图像,正确地更新了文章......但有些事情不太对劲?!
我的 GIF 没有使用最新的倒计时时间。
我检查了我的服务器 - 是的,图像生成正确,那么问题是什么?
事实证明我有点天真!我以为只要把图片的 URL 指向我的服务器,就能控制图片了。
但 dev.to 比我聪明多了,它实际上会从我的服务器抓取图片并缓存起来。你甚至无法使用经典的缓存清除技术(比如?t=12345在图片 URL 末尾添加缓存)来绕过它。
经过一番思考和抱怨之后,我找到了一个非常简单的解决方案。
当我生成图像时,我只是给它一个随机数作为文件名的一部分。
唯一的问题是我不希望我的服务器每分钟生成一个新图像并存储接下来的 144 天。
因此,当我生成新图像时,我也必须删除旧图像。
我的最后一个问题是,这实际上在两个单独的脚本上运行 - 一个用于生成图像,一个用于更新文档(并且我想将它们分开,以便我可以在发布最后一篇文章时在下一分钟运行创建脚本,因为创建可能需要 10-15 秒)。
所以最终我找到了一个快速解决方案。在 GIF 创建脚本中,我添加了以下代码:
//delete the existing file
$files = glob('img/countdown-holder/*');
foreach($files as $file){
  if(is_file($file)) {
    unlink($file);
  }
}

// generate a random number to "bust the cache"
$cacheBuster = rand(1000, 999999999);
//add our file back into the directory with a new file name
file_put_contents("img/countdown-holder/countdown" . $cacheBuster . ".gif", $gifBinary);
在文章更新脚本中我做了以下操作:
$directory = "img/countdown-holder/";
$files = scandir ($directory);
$ourImageURL = $directory . $files[2];
这样我们就可以抓取具有随机名称的文件,而不必在两个脚本之间直接传递信息。
我会把它放到关键任务流程中吗?不会!
它能满足我的需求吗?而且应该不会出什么问题吧?是的!这对我来说已经足够好了!
最后
将两个文件上传到服务器。
为它们每个设置一个 cron 作业,每分钟运行一次。
坐下来检查一切是否正常......如果您正在阅读这篇文章,并且计时器与 2021 年 9 月 1 日 09:00(格林威治标准时间)同步,那么一切正常!
就是这样,希望现在您知道如何创建带有动态添加文本的图像序列,将这些图像拼接在一起形成 GIF 并且(有点)知道如何使用 dev.to API 更新文章。
我计划很快写一篇关于 dev.to API 的详细文章,所以如果最后一部分对您来说还不够详细,那么请关注我,希望我的 API 文章能够有所帮助。
那么我们有多“同步”
好吧,如果您确实读到了这篇文章,您可能会注意到 GIF 要么出现了几分钟,要么甚至可能完全停止了!
但是,如果您刷新页面,GIF 应该在一分钟内准确,最多两分钟。
如果不是因为缓存问题,我可以通过一些额外的工作使其完美到秒,但你知道吗,这对我来说已经足够接近了!
它有任何实际应用吗?
您可能会认为 JavaScript 是一个更好的(并且更轻量级的!)解决方案,对于这样的事情来说,这只是浪费时间和“有趣的项目”。
但有一种情况这很有用......电子邮件营销。
能够精准地倒计时优惠或特别活动本身就很吸引人,而参与度才是关键!由于我们无法在电子邮件中运行 JavaScript,所以唯一的选择就是 GIF。
可能还有其他用途,但这就是为什么我想学习如何做到这一点,因为我计划在未来使用它来倒计时我主持/参与的任何活动!
那么我正在倒计时什么呢?
我的公司 InHu 正式成立。
这就是我现在要说的全部内容,如果您想了解更多,您必须关注我,因为我将慢慢发布我去年计划和策划的细节😉!
![[已删除用户] 图片](/upload/6-rhao.png)
 后端开发教程 - Java、Spring Boot 实战 - msg200.com
