运行 Elasticsearch 和 Kibana v7+(macOS/Linux 和 Windows)
注意!
如果您想在本地运行 Elasticsearch 和 Kibana v8+,具体步骤与本博客中介绍的有所不同。点击此处查看如何运行 v8+ 的博客!
Elastic Stack 由 Elasticsearch、Kibana、Beats 和 Logstash 组成。
总之,Elastic Stack 允许您从任何来源、以任何格式获取数据,然后实时搜索、分析和可视化它。
从一开始,Elastic Stack 就是免费且开放的!
本博客将引导您如何在 Linux、macOS 或 Windows 上本地下载和运行 Elasticsearch 和 Kibana。
以下链接将带您进入 Elasticsearch 和 Kibana 的下载页面。
macOS/Linux 和 Windows 的安装步骤略有不同。以下列出了这些操作系统的安装步骤。
如果您想更深入地了解 Elasticsearch 和 Kibana,请查看我的博客“ Elasticsearch 初学者指南”。
对于 macOS 和 Linux
Elasticsearch
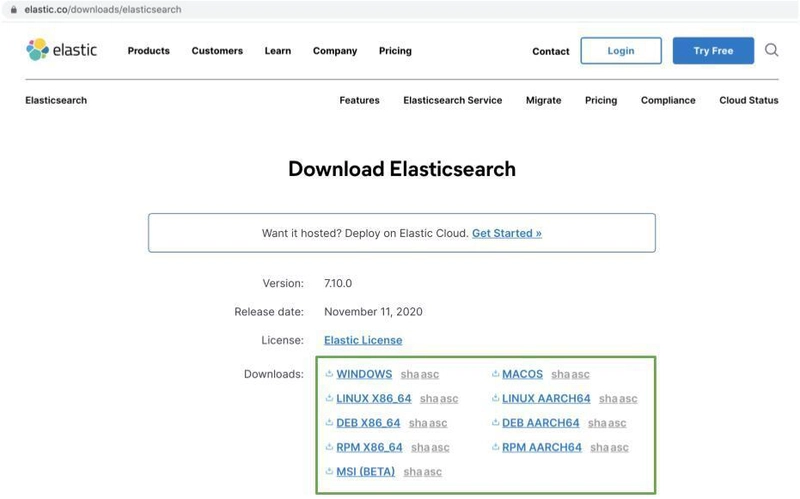
步骤1:下载Elasticsearch
转到Elasticsearch下载链接。
选择适合您的操作系统的下载选项(绿色框)。
步骤 2:重新定位下载的 Elasticsearch 并解压
将 Elasticsearch 重新定位到哪里取决于您,但在本教程中,我将其移动到桌面。
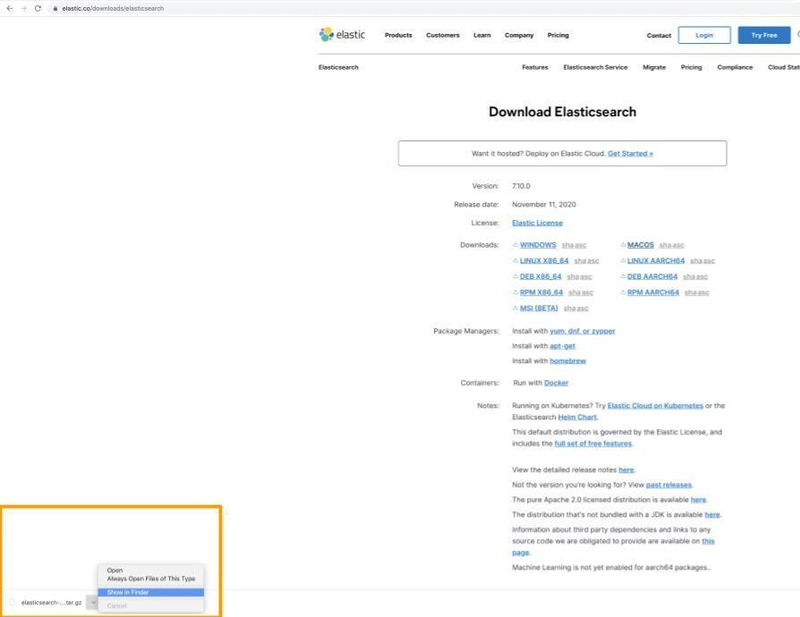
下载 Elasticsearch 后(橙色框),按住 Control 键Elasticsearch并单击 ,然后单击show in folder。
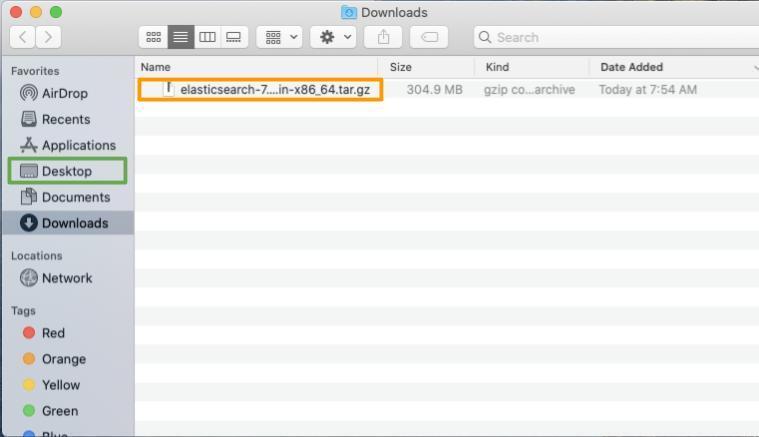
选择 Elasticsearch(橙色框)并将其移动到桌面(绿色框)。
前往桌面,双击 Elasticsearch(橙色框)进行解压。解压完成后,您将在桌面上看到一个名为 Elasticsearch 的蓝色文件夹。
步骤3:启动Elasticsearch服务器并确保一切正常运行
通过使用命令行,我们将在桌面上找到解压的 Elasticsearch 文件夹并运行 Elasticsearch 服务器!
打开你选择的终端。从你的主目录,复制并粘贴以下命令到你的终端,即可进入桌面。
# In the terminal of your choice
cd Desktop
在终端中运行ls命令来检查位于桌面上的解压的 Elasticsearch 文件夹(橙色框)的名称。
# In the terminal
ls
通过运行以下命令更改为解压的 Elasticsearch 目录。
# In the terminal
# A new version of Elasticsearch may have been released by the time you download Elasticsearch.
#Therefore, the version of your download may differ from what is shown below(7.10.0).
#Please make sure you cd into the Elasticsearch directory shown when using the ls command from the previous step.

cd elasticsearch-7.10.0
您将看到您现在位于 elasticsearch 目录(橙色框)。
在终端中,运行以下命令。
# In the terminal
bin/elasticsearch
在 Elasticsearch 服务器开始运行之前,您会看到光标闪烁一段时间!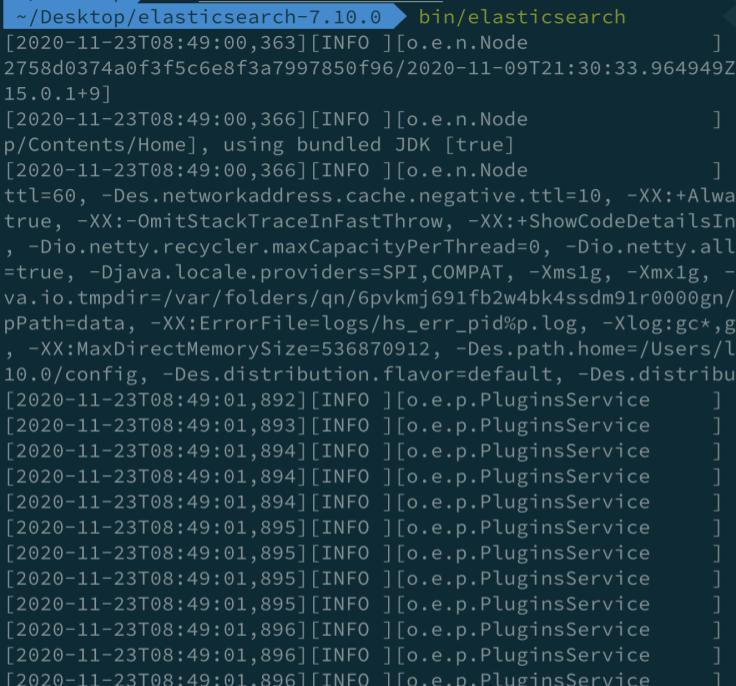
步骤 4:向 Elasticsearch 服务器发送 cURL 命令,以确保 Elasticsearch 已启动并正在运行
使用 REST API 向 Elasticsearch 服务器发送请求。这些请求将发送到端点http://localhost:9200。
我们将使用 cURL 命令来检查 Elasticsearch 服务器是否收到该请求。
打开一个新的终端。
在新终端的主目录中,运行以下命令。
# In the new terminal
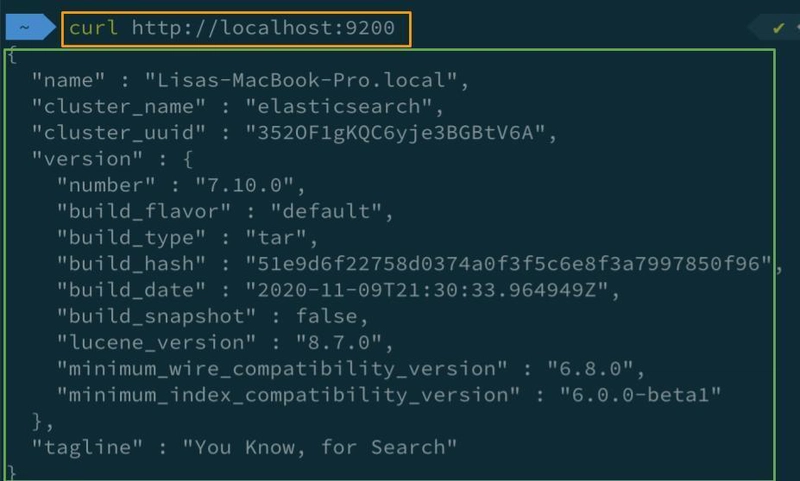
curl http://localhost:9200
运行命令(橙色框)时,您将在终端(绿色框)中看到以下 JSON 对象。如果看到此 JSON 对象,则表示一切正常,并且 Elasticsearch 已成功安装。
保持这两个终端打开,以保持 Elasticsearch 服务器运行。
基巴纳
下载 Kibana 与下载 Elasticsearch 非常相似。
步骤 1:下载 Kibana
Kibana 是 Elasticsearch 的 Web 界面。Kibana 附带与 Elasticsearch 通信的后端服务器。
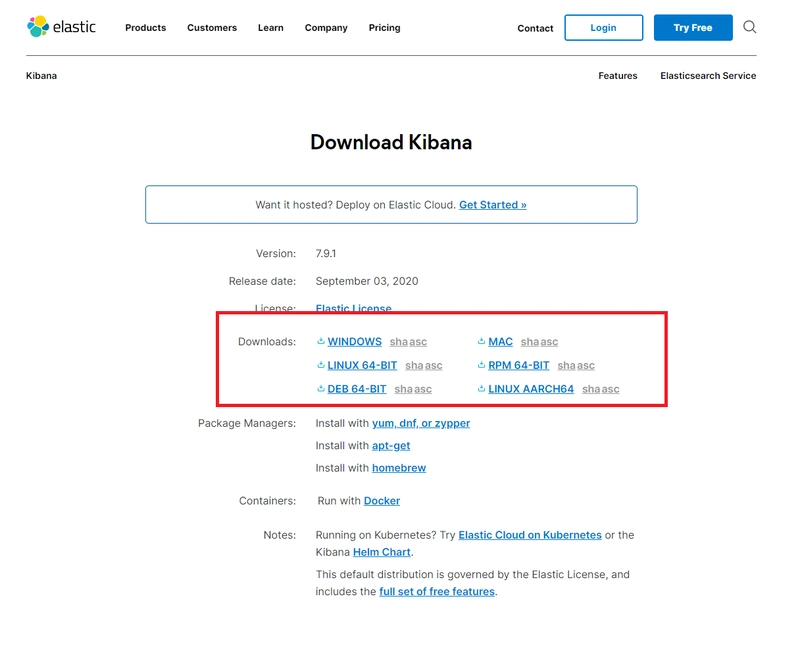
转到Kibana下载链接。
在用红色框突出显示的区域中,选择适合您的操作系统的下载选项。
您将看到已下载一个 zip 文件。
第 2 步:重新定位下载的 Kibana 并解压
Kibana 的重新定位位置由您决定,但在本教程中,我将其移动到桌面。
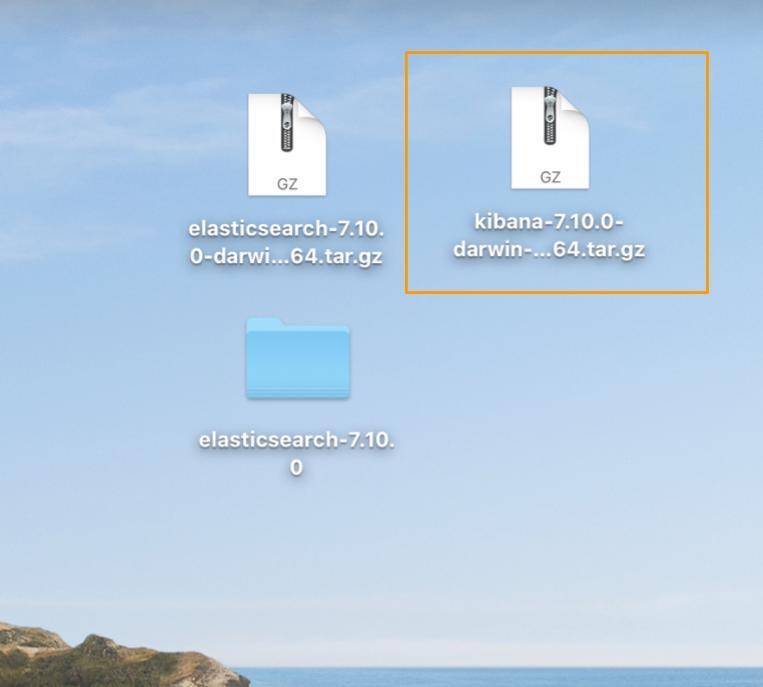
下载 Kibana 后(橙色框),按住 Control 键Kibana并单击 ,然后单击show in folder。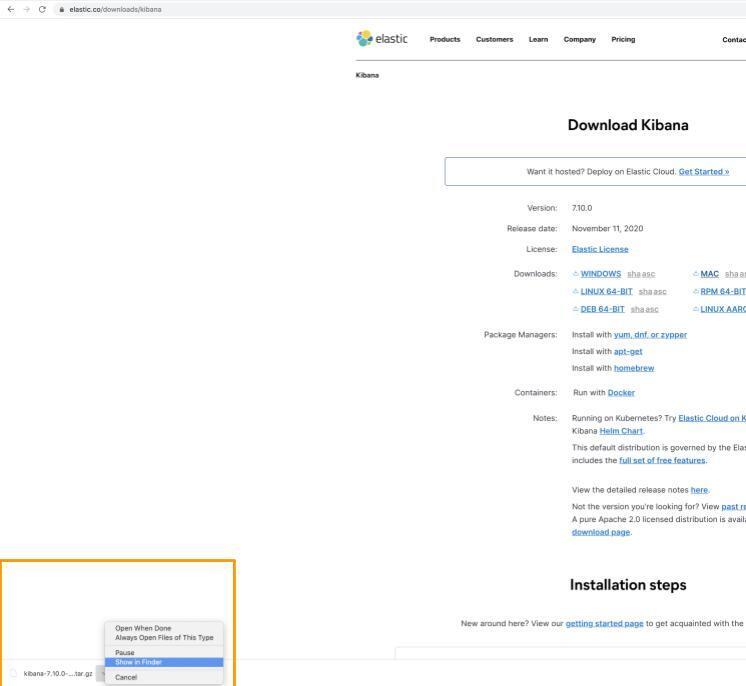
选择下载的 Kibana(橙色框)并将其移动到桌面(绿色框)。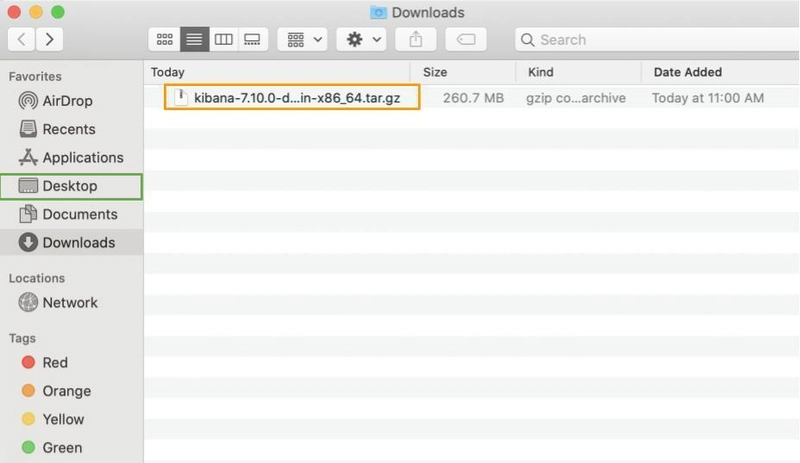
前往桌面,双击 Kibana(橙色框)进行解压。解压完成后,您将在桌面上看到一个名为“Kibana”的蓝色文件夹。
步骤 3:运行 Kibana 并确保一切正常运行
通过使用命令行,我们将在桌面上找到解压的 Kibana 文件夹并运行 Kibana 服务器!
打开一个新的终端。从你的主目录,复制并粘贴以下命令到你的终端,进入桌面。
# In a new terminal
cd Desktop
在终端中运行ls命令来检查位于桌面上的解压的 Kibana 文件夹(橙色框)的名称。
# In the terminal
ls
进入解压后的 Kibana 目录。
# In the terminal
# By the time you download Kibana, a new version of Kibana may have been released.
# Therefore, the version of your download may differ from what is shown below(7.10.0-darwin-x86_64).
# Please make sure you cd into the Kibana directory shown when using the ls command from the previous step.

cd kibana-7.10.0-darwin-x86_64
您将看到您现在位于 Kibana 目录(橙色框)。
在终端中,运行以下命令。
# In the terminal
bin/kibana
在看到 Kibana 运行之前,您会看到光标闪烁一段时间!
当您在终端中看到以下消息时Server is running at http://localhost:5601,即可使用 Kibana 界面了。
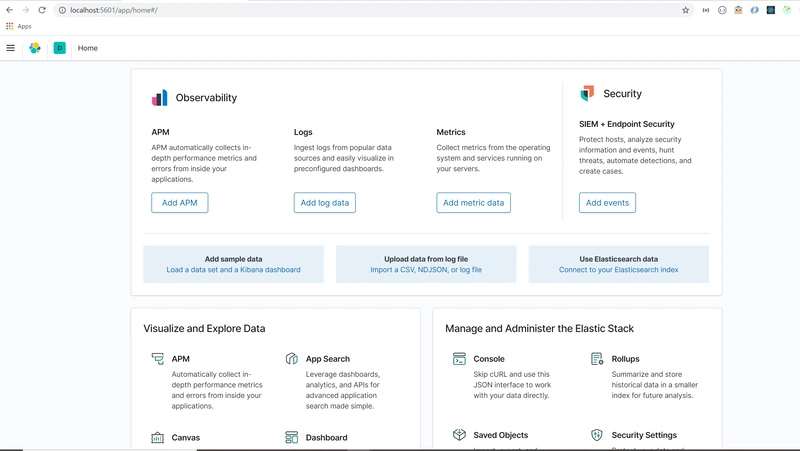
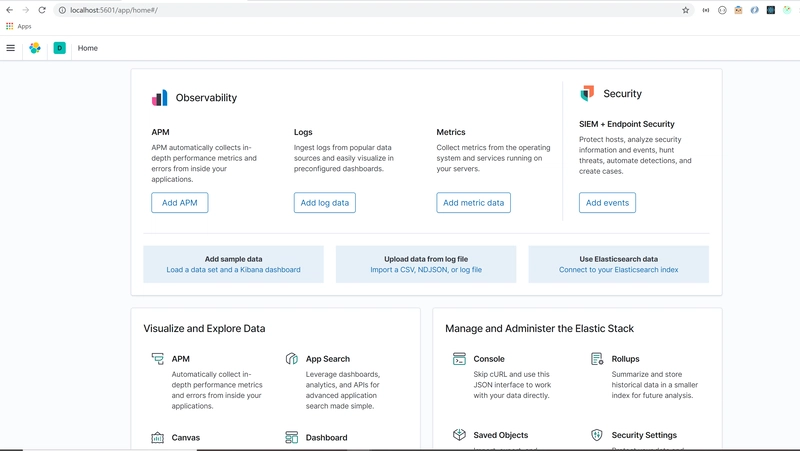
打开浏览器并转到http://localhost:5601。
您将看到浏览器上显示以下内容。
如果 Kibana 未在您的浏览器上加载...
If you are having trouble getting Kibana to load, try restarting your Elasticsearch server.
Go to the terminal used for your Elasticserach server.
Press control + c. Then, run bin/elasticsearch in the same terminal.

Go back to your terminal that is running Kibana.
Run control + c in the command prompt terminal.
Then, run bin/kibana in the terminal. Go to http://localhost:5601 on your browser.
好吧,让我们回到 Kibana 浏览器。
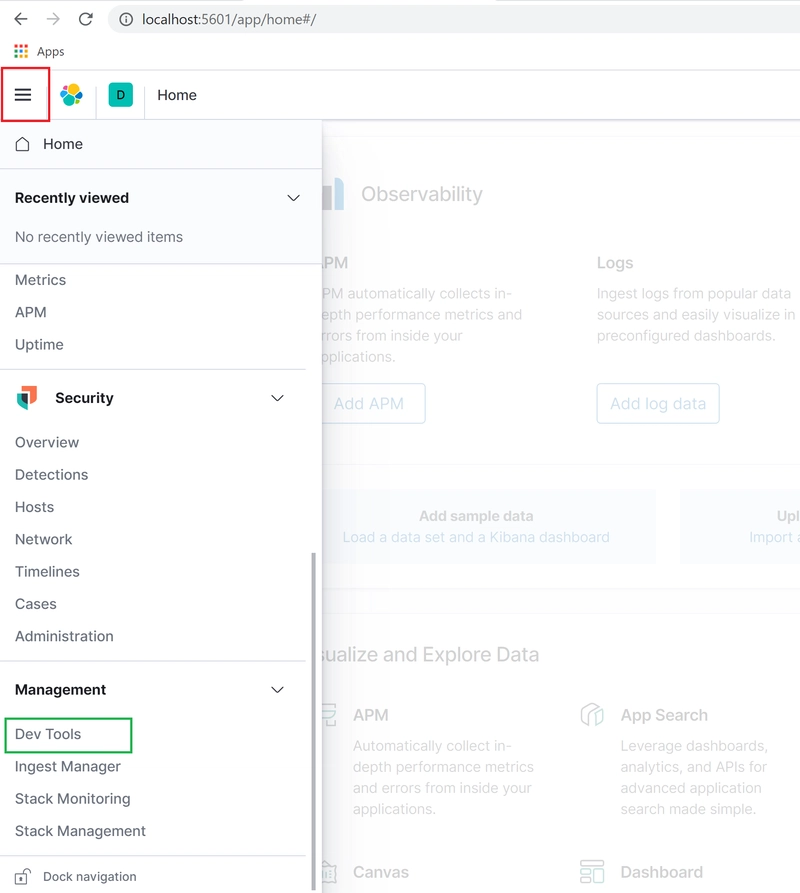
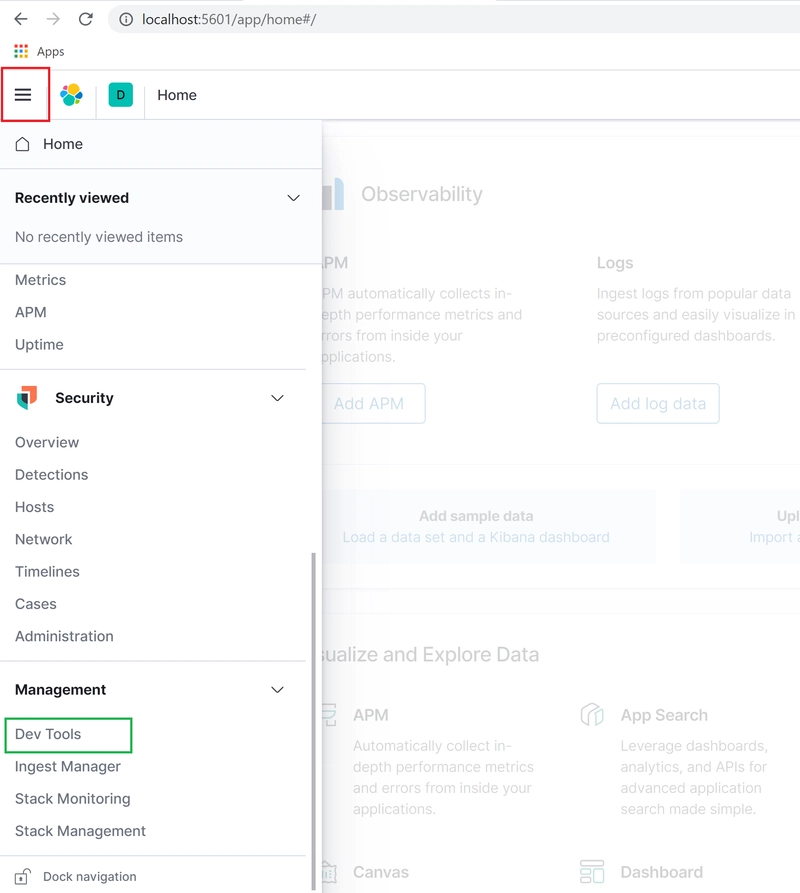
点击menu选项(红色框)以显示下拉菜单。向下滚动到管理部分,然后点击Dev Tools选项(绿色框)。
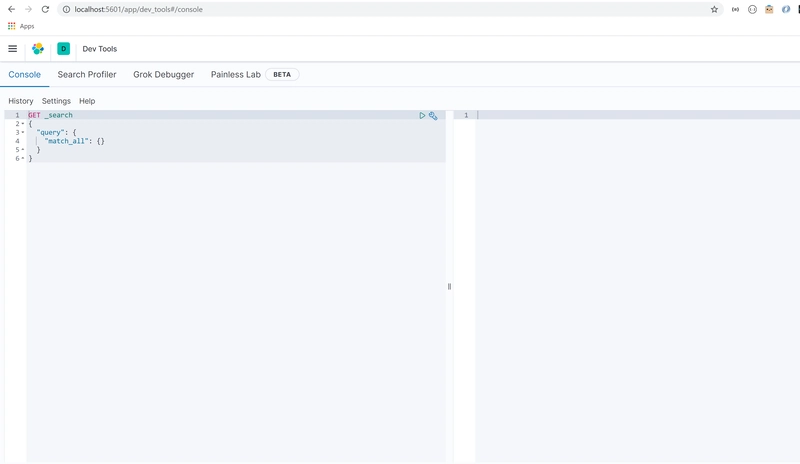
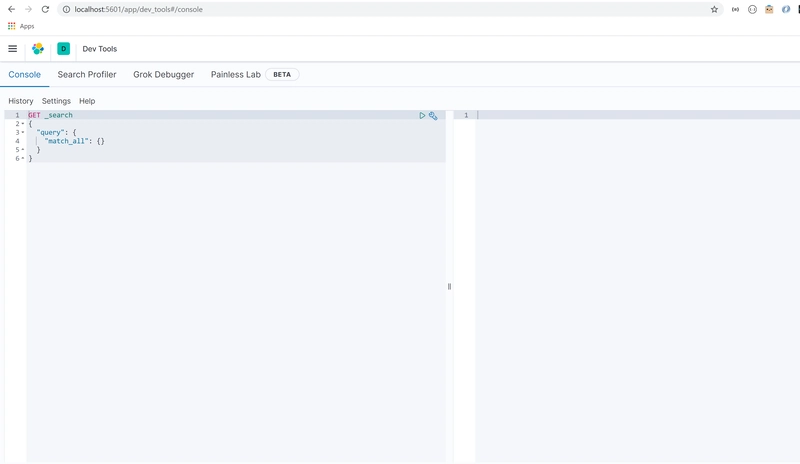
您将在此处看到以下界面,您可以在其中将搜索查询发送到 Elasticsearch!
恭喜!您已成功在 macOS/Linux 上下载并运行 Elasticsearch 和 Kibana!
步骤 4:开始探索 Elasticsearch 和 Kibana 的用途
我的《Elastic Stack 系列初学者速成课程》中介绍了分步指南。
第 1 部分
本研讨会将向您展示如何使用 Elasticsearch 和 Kibana 执行 CRUD(创建、读取、更新和删除)操作。
- 研讨会视频录像。时间戳 25:03 将直接带您进入 CRUD 操作部分。
- 使用 Elasticsearch 和 Kibana 执行 CRUD 操作所需的所有请求。
第 2 部分
本研讨会将向您展示如何将搜索查询从 Kibana 发送到 Elasticsearch,以及如何微调搜索结果的相关性。
第 2 部分 GitHub repo包含本次研讨会的视频记录以及研讨会期间涵盖的所有查询和聚合请求。
以下时间戳标记了您在设置 Elasticsearch 和 Kibana 后可能想要探索的主题:
- 如何将数据添加到 Elasticsearch 18:58
- 用于搜索的查询和聚合 21:56
- 用于微调准确率或召回率的查询 33:33
就是这样。现在,去探索你能做什么吧!
对于 Windows
Elasticsearch
步骤1:下载Elasticsearch
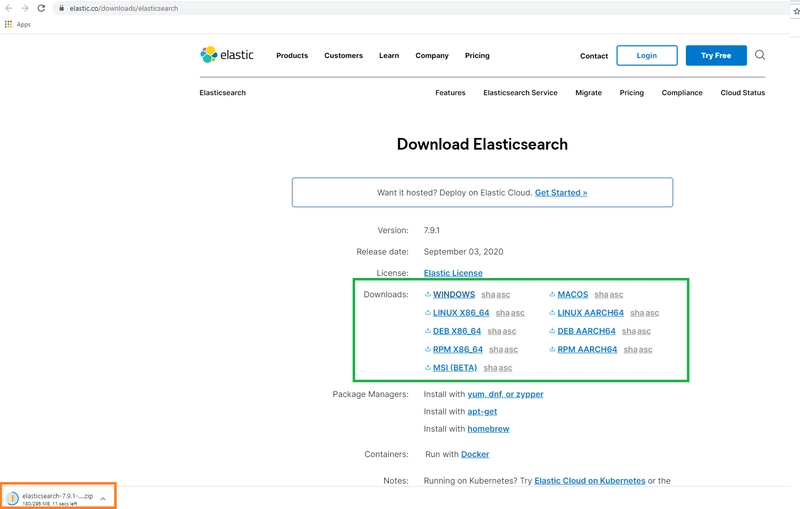
转到Elasticsearch下载链接。
在用绿色框突出显示的区域中,选择适用于 Windows 的下载选项。
您将看到已下载一个 zip 文件夹(橙色框)。
步骤 2:重新定位下载的 Elasticsearch 并解压
将此文件重新定位到何处由您决定,但对于本教程,我在 Windows(C:)驱动器中创建了一个名为 Elastic_Stack 的文件夹。
将下载的文件移动到 Elastic_Stack 文件夹。
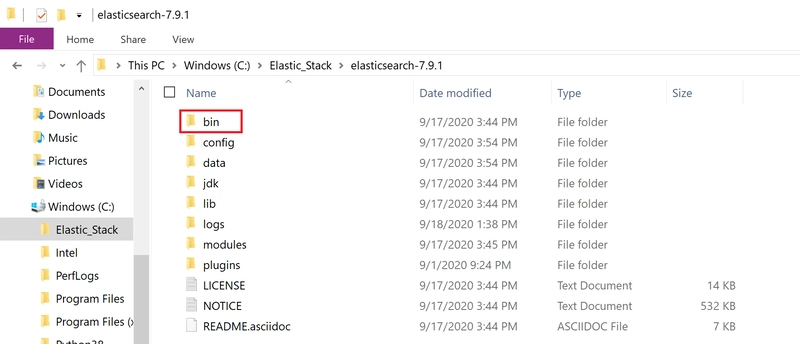
右键单击文件夹以显示弹出选项,然后单击extract all“选项”。文件夹解压后,双击该文件夹。您将在屏幕上看到以下内容。
双击该文件夹。
点击 bin 文件夹(红色框)。
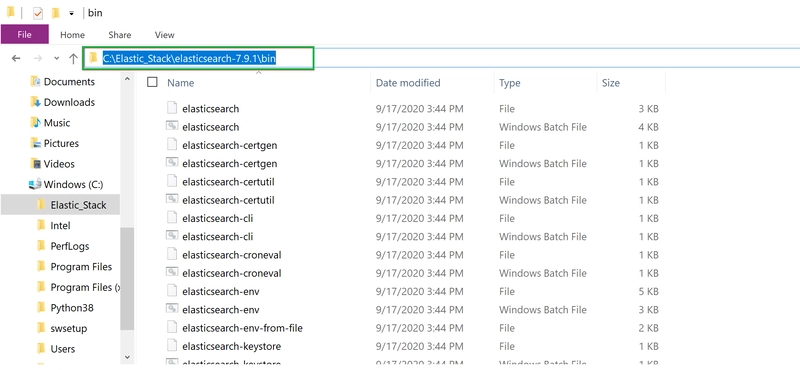
点击绿色方框高亮的区域。它会显示 bin 文件夹的文件路径。复制此地址。我们将在下一步中使用它。
步骤3:启动Elasticsearch服务器并确保一切正常运行
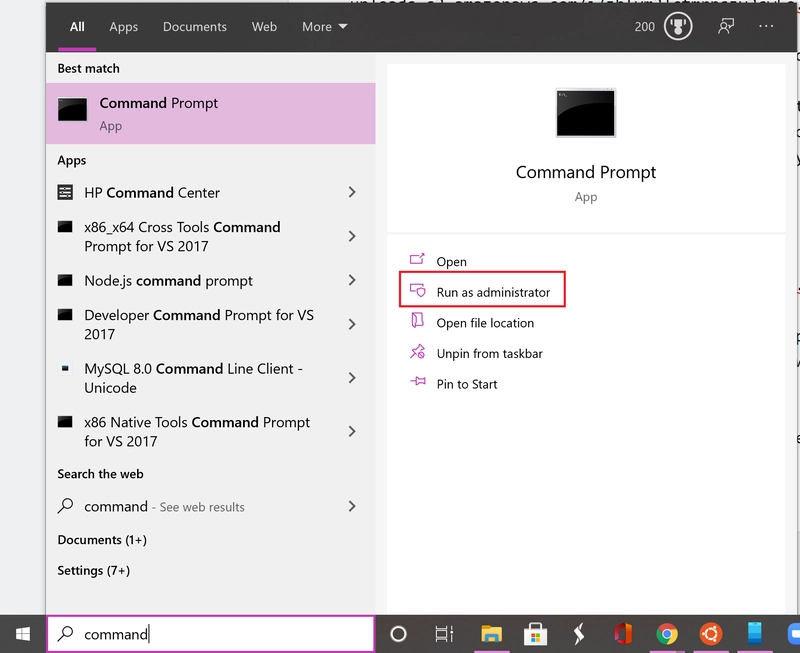
在搜索栏(紫色框)中搜索命令提示符应用程序,然后单击run as administrator选项(红色框)。
在命令提示符应用程序终端中,通过提供 bin 文件夹的文件路径切换到 bin 目录 (cd)。这是您在上一步中复制的文件路径。
# In the command prompt terminal

cd filepath to bin folder in Elasticsearch
红色框突出显示了我们用来更改 bin 目录的命令。
当您按下回车键时,您将看到已经进入 bin 目录(蓝色框)。
在终端中,运行以下命令。
# In the command prompt terminal

elasticsearch.bat
在 Elasticsearch 服务器开始运行之前,您会看到光标闪烁一段时间!
您将看到 Elasticsearch 服务器在本地主机的端口 9200(红色框)上运行。
使用 REST API 向 Elasticsearch 服务器发送请求。该请求将发送到端点http://localhost:9200。
我们将使用 cURL 命令来检查 Elasticsearch 服务器是否收到该请求。
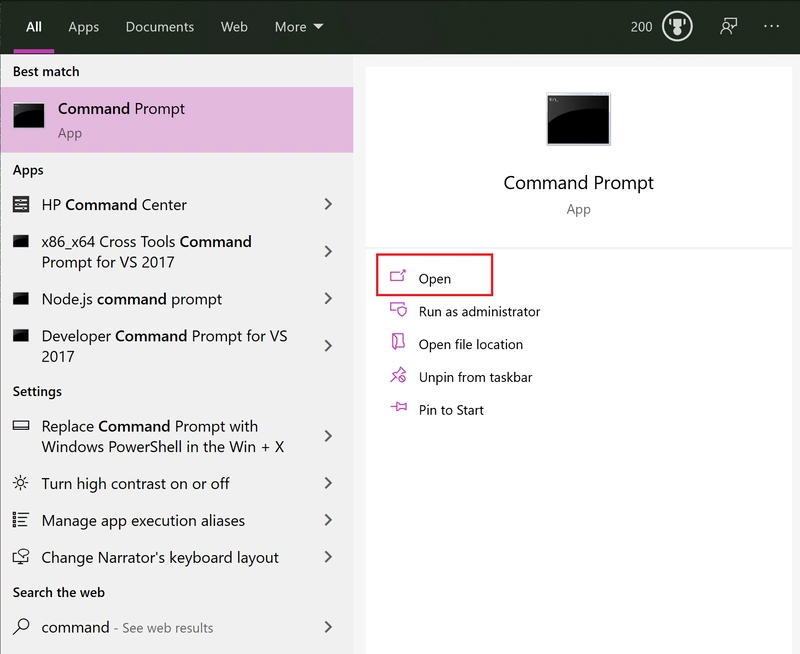
打开一个新的命令提示符窗口(红色框)。
在新的终端中,运行以下命令。
# In new command prompt terminal

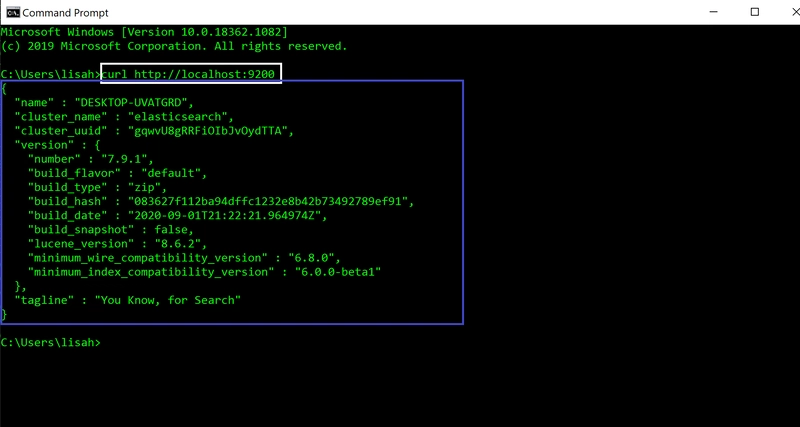
curl http://localhost:9200
当你运行命令(白色框)时,你将在终端(蓝色框)中看到以下 JSON 对象。这意味着一切正常,并且 Elasticsearch 已成功安装。
保持这些终端打开以保持 Elasticsearch 服务器运行。
基巴纳
安装 Kibana 与安装 Elasticsearch 非常相似。
步骤 1:下载 Kibana
Kibana 是 Elasticsearch 的 Web 界面。Kibana 附带与 Elasticsearch 通信的后端服务器。
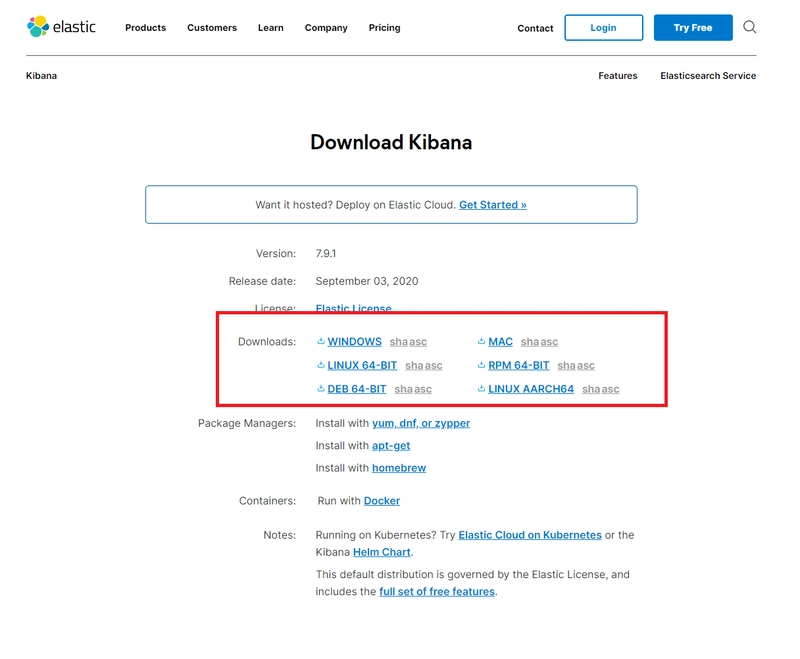
转到Kibana下载链接。
在红色框突出显示的区域中,选择适用于 Windows 的下载选项。
您将看到已下载一个 zip 文件夹。
第 2 步:重新定位下载的 Kibana 并解压
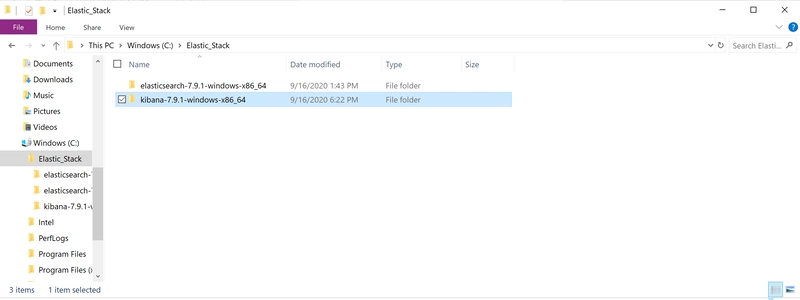
将此文件夹重新定位到何处由您决定,但对于本教程,我在 Windows(C:)驱动器中创建了一个名为 Elastic_Stack 的文件夹。
右键单击文件夹以显示选项,然后单击extract all“选项”。文件夹解压后,双击该文件夹。
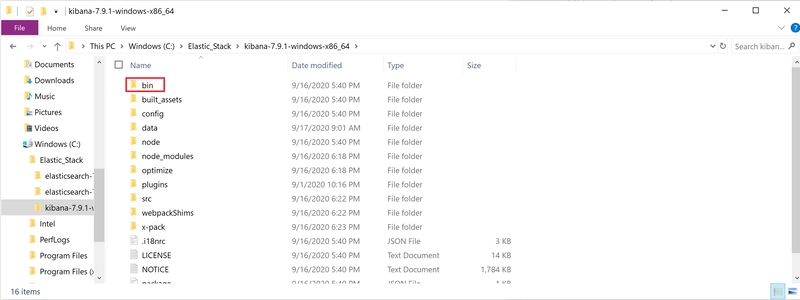
单击 bin 文件夹(红色框)。
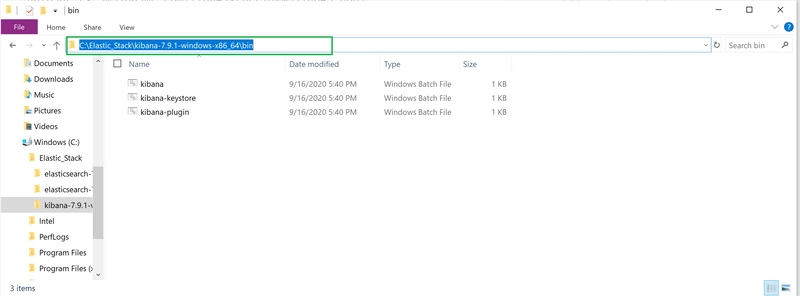
点击绿色方框高亮的区域。它会显示 bin 文件夹的文件路径。复制此地址。我们将在下一步中使用它。
步骤 3:运行 Kibana 并确保一切正常运行
首先,返回运行 Elasticsearch 服务器的命令提示符窗口。确保它仍在运行,并且没有显示任何错误消息。
打开一个新的命令提示符窗口。
在命令提示符应用程序终端中,通过提供 bin 文件夹的文件路径,切换到 Kibana 的 bin 目录 (cd)。这是您在上一步中从 bin 文件夹复制的路径。
# In the command prompt terminal

cd filepath to bin folder in Kibana
该命令已用红色框突出显示。
当您按下回车键时,您将看到已经进入 bin 目录(蓝色框)。
在终端中,运行以下命令。
# In the command prompt terminal

kibana.bat
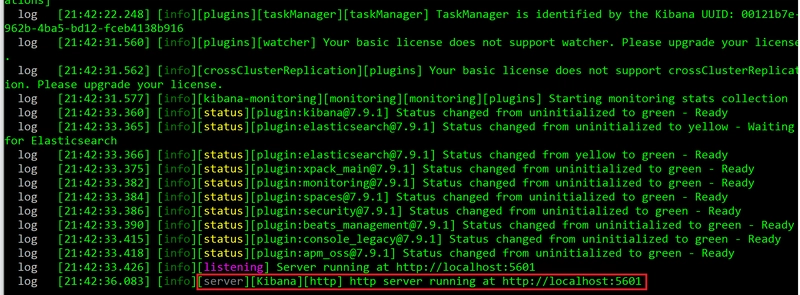
在看到 Kibana 运行之前,你会看到光标闪烁一会儿!当你在终端中
看到该消息时,你就可以开始使用 Kibana 界面了。http server running at http://localhost:5601
打开浏览器并转到http://localhost:5601。
您将看到浏览器上显示以下内容。
如果 Kibana 未在您的浏览器上加载...
If you are having trouble getting Kibana to load, try restarting your Elasticsearch server.
Go to the terminal used for your Elasticserach server.
Press control + c. Then, run elasticsearch.bat in the same terminal.

Go back to your terminal that is running Kibana.
Run control + c in the command prompt terminal.
Then, run kibana.bat in the terminal.
Go to http://localhost:5601 on your browser.
好吧,让我们回到 Kibana 浏览器。
点击menu选项(红色框)以显示下拉菜单。向下滚动到管理部分,然后点击Dev Tools选项(绿色框)。
您将在此处看到以下界面,您可以在其中将搜索查询发送到 Elasticsearch!
恭喜!您已成功在 Windows 上下载并运行 Elasticsearch 和 Kibana!
步骤 4:开始探索 Elasticsearch 和 Kibana 的用途
我的《Elastic Stack 系列初学者速成课程》中介绍了分步指南。
第 1 部分
本研讨会将向您展示如何使用 Elasticsearch 和 Kibana 执行 CRUD(创建、读取、更新和删除)操作。
- 研讨会视频录像。时间戳 25:03 将直接带您进入 CRUD 操作部分。
- 使用 Elasticsearch 和 Kibana 执行 CRUD 操作所需的所有请求。
第 2 部分
本研讨会将向您展示如何将搜索查询从 Kibana 发送到 Elasticsearch,以及如何微调搜索结果的相关性。
第 2 部分 GitHub repo包含本次研讨会的视频记录以及研讨会期间涵盖的所有查询和聚合请求。
以下时间戳标记了您在设置 Elasticsearch 和 Kibana 后可能想要探索的主题:
- 如何将数据添加到 Elasticsearch 18:58
- 用于搜索的查询和聚合 21:56
- 用于微调准确率或召回率的查询 33:33
就是这样。现在,去探索你能做什么吧!
鏂囩珷鏉ユ簮锛�https://dev.to/elastic/downloading-elasticsearch-and-kibana-macos-linux-and-windows-1mmo 后端开发教程 - Java、Spring Boot 实战 - msg200.com
