⚛️ 在 React 中应用策略模式(第二部分)
在第一部分中,我们探讨了策略模式在 React 项目中的重要性,并概述了它的实现。然而,之前提出的方法可能有点矫枉过正。本文旨在介绍一种更简单、更实用的策略模式应用方法。
示例 1️⃣:单位换算
问题陈述
假设您需要转换重量单位(例如,将 1000 克转换为 1 千克)。一个简单的解决方案涉及一个递归函数,如下所示:
export enum Weight {
  Gram = 'g',
  Kilogram = 'kg',
  Tonne = 't',
  Megatonne = 'Mt',
  Gigatonne = 'Gt',
}

const WEIGHT_UNIT_ORDER = Object.values(Weight);
const WEIGHT_UNIT_CONVERSION_THRESHOLD = 1_000;

export const convertWeightUnit = (weightInGram: number, unit = Weight.Gram): ConvertUnitResult => {
  if (weightInGram < WEIGHT_UNIT_CONVERSION_THRESHOLD ||
  unit === WEIGHT_UNIT_ORDER.at(-1)) {
    return { newValue: weightInGram, newUnit: unit };
  }

  const nextUnit = WEIGHT_UNIT_ORDER[
    Math.min(
      WEIGHT_UNIT_ORDER.indexOf(unit) + 1,
      WEIGHT_UNIT_ORDER.length - 1
    )
  ];

  return convertWeightUnit(weightInGram / WEIGHT_UNIT_CONVERSION_THRESHOLD, nextUnit);
};
这个例子为我们的讨论奠定了基础,但我们先不讨论递归算法本身。相反,让我们探索一下如何将这种逻辑应用于另一个单位集(例如文件大小),而无需重复代码。策略模式提供了一个优雅的解决方案。
应用策略模式
首先,我们必须定义添加新单元集所需的附加 TypeScript 枚举和接口:
- unit.utils.types.ts:
export enum Weight {
  Gram = 'g',
  Kilogram = 'kg',
  Tonne = 't',
  Megatonne = 'Mt',
  Gigatonne = 'Gt',
}

export enum FileSize {
  Byte = 'B',
  Kilobyte = 'KB',
  Megabyte = 'MB',
  Gigabyte = 'GB',
  Terabyte = 'TB',
  Petabyte = 'PB',
}

export type GeneralUnit = Weight | FileSize;

export interface ConvertUnitResult {
  newValue: number;
  newUnit: GeneralUnit;
}

export interface UnitConversionStrategy {
  [key: string]: {
    unitOrder: GeneralUnit[];
    threshold: number;
  };
}
现在我们需要修改代码以应用策略模式。每个策略模式实现的核心,都必须有一个定义策略的对象。在本例中,它是UNIT_CONVERSION_STRATEGY:
- unit.utils.ts:
import { ConvertUnitResult, FileSize, GeneralUnit, UnitConversionStrategy, Weight } from './unit.utils.types';

const UNIT_CONVERSION_STRATEGY: UnitConversionStrategy = {
  [Weight.Gram]: {
    unitOrder: Object.values(Weight),
    threshold: 1_000
  },
  [FileSize.Byte]: {
    unitOrder: Object.values(FileSize),
    threshold: 1_000
  },
};

// Populate the strategy for each unit in each category
Object.values(UNIT_CONVERSION_STRATEGY).forEach((unitStrategy) => {
  unitStrategy.unitOrder.forEach((unit) => {
    UNIT_CONVERSION_STRATEGY[unit] = unitStrategy;
  });
});

export const convertUnit = (value: number, unit: GeneralUnit): ConvertUnitResult => {
  const unitConversionStrategy = UNIT_CONVERSION_STRATEGY[unit];

  if (!unitConversionStrategy) throw new Error('Unit not supported');

  const { unitOrder, threshold } = unitConversionStrategy;

  if (value < threshold || unit === unitOrder.at(-1)) {
    return { newValue: value, newUnit: unit };
  }

  const nextUnit = unitOrder[
    Math.min(
      unitOrder.indexOf(unit) + 1,
      unitOrder.length - 1
    )
  ];

  return convertUnit(value / threshold, nextUnit);
};
您可以在实时代码和框中尝试一下:
通过利用如上所示的策略模式,我们规避了散弹枪式反模式。这种方法保持条件语句的数量不变,并通过仅扩展UNIT_CONVERSION_STRATEGY对象而不改变任何现有逻辑来简化新单元集的添加,从而遵循了 SOLID 的开放/封闭原则。
示例 2️⃣:CSS-in-JS 项目中的设计系统
策略模式可以应用于前端项目的另一个很好的例子是当你必须在设计系统中实现组件时。
问题陈述
考虑在设计系统中实现具有各种变体、颜色和大小的按钮:
- 按钮.类型.ts:
export type ButtonVariant = 'contained' | 'outlined' | 'text';

export type ButtonColor = 'primary' | 'secondary' | 'error' | 'success' | 'warning' | 'info';

export type ButtonSize = 'xs' | 'sm' | 'md';

export interface ButtonProps {
  color?: ButtonColor;
  variant?: ButtonVariant;
  size?: ButtonSize;
  children: React.ReactNode;
}
具有简单条件的实现可能会导致混乱的组件:
- Button.tsx(策略模式之前):
import { memo } from 'react';
import { Button as ThemeUIButton } from 'theme-ui';

import { ButtonProps } from './Button.types';

const ButtonBase = ({ color = 'primary', variant = 'contained', size = 'sm', children }: ButtonProps) => {
  return (
    <ThemeUIButton
      sx={{
        outline: 'none',
        borderRadius: 4,
        transition: '0.1s all',
        cursor: 'pointer',
        ...(variant === 'contained'
          ? {
              backgroundColor: `${color}.main`,
              color: 'white',
              '&:hover': {
                backgroundColor: `${color}.dark`,
              },
            }
          : {}),
        ...(variant === 'outlined'
          ? {
              backgroundColor: 'transparent',
              color: `${color}.main`,
              border: '1px solid',
              borderColor: `${color}.main`,
              '&:hover': {
                backgroundColor: `${color}.light`,
              },
            }
          : {}),
        ...(variant === 'text'
          ? {
              backgroundColor: 'transparent',
              color: `${color}.main`,
              '&:hover': {
                backgroundColor: `${color}.light`,
              },
            }
          : {}),
        ...(size === 'xs'
          ? {
              fontSize: '0.75rem',
              padding: '8px 12px',
            }
          : {}),
        ...(size === 'sm'
          ? {
              fontSize: '0.875rem',
              padding: '12px 16px',
            }
          : {}),
        ...(size === 'md'
          ? {
              fontSize: '1rem',
              padding: '16px 24px',
            }
          : {}),
      }}
    >
      {children}
    </ThemeUIButton>
  );
};

export const Button = memo(ButtonBase);
应用策略模式
现在让我们尝试应用策略模式,看看它如何帮助我们清除混乱:
- 按钮.utils.ts:
import { ButtonColor } from './Button.types';

export const getButtonVariantMapping = (color: ButtonColor = 'primary') => {
  return {
    contained: {
      backgroundColor: `${color}.main`,
      color: 'white',
      '&:hover': {
        backgroundColor: `${color}.dark`,
      },
    },
    outlined: {
      backgroundColor: 'transparent',
      color: `${color}.main`,
      border: '1px solid',
      borderColor: `${color}.main`,
      '&:hover': {
        backgroundColor: `${color}.light`,
      },
    },
    text: {
      backgroundColor: 'transparent',
      color: `${color}.main`,
      '&:hover': {
        backgroundColor: `${color}.light`,
      },
    },
  };
};

export const BUTTON_SIZE_STYLE_MAPPING = {
  xs: {
    fontSize: '0.75rem',
    padding: '8px 12px',
  },
  sm: {
    fontSize: '0.875rem',
    padding: '12px 16px',
  },
  md: {
    fontSize: '1rem',
    padding: '16px 24px',
  },
};
- Button.tsx(遵循策略模式):
import { memo } from 'react';
import { Button as ThemeUIButton } from 'theme-ui';

import { ButtonProps } from './Button.types';
import { getButtonVariantMapping, BUTTON_SIZE_STYLE_MAPPING } from './Button.utils';

const ButtonBase = ({ color = 'primary', variant = 'contained', size = 'sm', children }: ButtonProps) => {
  const buttonVariantStyle = getButtonVariantMapping(color)[variant];

  return (
    <ThemeUIButton
      sx={{
        outline: 'none',
        borderRadius: 4,
        transition: '0.1s all',
        cursor: 'pointer',
        ...buttonVariantStyle,
        ...BUTTON_SIZE_STYLE_MAPPING[size],
      }}
    >
      {children}
    </ThemeUIButton>
  );
};

export const Button = memo(ButtonBase);
这次重构显著提高了代码的可读性,并使我们明确地分离了关注点。
示例 3️⃣:验证徽章
问题陈述
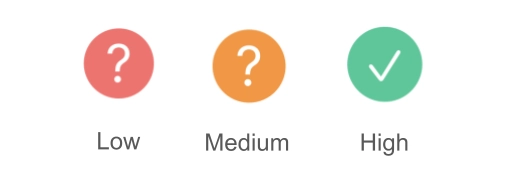
我们需要创建一个非常简单的验证徽章组件,需求如下:
- 低:红色“?”,悬停时显示“低验证级别”
- 中:橙色“?”,悬停时显示“中等验证级别”
- 高:绿色“✓”,悬停时显示“高验证级别”
如果不使用策略对象,我们可以像这样实现组件:
- 验证级别徽章.tsx:
import { Box, Tooltip } from '@mantine/core';

interface VerificationLevelBadgeProps {
  verificationLevel: 'high' | 'medium' | 'low';
}

export const VerificationLevelBadge = ({ verificationLevel }: VerificationLevelBadgeProps) => {
  return (
    <Tooltip
      label={
        verificationLevel === 'low'
          ? 'Low verification level'
          : verificationLevel === 'medium'
          ? 'Medium verification level'
          : 'High verification level'
      }
    >
      <Box
        component="span"
        sx={(theme) => ({
          display: 'inline-flex',
          alignItems: 'center',
          justifyContent: 'center',
          color: theme.white,
          width: 16,
          height: 16,
          fontStyle: 'normal',
          borderRadius: '50%',
          fontSize: verificationLevel === 'high' ? '0.625rem' : '0.75rem',
          background:
            verificationLevel === 'low'
              ? theme.colors.red[5]
              : verificationLevel === 'medium'
              ? theme.colors.orange[5]
              : theme.colors.teal[5],
        })}
      >
        {verificationLevel === 'high' ? '✓' : '?'}
      </Box>
    </Tooltip>
  );
};
这看起来糟透了。想象一下,当我们需要修改某些内容,或者需要添加新的验证级别时,会是什么情况。
应用策略模式
通过引入策略对象,代码的可读性将显著提高,并且为未来的变革铺平了道路:
- VerificationLevelBadge.utils.ts:
export const VERIFICATION_LEVEL_UI_MAPPING = {
  high: {
    backgroundColor: 'teal',
    text: '✓',
    tooltip: 'High verification level',
    fontSize: '0.625rem',
  },
  medium: {
    backgroundColor: 'orange',
    text: '?',
    tooltip: 'Medium verification level',
    fontSize: '0.75rem',
  },
  low: {
    backgroundColor: 'red',
    text: '?',
    tooltip: 'Low verification level',
    fontSize: '0.75rem',
  },
};
- 验证级别徽章.tsx:
import { Box, Tooltip } from '@mantine/core';

import { VERIFICATION_LEVEL_UI_MAPPING } from './VerificationLevelBadge.utils';

interface VerificationLevelBadgeProps {
  verificationLevel: 'high' | 'medium' | 'low';
}

export const VerificationLevelBadge = ({ verificationLevel }: VerificationLevelBadgeProps) => {
  const { tooltip, backgroundColor, text, fontSize } = VERIFICATION_LEVEL_UI_MAPPING[verificationLevel];

  return (
    <Tooltip label={tooltip}>
      <Box
        component="span"
        sx={(theme) => ({
          display: 'inline-flex',
          alignItems: 'center',
          justifyContent: 'center',
          color: theme.white,
          width: 16,
          height: 16,
          fontStyle: 'normal',
          borderRadius: '50%',
          fontSize,
        })}
        bg={backgroundColor}
      >
        {text}
      </Box>
    </Tooltip>
  );
};
结论
本文展示了策略模式在前端项目中的简化应用。通过采用此模式,我们可以避免代码重复,提高代码可读性,并在不修改现有逻辑的情况下轻松扩展功能。
请期待本系列的下一部分,我将在其中分享在前端项目中应用有用的设计模式的个人经验。
如果您对前端开发和 Web 开发感兴趣,请关注我并查看下面个人资料中我的文章。
文章来源:https://dev.to/itswillt/applying-design-patterns-in-react-strategy-pattern-part-2-221i 后端开发教程 - Java、Spring Boot 实战 - msg200.com

