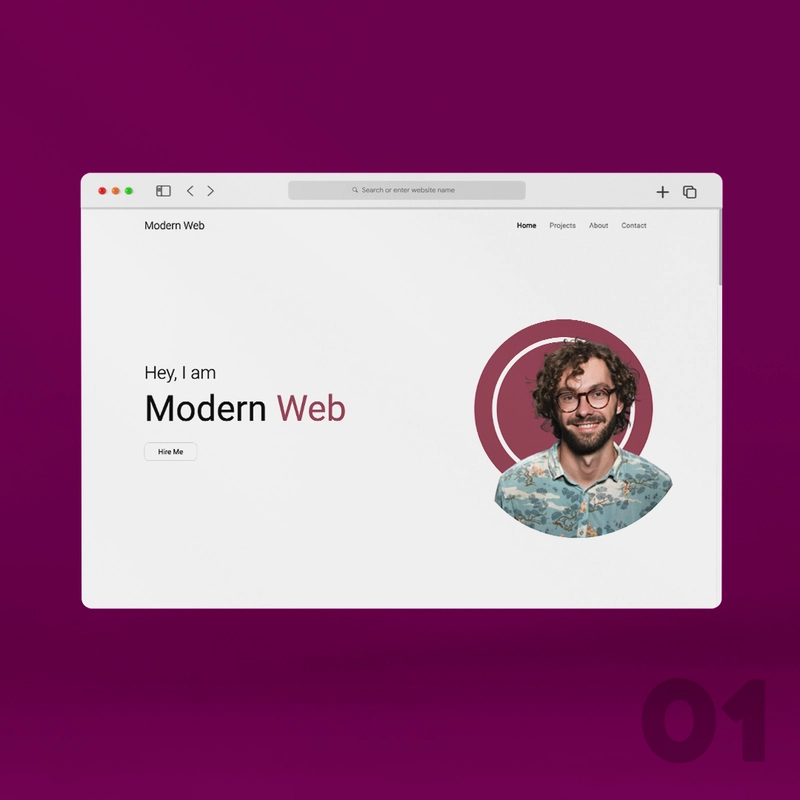
仅包含 HTML、CSS 和 JS 的响应式作品集
视频教程
让我们编码
大家好👋,希望你们一切顺利。这篇博客将教你如何制作一个外观时尚、响应式的作品集网站,让你可以自豪地向客户展示你的项目。所以,别浪费时间,让我们来看看今天的内容吧。
所以基本上,在这个作品集中,我们有一个单页布局,包含主页、关于页面、项目部分和联系部分。它的一些功能包括:
✅ 现代外观
✅ 响应所有屏幕
✅ 关于部分的时间线布局
✅ 带有超棒弹出窗口的交互式项目部分
✅ 网站中的平滑滚动和自定义选择
视频教程
如果你们有兴趣观看视频教程,可以在下面找到。
如果你能订阅我的频道并喜欢这个视频,它会激励我制作更多像这样的精彩内容😊
您可以下载源代码。
让我们编码
所以我想不要浪费更多时间,让我们看看如何编写网站代码。
文件夹结构
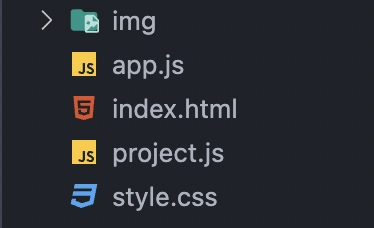
您可以从这里下载图片文件夹。您可以看到我们有app.js、index.html和style.css文件。但我还有project.js一个文件。该文件基本上包含一个数组“projectData”,其中包含多个“JS 对象”,这些对象就是项目卡片数据本身。所以基本上,我在这里创建这个文件是为了让我们可以通过编辑“数组”轻松地将项目添加到我们的网站,而不必编辑 HTML 文件并弄清楚为什么某些卡片上的 CSS 样式不起作用。这将使事情变得轻松。
项目.js
let projectData = [
    {
        image: 'img/project-1.png',
        name: 'project one',
        detail: 'Lorem ipsum dolor sit amet, consectetur adipiscing elit. Donec congue, augue quis rutrum auctor, erat est mattis velit, vel luctus est nisl',
        github: '#',
        live: '#',
        tags: '#javascript, #fullstack, #css'
    },
    more objects like this 👆
]
那么,让我们打开index.html文件,style.css开始创建网站。继续编写基本的 HTML5 模板,添加标题,并将 CSS 文件链接到模板。你也可以Roboto在 HTML 文件中链接 Google 字体。完成后,我们来创建导航栏。
因此,对于导航栏,请编写以下 HTML 代码。
<nav class="navbar">
    <h1 class="logo">Modern Web</h1>
    <ul class="nav-links-container">
        <li class="nav-link"><a href="#home-section" class="links active">home</a></li>
        <li class="nav-link"><a href="#project-section" class="links">projects</a></li>
        <li class="nav-link"><a href="#about-section" class="links">about</a></li>
        <li class="nav-link"><a href="#contact-section" class="links">contact</a></li>
    </ul>
</nav>
上面的 HTML 应该构成导航栏,现在我们只需要设置它的样式。
*{
    margin: 0;
    padding: 0;
    box-sizing: border-box;
}

body{
    margin: auto;
    width: 100%;
    position: relative;
    background-color: #fcfcfc;
    font-family: 'Roboto', sans-serif;
}

/* navbar */

.navbar{
    position: fixed;
    top: 0;
    left: 0;
    z-index: 3;
    width: 100%;
    height: 80px;
    padding: 0 10vw;
    display: flex;
    justify-content: space-between;
    align-items: center;
    background: #fcfcfc;
}

.logo{
    font-size: 1.5rem;
    font-weight: 300;
}

.nav-links-container{
    display: flex;
    list-style: none;
}

.links{
    text-decoration: none;
    color: #000;
    margin: 0 5px;
    padding: 10px;
    text-transform: capitalize;
    font-size: 1rem;
    opacity: 0.5;
    transition: .5s;
}

.links.active, .links:hover{
    opacity: 1;
}
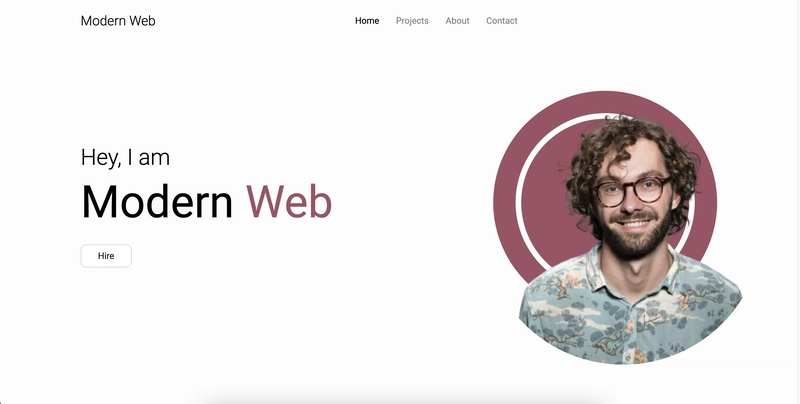
给出这些样式后,您应该会看到类似这样的内容。
太棒了,看起来很酷,现在我们可以开始处理标题部分了。基本上,我们的标题部分左侧会有一些内容,右侧会显示用户的图片。为此,你可以像这样编写 HTML 结构,之后navbar……
<!-- header -->
<header class="header" id="home-section">
    <div class="content">
        <h1 class="header-heading">Hey, I am <span class="brand-name">modern <span>web</span></span></h1>
        <a href="#" class="btn">Hire</a>
    </div>

    <div class="header-img-container">
        <div class="circle"></div>
        <img src="img/header-img.png" class="header-img" alt="">
    </div>
</header>
该网站没有任何 CSS,所以我们也添加它。
/* header */

.header{
    width: 100%;
    height: 100vh;
    padding: 0 10vw;
    display: flex;
    justify-content: space-between;
    align-items: center;
    gap: 50px;
}

.header-heading{
    font-size: 2.5rem;
    font-weight: 300;
    margin-bottom: 40px;
}

.header-heading .brand-name{
    display: block;
    text-transform: capitalize;
    font-size: 5rem;
    margin: 10px 0;
    font-weight: 400;
}

.brand-name span{
    color: #9f5264;
}

.btn{
    color: #121212;
    text-decoration: none;
    cursor: pointer;
    background: #fff;
    border: 1px solid #cecece;
    border-radius: 10px;
    padding: 10px 30px;
    text-transform: capitalize;
    transition: .5s;
    margin-right: 20px;
}

.header-img-container{
    display: flex;
    justify-content: center;
    align-items: center;
    position: relative;
}

.header-img{
    position: absolute;
    top: 60%;
    left: 60%;
    transform: translate(-50%, -50%);
    width: 500px;
    height: 500px;
    object-fit: cover;
}

.circle{
    width: 400px;
    height: 400px;
    border-radius: 50%;
    background: #9f5264;
    margin-left: 20px;
    position: relative;
    user-select: none;
}

.circle::before{
    content: '';
    position: absolute;
    top: 40px;
    left: 40px;
    bottom: 40px;
    right: 40px;
    border: 10px solid #fff;
    border-radius: 50%;
}
你应该会看到类似这样的内容。因为我们的 header 部分也完成了。
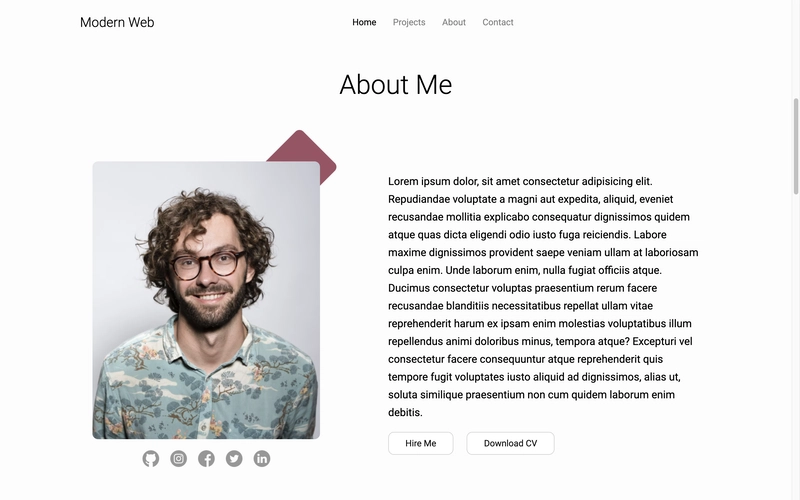
现在,让我们创建关于部分。在此之前,代码很容易理解,但如果您有任何不明白的地方,可以观看视频教程来了解详细信息,或者您也可以在讨论中直接问我,我会回答您的问题。好了,回到正题,对于关于部分,代码如下。
<!-- about section -->

<section id="about-section">
    <h1 class="heading">about me</h1>
    <!-- about -->
    <div class="about-container">
        <div class="image-container">
            <div class="square"></div>
            <img src="img/about.png" class="about-img" alt="">
            <div class="social-links">
                <a href="#"><img src="img/github.png" class="social-img" alt=""></a>
                <a href="#"><img src="img/insta.png" class="social-img" alt=""></a>
                <a href="#"><img src="img/fb.png" class="social-img" alt=""></a>
                <a href="#"><img src="img/twitter.png" class="social-img" alt=""></a>
                <a href="#"><img src="img/linked.png" class="social-img" alt=""></a>
            </div>
        </div>

        <!-- info part -->
        <div class="info">
            <p>Lorem ipsum dolor, sit amet consectetur adipisicing elit. Repudiandae voluptate a magni aut expedita, aliquid, eveniet recusandae mollitia explicabo consequatur dignissimos quidem atque quas dicta eligendi odio iusto fuga reiciendis. Labore maxime dignissimos provident saepe veniam ullam at laboriosam culpa enim. Unde laborum enim, nulla fugiat officiis atque. Ducimus consectetur voluptas praesentium rerum facere recusandae blanditiis necessitatibus repellat ullam vitae reprehenderit harum ex ipsam enim molestias voluptatibus illum repellendus animi doloribus minus, tempora atque? Excepturi vel consectetur facere consequuntur atque reprehenderit quis tempore fugit voluptates iusto aliquid ad dignissimos, alias ut, soluta similique praesentium non cum quidem laborum enim debitis.</p>
            <a href="#" class="btn">hire me</a>
            <a href="#" class="btn">download CV</a>
        </div>
    </div>
</section>
赋予它造型。
/* about section */

#about-section{
    position: relative;
    padding: 100px 10vw;
}

.heading{
    text-align: center;
    text-transform: capitalize;
    font-size: 3rem;
    font-weight: 300;
    margin-bottom: 100px;
}

.about-container{
    width: 100%;
    margin: 50px 0 100px;
    display: flex;
    gap: 100px;
}

.image-container{
    width: 40%;
    position: relative;
}

.about-img{
    width: 90%;
    height: 500px;
    display: block;
    object-fit: cover;
    margin: 10px auto;
    border-radius: 10px;
}

.square{
    width: 100px;
    height: 100px;
    border-radius: 10px;
    background: #9f5264;
    position: absolute;
    right: 10px;
    top: -30px;
    z-index: -1;
    transform: rotate(45deg);
}

.social-links{
    margin-top: 20px;
    display: flex;
    gap: 20px;
    justify-content: center;
}

.social-img{
    width: 30px;
    height: 30px;
    opacity: .4;
    transition: .5s;
}

.social-img:hover{
    opacity: 1;
}

.info{
    width: 50%;
}

.info p{
    font-size: 1.2rem;
    line-height: 2rem;
    margin: 30px 0;
}
href如果你注意到,我们在导航栏链接里添加了相应部分的 ID a。这是因为,当我们点击链接时,它会带你到相应的部分,但如果你现在点击它,滚动效果就会不流畅。所以,为了获得流畅的滚动效果,请在 CSS 文件中添加此项。
html{
    scroll-behavior: smooth;
}

::selection{
    background: #9f526430;
}
上述代码将使滚动更加平滑,并在选择时改变文本的背景颜色。
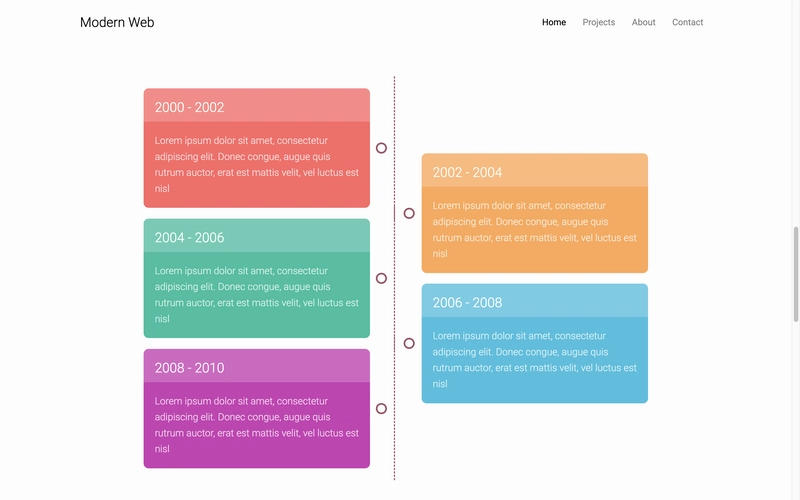
现在让我们创建技能和时间线,因为这些也是确保您在部分about section内添加 HTML 结构的一部分。#about-section
<!-- skills part -->
<h2 class="sub-heading">skills</h2>

<div class="skills">
    <p class="skill-name">HTML</p>
    <p class="skill-name">CSS</p>
    <p class="skill-name">JavaScript</p>
    <p class="skill-name">React.js</p>
    <p class="skill-name">Node.js</p>
    <p class="skill-name">PSQL</p>
    <p class="skill-name">MongoDB</p>
    <p class="skill-name">Firebase</p>
    <p class="skill-name">Fullstack Development</p>
    <p class="skill-name">Frontend Development</p>
    <p class="skill-name">APIs</p>
    <p class="skill-name">React Native</p>
    <p class="skill-name">More</p>
</div>

<!-- time line -->

<h2 class="sub-heading">education and experiences</h2>

<div class="timeline-container">
    <div class="card-container">
        <div class="card">
            <h1 class="card-title">2000 - 2002</h1>
            <p class="card-body">Lorem ipsum dolor sit, amet consectetur adipisicing elit. Quam, rerum obcaecati. Fuga officiis at libero dolore. Necessitatibus numquam ipsum rem?</p>
        </div>
    </div>
    +4 more cards.
</div>
/* skills */

.sub-heading{
    font-size: 2.5rem;
    font-weight: 300;
    margin: 40px 0;
    text-transform: capitalize;
}

.skills{
    display: flex;
    flex-wrap: wrap;
    gap: 20px;
    margin-bottom: 60px;
}

.skill-name{
    padding: 10px 20px;
    background: #fff;
    border: 1px solid #cecece;
    cursor: pointer;
    transition: .2s;
    border-radius: 10px;
}

.skill-name:hover{
    color: #fff;
    background-color: #9f5264;
}

/* time line */

.timeline-container{
    width: 100%;
    position: relative;
}

.card-container{
    width: 100%;
    padding: 0 10%;
    margin-top: -100px;
}

.card{
    display: block;
    width: 45%;
    min-height: 200px;
    min-width: 300px;
    background: #000;
    color: #fff;
    border: 1px solid #fcfcfc;
    border-radius: 10px;
    position: relative;
}

.card-container:nth-child(1) .card{
    margin-top: 150px;
    background-color: #fe6666;
}

.card-container:nth-child(2) .card{
    background-color: #ffa654;
}

.card-container:nth-child(3) .card{
    background-color: #18bfa1;
}

.card-container:nth-child(4) .card{
    background-color: #33c0df;
}

.card-container:nth-child(5) .card{
    background-color: #cb3bb4;
}

.card-container:nth-child(even) .card{
    margin-left: auto;
}

.card-title{
    width: 100%;
    height: 60px;
    font-weight: 300;
    background: rgba(255, 255, 255, 0.2);
    padding: 20px;
}

.card-body{
    padding: 20px;
    font-size: 1.1rem;
    line-height: 1.8rem;
    opacity: 0.8;
    font-weight: 300;
}

.card-container:nth-child(odd) .card::after{
    content: '';
    position: absolute;
    height: 120%;
    right: -11%;
    top: 50%;
    border-right: 2px dashed #9f5264;
    transform: translateY(-50%);
}

.card-container .card::before{
    content: '';
    position: absolute;
    width: 10px;
    height: 10px;
    right: -7.5%;
    top: 50%;
    transform: translateY(-50%);
    border-radius: 50%;
    border: 3px solid #9f5264;
}

.card-container:nth-child(even) .card::before{
    left: -8%;
}
您应该会看到类似这样的内容。
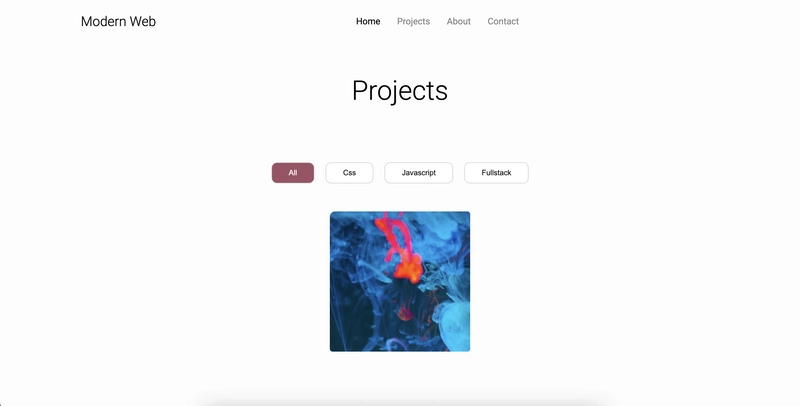
太好了,我们也完成了关于部分,现在让我们制作项目部分。
section id="project-section">
    <h1 class="heading">Projects</h1>

    <div class="filter">
        <button class="btn filter-btn active">all</button>
        <button class="btn filter-btn">css</button>
        <button class="btn filter-btn">javascript</button>
        <button class="btn filter-btn">fullstack</button>
    </div>

    <!--  project cards -->

    <div class="project-container">
        <div class="project-card">
            <div class="project-wrapper">
                <div class="project-thumbnail">
                    <img src="img/close.png" class="close-btn" alt="">
                    <img src="img/project-1.png" class="project-img" alt="">
                    <span class="tags">#javascript, #css, #fullstack</span>
                </div>

                <div class="project-body">
                    <h1 class="project-name">project 1</h1>
                    <p class="project-detail">Lorem ipsum dolor sit amet consectetur adipisicing elit. Nulla eum et veniam eos ratione accusantium aut, accusamus deserunt quis dolores.</p>
                    <a href="#" class="btn">github</a>
                    <a href="#" class="btn">see live</a>
                </div>
            </div>
        </div>
    </div>
</section>
这部分内容比较难理解,所以我建议你看一下教程。
/* project section */

#project-section{
    position: relative;
    margin: 50px 0;
    padding: 0 10vw;
}

.filter{
    display: flex;
    justify-content: center;
    gap: 20px;
    flex-wrap: wrap;
    margin-bottom: 50px;
}

.filter-btn{
    margin-right: 0;
}

.filter-btn.active{
    background: #9f5264;
    color: #fff;
}

.project-container{
    width: 100%;
    display: flex;
    flex-wrap: wrap;
    gap: 10px;
    position: relative;
    justify-content: center;
}

.project-card{
    width: 250px;
    height: 250px;
    overflow: hidden;
    display: flex;
    background: #ebebeb;
    transition: .5s;
    border-radius: 5px;
    position: relative;
}

.project-thumbnail{
    width: 100%;
    position: relative;
    border-radius: 5px;
    overflow: hidden;
}

.close-btn{
    position: absolute;
    top: 20px;
    left: 20px;
    width: 20px;
    cursor: pointer;
    display: none;
}

.project-image{
    width: 100%;
    height: 100%;
    object-fit: cover;
}

.project-card.active{
    border: 1px solid #cecece;
}

.project-wrapper{
    transition: 1s;
}

.project-card.blur{
    filter: blur(5px);
}

.project-card.active .project-wrapper{
    position: fixed;
    top: 0;
    left: 0;
    z-index: 2;
    width: 100%;
    height: 100vh;
    display: flex;
    justify-content: center;
    align-items: center;
    gap: 20px;
    background: rgba(0,0,0, 0.1);
}

.project-card.active .project-thumbnail{
    width: 300px;
    height: 300px;
}

.project-card.active .close-btn{
    display: block;
}

.project-card.active .tags{
    position: absolute;
    bottom: 10px;
    z-index: 2;
    left: 10px;
    color: #fff;
    opacity: .9;
}

.project-body{
    display: none;
}

.project-card.active .project-body{
    display: block;
    width: 300px;
    height: 300px;
    background: #fff;
    border-radius: 5px;
    padding: 30px;
    border: 1px solid #cecece;
}

.project-name{
    font-size: 2rem;
    font-weight: 300;
    text-transform: capitalize;
}

.project-detail{
    font-size: 16px;
    line-height: 20px;
    margin: 20px 0;
}

.project-body .btn{
    display: inline-block;
    margin-top: 10px;
    margin-right: 5px;
    padding: 10px 20px;
}
最后你会得到类似这样的结果
现在是时候编写 JS 代码,根据 project.js 中的数据制作项目卡片了。只需在 HTML 文件中链接 project.js 和 app.js 文件,就可以开始了。
内部project.js文件
const createProjectCards = (data) => {
    let projectContainer = document.querySelector('.project-container');

    projectContainer.innerHTML += `
            <div class="project-card" data-tags="${data.tags}">
                <div class="project-wrapper">
                    <div class="project-thumbnail">
                        <img src="img/close.png" class="close-btn" alt="">
                        <img src="${data.image}" class="project-img" alt="">
                        <span class="tags">${data.tags}</span>
                    </div>

                    <div class="project-body">
                        <h1 class="project-name">${data.name}</h1>
                        <p class="project-detail">${data.detail}</p>
                        <a href="${data.github}" class="btn">github</a>
                        <a href="${data.live}" class="btn">see live</a>
                    </div>
                </div>
            </div>
    `;
}

projectData.forEach(data => createProjectCards(data));
因此,首先在 HTML 文件中注释掉项目卡片,然后在 project.js 文件中编写代码。这基本上就是我们创建了一个函数,它会选择项目容器元素,并使用inner.html方法添加产品卡片的 HTML。我们已经使用template literals这个方法将 HTML 结构添加到容器中。
最后一行是简单的 forEach 循环,它为数组中存在的每个对象调用函数来创建卡片。
它将创建卡片,所以现在让我们添加弹出和关闭效果以及过滤器。
app.js在文件内部编写代码
// project cards open and close functions

let projects = document.querySelectorAll('.project-card');

projects.forEach((card, index) => {

    let closeBtn = card.querySelector('.close-btn');
    closeBtn.addEventListener('click', () => {
        projects.forEach((item, i) => {
            item.classList.remove('blur')
        })
        card.classList.remove('active');
    })

    card.addEventListener('click', (e) => {
        if(e.path[0] != closeBtn){
            projects.forEach((item, i) => {
                if(i != index){
                    item.classList.add('blur')
                }
            })
            card.classList.add('active')
        }
    })

})

// project filter function

const tags = document.querySelectorAll('.filter-btn');

tags.forEach(btn => {
    btn.addEventListener('click', () => {
        projects.forEach(card => {
            if(btn.innerHTML.toLowerCase() == 'all'){
                card.style.display = 'block';
            } else{
                if(card.getAttribute('data-tags').includes(btn.innerHTML.toLowerCase())){
                    card.style.display = 'block';
                } else{
                    card.style.display = 'none';
                }
            }
        })

        tags.forEach(item => item.classList.remove('active'));
        btn.classList.add('active')
    })
})
如果您觉得难以理解,请在评论中告诉我。
既然我们写了 JS,为什么不也写一个导航栏活动类的切换功能呢?这样当我们点击链接时,它就会激活该链接。
// nav toggle

let links = document.querySelectorAll('.links');

links.forEach(link => {
    link.addEventListener('click', () => {
        links.forEach(item => item.classList.remove('active'))
        link.classList.add('active');
    })
})
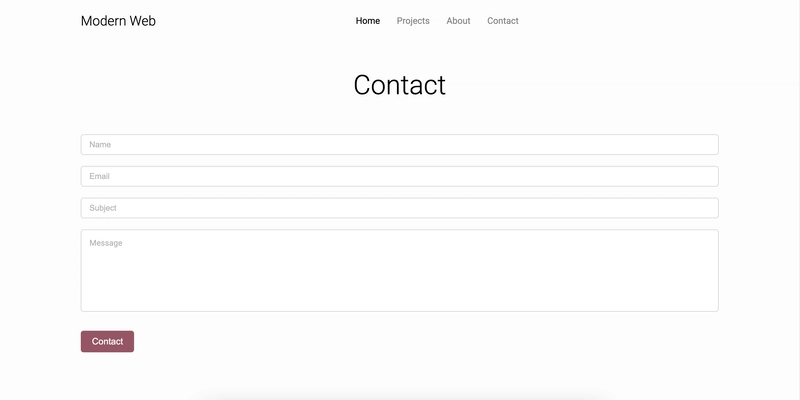
现在我们的 JS 代码已经写好了,一切正常。接下来我们只需要创建联系表单。
index.html
<section id="contact-section">
    <h1 class="heading">contact</h1>
    <div class="form">
        <input type="text" placeholder="name">
        <input type="email" placeholder="email">
        <input type="text" placeholder="subject">
        <textarea placeholder="message"></textarea>
        <button class="contact-btn">contact</button>
    </div>
</section>
/* contact section */

#contact-section{
    margin: 100px 0;
    padding: 0 10vw;
}

.form{
    width: 100%;
    margin-top: -50px;
}

input, textarea{
    width: 100%;
    height: 5vh;
    font-size: .9rem;
    padding: 1vw;
    background-color: #fff;
    border: 1px solid #cecece;
    border-radius: 5px;
    margin: 10px 0;
    outline: none;
}

::placeholder{
    color: #b4b4b4;
    text-transform: capitalize;
}

textarea{
    height: 20vh;
    font-family: 'roboto', sans-serif;
    resize: none;
}

.contact-btn{
    padding: 10px 20px;
    background: #9f5264;
    color: #fff;
    border: none;
    outline: none;
    font-size: 1rem;
    text-transform: capitalize;
    cursor: pointer;
    border-radius: 5px;
    margin-top: 20px;
}
你会得到类似这样的效果。好了,我们完成了,我们制作了一个很棒的现代化作品集网站。由于博客篇幅过长,我不会在这里添加“响应式”部分。你可以在视频中查看。
希望你喜欢这篇文章,喜欢这个网站设计和教程。如果这篇文章对你有帮助,记得关注我的Instagram和YouTube 账号。
您可以下载代码。感谢您的阅读👋
鏂囩珷鏉ユ簮锛�https://dev.to/themodernweb/how-to-make-responsive-portfolio-website-easy-code-with-html-css-and-js-3a72 后端开发教程 - Java、Spring Boot 实战 - msg200.com
