你需要了解的关于 Angular 动画的一切
1. 创建主要组件
2.实现列表组件(暂时没有动画)
3. 动画
结论
动画是一种设计工具,我们可以用它来赋予抽象的数字创作以实体感和可触性,使其更加熟悉和友好。许多组件库充分利用了动画,使其组件更贴近用户。好消息是,作为 Angular 开发者,我们几乎可以开箱即用地拥有出色的组件。坏消息是,我们几乎完全依赖这些库来实现动画。以至于 Angular 动画 API 成为最被低估的 API 之一,甚至可以说是最被低估的。
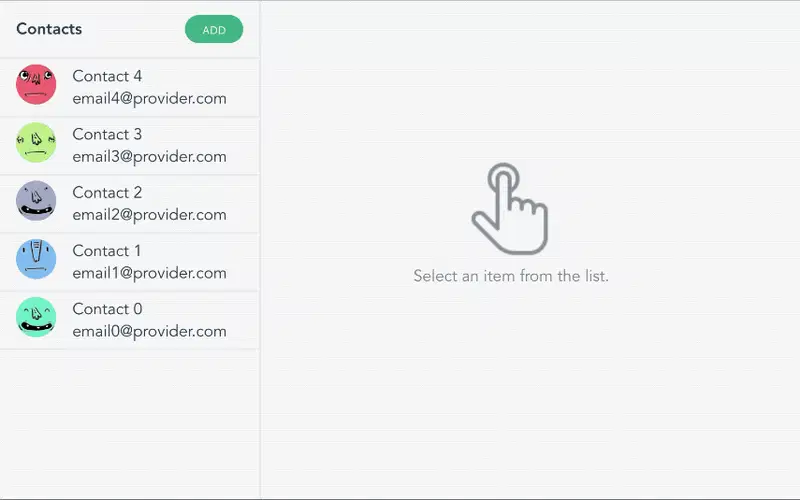
为了改变这种现状,我会尽力在这篇文章中向你展示所有你需要了解的 Angular 动画入门知识。为此,我们将一起构建这个很棒的组件:
正如他们所说,熟能生巧,所以如果您愿意,您可以通过克隆这个存储库并开始操作(这篇文章的每个部分代表存储库的一个 git 分支)。
注意 ->如果您不想继续往下看,您可以直接跳到第 3 部分,在那里您将了解 Angular 动画 API 为您提供的超能力。
1. 创建主要组件
让我们开始吧。确保你的机器上安装了Node、NPM和Angular CLI,创建一个新项目,并将其命名为“awesomeContacts”或任何你想起的巧妙名称,然后创建一个“list”组件:
ng new awesomeContacts --minimal=true --style=scss --routing=false --skip-install
cd awesomeContacts && yarn # or npm i
# wait for the install to finish, then create the 'list' component
ng g c components/list --spec=false && ng serve -o
完成后,删除 AppComponent 模板中的所有内容并用我们的 ListComponent ( <app-list></app-list>) 替换。
在我们直接进入下一部分之前,还有最后一件事要做。为了使动画正常工作,我们需要BrowserAnimationModule在 AppModule 导入中导入。所以你应该得到类似这样的内容:
import { BrowserAnimationsModule } from '@angular/platform-browser/animations';
//...

@NgModule({
  declarations: [AppComponent, ListComponent],
  imports: [BrowserModule, BrowserAnimationsModule],
  providers: [],
  bootstrap: [AppComponent],
})
export class AppModule {}
2.实现列表组件(暂时没有动画)
现在我们的应用和列表组件已经启动并运行,让我们快速实现一下组件。
由于这篇文章主要讲动画,我们不会过多关注这个实现。
首先,我们创建一个 Contact 对象的接口,然后创建一组要使用的联系人:
interface Contact {
  id: number;
  name: string;
  email: string;
  avatarUrl: string;
}

const CONTACTS_MOCK: Contact[] = new Array(5)
  .fill({})
  .map(
    (c: Contact, i: number) =>
      ({
        id: i,
        name: `Contact ${i}`,
        email: `email${i}@provider.com`,
        avatarUrl: `https://api.adorable.io/avatars/100/${~~(Math.random() * 100)}`,
      } as Contact),
  )
  .reverse(); // * to have them sorted in DESC order
ℹ️ adorable io是一个很棒的公共 API,提供占位符头像。ℹ️
(~~两个按位非运算符)相当于 Math.floor :)
一旦完成,实现list.component.ts应该看起来像这样:
@Component({
  selector: 'app-list',
  templateUrl: './list.component.html',
  styleUrls: ['./list.component.scss'],
})
export class ListComponent {
  contactList: Contact[] = CONTACTS_MOCK;
  selectedContact: Contact;

  onSelectItem(contact: Contact) {
    // * selecting a contact to focus on
    this.selectedContact = contact ? { ...contact } : null;
  }

  onAddItem() {
    const rndNum = Date.now();
    const newContact: Contact = {
      id: this.contactList.length * rndNum,
      name: `Contact ${this.contactList.length}`,
      email: `email${this.contactList.length}@provider.com`,
      avatarUrl: `https://api.adorable.io/avatars/285/${rndNum}`,
    };
    // * adding a new contact to the list
    this.contactList = [newContact, ...this.contactList];
    // * selecting the newly created contact
    this.onSelectItem(newContact);
  }

  onDeleteItem(contact: Contact) {
    // * removing a contact from the list
    this.contactList = this.contactList.filter(c => c.id != contact.id);
    if (this.selectedContact && this.selectedContact.id == contact.id) {
      // * if the removed contact is beaing focused on, then we remove the focus
      this.onSelectItem(null);
    }
  }
}
HTML 文件:
<!-- * side list -->
<aside class="side-list">
  <!-- * side list toolbar -->
  <div class="side-list-toolbar">
    <span class="title">Contacts</span>
    <button class="btn" (click)="onAddItem()">Add</button>
  </div>
  <!-- * side list items-->
  <div class="side-list-items">
    <div
      class="side-list-item"
      *ngFor="let contact of contactList; trackBy: contact?.id"
      [ngClass]="{ 'side-list-item-selected': contact.id == selectedContact?.id }"
      (click)="onSelectItem(contact)"
    >
      <div class="side-list-item-avatar">
        <img [src]="contact.avatarUrl" loading="lazy" alt="profile picture" />
      </div>
      <div class="side-list-item-info">
        <p class="side-list-item-info-name">{{ contact.name }}</p>
        <p class="side-list-item-info-email">{{ contact.email }}</p>
      </div>
    </div>
  </div>
</aside>
<!-- * content wrapper -->
<section class="side-list-content">
  <!-- * content -->
  <div class="side-list-content-data" *ngIf="!!selectedContact">
    <div class="side-list-content-data-inner">
      <div class="side-list-content-data-overview">
        <div class="side-list-content-data-overview-info">
          <h3>{{ selectedContact.name }}</h3>
          <span>{{ selectedContact.email }}</span>
        </div>
        <div class="side-list-content-data-overview-avatar">
          <img [src]="selectedContact.avatarUrl" loading="lazy" alt="profile picture" />
        </div>
      </div>
      <div class="side-list-content-data-separator">
        <h4>Overview</h4>
        <div>
          <button class="btn danger outline" (click)="onDeleteItem(selectedContact)">
            Delete
          </button>
        </div>
      </div>
      <p>Lorem</p>
    </div>
  </div>
  <!-- * empty selection -->
  <div class="side-list-content-empty" *ngIf="!selectedContact">
    <div>
      <img alt="empty-selection" loading="lazy" src="https://img.icons8.com/ios/100/000000/nui2.png" />
      <p>Select an item from the list.</p>
    </div>
  </div>
</section>
现在,让我们快速复制一些 CSS,使我们的组件看起来漂亮:
太好了,我们已经准备好处理动画了!
3. 动画
列表元素的动画
首先,我们先来看一下列表元素的添加和隐藏动画。目前我们有这样的动画:
我们想要的是这个(关注左侧的列表):
在组件文件中,我们需要导入动画函数,并在@Component()装饰器中添加一个名为 animations: 的元数据属性:
import { animate, style, group, query, transition, trigger } from '@angular/animations';

@Component({
  selector: 'app-root',
  templateUrl: 'app.component.html',
  styleUrls: ['app.component.css'],
  animations: [
    // we will implement the animations here
  ]
})
让我们看看这里将使用的动画 API:
| 功能 | 它起什么作用? |
|---|---|
| 扳机() | 启动动画并作为所有其他动画函数调用的容器。HTML 模板绑定到触发器名称 (triggerName)。使用第一个参数声明唯一的触发器名称。 |
| 过渡() | 定义两个命名状态之间的动画序列。特殊值:enter,并:leave在进入和退出状态时启动过渡 |
| 风格() | 定义一个或多个用于动画的 CSS 样式。控制动画期间 HTML 元素的视觉外观。 |
| 动画() | 指定过渡的时序信息。delay 和 easing 的值为可选值。其中可以包含 style() 调用。 |
| 团体() | 指定一组要并行运行的动画步骤(内部动画)。动画仅在所有内部动画步骤完成后才会继续。 |
我们将使用trigger()将动画绑定到一个动画名称,我们将其命名为“listItemAnimation”。然后,我们将使用 和 定义添加和抑制的动画序列transition(':enter')。transition(':leave')之后,我们将使用 定义起始样式style(),最后我们将使用 来设置高度动画animate()。
它看起来应该是这样的:
animations: [
   trigger('listItemAnimation', [
      transition(':enter', [
        style({ height: '0px', overflow: 'hidden' }),
        group([animate('250ms ease-out', style({ height: '!' }))]),
// although group is useless here (since we have only one animation)
// i like to leave it anyway just in case i want to add another
// parallel animation in the future
      ]),
      transition(':leave', [
        style({ height: '!', overflow: 'hidden' }),
        group([animate('250ms ease-out', style({ height: '0px' }))]),
      ]),
    ]),
]
ℹ️'!'是一个用于自动样式的特殊标记,其中样式源自正在动画的元素,并在动画启动时应用于动画。简而言之,它是动画应用之前的状态。
现在我们已经实现了动画,让我们将它绑定到 HTML 元素。添加@listItemAnimation到“side-list-item”元素:
    <div
      class="side-list-item"
      @listItemAnimation
      ...
    >
...
</div>
太棒了,我们快完成了,我们的联系人列表已经动画化了💪!
附言:如果您想在第一次打印时禁用此动画,则需要在父元素(列表元素)中添加一个:enter类似的空动画。当您将动画放置在组件上时,它会在触发时禁用其所有子动画。trigger('noEnterAnimation', [transition(':enter', [])]):enter:enter
动画内容
内容动画稍微有点棘手。如果我们从左到右对内容容器进行动画处理,我们有两个选择:要么调整宽度,要么平移元素。可惜的是,这两种方案都行不通。如果我们调整宽度,就会得到这样的效果:
随着宽度增加,内容也出现了,但感觉不对,因为内容没有从左向右滑动。为了解决这个问题,我们可以尝试将内容从左向右平移,但请看会发生什么:
它会产生一个闪烁效果(空的选择组件),因为当我们平移内容元素时,我们没有为其宽度设置动画,所以它会在眨眼间从当前值变为 0。因此,解决方案是,我们必须在为宽度设置动画的同时平移内容。
在下图中,我们有一个黑色的外部容器和蓝色的内部容器:

因此,我们将在平移蓝色容器的同时,对黑色容器的宽度进行动画处理。看起来应该像这样:

为此,我们需要为内容元素(黑色容器:“side-list-content-data”)及其子元素(蓝色容器:“side-list-content-data-inner”)添加动画。为此,我们需要使用另一个 Angular 动画 API:
| 功能 | 它起什么作用? |
|---|---|
| 询问() | 用于查找当前元素内的一个或多个内部 HTML 元素。 |
在该 API 的帮助下,实现应该如下所示:
   trigger('sideContentAnimation', [
      transition(':enter', [
        // we set the width of the outer container to 0, and hide the
        // overflow (so the inner container won't be visible)
        style({ width: '0px', overflow: 'hidden' }),
        group([
          // we animate the outer container width to it's original value
          animate('250ms ease-out', style({ width: '!' })),
          // in the same time we translate the inner element all the
          // way from left to right
          query('.side-list-content-data-inner', [
            style({ transform: 'translateX(-110%)' }),
            group([animate('250ms ease-out', style({ transform: 'translateX(-0%)' }))]),
          ]),
        ]),
      ]),
      transition(':leave', [
        style({ overflow: 'hidden' }),
        group([
          animate('250ms ease-out', style({ width: '0' })),
          query('.side-list-content-data-inner', [
            style({ transform: 'translateX(-0%)' }),
            group([animate('250ms ease-out', style({ transform: 'translateX(-110%)' }))]),
          ]),
        ]),
      ]),
    ])
您可以在此处找到完整的源文件。
使用动画更新的 HTML 文件sideContentAnimation:
  <!-- * content -->
  <div
      class="side-list-content-data"
      *ngIf="!!selectedContact"
      @sideContentAnimation
  >
  ...
  </div>
就是这样,我们已经完成了所需的行为,并且我们学习了如何使用 Angular 动画 API 来制作这些相当复杂的动画。
结论
总而言之,我们学习了如何使用trigger()来定义动画名称,然后我们用它transition()来定义不同状态之间的动画(例如:enter和:leave)。之后,我们用它来style()定义动画开始时的样式,我们用它来animate()更改样式,我们还了解了如何使用 来同时执行多个动画group()。最后,我们用它来query()将动画附加到我们正在动画的子元素上。
希望你喜欢这篇文章,我们下期再见。祝你
编程愉快!
这篇文章就到这里。希望你喜欢。如果喜欢,请分享给你的朋友和同事。你也可以在 Twitter 上关注我@theAngularGuy,这会对我有很大帮助。
祝你有美好的一天 !