使用 Javascript 编写日历插件
介绍
说到 JavaScript,我们经常会想到库和框架。如今,JavaScript 的使用方法五花八门,数不胜数。然而,我们常常忘记,即使没有框架或库,我们仍然可以使用经典的 JavaScript。在本文中,我们将只使用原生 JavaScript 构建一个插件。这个插件非常简单,可以在 HTML 页面中添加日历。
设置
我们需要三个文件:一个 HTML 文件、一个 CSS 文件和一个 JavaScript 文件。我们先从 JavaScript 文件开始,因为这是我们工作最多的地方。
插件骨架
(function (root, factory) {
  root.myCalendar = factory(root);
})(this, (root) => {
  let privateVar = "No, No, No...";
  let init = () => {
    console.log("Init the calendar");
  };
  return {
    init,
  };
});
我们要做的第一件事就是让我们的插件在我们的环境中可用。我们使用 IIFE(立即调用函数表达式)来实现这一点。如你所见,我们将第一个函数括在括号中,使其成为一个可以立即调用的表达式。
IIFE 对于封装代码非常有用。我的插件代码将无法从插件外部访问。我们稍后再讨论这一点。
让我们稍微分解一下上面的代码:
在我们的函数主体中我们执行以下操作:
root.myCalendar = factory(root);
root是什么?这是我们 IIFE 的第一个参数,也就是 this。所以,在浏览器中, this 就是window对象。我们将window.myCalendar设置为factory(root)。我们的 IIFE 的第二个参数factory是一个函数。这实际上就是我们的插件内容。
这种方法的妙处在于,window.myCalendar只会包含我的函数返回的内容。因此,我可以调用window.myCalendar.init(),但window.myCalendar.privateVar将是未定义的,因为它不是由我们的 IIFE 返回的。
导入我们的index.html
我们已经有一个插件了!它功能不多,但很管用。让我们创建一个 HTML 文件来测试一下。
<html>
  <head>
    <script src="simple-calendar.js"></script>
    <script>
      window.onload = function () {
        myCalendar.init();
        console.log(myCalendar.privateVar);
      };
    </script>
  </head>
  <body></body>
</html>
我们加载 JavaScript 文件。我将其命名为simple-calendar.js,但您可以随意命名。然后,在窗口加载完成后,在onload事件监听器中,调用myCalendar.init()并在 console.log 中记录myCalendar.privateVar变量。
注意: window.myCalendar和myCalendar在这里是相同的;)
以下是我在控制台中看到的内容:

太棒了!init函数打印出了我们预期的内容,而 privateVar 确实是undefined,因为它不是从我们的 IIFE 返回的,所以我们的插件不知道你在说什么!
CSS
我们先把这个问题解决掉,因为这不是本文的重点。创建一个 CSS 文件,并在其中添加以下样式:
#calendar {
  background: #fff;
  border-radius: 4px;
  color: #222629;
  overflow: hidden;
  margin-top: 20px;
  max-width: 400px;
}

#calendar.hidden {
  display: none;
}

button {
  border: none;
}

#calendar .header {
  background: #ddd;
  height: 40px;
  line-height: 40px;
  text-align: center;
}

#calendar .header + div {
  border: 1px solid black;
}

#calendar .month {
  display: inline-block;
  font-weight: bold;
}

#calendar button {
  background: none;
  color: inherit;
  cursor: pointer;
  font-size: 23px;
  font-weight: bold;
  height: 100%;
  padding: 0 15px;
}

#calendar button:first-child {
  float: left;
}

#calendar button:last-child {
  float: right;
}

#calendar .cell {
  background: #fff;
  color: #5d5d5d;
  box-sizing: border-box;
  display: inline-block;
  padding: 10px 0;
  text-align: center;
  width: calc(100% / 7);
  cursor: pointer;
}

#calendar .cell:hover {
  color: white;
  background-color: blue;
}

#calendar .day {
  font-size: 0.8rem;
  padding: 8px 0;
}

#calendar .cell.today {
  background-color: blue;
  color: white;
}

#calendar .day {
  color: black;
}
别忘了把它导入到我们的 HTML 文件中。在<head>页面的末尾,添加以下代码:
<link rel="stylesheet" href="calendar.css" />
当然,用您的文件名称替换calendar.css 。
添加功能
好的,它非常可爱,但是我的插件在这里仍然没有做任何事情......让我们开始吧。
月份、日期和今天
我首先需要获取月份列表、日期列表和今天的日期。我希望我的日历默认显示今天的日期。因此,在我们的插件中,在私有变量上方,添加以下内容:
// Beginning of the file cut for brevity
    let monthList = new Array(
      "january",
      "february",
      "march",
      "april",
      "may",
      "june",
      "july",
      "august",
      "september",
      "october",
      "november",
      "december"
    );
    let dayList = new Array(
      "sunday",
      "monday",
      "tuesday",
      "wednesday",
      "thursday",
      "friday",
      "saturday"
    );
    let today = new Date();
    today.setHours(0, 0, 0, 0);
    let privateVar = "No, No, No...";

  let init = () => {
    console.log("Init the calendar");
  };
  return {
    init,
  };
});
好,一切设置完毕。现在,我们可以开始修改 DOM 来实现日历了。显然,这一步需要在init函数中完成。我们希望在初始化插件时就能显示日历。
我们需要做几件事:
-
创建一个包含当前月份和年份名称的标题。此标题还应包含“下一页”和“上一页”按钮,用于在月份之间导航。
-
标题下方是日期列表,从星期日到星期一。
-
最后,我们将得到当前月份的天数。
标题
// Our variables are up there
let init = () => {
  let element = document.getElementById("calendar");

  let currentMonth = new Date(today.getFullYear(), today.getMonth(), 1);

  // Creating the div for our calendar's header
  let header = document.createElement("div");
  header.classList.add("header");
  element.appendChild(header);

  // Our "previous" button
  let previousButton = document.createElement("button");
  previousButton.setAttribute("data-action", "-1");
  previousButton.textContent = "\u003c";
  header.appendChild(previousButton);

  // Creating the div that will contain the actual month/year
  let monthDiv = document.createElement("div");
  monthDiv.classList.add("month");
  header.appendChild(monthDiv);

  // Our "next" button
  let nextButton = document.createElement("button");
  nextButton.setAttribute("data-action", "1");
  nextButton.textContent = "\u003e";
  header.appendChild(nextButton);
};
这里我们只用 JavaScript 添加了一些元素。我们没有使用任何花哨的 JavaScript API,只是使用了createElement、appendChild和setAttribute等经典的 JavaScript API 。我们创建了标题栏的 div 元素,用于包含当前月份的名称。我们还创建了上一个和下一个按钮。
请注意这一行:
let element = document.getElementById("calendar");
这个元素将包含我们的日历。我们把它放在一个 id 为calendar 的元素中。这是我做的选择,但我们稍后会让它可自定义。但这意味着我们需要在 HTML 中添加一个具有正确 id 的元素:
<!-- The <head> tag is up there-->
<body>
  <div id="calendar"></div>
</body>
HTML 代码就是这样。果然,我们可以在页面中看到 header 了。

我们继续前进吧!
添加日期列表和月份单元格
现在,让我们添加包含当前月份日期的单元格。我们需要注意的是:月初的“空”日期。我们的一周从星期日开始,但如果月份从星期三开始,我们就需要填充一些空单元格。
为了清楚起见,我将把这个逻辑放在它自己的方法中。
// This is inside the init function, right before the end of the function

 // Creating the div that will contain the days of our calendar
    let content = document.createElement("div");
    element.appendChild(content);

    // Load current month
    // monthDiv is the element in the header that will contain the month's name
    // content is the element that will contain our days' cells
    // We created those variables earlier in the function
    loadMonth(currentMonth, content, monthDiv);
    } // <- this is the end of the init function

  let loadMonth = (date, content, monthDiv) => {
    // Empty the calendar
    content.textContent = "";

    // Adding the month/year displayed
    monthDiv.textContent =
      monthList[date.getMonth()].toUpperCase() + " " + date.getFullYear();

    // Creating the cells containing the days of the week
    // I've created a separate method for this
    createDaysNamesCells(content);

    // Creating empty cells if necessary
    createEmptyCellsIfNecessary(content, date);


    // Number of days in the current month
    let monthLength = new Date(
      date.getFullYear(),
      date.getMonth() + 1,
      0
    ).getDate();

    // Creating the cells containing current's month's days
    for (let i = 1; i <= monthLength; i++) {
      let cell = document.createElement("span");
      cell.classList.add("cell");
      cell.textContent = `${i}`;
      content.appendChild(cell);

      // Cell's timestamp
      let timestamp = new Date(
        date.getFullYear(),
        date.getMonth(),
        i
      ).getTime();
      cell.addEventListener("click", () => {
        console.log(timestamp);
        console.log(new Date(timestamp))
      });

      // Add a special class for today
      if (timestamp === today.getTime()) {
        cell.classList.add("today");
      }
    }
  }

  let createDaysNamesCells = (content) => {
    for (let i = 0; i < dayList.length; i++) {
      let cell = document.createElement("span");
      cell.classList.add("cell");
      cell.classList.add("day");
      cell.textContent = dayList[i].substring(0, 3).toUpperCase();
      content.appendChild(cell);
    }
  };

  let createEmptyCellsIfNecessary = content => {
    for (let i = 0; i < date.getDay(); i++) {
      let cell = document.createElement("span");
      cell.classList.add("cell");
      cell.classList.add("empty");
      content.appendChild(cell);
    }
  }

  // The rest of the plugin down here, cut for brevity
这里发生了很多事!
-
我们首先调用loadMonth。此函数负责在标题中显示当前月份和当前年份的名称。
-
然后我们调用createDaysNamesCells来显示周日到周六的列表。
-
如果需要,我们调用createEmptyCellsIfNecessary来显示空单元格。我们将date变量赋给该函数,该变量代表当前月份的第一天。通过对该变量调用getDay()函数,我们可以获取日期的索引。由于日期从星期日开始,就像日历中的星期一样,所以我们可以执行一个简单的循环来渲染所需的空单元格数量。
-
最后,我们获取该月的天数,并在每个单元格中显示正确的日期。我们在每个单元格上添加了一个事件监听器,用于在控制台中打印所选日期的时间戳和日期。我们还为当前日期添加了一个类,该类将使用 CSS 进行样式设置。
这是目前的结果!
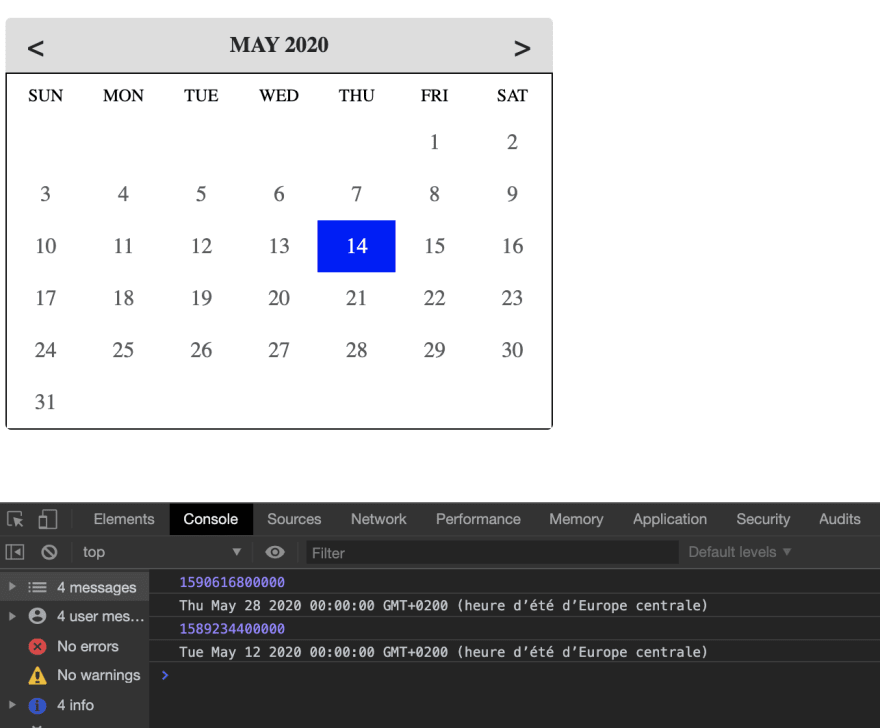
日历已正确呈现,当我们单击日期时,我们会在控制台中看到时间戳和我们单击的单元格的日期。
添加交互性
我们需要添加三件事:
- 当我点击某个日期时,它就变成选定的日期。
- 当我单击上一个按钮时,我们会转到上一个月。
- 当我点击下一步按钮时,我们进入下个月。
对于第一项,我们需要将“today”类添加到正确的单元格。我们还需要从之前选定的单元格中删除“today”类。 “today”是我选择的类名,但您可以随意命名。您只需适当地更新代码即可。导航到我们将时间戳和日期打印到控制台的位置,并将代码更改为:
cell.addEventListener("click", () => {
  console.log(timestamp);
  console.log(new Date(timestamp));
  document.querySelector(".cell.today")?.classList.remove("today");
  cell.classList.add("today");
});
这将正确设置您选择的单元格的样式。
最后,我们将添加下一个/上一个月的功能:
//Inside the init function

// Next/previous button functionality
element.querySelectorAll("button").forEach((element) => {
  element.addEventListener("click", () => {
    currentMonth.setMonth(
      currentMonth.getMonth() * 1 +
        parseInt(element.getAttribute("data-action")) * 1
    );
    loadMonth(currentMonth, content, monthDiv);
  });
});
我们为每个按钮添加一个事件监听器。我们将使用之前创建的data-action属性来判断我们点击的是“下一个”按钮还是“上一个”按钮。data -action 的值要么为 1,要么为 -1。我们修改 currentMonth 变量并再次调用loadMonth 函数,因为我们需要更新日历的内容。
并且它有效!
恭喜,您刚刚创建了一个 Javascript 插件!
以下是完整的 Javascript 代码:
(function (root, factory) {
  root.myCalendar = factory(root);
})(this, (root) => {
  let monthList = new Array(
    "january",
    "february",
    "march",
    "april",
    "may",
    "june",
    "july",
    "august",
    "september",
    "october",
    "november",
    "december"
  );
  let dayList = new Array(
    "sunday",
    "monday",
    "tuesday",
    "wednesday",
    "thursday",
    "friday",
    "saturday"
  );
  let today = new Date();
  today.setHours(0, 0, 0, 0);
  let privateVar = "No, No, No...";

  let init = () => {
    let element = document.getElementById("calendar");

    let currentMonth = new Date(today.getFullYear(), today.getMonth(), 1);

    // Creating the div for our calendar's header
    let header = document.createElement("div");
    header.classList.add("header");
    element.appendChild(header);

    // Creating the div that will contain the days of our calendar
    let content = document.createElement("div");
    element.appendChild(content);

    // Our "previous" button
    let previousButton = document.createElement("button");
    previousButton.setAttribute("data-action", "-1");
    previousButton.textContent = "\u003c";
    header.appendChild(previousButton);

    // Creating the div that will contain the actual month/year
    let monthDiv = document.createElement("div");
    monthDiv.classList.add("month");
    header.appendChild(monthDiv);

    // Our "next" button
    let nextButton = document.createElement("button");
    nextButton.setAttribute("data-action", "1");
    nextButton.textContent = "\u003e";
    header.appendChild(nextButton);

    // Next/previous button functionality
    element.querySelectorAll("button").forEach((element) => {
      element.addEventListener("click", () => {
        console.log(element.getAttribute("data-action"));
        currentMonth.setMonth(
          currentMonth.getMonth() * 1 +
            parseInt(element.getAttribute("data-action")) * 1
        );
        loadMonth(currentMonth, content, monthDiv);
      });
    });

    // Load current month
    loadMonth(currentMonth, content, monthDiv);
  };

  let createDaysNamesCells = (content) => {
    for (let i = 0; i < dayList.length; i++) {
      let cell = document.createElement("span");
      cell.classList.add("cell");
      cell.classList.add("day");
      cell.textContent = dayList[i].substring(0, 3).toUpperCase();
      content.appendChild(cell);
    }
  };

  let createEmptyCellsIfNecessary = (content, date) => {
    for (let i = 0; i < date.getDay(); i++) {
      let cell = document.createElement("span");
      cell.classList.add("cell");
      cell.classList.add("empty");
      content.appendChild(cell);
    }
  };

  let loadMonth = (date, content, monthDiv) => {
    // Empty the calendar
    content.textContent = "";

    // Adding the month/year displayed
    monthDiv.textContent =
      monthList[date.getMonth()].toUpperCase() + " " + date.getFullYear();

    // Creating the cells containing the days of the week
    createDaysNamesCells(content);

    // Creating empty cells if necessary
    createEmptyCellsIfNecessary(content, date);

    // Number of days in the current month
    let monthLength = new Date(
      date.getFullYear(),
      date.getMonth() + 1,
      0
    ).getDate();

    // Creating the cells containing current's month's days
    for (let i = 1; i <= monthLength; i++) {
      let cell = document.createElement("span");
      cell.classList.add("cell");
      cell.textContent = `${i}`;
      content.appendChild(cell);

      // Cell's timestamp
      let timestamp = new Date(
        date.getFullYear(),
        date.getMonth(),
        i
      ).getTime();
      cell.addEventListener("click", () => {
        console.log(timestamp);
        console.log(new Date(timestamp));

        document.querySelector(".cell.today")?.classList.remove("today");
        cell.classList.add("today");
      });

      // Add a special class for today
      if (timestamp === today.getTime()) {
        cell.classList.add("today");
      }
    }
  };
  return {
    init,
  };
});
玩得开心❤️
鏂囩珷鏉ユ簮锛�https://dev.to/damcosset/write-a-calendar-plugin-with-javascript-kk3