React Virtual Window - 虚拟化一切以提高性能!
TLDR;
我创建了一个新的 React Virtual Window 组件,它可以虚拟化列表和任何 React 子组件。本文将介绍它的工作原理。
请查看演示来检查一下。
如果您只是想使用它那么:
你可以从 npm 安装它
npm i virtual-window
并导入它
import { VirtualWindow } from 'virtual-window'
并使用它:
function MyComponent({list}) {
    return <VirtualWindow>
      <MyComponent1/>
      {list.map(l=><SomeComponent key={l.id} data={l} />)}
      <MyLastComponent/>
   </VirtualWindow>

}
或者在列表中提供要渲染的项目
function MyOtherComponent({list}) {
   return <VirtualWindow pass="data" list={list} item={<SomeComponent/>}/>
}
介绍
我最近写了一篇关于如何<Repeat/>为 React 制作一个组件的文章,它允许你构建包含重复元素的组件,而不会因为布局混乱而造成混乱{x.map(()=>...)}。虽然这个概念很有用,可以减轻理解组件带来的疲劳,但它实际上只是“糖衣炮弹”。
“ ” 的真正威力<Repeat/>在于,通过虚拟化,你可以使用它来启用非常庞大的列表,而不会降低 React 的速度。换句话说,只需渲染列表中那些为了屏幕完整而必须渲染的部分,而不必担心其他 80 万个会严重拖慢 React 速度的项目:)
市面上有很多虚拟列表开源项目(包括我自己做的一个!)然而,它们要么缺少我需要的功能,要么就是“黑盒子”。所以,我想是时候重新审视一下它的原理,看看能否制作一个更小、更强大、更简单的版本,以满足我在许多项目中发现的一系列需求。最终的版本足够简洁,我可以在一篇开发博文中详细描述,这真是个意外的惊喜——我之前的版本可不会这么做!我还认为,完成这个项目的过程有助于揭开 React 的神秘面纱,以及你可以用它构建哪些类型的组件。
所有代码均使用“Unlicense”许可证,属于公共领域(通常比文件中的源代码更长,哈哈!)
要求
以下是虚拟窗口的要求
- 创建一个可以渲染非常大的数组的虚拟列表,让用户感觉好像“没有什么特别的事情发生”
- 创建一个虚拟列表,不需要数组,而是通过指定
totalCount并使用渲染的组件来检索必要的信息 - 自动调整大小以适应父容器,无需指定固定高度
- 渲染不同高度的项目
- 渲染可以改变高度的项目
- 渲染任意一组 React 子组件,以便任何东西都可以在其上放置一个“窗口”
- 通过事件提供项目可见性以实现无限滚动
最终解决方案的演示
在我们深入构建这个解决方案之前,让我们先快速看一下我们将要实现什么。
具有可变高度的虚拟项目数组,每个项目都可以改变高度。
export const items = Array.from({ length: 2000 }, (_, i) => ({
  content: i,
  color: randomColor()
}))

export function Route1() {
  const classes = useStyles()

  return (
    <div className="App">
      <div className={classes.virtualBox}>
        <VirtualWindow list={items} item={<DummyItem />} />
      </div>
    </div>
  )
}
使用总数的虚拟列表。
export function Route3() {
  const classes = useStyles()

  return (
    <div className="App">
      <div className={classes.virtualBox}>
        <VirtualWindow
          totalCount={1500000}
          item={<VirtualItem />}
        />
      </div>
    </div>
  )
}
一组任意 React 组件上的虚拟窗口。
export function Route2() {
  const classes = useStyles()

  return (
    <div className="App">
      <div className={classes.virtualBox}>
        <VirtualWindow overscan={3}>
          <DummyUser />
          <DummyUser />
          <DummyUser />
          <Buttons />
          <DummyUser />
          <DummyUser />
          <DummyUser />
          <DummyUser />
          <Buttons />
          <DummyUser />
          <Buttons />
          <DummyUser />
          <Buttons />
          <DummyUser />
          <DummyUser />
          <DummyUser />
          <Buttons />
        </VirtualWindow>
      </div>
    </div>
  )
}
使用VirtualWindow
您可以随意使用 VirtualWindow,方法是从 GitHub repo 获取代码或使用以下方式:
npm i virtual-window
然后
import { VirtualWindow } from 'virtual-window'
项目
让我们首先简要描述一下我们的目标:我们将制作一个大的滚动区域,其大小适合我们所有的内容,并且我们只安装当前可见的内容,从而显著减少 React 渲染 UI 所需的时间。
基本选择
使用 JSX.Elements
以下代码调用是一种常见的误解MyComponent():
return <MyComponent key="someKey" some="prop"/>
这不会MyComponent()立即调用。它会创建一个虚拟 DOM 节点,该节点包含对MyComponent函数、props、key 等的引用。React 会MyComponent()在认为需要时调用:例如,props 发生了变化,找不到具有该 key 的现有已挂载组件等。React 会在需要渲染项目时执行此操作,因为虚拟 DOM 节点是另一个正在渲染的已挂载项目的子节点,因为它的钩子发生了变化,或者因为它是使用类似 挂载的组件树的根ReactDom.render()。
在我们的代码中,我们会频繁创建虚拟 DOM 节点,让它们一直存在并使用它们的 props。这样做完全没问题,React 并非魔法,“React 就是 JavaScript”,我们会充分利用这一点。
使用普通滚动 div
我们希望为用户提供一个标准的滚动界面,一个<div/>带有标准滚动条的标准界面。我们不想传递任何不稳定的滚动事件或鼠标点击事件,所以我们渲染的项目必须是滚动项目的子项(相关图表即将发布)。
项目第一阶段:固定高度虚拟列表
我们将分阶段进行,以便您更好地理解这些原理,避免在理解核心之前被与可变高度项目相关的更复杂的代码所困扰。为此,我们项目的第一阶段将构建一个高度相同的虚拟项目列表,然后在第二阶段对其进行调整,创建一个可变高度版本。
这是 React 中的一个标准滚动 div:
即使某些项目不在屏幕上,它们仍然会被渲染到 DOM,只是不可见而已。
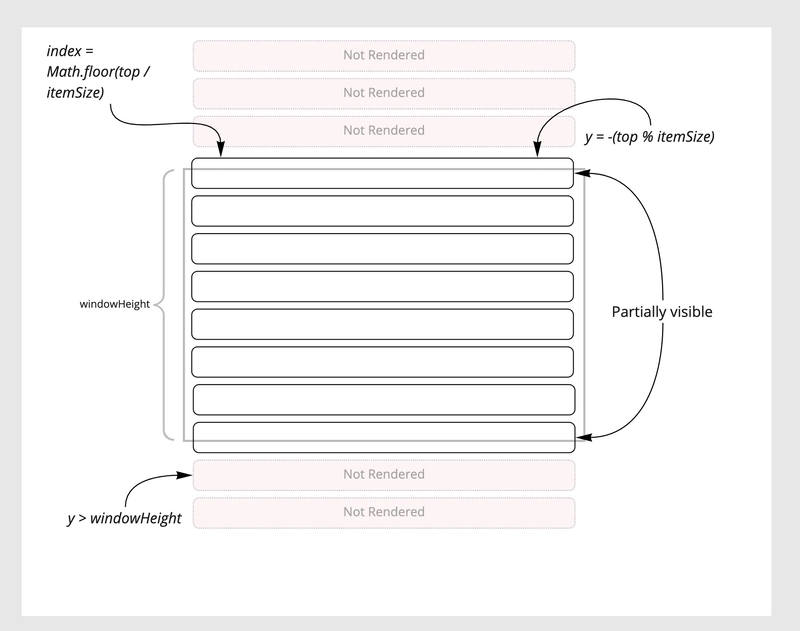
我们已经声明我们只想渲染可见项目,因此我们需要做的是找出第一个可见项目,将其渲染到正确的位置,然后继续,直到我们超出可见窗口。
推断渲染项最简单的方法是使用相对于屏幕视图的相对坐标。例如,可见窗口的顶部为 0。
对于固定大小的项目,我们知道滚动区域的总长度(以像素为单位)为 ,totalHeight = totalCount * itemSize并且如果我们滚动到位置,top则第一个部分或完全可见的项目是Math.floor(top / itemSize)。该项目距离屏幕顶部的距离是-(top % itemSize)。
视图的结构
现在让我们讨论如何构建构成组件的元素。
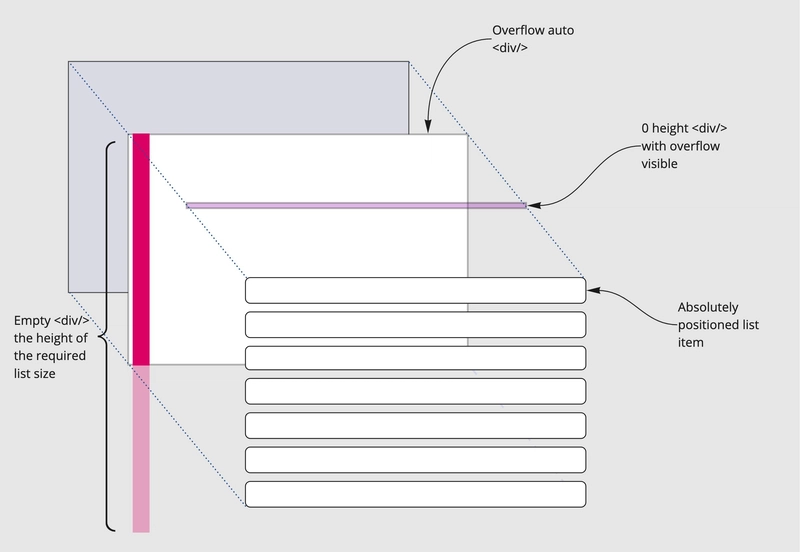
首先,我们需要一个位于底部的滚动容器,在其中我们需要一个<div/>指定滚动条高度的容器 - 因此它将是itemSize * totalCount像素高的。
我们需要另一个<div/>来包含虚拟项目。我们不想让它影响滚动条的高度——所以它会是 ,height: 0但也会是overflow: visible。这样,唯一控制scrollHeight滚动元素 的就是我们空的<div/>。
我们将以绝对坐标定位正在滚动的虚拟元素。
这个height: 0div非常重要,否则当我们用负片绘制虚拟物品时,top它会影响包含元素的大小。
我们希望将渲染项目的顶部设为 0,因为这样数学计算起来更容易,但事实上,因为它height: 0 <div/>是滚动条的子项,它也会被滚动 - 所以我们最终必须在计算结束时将其偏移量加回。
VirtualFixedRepeat 步骤
以下是我们创建固定虚拟重复所需的步骤。
- 测量容器的可用高度
- 创建一个可滚动的
<div/>作为我们的外部包装器 - 创建固定大小的空
<div/>,设置包装器内的滚动高度 - 创建
height: 0<div/>包含包装器内显示给用户的项目的 scrollTop根据包装纸将实物画在正确的位置- 当包装器滚动时,重新绘制新位置的项目
VirtualFixedRepeat 代码
现在是时候进行一些编码了,让我们看看第一部分所需的实用程序。
- 测量某物的尺寸
- 知道什么时候滚动了
使用观察者/使用测量
我们将通过编写两个钩子来帮助我们测量事物来开始我们的编码之旅,我们需要为最终的解决方案测量很多东西,但在这里我们只需要测量可用空间。
为了测量我们可以使用的东西ResizeObserver,如果您需要支持该堆栈,它具有适用于 IE11 的 polyfill。ResizeObserver允许我们提供一个 DOM 元素并接收其尺寸的初始通知给回调,当尺寸发生变化时,回调也会收到通知。
为了管理实例的生命周期ResizeObserver,我们创建了一个useObserver钩子。在这个钩子中,我们将 ResizeObserver 实例包装到useEffect钩子中。这样做还可以简化回调中的数据
import { useCallback, useEffect, useMemo } from "react"

export function useObserver(measure, deps = []) {
  const _measure = useCallback(measureFirstItem, [measure, ...deps])
  const observer = useMemo(() => new ResizeObserver(_measure), [
    _measure,
    ...deps
  ])
  useEffect(() => {
    return () => {
      observer.disconnect()
    }
  }, [observer])
  return observer

  function measureFirstItem(entries) {
    if (!entries?.length) return
    measure(entries[0])
  }
}
我们为 useObserver 提供一个函数,该函数将通过测量值和可选的附加依赖项数组进行回调,然后我们使用useMemo和useEffect模式立即创建一个实例,然后释放任何先前创建的实例。
注意 内部的闭包
useEffect(),我们返回的“unmount”函数会覆盖 的先前值observer,这是很自然的事情之一,但第一次需要一点思考。useEffect当观察者发生变化时运行,它返回一个引用 的函数。此时observer的值被嵌入到闭包中。observer
现在我们有了一个观察者,我们可以编写一个钩子来测量事物。这个钩子需要返回某个对象的大小,ref并附加到我们要测量的对象上。
import { useCallback, useState, useRef } from "react"
import { useObserver } from "./useObserver"

export function useMeasurement() {
  const measure = useCallback(measureItem, [])
  const observer = useObserver(measure, [])
  const currentTarget = useRef(null)
  // a ref is just a function that is called
  // by React when an element is mounted
  // we use this to create an attach method
  // that immediately observes the size
  // of the reference
  const attach = useCallback(
    function attach(target) {
      if (!target) return
      currentTarget.current = target
      observer.observe(target)
    },
    [observer]
  )
  const [size, setSize] = useState({})

  // Return the size, the attach ref and the current
  // element attached to
  return [size, attach, currentTarget.current]

  function measureItem({ contentRect, target }) {
    if (contentRect.height > 0) {
      updateSize(target, contentRect)
    }
  }
  function updateSize(target, rect) {
    setSize({
      width: Math.ceil(rect.width),
      height: Math.ceil(rect.height),
      element: target
    })
  }
}
为了让我们能够测量我们喜欢的东西,返回数组的第二个元素是一个函数,我们将其作为 传递给被测量项ref={}。ref 是一个使用某个对象的当前值回调的函数——所以useRef()通常情况下,它返回一个函数,当被调用时,该函数会更新 的值someRef.current。
我们现在可以测量如下内容:
function MyComponent() {
    const [size, attach] = useMeasurement()
    return <div ref={attach}>
        The height of this div is {size.height ?? "unknown"} pixels
    </div>
}
useScroll 钩子
对于固定尺寸的版本,我们只需要测量将要滚动的内容,因此我们制作一个将所有这些结合在一起的钩子:useScroll
import { useEffect, useRef, useState } from "react"
import { useObserver } from "./useObserver"
import _ from "./scope"

const AVOID_DIVIDE_BY_ZERO = 0.001

export function useScroll(whenScrolled) {
  const observer = useObserver(measure)
  const scrollCallback = useRef()
  scrollCallback.current = whenScrolled

  const [windowHeight, setWindowHeight] = useState(AVOID_DIVIDE_BY_ZERO)
  const scroller = useRef()
  useEffect(configure, [observer])
  return [scroller, windowHeight, scroller.current]

  function configure() {
    if (!scroller.current) return
    let observed = scroller.current
    observer.observe(observed)
    observed.addEventListener("scroll", handleScroll, { passive: true })
    return () => {
      observed.removeEventListener("scroll", handleScroll)
    }

    function handleScroll(event) {
      if (scrollCallback.current) {
        _(event.target)(_ => {
          scrollCallback.current({
            top: Math.floor(_.scrollTop),
            left: Math.floor(_.scrollLeft),
            height: _.scrollHeight,
            width: _.scrollWidth
          })
        })
      }
    }
  }

  function measure({ contentRect: { height } }) {
    setWindowHeight(height || AVOID_DIVIDE_BY_ZERO)
  }
}
useScroll 钩子会测量你附加到的元素,ref并为其添加一个滚动监听器。每当元素滚动时,监听器都会回调一个指定的函数。
整合
现在,我们已经掌握了渲染实际组件所需的固定虚拟列表的各个部分。我将这个组件分为四个阶段:
- 配置——设置必要的钩子等
- 计算——计算出我们要渲染的内容
- 通知 - 发送有关正在渲染的项目的任何事件
- 渲染——返回最终渲染的结构
我们的VirtualFixedRepeat签名如下:
export function VirtualFixedRepeat({
  list,
  totalCount = 0,
  className = "",
  itemSize = 36,
  item = <Simple />,
  onVisibleChanged = () => {},
  ...props
})
我们有一个组件来渲染每个列表条目item(可以回退到 Fragment 克隆,它不关心是否传递了额外的 props)。我们有list和项目总数——如果我们不提供 list,则必须提供totalCount。还有一个事件用于通知父级可见项目,当然还有项目的固定垂直大小!
附加内容props可以包括一个keyFn将被传递下来并用于为某些特殊情况下呈现的元素制定密钥。
配置
好的,这是列表的配置阶段:
// Configuration Phase

  const [{ top = 0 }, setScrollInfo] = useState({})

  const [scrollMonitor, windowHeight] = useScroll(setScrollInfo)

  totalCount = list ? list.length : totalCount
我们有一个用来保存当前滚动位置的状态top,并将其设置方法传递给一个useScroll钩子,该钩子返回要附加的引用scrollMonitor以及它所附加到的项的当前高度。我们将<div/>返回的值设置为 a flex=1,height=100%这样它就能填充其父级。
最后,如果有的话,我们会totalCount从中进行更新。list
计算
  // Calculation Phase

  let draw = useMemo(render, [
    top,
    props,
    totalCount,
    list,
    itemSize,
    windowHeight,
    item
  ])

  const totalHeight = itemSize * totalCount
我们将想要的项目渲染到一个名为的数组中,并根据提供的信息draw计算出空白的高度。<div/>
显然,大部分工作发生在render
  function render() {
    return renderItems({
      windowHeight,
      itemSize,
      totalCount,
      list,
      top,
      item,
      ...props
    })
  }
render 是一个闭包,调用一个全局函数renderItems
function renderItems({
  windowHeight,
  itemSize,
  totalCount,
  list,
  top,
  ...props
}) {
  if (windowHeight < 1) return []

  let draw = []

  for (
    let scan = Math.floor(top / itemSize), start = -(top % itemSize);
    scan < totalCount && start < windowHeight;
    scan++
  ) {
    const item = (
      <RenderItem
        {...props}
        top={start}
        offset={top}
        key={scan}
        index={scan}
        data={list ? list[scan] : undefined}
      />
    )
    start += itemSize

    draw.push(item)
  }
  return draw
}
好了,终于到了!我们按照前面的步骤计算出列表顶部元素和负偏移量,然后遍历列表,<RenderItem/>为每个元素添加实例。注意,我们传递了当前偏移量(如上所述),以确保我们能够正确处理滚动列表。
这里是RenderItem:
import { useMemo } from "react"
import { getKey } from "./getKey"

export function RenderItem({
  data,
  top,
  offset,
  item,
  keyFn = getKey,
  pass = "item",
  index
}) {
  const style = useMemo(
    () => ({
      top: top + offset,
      position: "absolute",
      width: "100%",
    }),
    [top, offset]
  )

  return (
      <div style={style}>
        <item.type
          key={data ? keyFn(data) || index : index}
          {...{ ...item.props, [pass]: data, index }}
        />
      </div>
    )
  )
}
好的,如果你读过我之前写的文章,你就会知道,这样做<SomeComponent/>会返回一个对象,该对象具有创建副本所需的.type所有.props必要条件。这就是我们在这里所做的。
我们创建一种样式(记忆以避免不必要的重绘),然后我们为每个列表条目创建一个我们想要绘制的模板项的实例,将当前索引和来自 prop 中的数组的任何数据传递给它,item除非我们向 传递了不同的名称VirtualFixedRepeat。
通知
回到 VirtualFixedRepeat 的主体,我们现在需要通知父级正在绘制的内容:
  //Notification Phase

  useVisibilityEvents()
我们有一个本地闭包钩子来发送事件:
  function useVisibilityEvents() {
    // Send visibility events
    const firstVisible = draw[0]
    const lastVisible = draw[draw.length - 1]
    useMemo(() => onVisibleChanged(firstVisible, lastVisible), [
      firstVisible,
      lastVisible
    ])
  }
它仅获取正在绘制的第一个和最后一个元素,并使用useMemo仅onVisibleChanged在它们改变时调用提供的父元素。
渲染
最后一步是渲染我们的组件结构:
  // Render Phase

  const style = useMemo(() => ({ height: totalHeight }), [totalHeight])

  return (
    <div ref={scrollMonitor} className={`vr-scroll-holder ${className}`}>
      <div style={style}>
        <div className="vr-items">{draw}</div>
      </div>
    </div>
  )
.vr-items {
  height: 0;
  overflow: visible;
}

.vr-scroll-holder {
  height: 100%;
  flex: 1;
  position: relative;
  overflow-y: auto;
}
整个 VirtualFixedRepeat
export function VirtualFixedRepeat({
  list,
  totalCount = 0,
  className = "",
  itemSize = 36,
  item = <Simple />,
  onVisibleChanged = () => {},
  ...props
}) {
  // Configuration Phase

  const [{ top = 0 }, setScrollInfo] = useState({})

  const [scrollMonitor, windowHeight] = useScroll(setScrollInfo)

  totalCount = list ? list.length : totalCount

  // Calculation Phase

  let draw = useMemo(render, [
    top,
    totalCount,
    list,
    itemSize,
    windowHeight,
    item
  ])

  const totalHeight = itemSize * totalCount

  //Notification Phase

  useVisibilityEvents()

  // Render Phase

  const style = useMemo(() => ({ height: totalHeight }), [totalHeight])

  return (
    <div ref={scrollMonitor} className={`${className} vr-scroll-holder`}>
      <div style={style}>
        <div className="vr-items">{draw}</div>
      </div>
    </div>
  )

  function render() {
    return renderItems({
      windowHeight,
      itemSize,
      totalCount,
      list,
      top,
      item,
      ...props
    })
  }

  function useVisibilityEvents() {
    // Send visibility events
    const firstVisible = draw[0]
    const lastVisible = draw[draw.length - 1]
    useMemo(() => onVisibleChanged(firstVisible, lastVisible), [
      firstVisible,
      lastVisible
    ])
  }
}

function renderItems({
  windowHeight,
  itemSize,
  totalCount,
  list,
  top,
  ...props
}) {
  if (windowHeight < 1) return [[], []]

  let draw = []

  for (
    let scan = Math.floor(top / itemSize), start = -(top % itemSize);
    scan < totalCount && start < windowHeight;
    scan++
  ) {
    const item = (
      <RenderItem
        {...props}
        visible={true}
        top={start}
        offset={top}
        key={scan}
        index={scan}
        data={list ? list[scan] : undefined}
      />
    )
    start += itemSize

    draw.push(item)
  }
  return draw
}
下面是实际效果:
项目第二阶段:可变高度物品
那么,为什么变量高度如此复杂呢?想象一下,我们有一个包含 1,000,000 个项目的虚拟列表。如果我们想要在给定某个值的情况下计算出在列表中绘制的内容top,最简单的方法是将所有高度相加,直到达到top。这不仅很慢,而且我们还需要知道高度!要知道高度,我们需要渲染这些项目。哦……是的,这行不通。
我上次尝试用的是“非常聪明”的身高计算器和估算器。我说“非常聪明”——我也可以说“太聪明了”,不过不管怎样,我们还是别纠结这个了。我当时有点“顿悟”了。
用户要么流畅地滚动,要么拿起滚动条,然后跳跃几步。代码就是这样的!
expectedSize我们可以通过计算所有已绘制项目的平均高度来轻松获得一个。如果用户滚动量很大,就可以用这个高度来猜测它应该在哪里。
当用户滚动少量内容(例如少于几页)时,使用滚动的增量来移动已经存在的内容并填充空白。
现在这种方法的问题在于,错误会在大滚动和小滚动之间蔓延——然后“又来了!”……只要在错误发生时修复它们就行了。它们只出现在这个列表的顶部和底部。去修复它吧。如果第一个项目低于窗口顶部,就把滚动条移到 0 等等!
新的希望
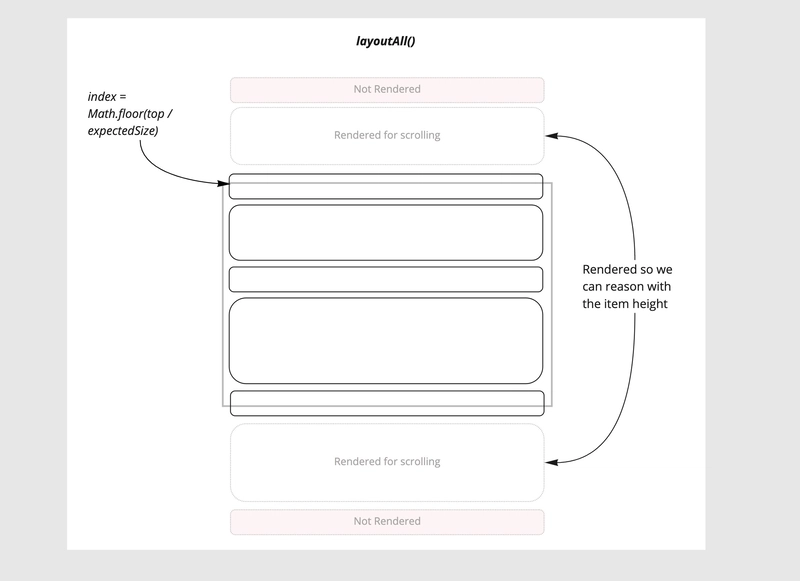
好了,现在我们已经有了可变高度的方案,但还有更多工作要做。我们不能直接在屏幕上渲染物体,因为它们的位置会受到屏幕“外”物体的影响。所以我们需要进行过扫描,渲染更多物体。
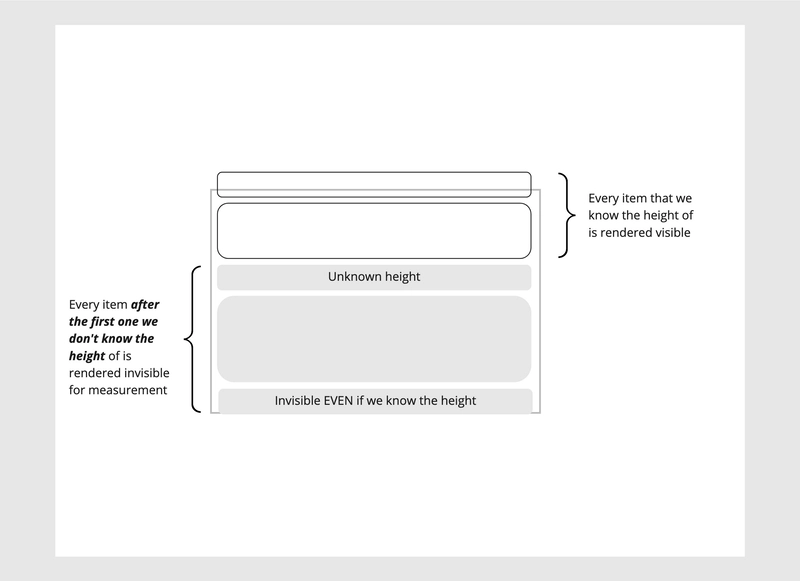
我们还需要计算物体的高度,并且不希望显示屏四处移动,所以我们需要两种类型的物体。一种是因为我们已知它们的高度而呈现可见,另一种是因为我们测量它们而呈现不可见。为了避免任何麻烦,如果我们发现任何高度未知的物体,之后我们就不会再显示任何其他物体。
最后,当可以时,我们希望通过滚动的增量来移动已经存在的东西:
更多帮手
现在我们需要测量所有东西,我们需要知道已经测量了多少个物体,以及测量的总高度,这样我们才能得到一个expectedSize。此外,物体的高度会发生变化,当它们发生变化时,我们需要进行重新布局。
useDebouncedRefresh
首先,让我们解决一个问题,即有一个函数会导致我们的组件重新渲染并稍微消除抖动,因为许多项目可能同时报告它们的高度。
import { useCallback, useState } from "react"

const debounce = (fn, delay) => {
  let timer = 0
  return (...params) => {
    clearTimeout(timer)
    timer = setTimeout(() => fn(...params), delay)
  }
}

export function useDebouncedRefresh() {
  const [refresh, setRefresh] = useState(0)
  // eslint-disable-next-line react-hooks/exhaustive-deps
  const changed = useCallback(
    debounce(() => setRefresh(i => i + 1)),
    [setRefresh]
  )
  changed.id = refresh
  return changed
}
它使用一个简单的useState钩子来引起重绘,然后返回一个去抖动函数,当调用该函数时将更新状态。
MeasuredItem 和 MeasurementContext
我们现在需要测量很多东西,所以我们有一个上下文来放置结果,其中有通过项目索引查找高度和总数等。
import { useContext, useState, createContext } from "react"
import { useMeasurement } from "./useMeasurement"

export const MeasuredContext = createContext({
  sizes: {},
  measuredId: 1,
  total: 0,
  count: 0,
  changed: () => {}
})

const EMPTY = { height: 0, width: 0 }

export function Measured({ children, style, id }) {
  const context = useContext(MeasuredContext)
  const [measureId] = useState(() =>
    id === undefined ? context.measureId++ : id
  )
  const [size, attach] = useMeasurement(measureId, true)
  const existing = context.sizes[measureId] || EMPTY
  if (size.height > 0 && size.height !== existing.height) {
    if (existing === EMPTY) {
      context.count++
    }
    context.total -= existing.height
    context.total += size.height
    context.sizes[measureId] = size
    context.changed()
  }

  return (
    <div key={measureId} style={style} ref={attach}>
      {children}
    </div>
  )
}
我们将使用 来useDebouncedRefresh()代替默认的 emptychanged方法,以便在任何高度发生变化时使组件重新布局。如您所见,useMeasurement用于跟踪项目高度的变化,并将其存储在一个易于访问的结构中,我们可以随时以 O(1) 的时间复杂度进行查询。现在我们可以在组件<MeasuredItem>内部使用它<RenderItem/>,而不是使用包装器<div/>,并且可以快速了解所有正在渲染的项目的大小。
return (
    (
      <Measured id={index} style={style}>
        <item.type
          key={data ? keyFn(data) || index : index}
          {...{ ...item.props, [pass]: data, index }}
        />
      </Measured>
    )
  )
我们新的可变高度 VirtualWindow
现在终于到了写下来的时候了,<VirtualWindow/>我们将使用与以前相同的阶段:
- 配置——设置必要的钩子等
- 计算——计算出我们要渲染的内容
- 通知 - 发送有关正在渲染的项目的任何事件
- 渲染——返回最终渲染的结构
签名没有太大变化,我们将使用“itemSize”作为临时大小,直到我们测量至少两个值为止。我们添加了将childrenof<VirtualWindow/>作为要渲染的内容列表的功能:
export function VirtualWindow({
  children,
  list = children?.length ? children : undefined,
  totalCount = 0,
  itemSize = 36,
  item = <Simple />,
  onVisibleChanged = () => {},
  overscan = 2,
  ...props
})
配置
 // Configuration Phase

  const [{ top = 0 }, setScrollInfo] = useState({})
  const previousTop = useRef(0)
  const changed = useDebouncedRefresh()
  const lastRendered = useRef([])

  const [scrollMonitor, windowHeight, scrollingElement] = useScroll(
    setScrollInfo
  )

  const measureContext = useMemo(
    () => ({
      sizes: {},
      changed,
      total: 0,
      count: 0
    }),
    [changed]
  )

  totalCount = list ? list.length : totalCount
我们在配置阶段添加了一个新对象作为MeasuredContext值。我们修改了函数useDebouncedRefresh(),并获取了之前渲染的项目和之前滚动位置的引用,这样我们就可以计算出滚动的增量。
计算
 // Calculation Phase

  let delta = Math.floor(previousTop.current - top)
  previousTop.current = top

  const expectedSize = Math.floor(
    measureContext.count > 2
      ? measureContext.total / measureContext.count
      : itemSize
  )

  let [draw, visible] = useMemo(render, [
    top,
    delta,
    props,
    expectedSize,
    totalCount,
    list,
    measureContext,
    windowHeight,
    item,
    overscan
  ])

  const totalHeight = Math.floor(
    (totalCount - visible.length) * expectedSize +
      visible.reduce((c, a) => c + a.props.height, 0)
  )

  lastRendered.current = visible
  // Fixup pesky errors at the end of the window
  const last = visible[visible.length - 1]
  if (last && +last.key === totalCount - 1 && totalHeight > windowHeight) {
    if (last.props.top + last.props.height < windowHeight) {
      delta = Math.floor(windowHeight - (last.props.top + last.props.height))
      ;[draw, visible] = render()
      lastRendered.current = visible
    }
  }
  // Fix up pesky errors at the start of the window
  if (visible.length) {
    const first = visible[0]
    if (first.key === 0 && first.props.top > 0) {
      scrollingElement.scrollTop = 0
    }
  }
在这里,我们根据测量上下文计算出滚动的增量、项目的估计大小并渲染这些项目。
现在,我们从方法中返回两个数组render。一个是要绘制的项目,另一个是可见的项目。draw数组将包含正在测量的不可见项目,这些项目将在函数末尾渲染,但我们也想知道我们绘制的可见项目。
我们缓存这些visible项目以供下一个绘制周期使用,然后修复我提到的那些错误。如果窗口末尾出现错误,我们会找出错误所在,然后再次调用渲染器。在窗口顶部,我们只需修复scrollTop滚动条的 。
注意我们现在如何计算滚动条的高度 - 它是可见项目的高度+其他所有项目的预期大小。
render
renderItems现在分为两件事,要么从渲染,expectedSize要么移动已经可见的东西:
  if (
    !rendered.length ||
    top < expectedSize ||
    Math.abs(delta) > windowHeight * 5
  ) {
    return layoutAll()
  } else {
    return layoutAgain()
  }
我们在几种情况下布局所有项目:第一次,大量滚动,我们位于列表顶部等。否则,我们会尝试移动我们已经拥有的项目 - 这些可见的项目是从上次缓存的,作为传入的rendered。
  function layoutAll() {
    const topItem = Math.max(0, Math.floor(top / expectedSize))
    return layout(topItem, -(top % expectedSize))
  }

  function layoutAgain() {
    let draw = []
    let renderedVisible = []
    let firstVisible = rendered.find(f => f.props.top + delta >= 0)
    if (!firstVisible) return layoutAll()
    let topOfFirstVisible = firstVisible.props.top + delta

    if (topOfFirstVisible > 0) {
      // The first item is not at the top of the screen,
      // so we need to scan backwards to find items to fill the space
      ;[draw, renderedVisible] = layout(
        +firstVisible.key - 1,
        topOfFirstVisible,
        -1
      )
    }
    const [existingDraw, exisitingVisible] = layout(
      +firstVisible.key,
      topOfFirstVisible
    )
    return [draw.concat(existingDraw), renderedVisible.concat(exisitingVisible)]
  }
巧妙之处在于layoutAgain。我们找到第一个可见的项目,滚动过去后delta会完全显示在屏幕上。我们以此为middle起点,前后布局。所以,这是middle-out献给所有硅谷粉丝的 :)
该layout函数与我们之前看到的固定函数类似,但具有适用于双向的条件,并添加了基于我们是否知道项目高度的“可见性”原则(如上图所示)。它还维护两个数组:绘制项目和可见项目。
function layout(scan, start, direction = 1) {
    let draw = []
    let renderedVisible = []

    let adding = true

    for (
      ;
      scan >= 0 &&
      start > -windowHeight * overscan &&
      scan < totalCount &&
      start < windowHeight * (1 + overscan);
      scan += direction
    ) {
      let height = sizes[scan]?.height
      if (height === undefined) {
        // Stop drawing visible items as soon as anything
        // has an unknown height
        adding = false
      }
      if (direction < 0) {
        start += (height || expectedSize) * direction
      }
      const item = (
        <RenderItem
          {...props}
          visible={adding}
          height={height}
          top={start}
          offset={top}
          key={scan}
          index={scan}
          data={list ? list[scan] : undefined}
        />
      )
      if (direction > 0) {
        start += (height || expectedSize) * direction
      }
      if (adding) {
        if (direction > 0) {
          renderedVisible.push(item)
        } else {
          // Keep the lists in the correct order by
          // unshifting as we move backwards
          renderedVisible.unshift(item)
        }
      }
      draw.push(item)
    }
    return [draw, renderedVisible]
  }
通知阶段
通知阶段需要做更多的工作来找到实际可见范围内的项目,但除此之外非常相似:
  function useVisibilityEvents() {
    // Send visibility events
    let firstVisible
    let lastVisible
    for (let item of visible) {
      if (
        item.props.top + item.props.height > 0 &&
        item.props.top < windowHeight
      ) {
        firstVisible = firstVisible || item
        lastVisible = item
      }
    }
    useMemo(() => onVisibleChanged(firstVisible, lastVisible), [
      firstVisible,
      lastVisible
    ])
  }
渲染阶段
渲染阶段只需要添加我们的 MeasuredContext,以便项目可以报告其大小:
  // Render Phase

  const style = useMemo(() => ({ height: totalHeight }), [totalHeight])

  return (
    <MeasuredContext.Provider value={measureContext}>
      <div ref={scrollMonitor} className="vr-scroll-holder">
        <div style={style}>
          <div className="vr-items">{draw}</div>
        </div>
      </div>
    </MeasuredContext.Provider>
  )
全套工具和杂物
完成VirtualWindow功能
import { useMemo, useState, useRef } from "react"
import { MeasuredContext } from "./Measured"
import { useDebouncedRefresh } from "./useDebouncedRefresh"
import { useScroll } from "./useScroll"
import { RenderItem } from "./RenderItem"
import { Simple } from "./Simple"
import "./virtual-repeat.css"

export function VirtualWindow({
  children,
  list = children?.length ? children : undefined,
  totalCount = 0,
  itemSize = 36,
  item = <Simple />,
  onVisibleChanged = () => {},
  overscan = 2,
  ...props
}) {
  // Configuration Phase

  const [{ top = 0 }, setScrollInfo] = useState({})
  const previousTop = useRef(0)
  const changed = useDebouncedRefresh()
  const lastRendered = useRef([])

  const [scrollMonitor, windowHeight, scrollingElement] = useScroll(
    setScrollInfo
  )

  const measureContext = useMemo(
    () => ({
      sizes: {},
      changed,
      total: 0,
      count: 0
    }),
    [changed]
  )

  totalCount = list ? list.length : totalCount

  // Calculation Phase

  let delta = Math.floor(previousTop.current - top)
  previousTop.current = top

  const expectedSize = Math.floor(
    measureContext.count > 2
      ? measureContext.total / measureContext.count
      : itemSize
  )

  let [draw, visible] = useMemo(render, [
    top,
    delta,
    props,
    expectedSize,
    totalCount,
    list,
    measureContext,
    windowHeight,
    item,
    overscan
  ])

  const totalHeight = Math.floor(
    (totalCount - visible.length) * expectedSize +
      visible.reduce((c, a) => c + a.props.height, 0)
  )

  lastRendered.current = visible
  const last = visible[visible.length - 1]
  if (last && +last.key === totalCount - 1 && totalHeight > windowHeight) {
    if (last.props.top + last.props.height < windowHeight) {
      delta = Math.floor(windowHeight - (last.props.top + last.props.height))
      ;[draw, visible] = render()
      lastRendered.current = visible
    }
  }

  if (visible.length) {
    const first = visible[0]
    if (first.key === 0 && first.props.top > 0) {
      scrollingElement.scrollTop = 0
    }
  }

  //Notification Phase

  useVisibilityEvents()

  // Render Phase

  const style = useMemo(() => ({ height: totalHeight }), [totalHeight])

  return (
    <MeasuredContext.Provider value={measureContext}>
      <div ref={scrollMonitor} className="vr-scroll-holder">
        <div style={style}>
          <div className="vr-items">{draw}</div>
        </div>
      </div>
    </MeasuredContext.Provider>
  )

  function render() {
    return renderItems({
      windowHeight,
      expectedSize,
      rendered: lastRendered.current,
      totalCount,
      delta,
      list,
      measureContext,
      top,
      item,
      overscan,
      ...props
    })
  }

  function useVisibilityEvents() {
    // Send visibility events
    let firstVisible
    let lastVisible
    for (let item of visible) {
      if (
        item.props.top + item.props.height > 0 &&
        item.props.top < windowHeight
      ) {
        firstVisible = firstVisible || item
        lastVisible = item
      }
    }
    useMemo(() => onVisibleChanged(firstVisible, lastVisible), [
      firstVisible,
      lastVisible
    ])
  }
}

function renderItems({
  windowHeight,
  expectedSize,
  rendered,
  totalCount,
  delta,
  list,
  overscan = 2,
  measureContext,
  top,
  ...props
}) {
  if (windowHeight < 1) return [[], []]
  const { sizes } = measureContext
  if (
    !rendered.length ||
    top < expectedSize ||
    Math.abs(delta) > windowHeight * 5
  ) {
    return layoutAll()
  } else {
    return layoutAgain()
  }

  function layoutAll() {
    const topItem = Math.max(0, Math.floor(top / expectedSize))
    return layout(topItem, -(top % expectedSize))
  }

  function layoutAgain() {
    let draw = []
    let renderedVisible = []
    let firstVisible = rendered.find(f => f.props.top + delta >= 0)
    if (!firstVisible) return layoutAll()
    let topOfFirstVisible = firstVisible.props.top + delta

    if (topOfFirstVisible > 0) {
      // The first item is not at the top of the screen,
      // so we need to scan backwards to find items to fill the space
      ;[draw, renderedVisible] = layout(
        +firstVisible.key - 1,
        topOfFirstVisible,
        -1
      )
    }
    const [existingDraw, exisitingVisible] = layout(
      +firstVisible.key,
      topOfFirstVisible
    )
    return [draw.concat(existingDraw), renderedVisible.concat(exisitingVisible)]
  }

  function layout(scan, start, direction = 1) {
    let draw = []
    let renderedVisible = []

    let adding = true

    for (
      ;
      scan >= 0 &&
      start > -windowHeight * overscan &&
      scan < totalCount &&
      start < windowHeight * (1 + overscan);
      scan += direction
    ) {
      let height = sizes[scan]?.height
      if (height === undefined) {
        adding = false
      }
      if (direction < 0) {
        start += (height || expectedSize) * direction
      }
      const item = (
        <RenderItem
          {...props}
          visible={adding}
          height={height}
          top={start}
          offset={top}
          key={scan}
          index={scan}
          data={list ? list[scan] : undefined}
        />
      )
      if (direction > 0) {
        start += (height || expectedSize) * direction
      }
      if (adding) {
        if (direction > 0) {
          renderedVisible.push(item)
        } else {
          renderedVisible.unshift(item)
        }
      }
      draw.push(item)
    }
    return [draw, renderedVisible]
  }
}
结论
本文确实有很多内容需要消化,但希望即使是其中的单个钩子也能对你自己的代码有所帮助或启发。该项目的代码可在 GitHub 上找到:
 miketalbot /虚拟窗口
可以虚拟化列表和任何子集的 React 组件。
也可在 CodeSandbox 上使用
或者只是在您自己的项目中使用它:
npm i virtual-window
import { VirtualWindow } from 'virtual-window'
需要改进的地方
- 更大的滚动区域
目前,滚动条的高度受限于浏览器滚动区域的最大高度。可以通过将滚动位置乘以一个系数来缓解这个问题,但在这种情况下,滚轮的像素精度会有所降低,因此需要进一步研究。
文章来源:https://dev.to/miketalbot/react-virtual-window-virtualise-anything-for-a-performance-boost-full-tutorial-3moe 后端开发教程 - Java、Spring Boot 实战 - msg200.com


