🤯 在 X (Twitter) 上获得曝光:使用 NextJS 安排你的帖子 🚀🚀
TL;DR
TL;DR
在本教程中,您将学习如何创建 X(Twitter)帖子调度程序🔥
- 通过 X(Twitter)验证用户身份。
- 安排帖子并将其保存到 Supabase。
- 使用 Trigger.dev 发布到 X(Twitter)。
NextJS 的后台作业管理
Trigger.dev 是一个开源库,可让您使用 NextJS、Remix、Astro 等为您的应用程序创建和监控长时间运行的作业!
如果您能花 10 秒钟给我们一颗星,我将非常感激 💖
https://github.com/triggerdotdev/trigger.dev
让我们开始吧🔥
让我们通过运行下面的代码片段来创建一个 TypeScript Next.js 应用程序。
npx create-next-app x-post-scheduler
安装 React Icons 和 Headless UI软件包。React Icons 使我们能够在应用程序中使用不同的图标,并且我们将利用 Headless UI 为应用程序 添加 动画自定义模态框。
npm install @headlessui/react react-icons
正确的身份验证方法🔐
在这里,我将引导您了解如何向 Next.js 应用程序添加 X 身份验证并启用代表用户发送帖子的权限。
要创建 Twitter 开发者项目,您必须拥有一个X 帐户。访问 主页并创建一个新项目。
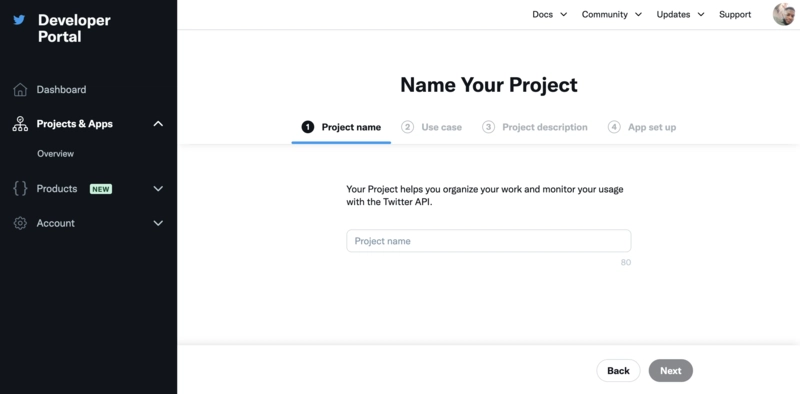
提供合适的项目名称并回答所有必需的问题。
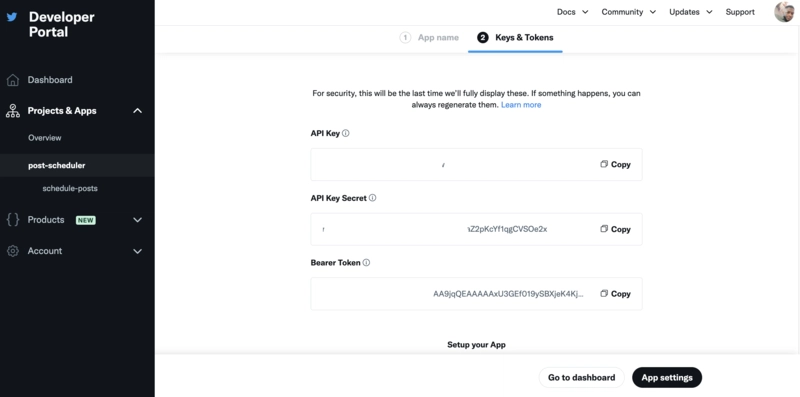
接下来,在项目下创建一个应用程序,并将生成的令牌复制到.env.localNext.js 项目中的文件中。
TWITTER_API_KEY=<your_api_key>
TWITTER_API_SECRET=<your_api_secret>
TWITTER_BEARER_TOKEN=<your_bearer_token>
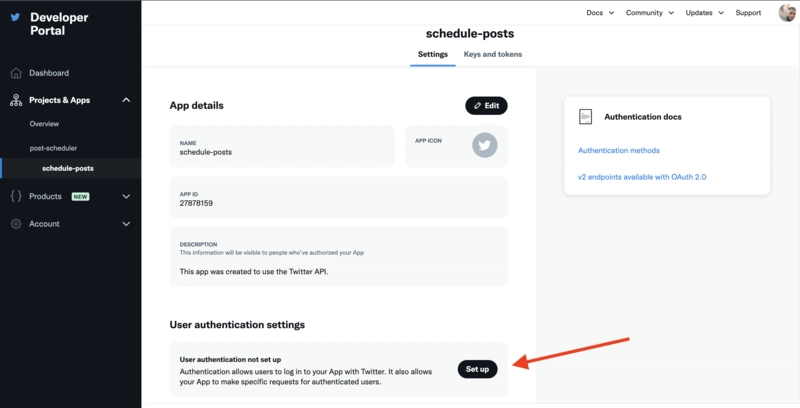
向下滚动页面并设置用户身份验证,以允许用户通过 X 登录您的应用程序。
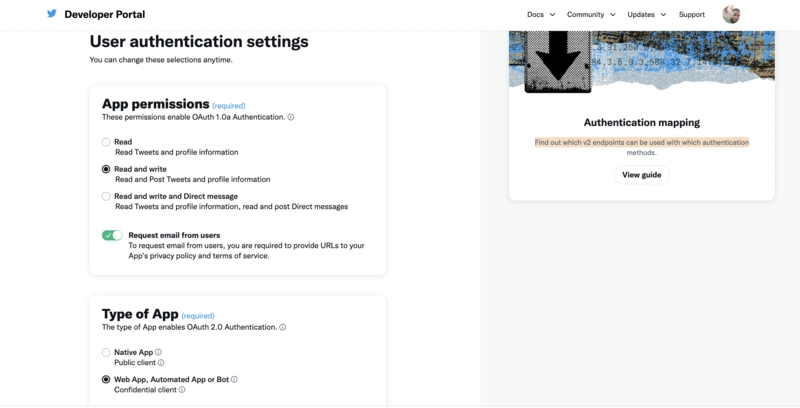
选择Read and write作为应用程序权限,启用Request email from users,并选择Web app作为应用程序类型。
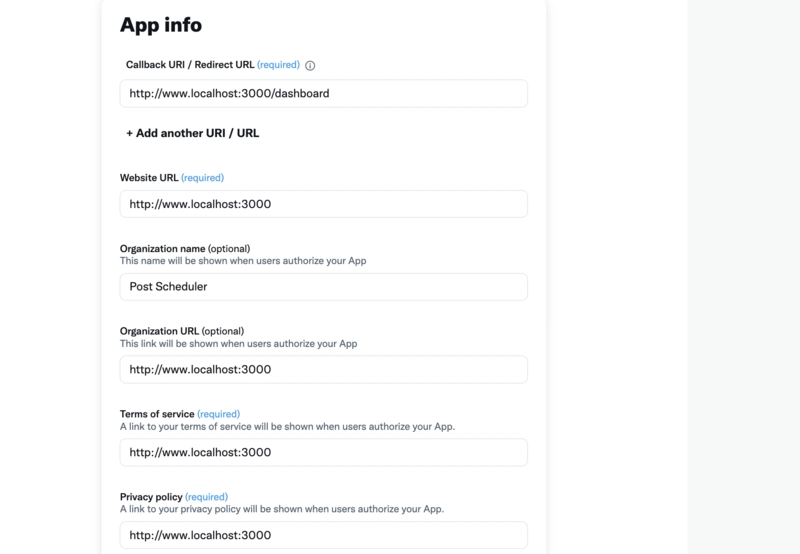
向下滚动到下一部分,并提供应用的回调 URL、网站 URL 和所需信息。如果您使用的是 Next.js 开发服务器,则可以使用下图中相同的输入。身份验证后,用户将被重定向到http://www.localhost:3000/dashboard,这是客户端的另一个路由。
设置身份验证过程后,将 OAuth 2.0 客户端 ID 和密钥保存到.env.local文件中。
TWITTER_CLIENT_ID=<app_client_id>
TWITTER_CLIENT_SECRET=<app_client_secret>
向 Next.js 添加 X 身份验证
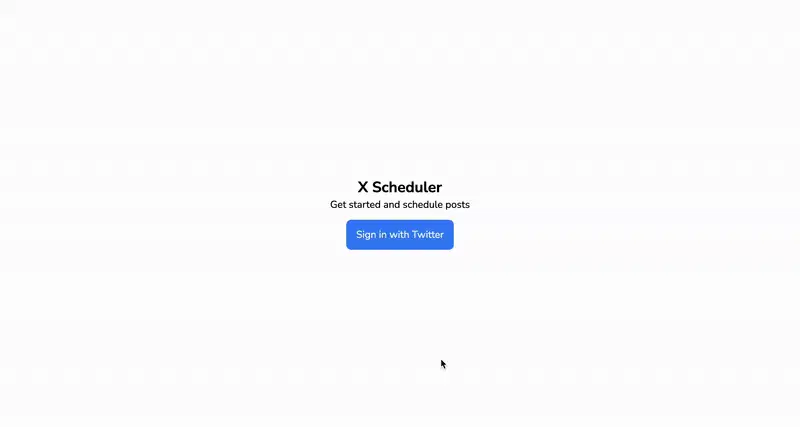
在文件中创建一个Sign in with Twitter链接元素index.ts,将用户重定向到 X 并允许他们授予您的应用访问其个人资料的权限。
import { Inter } from "next/font/google";
const inter = Inter({ subsets: ["latin"] });
import Link from "next/link";

export default function Home() {
    const router = useRouter();

    const getTwitterOauthUrl = () => {
        const rootUrl = "https://twitter.com/i/oauth2/authorize";
        const options = {
            redirect_uri: "<your_callback_URL>",
            client_id: process.env.TWITTER_CLIENT_ID!,
            state: "state",
            response_type: "code",
            code_challenge: "y_SfRG4BmOES02uqWeIkIgLQAlTBggyf_G7uKT51ku8",
            code_challenge_method: "S256",
            //👇🏻 required scope for authentication and posting tweets
            scope: ["users.read", "tweet.read", "tweet.write"].join(" "),
        };
        const qs = new URLSearchParams(options).toString();
        return `${rootUrl}?${qs}`;
    };

    return (
        <main
            className={`flex items-center flex-col justify-center min-h-screen ${inter.className}`}
        >
            <h2 className='font-bold text-2xl '>X Scheduler</h2>
            <p className='mb-3 text-md'>Get started and schedule posts</p>
            <Link
                href={getTwitterOauthUrl()}
                className='bg-blue-500 py-3 px-4 text-gray-50 rounded-lg'
            >
                Sign in with Twitter
            </Link>
        </main>
    );
}
从上面的代码片段中,Sign in with Twitter链接执行该getTwitterOauthUrl功能,将用户重定向到 X 并允许他们授予应用程序访问其个人资料的权限。
当用户授权您的应用时,他们会被重定向到回调URL页面,您需要访问code添加到URL的参数并将此代码发送到服务器进行进一步处理。
http://www.localhost:3000/dashboard?state=state&code=WTNhMUFYSDQwVnBsbEFoWGM0cmIwMWhKd3lJOFM1Q3FuVEdtdE5ESU1mVjIwOjE2OTY3NzMwMTEyMzc6M
接下来,/dashboard通过创建一个dashboard.tsx文件来创建客户端路由,该文件从 URL 中提取代码参数并在组件安装时将其发送到服务器。
import React, { useCallback, useEffect } from "react";

const Dashboard = () => {
    const sendAuthRequest = useCallback(async (code: string | null) => {
        try {
            const request = await fetch("/api/twitter/auth", {
                method: "POST",
                body: JSON.stringify({ code }),
                headers: {
                    "Content-Type": "application/json",
                },
            });
            const response = await request.json();
            console.log("RES >>>", response);
        } catch (err) {
            console.error(err);
        }
    }, []);

    useEffect(() => {
        const params = new URLSearchParams(window.location.href);
        const code = params.get("code");
        sendAuthRequest(code);
    }, [sendAuthRequest]);

    return (
        <main className='w-full min-h-screen'>
            <p>Dashboard</p>
        </main>
    );
};

export default Dashboard;
上面的代码片段从 URL 中检索代码参数并将其发送到/api/twitter/auth服务器上对用户进行身份验证的端点。
在服务器上,收到的代码会获取用户的访问令牌。使用此令牌,您可以检索用户的详细信息并将其保存或发送到客户端。
因此,创建一个api/twitter/auth.ts文件(服务器路由),用于接收来自客户端的代码参数。将下面的代码片段复制到文件顶部。
import type { NextApiRequest, NextApiResponse } from "next";

const BasicAuthToken = Buffer.from(
    `${process.env.TWITTER_CLIENT_ID!}:${process.env.TWITTER_CLIENT_SECRET!}`,
    "utf8"
).toString("base64");

const twitterOauthTokenParams = {
    client_id: process.env.TWITTER_CLIENT_ID!,
//👇🏻 according to the code_challenge provided on the client
    code_verifier: "8KxxO-RPl0bLSxX5AWwgdiFbMnry_VOKzFeIlVA7NoA",
    redirect_uri: `<your_callback_URL>`,
    grant_type: "authorization_code",
};

//gets user access token
export const fetchUserToken = async (code: string) => {
    try {
        const formatData = new URLSearchParams({
            ...twitterOauthTokenParams,
            code,
        });
        const getTokenRequest = await fetch(
            "https://api.twitter.com/2/oauth2/token",
            {
                method: "POST",
                body: formatData.toString(),
                headers: {
                    "Content-Type": "application/x-www-form-urlencoded",
                    Authorization: `Basic ${BasicAuthToken}`,
                },
            }
        );
        const getTokenResponse = await getTokenRequest.json();
        return getTokenResponse;
    } catch (err) {
        return null;
    }
};

//gets user's data from the access token
export const fetchUserData = async (accessToken: string) => {
    try {
        const getUserRequest = await fetch("https://api.twitter.com/2/users/me", {
            headers: {
                "Content-type": "application/json",
                Authorization: `Bearer ${accessToken}`,
            },
        });
        const getUserProfile = await getUserRequest.json();
        return getUserProfile;
    } catch (err) {
        return null;
    }
};
- 从上面的代码片段来看,
- 该
BasicAuthToken变量包含您的令牌的编码版本。 - 包含
twitterOauthTokenParams获取用户访问令牌所需的参数。 - 该
fetchUserToken函数向 Twitter 的端点发送请求并返回用户的访问令牌,然后该fetchUserData函数接受令牌并检索用户的 X 配置文件。
- 该
最后,如下所示创建端点。
export default async function handler(
    req: NextApiRequest,
    res: NextApiResponse
) {
    const { code } = req.body;
    try {
        const tokenResponse = await fetchUserToken(code);
        const accessToken = tokenResponse.access_token;
        if (accessToken) {
            const userDataResponse = await fetchUserData(accessToken);
            const userCredentials = { ...tokenResponse, ...userDataResponse };
            return res.status(200).json(userCredentials);
        }
    } catch (err) {
        return res.status(400).json({ err });
    }
}
上面的代码片段使用上面声明的函数检索用户的访问令牌和配置文件详细信息,将它们合并为一个对象,然后将它们发送回客户端。
恭喜!您已成功将 X(Twitter)身份验证添加到 Next.js 应用程序。
构建时间表仪表板 ⏰
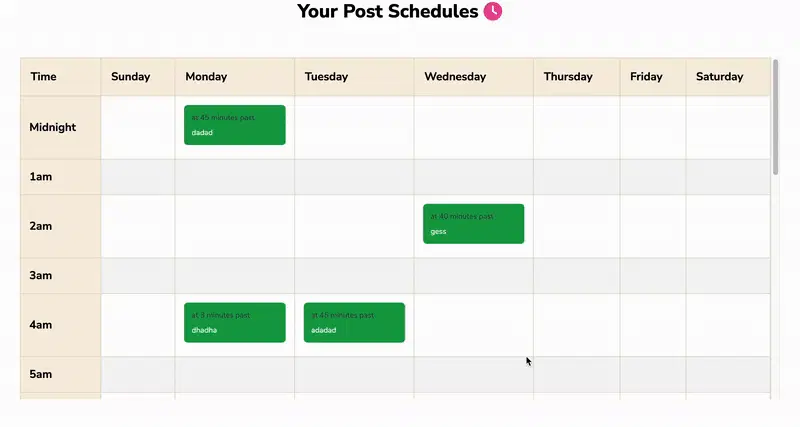
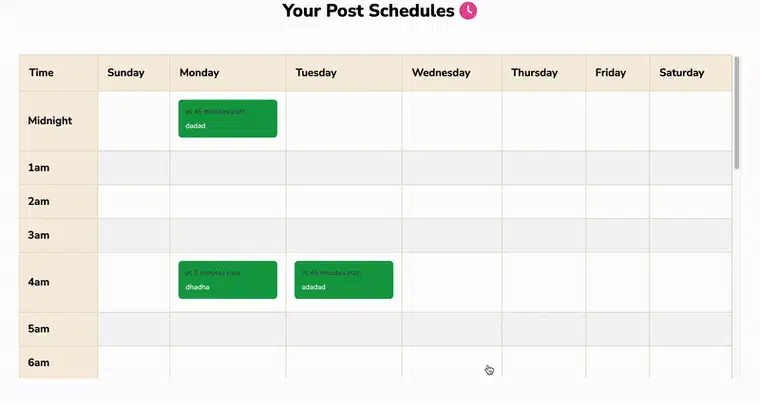
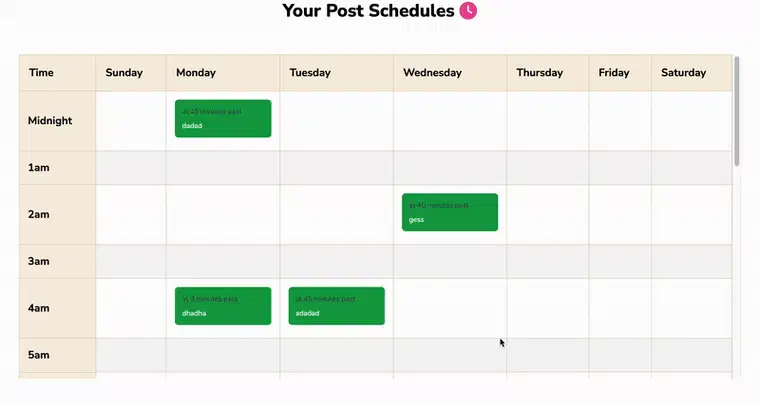
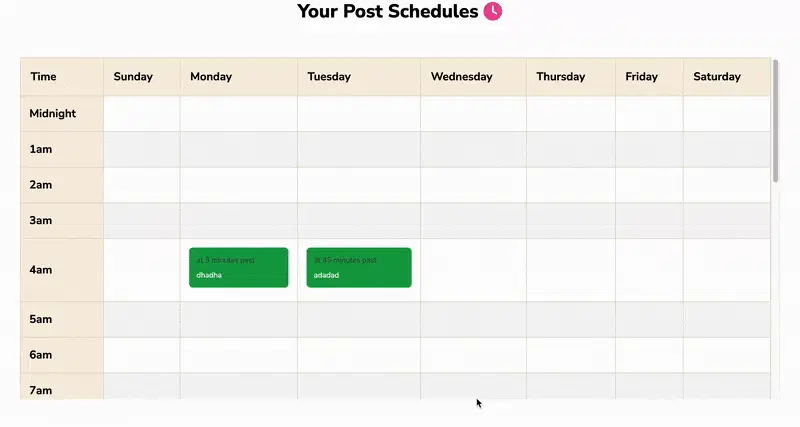
在本节中,您将学习如何通过构建类似日历的表来为应用程序创建用户界面,以便用户在每个单元格中添加和删除预定的帖子。
在我们继续之前,请创建一个utils/util.ts文件。它将包含应用程序中使用的一些函数。
mkdir utils
cd utils
touch util.ts
将下面的代码片段复制到util.ts文件中。它描述了表头的结构及其内容(时间和日程安排)。它们将映射到用户界面上的表格中。
export interface Content {
    minutes?: number;
    content?: string;
    published?: boolean;
    day?: number;
}
export interface AvailableScheduleItem {
    time: number;
    schedule: Content[][];
}
// table header
export const tableHeadings: string[] = [
    "Time",
    "Sunday",
    "Monday",
    "Tuesday",
    "Wednesday",
    "Thursday",
    "Friday",
    "Saturday",
];

// table contents
export const availableSchedule: AvailableScheduleItem[] = [
    {
        time: 0,
        schedule: [[], [], [], [], [], [], []],
    },
    {
        time: 1,
        schedule: [[], [], [], [], [], [], []],
    },
    {
        time: 2,
        schedule: [[], [], [], [], [], [], []],
    },
    {
        time: 3,
        schedule: [[], [], [], [], [], [], []],
    },
    {
        time: 4,
        schedule: [[], [], [], [], [], [], []],
    },
    {
        time: 5,
        schedule: [[], [], [], [], [], [], []],
    },
    {
        time: 6,
        schedule: [[], [], [], [], [], [], []],
    },
    {
        time: 7,
        schedule: [[], [], [], [], [], [], []],
    },
    {
        time: 8,
        schedule: [[], [], [], [], [], [], []],
    },
    {
        time: 9,
        schedule: [[], [], [], [], [], [], []],
    },
    {
        time: 10,
        schedule: [[], [], [], [], [], [], []],
    },
    {
        time: 11,
        schedule: [[], [], [], [], [], [], []],
    },
    {
        time: 12,
        schedule: [[], [], [], [], [], [], []],
    },
    {
        time: 13,
        schedule: [[], [], [], [], [], [], []],
    },
    {
        time: 14,
        schedule: [[], [], [], [], [], [], []],
    },
    {
        time: 15,
        schedule: [[], [], [], [], [], [], []],
    },
    {
        time: 16,
        schedule: [[], [], [], [], [], [], []],
    },
    {
        time: 17,
        schedule: [[], [], [], [], [], [], []],
    },
    {
        time: 18,
        schedule: [[], [], [], [], [], [], []],
    },
    {
        time: 19,
        schedule: [[], [], [], [], [], [], []],
    },
    {
        time: 20,
        schedule: [[], [], [], [], [], [], []],
    },
    {
        time: 21,
        schedule: [[], [], [], [], [], [], []],
    },
    {
        time: 22,
        schedule: [[], [], [], [], [], [], []],
    },
    {
        time: 23,
        schedule: [[], [], [], [], [], [], []],
    },
];
将下面的代码片段添加到文件中,以帮助将时间格式化为用户更易读的格式。
export const formatTime = (value: number) => {
    if (value === 0) {
        return `Midnight`;
    } else if (value < 10) {
        return `${value}am`;
    } else if (value >= 10 && value < 12) {
        return `${value}am`;
    } else if (value === 12) {
        return `${value}noon`;
    } else {
        return `${value % 12}pm`;
    }
};
更新dashboard.tsx文件以在网页上的表格中显示表格标题和内容。
"use client";
import React, { useState } from "react";
import {
    Content,
    availableSchedule,
    formatTime,
    tableHeadings,
} from "@/utils/util";
import { FaClock } from "react-icons/fa6";

const Dashboard = () => {
    const [yourSchedule, updateYourSchedule] = useState(availableSchedule);

    //👇🏻 add scheduled post
    const handleAddPost = (id: number, time: number) => {
        console.log({ id, time });
    };

    //👇🏻 delete scheduled post
    const handleDeletePost = (
        e: React.MouseEvent<HTMLParagraphElement>,
        content: Content,
        time: number
    ) => {
        e.stopPropagation();
        if (content.day !== undefined) {
            console.log({ time, content });
        }
    };

    return (
        <main className='w-full min-h-screen'>
            <header className='w-full flex items-center mb-6 justify-center'>
                <h2 className='text-center font-extrabold text-3xl mr-2'>
                    Your Post Schedules
                </h2>
                <FaClock className='text-3xl text-pink-500' />
            </header>
            <div className=' p-8'>
                <div className='w-full h-[80vh] overflow-y-scroll'>
                    <table className='w-full border-collapse'>
                        <thead>
                            <tr>
                                {tableHeadings.map((day, index) => (
                                    <th
                                        key={index}
                                        className='bg-[#F8F0DF] text-lg p-4 font-bold'
                                    >
                                        {day}
                                    </th>
                                ))}
                            </tr>
                        </thead>
                        <tbody>
                            {yourSchedule.map((item, index) => (
                                <tr key={index}>
                                    <td className='bg-[#F8F0DF] text-lg font-bold'>
                                        {formatTime(item.time)}
                                    </td>
                                    {item.schedule.map((sch, id) => (
                                        <td
                                            key={id}
                                            onClick={() => handleAddPost(id, item.time)}
                                            className='cursor-pointer'
                                        >
                                            {sch.map((content, ind: number) => (
                                                <div
                                                    key={ind}
                                                    onClick={(e) =>
                                                        handleDeletePost(e, content, item.time)
                                                    }
                                                    className={`p-3 ${
                                                        content.published ? "bg-pink-500" : "bg-green-600"
                                                    }  mb-2 rounded-md text-xs cursor-pointer`}
                                                >
                                                    <p className='text-gray-700 mb-2'>
                                                        {content.minutes === 0
                                                            ? "o'clock"
                                                            : `at ${content.minutes} minutes past`}
                                                    </p>
                                                    <p className=' text-white'>{content.content}</p>
                                                </div>
                                            ))}
                                        </td>
                                    ))}
                                </tr>
                            ))}
                        </tbody>
                    </table>
                </div>
            </div>
        </main>
    );
};

export default Dashboard;
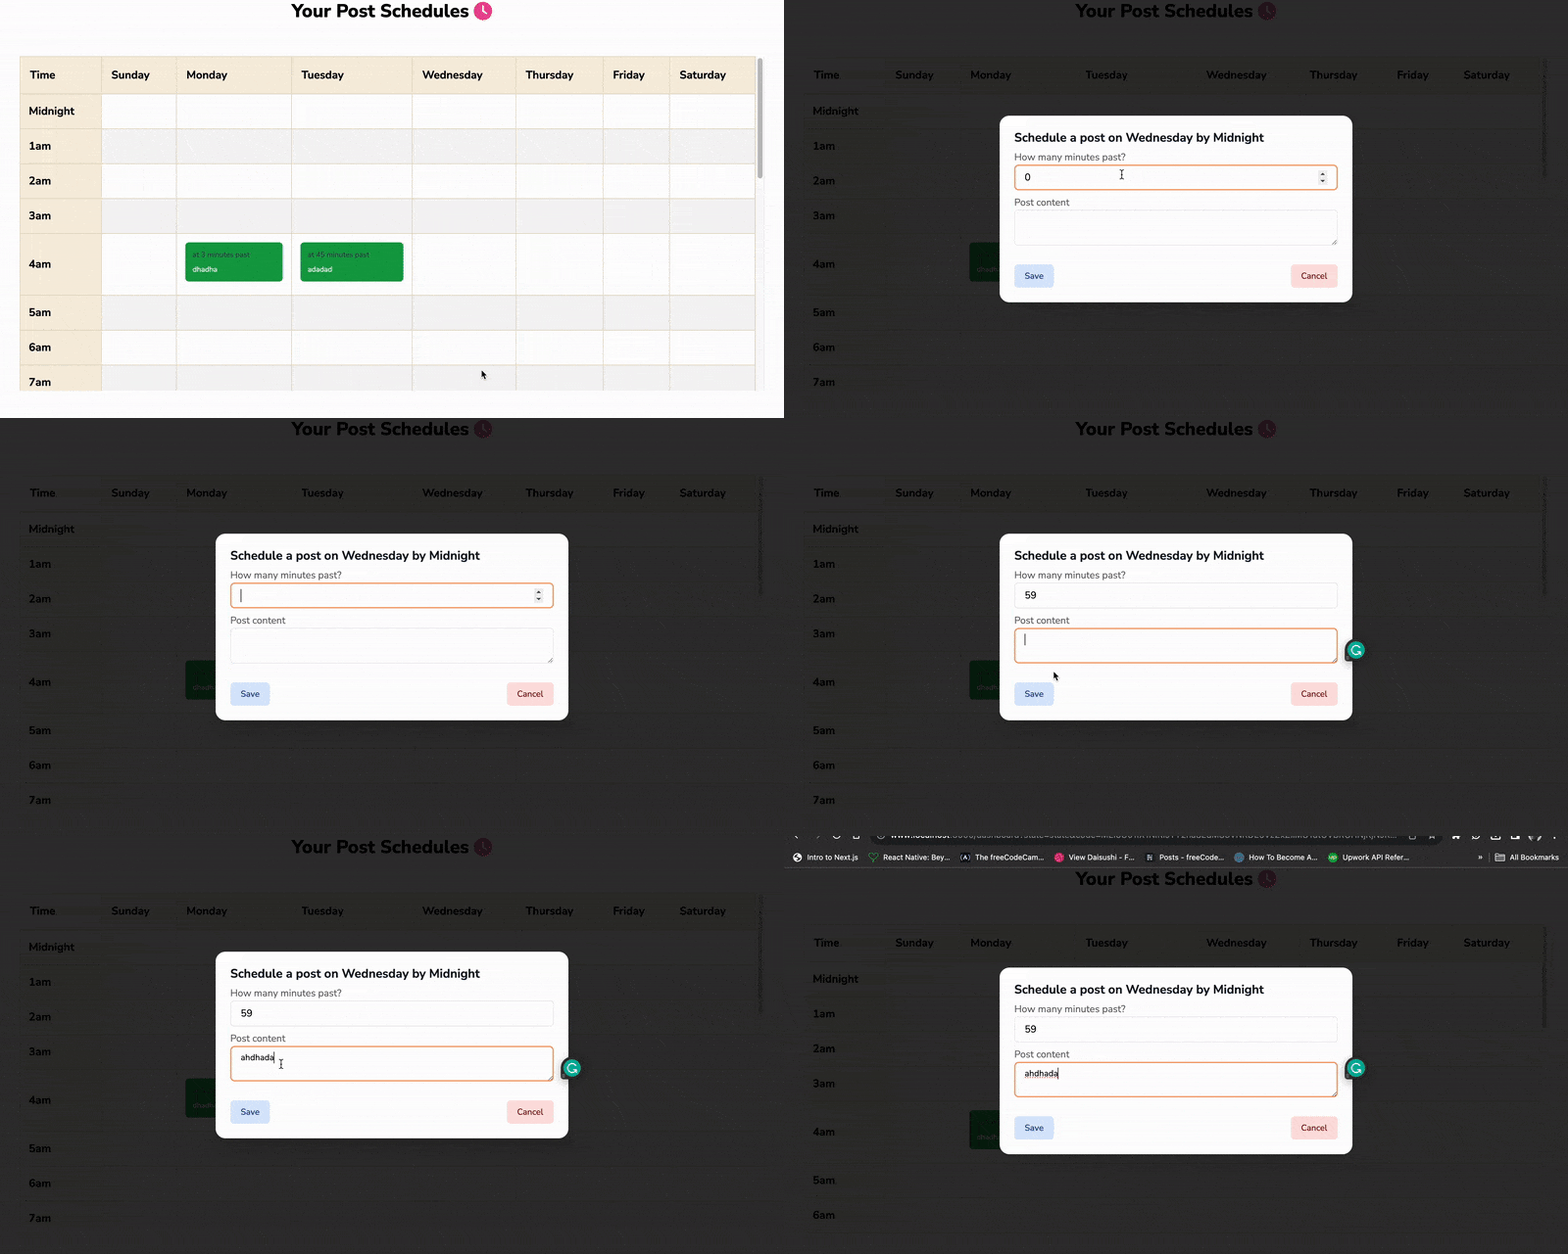
handleAddPost当用户点击表格上的空白单元格时,该函数运行;handleDeletePost当用户点击单元格内的预定帖子时,则执行。
在该util.ts文件中,创建用于新添加的帖子和要删除的选定帖子的 Typescript 接口。该DelSectedCellTypescript 接口定义了单元格中帖子的属性,并SelectedCell表示新添加帖子的结构。
export interface DelSelectedCell {
    content?: string;
    day_id?: number;
    day?: string;
    time_id?: number;
    time?: string;
    minutes?: number;
}
export interface SelectedCell {
    day_id?: number;
    day?: string;
    time_id?: number;
    time?: string;
    minutes?: number;
}
将DelSelectedCell和SelectedCell接口导入dashboard.tsx文件,并创建包含这两个数据结构的状态。添加两个布尔状态,用于在用户执行添加或删除事件时显示所需的模态框。
const [selectedCell, setSelectedCell] = useState<SelectedCell>({
    day_id: 0,
    day: "",
    time_id: 0,
    time: "",
});
const [delSelectedCell, setDelSelectedCell] = useState<DelSelectedCell>({
    content: "",
    day_id: 0,
    day: "",
    time_id: 0,
    time: "",
    minutes: 0,
});
//👇🏻 triggers the add post modal
const [addPostModal, setAddPostModal] = useState(false);
//👇🏻 triggers the delete post modal
const [deletePostModal, setDeletePostModal] = useState(false);
修改handleAddPost和handleDeletePost函数以更新最近添加的状态,如下所示。
const handleAddPost = (id: number, time: number) => {
    setSelectedCell({
        day_id: id + 1,
        day: tableHeadings[id + 1],
        time_id: time,
        time: formatTime(time),
    });
    setAddPostModal(true);
};

const handleDeletePost = (
    e: React.MouseEvent<HTMLParagraphElement>,
    content: Content,
    time: number
) => {
    e.stopPropagation();
    if (content.day !== undefined) {
        setDelSelectedCell({
            content: content.content,
            day_id: content.day,
            day: tableHeadings[content.day],
            time_id: time,
            time: formatTime(time),
            minutes: content.minutes,
        });
        setDeletePostModal(true);
    }
};
使用 Headless UI 删除和添加帖子模式
在本节中,介绍如何在用户单击单元格时添加帖子,以及如何在用户单击单元格中的特定帖子时从计划中删除帖子。
创建一个包含添加和删除帖子模式的组件文件夹。
mkdir components
cd components
touch AddPostModal.tsx DeletePostModal.tsx
dashboard.tsx当用户想要添加或删除帖子时,显示两个组件。
return (
    <main>
        {/*-- other dashboard elements --*/}
        {addPostModal && (
            <AddPostModal
                setAddPostModal={setAddPostModal}
                addPostModal={addPostModal}
                selectedCell={selectedCell}
                yourSchedule={yourSchedule}
                updateYourSchedule={updateYourSchedule}
                profile={username}
            />
        )}
        {deletePostModal && (
            <DeletePostModal
                setDeletePostModal={setDeletePostModal}
                deletePostModal={deletePostModal}
                delSelectedCell={delSelectedCell}
                yourSchedule={yourSchedule}
                updateYourSchedule={updateYourSchedule}
                profile={username}
            />
        )}
    </main>
);
两个组件都接受时间表、包含要添加或删除的帖子的状态以及用户的 X 用户名作为道具。
将下面的代码片段复制到AddPostModal.tsx文件中。
import {
    SelectedCell,
    AvailableScheduleItem,
    updateSchedule,
} from "@/utils/util";
import { Dialog, Transition } from "@headlessui/react";
import {
    FormEventHandler,
    Fragment,
    useState,
    Dispatch,
    SetStateAction,
} from "react";

interface Props {
    setAddPostModal: Dispatch<SetStateAction<boolean>>;
    updateYourSchedule: Dispatch<SetStateAction<AvailableScheduleItem[]>>;
    addPostModal: boolean;
    selectedCell: SelectedCell;
    profile: string | any;
    yourSchedule: AvailableScheduleItem[];
}

const AddPostModal: React.FC<Props> = ({
    setAddPostModal,
    addPostModal,
    selectedCell,
    updateYourSchedule,
    profile,
    yourSchedule,
}) => {
    const [content, setContent] = useState<string>("");
    const [minute, setMinute] = useState<number>(0);
    const closeModal = () => setAddPostModal(false);

const handleSubmit: FormEventHandler<HTMLFormElement> = (e) => {
        e.preventDefault();
}
    return ()
}
上面的代码片段接受通过 props 传递的值到组件中。content 和 minutes 状态保存了帖子的内容和帖子的预定发布时间。handleSubmit当用户点击Save按钮安排发布帖子时,该函数就会执行。
从组件返回以下 JSX 元素AddPostModal。以下代码片段使用 Headless UI 组件 渲染一个动画且已自定义的模态框。
<div>
    <Transition appear show={addPostModal} as={Fragment}>
        <Dialog as='div' className='relative z-10' onClose={closeModal}>
            <Transition.Child
                as={Fragment}
                enter='ease-out duration-300'
                enterFrom='opacity-0'
                enterTo='opacity-100'
                leave='ease-in duration-200'
                leaveFrom='opacity-100'
                leaveTo='opacity-0'
            >
                <div className='fixed inset-0 bg-black bg-opacity-80' />
            </Transition.Child>

            <div className='fixed inset-0 overflow-y-auto'>
                <div className='flex min-h-full items-center justify-center p-4 text-center'>
                    <Transition.Child
                        as={Fragment}
                        enter='ease-out duration-300'
                        enterFrom='opacity-0 scale-95'
                        enterTo='opacity-100 scale-100'
                        leave='ease-in duration-200'
                        leaveFrom='opacity-100 scale-100'
                        leaveTo='opacity-0 scale-95'
                    >
                        <Dialog.Panel className='w-full max-w-xl transform overflow-hidden rounded-2xl bg-white p-6 text-left align-middle shadow-xl transition-all'>
                            <Dialog.Title
                                as='h3'
                                className='text-xl font-bold leading-6 text-gray-900'
                            >
                                Schedule a post on {selectedCell.day} by {selectedCell.time}
                            </Dialog.Title>

                            <form className='mt-2' onSubmit={handleSubmit}>
                                {minute > 59 && (
                                    <p className='text-red-600'>
                                        Error, please minute must be less than 60
                                    </p>
                                )}
                                <label htmlFor='minute' className='opacity-60'>
                                    How many minutes past?
                                </label>
                                <input
                                    type='number'
                                    className='w-full border-[1px] px-4 py-2 rounded-md mb-2'
                                    name='title'
                                    id='title'
                                    value={minute.toString()}
                                    onChange={(e) => setMinute(parseInt(e.target.value, 10))}
                                    max={59}
                                    required
                                />

                                <label htmlFor='content' className='opacity-60'>
                                    Post content
                                </label>
                                <textarea
                                    className='w-full border-[1px] px-4 py-2 rounded-md mb-2 text-sm'
                                    name='content'
                                    id='content'
                                    value={content}
                                    onChange={(e) => setContent(e.target.value)}
                                    required
                                />

                                <div className='mt-4 flex items-center justify-between space-x-4'>
                                    <button
                                        type='submit'
                                        className='inline-flex justify-center rounded-md border border-transparent bg-blue-100 px-4 py-2 text-sm font-medium text-blue-900 hover:bg-blue-200 focus:outline-none focus-visible:ring-2 focus-visible:ring-blue-500 focus-visible:ring-offset-2'
                                    >
                                        Save
                                    </button>

                                    <button
                                        type='button'
                                        className='inline-flex justify-center rounded-md border border-transparent bg-red-100 px-4 py-2 text-sm font-medium text-red-900 hover:bg-red-200 focus:outline-none focus-visible:ring-2 focus-visible:ring-red-500 focus-visible:ring-offset-2'
                                        onClick={closeModal}
                                    >
                                        Cancel
                                    </button>
                                </div>
                            </form>
                        </Dialog.Panel>
                    </Transition.Child>
                </div>
            </div>
        </Dialog>
    </Transition>
</div>
handleSubmit按照如下所示更新函数。
const handleSubmit: FormEventHandler<HTMLFormElement> = (e) => {
    e.preventDefault();
    if (
        Number(minute) < 60 &&
        content.trim().length > 0 &&
        selectedCell.time_id !== undefined &&
        selectedCell.day_id !== undefined
    ) {
        const newSchedule = [...yourSchedule];
        const selectedDay =
            newSchedule[selectedCell.time_id].schedule[selectedCell.day_id - 1];
        selectedDay.push({
            content,
            published: false,
            minutes: minute,
            day: selectedCell.day_id,
        });
        updateYourSchedule(newSchedule);
        closeModal();
    }
};
该函数首先验证用户输入的分钟数是否有效,确保内容不为空,并确认所选的时间和日期已定义。然后,它检索用户的发布计划,确定所选的发布日期,并使用新的发布详情更新数组。
将下面的代码片段添加到DeletePostModal.tsx文件中。
"use client";
import { Dialog, Transition } from "@headlessui/react";
import { Fragment, Dispatch, SetStateAction } from "react";
import {
    DelSelectedCell,
    AvailableScheduleItem,
    updateSchedule,
} from "../utils/util";

interface Props {
    setDeletePostModal: Dispatch<SetStateAction<boolean>>;
    deletePostModal: boolean;
    delSelectedCell: DelSelectedCell;
    profile: string | any;
    yourSchedule: AvailableScheduleItem[];
    updateYourSchedule: Dispatch<SetStateAction<AvailableScheduleItem[]>>;
}

const DeletePostModal: React.FC<Props> = ({
    setDeletePostModal,
    deletePostModal,
    delSelectedCell,
    yourSchedule,
    updateYourSchedule,
    profile,
}) => {
    const closeModal = () => setDeletePostModal(false);

    const handleDelete = () => {};

    return <main>{/**-- JSX elements --**/}</main>;
};
在组件内渲染这些 JSX 元素DeletePostModal。
return (
    <div>
        <Transition appear show={deletePostModal} as={Fragment}>
            <Dialog as='div' className='relative z-10' onClose={closeModal}>
                <Transition.Child
                    as={Fragment}
                    enter='ease-out duration-300'
                    enterFrom='opacity-0'
                    enterTo='opacity-100'
                    leave='ease-in duration-200'
                    leaveFrom='opacity-100'
                    leaveTo='opacity-0'
                >
                    <div className='fixed inset-0 bg-black bg-opacity-25' />
                </Transition.Child>

                <div className='fixed inset-0 overflow-y-auto'>
                    <div className='flex min-h-full items-center justify-center p-4 text-center'>
                        <Transition.Child
                            as={Fragment}
                            enter='ease-out duration-300'
                            enterFrom='opacity-0 scale-95'
                            enterTo='opacity-100 scale-100'
                            leave='ease-in duration-200'
                            leaveFrom='opacity-100 scale-100'
                            leaveTo='opacity-0 scale-95'
                        >
                            <Dialog.Panel className='w-full max-w-md transform overflow-hidden rounded-2xl bg-white p-6 text-left align-middle shadow-xl transition-all'>
                                <Dialog.Title
                                    as='h3'
                                    className='text-xl font-bold leading-6 text-gray-900'
                                >
                                    Delete post
                                </Dialog.Title>
                                <div className='mt-2'>
                                    <p className='mb-3'>Are you sure you want to delete?</p>
                                    <p className='text-sm text-gray-500'>
                                        {`"${delSelectedCell.content}" scheduled for ${delSelectedCell.day} at ${delSelectedCell.time_id}:${delSelectedCell.minutes}`}
                                    </p>
                                </div>

                                <div className='mt-4 flex items-center justify-between space-x-4'>
                                    <button
                                        type='button'
                                        className='inline-flex justify-center rounded-md border border-transparent bg-blue-100 px-4 py-2 text-sm font-medium text-blue-900 hover:bg-blue-200 focus:outline-none focus-visible:ring-2 focus-visible:ring-blue-500 focus-visible:ring-offset-2'
                                        onClick={handleDelete}
                                    >
                                        Yes
                                    </button>
                                    <button
                                        type='button'
                                        className='inline-flex justify-center rounded-md border border-transparent bg-red-100 px-4 py-2 text-sm font-medium text-red-900 hover:bg-red-200 focus:outline-none focus-visible:ring-2 focus-visible:ring-red-500 focus-visible:ring-offset-2'
                                        onClick={closeModal}
                                    >
                                        Cancel
                                    </button>
                                </div>
                            </Dialog.Panel>
                        </Transition.Child>
                    </div>
                </div>
            </Dialog>
        </Transition>
    </div>
);
修改该handleDelete功能以接受所选帖子的属性并将其从计划中删除。
const handleDelete = () => {
    if (
        delSelectedCell.time_id !== undefined &&
        delSelectedCell.day_id !== undefined
    ) {
        //👇🏻 gets the user's post schedule
        const initialSchedule = [...yourSchedule];
        //👇🏻 gets the exact day the post is scheduled for
        let selectedDay =
            initialSchedule[delSelectedCell.time_id].schedule[
                delSelectedCell.day_id - 1
            ];
        //👇🏻 filters the array to remove the selected post
        const updatedPosts = selectedDay.filter(
            (day) =>
                day.content !== delSelectedCell.content &&
                day.minutes !== delSelectedCell.minutes
        );
        //👇🏻 updates the schedule
        initialSchedule[delSelectedCell.time_id].schedule[
            delSelectedCell.day_id - 1
        ] = updatedPosts;
        //👇🏻 updates the schedule
        updateYourSchedule(initialSchedule);
        closeModal();
    }
};
恭喜你完成了这么多!现在你可以从每个单元格添加和删除定时发布的帖子了。接下来,让我们将后端数据库(Supabase)连接到应用程序,以便在页面刷新时持久保存数据。
将所有内容保存到数据库📀
Supabase 是一款开源的 Firebase 替代方案,可让您为软件应用程序添加身份验证、文件存储、Postgres 和实时数据库。使用 Supabase,您可以在几分钟内构建安全且可扩展的应用程序。
在本节中,你将学习如何将 Supabase 集成到你的 Next.js 应用程序中,以及如何通过 Supabase 保存和更新用户的日程安排。在继续之前,请先安装 Supabase 软件包。
npm install @supabase/supabase-js
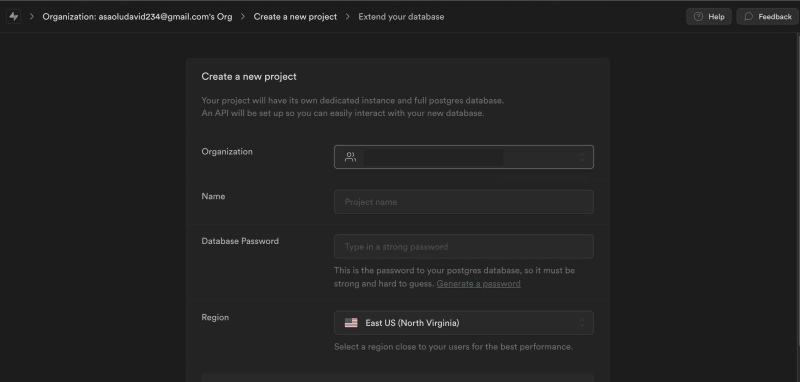
访问 Supabase 主页 并创建一个新的组织和项目。
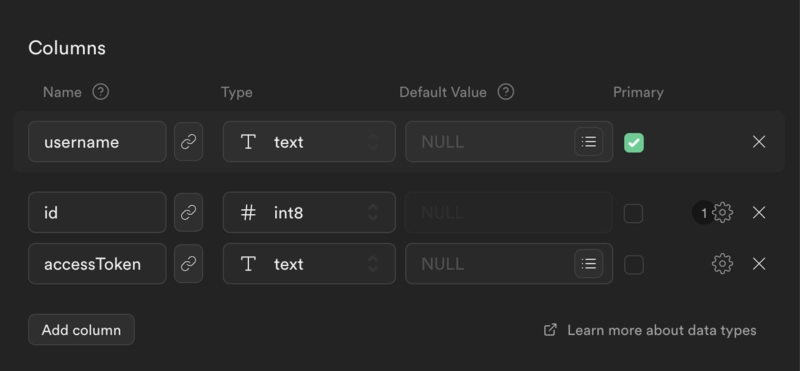
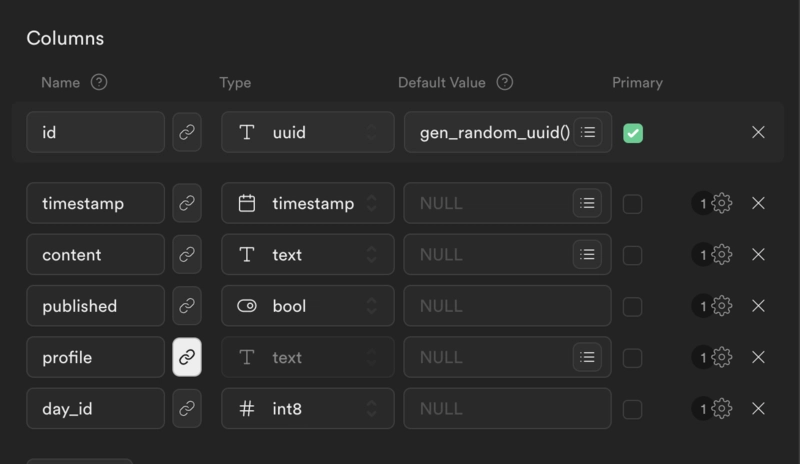
要为应用程序设置数据库,您需要创建两个表 -schedule_posts包含预定的帖子和users包含从 X 检索的所有用户信息的表。
该users表有三列,分别包含用户名、ID 和身份验证后检索到的访问令牌。请确保将用户名列设置为该表的主键。
该schedule_posts表包含六列:每行一个唯一的 ID、指示帖子何时上线的时间戳、X 的帖子内容、帖子状态、用户在 X 上的用户名以及day_id代表预定日期。day_id对于检索现有时间表是必要的。
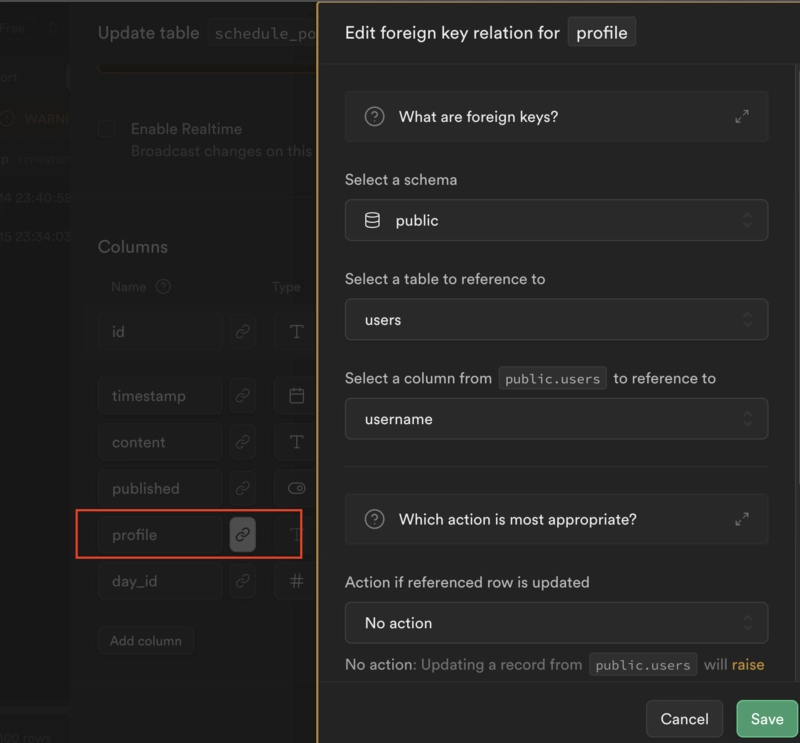
接下来,将该profile列设置为表中用户名列的外键users。在执行合并两个表中数据的查询时,我们需要此连接。
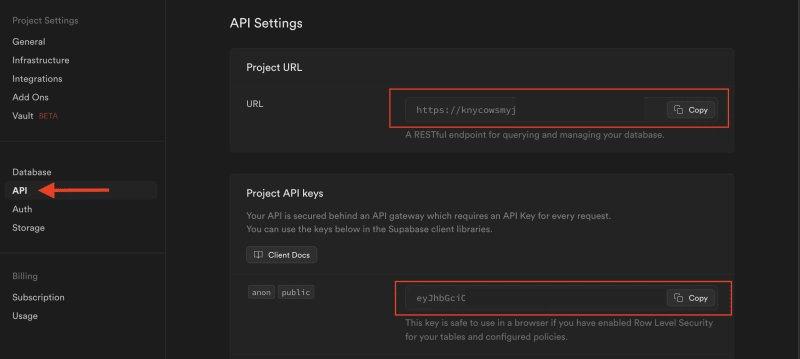
点击 API 侧边栏菜单,将项目的URL和API复制到 .env.local 文件中。
NEXT_PUBLIC_SUPABASE_URL=<public_supabase_URL>
NEXT_PUBLIC_SUPABASE_ANON_KEY=<supabase_anon_key>
最后,创建一个 src/supbaseClient.ts 文件并为应用程序创建Supabase客户端。
import { createClient } from "@supabase/supabase-js";

const supabaseURL = process.env.NEXT_PUBLIC_SUPABASE_URL!;
const supabaseAnonKey = process.env.NEXT_PUBLIC_SUPABASE_ANON_KEY!;

export const supabase = createClient(supabaseURL, supabaseAnonKey, {
  auth: { persistSession: false },
});
最后,api/schedule在服务器上创建一个包含读取、创建和删除路由的文件夹。该文件夹api/schedule/create用于向数据库添加新的帖子发布计划、api/schedule/delete删除选定的帖子以及api/schedule/read获取用户创建的所有帖子。
cd pages/api
mkdir schedule
touch create.ts delete.ts read.ts
在我们继续之前,请更新api/twitter/auth端点以便在身份验证后将用户的访问令牌和配置文件信息保存到 Supabase。
import { supabase } from '../../../../supabaseClient';

export default async function handler(
  req: NextApiRequest,
  res: NextApiResponse
) {
    const { code } = req.body
        try {
            const tokenResponse = await fetchUserToken(code)
            const accessToken = tokenResponse.access_token

            if (accessToken) {
                const userDataResponse = await fetchUserData(accessToken)
                const userCredentials = { ...tokenResponse, ...userDataResponse };
                                //👇🏻 saves user's information to Supabase
                const { data, error } = await supabase.from("users").insert({
                    id: userCredentials.data.id,
                    accessToken: userCredentials.access_token,
                    username: userCredentials.data.username
                });
                if (!error) {
                    return res.status(200).json(userCredentials)

                } else {c
                    return res.status(400).json({error})
                }
            }

        } catch (err) {
            return res.status(400).json({err})
        }
}
安排新帖子
修改api/schedule/create端点以接受帖子详细信息并将其保存到 Supabase。
import type { NextApiRequest, NextApiResponse } from "next";
import { supabase } from "../../../../supabaseClient";

export default async function handler(
    req: NextApiRequest,
    res: NextApiResponse
) {
    const { profile, timestamp, content, published, day_id } = req.body;

    const { data, error } = await supabase.from("schedule_posts").insert({
        profile, timestamp, content, published, day_id
    });
    res.status(200).json({data, error});

}
在文件中添加一个函数utils/util.ts,用于接收来自客户端的所有帖子详细信息并将其发送到端点。当用户添加新计划时,执行该函数。
export const getNextDayOfWeek = (dayOfWeek: number, hours: number, minutes: number) => {
    var today = new Date();
    var daysUntilNextDay = dayOfWeek - today.getDay();
    if (daysUntilNextDay < 0) {
        daysUntilNextDay += 7;
    }
    today.setDate(today.getDate() + daysUntilNextDay);
    today.setHours(hours);
    today.setMinutes(minutes);
    return today;
}

export const updateSchedule = async (
    profile: string,
    schedule: any
) => {
    const { day_id, time, minutes, content, published } = schedule
    const timestampFormat = getNextDayOfWeek(day_id, time, minutes)
    try {
    await fetch("/api/schedule/create", {
            method: "POST",
            body: JSON.stringify({profile, timestamp: timestampFormat, content, published, day_id}),
            headers: {
                "Content-Type": "application/json",
            },
        });

    } catch (err) {
        console.error(err);
    }
};
该getNextDayOfWeek函数接受帖子的日期、小时和分钟,获取所选日期的日期,并将帖子的时间和日期转换为数据库可接受的日期时间格式,然后将其添加到请求正文中。该profile参数包含身份验证后存储在本地存储中的用户 X 用户名。
删除预定的帖子
更新api/schedule/delete端点以接受帖子的数据并将其从数据库中删除。
import type { NextApiRequest, NextApiResponse } from "next";
import { supabase } from "../../../../supabaseClient";

export default async function handler(
    req: NextApiRequest,
    res: NextApiResponse
) {
    const { profile, timestamp, content } = req.body;

    const { data, error } = await supabase
        .from("schedule_posts").delete().eq("content", content).eq("timestamp", timestamp.toISOString())

    res.status(200).json({ data, error });
}
在文件中创建客户端函数utils/util.ts,当用户删除帖子时向端点发送请求。
export const deleteSchedule = async (
    profile: string,
    schedule: any
) => {
    const { day_id, time_id, minutes, content, published } = schedule
    const timestampFormat = getNextDayOfWeek(day_id, time_id, minutes)

    try {
        await fetch("/api/schedule/delete", {
            method: "POST",
            body: JSON.stringify({ profile, timestamp: timestampFormat,  content}),
            headers: {
                "Content-Type": "application/json",
            },
        });
    } catch (err) {
        console.error(err);
    }

};
获取用户的日程安排
修改api/schedule/create端点以接受帖子详细信息并将其添加到数据库。
// Next.js API route support: https://nextjs.org/docs/api-routes/introduction
import type { NextApiRequest, NextApiResponse } from "next";
import { supabase } from "../../../../supabaseClient";

export default async function handler(
    req: NextApiRequest,
    res: NextApiResponse
) {
    const { profile, timestamp, content, published, day_id } = req.body;

    const { data, error } = await supabase.from("schedule_posts").insert({
        profile, timestamp, content, published, day_id
    });
    res.status(200).json({data, error});

}
在客户端创建其请求函数,检索所有预定的帖子并将其转换为前端所需的格式。
export const fetchSchedule = async (
    profile: string, updateYourSchedule: Dispatch<SetStateAction<AvailableScheduleItem[]>>
) => {
    try {
        const request = await fetch("/api/schedule/read", {
            method: "POST",
            body: JSON.stringify({ profile }),
            headers: {
                "Content-Type": "application/json",
            },
        });
        const response = await request.json();
        const { data } = response
        //👇🏻 if there is a response
        if (data) {
            const result = data.map((item: any) => {
                const date = new Date(item.timestamp);
                //👇🏻 returns a new array in the format below
                return {
                    //👇🏻 converts 24 hour to 0 hour
                    time: date.getUTCHours() + 1 < 24 ? date.getUTCHours() + 1 : 0,
                    schedule: {
                        content: item.content,
                        published: item.published,
                        minutes: date.getUTCMinutes(),
                        day: item.day_id
                    },
                }

            })
            //👇🏻 loops through retrieved schedule and add them to the large table array
            result.forEach((object: any) => {
                const matchingObjIndex = availableSchedule.findIndex((largeObj) => largeObj.time === object.time);
                if (matchingObjIndex !== -1) {
                    availableSchedule[matchingObjIndex].schedule[object.schedule.day].push(object.schedule)
                }
            })
            updateYourSchedule(availableSchedule)
        }
    } catch (err) {
        console.error(err);
    }

};
上面的代码片段从服务器接收预定的帖子,将其转换为表格 UI 所需的格式,然后循环遍历数据,将它们添加到availableSchedule包含表格布局的大数组中,并使用修改后的版本更新计划状态。
恭喜!您已成功将 Supabase 添加到应用程序中。
在正确的时间发送帖子⏳
Trigger.dev提供三种通信方式:webhook、schedule 和 event。schedule 适用于重复执行的任务,event 会在发送有效负载时激活作业,而 webhook 会在特定事件发生时触发实时作业。
在本节中,您将学习如何使用 Trigger.dev 安排重复任务,通过将当前时间与计划的发布时间进行比较,并在计划的时间自动将它们发布到 X。
将 Trigger.dev 添加到 Next.js 应用
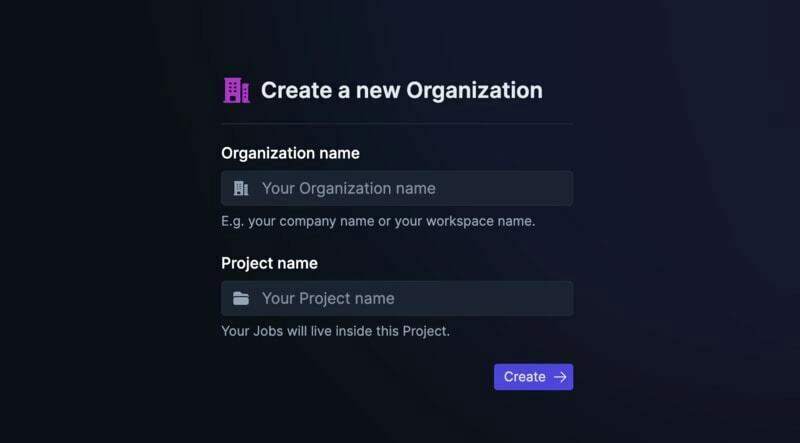
在继续之前,您需要 创建一个 Trigger.dev 帐户。注册后,创建一个组织并为您的工作选择一个项目名称。
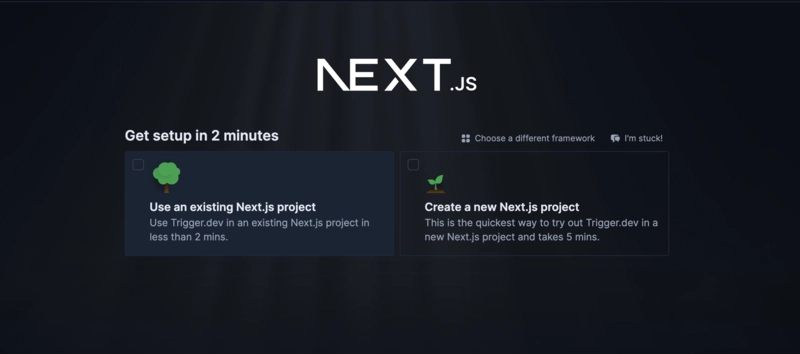
选择 Next.js 作为您的框架,并按照将 Trigger.dev 添加到现有 Next.js 项目的过程进行操作。
否则,请单击 Environments & API Keys 项目仪表板的侧边栏菜单。
复制您的 DEV 服务器 API 密钥,并运行以下代码片段来安装 Trigger.dev。请仔细按照说明操作。
npx @trigger.dev/cli@latest init
启动您的 Next.js 项目。
npm run dev
在另一个终端中,运行以下代码片段以在 Trigger.dev 和 Next.js 项目之间建立隧道。
npx @trigger.dev/cli@latest dev
最后,将 jobs/examples.ts 文件重命名为 jobs/functions.ts。所有作业都在这里处理。
恭喜!🎉您已成功将 Trigger.dev 添加到您的 Next.js 应用程序。
使用 Trigger.dev 在 X 上发布预定内容
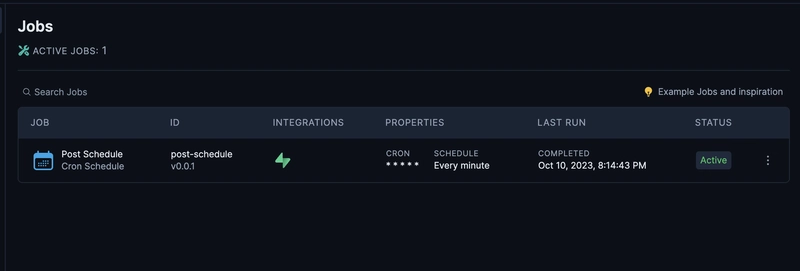
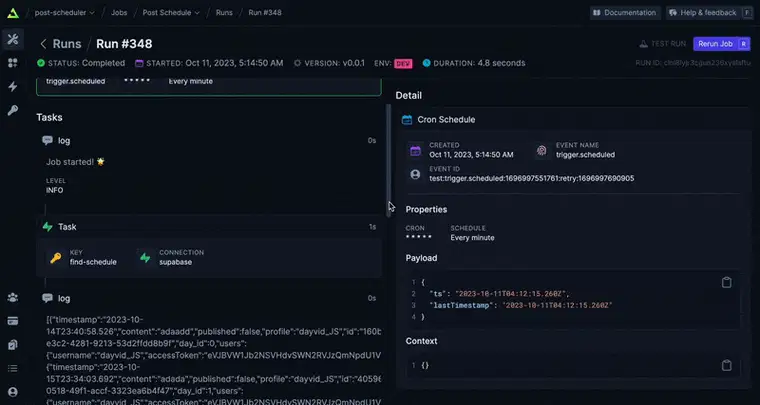
在这里,您将学习如何使用 Trigger 创建重复作业。该作业将每分钟检查一次已安排的帖子,并在用户指定的准确时间将内容发布到 X。
要将 Trigger.dev 与 Supabase 集成,您需要安装Trigger.dev Supabase 包。
npm install @trigger.dev/supabase
将[cronTrigger](https://trigger.dev/docs/sdk/crontrigger)和Supabase从各自的包中导入到jobs/functions.ts文件中。该cronTrigger()函数使我们能够按重复计划执行作业。
import { cronTrigger } from "@trigger.dev/sdk";
import { Supabase } from "@trigger.dev/supabase";

const supabase = new Supabase({
    id: "supabase",
    supabaseUrl: process.env.NEXT_PUBLIC_SUPABASE_URL!,
    supabaseKey: process.env.NEXT_PUBLIC_SUPABASE_ANON_KEY!,
});
修改文件中的作业jobs/functions.ts以获取尚未发布的帖子,并且其计划时间与当前时间相匹配。
client.defineJob({
    id: "post-schedule",
    name: "Post Schedule",
    //👇🏻 integrate Supabase
    integrations: { supabase },
    version: "0.0.1",
    //👇🏻 runs every minute
    trigger: cronTrigger({
      cron: "* * * * *",
    }),
    run: async (payload, io, ctx) => {
        await io.logger.info("Job started! 🌟");

        const { data, error } = await io.supabase.runTask(
            "find-schedule",
            async (db) => {
                return (await db.from("schedule_posts")
                    .select(`*, users (username, accessToken)`)
                    .eq("published", false)
                    .lt("timestamp", new Date().toISOString()))
            }
        );

        await io.logger.info(JSON.stringify(data))
}
});
上面的代码片段使用和表username之间创建的外键 ( )执行连接查询。此查询返回 表中的访问令牌和用户名以及 中的所有数据。usersschedule_postsusersschedule_posts
最后,遍历帖子并将其内容发布在 X 上。
      for (let i = 0; i < data?.length; i++) {
            try {
                const postTweet = await fetch("https://api.twitter.com/2/tweets", {
                    method: "POST",
                    headers: {
                        "Content-type": "application/json",
                        Authorization: `Bearer ${data[i].users.accessToken}`,
                    },
                    body: JSON.stringify({ text: data[i].content })
                })
                const getResponse = await postTweet.json()
                await io.logger.info(`${i}`)
                await io.logger.info(`Tweet created successfully!${i} - ${getResponse.data}`)

            } catch (err) {
                await io.logger.error(err)
            }

        }
恭喜!您已完成本教程的项目。
结论
到目前为止,您已经学习了如何向 Next.js 应用程序添加 Twitter (X) 身份验证、如何将数据保存到 Supabase 以及如何使用 Trigger.dev 创建重复任务。
作为开源开发者,我们诚邀您加入我们的 社区 ,贡献力量并与维护人员互动。欢迎访问我们的 GitHub 代码库 ,贡献代码并创建与 Trigger.dev 相关的问题。
本教程的源代码可以在这里找到:
https://github.com/triggerdotdev/blog/tree/main/x-post-scheduler
感谢您的阅读!
帮帮我🩷
如果您能花 10 秒钟给我们一颗星,我将非常感激 💖
https://github.com/triggerdotdev/trigger.dev
 后端开发教程 - Java、Spring Boot 实战 - msg200.com


