使用 DevTO API 创建您自己的博客
我于 2019 年 6 月加入 DevTO。这是一个非常有趣的平台,程序员们可以在这里分享想法,互相帮助,共同成长。它是一个在线社区,可以分享和发现好点子,进行辩论,结交朋友。任何人都可以分享文章、问题、讨论等,只要他们拥有所分享文字的版权。欢迎从您自己的博客交叉发布 - 引用请见“关于”页面。
我在这个平台上写过几篇文章,确实很喜欢。更有趣的是,我发现了他们的API(测试版),可以获取 JSON 格式的文章。
我知道我可以把 DevTO 的所有帖子放到我新重建的网站上。但仍有一些挑战需要解决:
- 它在我的网站上应该是什么样子?
- 我如何显示“所有帖子”页面?
- 如何显示文章页面?
幸运的是,我已经把所有想法都想好了,并且已经付诸实践。以下是我使用 Angular 实现的方法,你也可以使用任何你喜欢的框架。
它在我的网站上应该是什么样子?
我尽量让它在各种设备上都简洁易读。你可以做一些研究,然后决定如何设计自己的博客。
我如何显示“所有帖子”页面?
我可以获取所有文章的端点是已发布的文章。通过参数“用户名”,我可以返回我撰写的所有文章。
https://dev.to/api/articles?username=dalenguyen
这是样本返回:
[
   {
      "type_of":"article",
      "id":186759,
      "title":"Create Your Website For FREE with Github Pages - Angular",
      "description":"---",
      "cover_image":"---",
      "published_at":"2019-10-09T13:19:07.906Z",
      "tag_list":[
         "angular",
         "github",
         "beginners",
         "webdev"
      ],
      "slug":"create-your-website-for-free-with-github-pages-angular-1c05",
      "path":"/dalenguyen/create-your-website-for-free-with-github-pages-angular-1c05",
      "url":"---",
      "canonical_url":"---",
      "comments_count":0,
      "positive_reactions_count":39,
      "published_timestamp":"2019-10-09T13:19:07Z",
      "collection_id":null,
      "user":{
         "name":"Dale Nguyen",
         "username":"dalenguyen",
         "twitter_username":null,
         "github_username":"dalenguyen",
         "website_url":"https://dalenguyen.me",
      }
   },
--------------
]
它只提供基本信息,不包含文章正文。我使用的参数有id、title、path、description 和 cover_image。下一节你就会明白为什么我需要id 。以下是我在博客上显示它的方式。
对于内容,使用 HttpClient 从 API 获取 JSON 非常容易。
// blog.service.ts
try {
      articles = await this.http.get('https://dev.to/api/articles?username=dalenguyen').toPromise()
} catch (error) {
      console.error(error)
}
然后用 Angular Material 显示它
// blog.component.html
<div id="blog">
  <h1>Blog</h1>
<section id="articles" *ngIf="articles.length > 0">
    <mat-card class="example-card" *ngFor="let article of articles">
      <mat-card-header>
        <mat-card-title>{{ article.title }}</mat-card-title>
      </mat-card-header>
      <img mat-card-image src="{{ article.cover_image }}" alt="{{ article.title }}">
      <mat-card-content>
        <p>
          {{ article.description }}
        </p>
      </mat-card-content>
      <mat-card-actions>
        <button mat-button (click)="openPost(article)">READ MORE</button>
      </mat-card-actions>
    </mat-card>
  </section>
</div>
为了获取单篇文章,我将使用 id 来获取文章的内容。
// blog.compoment.ts
openPost(article: any) {
    this.router.navigate(['/blog', article.slug], { queryParams: { id: article.id }})
}
如何显示文章页面?
这是比较棘手的部分,因为我需要发出另一个请求才能获取单个帖子的内容 - 并且 id 就是用于此目的的。
// post.service.ts
try {
      article = await this.http.get('https://dev.to/api/articles/186759').toPromise()
} catch (error) {
      console.error(error)
}
对于 HTML 部分
// post.component.html
<div id="post" *ngIf="article !== null">
  <header>
    <h1>{{ article.title }}</h1>
    <p>Written by {{ article.user.name }}</p>
    <p> {{ article.published_at | date }}</p>
  </header>
<article [innerHTML]="articleBody">
  </article>
</div>
对于文章中嵌入的 URL,我该如何处理?如果我直接保留它,就会跳转到 DevTo 网站,我真的不想这样。所以在将 HTML 提供给前端之前,我必须将 DevTo 的域名替换成我的网站。
// post.component.ts
private cleanArticleContent(html: string): string {
    return html.replace(/https:\/\/dev.to\/dalenguyen/g, 'https://dalenguyen.me/blog')
}
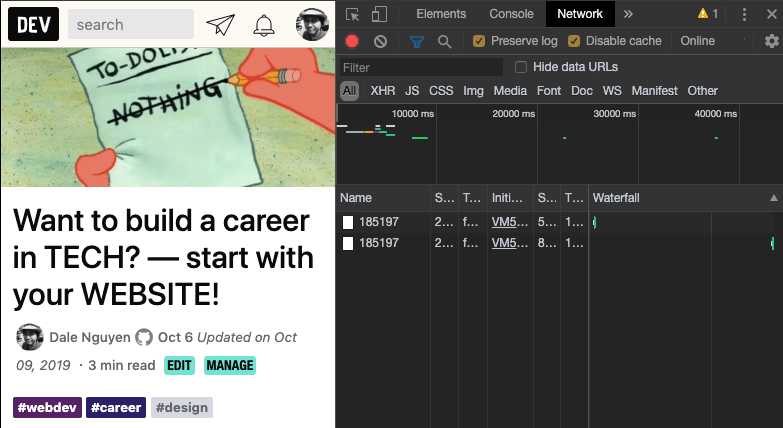
对于 id 部分,每当您在 DevTO 上有嵌入链接时,您都必须手动添加 Id。
https://dev.to/dalenguyen/want-to-build-a-career-in-tech-start-with-your-website-44i7?id=185197
当您打开检查并转到网络选项卡时,可以找到该 ID。
从现在起,您可以创建自己的博客,内容来自 DevTO——文章可能需要几个小时才能显示在您的网站上。您可以从我的Github帐户中找到该项目。
鏂囩珷鏉ユ簮锛�https://dev.to/dalenguyen/create-your-own-blog-with-devto-api-6m8 后端开发教程 - Java、Spring Boot 实战 - msg200.com

