我使用 Svelte 创建了一个测验应用程序,现在我无法返回到任何其他框架。
我经常听说Svelte,听完这个演讲后,我也想尝试一下。于是我就试了,结果发现 Svelte 真的非常棒。我之前经常用React编程,一些明显的差异让我爱上了 Svelte。
什么是 Svelte
Svelte是一个编译器,它将基于声明式组件的代码转换为可以直接操作 DOM 的 JavaScript。你可能听说过 Svelte 速度极快,比市面上任何其他框架都快,这是事实。这背后的原因在于,Svelte 与其说是一个框架或库,不如说是一个编译器。Svelte 不使用 Shadow DOM 或 Virtual DOM 来执行 DOM 更新,这自然使其速度比那些使用 Virtual DOM 实现的框架或库快几个数量级。它试图消除大量的样板代码,并且真正做到了响应式。如果你像我一样来自 React 生态系统,Svelte 会在很多方面挑战你的思维方式。
在本文中,我们将创建一个小型琐事应用程序,并看看 Svelte 与 React 相比如何。
我们先创建一个 Svelte 项目。Sveltecreate-react-app提供了一种启动 Svelte 应用的方法。只需运行下面的代码即可启动并运行。
npx degit sveltejs/template my-svelte-project
cd my-svelte-project

npm install
npm run dev
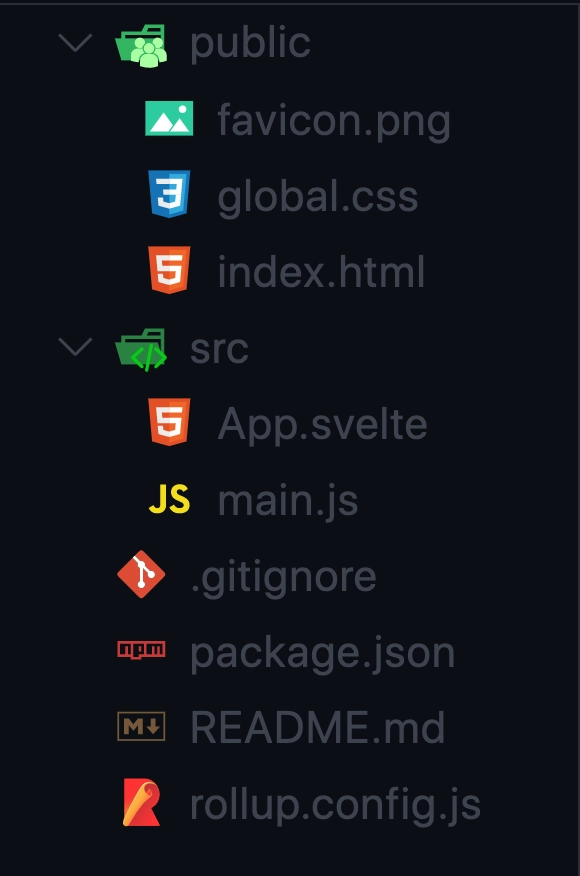
我们的项目目录应该是这样的。
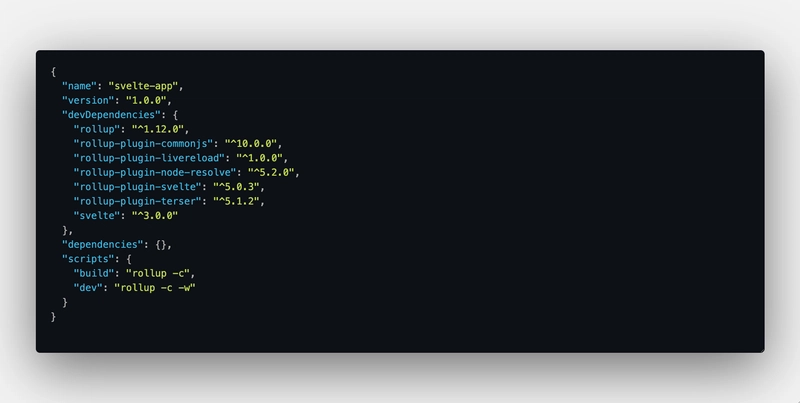
现在,如果你打开它,package.json你会看到一些令人惊奇的东西。
它没有dependencies列出任何依赖项。所有依赖项都是devDependencies。这是因为 Svelte 是一个编译器,所有依赖项都是在生成构建时预先计算的,因此我们的最终代码不附带任何依赖项,从而使我们的构建大小大大减小。
- 该
main.js文件是我们进入应用程序的主要入口点。它就像App.jsReact 项目中的文件一样。 - 我们也看到了这个
App.svelte文件。让我们打开它并了解它的不同部分。 - 如果您熟悉 React,我们就会知道,React 专用文件通常以
.jsx扩展名结尾。同样,在 Svelte 中,所有 Svelte 专用文件也以.svelte扩展名结尾。 - 每个 Svelte 文件仅包含
markup (HTML tags)标记,或在标记中包含样式的标记<style></style>或包含在标记中的 JavaScript<script></script>,或包含这三种内容。 - Svelte 组件最好的部分是,其中的样式仅限于该组件,因此您不会遇到样式泄漏到其他组件的问题。
- 如果您习惯使用JS 编写 HTML ,那么
JSXSvelte 与此完全相反,您将所有内容都写入一个svelte文件中,这只是编写HTML文件的语法糖。
注意:如果您有 React 背景,您可能不习惯这样思考,但相信我,这将帮助您扩展您的界限。
话虽如此,我们开始吧。
首先,我们来看一下这个App.svelte文件。这是我们的主文件/组件,它是应用程序的入口点。你可以参考下面的代码。
<script>
  // import QuizArea from './QuizArea.svelte';
</script>

<style>
  main {
    text-align: center;
    padding: 1em;
    max-width: 240px;
    margin: 0 auto;
  }

  h1 {
    text-transform: uppercase;
    font-size: 4em;
    font-weight: 100;
  }

  @media (min-width: 640px) {
    main {
      max-width: none;
    }
  }
</style>

<main>
  <!-- <QuizArea></QuizArea> -->
</main>
- 正如您在代码中看到的,我们有
script、style和markup用于组件。目前,除了将一些样式应用于应用程序之外,代码没有什么特别之处。 - 但很快我们就会取消该
QuizArea组件的注释。
我希望您已经对 Svelte 文件/组件中的不同部分有了基本的了解。
我没有在这篇文章中添加项目中的所有文件,但如果您想随时引用代码,可以在这里获取。
现在,让我们创建一个新QuizArea组件。为此,QuizArea.svelte在src目录中创建一个名为 的文件。
我们将分别研究这三个部分。
- 首先我们有
<styles></styles>标签。你可以在标签之间添加任何你想要的组件样式<style>。 - 在 Svelte 中,我们不需要在单独的文件中编写样式
CSS,而是在组件本身内编写样式。 QuizArea我已经在下面的代码中为组件定义了样式,但您可以按照自己想要的方式设置其样式。
<style>
  #main {
    position: absolute;
    left: 50%;
    top: 50%;
    transform: translateX(-50%) translateY(-50%);
    height: calc(100vh - 40%);
    width: calc(100vw - 40%);
    padding: 15px;

    background-color: white;
    border-radius: 6px;
    box-shadow: 0 0 5px white;

    text-align: left;
  }

  span {
    display: block;
    margin-top: 20px;
  }

  button {
    margin-top: 15px;
    margin-right: 15px;
    padding: 10px;
    float: right;

    color: white;
    background-color: #ff3e00;
    border: none;
    border-radius: 10px;
    cursor: pointer;
  }

  button:hover {
    box-shadow: 0 0 5px #ff3e00;
  }

  #heading {
    font-size: 24px;
    font-weight: bolder;
  }

  #difficulty {
    position: absolute;
    right: 16px;
    top: 16px;
    height: 25px;
    width: 80px;
    padding: 5px;

    background: rgb(97, 225, 230);
    color: white;
    text-align: center;
    border-radius: 16px;
  }

  #category {
    font-size: 12px;
    font-weight: normal;
  }

  #button-bar {
    position: absolute;
    bottom: 16px;
    right: 0;
  }

  #choice {
    margin-top: 16px;
    padding: 8px;

    border: 1px solid #4e5656;
    border-radius: 8px;
  }

  #choice:hover {
    cursor: pointer;
    background: green;
    border: 1px solid green;
    color: white;
  }

  #snackbar {
    position: absolute;
    left: 16px;
    bottom: 16px;
  }
</style>
这很简单,没有什么特别的,也没有什么 Svelte 特有的。唯一的区别在于,我们把它styles和其他组件的代码写在同一个文件中。
- 接下来我们将讨论
<script></script>标签。我们将把所有的 JavaScript 代码都写在这个标签里,接下来我们将看看 Svelte 是如何运作的。 - 因此,在 Svelte 中,我们将使用
let或const来声明变量。我们声明的所有变量都是必需state变量。所有 的规则都JavaScript适用于这些变量,因此const变量不能被重新赋值,而let变量可以重新赋值。 useState()它们与我们在 React 中声明使用的变量相同。- Svelte 最棒的地方在于,每当状态变量的值发生变化时,组件都会自动重新渲染。无需调用任何
set函数。
// In Svelte
let name = 'Manan';

// Same thing in React
const [name, setName] = React.useState('Manan');

// causes component to re-render
name = 'Maitry';

// Same thing in React
setName('Maitry');
- 我们已经讨论过了,
state所以自然而然地我们也会讨论props。在 Svelte 中,你只需export在变量声明后面添加关键字即可声明一个 prop。
// props in Svelte
export let name;
- 现在,该
nameprop 可以在其他组件中使用了。我们可以像在 React 中一样声明任意数量的 prop。 - 我们甚至可以声明
functions它可以充当我们的event handlers或可以用于任何其他目的,如获取数据、提供实用程序操作等。
// on click handler
function handleClick(change) {
  snackbarVisibility = false;

  if (change === 'f') questionNo += 1;
  else questionNo -= 1;

  question = htmlDecode(data[questionNo].question);
  answerChoices = shuffle(
    [
      ...data[questionNo].incorrect_answers,
      data[questionNo].correct_answer
    ].map(a => htmlDecode(a))
  );
  answer = htmlDecode(data[questionNo].correct_answer);
  category = htmlDecode(data[questionNo].category);
  difficulty = data[questionNo].difficulty;
}
- 我们可以使用关键字导入其他模块、包或组件
import。这与我们在 React 中所做的类似。
// imports the Snackbar component
import Snackbar from './Snackbar.svelte';
这部分的主要内容是,我们JavaScipt只需稍加改动就可以编写任何我们想要的内容,编译器将为我们完成剩下的工作。
现在的问题是,如何在 HTML 标记中使用 JavaScript 变量。因此,在应用程序的最后部分,我们将研究这个问题。
- 渲染任何变量都非常简单。我们只需将变量括在花括号中,就像这样
{variableName}。
<!-- see how simple it is :smiley:-->
<p>Hello {name}!</p>

<!-- outputs -->
Hello Manan
- 请记住,Svelte 文件中的标记是 Html-ish,因此我们可以使用内置的 Svelte 表达式来执行诸如有条件地渲染某些内容或循环给定值之类的操作。
- 为了有条件地渲染某些内容,我们使用
{#if expression}<div></div> {/if}。这里的expression可以是任何在范围内的有效变量或表达式(即在<script>标签内声明的)。
{#if name}
<div id="snackbar">
  <Snackbar message="{correct}"></Snackbar>
</div>
{/if}
- 要循环遍历数组,我们使用
{#each expression as exp}<div></div>{/each}。这里expression是一个可迭代值,而是exp该可迭代值的每个条目。
{#each answerChoices as choice}
<div id="choice" on:click="{(e) => handleAnswerChoice(e)}">
  <i>{choice}</i>
</div>
{/each}
这只是冰山一角,您可以在这里了解有关 Svelte 功能的更多信息。
这样,我们现在就可以把组件拼接起来了。将下面的代码复制并粘贴到你的QuizArea.svelte文件中。
<script>
  import { onMount } from 'svelte';
  import { htmlDecode, shuffle } from './utils.js';
  import Snackbar from './Snackbar.svelte';

  let data;

  let questionNo = 0;
  let question = 'loading...';
  let answerChoices;
  let answer;
  let category = 'loading...';
  let difficulty = 'loading...';

  let correct = false;
  let snackbarVisibility = false;
  $: score = 0;

  // function for fetching data
  function fetchData() {
    fetch('https://opentdb.com/api.php?amount=10')
      .then(resp => resp.json())
      .then(res => {
        data = res.results;
        question = htmlDecode(data[questionNo].question);
        answerChoices = shuffle(
          [
            ...data[questionNo].incorrect_answers,
            data[questionNo].correct_answer
          ].map(a => htmlDecode(a))
        );
        answer = htmlDecode(data[questionNo].correct_answer);
        category = htmlDecode(data[questionNo].category);
        difficulty = data[questionNo].difficulty;
      })
      .catch(e => console.error(e));
  }

  onMount(fetchData);

  // function for moving onto next/prev question
  function handleClick(change) {
    snackbarVisibility = false;

    if (change === 'f') questionNo += 1;
    else questionNo -= 1;

    question = htmlDecode(data[questionNo].question);
    answerChoices = shuffle(
      [
        ...data[questionNo].incorrect_answers,
        data[questionNo].correct_answer
      ].map(a => htmlDecode(a))
    );
    answer = htmlDecode(data[questionNo].correct_answer);
    category = htmlDecode(data[questionNo].category);
    difficulty = data[questionNo].difficulty;
  }

  // function to check the correctness of an answer
  function handleAnswerChoice(e) {
    if (e.target.innerText === answer && !correct) {
      correct = true;
      score += 1;
    } else if (correct) correct = false;
    snackbarVisibility = true;
  }
</script>

<style>
  #main {
    position: absolute;
    left: 50%;
    top: 50%;
    transform: translateX(-50%) translateY(-50%);
    height: calc(100vh - 40%);
    width: calc(100vw - 40%);
    padding: 15px;

    background-color: white;
    border-radius: 6px;
    box-shadow: 0 0 5px white;

    text-align: left;
  }

  span {
    display: block;
    margin-top: 20px;
  }

  button {
    margin-top: 15px;
    margin-right: 15px;
    padding: 10px;
    float: right;

    color: white;
    background-color: #ff3e00;
    border: none;
    border-radius: 10px;
    cursor: pointer;
  }

  button:hover {
    box-shadow: 0 0 5px #ff3e00;
  }

  #heading {
    font-size: 24px;
    font-weight: bolder;
  }

  #difficulty {
    position: absolute;
    right: 16px;
    top: 16px;
    height: 25px;
    width: 80px;
    padding: 5px;

    background: rgb(97, 225, 230);
    color: white;
    text-align: center;
    border-radius: 16px;
  }

  #category {
    font-size: 12px;
    font-weight: normal;
  }

  #button-bar {
    position: absolute;
    bottom: 16px;
    right: 0;
  }

  #choice {
    margin-top: 16px;
    padding: 8px;

    border: 1px solid #4e5656;
    border-radius: 8px;
  }

  #choice:hover {
    cursor: pointer;
    background: green;
    border: 1px solid green;
    color: white;
  }

  #snackbar {
    position: absolute;
    left: 16px;
    bottom: 16px;
  }

  @media screen and (max-width: 960px) {
    #main {
      width: calc(100vw - 15%);
    }
    #difficulty {
      top: -16px;
    }
  }
</style>

<div id="main">
  <span id="heading"
    >Question {questionNo + 1}
    <i id="category">(Category - {category})</i></span
  >
  <span>{question}</span>
  <div id="difficulty">{difficulty}</div>

  {#if answerChoices} {#each answerChoices as choice}
  <div id="choice" on:click="{(e) => handleAnswerChoice(e)}">
    <i>{choice}</i>
  </div>
  {/each} {/if}

  <div id="button-bar">
    {#if !(questionNo > 10)}
    <button value="Next" on:click="{() => handleClick('f')}">Next</button>
    {/if} {#if questionNo > 0}
    <button value="Back" on:click="{() => handleClick('b')}">
      Previous
    </button>
    {/if}
  </div>

  {#if snackbarVisibility}
  <div id="snackbar">
    <Snackbar message="{correct}"></Snackbar>
  </div>
  {/if}
</div>
现在,我们已经有了一个完全用 Svelte 编写的应用。快来试试npm run dev你的应用的实际效果吧。这个小巧的应用展示了 Svelte 的强大功能。对我来说,它可能会彻底改变我们的网页设计方式,我对未来的发展充满期待。
本文的主要目的是让您大致了解 Svelte 以及它的优点。希望您现在能够更轻松地使用 Svelte。
想法💭
请在下方讨论区分享你对 Svelte 的看法。此外,如果你在应用中遇到问题,或者想了解更多信息,或者对任何部分感到困惑,请随时提问。
感谢您的阅读!
与往常一样,通过Twitter和Instagram与我联系。
直到下一次,祝您平安,编码愉快!!!
干杯。
文章来源:https://dev.to/manan30/i-created-a-quiz-app-using-svelte-and-now-i-cannot-go-back-to-any-other-framework-1jeo 后端开发教程 - Java、Spring Boot 实战 - msg200.com

