React Native 出租车应用:预订信息。Places API
让
我们继续处理预订流程。我们将使用相同的 UserScreen 组件来执行以下操作:
- 出发信息
- 预订信息
我们已经在本教程的前几部分处理了出发信息。对于预订信息,让我们开始在src/components/BookingInformation.js中为组件创建一个新文件:
// src/components/BookingInformation.js
import React from "react"
import styled from "styled-components/native"
import FeatherIcon from "react-native-vector-icons/Feather"
import { formatPlaceName } from "../utils"
import { usePlace } from "../context/PlacesManager"

const Container = styled.View`
  flex: 1.5;
  background-color: #fff;
  padding-vertical: 20px;
  padding-horizontal: 20px;
`

export const Location = styled.View`
  flex-direction: row;
  align-items: center;
`
const LocationPlaceholder = styled.Text`
  color: #717171;
  font-size: 14px;
  margin-left: 5px;
  font-weight: 600;
`;

const Text = styled.Text`
  color: #000;
  font-size: 16px;
  font-weight: 600;
  margin-left: 5px;
`

export default function BookingInformation() {
  const {
    place: { currentPlace },
  } = usePlace()

  return (
    <Container>
      <Location>
        <FeatherIcon name="map-pin" size={15} color="gray" />
        <Text testID="current-place-description">
          {formatPlaceName(currentPlace.description)}
        </Text>
      </Location>

      <FeatherIcon
        name="more-vertical"
        size={15}
        color="gray"
        marginTop={-10}
      />

      <Location>
        <FeatherIcon name="more-vertical" size={15} color="gray" />
        <LocationPlaceholder testID="destination-label">
          Destination address
        </LocationPlaceholder>
      </Location>
    </Container>
  )
}
我们创建了几个 Styled 组件,并从 PlacesManager Context Provider 导入了自定义钩子,用于显示所选的当前地点描述。主要想法是,当我们切换DepartureInformation 组件中的按钮时,usePlace显示UserScreen 组件中的相应内容。BookingInformationBook Now
我将在我们的应用中创建另一个自定义钩子组件来实现显示/隐藏功能。为此,让我们创建一个新文件夹taxiApp/src/hooks/index.js:
// taxiApp/src/hooks/index.js
import {useState} from 'react';

export const useShowState = (initialOpen = false) => {
  const [isOpen, setIsOpen] = useState(initialOpen);

  const onToggle = () => {
    setIsOpen((prevState) => !prevState);
  };

  return [isOpen, onToggle];
};
现在,让我们useShowState在 UserScreen 组件中使用自定义钩子。
// taxiApp/src/screens/UserScreen.js
/**
 * Sample React Native App
 * https://github.com/facebook/react-native
 *
 * @format
 * @flow strict-local
 */

import React, {useEffect, useState} from 'react';
import {StatusBar, Platform, Image} from 'react-native';
import styled from 'styled-components/native';
import MapView, {PROVIDER_GOOGLE} from 'react-native-maps';
import {check, request, PERMISSIONS, RESULTS} from 'react-native-permissions';
import Geolocation from 'react-native-geolocation-service';
import {customStyleMap, MenuButtonLeft} from '../styles';
import FeatherIcon from 'react-native-vector-icons/Feather';
import DepartureInformation from '../components/DepartureInformation';
import Geocoder from 'react-native-geocoding';
import {usePlace} from '../context/PlacesManager';
import {GOOGLE_MAPS_API_KEY} from '../utils/constants';
import marker from '../assets/icons-marker.png';
// Import BookingInformation and useShowState custom hook
import BookingInformation from '../components/BookingInformation';
import {useShowState} from '../hooks';

Geocoder.init(GOOGLE_MAPS_API_KEY, {language: 'en'});

const Container = styled.SafeAreaView`
  flex: 1;
  background-color: #fff;
`;

const mapContainer = {
  flex: 7,
};

const FixedMarker = styled.View`
  left: 50%;
  margin-left: -16px;
  margin-top: -125px;
  position: absolute;
  top: 50%;
`;

const markerStyle = {
  height: 36,
  width: 36,
};

const UserScreen = ({navigation}) => {
  const [location, setLocation] = useState(null);
  const {place, dispatchPlace} = usePlace();
  // Create a local state using the custom Hook
  const [showBooking, toggleShowBookingViews] = useShowState(false);

  const handleLocationPermission = async () => {
    let permissionCheck = '';
    if (Platform.OS === 'ios') {
      permissionCheck = await check(PERMISSIONS.IOS.LOCATION_WHEN_IN_USE);

      if (permissionCheck === RESULTS.DENIED) {
        const permissionRequest = await request(
          PERMISSIONS.IOS.LOCATION_WHEN_IN_USE,
        );
        permissionRequest === RESULTS.GRANTED
          ? console.warn('Location permission granted.')
          : console.warn('Location perrmission denied.');
      }
    }

    if (Platform.OS === 'android') {
      permissionCheck = await check(PERMISSIONS.ANDROID.ACCESS_FINE_LOCATION);

      if (permissionCheck === RESULTS.DENIED) {
        const permissionRequest = await request(
          PERMISSIONS.ANDROID.ACCESS_FINE_LOCATION,
        );
        permissionRequest === RESULTS.GRANTED
          ? console.warn('Location permission granted.')
          : console.warn('Location perrmission denied.');
      }
    }
  };

  useEffect(() => {
    handleLocationPermission();
  }, []);

  useEffect(() => {
    Geolocation.getCurrentPosition(
      position => {
        const {latitude, longitude} = position.coords;
        Geocoder.from({
          latitude: latitude,
          longitude: longitude,
        }).then(res => {
          const {
            formatted_address,
            place_id,
            geometry: {
              location: {lat, lng},
            },
          } = res.results[0];
          setLocation({latitude, longitude});
          dispatchPlace({
            type: 'SET_CURRENT_PLACE',
            description: formatted_address,
            placeId: place_id,
            latitude: lat,
            longitude: lng,
          });
        });
      },
      error => {
        console.log(error.code, error.message);
      },
      {enableHighAccuracy: true, timeout: 15000, maximumAge: 10000},
    );
  }, [dispatchPlace]);

  const onRegionChange = ({latitude, longitude}) => {
    Geocoder.from({
      latitude,
      longitude,
    }).then(res => {
      const {
        formatted_address,
        place_id,
        geometry: {
          location: {lat, lng},
        },
      } = res.results[0];

      dispatchPlace({
        type: 'SET_CURRENT_PLACE',
        description: formatted_address,
        placeId: place_id,
        latitude: lat,
        longitude: lng,
      });
    });
  };

  useEffect(() => {
    navigation.setOptions({
      headerLeft: () => (
        <MenuButtonLeft
          onPress={() => navigation.navigate('Menu')}
          testID="modal-menu">
          <FeatherIcon name="menu" size={25} color="#000" />
        </MenuButtonLeft>
      ),
    });
  }, [navigation]);

  return (
    <Container>
      <StatusBar barStyle="dark-content" />
      {location && (
        <MapView
          testID="map"
          style={mapContainer}
          provider={PROVIDER_GOOGLE}
          initialRegion={{
            latitude: location.latitude,
            longitude: location.longitude,
            latitudeDelta: 0.0922,
            longitudeDelta: 0.0421,
          }}
          onRegionChangeComplete={onRegionChange}
          showsUserLocation={true}
          customMapStyle={customStyleMap}
          paddingAdjustmentBehavior="automatic"
          showsMyLocationButton={true}
          showsBuildings={true}
          maxZoomLevel={17.5}
          loadingEnabled={true}
          loadingIndicatorColor="#fcb103"
          loadingBackgroundColor="#242f3e"
        />
      )}

      <FixedMarker testID="fixed-marker">
        <Image style={markerStyle} source={marker} />
      </FixedMarker>

      {/* Logic to when to show BookingInformation or DepartureInformation */}
      {showBooking ? (
        <BookingInformation />
      ) : (
        <DepartureInformation toggleShowBookingViews={toggleShowBookingViews} />
      )}
{/* See that we pass toggleShowBookingViews as prop */}
    </Container>
  );
};

export default UserScreen;
如您所见,我们将BookingInformation组件和useShowState自定义钩子导入到UserScreen。自定义钩子将创建一个本地状态,用于处理何时显示/隐藏BookingInformation和DepartureInformation。
我们还将toggleShowBookingViewsfunction 作为 prop 传递给了 DepartureInformation。目的是切换Book Now按钮并更新showBooking状态。
现在让我们转到DepartureInformation并处理刚刚传递的新道具。
// taxiApp/src/components/DepartureInformation.js
...
export default function DepartureInformation({toggleShowBookingViews}) {
...
  return (
    <Container platform={Platform.OS}>
      ...

      <BookNow>
        <BookNowButton
          onPress={toggleShowBookingViews}
          testID="book-now-button">
          <ButtonText>Book now</ButtonText>
        </BookNowButton>
      </BookNow>
    </Container>
  );
}

DepartureInformation.propTypes = {
  toggleShowBookingViews: PropTypes.func,
};
我们接收传递的 prop toggleShowBookingViews,然后用组件中的新 prop 函数替换 console.log() 函数BookNowButton。
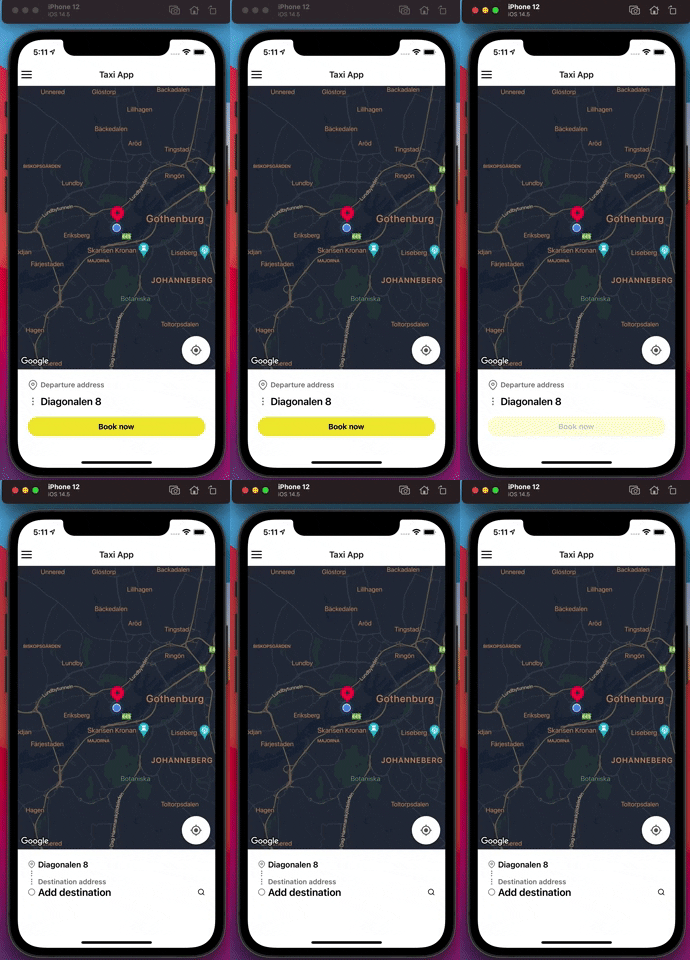
因此,如果按下按钮时一切正常Book Now,您应该会看到BookingInformation组件 UI,如下面的 gif 所示。
添加预订信息输入
我们需要添加一个输入框,让用户输入目的地。我们的想法是,Modal在 中显示TextInput。在此之前,我们先添加一个Pressable用于打开模态框的组件。
// taxiApp/src/components/BookingInformation.js
import React from 'react';
import styled from 'styled-components/native';
import FeatherIcon from 'react-native-vector-icons/Feather';
import {formatPlaceName} from '../utils';
import {usePlace} from '../context/PlacesManager';
// Import custom hook for show/hide elements.
import {useShowState} from '../hooks';

const Container = styled.View`
  flex: 1.5;
  background-color: #fff;
  padding-vertical: 20px;
  padding-horizontal: 20px;
`;

export const Location = styled.View`
  flex-direction: row;
  align-items: center;
`;

const LocationPlaceholder = styled.Text`
  color: #717171;
  font-size: 14px;
  margin-left: 5px;
  font-weight: 600;
`;

const Text = styled.Text`
  color: #000;
  font-size: 16px;
  font-weight: 600;
  margin-left: 5px;
`;

// New Pressable component
const LocationPressable = styled.Pressable`
  flex-direction: row;
  align-items: center;
  margin-bottom: 10px;
`;

// New styled component
const AddDestinationText = styled.Text`
  color: #000;
  font-size: 20px;
  font-weight: 600;
  margin-left: 5px;
`;

// New styled component
const TextRight = styled(Text)`
  margin-left: auto;
`;

export default function BookingInformation() {
  // Add destinationPlace from PlacesManager
  const {
    place: {currentPlace, destinationPlace},
  } = usePlace();
  // Create a local state for toggle a Modal
  const [isModalVisible, togglePlaceModal] = useShowState();

  return (
    <Container>
      <Location>
        <FeatherIcon name="map-pin" size={15} color="gray" />
        <Text testID="current-place-description">
          {formatPlaceName(currentPlace.description)}
        </Text>
      </Location>

      <FeatherIcon
        name="more-vertical"
        size={15}
        color="gray"
        marginTop={-10}
      />

      <Location>
        <FeatherIcon name="more-vertical" size={15} color="gray" />
        <LocationPlaceholder testID="destination-label">
          Destination address
        </LocationPlaceholder>
      </Location>
      {/* Add new components for toggle a Modal */}
      <LocationPressable onPress={togglePlaceModal}>
        <FeatherIcon name="circle" size={15} color="gray" />
        <AddDestinationText testID="destination-place-description">
          {formatPlaceName(destinationPlace.description) || 'Add destination'}
        </AddDestinationText>
        <TextRight>
          <FeatherIcon name="search" size={15} color="#000" />
        </TextRight>
      </LocationPressable>
    </Container>
  );
}
我们导入了用于处理显示/隐藏模态框的自定义钩子。添加了几个新的样式化组件,包括Pressable来自 React Native 的组件。此外,还添加了destinationPlace来自 PlacesManager 上下文提供程序的组件。
目标地址模式
好的,我们需要创建一个名为的新组件SearchAddressModal,在该 Modal 内部我们将有一个 TextInput 用于搜索用户目的地。SearchAddressModal将从组件中调用BookingInformation。
React Native 模态框
我们将使用一个名为react-native-modalModal 组件的新包,让我们安装它:
npm i react-native-modal --save-exact
在里面创建一个新文件taxiApp/src/components/SearchAddressModal.js:
// taxiApp/src/components/SearchAddressModal.js
import React from 'react';
import {StatusBar, TextInput} from 'react-native';
import styled from 'styled-components/native';
import Modal from 'react-native-modal';
import FeatherIcon from 'react-native-vector-icons/Feather';

const Container = styled.SafeAreaView`
  flex: 1;
`;

const BackButton = styled.TouchableOpacity`
  margin-top: 10px;
`;

const ModalChildrenView = styled.View`
  flex-direction: row;
  align-items: center;
`;

const SearchContainer = styled.View`
  flex-direction: row;
  align-items: center;
`;

const ClearDestinationButton = styled.TouchableOpacity`
  margin-left: auto;
`;

const Input = styled(TextInput)`
  color: #000000;
  font-size: 20px;
  font-weight: 600;
  height: 50px;
  width: 90%;
  padding: 10px;
`;

export default function SearchAddressModal({isModalVisible, toggleModal}) {
  return (
    <Modal
      isVisible={isModalVisible}
      backdropColor="white"
      backdropOpacity={1}
      animationIn="slideInUp"
      testID="search-address-modal">
      <StatusBar barStyle="dark-content" />
      <Container>
        <BackButton testID="back-button" onPress={toggleModal}>
          <FeatherIcon name="arrow-left" size={20} color="gray" />
        </BackButton>

        <ModalChildrenView>
          <SearchContainer>
            <FeatherIcon name="map-pin" size={20} color="gray" />
            <Input
              placeholder="Add destination"
              placeholderTextColor="#000000"
            />
            <ClearDestinationButton testID="clear-button" onPress={() => {}}>
              <FeatherIcon name="x-circle" color="grey" size={20} />
            </ClearDestinationButton>
          </SearchContainer>
        </ModalChildrenView>
      </Container>
    </Modal>
  );
}
如你所见,我们有一个使用 Modal 的新组件react-native-modal。目前,此组件没有本地状态;相反,我们从组件接收一些 props 来BookingInformation检查 Modal 的状态并关闭 Modal。
我们添加了一个TextInput,但它目前不起作用,因为它没有状态。Input组件的本地状态将作为 prop 从 获得BookingInformation。
从预订信息中打开模式
移入BookingInformation并导入新组件,同时传递新 Modal 组件需要可见的道具。
// taxiApp/src/components/BookingInformation.js
import SearchAddressModal from './SearchAddressModal';

...
export default function BookingInformation() {
...
  const [isModalVisible, togglePlaceModal] = useShowState();

  return (
    <>
      <Container>
        ...
      </Container>
     {/* Import the new Modal component */}
      <SearchAddressModal
        isModalVisible={isModalVisible}
        toggleModal={togglePlaceModal}
      />
    </>
  );
}
正如您所看到的,我们导入了我们创建的新 Modal 组件,并且我们在<Container></Container>组件外部进行渲染,这就是我们<></>在 Container 组件之前和之后使用的原因。
<SearchAddressModal />我们还传递了组件期望显示/隐藏的两个道具。
 <SearchAddressModal
        isModalVisible={isModalVisible}
        toggleModal={togglePlaceModal}
      />
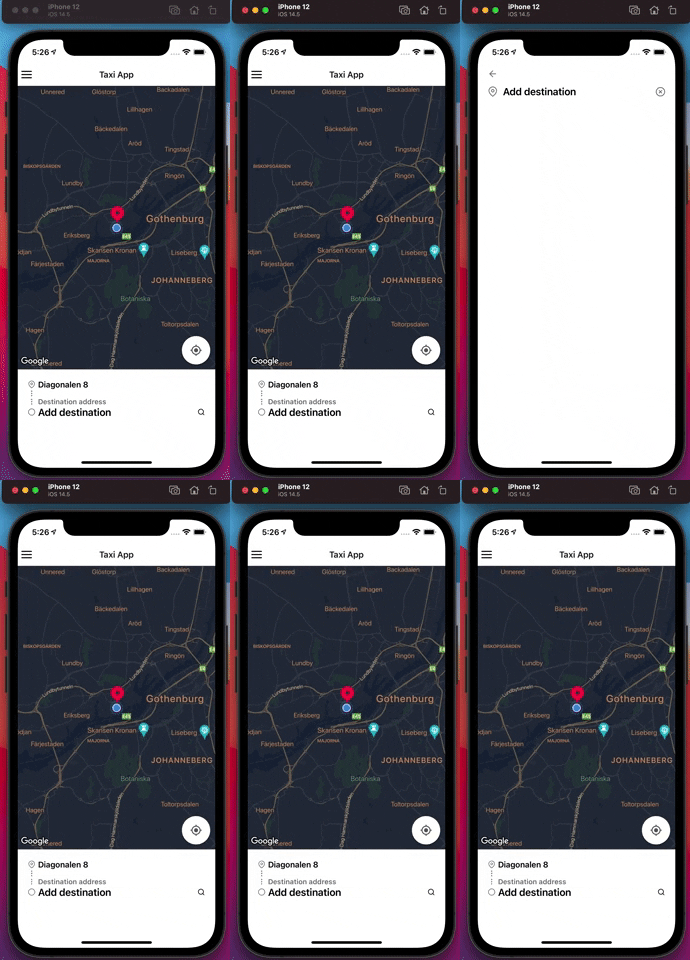
如果一切正常,当你点击“添加目的地”组件时,你应该会看到模态窗口可见。在模态窗口内,你可以点击后退箭头按钮将其关闭。
为模态输入添加本地状态
正如我上面提到的,让我们添加一个本地状态来使 Input 组件正常工作。这个本地状态将来自BookingInformationModal 组件并传递给它。
// taxiApp/src/components/BookingInformation.js
import React, {useState} from 'react';
...

export default function BookingInformation() {
  const {
    place: {currentPlace, destinationPlace},
  } = usePlace();
  const [isModalVisible, togglePlaceModal] = useShowState();
 // Input Modal state
  const [newAddress, setNewAddress] = useState(null);

  return (
    <>
      <Container>
        ...
      </Container>

      <SearchAddressModal
        isModalVisible={isModalVisible}
        toggleModal={togglePlaceModal}
     +  newAddress={newAddress}
     +  setNewAddress={setNewAddress}
      />
    </>
  );
}
现在,我们必须进入SearchAddressModal组件并接收两个道具并将它们用于Input组件。
// taxiApp/src/components/SearchAddressModal.js
...

export default function SearchAddressModal({
  isModalVisible,
  toggleModal,
+ newAddress,
+ setNewAddress,
}) {
  return (
    <Modal
      isVisible={isModalVisible}
      backdropColor="white"
      backdropOpacity={1}
      animationIn="slideInUp"
      testID="search-address-modal">
      <StatusBar barStyle="dark-content" />
      <Container>
        <BackButton testID="back-button" onPress={toggleModal}>
          <FeatherIcon name="arrow-left" size={20} color="gray" />
        </BackButton>

        <ModalChildrenView>
          <SearchContainer>
            <FeatherIcon name="map-pin" size={20} color="gray" />
            <Input
              placeholder="Add destination"
              placeholderTextColor="#000000"
   +          value={newAddress}
   +          onChangeText={text => setNewAddress(text)}
            />
            <ClearDestinationButton
              testID="clear-button"
   +          onPress={() => setNewAddress('')}>
              <FeatherIcon name="x-circle" color="grey" size={20} />
            </ClearDestinationButton>
            </ClearDestinationButton>
          </SearchContainer>
        </ModalChildrenView>
      </Container>
    </Modal>
  );
}
之后,我们就可以在输入组件中输入内容了。此外,按下“x-circle”按钮时,我们应该能够清除输入的内容。
Google 地点 API
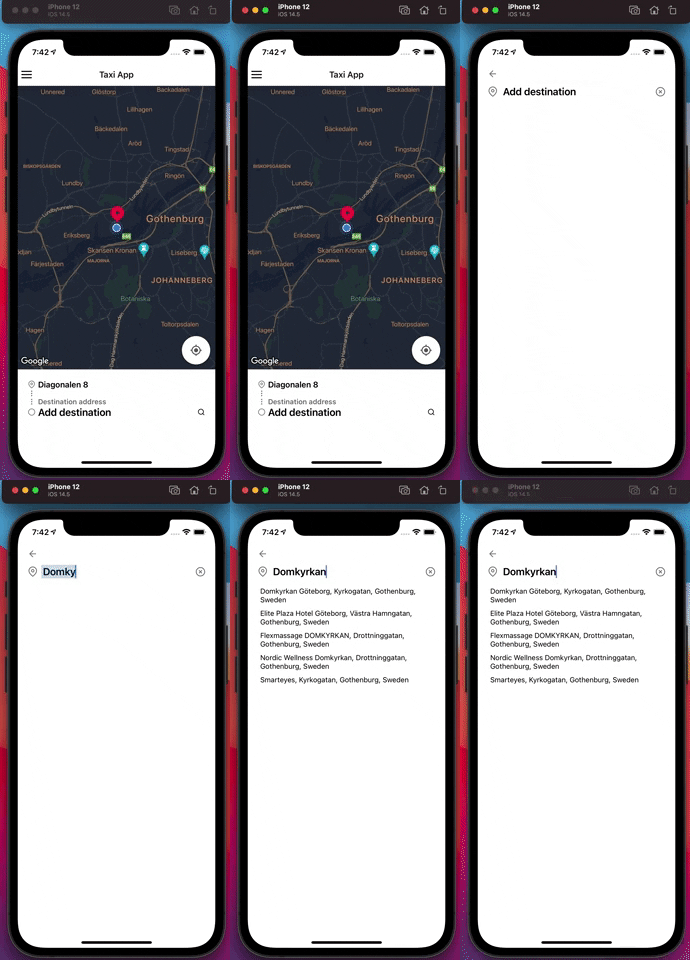
当我们使用模态屏幕上的输入组件输入时,我们将使用 Google 的 Places API 来搜索我们的目的地。
有一个很棒的 React Native 包,react-native-google-places-autocomplete你可以使用,我测试过,运行良好。它已经自带了一个输入组件。
但是,为了更好地控制这个项目,我决定一步一步地进行。
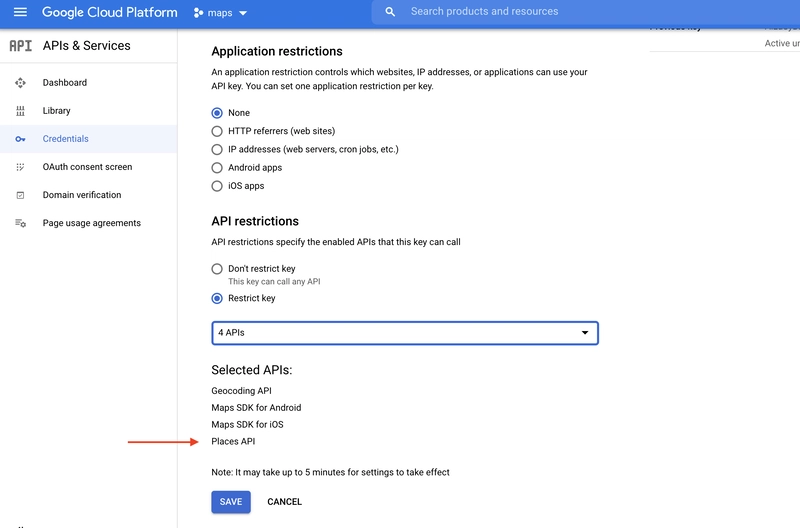
我们需要在 Google Console Cloud 项目中启用Places API ,步骤与我们为 Android 和 iOS 启用 Geocoding API 和 Maps SDK 时遵循的步骤相同。
这个过程非常简单,我们需要从端点获取数据,并传递 Google Maps API Key 和目的地。我们将在src/utils/index.js文件中创建一个新的函数实用程序来实现这一点:
import {GOOGLE_MAPS_API_KEY} from './constants';

...
// This function receive two arguments
export const APIPlaceAutocomplete = (destination, currentPlace) => {
  const URL = `https://maps.googleapis.com/maps/api/place/autocomplete/json?key=${GOOGLE_MAPS_API_KEY}&input=${destination}&location=${currentPlace.latitude},${currentPlace.longitude}&radius=2000`;

  if (destination.length > 0) {
    return fetch(URL)
      .then(resp => resp.json())
      .catch(error => error);
  } else {
    return 'No destination Address provided';
  }
};
https://maps.googleapis.com/maps/api/place/autocomplete/json因此,我们通过传递几个参数来获取:
- 钥匙
- 输入
- 地点
- 半径
我们必须从SearchAddressModal组件调用此函数并传递成功调用端点所需的参数。
使用 Lodash Debounce 获取地点 API
如果我们在使用 Modal 中的输入组件输入时调用 Google Places API,则每次输入任何单个单词时都会进行调用,这是无用的并且不适合优化。
这就是为什么我们要使用 Lodash 库中的 Debounce。安装 Lodash:
npm i --save-exact lodash
打开 SearchAddressModal 组件:
+ import React, {useState, useEffect, useCallback} from 'react';
...
import {debounce} from 'lodash';
import {APIPlaceAutocomplete} from '../utils';

...

export default function SearchAddressModal({
  isModalVisible,
  toggleModal,
  newAddress,
  setNewAddress,
+ currentPlace,
}) {
+  const [predictions, setPredictions] = useState([]);

+  useEffect(() => {
    if (newAddress) {
      debounceSearch(newAddress);
    } else {
      setPredictions([]);
    }
  }, [newAddress, debounceSearch]);

+  const debounceSearch = useCallback(
    debounce(address => {
      APIPlaceAutocomplete(address, currentPlace)
        .then(results => {
          setPredictions(results.predictions);
        })
        .catch(e => console.warn(e));
    }, 1000),
    [],
  );

  return (
    <Modal
        ...
    </Modal>
  );
}
我们首先从 React 导入useState、useEffect和useCallback。我们还debounce从lodash和最近创建的函数 utility导入APIPlaceAutocomplete。
我们还收到了一个新的 prop,。currentPlace我们可以使用 PlacesManager 中的自定义钩子将此 prop 注入到 Modal 组件中,但我决定从 BookingInformation 中接收它。
使用 useState,我们创建一个名为的本地状态predictions,它是一个空数组,在这里我们将显示来自 Google Places API 的预测列表。
useEffect(() => {
    if (newAddress) {
      debounceSearch(newAddress);
    } else {
      setPredictions([]);
    }
  }, [newAddress, debounceSearch]);
如果有,我们就用newAddress调用该函数。否则,我们就用一个空数组调用 setPredictions。debounceSearchnewAddress
const debounceSearch = useCallback(
    debounce(address => {
      APIPlaceAutocomplete(address, currentPlace)
        .then(results => {
          setPredictions(results.predictions);
        })
        .catch(e => console.warn(e));
    }, 1000),
    [],
  );
我们使用带有 debounce 的 useCallback,这意味着每隔 1 秒,我们将调用该APIPlaceAutocomplete函数,并传递该函数所需的两个参数。
因此,让我们将currentPlaceBookingInformation 作为 prop 传递给 SearchAddressModal 组件。
...
export default function BookingInformation() {
...

  return (
    <>
      ...

      <SearchAddressModal
        isModalVisible={isModalVisible}
        toggleModal={togglePlaceModal}
        newAddress={newAddress}
        setNewAddress={setNewAddress}
   +    currentPlace={currentPlace}
      />
    </>
  );
}
使用 Flatlist 渲染预测列表
我们需要渲染存储在本地状态中的预测列表predictions。首先,让我们在里面创建一个新组件src/components/Prediction.js:
import React from 'react';
import {TouchableOpacity} from 'react-native';
import styled from 'styled-components/native';

const Text = styled.Text`
  padding: 5px;
  font-size: 14px;
`;

export default function Prediction({description, place_id}) {
  return (
    <TouchableOpacity
      key={place_id}
      testID={`prediction-row-${place_id}`}
      onPress={() => {}}>
      <Text>{description}</Text>
    </TouchableOpacity>
  );
}
现在让我们进入 SearchAddressModal 并开始将它与 React Native 的 Flatlist 组件一起使用。
...
+ import Prediction from './Prediction';

...

const Predictions = styled.View`
  margin-bottom: 20px;
`;

export default function SearchAddressModal({
  isModalVisible,
  toggleModal,
  newAddress,
  setNewAddress,
  currentPlace,
}) {
  const [predictions, setPredictions] = useState([]);

  useEffect(() => {
    if (newAddress) {
      debounceSearch(newAddress);
    } else {
      setPredictions([]);
    }
  }, [newAddress, debounceSearch]);

  const debounceSearch = useCallback(
    debounce(address => {
      APIPlaceAutocomplete(address, currentPlace)
        .then(results => {
          setPredictions(results.predictions);
        })
        .catch(e => console.warn(e));
    }, 1000),
    [currentPlace, setPredictions],
  );

+  const renderPredictions = ({item}) => <Prediction {...item} />;

  return (
    <Modal
      ...

        <ModalChildrenView>
          ...
        </ModalChildrenView>
+       <Predictions>
          {predictions.length > 0 && (
            <FlatList
              data={predictions}
              renderItem={renderPredictions}
              keyExtractor={item => item.place_id}
            />
          )}
        </Predictions>
      </Container>
    </Modal>
  );
}
大学考试
测试时间到了!😍
我们需要为 BookingInformation 组件添加一个新的测试文件。在第一个测试中,我们将测试该组件是否正确渲染。
创建一个新的测试文件src/components/__tests__/BookingInformation.test.js:
import React from 'react';
import {render} from '@testing-library/react-native';
import BookingInformation from '../BookingInformation';
import {PlaceContext} from '../../context/PlacesManager';

describe('<BookingInformation />', () => {
  test('should render correctly when not selected destination', () => {
    const place = {
      currentPlace: {
        description: 'Keillers Park',
        placeId: 'abc',
      },
      destinationPlace: {description: '', placeId: ''},
    };
    const dispatchPlace = jest.fn();
    const {getByTestId, getByText} = render(
      <PlaceContext.Provider value={{place, dispatchPlace}}>
        <BookingInformation />
      </PlaceContext.Provider>,
    );

    expect(getByText('Keillers Park')).toBeDefined();
    expect(getByText('Add destination')).toBeDefined();
    expect(getByTestId('destination-label')).toBeDefined();
  });
});
我们还为SearchAddressModal组件添加另一个测试文件。创建一个新文件src/components/__tests__/SearchAddressModal.test.js
import React from 'react';
import {render} from '@testing-library/react-native';
import SearchAddressModal from '../SearchAddressModal';

describe('<SearchAddressModal />', () => {
  test('should render correctly', () => {
    const {getByPlaceholderText, getByTestId, queryByText} = render(
      <SearchAddressModal isModalVisible={true} />,
    );

    expect(getByTestId('back-button')).toBeDefined();
    expect(getByPlaceholderText('Add destination')).toBeDefined();
    expect(getByTestId('clear-button')).toBeDefined();
    expect(queryByText(/Recent/i)).toBeDefined();
  });
});
目前,我们仅测试组件是否正确渲染。我们检查“返回”按钮、“添加目标占位符”、“清除按钮”以及“最近位置”标题。
现在,让我们添加另一个关于“应该呈现预测列表”的测试用例。
我们需要测试一些东西,比如lodash.debounce代码和 APIPlaceAutocomplete 函数的获取。
打开src/components/__tests__/SearchAddressModal.test.js:
test('should render a list of predictions', async () => {
    const lodash = require('lodash');
    lodash.debounce = jest.fn(fn => fn);
    jest.useFakeTimers();
    const promise = Promise.resolve();
    const mockSetNewAddress = jest.fn(() => promise);
    const newAddress = 'Domkyrkan';
    const mockCurrentPlace = {
      description: 'Keillers Park',
      placeId: 'abc',
      latitude: 57.7,
      longitude: 11.93,
    };

    render(
      <SearchAddressModal
        newAddress={newAddress}
        setNewAddress={mockSetNewAddress}
        currentPlace={mockCurrentPlace}
      />,
    );
  });
目前,我们需要使用lodashjest.fn 模拟 lodash.debounce 函数。我们需要使用 jest 的模拟计时器来模拟等待时间。
当我们运行测试时它会失败,因为我们需要模拟 APIPlaceAutocomplete 内部使用的获取函数。
为了模拟 Fetch,我们使用了一个新的库jest-fetch-mock。打开你的终端并安装jest-fetch-mock。
npm install --save-dev jest-fetch-mock
打开我们的jest-setup.js配置文件并粘贴下一行来完成设置
require('jest-fetch-mock').enableMocks();
还更新测试,添加用于获取的模拟响应。
test('should render a list of predictions', () => {
    const lodash = require('lodash');
    lodash.debounce = jest.fn(fn => fn);
    jest.useFakeTimers();

    const results = {
      predictions: [
        {
          description: 'Domkyrkan',
          place_id: '123',
        },
      ],
    };
    fetch.mockResponseOnce(JSON.stringify(results));

    const promise = Promise.resolve();
    const mockSetNewAddress = jest.fn(() => promise);
    const newAddress = 'Domkyrkan';
    const mockCurrentPlace = {
      description: 'Keillers Park',
      placeId: 'abc',
      latitude: 57.7,
      longitude: 11.93,
    };

    render(
      <SearchAddressModal
        newAddress={newAddress}
        setNewAddress={mockSetNewAddress}
        currentPlace={mockCurrentPlace}
      />,
    );
  });
我们通过传递一个预测数组来模拟获取。现在,让我们触发一个事件来模拟用户输入新地址:
test('should render a list of predictions', () => {
    const lodash = require('lodash');
    lodash.debounce = jest.fn(fn => fn);
    jest.useFakeTimers();
    const results = {
      predictions: [
        {
          description: 'Domkyrkan',
          place_id: '123',
        },
      ],
    };
    fetch.mockResponseOnce(JSON.stringify(results));
    const promise = Promise.resolve();
    const mockSetNewAddress = jest.fn(() => promise);
    const newAddress = 'Domkyrkan';
    const mockCurrentPlace = {
      description: 'Keillers Park',
      placeId: 'abc',
      latitude: 57.7,
      longitude: 11.93,
    };

    const {getByPlaceholderText} = render(
      <SearchAddressModal
        newAddress={newAddress}
        setNewAddress={mockSetNewAddress}
        currentPlace={mockCurrentPlace}
      />,
    );

    fireEvent.changeText(getByPlaceholderText('Add destination'), newAddress);
    expect(mockSetNewAddress).toHaveBeenCalledWith(newAddress);
  });
我们从渲染组件中选择getByPlaceholderText函数,并导入fireEvent来添加新地址。然后,我们断言已调用更新 InputText 的本地状态。
让我们通过添加其余内容loadash.bounce并呈现预测列表来完成。
test('should render a list of predictions', async () => {
    const lodash = require('lodash');
    lodash.debounce = jest.fn((fn) => fn);
    const onResponse = jest.fn();
    const onError = jest.fn();
    jest.useFakeTimers();
    const results = {
      predictions: [
        {
          description: 'Domkyrkan',
          place_id: '123',
        },
      ],
    };
    fetch.mockResponseOnce(JSON.stringify(results));
    const promise = Promise.resolve();
    const mockSetNewAddress = jest.fn(() => promise);
    const newAddress = 'Domkyrkan';
    const mockCurrentPlace = {
      description: 'Keillers Park',
      placeId: 'abc',
      latitude: 57.7,
      longitude: 11.93,
    };

    const {getByPlaceholderText, queryByTestId} = render(
      <SearchAddressModal
        newAddress={newAddress}
        setNewAddress={mockSetNewAddress}
        currentPlace={mockCurrentPlace}
        currentSession={currentSession}
        dispatchAuth={dispatchAuth}
      />,
    );

    fireEvent.changeText(getByPlaceholderText('Add destination'), newAddress);
    expect(mockSetNewAddress).toHaveBeenCalledWith(newAddress);

    lodash.debounce(
      APIPlaceAutocomplete(newAddress, mockCurrentPlace)
        .then(onResponse)
        .catch(onError)
        .finally(() => {
          expect(onResponse).toHaveBeenCalled();
          expect(onError).not.toHaveBeenCalled();

          expect(onResponse.mock.calls[0][0][0]).toEqual(results);
        }),
      1000,
    );

    expect(queryByTestId('prediction-row-0')).toBeNull();

    await act(() => promise);
    queryByTestId('prediction-row-0');
  });
不要忘记从测试库中导入 APIPlaceAutocompleteimport {APIPlaceAutocomplete} from '../../utils';和act函数。
看看我们如何async/await解决承诺,以便我们可以使用以下方法查看预测列表await act(() => promise);
🛑 停!
我现在就讲到这里。希望你现在一切顺利,并且学到一两点东西。我们将在下一篇文章中继续讨论预订信息组件。
敬请关注!
文章来源:https://dev.to/cecheverri4/react-native-taxi-app-booking-information-24op 后端开发教程 - Java、Spring Boot 实战 - msg200.com


