如何使用 React 构建 Crypto Tracker Chart
步骤 1️⃣-初始化项目
步骤🥈 - 编写初始代码
步骤 ③ - 构建主图表
让我们总结一下🌯
大家好👩🏼💻,
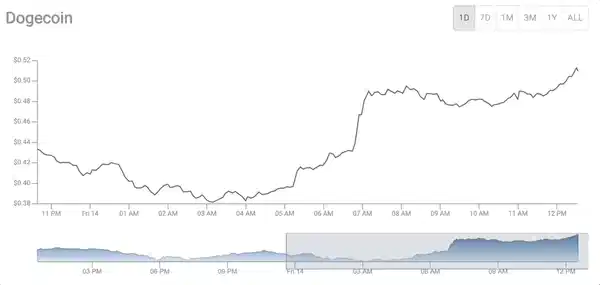
最近,我访问了一个加密货币追踪网站,查看狗狗币的价格,看看它是否会飞涨🚀
我很好奇如何使用 React、其他库和工具在该网站上构建简化版本。
这是我的酷炫😎项目的链接:
https://cryptotracker.ayeprahman.com/
因此,我进行了研究以找到要使用哪个 API,并偶然发现了来自团队 🦎 CoinGecko的免费、可靠且全面的 API 。
与此同时,我的目标也是专注于寻找一款底层可视化工具,它兼具 D3 与 React 的强大功能、灵活性、优化的速度以及较小的 bundle 大小。于是我偶然发现了Airbnb 的Visx 。
我想到的一些功能是,
- 列出所有支持的硬币价格、市值、交易量和市场相关数据。
- 使用时间过滤器和刷屏功能以图表形式显示硬币价格以选择时间范围。
但在这里我将重点讨论上面的第二点。
对于这个项目,我将使用
- ReactJS 与 TypeScript
- visx 用于可视化
- styled-component 用于样式设置
- coingecko api
- 用于 UI 组件的 Material-ui。
- 以及其他图书馆。
步骤 1️⃣-初始化项目
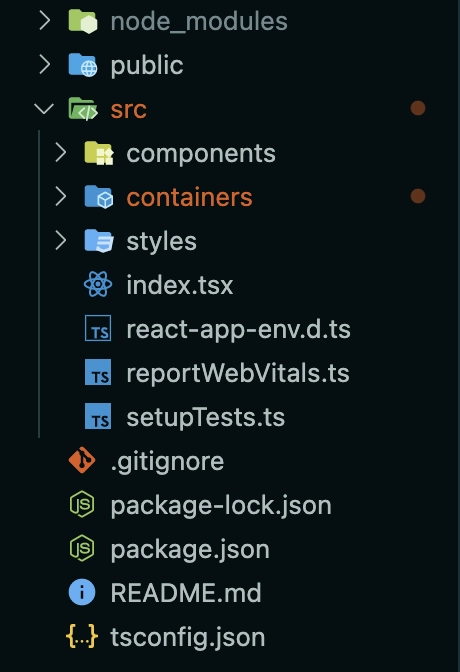
首先,让我们使用create-react-app创建我们的 React 项目。如果您尚未全局安装 create-react-app,可以在命令行中使用 进行安装npm install -g create-react-app。我们将在 React 项目中使用 TypeScript npx create-react-app <name of your project name> --template typescript。
如果你以前没用过 TypeScript,简而言之,这门语言能让我们更有效地运用 JavaScript 技能。事实上,编译代码后,所有 TypeScript 代码都会消失,生成干净、跨平台安全的 JavaScript 代码。除了互操作性之外,TypeScript 还增加了一些独特的功能,包括静态类型、接口、类等等。
接下来cd <name of your project>安装所有初始依赖项。
npm i axios axios-hooks @material-ui/core @material-ui/lab use-query-params @visx/axis @visx/brush @visx/gradient @visx/group @visx/shape @visx/tooltip d3-array date-fns numeral -f && npm i -D @types/styled-components @types/numeral @types/d3-array
正如您在依赖项中看到的,对于 Visx 包,我们仅安装项目所需的必要包,以免增加包的大小。
接下来,让我们开始构建我们的项目。
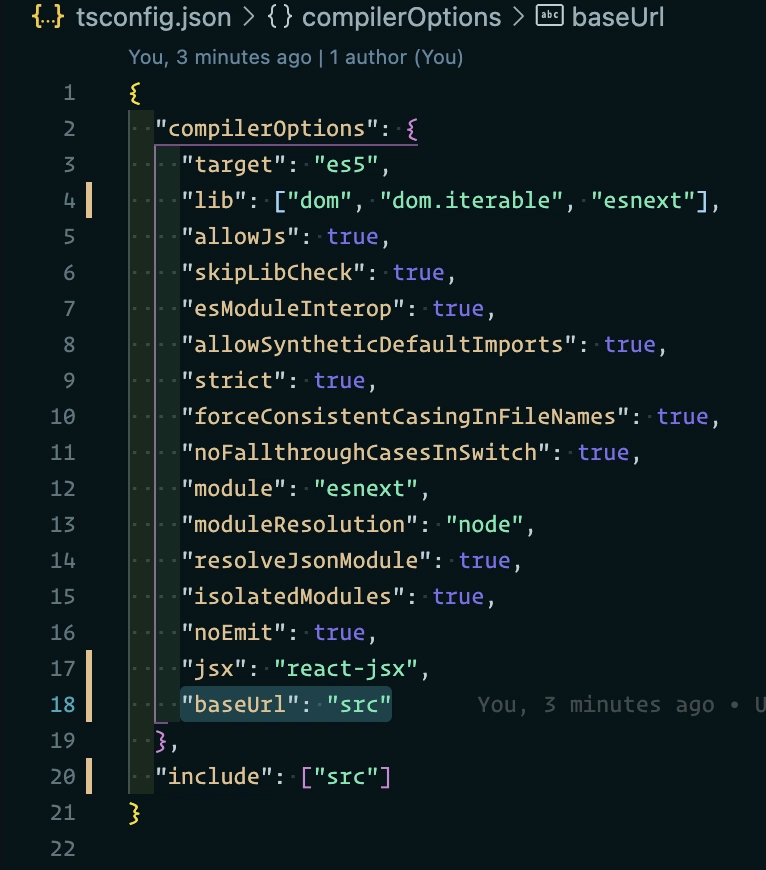
让我们添加"baseUrl": "src"根目录tsconfig.json以实现绝对导入。更多关于绝对导入的信息,请点击此处。
步骤🥈 - 编写初始代码
我们将创建一个src/containers/Market/index.tsx用于 API 集成的容器。接下来,我们将使用useAxios调用我们的货币市场图表端点。
为了在图表中显示价格,我们将使用/coins/{ids}/market_chart历史市场数据,包括价格、市值和 24 小时交易量。https ://www.coingecko.com/api/documentations/v3#/
让我们先写出我们的初始代码:
// src/containers/Market/index.tsx
import React from "react";
import useAxios from "axios-hooks";
import { TimeFilters } from "enums/TimeFilters";

export type TimeStamp = number;
export type Price = number;

export interface GetMarketChartResponse {
  prices?: [TimeStamp, Price][];
}

const MARKET_CHART_ID = "bitcoin";

const Market = () => {
  const [timeFilter, setTimeFilter] = React.useState<string>(TimeFilters.P1D);
  const [{ data, loading, error }] = useAxios<GetMarketChartResponse | null>({
    url: `https://api.coingecko.com/api/v3/coins/${MARKET_CHART_ID}/market_chart?vs_currency=usd&days=${timeFilter}`,
    method: "GET",
  });

  return <div>{JSON.stringify(data.prices)}</div>;
};

export default Market;
让我们映射价格数据,以便稍后传递给图表。价格数据返回一个数组,其中时间戳为 0 个索引,价格值为1 个索引。我们将日期时间戳转换为 Date 对象,以便稍后传递给辅助图表。
  const mappedData: DataProps[] = React.useMemo(() => {
    return data?.prices
      ? data.prices.map((ele) => ({
          date: new Date(ele[0]),
          price: ele[1],
        }))
      : [];
  }, [data]);
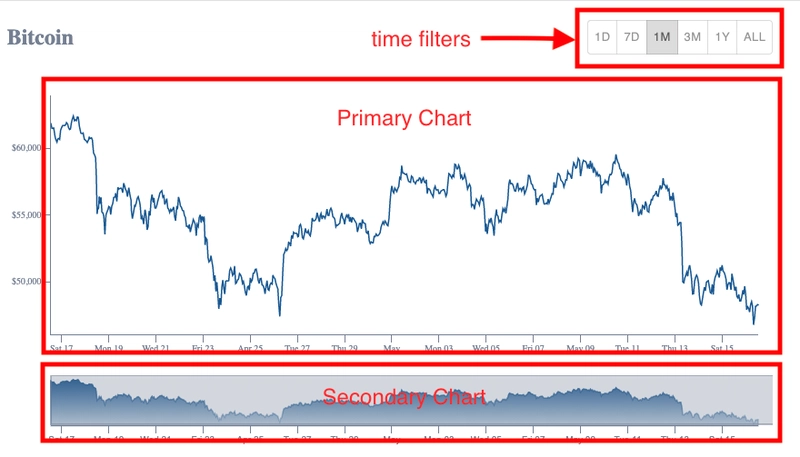
在我们进入下一步之前,我们需要开发三个主要组件。
- 主要图表- 显示折线图、价格、日期和工具提示。
- 辅助图表- 显示区域图表,画笔功能可突出显示特定时间范围。
- 时间过滤按钮- 允许我们按特定时间段进行过滤,例如(过去 1 个月)
总体 IO 将是:
- 数据价格将传递到我们的辅助图表。
- 设置初始突出显示时间范围并设置主要图表的过滤数据
- 更改突出显示的次要图表将更新主要图表。
- 更改时间过滤按钮将获取最新的价格数据。
- 将鼠标悬停在主图表上的特定点将显示日期和价格值。
步骤 ③ - 构建主图表
让我们创建一个主要的图表组件和界面。
// src/interfaces/DataProps.ts
export interface DataProps {
  date: string | Date;
  price: number;
}
// src/components/PrimaryChart/interfaces.ts
import { DataProps } from "interfaces/DataProps";

export interface PrimaryChartProps {
  data: DataProps[];
  width: number;
  height: number;
  margin?: { top: number; right: number; bottom: number; left: number };
}

export type TooltipData = DataProps;
// src/components/PrimaryChart/index.tsx
/* eslint-disable react-hooks/rules-of-hooks */
import React from "react";
import { PrimaryChartProps } from "./interfaces";

const PrimaryChart: React.FC<PrimaryChartProps> = ({
  data,
  width,
  height,
  margin = { top: 0, right: 0, bottom: 0, left: 0 },
}) => {
  // bounds
  const xMax = Math.max(width - margin.left - margin.right, 0);
  const yMax = Math.max(height - margin.top - margin.bottom, 0);

  return (
    <div style={{ position: "relative", margin: "0 0 1rem" }}>
      <svg width={width} height={height}>
        {/* we will include line chart, and tooltip */}
      </svg>
    </div>
  );
};

export default PrimaryChart;
我们的主要图表需要数据来缩放,显示 X 轴日期、Y 轴价格值以及稍后的工具提示。我们传递高度和重量来指定 svg 的盒子大小,以控制其余元素。
现在让我们创建一个可重复使用的折线图,以便在主图表中呈现。
// src/components/LineChart/index.tsx
import React from "react";
import { LinePath } from "@visx/shape";
import { Group } from "@visx/group";
import { AxisLeft, AxisBottom } from "@visx/axis";
import { LineChartProps } from "./interfaces";
import { DataProps } from "interfaces/DataProps";
import {
  AXIS_COLOR,
  AXIS_BOTTOM_TICK_LABEL_PROPS,
  AXIS_LEFT_TICK_LABEL_PROPS,
} from "./constants";

const LineChart: React.FC<LineChartProps> = ({
  data,
  width,
  yMax,
  margin,
  xScale,
  yScale,
  hideBottomAxis = false,
  hideLeftAxis = false,
  stroke,
  top,
  left,
  yTickFormat,
  children,
}) => {
  if (!data) return null;
  // accessors
  const getDate = (d: DataProps) => new Date(d?.date);
  const getStockValue = (d: DataProps) => d?.price;

  return (
    <Group left={left || margin.left} top={top || margin.top}>
      <LinePath<DataProps>
        data={data}
        x={(d) => xScale(getDate(d)) || 0}
        y={(d) => yScale(getStockValue(d)) || 0}
        strokeWidth={1.5}
        stroke={stroke}
      />
      {!hideBottomAxis && (
        <AxisBottom
          top={yMax + margin.top}
          scale={xScale}
          numTicks={width > 520 ? 10 : 5}
          stroke={AXIS_COLOR}
          tickStroke={AXIS_COLOR}
          tickLabelProps={() => AXIS_BOTTOM_TICK_LABEL_PROPS}
        />
      )}
      {!hideLeftAxis && (
        <AxisLeft
          scale={yScale}
          numTicks={5}
          stroke={AXIS_COLOR}
          tickStroke={AXIS_COLOR}
          tickLabelProps={() => AXIS_LEFT_TICK_LABEL_PROPS}
          tickFormat={(d) => {
            return yTickFormat ? yTickFormat(d) : d;
          }}
        />
      )}
      {children}
    </Group>
  );
};

export default LineChart;
然后我们将新创建的折线图导入到主图表中。
// src/components/PrimaryChart/index.tsx
/* eslint-disable react-hooks/rules-of-hooks */
import React, { useMemo } from "react";
import numeral from "numeral";
import { scaleLinear, scaleTime } from "@visx/scale";
import { max, min, extent } from "d3-array";
import { PrimaryChartProps } from "./interfaces";
import { DataProps } from "interfaces/DataProps";
import LineChart from "components/LineChart";
import { theme } from "styles";

// accessors
const getDate = (d: DataProps) => new Date(d.date);
const getStockValue = (d: DataProps) => d?.price;

const PrimaryChart: React.FC<PrimaryChartProps> = ({
  data,
  width = 10,
  height,
  margin = { top: 0, right: 0, bottom: 0, left: 0 },
}) => {
  // bounds
  const xMax = Math.max(width - margin.left - margin.right, 0);
  const yMax = Math.max(height - margin.top - margin.bottom, 0);

  // scales
  const dateScale = useMemo(() => {
    return scaleTime({
      range: [0, xMax],
      domain: extent(data, getDate) as [Date, Date],
    });
  }, [xMax, data]);
  const priceScale = useMemo(() => {
    return scaleLinear({
      range: [yMax + margin.top, margin.top],
      domain: [min(data, getStockValue) || 0, max(data, getStockValue) || 0],
      nice: true,
    });
    //
  }, [margin.top, yMax, data]);

  return (
    <div style={{ position: "relative", margin: "0 0 1rem" }}>
      <svg width={width} height={height}>
        <LineChart
          data={data}
          width={width}
          margin={{ ...margin }}
          yMax={yMax}
          xScale={dateScale}
          yScale={priceScale}
          stroke={theme.colors.lapislazuli}
          yTickFormat={(d) => {
            return numeral(d).format(d <= 100 ? "$0.00" : "$0,0");
          }}
        />
      </svg>
    </div>
  );
};

export default PrimaryChart;
要使 LineChart 正常工作,我们需要做两件关键的事情,即根据 X 和 Y boxSize 缩放数据,即scaleTime()和scaleLinear()
- scaleTime - 允许我们根据我们提供的范围和域构建一个新的时间尺度。
- scaleLinear - 允许我们根据我们提供的范围和域构建一个连续的比例。
我们还使用了 React useMemo,仅在依赖项发生变化时才重新计算已记忆的值。这种优化有助于避免每次渲染时进行昂贵的计算。
  // scales
  const dateScale = useMemo(() => {
    return scaleTime({
      range: [0, xMax],
      domain: extent(data, getDate) as [Date, Date],
    });
  }, [xMax, data]);
  const priceScale = useMemo(() => {
    return scaleLinear({
      range: [yMax + margin.top, margin.top],
      domain: [min(data, getStockValue) || 0, max(data, getStockValue) || 0],
      nice: true,
    });
    //
  }, [margin.top, yMax, data]);
哇喔💦,我们刚刚写了这么多代码!赶紧喝杯☕️,看看📹。
接下来,让我们集成逻辑,以便在鼠标悬停在图表中的特定点时,在主图表中显示工具。我们将使用 中的工具提示钩子助手@visx/tooltip。
import {
  useTooltip,
  TooltipWithBounds,
  defaultStyles as defaultToopTipStyles,
} from "@visx/tooltip";
然后在我们的主图表中,useTooltip公开我们需要处理悬停时工具提示的值和位置的函数和变量。
const PrimaryChart: React.FC<PrimaryChartProps> = ({
  data,
  width = 10,
  height,
  margin = { top: 0, right: 0, bottom: 0, left: 0 },
}) => {
  const {
    showTooltip,
    hideTooltip,
    tooltipData,
    tooltipTop = 0,
    tooltipLeft = 0,
  } = useTooltip<DataProps>();
现在在下一行中,让我们包含处理工具提示位置和设置值的函数。
// tooltip handler
  const handleTooltip = useCallback(
    (
      event: React.TouchEvent<SVGRectElement> | React.MouseEvent<SVGRectElement>
    ) => {
      const { x } = localPoint(event) || { x: 0 };
      const currX = x - margin.left;
      const x0 = dateScale.invert(currX);
      const index = bisectDate(data, x0, 1);
      const d0 = data[index - 1];
      const d1 = data[index];
      let d = d0;

      // calculate the cursor position and convert where to position the tooltip box.
      if (d1 && getDate(d1)) {
        d =
          x0.valueOf() - getDate(d0).valueOf() >
          getDate(d1).valueOf() - x0.valueOf()
            ? d1
            : d0;
      }

      // we setting the position and value to be display later in our tooltip component below
      showTooltip({
        tooltipData: d,
        tooltipLeft: x,
        tooltipTop: priceScale(getStockValue(d)),
      });
    },
    [showTooltip, priceScale, dateScale, data, margin.left]
  );
但是,为了在图表中获取触摸点和数据值,我们需要一个能够跟踪鼠标光标触摸点的组件。让我们从 Visx 中引入 Bar 组件来实现这一点。
 {/* a transparent ele that track the pointer event, allow us to display tooltup */}
        <Bar
          x={margin.left}
          y={margin.top * 2}
          width={xMax}
          height={yMax}
          fill="transparent"
          rx={14}
          onTouchStart={handleTooltip}
          onTouchMove={handleTooltip}
          onMouseMove={handleTooltip}
          onMouseLeave={() => hideTooltip()}
        />
我们想要展示 3 个主要组件
- 在特定点的垂直方向上绘制的线
- 一个圆形元素来指示数据点
- 用于显示我们的日期和价格值的工具提示框。
现在让我们包含这几行代码!
// src/components/PrimaryChart/index.tsx
/* eslint-disable react-hooks/rules-of-hooks */
import React, { useMemo, useCallback } from "react";
import { format } from "date-fns";
import numeral from "numeral";
import {
  useTooltip,
  TooltipWithBounds,
  defaultStyles as defaultToopTipStyles,
} from "@visx/tooltip";
import { scaleLinear, scaleTime } from "@visx/scale";
import { localPoint } from "@visx/event";
import { Line, Bar } from "@visx/shape";
import { max, min, extent, bisector } from "d3-array";
import { PrimaryChartProps } from "./interfaces";
import { DataProps } from "interfaces/DataProps";
import LineChart from "components/LineChart";
import { theme } from "styles";

// accessors
const getDate = (d: DataProps) => new Date(d.date);
const getStockValue = (d: DataProps) => d?.price;
const getFormatValue = (d: DataProps) => numeral(d.price).format("$0,0.00");
const bisectDate = bisector<DataProps, Date>((d) => new Date(d.date)).left;

const PrimaryChart: React.FC<PrimaryChartProps> = ({
  data,
  width = 10,
  height,
  margin = { top: 0, right: 0, bottom: 0, left: 0 },
}) => {
  const {
    showTooltip,
    hideTooltip,
    tooltipData,
    tooltipTop = 0,
    tooltipLeft = 0,
  } = useTooltip<DataProps>();

  // bounds
  const xMax = Math.max(width - margin.left - margin.right, 0);
  const yMax = Math.max(height - margin.top - margin.bottom, 0);

  // scales
  const dateScale = useMemo(() => {
    return scaleTime({
      range: [0, xMax],
      domain: extent(data, getDate) as [Date, Date],
    });
  }, [xMax, data]);
  const priceScale = useMemo(() => {
    return scaleLinear({
      range: [yMax + margin.top, margin.top],
      domain: [min(data, getStockValue) || 0, max(data, getStockValue) || 0],
      nice: true,
    });
    //
  }, [margin.top, yMax, data]);

  // tooltip handler
  const handleTooltip = useCallback(
    (
      event: React.TouchEvent<SVGRectElement> | React.MouseEvent<SVGRectElement>
    ) => {
      const { x } = localPoint(event) || { x: 0 };
      const currX = x - margin.left;
      const x0 = dateScale.invert(currX);
      const index = bisectDate(data, x0, 1);
      const d0 = data[index - 1];
      const d1 = data[index];
      let d = d0;

      // calculate the cursor position and convert where to position the tooltip box.
      if (d1 && getDate(d1)) {
        d =
          x0.valueOf() - getDate(d0).valueOf() >
          getDate(d1).valueOf() - x0.valueOf()
            ? d1
            : d0;
      }

      showTooltip({
        tooltipData: d,
        tooltipLeft: x,
        tooltipTop: priceScale(getStockValue(d)),
      });
    },
    [showTooltip, priceScale, dateScale, data, margin.left]
  );

  return (
    <div style={{ position: "relative", margin: "0 0 1rem" }}>
      <svg width={width} height={height}>
        <LineChart
          data={data}
          width={width}
          margin={{ ...margin }}
          yMax={yMax}
          xScale={dateScale}
          yScale={priceScale}
          stroke={theme.colors.lapislazuli}
          xTickFormat={(d) => {
            return numeral(d).format(d <= 100 ? "$0.00" : "$0,0");
          }}
        />
        {/* a transparent ele that track the pointer event, allow us to display tooltup */}
        <Bar
          x={margin.left}
          y={margin.top * 2}
          width={xMax}
          height={yMax}
          fill="transparent"
          rx={14}
          onTouchStart={handleTooltip}
          onTouchMove={handleTooltip}
          onMouseMove={handleTooltip}
          onMouseLeave={() => hideTooltip()}
        />
        {/* drawing the line and circle indicator to be display in cursor over a
          selected area */}
        {tooltipData && (
          <g>
            <Line
              from={{ x: tooltipLeft, y: margin.top * 2 }}
              to={{ x: tooltipLeft, y: yMax + margin.top * 2 }}
              stroke={theme.colors.primary}
              strokeWidth={2}
              opacity={0.5}
              pointerEvents="none"
              strokeDasharray="5,2"
            />
            <circle
              cx={tooltipLeft}
              cy={tooltipTop + 1 + margin.top}
              r={4}
              fill="black"
              fillOpacity={0.1}
              stroke="black"
              strokeOpacity={0.1}
              strokeWidth={2}
              pointerEvents="none"
            />
            <circle
              cx={tooltipLeft}
              cy={tooltipTop + margin.top}
              r={4}
              fill={theme.colors.lapislazuli}
              stroke="white"
              strokeWidth={2}
              pointerEvents="none"
            />
          </g>
        )}
      </svg>
      {/* To display the tooltip box with price and value */}
      {tooltipData && (
        <div>
          <TooltipWithBounds
            key={Math.random()}
            top={tooltipTop - 12}
            left={tooltipLeft}
            style={{
              ...defaultToopTipStyles,
              background: theme.colors.lapislazuli,
              padding: "0.5rem",
              border: "1px solid white",
              color: "white",
            }}
          >
            <ul style={{ padding: "0", margin: "0", listStyle: "none" }}>
              <li style={{ paddingBottom: "0.25rem" }}>
                <b>{format(getDate(tooltipData), "PPpp")}</b>
              </li>
              <li>
                Price: <b>{`${getFormatValue(tooltipData)}`}</b>
              </li>
            </ul>
          </TooltipWithBounds>
        </div>
      )}
    </div>
  );
};

export default PrimaryChart;
在我们测试之前,让我们将主图表包含在我们的市场容器中,并将我们的映射数据传递给我们的主图表。
// src/containers/Market/index.tsx
const Market = () => {
  const [timeFilter, setTimeFilter] = React.useState<string>(TimeFilters.P1D);

  const [{ data, loading, error }] = useAxios<GetMarketChartResponse | null>({
    url: `https://api.coingecko.com/api/v3/coins/${MARKET_CHART_ID}/market_chart?vs_currency=usd&days=${timeFilter}`,
    method: "GET",
  });

  const mappedData: DataProps[] = React.useMemo(() => {
    return data?.prices
      ? data.prices.map((ele) => ({
          date: new Date(ele[0]),
          price: ele[1],
        }))
      : [];
  }, [data]);

  return (
    <>
      {mappedData?.length ? (
        <>
          <PrimaryChart
            data={mappedData}
            height={200}
            width={600}
            margin={{
              top: 16,
              right: 16,
              bottom: 40,
              left: 48,
            }}
          />
        </>
      ) : null}
    </>
  );
};
现在尝试悬停我们的 PrimaryChart!
恭喜!我们已成功显示第一个带有工具提示的图表!
让我们总结一下🌯
对于其余的实现,您可以在这里查看我的开源项目:react-crypto-tracker。
构建这个项目的过程很有趣,同时我也学习了所有必要的工具/库来实现它。学习 Visx 的难度很高,但一切都值得!
如果你喜欢我的博客,请给我的项目点赞⭐️来支持我。你可以在Twitter或LinkedIn上联系我。再次感谢你的阅读📚,祝你独角兽🦄一路平安!
文章来源:https://dev.to/onlyayep/how-i-build-crypto-tracker-chart-with-react-4k9h 后端开发教程 - Java、Spring Boot 实战 - msg200.com


