使用 Notion 和 Kelvin Data 实现个人 CRM 自动化
介绍
Notion 为我们用单个应用程序实现的功能提供了巨大的可能性,老实说,它是管理个人 CRM 的最佳方式之一。
现在,如果有一种方法可以尝试从网上获取诸如 twitter id、Linkedin url、姓名和其他一些详细信息,只需提供用户电子邮件地址即可。
感觉很棒吧?
了解一下Kelvin Data,它是一种 API 即服务,开发人员可以使用 API 访问数百万人的数据。
先决条件
- JavaScript 基础
- 节点 JS
- Notion 账户
- 开尔文数据账户
我们将要构建什么
上面的 GIF 展示了 API 的工作原理,它将为我们获取并填充剩余字段的数据。字段的填充由 Notion Integration 负责。
让我们一起建造
概念整合
要运行任何自动化并访问 Notion API,我们需要一些称为 Notion 集成的东西。
您可以前往https://www.notion.so/my-integrations创建您的集成并创建您的 Notion 集成。
万一您在任何地方遇到意外,请使用此处提到的详细指南。
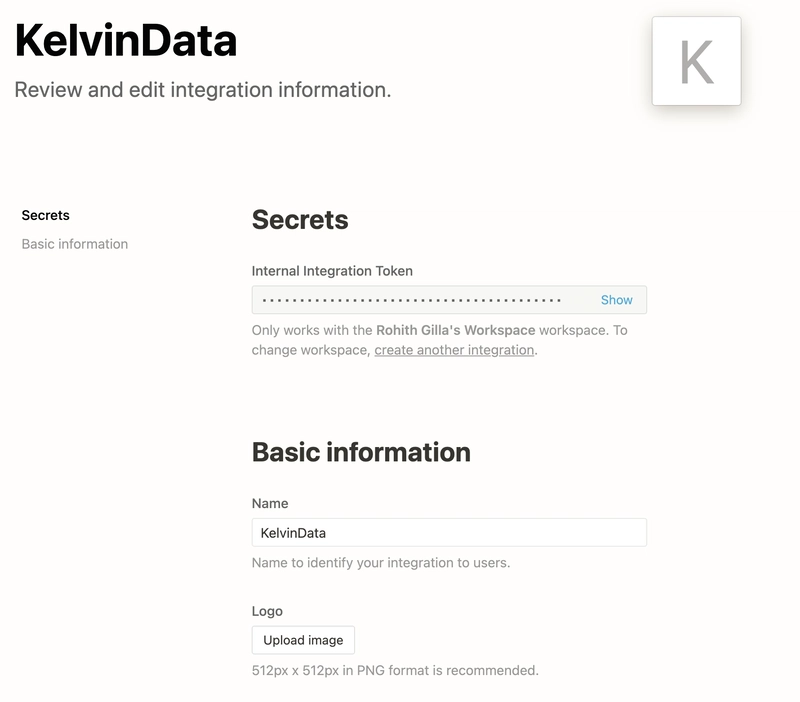
一旦完成集成创建,它看起来就会像这样。
KelvinData是我的集成的名称,下一部分我们将需要内部集成令牌。
创建概念数据库
转到任何 Notion 页面并单击/并搜索Table Full Page选项,然后单击输入。]
您可以在下面生成的 GIF 中找到这些步骤。
现在您需要获取我们创建的数据库的数据库 ID,您可以按照此处提到的步骤获取该 ID https://developers.notion.com/docs#step-2-share-a-database-with-your-integration。
将集成添加到创建的 Notion 数据库
现在,一旦我们有了数据库,我们就必须授予我们在第一步中完成的 Notion 集成的访问权限。
您可以在下面生成的 GIF 中找到这些步骤。
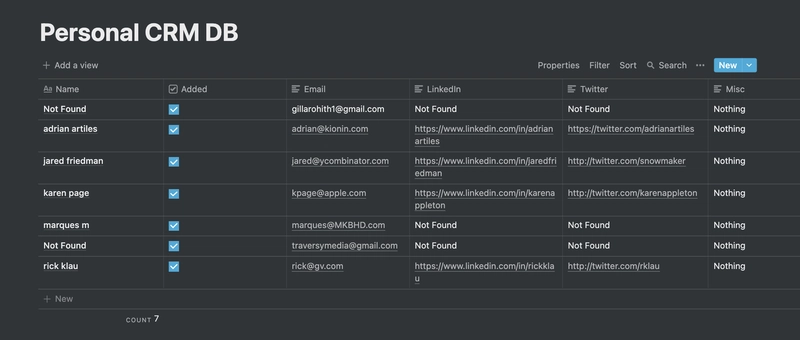
您现在可以添加所需的列,对于我们要做的示例,我们将添加
- 姓名
- 叽叽喳喳
- 电子邮件
- 杂项
您可以根据需要添加许多其他字段。
我的表格行看起来像这样
Node JS 应用程序
对于此应用程序,我们将使用 JS 来构建 Node JS 应用程序。
创建应用程序
执行以下命令来创建项目并安装所需的依赖项和开发依赖项。
mkdir notion-crm-kelvindata # Creates new directory
cd notion-crm-kelvindata # Moves to the created directory

npm init -y # Initialises the basic npm app

npm install @notionhq/client api dotenv # Installing the required dependencies
npm install --save-dev nodemon # Installing the required dev dependencies
编辑 package.json 文件
编辑package.json文件并添加以下行
"type": "module",
这将确保我们可以进行 ES6 导入。
在该scripts部分中,添加以下脚本
"dev": "nodemon index.js"
这将不断监听变化并运行应用程序。
完成后,package.json文件看起来像这样。
{
  "name": "notion-crm-kelvindata",
  "version": "1.0.0",
  "description": "",
  "type": "module",
  "main": "index.js",
  "scripts": {
    "dev": "nodemon index.js"
  },
  "keywords": [],
  "author": "Rohith Gilla",
  "license": "ISC",
  "dependencies": {
    "@notionhq/client": "^0.3.2",
    "api": "^3.4.0",
    "dotenv": "^10.0.0"
  },
  "devDependencies": {
    "nodemon": "^2.0.12"
  }
}
环境文件
我们将需要NOTION_DATABASE_ID,NOTION_SECRET_KEY和KELVIN_DATA_KEY。
我们已经在第一个 Notion 集成设置中看到了如何获取数据库 ID 和密钥。
现在我们需要很棒的 Kelvin Data API 密钥,很简单,访问https://www.kelvindata.com/并单击获取 API 密钥按钮,填写所需的详细信息即可完成。
将其保存在环境文件中,为了方便访问,我创建了一个.env.example文件。您可以在 GitHub 存储库中找到该文件,链接位于博客文章下方。
它看起来像这样,但您需要填写详细信息来代替字符串。
NOTION_DATABASE_ID=""
NOTION_SECRET_KEY=""
KELVIN_DATA_KEY=""
核
由于我们将其用作模块来使用require关键字,因此我们需要通过以下方式定义 require。
import { createRequire } from "module";
const require = createRequire(import.meta.url);
开尔文数据初始化
Kelvin Data 有很好的 API 参考,你可以在这里找到它https://kelvin-data.readme.io/reference/searchv2_query。
它展示了如何集成各种框架和技术。
我们使用 Node,因此第一步我们需要初始化将用于搜索用户数据库的 kelvin data sdk。
const kelvinSDK = require("api")("@kelvin-data/v1.0#3bettnkt7yytde");
这行代码会帮我们获取所需的 SDK,简单来说,这个包api会接受 OpenAPI 规范并生成SDK。这太酷了,也太实用了。
Notion API 初始化
import { Client } from "@notionhq/client";

const NOTION_SECRET_KEY = process.env.NOTION_SECRET_KEY;
const NOTION_DATABASE_ID = process.env.NOTION_DATABASE_ID;

const notion = new Client({ auth: NOTION_SECRET_KEY });
查询
现在我们必须查询我们在步骤 1 中构建的 Notion 表。
const response = await notion.databases.query({
      database_id: NOTION_DATABASE_ID,
  });
简单,我们直接用参数去数据库中查询database_id。
我们可以向 传递多个参数filter,sort并指定页面大小。本例中我们尽量简单,只传递database_id。
获取必填字段
现在我们需要所有列对象,更重要的是电子邮件字段上的文本。
const email = result.properties["Email"];
const name = result.properties["Name"];
const emailText = email[email.type][0]["plain_text"];
const isAdded = result.properties["Added"];
const isAddedBool = isAdded[isAdded.type];
const linkedIn = result.properties["LinkedIn"];
const misc = result.properties["Misc"];
const twitter = result.properties["Twitter"];
变量email name isAdded linkedIn twitter并misc包含相应字段的值。
它们是有点疯狂的嵌套对象!!
const emailText = email[email.type][0]["plain_text"];
通过上述操作,我们得到了电子邮件的文本。
如果您看到数据库中有一个字段Added,即复选框。这将帮助我们了解该行是否已被处理。
为了获取字段的值,我们执行的操作与获取字段的值时所做的事情类似。
const isAdded = result.properties["Added"];
用数据初始化变量
var fullName = "Not Found";
var linkedInUrl = "Not Found";
var twitterUrl = "Not Found";
var miscData = "Not Found";
这些是我们想要在用例中找出的有关人员的数据,我们将用“未找到”值预先填充它们,一旦找到,我们将用实际值替换。
搜索并保存
if (!isAddedBool) {
    // Search and save logic
}
首先,我们检查复选框值是否为真,这意味着该行已经被处理。
点击 Kelvin Data API 并获取结果
const searchResponse = await kelvinSDK["searchV2_query"]({
  email: emailText,
  limit: 1,
});
由于 SDK 为我们生成了所有内容,我们只需要使用以下命令查询 APIemail
有不同的方法来查询 API,您可以在这里找到它们。
现在是应用程序最简单的部分,从响应中获取所需字段并将它们保存在我们上面创建的变量中。
if (searchResponse.length !== 0) {
    fullName = searchResponse[0].name.full;
    const linkedInObj = searchResponse[0].profiles.find(
      (profile) => profile.network === "linkedin"
    );
    const twitterObj = searchResponse[0].profiles.find(
      (profile) => profile.network === "twitter"
    );
    if (linkedInObj) {
      linkedInUrl = linkedInObj.url;
    }
    if (twitterObj) {
      twitterUrl = twitterObj.url;
    }
  }
Notion API 更新
Notion API 更新的工作方式并未针对所有用例进行正确记录,API 文档仅讨论如何更新布尔值或数字。它们没有讨论如何更新文本或其他字段。
经过一番挖掘,我发现了以下更新方法,请注意,这可能会在未来的版本中发生变化,但大致相似。
我们需要构建一个对象来更新字段,可以通过以下方式完成。
var changedResult = {
    ...result.properties,
    Twitter: {
      ...twitter,
      rich_text: [
        {
          type: "text",
          text: {
            content: twitterUrl,
            link: twitterUrl !== "Not Found" ? { url: twitterUrl } : null,
          },
          plain_text: twitterUrl,
          href: null,
        },
      ],
    },
    LinkedIn: {
      ...linkedIn,
      rich_text: [
        {
          type: "text",
          text: {
            content: linkedInUrl,
            link:
              linkedInUrl !== "Not Found" ? { url: linkedInUrl } : null,
          },
          plain_text: linkedInUrl,
          href: null,
        },
      ],
    },
    Misc: {
      ...misc,
      rich_text: [
        {
          type: "text",
          text: { content: miscData, link: null },
          plain_text: miscData,
          href: null,
        },
      ],
    },
    Added: {
      ...isAdded,
      checkbox: true,
    },
    Name: {
      ...name,
      title: [
        {
          type: "text",
          text: { content: fullName, link: null },
          plain_text: fullName,
          href: null,
        },
      ],
    },
  };
让我们检查一下物体,看看发生了什么
LinkedIn: {
    ...linkedIn,
    rich_text: [
      {
        type: "text",
        text: {
          content: linkedInUrl,
          link:
            linkedInUrl !== "Not Found" ? { url: linkedInUrl } : null,
        },
        plain_text: linkedInUrl,
        href: null,
      },
    ],
  },
...linkedIn我们正在传播初始值,因为它们包含一些字段,例如id和其他字段。- 我们需要覆盖该
rich_text字段,为了实现这一点,我们通过将以下对象添加到该rich_text数组来执行以下操作。
{
    type: "text", // type of the value
    text: {
      content: linkedInUrl,
      link:
        linkedInUrl !== "Not Found" ? { url: linkedInUrl } : null,
    },
    plain_text: linkedInUrl,
    href: null,
  },
我们对其他字段也进行同样的操作。
最后一步使用 Notion API 更新对象
这非常简单,我们获取更新的对象并使用概念 api 更新数据库。
await notion.pages.update({
  page_id: result.id,
  properties: changedResult,
});
错误处理
我们将保持其简单,整个函数将被包装在一个try/catch块中。
定期运行
我们所拥有的功能需要每 5 秒定期运行一次,更像是一个 cron 作业,但又不是一个 cron 作业。
我们使用 JavaScriptsetTimeout函数来实现这一点。
setTimeout(main, 5000);
把所有东西拼接在一起
现在让我们把我们做的所有东西放在一起👇
import { createRequire } from "module";
const require = createRequire(import.meta.url);
import { Client } from "@notionhq/client";

const kelvinSDK = require("api")("@kelvin-data/v1.0#3bettnkt7yytde");
require("dotenv").config();

const NOTION_SECRET_KEY = process.env.NOTION_SECRET_KEY;
const NOTION_DATABASE_ID = process.env.NOTION_DATABASE_ID;

kelvinSDK.auth(process.env.KELVIN_DATA_KEY);

const notion = new Client({ auth: NOTION_SECRET_KEY });

async function main() {
  try {
    const response = await notion.databases.query({
      database_id: NOTION_DATABASE_ID,
    });
    //iterate over response.results
    response.results.forEach(async (result) => {
      const email = result.properties["Email"];
      const name = result.properties["Name"];
      const emailText = email[email.type][0]["plain_text"];
      const isAdded = result.properties["Added"];
      const isAddedBool = isAdded[isAdded.type];
      const linkedIn = result.properties["LinkedIn"];
      const misc = result.properties["Misc"];
      const twitter = result.properties["Twitter"];

      var fullName = "Not Found";
      var linkedInUrl = "Not Found";
      var twitterUrl = "Not Found";
      var miscData = "Not Found";
      if (!isAddedBool) {
        const searchResponse = await kelvinSDK["searchV2_query"]({
          email: emailText,
          limit: 1,
        });
        if (searchResponse.length !== 0) {
          fullName = searchResponse[0].name.full;
          const linkedInObj = searchResponse[0].profiles.find(
            (profile) => profile.network === "linkedin"
          );
          const twitterObj = searchResponse[0].profiles.find(
            (profile) => profile.network === "twitter"
          );
          if (linkedInObj) {
            linkedInUrl = linkedInObj.url;
          }
          if (twitterObj) {
            twitterUrl = twitterObj.url;
          }
        }
        var changedResult = {
          ...result.properties,
          Twitter: {
            ...twitter,
            rich_text: [
              {
                type: "text",
                text: {
                  content: twitterUrl,
                  link: twitterUrl !== "Not Found" ? { url: twitterUrl } : null,
                },
                plain_text: twitterUrl,
                href: null,
              },
            ],
          },
          LinkedIn: {
            ...linkedIn,
            rich_text: [
              {
                type: "text",
                text: {
                  content: linkedInUrl,
                  link:
                    linkedInUrl !== "Not Found" ? { url: linkedInUrl } : null,
                },
                plain_text: linkedInUrl,
                href: null,
              },
            ],
          },
          Misc: {
            ...misc,
            rich_text: [
              {
                type: "text",
                text: { content: miscData, link: null },
                plain_text: miscData,
                href: null,
              },
            ],
          },
          Added: {
            ...isAdded,
            checkbox: true,
          },
          Name: {
            ...name,
            title: [
              {
                type: "text",
                text: { content: fullName, link: null },
                plain_text: fullName,
                href: null,
              },
            ],
          },
        };
        await notion.pages.update({
          page_id: result.id,
          properties: changedResult,
        });
      }
    });
  } catch (error) {
    console.log(error);
  }
  setTimeout(main, 5000);
}

main();
GitHub 存储库
您可以在这里找到存储库。
GitHub - Rohithgilla12/notion-crm-kelvindata:
如果您喜欢它,请为该存储库加注星标。
部署解决方案
在这篇博文中,我们不会介绍部署,但会建议一些免费的替代方案
您可以使用 Deta Micros 在 Deta 上部署您的 Node JS 应用程序,您可以在这里了解更多信息
如果您对heroku更熟悉,您可以尝试一下。
您可以使用 vercel 来部署您的 NodeJS 应用程序。
您还可以查看StackBlitz
另一个值得一试的好资源是Replit。
解决方案有很多,我仅列举了其中几个。
后续步骤
Notion 非常强大,而集成则使其更加强大。
Kelvin Data 是一个令人惊叹的 API,其创意无限,从个人 CRM 到企业级扩展等等。
继续航行,创造奇迹。
[更新 1]:感谢您对该帖子的积极回应,我已经与 Kelvin Data 团队进行了交谈,他们说在大约一周内,在实施防止滥用的系统后,将有一种方法可以通过优惠券代码获得免费积分。
因此,请继续关注文章中提供的优惠券代码,您将凭借该优惠券代码获得免费积分,或者查看我的Twitter,我将在那里更新相同的内容。
谢谢,
罗希特·吉拉
文章来源:https://dev.to/gillarohith/automate-your-personal-crm-with-notion-and-kelvin-data-ono 后端开发教程 - Java、Spring Boot 实战 - msg200.com


