使用 Novu、React 和 Express 打造梦想待办事项应用!✅
TL;DR
在本文中,你将学习如何制作一款适合你的待办事项应用。这款应用的首要目标是提高个人效率,完成任务,并远离干扰!
所以,系好安全带,让我们开始旅程吧。🚀
为什么?🤔
在我们身处的信息过载时代,很多人并不擅长高效地专注于一项任务。为了解决这个问题,一个广为接受的方法是列出你想要完成的任务清单。
这也是我的方法,但随着时间的推移,我开始感到基本功能受到限制,并发现自己需要在不同的应用程序之间切换以实现不同的功能。
我的主要用例是:
- 一个计划我一周的地方。
- 我每天要对当天想要实现的目标进行细分。
- 了解当前时间和日期。
- 当我完成一项任务时,受到启发去采取行动并感到很有成就感。
- 向我分配了任务的人员发送非正式短信提醒。
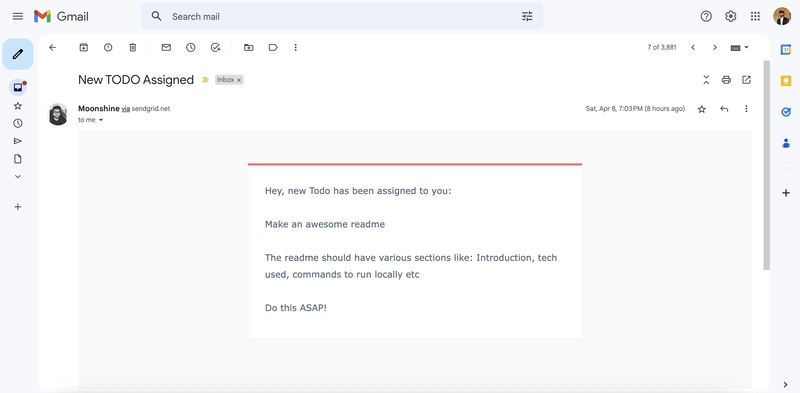
- 向同事发送正式的电子邮件提醒。
- 该应用程序应该随处可用。
为了实现这些目标,我不得不在多个应用程序之间进行切换:一个跨平台的待办事项应用程序(出奇地难找到)、一个日历应用程序、一个报价应用程序、一个信使应用程序和一个电子邮件应用程序。
不用说,在这些应用程序之间切换违背了我使用这些应用程序的初衷:在无干扰的环境中最大限度地提高个人工作效率。
看到没有一款应用能满足我的所有功能,我决定自己开发一款。但有一个问题:我可以开发一个很棒的待办事项应用,但如何向用户发送分配给他们的任务提醒,这个问题仍然没有得到解决。
进入 Novu!
Novu 帮我解决了工作流程中最大的困扰——拿起手机发信息提醒别人该做的任务。别忘了,保持不受干扰对我来说很重要,而拿起手机几乎就像是在邀请那些光鲜亮丽、充满诱惑的干扰。
但是有了 Novu,我现在可以构建一个待办事项应用程序,通过它我可以向我的朋友发送非正式的短信提醒,以及向我的同事发送正式的电子邮件提醒。
Novu - 面向开发人员的开源通知基础设施:
Novu 是一个面向开发者的开源通知基础设施。它可以帮助您管理所有产品通知,包括应用内通知(类似 Facebook 的铃铛图标)、电子邮件、短信、Discord 等等。
如果您在 GitHub 上查看我们并给我们一颗星,我会非常高兴!❤️
https://github.com/novuhq/novu
让我们从我们的应用程序 Moonshine 开始:
我们将分两个阶段构建我们的应用——后端和前端。后端和前端将分别位于不同的 GitHub 仓库中,我还将向您展示如何将 Moonshine 部署到 Web 上,以便我们能够从任何地方访问它。
让我们从后端开始。
基本设置:
我们将从一个空的 git 仓库开始。创建一个空的 git 仓库,输入所有相关信息,并将其发布到 GitHub。然后在你的 IDE 中打开它(我将使用 VS Code):
我们的第一步是安装所有必需的软件包。我们将依赖npm (Node 包管理器)中的几个软件包。
要开始此过程,我们将使用以下命令生成一个 package.json:
npm init -y
此命令生成 package.json 文件,现在我们可以安装所需的所有软件包。使用以下命令安装所有软件包:
npm i dotenv novu bcryptjs body-parser cors express jsonwebtoken mongoose nodemon
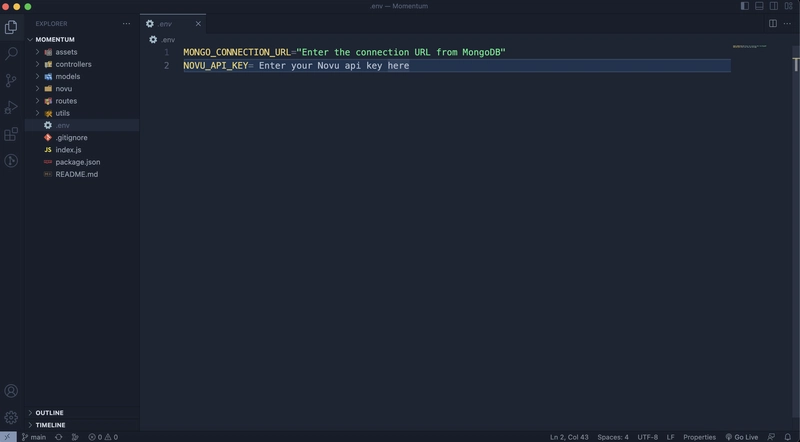
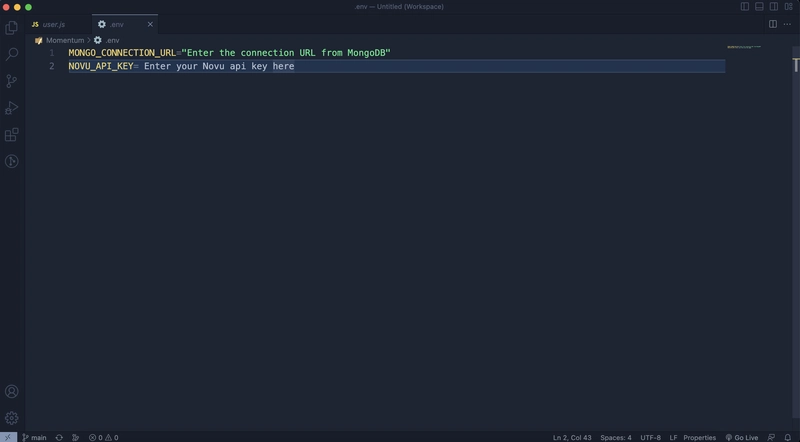
现在,在项目根目录下创建一个.env 文件和一个.gitignore文件。我们会将所有敏感数据(例如 MongoDB 连接 URL 和 Novu API 密钥)保存在.env文件中。为了防止这些数据被 git 暂存并推送到 GitHub,请将.env文件添加到.gitignore文件中,如下所示:
连接到数据库:
完成基本设置后,我们需要连接到数据库来存储信息。我们将使用 MongoDB,因为它非常容易上手,并且能够满足我们所有的需求。所以,请创建您的 MongoDB 帐户并登录。
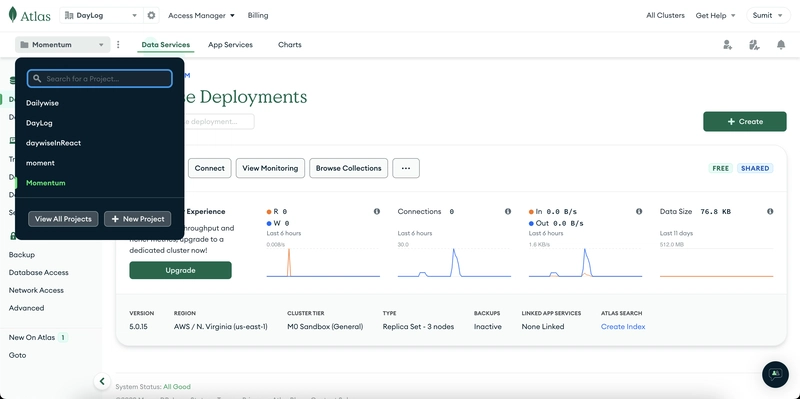
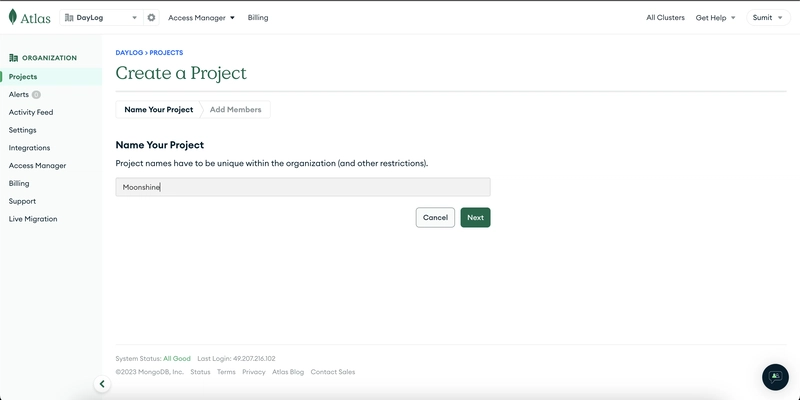
我们需要从 MongoDB 获取数据库连接 URL。要获取该 URL,请转到左上角,然后从那里创建一个新项目。
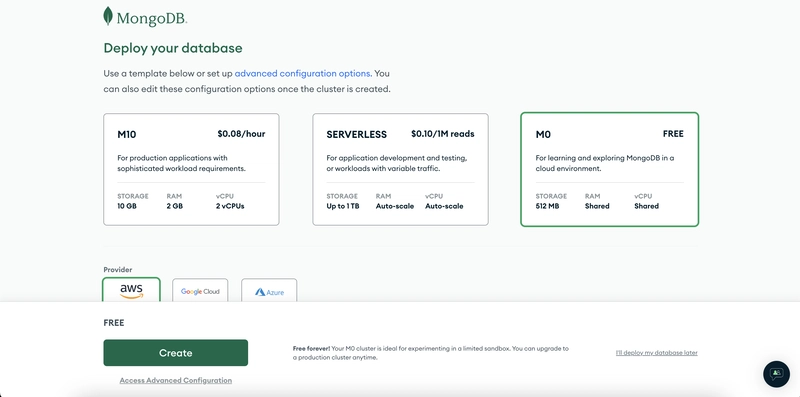
为您的项目命名,然后单击“创建项目”,然后单击“构建数据库”
之后,选择免费选项,保留所有内容为默认设置
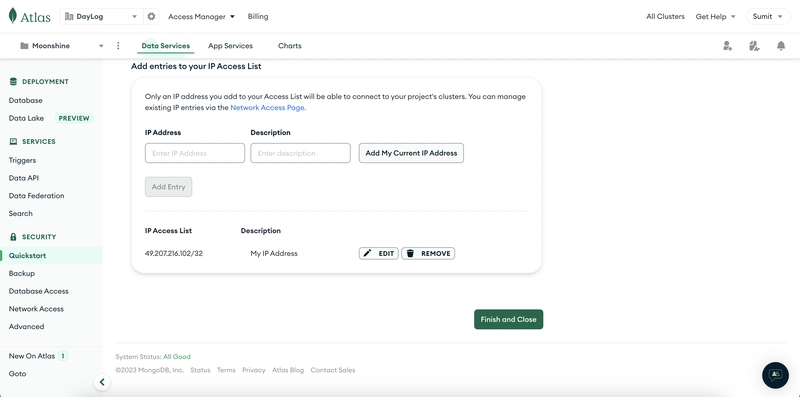
输入用于 MongoDB 身份验证的用户名和密码(记下密码,我们需要它)。然后滚动到页面底部,单击“完成并关闭”:
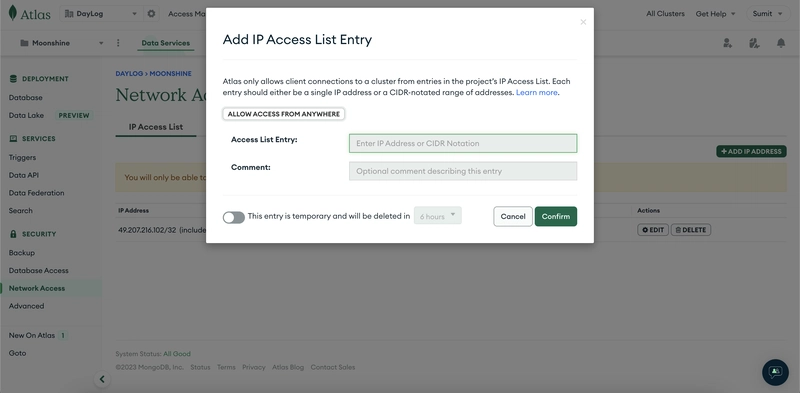
现在我们需要连接到数据库。从左侧菜单中选择“连接”,然后选择“网络访问”。然后转到“添加 IP”,并选择“允许从任何位置访问”,如下所示:
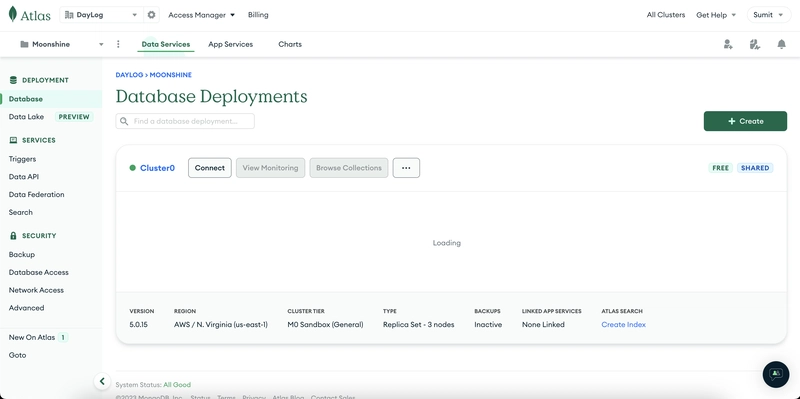
现在,从左侧菜单再次转到数据库并单击连接按钮
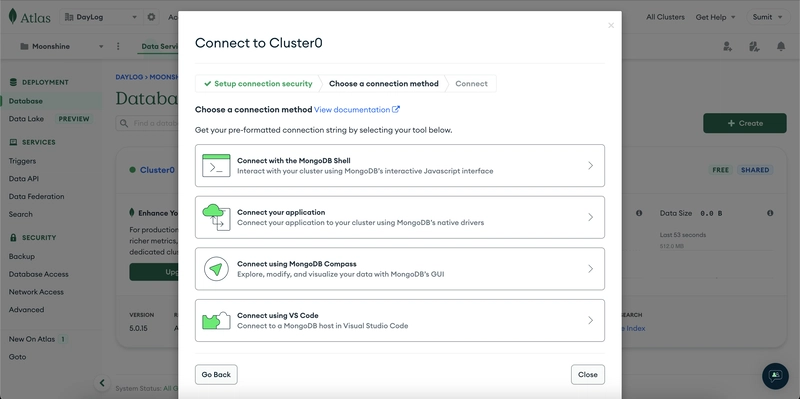
在这里,选择“连接您的应用程序”,如下所示:
现在,将连接 URL 复制到您的 .env 文件中,只需将其替换为您上面保存的密码即可。
获取我们的 Novu API 密钥:
数据库连接后,我们需要 Novu API 密钥,您可以轻松获取。
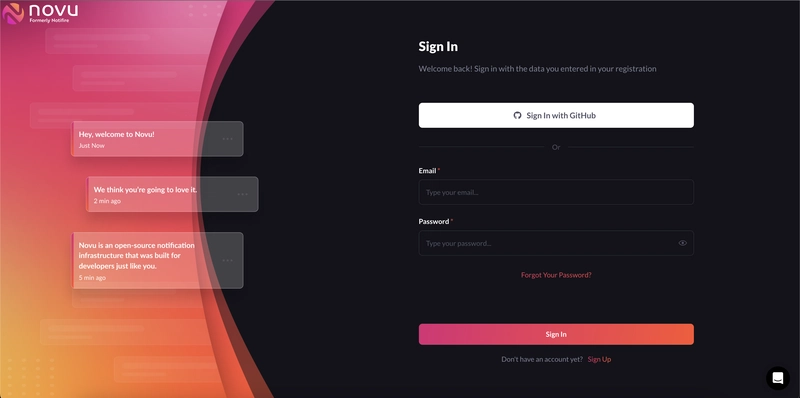
前往Novu 的 Web 平台
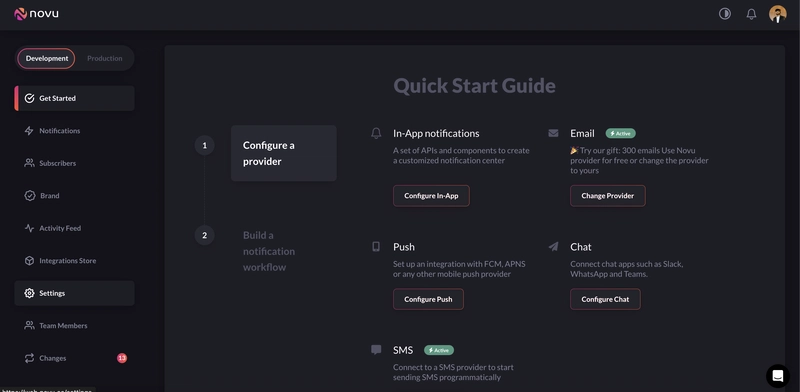
创建您的帐户并登录。然后从左侧导航菜单前往“设置” 。
现在,在设置中,转到第二个名为“API 密钥”的选项卡。在那里,您将看到您的 Novu API 密钥。复制它并将其添加到项目根目录中的.env文件中:
现在,我们已经完成了所有基础工作并准备开始编写后端代码。
编写后端代码:
后端代码的第一部分是控制器,它包含处理应用程序 http 请求的函数代码。我们将在这里创建两个文件:
- 我们的待办事项应用程序的所有 http 方法之一,例如获取所有待办事项、添加新待办事项、删除待办事项等。
- 另一个涉及身份验证的 http 方法,如登录和注册。
我们的 auth 文件内容如下。它包含两个函数——signUp 和 signIn。signUp 函数会检查输入的信息是否已属于已注册用户,并做出相应的响应。如果尚未属于现有用户,则会在我们之前创建的数据库中创建一个新用户。
import jwt from "jsonwebtoken"
import bcrypt from "bcryptjs";
import user from "../models/user.js";

export const signUp= async (req,res)=>{
    const {first_name,last_name,email,password,confirm_password}=req.body;
    try {
        const existingUser= await user.findOne({email});
        if(existingUser) return res.status(400).json({message:"User already exists.."});

        if (password!==confirm_password) return res.status(400).json({message:"Password should match.."})
        const hashedPassword= await bcrypt.hash(password,12);
        const result= await user.create({email,password:hashedPassword,name: `${first_name} ${last_name}`});
        const token= jwt.sign({email:result.email,id:result._id},'secret',{expiresIn:'5h'});
        res.status(200).json({result,token});
    } catch (error) {
        res.status(500).json({message:"Something went wrong!! try again."})
    }
}

export const signIn= async (req,res)=>{
    const {email,password}=req.body;
    try {
        const existingUser= await user.findOne({email});
        if(!existingUser) return res.status(404).json({message:"User does not exist!!"})

        const isPasswordCorrect= await bcrypt.compare(password,existingUser.password);

        if(!isPasswordCorrect) return res.status(400).json({message:"Invalid password,try again!!"});

        const token= jwt.sign({email:existingUser.email,id:existingUser._id},'secret',{expiresIn:'5h'});

        res.status(200).json({result:existingUser, token});
    } catch (error) {
        res.status(500).json({message:"Something went wrong!! please try again"});
    }
}
类似地,我们的todo文件的内容如下:
import notes from "../models/note.js";
import mongoose from "mongoose";
import {
  getNotification,
  inAppNotification,
  smsNotification,
} from "../novu/novu.js";

export const getNotes = async (req, res) => {
  try {
    const allNotes = await notes.find();
    res.status(200).json(allNotes);
  } catch (error) {
    res.status(409).json({ message: error });
  }
};

export const createNote = async (req, res) => {
  const { title, description, date, message } = req.body;
  const newNote = new notes({
    title,
    description,
    date,
    creator: req.userId,
    createdAt: new Date().toISOString(),
    checked: false,
  });
  try {
    await newNote.save();
    await inAppNotification(title, description, req.userId, message);
    res.status(201).json(newNote);
  } catch (error) {
    res.status(409).json({ message: error });
  }
};

export const deleteNote = async (req, res) => {
  const { id } = req.params;
  if (!mongoose.Types.ObjectId.isValid(id))
    return res.status(404).send(`no note is available with id:${id}`);
  await notes.findByIdAndRemove(id);
  res.json({ message: "Note deleted successfully" });
};

export const updateNote = async (req, res) => {
  const { id: _id } = req.params;
  const note = req.body;
  if (!mongoose.Types.ObjectId.isValid(_id))
    return res.status(404).send(`No note is available with id:${id}`);
  const updatedNote = await notes.findByIdAndUpdate(
    _id,
    { ...note, _id },
    { new: true }
  );
  res.json(updatedNote);
};

export const sendSmsNotification = async (req, res) => {
  try {
    const { title, description, phone, noteId } = req.body;
    await smsNotification(title, description, phone, noteId);
    res.status(200).json({ message: "SMS sent successfully" });
  } catch (error) {
    console.log("sendSmsNotification error", error);
    res.status(500).json({ message: "Failed to send SMS" });
  }
};

export const sendEmailNotification = async (req, res) => {
  try {
    const { title, description, email, noteId } = req.body;
    await getNotification(title, description, email, noteId);
    res.status(200).json({ message: "Email sent successfully" });
  } catch (error) {
    console.log("sendEmailNotification error", error);
    res.status(500).json({ message: "Failed to send Email" });
  }
};

export const deleteInAppNotification = async (req, res) => {
  try {
    const { title, description, userId, message } = req.body;
    await inAppNotification(title, description, userId, message);
    res.status(200).json({ message: "Todo delted successfully" });
  } catch (error) {
    console.log("deleteInAppNotification error", error);
    res.status(500).json({ message: "Todo deleted successfully" });
  }
};

export const toggleNoteDone = async (req, res) => {
  try {
    const noteRef = await notes.findById(req.params.id);

    const note = await notes.findOneAndUpdate(
      { _id: req.params.id },
      { done: !noteRef.done }
    );

    await note.save();

    return res.status(200).json(note);
  } catch (error) {
    return res.status(500).json(error.message);
  }
};
它包含以下主要功能以及其他一些功能:
-
getNotes- 此功能从我们的数据库中检索所有待办事项并将其作为响应发送。 -
createNote- 此函数会创建一个新的待办事项并将其保存到数据库中。它还会向创建此笔记的用户发送应用内通知(这得益于 Novu magic,我们的应用有一个很棒的通知中心来存储所有应用内通知)。 -
deleteNote- 此函数根据提供的 ID 从数据库中删除待办事项(取决于单击了哪个待办事项的删除按钮)。 -
updateNote- 此函数根据提供的 ID 更新数据库中的待办事项。 -
sendSmsNotification- 此功能向提供的电话号码发送短信通知(再次使用 Novu 的神奇力量)。 -
sendEmailNotification- 此功能向提供的电子邮件地址发送电子邮件通知(通过召唤 Novu 的魔法力量)。
现在,我们所有的 http 方法都已完成,并且也已导出。接下来,我们需要设置一个模板(称为Schema),该模板的格式是我们期望将数据发送到之前创建的数据库的格式。
数据库架构:
MongoDB 将数据存储在名为“Collections”的实体中。可以这样理解:我们的数据库是一个房间,而“Collections”则是房间里用来存储数据的盒子。以下是我们的 auth 文件的架构:
import mongoose from "mongoose";

const userSchema = mongoose.Schema(
    {
        id:{type:String},
        name:{type:String,required:true},
        email:{type:String,required:true},
        password:{type:String,required:true}
    },
    {
        collection: "user"
    }
)

export default mongoose.model("User", userSchema);
该模式定义了用户文档的字段和类型 - id、姓名、电子邮件和密码。
名称、电子邮件和密码字段的必需属性设置为 true,这意味着在创建新的用户文档之前,这些字段必须具有值。
类似地,这是我们待办事项的架构:
import mongoose from "mongoose";

const noteSchema = mongoose.Schema(
  {
    title: { type: String, required: true },
    description: { type: String },
    date: { type: Date, required: true },
    creator: { type: String, required: true },
    createdAt: {
      type: Date,
      default: new Date(),
    },
    done: { type: Boolean, default: false },
  },
  {
    collection: "note",
  }
);

export default mongoose.model("Notes", noteSchema);
设置 Novu 触发功能:
我们现在需要为我们希望应用程序拥有的每种通知类型设置 Novu 触发功能,即:应用内、电子邮件和短信。
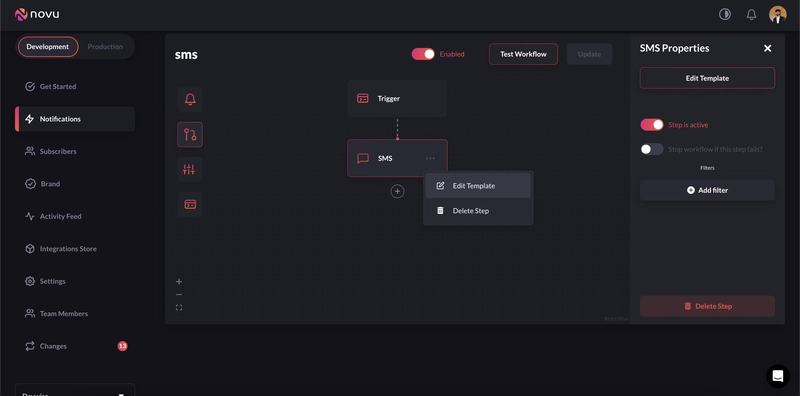
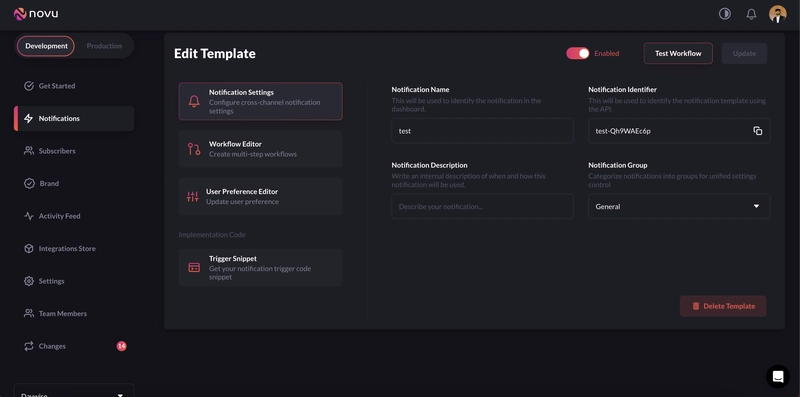
要进行配置,请转到Novu 网页平台,从左侧导航菜单中选择“通知”,然后转到工作流编辑器,并从右侧菜单中选择一个渠道。现在,点击三点菜单,然后转到“编辑模板”
现在为每个通知创建一个模板——因此,我们需要一个用于电子邮件的模板、一个用于短信的模板以及最后一个用于应用内通知的模板。我们还需要连接到通知提供商,以确保通知正常工作。
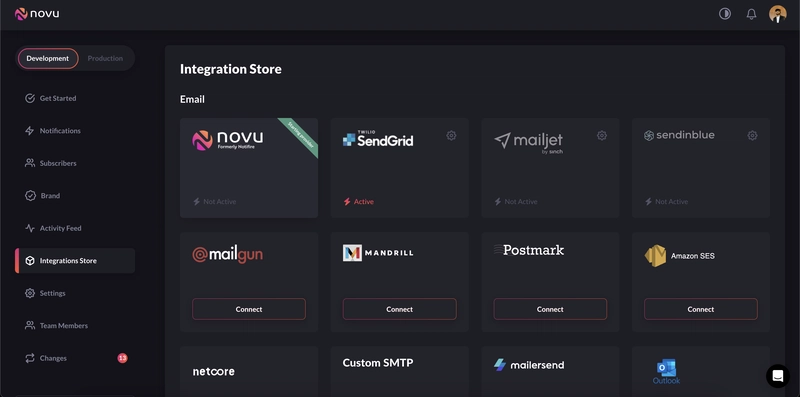
幸运的是,Novu 有一个内置的“集成商店”,其中有大量提供商,几乎涵盖了您能想到的每个渠道 - 从电子邮件到短信、聊天到推送通知。
一切尽在其中!
从左侧导航栏转到集成商店并连接您的提供商。
我们将使用“Sendgrid”发送电子邮件,“Twillio”发送短信。
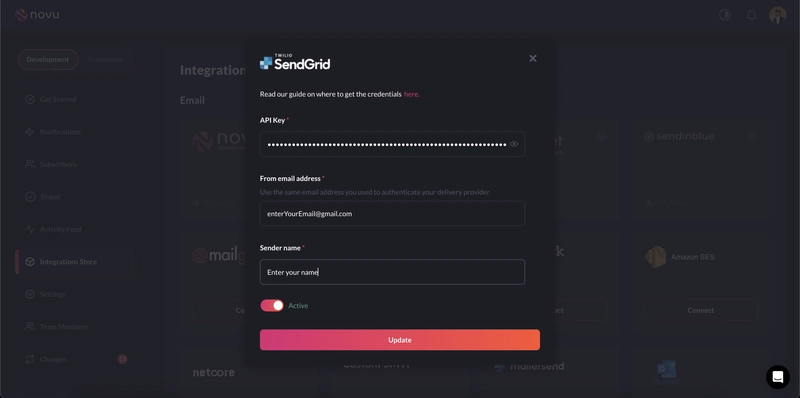
请按照 Novu 提供的指南连接这两个应用(参见下图中粉色的“此处”链接)。
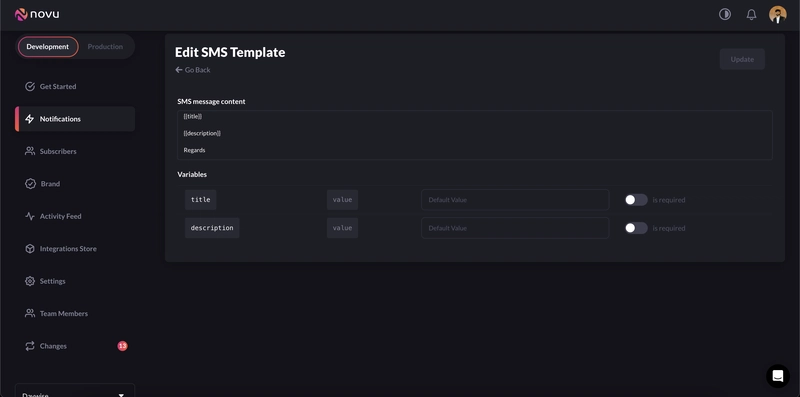
连接后,您可以根据自己的喜好配置每个通道。这里我演示了如何配置短信通道,但您也可以使用类似的步骤配置其他通道。
在 Novu 中配置通知渠道:
要配置渠道,请从左侧导航菜单中选择“通知”,然后点击右上角的“新建”按钮创建模板。输入名称并复制触发代码。
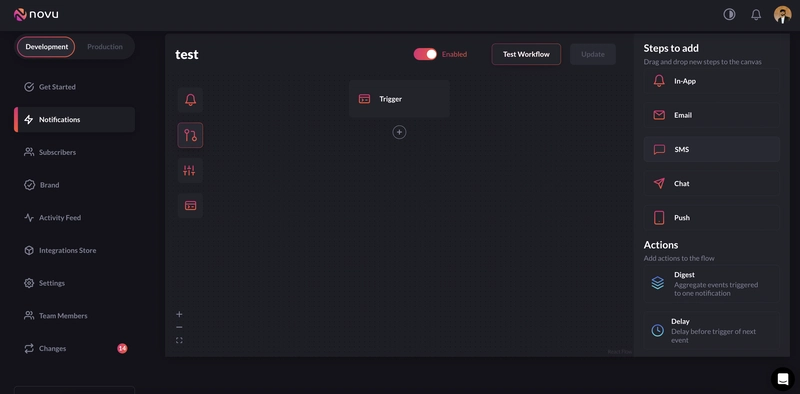
然后关闭它并转到“工作流编辑器”。在右侧,您将看到可以添加到 Novu 画布的频道。只需将“SMS”从右侧拖到中间的 Novu 画布即可。这就是所有奇迹发生的地方!✨
您可以添加各种通知渠道,根据自己的喜好自定义模板,测试通知、设置延迟等等——所有这些都可以在一个地方完成。事实上,如果我开始列出 Novu 的所有功能,我可能会把这篇文章写成一篇文章,因为 Novu 的功能实在太多了:
您也可以使用上述步骤自定义电子邮件和应用内渠道,只需从工作流编辑器中选择相关渠道即可。
复制每个频道触发 Novu 的代码后,请前往项目目录,在Novu目录下创建一个“Novu.js”文件,并将所有内容粘贴到其中。请务必使用 Novu API 密钥、订阅者 ID 等相关数据更新代码片段。
我们的Novu.js内容如下。它包含我们在上面的步骤中从 Novu 的 Web 平台获取的各个渠道的所有代码片段:
import { Novu } from '@novu/node';
import dotenv from "dotenv";


dotenv.config();

export const getNotification = async (title,description,email,Id) => {
    const novu = new Novu(process.env.NOVU_API_KEY);

    await novu.subscribers.identify(Id, {
        email: email,
        firstName: "Subscriber"
    });

    await novu.trigger('momentum--L67FbJvt', {
        to: {
          subscriberId: Id,
          email: email
        },
        payload: {
            title: title,
            description: description
        }
    });
}


export const smsNotification = async (title,description,phone,Id) => {
    const novu = new Novu(process.env.NOVU_API_KEY);

    novu.trigger('sms', {
        to: {
        subscriberId: Id,
        phone: `+91${phone}`
        },
        payload: {
        title: title,
        description: description
        }
    });
}

export const inAppNotification = async (title,description,Id,message) => {
    const novu = new Novu(process.env.NOVU_API_KEY);

    await novu.subscribers.identify(Id, {
        firstName: "inAppSubscriber"
    });

    await novu.trigger('in-app', {
        to: {
            subscriberId: Id
        },
        payload: {
            title: title,
            description: description,
            message: message
        }
    });
}
在这里,我们将从我们的“.env”文件中获取 Novu 的 api 密钥,没有它,我们的应用程序将无法运行。
此外,您还需要输入短信的国家代码,因为我已经在上面的短信触发功能中输入了印度的国家代码(+91)。
我们还需要设置一个用于身份验证的实用函数,如下所示:
import jwt from "jsonwebtoken";

const auth=  async (req,res,next)=>{
    try {
        const token= req.headers.authorization.split(" ")[1];
        const isCustomAuth= token.length<500;

        let decodedData;
        if(token && isCustomAuth){
            decodedData= jwt.verify(token,'secret');
            req.userId= decodedData?.id;
        }
        next();
    } catch (error) {
        console.log("auth middleware error",error);
    }
}

export default auth;
最后,我们需要设置 http 路由并将每个应用程序路由映射到相应的函数(我们已经在上面的控制器中设置了)。
这是我们的待办事项路线的代码:
import express from "express";
import {
  createNote,
  deleteNote,
  updateNote,
  getNotes,
  sendEmailNotification,
  sendSmsNotification,
  deleteInAppNotification,
  toggleNoteDone,
} from "../controllers/note.js";
import auth from "../utils/auth.js";
const router = express.Router();

router.get("/", auth, getNotes);
router.post("/", auth, createNote);
router.patch("/:id", updateNote);
router.delete("/:id", deleteNote);
router.get("/:id", toggleNoteDone);

// for novu API
router.post("/send-sms", sendSmsNotification);
router.post("/send-email", sendEmailNotification);
router.post("/delete", auth, deleteInAppNotification);

export default router;
这是用于身份验证的路由文件:
import express from "express";
import {signUp,signIn} from "../controllers/user.js"
const router= express.Router();

router.post('/signup',signUp);
router.post('/signin',signIn);

export default router;
后端已经完成,现在我们将转向前端,也就是应用程序的客户端。只需将后端部署到你选择的任何服务即可。
我正在使用 Render 的免费版本,但您可以使用您选择的版本,例如 Heroku。
它们都具有持续部署功能,每次将提交推送到后端存储库时,都会自动触发新的构建。
无论你使用哪种服务,部署到互联网后都要记下它的 URL。我们需要将它插入到前端,以便它能够与后端通信。
转向前端:
对于前端,我们将使用“create-react-app”工具为我们的应用程序设置项目(及其 git repo)。
只需打开终端并执行以下命令:
npx create-react-app moonshine
现在进入“Moonshine”目录并通过以下方式启动项目:
cd moonshine
npm start
这将启动基本的 React 项目。同样,我们将创建一个.env文件,并添加 Novu 标识符(与上面获取 Novu API 密钥的位置相同),然后将其添加到.gitignore 文件中,这样 git 就不会跟踪它。
我们还需要安装以下软件包:
Novu, axios, dotenv, jwt-decode, moment, react-datepicker, react-icons, react-redux and react-toastify
我们可以使用以下命令安装每个包:
npm i X
其中“X”是包的名称。
我们的前端代码的目录结构:
我们将把前端代码分布到以下目录中:
- 组件:这将包含我们的应用程序所构成的每个组件的单独代码 - 标题、加载器、待办事项和报价。
- 页面:这将包含我们应用程序包含的所有页面。每个页面由一个或多个组件组成。我们应用程序中的页面包括:首页、登录、注册和报价。
- Common:此目录包含我们整个应用程序的通用文件。对我们来说,它将包含使前端能够与应用程序的后端通信的功能。
- 动作:从名称可以看出,它包含指示当用户执行某项任务时要触发哪个动作的代码。
- Reducer:Reducer 让我们管理在应用程序中执行操作时状态如何变化。
我将上述每个目录中的一个文件的代码分享给大家。如果您需要,可以从下面链接的 GitHub 仓库中查看前端和后端的完整代码。
我们的 todo 组件的代码是:
import React, { useState, useEffect } from "react";
import "./note.css";
import { useDispatch } from "react-redux";
import {
  deleteNote,
  deleteTodoInApp,
  sendEmailNotification,
  sendSmsNotification,
  toggleTodo,
} from "../../actions/notes";
import { MdOutlineEmail } from "react-icons/md";
import { BsTrash3Fill } from "react-icons/bs";
import { FiEdit } from "react-icons/fi";
import { MdSms } from "react-icons/md";
import { BsReverseLayoutTextWindowReverse } from "react-icons/bs";

const Note = ({
  item,
  setCurrentId,
  setShowForm,
  setIsEditing,
  setSelectedDate,
  theme,
}) => {
  const [email, setEmail] = useState("");
  const [phone, setPhone] = useState("");
  const [isEmail, setIsEmail] = useState(false);
  const [isSms, setIsSms] = useState(false);
  const [showDescription, setShowDescription] = useState(false);

  const [user, setUser] = useState(JSON.parse(localStorage.getItem("profile")));
  const dispatch = useDispatch();

  useEffect(() => {
    setUser(JSON.parse(localStorage.getItem("profile")));
  }, []);

  const donehandler = async (event) => {
    dispatch(toggleTodo(item._id));
  };

  const deleteTodoHandler = async () => {
    const deleteInAppNote = {
      title: item.title,
      description: item.description,
      userId: user?.result?._id,
      message: "deleted",
    };
    try {
      dispatch(deleteTodoInApp(deleteInAppNote));
      dispatch(deleteNote(item._id));
    } catch (error) {
      console.log("deleteTodoHandler error", error);
    }
  };

  const smsHandler = () => {
    setIsSms((prev) => !prev);
  };

  const emailHandler = () => {
    setIsEmail((prev) => !prev);
  };

  const descriptionHandler = () => {
    setShowDescription((prev) => !prev);
  };

  const editTodoHandler = () => {
    setCurrentId(item._id);
    setSelectedDate(new Date(item.date));
    setShowForm(true);
    setIsEditing(true);
    window.scrollTo({ top: 0, behavior: "smooth" });
  };

  const handleSubmitEmail = async (e) => {
    e.preventDefault();
    const emailNote = {
      title: item.title,
      description: item.description,
      email: email,
      noteId: item._id,
    };
    try {
      dispatch(sendEmailNotification(emailNote));
    } catch (error) {
      console.log("handleSubmitEmail error", error);
    }
    setEmail("");
  };

  const handleSubmitPhone = async (e) => {
    e.preventDefault();
    const smsNote = {
      title: item.title,
      description: item.description,
      phone: phone,
      noteId: item._id,
    };
    try {
      dispatch(sendSmsNotification(smsNote));
    } catch (error) {
      console.log("handleSubmitPhone error", error);
    }
    setPhone("");
  };

  return (
    <div
      className="note"
      style={{
        backgroundColor: theme ? "#1f1f2b" : "#f2f2f2",
      }}
    >
      <div className="note_container">
        <div className="note_text_container">
          <input
            type="checkbox"
            className="note_checkbox"
            checked={item.done}
            onChange={donehandler}
            style={{
              cursor: "pointer",
            }}
          />
          <h2 className={item.done ? "note_title done" : "note_title"}>
            {item.title}
          </h2>
        </div>
        <div className="note_button_container">
          {item.description.length > 0 && (
            <div
              className="icon_container note_description"
              onClick={descriptionHandler}
            >
              <BsReverseLayoutTextWindowReverse />
            </div>
          )}
          <div className="icon_container note_email" onClick={emailHandler}>
            <MdOutlineEmail />
          </div>
          <div className="icon_container note_sms" onClick={smsHandler}>
            <MdSms />
          </div>
          <div className="icon_container note_update" onClick={editTodoHandler}>
            <FiEdit />
          </div>
          <div
            className="icon_container note_delete"
            onClick={deleteTodoHandler}
          >
            <BsTrash3Fill />
          </div>
        </div>
      </div>
      <div className="note_input_container">
        {showDescription && (
          <p
            className={item.done ? "note_description done" : "note_description"}
          >
            {item.description}
          </p>
        )}
        {isEmail && (
          <form className="note_form_container" onSubmit={handleSubmitEmail}>
            <input
              className="input_box"
              type="email"
              value={email}
              onChange={(e) => setEmail(e.target.value)}
              placeholder="Enter Assignee email"
            />
            <button className="note_form_button">send Email</button>
          </form>
        )}
        {isSms && (
          <form className="note_form_container" onSubmit={handleSubmitPhone}>
            <input
              className="input_box"
              value={phone}
              onChange={(e) => setPhone(e.target.value)}
              type="number"
              placeholder="Enter Number"
            />
            <button className="note_form_button">Send sms</button>
          </form>
        )}
      </div>
    </div>
  );
};

export default Note;
该组件负责呈现待办事项卡,其中包含注释的标题、描述(如果有)和一个复选框,以指示注释的完成状态以及各种选项,例如删除注释、发送电子邮件或短信通知、编辑注释以及将其标记为已完成或未完成。
类似地,组件的代码quotes是:
import React, { useEffect, useState } from "react";
import Quote from "../../components/Quote/Quote";
import "./landscape.css";

const numImagesAvailable = 988; //how many photos are total in the collection
const numItemsToGenerate = 1; //how many photos you want to display
const imageWidth = 1920; //image width in pixels
const imageHeight = 1080; //image height in pixels
const collectionID = 30697288; //Beach & Coastal, the collection ID from the original url

function renderGalleryItem(randomNumber) {
  fetch(
    `https://source.unsplash.com/collection/${collectionID}/${imageWidth}x${imageHeight}/?sig=${randomNumber}`
  ).then((response) => {
    let body = document.querySelector("body");
    body.style.backgroundImage = `url(${response.url})`;
  });
}

const Landscape = () => {
  const [refresh, setRefresh] = useState(false);
  useEffect(() => {
    let randomImageIndex = Math.floor(Math.random() * numImagesAvailable);
    renderGalleryItem(randomImageIndex);

    return () => {
      let body = document.querySelector("body");
      body.style.backgroundImage = "";
    };
  }, []);

  const refreshImage = () => {
    let randomImageIndex = Math.floor(Math.random() * numImagesAvailable);
    renderGalleryItem(randomImageIndex);
    setRefresh((prev) => !prev);
  };

  return (
    <>
      <Quote refresh={refresh} />
      <button
        className="refresh_button"
        style={{ position: "absolute", top: 1, right: "15rem" }}
        onClick={refreshImage}
      >
        Refresh
      </button>
    </>
  );
};

export default Landscape;
它使用 Unsplash API 渲染出一张精美的图片背景,并在其上添加一句励志名言。该组件还包含一个“刷新”按钮,点击后可刷新图片和励志名言。
对我们的后端进行 API 调用:
接下来,由于 API 调用在整个应用程序中很常见,我们将其放入“common”目录中。它用于axios向后端发出 API 调用,以实现诸如用户身份验证、待办事项的 CRUD 操作以及发送电子邮件和短信通知等功能。
记住我们之前复制的后端 URL。我们将把它插入到这个文件中,以便从应用前端到我们之前部署的后端进行 API 调用。
它包含以下代码:
import axios from "axios";

const API = axios.create({ baseURL: "<Enter your back-end URL that you'd copied>" });

API.interceptors.request.use((req) => {
  if (localStorage.getItem("profile")) {
    req.headers.authorization = `Bearer ${
      JSON.parse(localStorage.getItem("profile")).token
    }`;
  }
  return req;
});

// for authentication

export const signIn = (userData) => API.post("/users/signin", userData);
export const signUP = (userData) => API.post("/users/signup", userData);

// for CRUD features

export const fetchNotes = () => API.get("/notes");
export const createNote = (newNote) => API.post("/notes", newNote);
export const updateNote = (id, updatedNote) =>
  API.patch(`/notes/${id}`, updatedNote);
export const deleteNote = (id) => API.delete(`/notes/${id}`);
export const updateNoteChecked = (id) => API.get(`/notes/${id}`);

// for novu implementation
export const sendSms = (note) => API.post("/notes/send-sms", note);
export const sendEmail = (note) => API.post("/notes/send-email", note);
export const deleteInApp = (note) => API.post("/notes/delete", note);
在登录和注册时,我们从“身份验证操作”运行相应的身份验证操作,其代码如下:
import * as api from "../common/api"
import {toast} from "react-toastify";

export const signin=(formValue,navigate)=> async (dispatch)=>{
    try {
        const {data}= await api.signIn(formValue);
        dispatch({type:"AUTH",payload:data});
        navigate("/home");
        toast.success("loggedin successfully!!");
    } catch (error) {
        console.log("signin error",error);
        toast.error("something went wrong!! try again");
    }
}

export const signup=(formvalue,navigate)=>async (dispatch)=>{
    try {
        const {data}= await api.signUP(formvalue);
        dispatch({type:"AUTH",payload:data});
        navigate("/home");
        toast.success("user created successfully");
    } catch (error) {
        console.log("signup error",error);
        toast.error("something went wrong!! try again");
    }
}
最后,我们使用一个 reducer 来管理 Moonshine 的状态:
const noteReducer = (state = [], action) => {
  switch (action.type) {
    case "FETCH_ALL":
      return action.payload;
    case "CREATE":
      return [...state, action.payload];
    case "UPDATE":
      return state.map((note) =>
        note._id === action.payload._id ? action.payload : note
      );
    case "TOGGLE_DONE":
      return state.map((note) =>
        note._id === action.payload._id ? { ...note, done: !note.done } : note
      );
    case "DELETE":
      return state.filter((note) => note._id !== action.payload);
    default:
      return state;
  }
};

export default noteReducer;
除了这四个目录中的文件之外,我们的项目目录的根目录还包含index.js和app.js。
在 中index.js,我们将'App'组件(在文件中定义app.js)包装在 'router' 和 'provider' 中。'Router' 允许我们定义和使用各种应用路由(如上所述),而 'provider' 允许我们使用 React 的 redux store,它基本上就是前端的数据库。
包装应用程序组件意味着这两个组件都可以在整个应用程序中使用:
import React from "react";
import ReactDOM from "react-dom/client";
import "./index.css";
import App from "./App";
import { BrowserRouter as Router } from "react-router-dom";
import { Provider } from "react-redux";
import thunk from "redux-thunk";
import { applyMiddleware, compose, createStore } from "redux";
import reducers from "./reducers";
import { Toaster } from "react-hot-toast";

const store = createStore(reducers, compose(applyMiddleware(thunk)));

const root = ReactDOM.createRoot(document.getElementById("root"));
root.render(
  <React.StrictMode>
    <Router>
      <Provider store={store}>
        <App />
        <Toaster />
      </Provider>
    </Router>
  </React.StrictMode>
);
最后,这是我们简单的应用程序组件:
import { Routes, Route } from "react-router-dom";
import Home from "./pages/Home/Home";
import Landscape from "./pages/Landscape/Landscape";
import Login from "./pages/Login/Login";
import Signup from "./pages/Signup/Signup";

function App() {
  return (
    <div>
      <Routes>
        <Route path="/" element={<Login />} />
        <Route path="/signup" element={<Signup />} />
        <Route path="/gallery" element={<Landscape />} />
        <Route path="/home" element={<Home />} />
      </Routes>
    </div>
  );
}

export default App;
它渲染不同的“路由组件”,每个组件都与应用中的一条路径关联。当请求该路径时,相应的组件就会渲染到客户端设备的视图上。
部署我们的前端:
我们需要单独部署前端。为此,我们将使用 Vercel,过程相当简单:
- 登录Vercel(使用您的 GitHub 帐户),
- 指向前端的 GitHub 仓库。
- 在其中输入您的环境变量。
就是这样!
如果您遵循本教程,您将拥有一个已部署的 Moonshine 版本并运行,它具有以下功能:
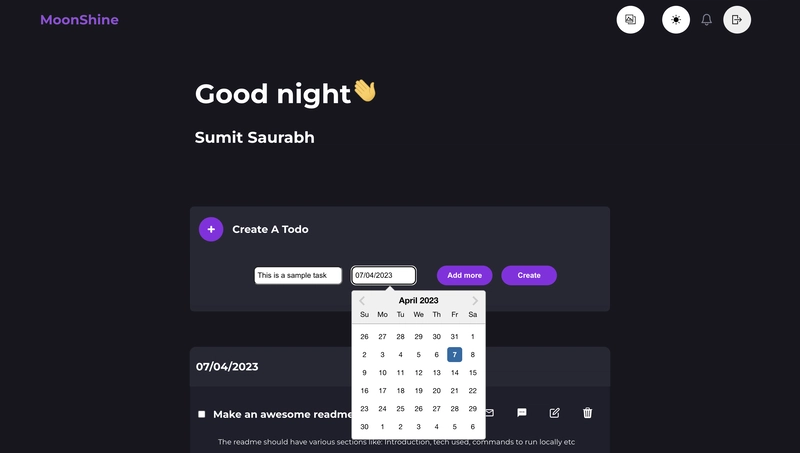
- 待办事项应用程序的所有功能 - 创建待办事项、更新待办事项、将任务标记为已完成/未完成并删除它。
- 暗/亮模式。
- 使用 Novu 向电话号码发送有关任务的短信提醒。
- 使用 Novu 发送电子邮件提醒。
- 每次打开引言页面时都会出现一张精美的图片和引言。
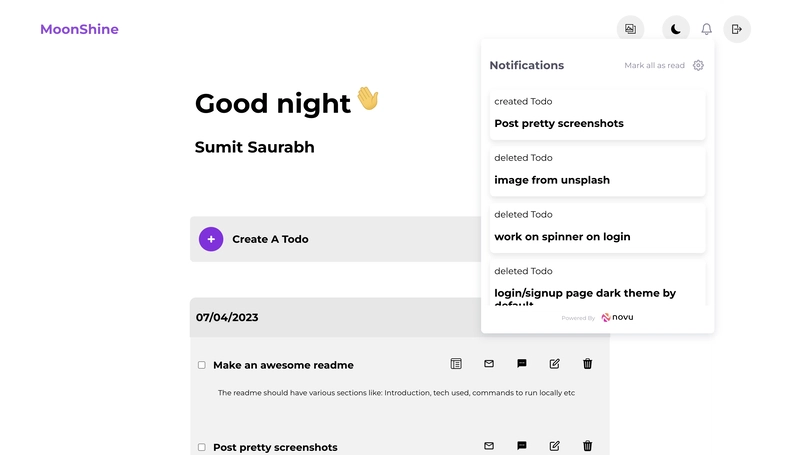
- 应用内通知中心,在创建或删除待办事项时发出通知。
- 注册/登录页面等等。
注意:您可能需要遵守当地法律才能使用 Moonshine 发送短信通知。就我而言,印度法律要求在发送短信前进行一次性 OTP 验证。
最后,如果你被困在任何地方需要我,我随时可以提供帮助
这个项目由 Novu 促成,我们投入了大量的时间和精力才制作出这样的教程,所以如果您能抽出时间并为其 GitHub 代码库点赞,那对我来说意义重大。感谢您的支持!⭐⭐⭐⭐⭐
https://github.com/novuhq/novu
如果你喜欢这篇文章,别忘了在下方留言哦。
祝你一切顺利,再见!👋
〜苏米特·索拉布
文章来源:https://dev.to/novu/make-a-dream-todo-app-with-novu-react-and-express-2p9l 后端开发教程 - Java、Spring Boot 实战 - msg200.com

