使用 Vue.js 从头开始构建轮播
我没有阅读复杂的第三方库文档,而是尝试弄清楚如何从头开始构建“多卡”轮播。
有关最终代码,请查看我的 GitHub repo。
如果您想看一个真实的例子,我在最近的一个项目中使用了这种方法的逻辑(受到 Thin Tran教程的启发): sprout-tan.vercel.app。
1. 理解结构
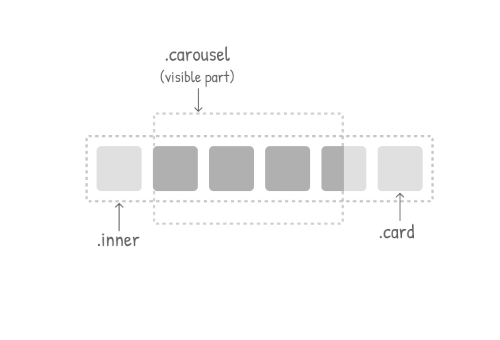
这是上面演示的底层结构:
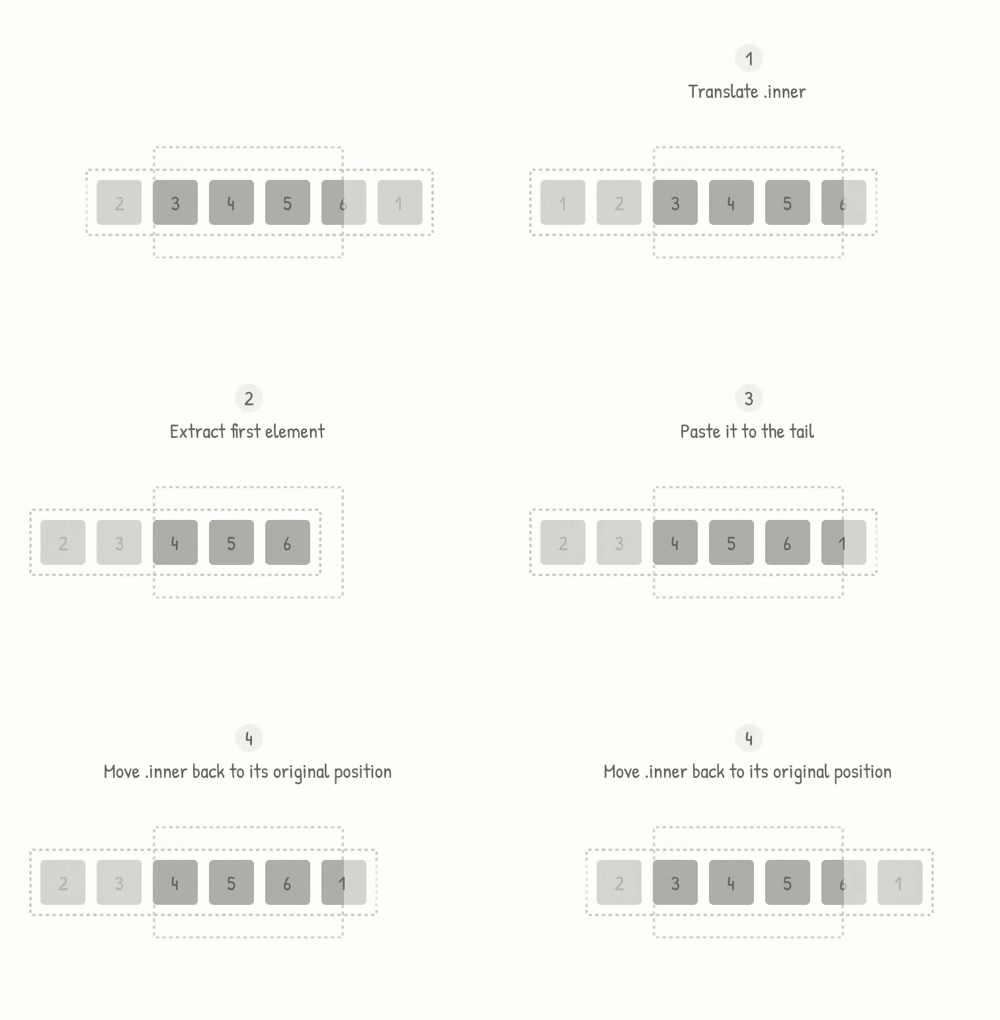
但让我们看看它实际上是如何工作的:
虽然在这个 .gif 中,每个步骤都有动画过渡,但这只是为了更容易地形象化所有 4 个步骤:
- 翻译
.inner包装器。 - 提取第一项。
- 粘贴到尾部。
- 移
.inner回其原始位置。
在实际实现中,只有步骤 #1 会以动画形式呈现。其他步骤会立即执行。这给我们一种无限/连续导航循环的感觉。你看不出来吗?跟我来吧 😉
2. 构建轮播结构
让我们从这个基本组件开始:
<template>
  <div class="carousel">
    <div class="inner">
      <div class="card" v-for="card in cards" :key="card">
        {{ card }}
      </div>
    </div>
  </div>
  <button>prev</button>
  <button>next</button>
</template>

<script>
export default {
  data () {
    return {
      cards: [1, 2, 3, 4, 5, 6, 7, 8]
    }
  }
}
</script>
这正是第 1 节中的结构。.carousel容器是卡片在其中移动的框架。
3. 添加样式
...

<style>
.carousel {
  width: 170px; /* ❶ */
  overflow: hidden; /* ❷ */
}

.inner {
  white-space: nowrap; /* ❸ */
}

.card {
  width: 40px;
  margin-right: 10px;
  display: inline-flex;

  /* optional */
  height: 40px;
  background-color: #39b1bd;
  color: white;
  border-radius: 4px;
  align-items: center;
  justify-content: center;
}

/* optional */
button {
  margin-right: 5px;
  margin-top: 10px;
}
</style>
解释:
❶:固定宽度可确保新项目添加到轮播可见区域之外。但如果卡片数量足够多,您可以根据需要调整宽度。❷ :使用 属性可以裁剪超出 的元素。❸ :防止元素(在本例中为)在父
空间填满后自动换行。参见white-space。overflow: hidden;.carouselinline-blockinline-flex
预期结果:
4. 翻译.inner包装器(步骤 1)
<template>
  ...
  <button @click="next">next</button>
</template>

<script>
export default {
  data () {
    return {
      // ...
      innerStyles: {},
      step: ''
    }
  },

  mounted () {
    this.setStep()
  },

  methods: {
    setStep () {
      const innerWidth = this.$refs.inner.scrollWidth // ❶
      const totalCards = this.cards.length
      this.step = `${innerWidth / totalCards}px` // ❷
    },

    next () {
      this.moveLeft() // ❸
    },

    moveLeft () {
      this.innerStyles = {
        transform: `translateX(-${this.step})`
      }
    }
  }
}
</script>

<style>
/* ... */

.inner {
  transition: transform 0.2s; /* ❹ */
  /* ... */
}

/* ... */
</style>
解释:
❶:该
$refs属性允许您访问模板引用。scrollWith即使由于溢出而部分隐藏,它也能提供元素的宽度。❷
:这将动态设置轮播的“步长”,即每次按下“下一个”或“上一个”按钮时我们需要平移元素的距离.inner。有了这个,您甚至不需要指定.card元素的宽度(只要它们大小相同即可)。❸ :要移动卡片,我们将平移整个包装器,并操作其属性。❹ :是我们想要设置动画的属性。.innertransformtransform
预期结果:
5. 移动cards[]数组(步骤 2 和 3)
<script>
// ...

  next () {
    // ...
    this.afterTransition(() => { // ❶
      const card = this.cards.shift() // ❷
      this.cards.push(card) // ❸
    })
  },

  afterTransition (callback) {
    const listener = () => { // ❹
      callback()
      this.$refs.inner.removeEventListener('transitionend', listener)
    }
    this.$refs.inner.addEventListener('transitionend', listener) // ❺
  }

// ...
</script>
解释:
❶:将回调作为参数,该回调将
afterTransition()在发生转换后执行.inner。❷ :该方法从数组中取出第一个元素并返回它。❸ :该方法在数组末尾添加一个元素。❹
:我们定义事件监听器回调:。它将调用我们的实际回调,然后在执行时自行删除。❺ :我们添加事件监听器。Array.prototype.shift()Array.prototype.push()listener()
我鼓励你实现这个prev()方法。提示:查看 MDN上关于数组操作的条目。
6. 移.inner回原位(步骤4)
<script>
// ...

  next () {
    // ...

    this.afterTransition(() => {
      // ...
      this.resetTranslate() // ❶
    })
  },

  // ...

  resetTranslate () {
    this.innerStyles = {
      transition: 'none', // ❷
      transform: 'translateX(0)'
    }
  }

// ...
</script>
解释:
❶:在移动数组后重置
.inner的位置cards[],抵消后者引起的额外平移。❷
:我们设置transition为none,以便立即重置。
预期结果:
7. 最终调音
至此,我们的轮播功能已经可以正常工作了。但是还存在一些 bug:
- 错误 1:调用
next()过于频繁会导致导航无法过渡。 也一样prev()。
我们需要找到一种方法,在 CSS 过渡期间禁用这些方法。我们将使用 data 属性transitioning来跟踪此状态。
data () {
  return {
    // ...
    transitioning: false
  }
},

// ...

next () {
  if (this.transitioning) return

  this.transitioning = true
  // ...

  this.afterTransition(() => {
    // ...
    this.transitioning = false
  })
},
- 错误 2:与 的情况不同
next(),当我们调用 时prev(),上一张牌不会滑入。它会立即出现。
如果你仔细观察,就会发现我们当前的实现仍然与本教程开头提出的结构有所不同。前者中,.inner的左侧与.carousel的左侧对齐。后者中.inner, 的左侧从.carousel的边界之外开始:区别在于占用单张卡片的空间。
因此,让我们.inner始终保持向左平移一步。
// ...
mounted () {
  // ...
  this.resetTranslate()
},

// ...

moveLeft () {
  this.innerStyles = {
    transform: `translateX(-${this.step})
                translateX(-${this.step})` // ❶
  }
},

moveRight () {
  this.innerStyles = {
    transform: `translateX(${this.step})
                translateX(-${this.step})` // ❷
  }
},

// ...

resetTranslate () {
  this.innerStyles = {
    transition: 'none',
    transform: `translateX(-${this.step})`
  }
}

// ...
解释:
- ❶ 和 ❷:每次执行
moveRight()或时,我们都会重置的moveLeft()所有值。因此,有必要添加额外的,这是我们希望所有其他转换从其发生的位置。transform.innertranslateX(-${this.step})
8. 结论
就这样。真是个奇妙的旅程啊,对吧?😅 难怪这在技术面试中很常见。不过现在你知道了如何——或者说,用另一种方式——构建你自己的“多卡”轮播。
再次,这里是完整的代码(星星⭐对我来说意义重大🫶)。希望您觉得它有用,也欢迎在评论区分享您的想法/改进。
感谢阅读!
额外奖励✨:感谢Matt Jenkins,您现在可以查看使用 Composition API 和 Setup Syntax 的更新版本。
鏂囩珷鏉ユ簮锛�https://dev.to/laurxn/how-to-build-a-carousel-from-scratch-using-vue-js-4ki0 后端开发教程 - Java、Spring Boot 实战 - msg200.com


