Golang Rest Api使用 GO 构建您的第一个 Rest API
使用 GO 构建您的第一个 Rest API
让我们开始吧
Bookdata API
使用 GO 构建您的第一个 Rest API
本次研讨会分为三个部分。
- API
- 休息API
- 使用 GO 的 Rest API
API
如果你接触电脑时间够长,你可能听说过这个东西。这个 API 是什么?
API 代表应用程序接口 (Application Program Interface)。就像计算机科学中的大多数概念一样,这个缩写没什么用。
它实际上的意思是,它公开了功能,但内部机制却没有公开。如果你使用支持函数或方法编写的语言(几乎所有编程语言)进行编程,你就会完全理解我在说什么。
func addNumber(a, b int) int {
    // DO AMAZING MATH HERE
    // and return the result
}
即使您是 Go 新手,您也可以知道该函数是关于将两个数字相加并返回结果。
对于函数的用户,您只需调用该函数,而不必担心该函数如何执行其功能(不要信任每个函数)。
API 就是这样。API 可以是你编写的函数,也可以是库中的函数、框架中的方法,甚至是一个 http 端点。
休息API
如今大多数 API 都是 Web API。这点就别引用我的话了,因为我没有做过任何研究来得到一个合适的数字。😁 不过考虑到 Web 服务和 Web 应用的数量,我觉得我的推论应该不会错。
什么是 REST
REST 是“RE presentational S tate Transfer”的缩写。它是一种分布式超媒体系统的架构风格,由 Roy Fielding 于 2000 年在其著名论文中首次提出。
与任何其他架构风格一样,REST 也有其自身的6 条指导约束,如果接口需要被称为RESTful ,则必须满足这些约束。这些原则如下所示。
REST 的指导原则
- 客户端-服务器——通过将用户界面问题与数据存储问题分离,我们提高了用户界面跨多个平台的可移植性,并通过简化服务器组件提高了可扩展性。
- 无状态– 客户端向服务器发送的每个请求都必须包含理解该请求所需的所有信息,并且无法利用服务器上存储的任何上下文。因此,会话状态完全保存在客户端。
- 可缓存– 缓存约束要求对请求的响应中的数据进行隐式或显式标记,使其为可缓存或不可缓存。如果响应为可缓存,则客户端缓存有权将该响应数据重用于后续的等效请求。
- 统一接口——通过将软件工程的通用性原则应用于组件接口,可以简化整体系统架构,并提高交互的可见性。为了获得统一的接口,需要多种架构约束来指导组件的行为。REST 由四个接口约束定义:资源标识;通过表述操作资源;自描述消息;以及作为应用程序状态引擎的超媒体。
- 分层系统——分层系统样式通过限制组件行为,使架构由分层层组成,使得每个组件无法“看到”与其交互的直接层之外的内容。
- 按需代码(可选) —— REST 允许通过下载和执行小程序或脚本形式的代码来扩展客户端功能。这减少了需要预先实现的功能数量,从而简化了客户端。
要查看 REST API 的示例,我们可以使用
HTTP 动词
这些是 HTTP API 遵循的一些约定。它们实际上并非 Rest 规范的一部分。但为了充分利用 Rest API,我们需要理解这些约定。
HTTP 定义了一组请求方法来指示针对给定资源执行的期望操作。虽然它们也可以是名词,但这些请求方法有时被称为HTTP 动词。它们各自实现不同的语义,但其中一些方法共享一些共同的特性:例如,请求方法可以是安全的、幂等的或可缓存的。
GET该GET方法请求指定资源的表述。使用的请求GET应该仅检索数据。
HEAD该HEAD方法要求响应与请求相同GET,但没有响应主体。
POST该POST方法用于向指定资源提交实体,通常会导致状态改变或服务器产生副作用。
PUT该PUT方法用请求有效负载替换目标资源的所有当前表示。
DELETE该DELETE方法删除指定的资源。
CONNECT该CONNECT方法建立到目标资源所标识的服务器的隧道。
OPTIONS该OPTIONS方法用于描述目标资源的通信选项。
TRACE该TRACE方法沿着到目标资源的路径执行消息环回测试。
PATCH该PATCH方法用于对资源进行部分修改。
这些都是谎言。
状态代码
1xx信息
2xx 成功
3xx 重定向
4xx 客户端错误
- 400 错误请求
- 401 未授权
- 402 需要付款
- 403 禁止
- 404 未找到
- 405 方法不允许
- 406 不可接受
- 407 需要代理身份验证
- 408 请求超时
- 409冲突
- 410 已消失
- 411 长度要求
- 412 先决条件不满足
- 413 有效负载太大
- 414 请求 URI 太长
- 415 不支持的媒体类型
- 416 请求范围不满足
- 417 期望失败
- 418 我是一把茶壶
- 421 错误请求
- 422 无法处理的实体
- 423 已锁定
- 424 依赖失败
- 426 需要升级
- 428 需要先决条件
- 429 请求过多
- 431 请求标头字段太大
- 444 连接关闭且无响应
- 451 因法律原因不可用
- 499 客户端关闭请求
5xx 服务器错误
- 500 内部服务器错误
- 501 未实现
- 502错误的网关
- 503 服务不可用
- 504 网关超时
- 505 HTTP 版本不受支持
- 506变体也进行谈判
- 507 存储空间不足
- 508 检测到循环
- 510 未扩展
- 511 需要网络身份验证
- 599 网络连接超时错误
这也没有实际意义。
术语
以下是与 REST API 相关的最重要的术语
- 资源是一个对象或某种事物的表示,它包含一些关联数据,并可以通过一组方法对其进行操作。例如,动物、学校和员工都是资源,而删除、添加和更新是可以对这些资源执行的操作。
- 集合是资源的集合,例如公司是公司资源的集合。
- URL(统一资源定位符)是一种可以定位资源并对其执行某些操作的路径。
API 端点
API 端点看起来是这样的。
https://www.github.com/golang/go/search?q=http&type=Commits
此 URL 可分为以下部分
| 协议 | 子域名 | 领域 | 小路 | 港口 | 询问 |
|---|---|---|---|---|---|
| http/https | 子域名 | 基本网址 | 资源/其他资源 | 一些港口 | 键值对 |
| https | 万维网 | github.com | golang/go/搜索 | 80 | ?q=http&type=提交 |
协议
浏览器或客户端应如何与服务器通信。
子域名
主域名的子划分
领域
用于识别互联网上的网站的唯一参考
港口
应用程序运行的服务器端口。默认端口为 80。因此大多数情况下我们看不到它。
小路
Rest API 中的路径参数代表资源。
https://jsonplaceholder.typicode.com/posts/1/comments
posts/1/comments
此路径代表1st posts资源'ccomments
基本结构是
top-level-resource/<some-identifier>/secondary-resource/<some-identifier>/...
询问
查询是信息的键值对,主要用于过滤目的。
https://jsonplaceholder.typicode.com/posts?userId=1
之后的部分?是查询参数。这里我们只有一个查询。userId=1
标题
这不是 URL 本身的一部分,而是客户端或服务器发送的网络组件的一部分。根据发送方的不同,有两种类型的标头
- 请求标头(客户端->服务器)
- 响应头(服务器->客户端)
身体
您可以向服务器的请求和服务器的响应添加额外信息。
响应类型
通常是 JSON 或 XML。
现在主要是 JSON。
使用 GO 的 Rest API
这就是你来这里的原因。或者说,我希望这就是你来这里的原因。
上述文章发表于 2012 年。但对于了解围棋背后的思想仍然非常有意义。
如果您正在编写 Rest API,为什么要选择 go?
- 它已经编译好了。所以你得到的是小的二进制文件。
- 它速度很快。(比 c/c++ 或 rust 慢)但比大多数其他 Web 编程语言快。
- 这很容易理解。
- 它在微服务世界中运行良好,原因如下:
净/http
Go 语言的标准库自带了 net/ net/httphttp 包,它是构建 RestAPI 的绝佳起点。而且,大多数其他库添加了额外的功能,也可以与 net/http 包互操作,因此了解 net/http 包对于使用 Go 语言开发 RestAPI 至关重要。
我们可能不需要了解 net/http 包中的所有内容。但在开始之前,我们需要了解一些内容。
处理程序接口
我从来不提倡记住某些东西,但正如Todd Mcleod在他的课程中反复提到的,我们需要记住 Handler 接口。
type Handler interface {
        ServeHTTP(ResponseWriter, *Request)
}
它就在这里。
它只有一种方法。
如果一个结构体或对象有一个ServeHTTP接受ResponseWriter指向的方法,那么它将是 Handler Request。
凭借我们所掌握的所有知识,我们现在已经准备好造成一些破坏。
让我们开始吧
我想现在我们可以开始了。
理论讲了这么多。我答应过你,会构建你的第一个 RestAPI。
简单的 Rest API
那么让我们直接开始吧。
在你想要编写 Go 代码的文件夹中
go mod init api-test
创建一个新文件,您可以随意命名它。
我正在呼唤我的main.go
package main

import (
    "log"
    "net/http"
)

type server struct{}

func (s *server) ServeHTTP(w http.ResponseWriter, r *http.Request) {
    w.Header().Set("Content-Type", "application/json")
        w.WriteHeader(http.StatusOK)
    w.Write([]byte(`{"message": "hello world"}`))
}

func main() {
    s := &server{}
    http.Handle("/", s)
    log.Fatal(http.ListenAndServe(":8080", nil))
}
让我们分解一下这个代码。
在顶部,我们package main所有的可执行文件都需要一个主包。
我们有我们的导入。log用于在发生错误时记录错误。net/http因为我们正在编写一个 rest api。
然后我们有一个名为 server 的结构体。它没有字段。我们将向这个服务器添加一个方法ServeHTTP,该方法将满足 Handler 接口。你会注意到,在 Go 语言中,我们不需要明确说明我们正在实现的接口。编译器足够智能,可以识别这一点。在该ServeHTTP方法中,我们设置 httpStatus 为 200 来表示请求成功。我们将内容类型设置为 ,application/json以便客户端能够理解我们何时将 JSON 作为有效负载返回。最后我们这样写:
{"message": "hello world"}
對應。
让我们运行我们的服务器
go run main.go
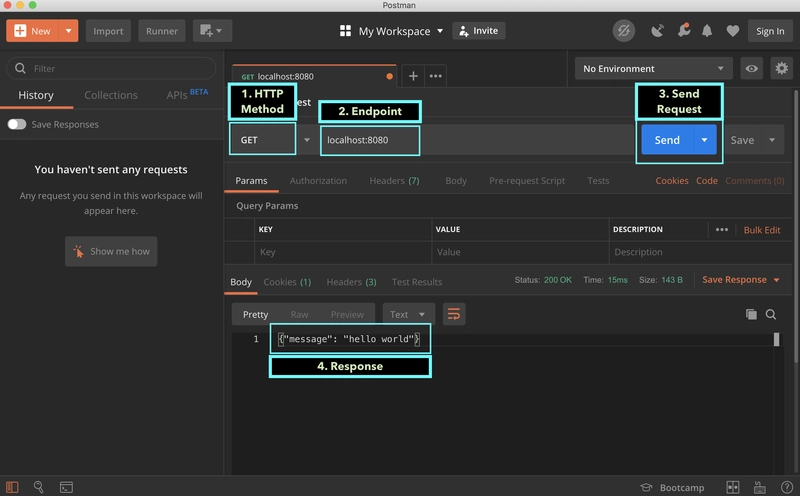
如果您之前已经安装过 Postman,让我们快速用 Postman 测试我们的应用程序。
Get 返回我们的消息。
干得好!
但是等等。
让我们看看我们的应用程序还支持哪些其他 HTTP 动词。
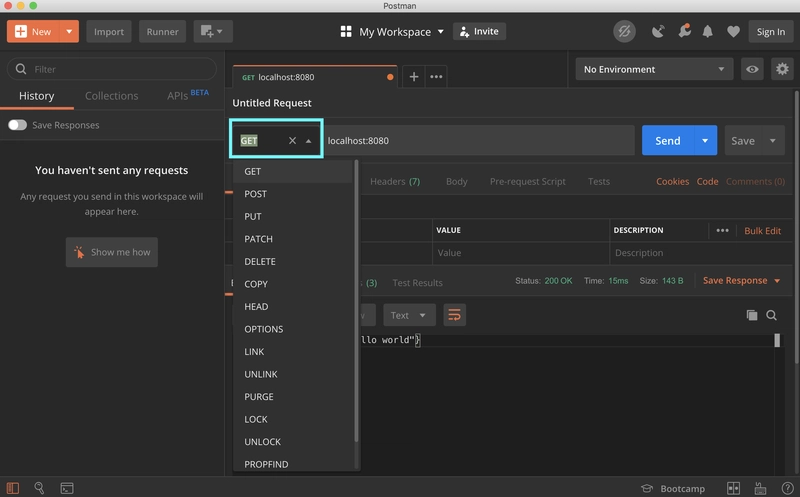
在 Postman 中,我们可以更改请求类型。点击下拉菜单,选择其他类型。假设我们选择的是 Post。
现在,如果我们运行请求,我们将得到相同的结果。
嗯,这本身并不算什么 bug。但大多数情况下,我们可能希望根据请求类型做不同的事情。
让我们看看如何做到这一点。
我们将使用以下内容修改我们的 ServeHTTP 方法。
func (s *server) ServeHTTP(w http.ResponseWriter, r *http.Request) {
    w.Header().Set("Content-Type", "application/json")
    switch r.Method {
    case "GET":
        w.WriteHeader(http.StatusOK)
        w.Write([]byte(`{"message": "get called"}`))
    case "POST":
        w.WriteHeader(http.StatusCreated)
        w.Write([]byte(`{"message": "post called"}`))
    case "PUT":
        w.WriteHeader(http.StatusAccepted)
        w.Write([]byte(`{"message": "put called"}`))
    case "DELETE":
        w.WriteHeader(http.StatusOK)
        w.Write([]byte(`{"message": "delete called"}`))
    default:
        w.WriteHeader(http.StatusNotFound)
        w.Write([]byte(`{"message": "not found"}`))
    }
}
如果我们的服务器已经运行,那么让我们停止它ctrl-c
再次运行。
go run main.go
再次使用 postman 或 curl 进行测试。
您可能已经注意到的一件事是,我们正在使用服务器结构来附加方法。
go 团队知道这很不方便,并为我们提供了HandleFunchttp 包上的一个方法,允许我们传递一个具有相同签名的函数ServeHTTP并提供路由。
我们可以用它来稍微清理一下我们的代码
package main

import (
    "log"
    "net/http"
)

func home(w http.ResponseWriter, r *http.Request) {
    w.Header().Set("Content-Type", "application/json")
    switch r.Method {
    case "GET":
        w.WriteHeader(http.StatusOK)
        w.Write([]byte(`{"message": "get called"}`))
    case "POST":
        w.WriteHeader(http.StatusCreated)
        w.Write([]byte(`{"message": "post called"}`))
    case "PUT":
        w.WriteHeader(http.StatusAccepted)
        w.Write([]byte(`{"message": "put called"}`))
    case "DELETE":
        w.WriteHeader(http.StatusOK)
        w.Write([]byte(`{"message": "delete called"}`))
    default:
        w.WriteHeader(http.StatusNotFound)
        w.Write([]byte(`{"message": "not found"}`))
    }
}

func main() {
    http.HandleFunc("/", home)
    log.Fatal(http.ListenAndServe(":8080", nil))
}
功能应该完全相同。
大猩猩Mux
net/http内置方法很棒。我们可以编写一个无需外部库的服务器。但net/http它也有局限性。没有直接处理路径参数的方法。就像请求方法一样,我们必须手动处理路径和查询参数。
Gorilla Mux 是一个非常流行的库,它与 net/http 包配合得很好,可以帮助我们做一些事情,让 api 构建变得轻而易举。
使用 Gorilla Mux
要安装模块,我们可以使用go get
Go get 在底层使用 git。
在同一文件夹中,您可以go.mod运行main.go
go get github.com/gorilla/mux
我们将代码改为
package main

import (
    "log"
    "net/http"

    "github.com/gorilla/mux"
)

func home(w http.ResponseWriter, r *http.Request) {
    w.Header().Set("Content-Type", "application/json")
    switch r.Method {
    case "GET":
        w.WriteHeader(http.StatusOK)
        w.Write([]byte(`{"message": "get called"}`))
    case "POST":
        w.WriteHeader(http.StatusCreated)
        w.Write([]byte(`{"message": "post called"}`))
    case "PUT":
        w.WriteHeader(http.StatusAccepted)
        w.Write([]byte(`{"message": "put called"}`))
    case "DELETE":
        w.WriteHeader(http.StatusOK)
        w.Write([]byte(`{"message": "delete called"}`))
    default:
        w.WriteHeader(http.StatusNotFound)
        w.Write([]byte(`{"message": "not found"}`))
    }
}

func main() {
    r := mux.NewRouter()
    r.HandleFunc("/", home)
    log.Fatal(http.ListenAndServe(":8080", r))
}
除了新的导入和第 32 行之外,看起来没有什么变化。
HandleFunc HTTP 方法
但是现在我们可以做更多的事情,比如HandleFunc让每个函数处理一个特定的 HTTP 方法。
它看起来像这样
package main

import (
    "log"
    "net/http"

    "github.com/gorilla/mux"
)

func get(w http.ResponseWriter, r *http.Request) {
    w.Header().Set("Content-Type", "application/json")
    w.WriteHeader(http.StatusOK)
    w.Write([]byte(`{"message": "get called"}`))
}

func post(w http.ResponseWriter, r *http.Request) {
    w.Header().Set("Content-Type", "application/json")
    w.WriteHeader(http.StatusCreated)
    w.Write([]byte(`{"message": "post called"}`))
}

func put(w http.ResponseWriter, r *http.Request) {
    w.Header().Set("Content-Type", "application/json")
    w.WriteHeader(http.StatusAccepted)
    w.Write([]byte(`{"message": "put called"}`))
}

func delete(w http.ResponseWriter, r *http.Request) {
    w.Header().Set("Content-Type", "application/json")
    w.WriteHeader(http.StatusOK)
    w.Write([]byte(`{"message": "delete called"}`))
}

func notFound(w http.ResponseWriter, r *http.Request) {
    w.Header().Set("Content-Type", "application/json")
    w.WriteHeader(http.StatusNotFound)
    w.Write([]byte(`{"message": "not found"}`))
}

func main() {
    r := mux.NewRouter()
    r.HandleFunc("/", get).Methods(http.MethodGet)
    r.HandleFunc("/", post).Methods(http.MethodPost)
    r.HandleFunc("/", put).Methods(http.MethodPut)
    r.HandleFunc("/", delete).Methods(http.MethodDelete)
    r.HandleFunc("/", notFound)
    log.Fatal(http.ListenAndServe(":8080", r))
}
如果你运行这个程序,它应该仍然会做同样的事情。
这时你可能会想,用更多行代码做同样的事情有什么好处呢?
但这样想想,我们的代码变得更加干净,可读性也更高了。
清晰胜于聪明
罗布·派克
子路由器
func main() {
    r := mux.NewRouter()
    api := r.PathPrefix("/api/v1").Subrouter()
    api.HandleFunc("", get).Methods(http.MethodGet)
    api.HandleFunc("", post).Methods(http.MethodPost)
    api.HandleFunc("", put).Methods(http.MethodPut)
    api.HandleFunc("", delete).Methods(http.MethodDelete)
    api.HandleFunc("", notFound)
    log.Fatal(http.ListenAndServe(":8080", r))
}
除了我们创建了一个叫做子路由器的东西之外,其他一切都保持不变。当我们想要支持多种资源时,子路由器非常有用。它帮助我们对内容进行分组,并避免我们重复输入相同的路径前缀。
我们将 API 移至api/v1。这样,如果需要,我们可以创建 API 的 v2 版本。
路径和查询参数
package main

import (
    "fmt"
    "log"
    "net/http"
    "strconv"

    "github.com/gorilla/mux"
)

func get(w http.ResponseWriter, r *http.Request) {
    w.Header().Set("Content-Type", "application/json")
    w.WriteHeader(http.StatusOK)
    w.Write([]byte(`{"message": "get called"}`))
}

func post(w http.ResponseWriter, r *http.Request) {
    w.Header().Set("Content-Type", "application/json")
    w.WriteHeader(http.StatusCreated)
    w.Write([]byte(`{"message": "post called"}`))
}

func put(w http.ResponseWriter, r *http.Request) {
    w.Header().Set("Content-Type", "application/json")
    w.WriteHeader(http.StatusAccepted)
    w.Write([]byte(`{"message": "put called"}`))
}

func delete(w http.ResponseWriter, r *http.Request) {
    w.Header().Set("Content-Type", "application/json")
    w.WriteHeader(http.StatusOK)
    w.Write([]byte(`{"message": "delete called"}`))
}

func params(w http.ResponseWriter, r *http.Request) {
    pathParams := mux.Vars(r)
    w.Header().Set("Content-Type", "application/json")

    userID := -1
    var err error
    if val, ok := pathParams["userID"]; ok {
        userID, err = strconv.Atoi(val)
        if err != nil {
            w.WriteHeader(http.StatusInternalServerError)
            w.Write([]byte(`{"message": "need a number"}`))
            return
        }
    }

    commentID := -1
    if val, ok := pathParams["commentID"]; ok {
        commentID, err = strconv.Atoi(val)
        if err != nil {
            w.WriteHeader(http.StatusInternalServerError)
            w.Write([]byte(`{"message": "need a number"}`))
            return
        }
    }

    query := r.URL.Query()
    location := query.Get("location")

    w.Write([]byte(fmt.Sprintf(`{"userID": %d, "commentID": %d, "location": "%s" }`, userID, commentID, location)))
}

func main() {
    r := mux.NewRouter()

    api := r.PathPrefix("/api/v1").Subrouter()
    api.HandleFunc("", get).Methods(http.MethodGet)
    api.HandleFunc("", post).Methods(http.MethodPost)
    api.HandleFunc("", put).Methods(http.MethodPut)
    api.HandleFunc("", delete).Methods(http.MethodDelete)

    api.HandleFunc("/user/{userID}/comment/{commentID}", params).Methods(http.MethodGet)

    log.Fatal(http.ListenAndServe(":8080", r))
}
让我们看看params第 36 行的函数。我们处理路径参数和查询参数。
有了这些,你现在知道的已经足够危险了。
Bookdata API
Kaggle 上有一个 bookdata 数据集。它是一个 csv 文件,包含大约 13000 本书。我们将使用它来创建我们自己的 bookdata api。
您可以在那里查看文件☝🏼。
克隆仓库
让我们开始吧。
在单独的文件夹中
git clone https://github.com/moficodes/bookdata-api.git
代码之旅
代码里面有两个包,一个叫datastore,一个叫loader。
Loader 负责将csv数据转换为 bookdata 对象数组。
数据存储区处理我们如何访问数据。它主要是一个包含一些方法的接口。
运行应用程序
从仓库的根目录
跑步
go run .
端点
该应用程序有几个端点
所有 api 端点都以/api/v1
要到达任何端点使用baseurl:8080/api/v1/{endpoint}
Get Books by Author
"/books/authors/{author}"
Optional query parameter for ratingAbove ratingBelow limit and skip

Get Books by BookName
"/books/book-name/{bookName}"
Optional query parameter for ratingAbove ratingBelow limit and skip


Get Book by ISBN
"/book/isbn/{isbn}"

Delete Book by ISBN
"/book/isbn/{isbn}"

Create New Book
"/book"
将应用部署到云端
此步骤完全可选。但如果您想在云端运行 Go 应用,IBM Cloud 提供了一个基于 Cloud Foundry 的优秀 PaaS 解决方案。
如果你想跟进
拥有 IBM Cloud 帐户并安装 IBM Cloud CLI 后,
从终端
ibmcloud login
ibmcloud target --cf
manifest.yaml在克隆的存储库的根目录中打开。
将应用名称更改为你喜欢的名称。更改后,文件应该如下所示
---
applications:
- name: <your-app-name>
  random-route: true
  memory: 256M
  env:
    GOVERSION: go1.12
    GOPACKAGENAME: bookdata-api
  buildpack: https://github.com/cloudfoundry/go-buildpack.git
然后从 repo 的根目录运行
ibmcloud cf push
等几分钟,瞧!它应该正在运行。
查找你的应用网址
ibmcloud cf apps
您应该会看到您的应用程序正在运行并且其中有 URL。
您可以从该 URL 测试所有端点是否仍然有效。
测试
您可以测试我正在运行的应用程序mofi-golang-api-demo-appreciative-antelope.mybluemix.net(这里没有前端,请尝试端点)
如果你想看 JK 罗琳写的所有书
https://mofi-golang-api-demo-appreciative-antelope.mybluemix.net/api/v1/books/authors/rowling
如果您有任何疑问,请随时联系我@moficodes。
文章来源:https://dev.to/moficodes/build-your-first-rest-api-with-go-2gcj 后端开发教程 - Java、Spring Boot 实战 - msg200.com

