测试 UI - Next JS、Typescript、Jest 和 React 测试库
简介
众所周知,React 就是 JavaScript。这意味着它可以像任何其他 JS 应用程序一样进行测试。市面上有很多测试库和测试运行器,但我发现最好的配置是Jest + React 测试库。我每天都在工作和业余项目中使用它。值得一提的是,这也是React 团队推荐的堆栈。
我喜欢 RTL 的一点是,它专注于测试应用程序的行为方式,而不是它的实现方式。这能让你更有信心,确保用户不会对一些奇怪的 bug 等感到意外。如果你想了解更多关于这种方法的信息,我强烈推荐 Kent C. Dodds 的这两篇文章。
现在让我们看看如何在工作示例中运用所有这些知识。
我们要测试什么?
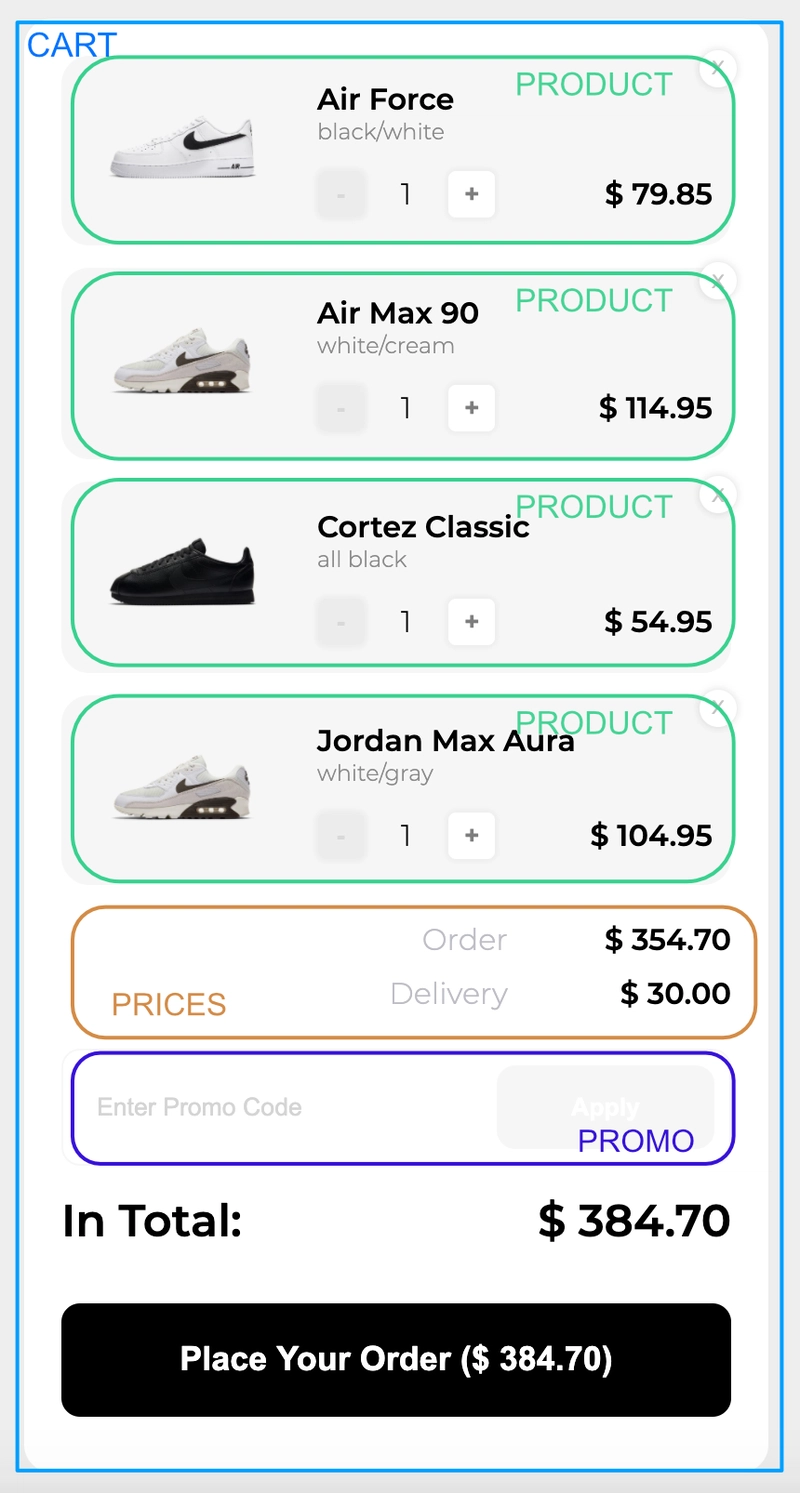
为了本教程的目的,我使用NextJS创建了一个简单的购物车。您可以在此处查看现场演示,或者如果您想查看其背后的代码,请查看repo。
从功能上来说,购物车相当标准,用户可以更改商品数量、下单、移除商品或添加优惠码。我们不会关注如何添加新商品、关闭购物车等操作,因为我们只想专注于购物车本身的行为。
让我们把购物车看作一个包含一些嵌套组件的小部件。在思考要测试什么时,我通常会从嵌套最深的组件开始,一直到根组件,并写下使用产品时可能发生的所有事情。
并非所有组件都必须有自己的spec文件。例如,Promo如果Prices组件纯粹是展示性的,它们只会渲染传递给它们的任何 props。在这种情况下,我们无需编写专门的测试。
在本教程中,我们将创建两个spec文件,Product.spec.tsx和Cart.spec.tsx。这应该涵盖我们所有的场景。
考虑到用户的体验,让我们编写测试用例(目前为空,稍后我们将添加正文)。
//Product.spec.tsx
test('shows the correct name', () => {});
test('shows the correct color', () => {});
test('shows the correct price', () => {});
test('shows the correct quantity', () => {});
test('shows the discounted price', () => {});
test('does not show the discounted price', () => {});
test('disables the decrease button when the quantity equals 1', () => {});
//Cart.spec.tsx
test('shows the correct products', () => {});
test('shows the correct order price', () => {});
test('shows the correct delivery price', () => {});
test('shows the correct total price', () => {});
test('allows to apply a valid promo code', () => {});
test('allows to insert new promo code', () => {});
test('does not allow to apply invalid promo code', () => {});
test('updates the prices accordingly when valid promo code is applied', () => {});
我们可能会想出更多的测试用例,但这些涵盖了我们应用程序的主要功能。
编写代码
产品组件
让我们从Product组件开始。首先,我们将创建一个默认的 props 对象,它将传递给渲染的组件。对于项目中的数据源,我们使用了一个模拟文件。我们可以在测试中使用相同的数据。
//Product.spec.tsx
import  React  from  'react';
import { render } from  '@testing-library/react';
import  Product, { Props } from  './Product';
import  { mockData }  from  '../../../mock-data';

const  DEFAULT_PROPS:  Props  = {
    product: mockData.products[0],
    handleRemove:  jest.fn(),
    handleAdd:  jest.fn(),
    handleSubtract:  jest.fn(),
};
最基本的测试
现在,让我们一起解决前四个测试,因为它们非常相似 - 它们只是检查传递的道具是否当前在屏幕上呈现。
//Product.spec.tsx
test('shows the correct name', () => {
    render(<Product {...DEFAULT_PROPS} />);
    expect(screen.getByText(DEFAULT_PROPS.product.name)).toBeInTheDocument();
});

test('shows the correct color', () => {
    render(<Product {...DEFAULT_PROPS} />);
    expect(screen.getByText(DEFAULT_PROPS.product.color)).toBeInTheDocument();});

test('shows the correct price', () => {
    render(<Product {...DEFAULT_PROPS} />);
    expect(screen.getByText(DEFAULT_PROPS.product.price.toString(), { exact: false })).toBeInTheDocument();
});

test('shows the correct quantity', () => {
    render(<Product {...DEFAULT_PROPS} />);
    expect(screen.getByText(DEFAULT_PROPS.product.quantity.toString())).toBeInTheDocument();
});
如你所见,我们将Product组件传递DEFAULT_PROPS给该rtl's render方法。你可能已经猜到了,该方法将渲染我们的组件(更多信息请查看文档)。
为了提高可复用性,我们可以像这样提取 render 方法:
//Product.spec.tsx
const  renderComponent  = (props = {}) => {
    return {
        ...render(<Product {...DEFAULT_PROPS} {...props} />),
        props: {
            ...DEFAULT_PROPS,
            ...props,
        },
    };
};

test('shows the correct name', () => {
    renderComponent();
    expect(screen.getByText(DEFAULT_PROPS.product.name)).toBeInTheDocument();
});

test('shows the correct color', () => {
    renderComponent();
    expect(screen.getByText(DEFAULT_PROPS.product.color)).toBeInTheDocument();
});

test('shows the correct price', () => {
    renderComponent();
    expect(screen.getByText(DEFAULT_PROPS.product.price.toString(), { exact:  false })).toBeInTheDocument();
});

test('shows the correct quantity', () => {
    renderComponent();
    expect(screen.getByText(DEFAULT_PROPS.product.quantity.toString())).toBeInTheDocument();
});
这边走:
- 我们不必每次都传递组件,
- 我们可以访问用于渲染的道具,
- 我们可以传递自定义 props 并覆盖默认 props
测试每一个
让我们继续下一个测试:
//Product.spec.tsx
test.each`
    discount | price     | promoAvailable | expectedDiscountPrice
    ${20}    | ${29.99}  | ${true}        | ${23.99}
    ${25}    | ${56.72}  | ${true}        | ${42.54}
    ${15}    | ${121.55} | ${true}        | ${103.32}
    ${20}    | ${29.99}  | ${false}       | ${23.99}
    ${25}    | ${56.72}  | ${false}       | ${42.54}
    ${15}    | ${121.55} | ${false}       | ${103.32}
`(
    'shows or does not show the discounted price',
    ({ discount, price, promoAvailable, expectedDiscountPrice }) => {
    renderComponent({
        discount,
        product: { ...DEFAULT_PROPS.product, price, promoAvailable },
    });

    if (promoAvailable) {
        expect(screen.getByText(`$ ${expectedDiscountPrice}`)).toBeInTheDocument();
        screen.getByText(`${price}`);
    } else {
        expect(screen.queryByText(`$${expectedDiscountPrice}`)).toBeNull();
        screen.getByText(`$ ${price}`);
    }
);
在此测试中,我们确保促销活动正确应用于产品,并且折扣价格计算正确。您可以在演示 gif 中看到,当用户添加正确的促销代码时,部分产品的价格会降低。这是一个简单的场景:
- 如果产品可以应用促销,我们想检查新旧价格是否一致
- 如果产品不能应用促销,我们要检查是否显示正常价格,而没有显示折扣价格
为了确保涵盖一些情况,我们将使用test.each函数。
传递给此方法的表的每一行都将是在同一断言测试中使用的单独数据块。
函数模拟
我们在这个组件中要介绍的最后一件事是测试作为 props 传递的回调。这是一个面向开发者用户的示例。
//Product.spec.tsx
describe('fires callback on button click', () => {
    test('add button', () => {
        renderComponent();
        userEvent.click(screen.getByRole('button', { name: /\\+/i }));
        expect(DEFAULT_PROPS.handleAdd).toBeCalled();
        expect(DEFAULT_PROPS.handleAdd).toBeCalledTimes(1);
        expect(DEFAULT_PROPS.handleAdd).toBeCalledWith(DEFAULT_PROPS.product.id);
    });

    test('subtract button', () => {
        renderComponent({
            product: {
                ...DEFAULT_PROPS.product,
                quantity:  2,
            },
        });
        userEvent.click(screen.getByRole('button', { name: /\\-/i }));
        expect(DEFAULT_PROPS.handleSubtract).toBeCalled();
        expect(DEFAULT_PROPS.handleSubtract).toBeCalledTimes(1);
        expect(DEFAULT_PROPS.handleSubtract).toBeCalledWith(
            DEFAULT_PROPS.product.id
        );
    });

    test('remove button', () => {
        renderComponent();
        userEvent.click(screen.getByRole('button', { name: /\\x/i }));
        expect(DEFAULT_PROPS.handleRemove).toBeCalled();
        expect(DEFAULT_PROPS.handleRemove).toBeCalledTimes(1);
        expect(DEFAULT_PROPS.handleRemove).toBeCalledWith(DEFAULT_PROPS.product.id);
    });
});
这三个测试的结构和断言几乎完全相同。test.each在这种情况下,我们或许可以再次使用它们,但是上一个测试中,我们使用的是同一个元素,但数据不同,而这里我们有不同的行为,只是碰巧使用了相同的测试函数体,所以最好分别测试它们。
让我们分解一下代码:
- 我们渲染组件
- 我们使用
userEvent库来模拟点击事件 - 我们做出 3 个断言:
- 回调函数是否被调用了?
- 该函数只被调用过一次吗?
- 是否已使用正确的产品 ID 调用该函数?
值得一提的是,我们可以通过这种方式检查回调,因为我们jest.fn()在中对其进行了分配DEFAULT_PROPS。
购物车组件
我们可以像处理组件一样开始Product。让我们创建一个DEFAULT_PROPSandrenderComponent函数。
//Cart.spec.tsx
import React from  'react';
import { render, screen }  from  '@testing-library/react';
import Cart, { Props }  from  './Cart';
import { mockData }  from  '../../mock-data';

const DEFAULT_PROPS: Props = {
    ...mockData,
    removeProduct: jest.fn(),
    addProduct: jest.fn(),
    subtractProduct:  jest.fn(),
    freeDeliveryPrice:  500,
};

const renderComponent = (props = {}) =>  {
    return {
        ...render(<Cart {...DEFAULT_PROPS} {...props} />),
        props: {
            ...DEFAULT_PROPS,
            ...props,
        },
    };
};
让我们从基础开始,检查产品是否渲染成功。我们已经知道Product组件显示的信息正确,所以这里我们只需确保它Cart确实渲染了产品即可。对于每个产品,我们测试一下它的名称是否显示出来。
//Cart.spec.tsx
test('shows the correct products', () => {
    renderComponent();
    DEFAULT_PROPS.products.forEach(({ name }) => {
        expect(screen.getByText(name)).toBeInTheDocument();
    });
});
在我们的用户界面中,有三个主要价格——订单价格(产品价格总和)、配送价格和总价格(订单价格 + 配送价格)。我们需要确保它们能够正确计算和显示。
价格测试
test('shows the correct order price', () => {
    renderComponent();
    const  expectedPrice = 354.65;

    expect(screen.getByText(new RegExp(`${expectedPrice}`, 'i'))).toBeInTheDocument();
});
我们可以计算价格并检查它是否存在于文件中。
//Cart.spec.tsx
describe('shows the correct delivery price', () => {

  test('when free delivery price was not exceed', () => {
    renderComponent();
    expect(screen.getByText(/30.00/i)).toBeInTheDocument();
  });

  test('when free delivery price was exceed', () => {
    renderComponent({
      products: [
        ...DEFAULT_PROPS.products,
        {
          id: '5',
          name: 'Blazer',
          color: 'yellow',
          price: 150,
          image: 'images/air-force.png',
          promoAvailable: true,
          quantity: 1,
        },
      ],
    });
    expect(screen.getByText(/free/i)).toBeInTheDocument();
  });
});
在我们的应用中,配送价格可以设置为 -$30或Free。如果订单价格超过该freeDeliveryPrice值(我们在Cart组件中将其默认为 500),则免运费。首先,我们测试订单金额低于 500 的情况;其次,我们添加一个额外的产品来提高订单价格,我们预计配送金额会发生变化。
//Cart.spec.tsx
describe('shows the correct total price', () => {

  test('when free delivery price was not exceed', () => {
    renderComponent();
    const expectedPrice = 384.65;

      expect(screen.getByText(/in total:/i)).toHaveTextContent(
        new RegExp(`${expectedPrice}`, 'i')
      );
  });

  test('when free delivery price was exceed', () => {
    const { props } = renderComponent({
      products: [
        ...DEFAULT_PROPS.products,
        {
          id: '5',
          name: 'Blazer',
          color: 'yellow',
          price: 150,
          image: 'images/air-force.png',
          promoAvailable: true,
          quantity: 1,
        },
      ],
    });
    const expectedPrice = 504.65;

    expect(screen.getByText(/in total:/i)).toHaveTextContent(
      new RegExp(`${expectedPrice}`, 'i')
    );
  });
我们在这个测试中做了类似的事情。在这两种情况下,我们都会预先计算预期总价(包含和不包含运费),然后查询 UI 以查看是否渲染了正确的值。
促销代码
我们要测试的最后一个功能是添加促销代码。如果用户输入正确的代码(它们在模拟数据中定义),价格将相应降低。我们已经在Product组件中测试过了,所以这次我们可以专注于订单和总价。具体来说,我们要检查三件事:
- 我们可以应用有效的代码吗
- 我们可以应用无效代码吗
- 价格是否相应更新
//Cart.spec.tsx
test('allows to apply a valid promo code', () => {
  renderComponent();
  const { name, discount } = DEFAULT_PROPS.promoCodes[0];

  userEvent.type(screen.getByRole('textbox'), name);
  userEvent.click(screen.getByRole('button', { name: /apply/i }));

  expect(screen.getByText(/discount applied: /i)).toHaveTextContent(
    discount.toString()
  );
});

test('does not allow to apply invalid promo code', () => {
  renderComponent();

  userEvent.type(screen.getByRole('textbox'), 'INVALID_PROMO_CODE');
  userEvent.click(screen.getByRole('button', { name: /apply/i }));

  expect(screen.getByRole('alert')).toMatchInlineSnapshot();
});

test('updates the prices accordingly when valid promo code is applied', () => {
  renderComponent();

  const { name } = DEFAULT_PROPS.promoCodes[0];

  userEvent.type(screen.getByRole('textbox'), name);
  userEvent.click(screen.getByRole('button', { name: /apply/i }));

  const orderPrice = 314.21;

  expect(
    screen.getByText(new RegExp(`${orderPrice}`, 'i'))
  ).toBeInTheDocument();
  expect(screen.getByText(/in total:/i)).toHaveTextContent(
    new RegExp(`${orderPrice + 30}`, 'i')
  );
});
首先,我们要输入promoCode并提交。我们可以使用userEvent库来完成这两项任务。
在第一种情况下,我们要通过查询成功文本并检查其值来检查代码是否正确应用discount。
在第二个测试中,我们插入了错误的代码,然后检查 UI 中渲染的警报。这次我们想使用这个非常酷的jest断言—— toMatchInlineSnapshot。我不太喜欢快照测试,但在本例中,它非常合适。警报文本可以被视为实现细节,因此我们不想硬编码其值。请注意,第一次运行后,快照将在测试中生成。如果有人要更改警报消息的文本,测试将捕获该更改,您可以通过更新快照来判断更改是否正确。
第三次测试与之前的测试基本相同。我们只需要查找更新后的订单和总价即可。
总结
如你所见,使用 Jest 和 RTL 测试 React 应用非常酷,而且并不复杂。多亏了它们,我们获得了许多优秀的工具来确保应用程序按预期运行。正如我在开头提到的,由于我们避免测试实现细节,规范在应用/网站/产品发布之前给了我们很大的信心。
希望这篇短文能让你对 Rect 测试有更多的了解,并对你未来的项目有所帮助。最后还有一点,我再强调一遍:如有疑问,请务必查阅Kent 的测试资料。这些资料非常棒,一定能解答你在编写测试时遇到的大多数问题和疑虑。
鏂囩珷鏉ユ簮锛�https://dev.to/maciekgrzybek/testing-ui-next-js-typescript-jest-and-react-testing-library-4dkl 后端开发教程 - Java、Spring Boot 实战 - msg200.com
