如何使用 Heroku/Netlify 部署全栈 MERN 应用
让我们开始吧!
你做到了!
这篇文章旨在为想要部署全栈 MERN 应用的用户提供指南。虽然步骤非常具体,阅读起来可能有点费劲,但可以确保用户在从 A 点到 B 点的过程中不会感到困惑。
如果您已经完成了其中一些步骤,并且知道如何执行这些步骤,请随意跳转。
如果这是你的第一次,不要害怕!只需阅读并逐一完成每个步骤即可。
注意:本指南基于我的具体项目结构,并且此方法非常有效。当然,还有其他部署方式,以及人们喜欢的其他项目结构。
让我们开始吧!
项目背景
所以你有一个很酷的项目想要向世界展示,我们如何部署全栈 MERN 应用程序?
让我们首先了解一下我如何做到这一点的一些基本知识和背景:我的项目结构、基本配置以及我为什么选择这种部署方式。
MERN 是什么?
MERN 代表MongoDB - Express - React - Node。
- MongoDB 用于数据库
- 服务器端使用 Node 和 Express
- 客户端的 React
还有 MEAN 堆栈,它使用 Angular 而不是 React,以及...MEVN(?) 堆栈...无论如何,它使用 Vue 而不是 React 或 Angular。
项目结构
开发人员之间、公司之间,有一件事是肯定存在差异的,那就是我们如何构建整个项目。我指的是各个目录之间的关系。这是我完全折叠的根目录,可以向你展示顶层内容:

只需三件事:
- 我的 VS Code 设置和扩展 JSON 文件
- 客户端代码
- 服务器端代码
我喜欢这种结构,因为对我来说,职责划分清晰。这样我只需折叠整个文件夹就能更轻松地处理其中一项或另一项。例如,如果我想添加/修复/修改某个 UI 功能,就无需打开我的server目录。
我觉得它让操作变得合乎逻辑且简单易用。再次强调,这完全是个人喜好。这也是本指南中描述的项目部署方式的一个重要原因。
一些部署选项
感谢 Dave Ceddia 整理了这份清单 - 这是在他的一篇博客文章中找到的。
- 保持
client并server在一起- 您的 Express 和 React 文件将位于同一台机器上,并且 Express 将同时处理您的 API 请求和React 文件
- 将您的 API 置于代理之后
- 这将允许您的 Express 和 React 文件仍然驻留在一台机器上,但每个文件将由不同的服务器提供服务
- 分裂
client(本指南server的选项)- 在一台机器上托管 Express API,在另一台机器上托管 React App
我对部署并没有太多经验,因此前两个选项我从未尝试过。
我确实知道,在某些情况下,为了在一台机器上进行部署,很多开发人员必须将他们的整个client目录嵌套在其中 server。这是我选择部署路线的一个重要原因,因为对我来说,我希望保持上图所示的结构,并将客户端代码和服务器端代码明确分开。
项目配置
我部署的项目的基础是 Create-React-App,它附带了webpack.config.js和其他开箱即用的基本配置,用于前端。
我也使用了 Webpack 作为server目录,以便让所有这些漂亮的imports 和exports 为我工作,并允许我在服务器端分离职责。
client下面是一个展开的目录截图,server只是为了展示我是如何设置的。为了使这个项目结构正常工作,只需要几样东西,我会指出来。

每个目录client和server都需要:
.gitignore- 忽略我们不想存储在仓库中的文件和目录
package.json- 为了明确我们的独立
dependencies和devDependencies
- 为了明确我们的独立
webpack.config.js- 没有
client,因为 Create-React-App 再次提供了一个开箱即用的,所以我不需要在那里指定它
- 没有
你可能注意到我有一个yarn.lockinsideclient和一个package-lock.jsoninside server。我特意分别yarn在客户端和npm服务器端使用,因为这样可以帮助我在脑海中区分它们。我知道如果我使用 ,yarn那么我就是 in client;如果我使用 ,那么npm我就是 in server。再次强调,这只是个人偏好——你可以同时使用yarn或npm,而且不会有问题。
你可能也注意到了 ,Procfile我们将在指南的后面部分介绍它。先预告一下,Heroku 需要它来部署我们的server代码,所以它位于 中server。
现在我们对我的项目设置方式有了一些了解,让我们来谈谈实际的部署过程。
部署过程
我们具体要做的是将server代码托管在 Heroku 上,并将client代码托管在 Netlify 上。这样,托管在 Netlify 上的 React 应用就会向托管在 Heroku 上的 Express API 发出 API 请求。
这将假设您已正确client运行server并且已将您的应用程序连接到 MongoDB 上托管的数据库。
步骤
-
创建 Netlify 帐户或登录(如果有)
-
创建一个 Heroku 帐户或登录(如果有)
-
- 这篇链接文章提供了有关如何在 Mac 和 Windows 上执行此操作的说明
-
转到你的终端并输入
heroku login- 这将提示您按任意键,一旦您按了它就会带您到浏览器,您只需单击“登录”即可。
- 一旦成功,您可以关闭该浏览器窗口并导航到您的文本编辑器,同时打开您的项目
-
在目录中创建一个名为 的文件
Procfile,没有文件扩展名。/server- 仅将此文本包含在
Procfileweb: node dist/main.js
- 这告诉 Heroku 在构建我们的应用程序后该做什么 - 具体来说就是从 webpack 运行我们的捆绑文件,其中包含我们所有的服务器逻辑
- 如果我们不包括这个,它可能会构建得很好,但实际上永远不会启动我们的服务器
- 仅将此文本包含在
-
现在我们必须添加
server/package.json以下块:- 您很可能可以在任何地方添加它(不嵌套在任何其他属性中),但我将它添加到
"main"顶部附近的属性下方server/package.json。 - 建议先检查你的 node 和 npm 版本,以确定下一个区块中要使用哪些版本。虽然版本略有不同可能不会破坏你的应用,但更安全的做法是指定你在开发中使用的版本,以防止出现意外行为。
node -v或者node --version检查你的 Node 版本npm -v或者npm --version检查你的 npm 版本engines如果这些版本与我的不同,则添加返回此属性的版本。- 我以前常
"14.x"说node,“只要 Node 的主版本是 14,就使用最新的次版本。主版本发布时,很可能会出现重大变更,而这些变更是我们想要避免的。”
“引擎”:{
“节点”:“14.x”,
“npm”:“6.14.7”
}, - 您很可能可以在任何地方添加它(不嵌套在任何其他属性中),但我将它添加到
7. We need to allow access to your MongoDB database now from a new IP address. For simplicity, I added all IP addresses to be allowed.
- **BIG NOTE**: In a production app **_you do not want to allow all IP addresses to access your database_**! You will want to find the specific IP address that hosts your server-side and add just that one as allowed.
- The app I deployed does not contain any sensitive information. It's just a simple card game so no need for me to be super secure. _Once more_, do not do this for a real production app or even a side project that may contain sensitive information.
1. Go to the [MongoDB Website](https://www.mongodb.com/) and sign in
2. Navigate to the Project you're deploying using the dropdown on the top left
3. Then click the `Network Access` tab on the left side bar
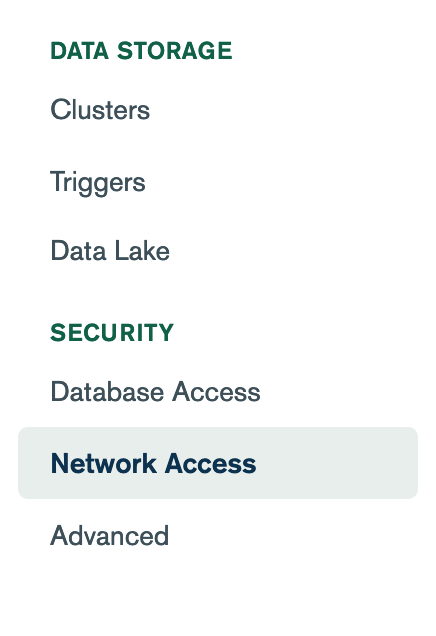
4. Click the green button on the right of the screen that says `Add IP Address`

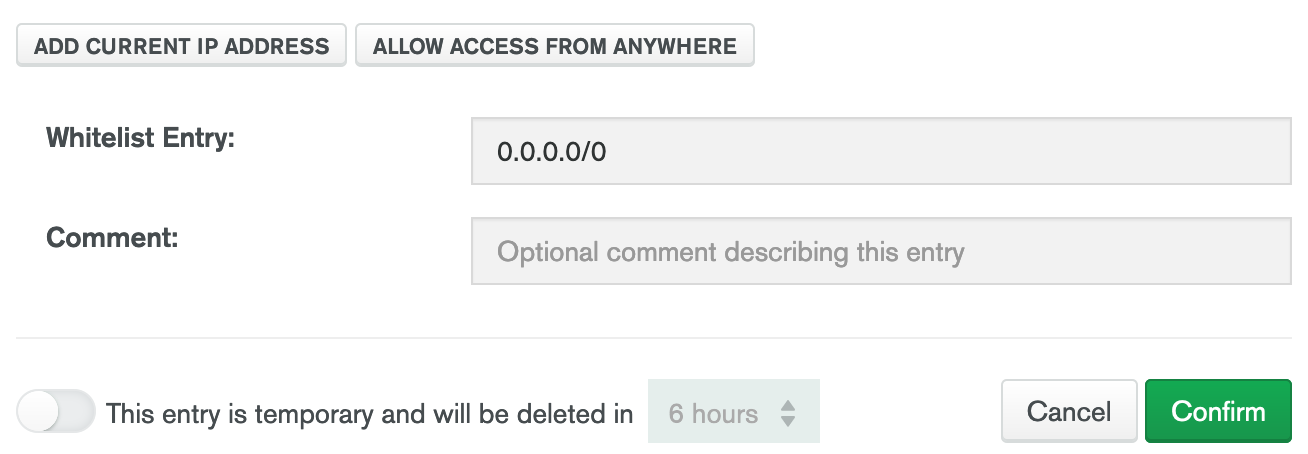
5. A modal will popup. Click the button that says `Allow Access from Anywhere`. This will place `0.0.0.0/0` in the `Whitelist Entry` input. Then click `Confirm`.
8. In development I had the express server listen to `localhost:5000` to run there and my react app ran on port `3000`. We must change what this Express server will listen for to `app.listen(process.env.PORT || 5000)`
- So this will tell the server to listen to the `.env` environment variable `PORT` which **_we should not have set in our own_** `.env` _file_. OR it will listen to port 5000.
- The `process.env.PORT` will be set by Heroku's `.env` - they essentially will tell our server which port to listen to.
- If there is no such `process.env.PORT`, in other words there is no `.env` file that has been configured, then it will default to `5000`. This will allow us to keep that code in *and* be able to run it in our local development environment on port `5000` because we *do not* have a `.env` variable `PORT`.
```js
// server.js
/*
Other code...
*/
app.listen(process.env.PORT || 3000);
---

**Ensure in your terminal that you are inside the _root_ of the project you are deploying for these next two steps**

---
-
现在回到终端,我们接下来输入的命令是
heroku git:remote -a <project-name>。 可以替换<project-name>成任何你想要的名称——为了简单起见,我建议使用项目名称。例如,它看起来像heroku git:remote -a my-project。- 这将专门与 Heroku 创建一个远程连接,并在该远程分支上为您创建一个分支,您的应用名称将是您提供的名称,例如
my-project上面提到的名称。接下来,我们将把push服务器代码迁移到该远程 Heroku 分支。```
heroku git:远程-a 我的项目
- 这将专门与 Heroku 创建一个远程连接,并在该远程分支上为您创建一个分支,您的应用名称将是您提供的名称,例如
10. The command we need to push our `server` code specifically, because we have the separation of `client` and `server` in our project structure, is `git subtree push --prefix server heroku master`
    - This is telling git to push a subtree, or in other words a *subdirectory*, from our current git repo. The `--prefix` flag comes before that subdirectory that we want to push, in our case it is `server`. And lastly we're telling it to push to the remote `heroku` our `master` branch.
    ```


    git subtree push --prefix server heroku master
---

**IF you want to test and ensure that you've deployed your server to Heroku just add in a test route in your `server.js` like:**
```js
app.get('/', (req, res) => { res.send('Hello from Express!')
You can view your app by:
- Copy and pasting the url that will appear in your Terminal after successfully pushing your code to the remote Heroku branch
- Navigating to your project on [the Heroku website](http://heroku.com) and there will be a button that says 'View App' - click it and it will take you there
- If you see the 'Hello from Express!' (or whatever test message you used) then that means your server is running correctly
---
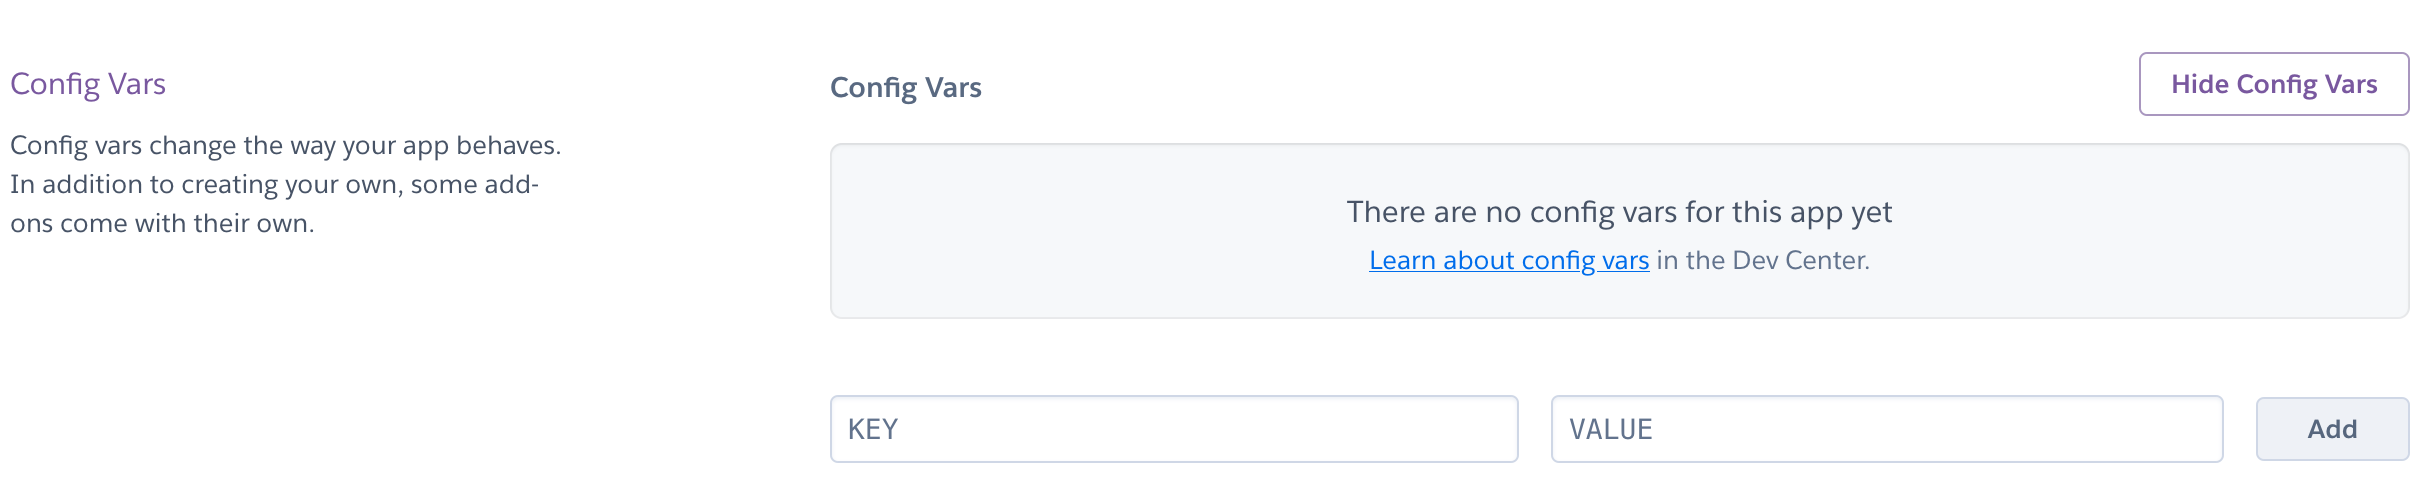
11. Now for our MongoDB connection to work we must define an environment variable for Heroku to store our MongoDB connection string.
> We want to keep our connection string secret as we don't want anybody able to connect to our database and change, delete, add things etc.
> In our local build the connection string, is stored in our `.env` file inside of `/server`. I named by connection string `MONGODB_URI`. You can do this next step on the Heroku CLI or on the Heroku website.
> I recommend the website it's more straightforward and you don't have to worry about escaping special characters. I'm going to describe the next steps going through the website.
- Navigate to your dashboard on Heroku
- Click on your project name that will be present from our previous steps where we created our remote branch and pushed the code
- Navigate to the Settings tab near the top
- The second section is 'Config Vars' - click on 'Reveal Config Vars'
- You'll see two inputs:
- One is the name of your environment variable - name this **whatever you have it named in your local build**. For me that is `MONGODB_URI`.
- Second is the value - paste your whole connection string here that you should copy from your `.env` file directly to avoid any typos.
- Then just click 'Add' and our MongoDB connection environment variable is set.
---
Our `server` code is officially deployed and configured correctly. Now onto the `client` code with Netlify.
---
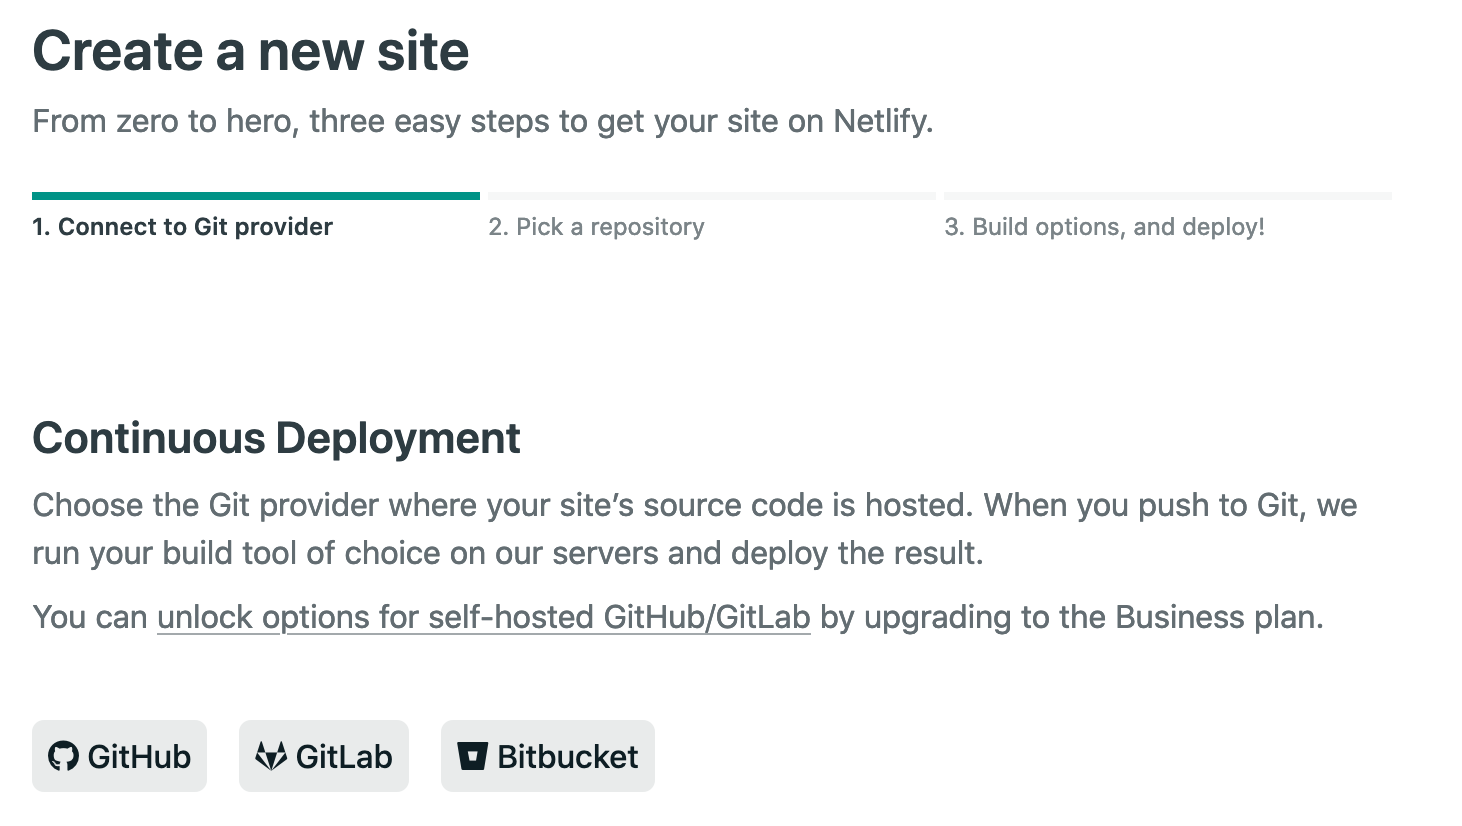
12. Next is to deploy the front-end React code in `/client` to Netlify. Login to Netlify if you haven't already, the default tab should be `Sites` or just navigate to that tab.
- Click the button that says `New site from Git`

- Click the `Github` (or `GitLab` / `BitBucket` if that's where your repo is hosted) button below `Continuous Deployment`
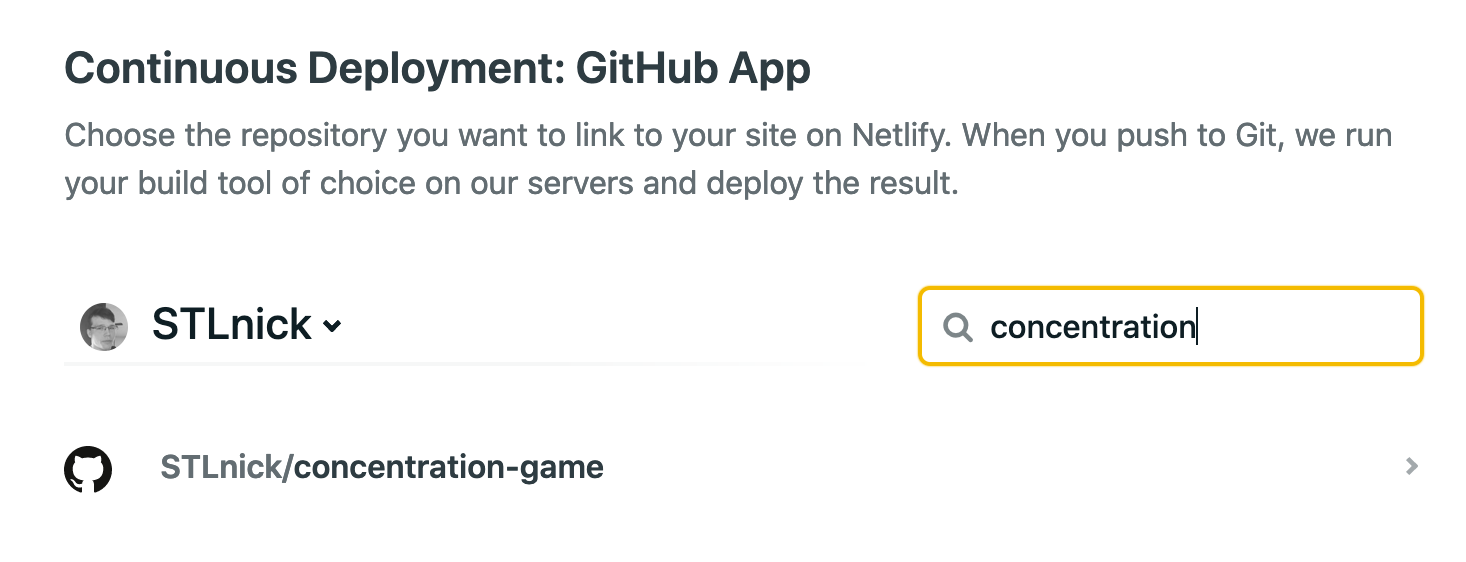
- There will be a search bar that says `Search Repos` - type in the name of your project repo here to find it then click the line that has the repo you're looking for
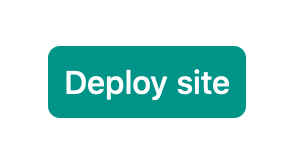
- Click `Deploy Site`.
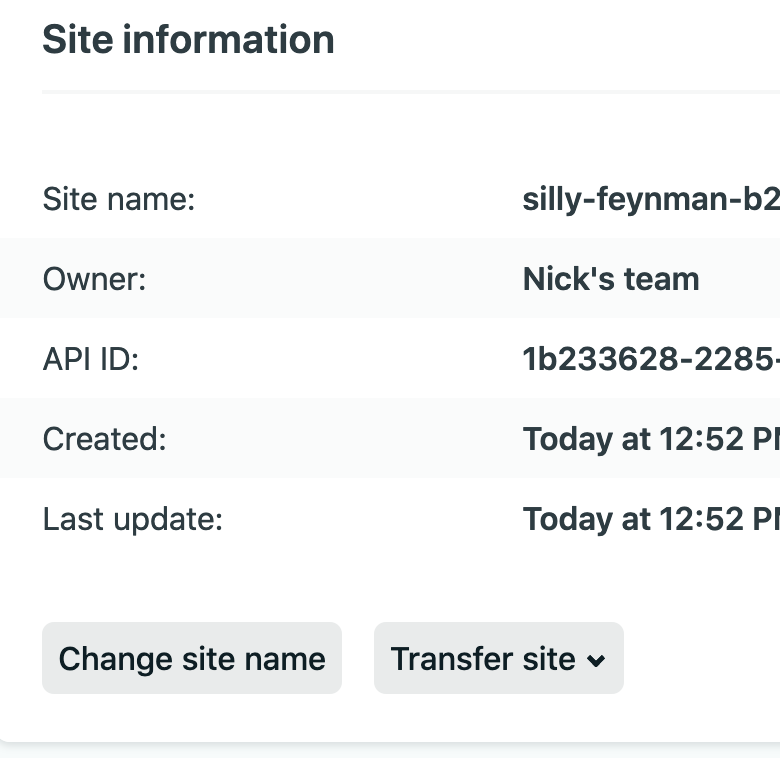
- Once that's done it will take you to a page that shows a box near the top with your auto-generated site name and your site url right under it. In that box click `Site Settings`.
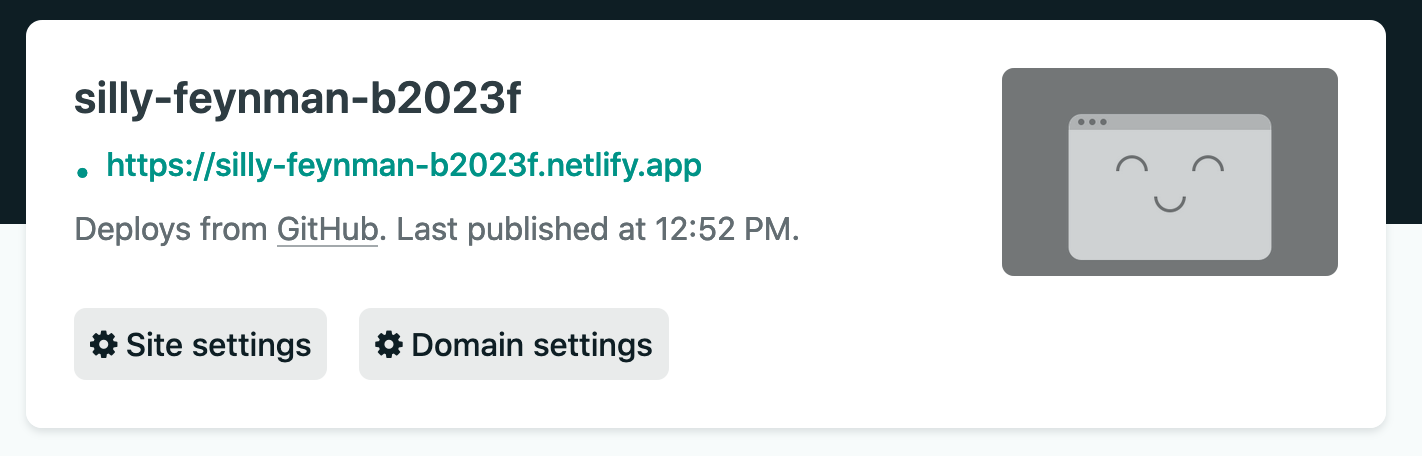
- First you can change your site name here if you'd like by clicking the `Change site name` button on that first page. Do that if you'd like.
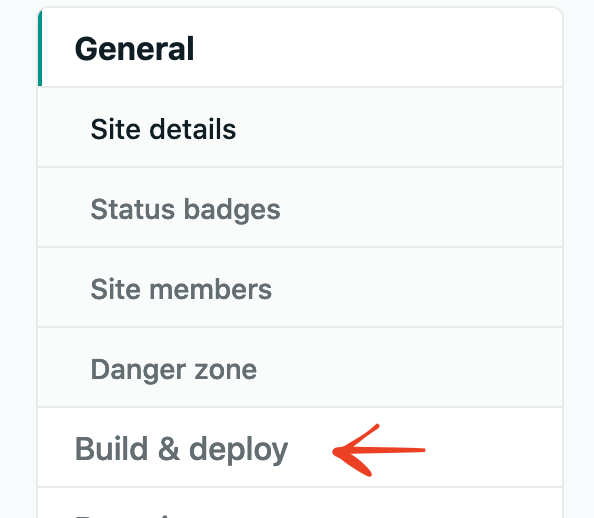
- Now on the left menu bar click on the tab that says `Build & Deploy`.
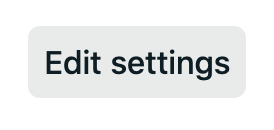
- Click the `Edit Settings`
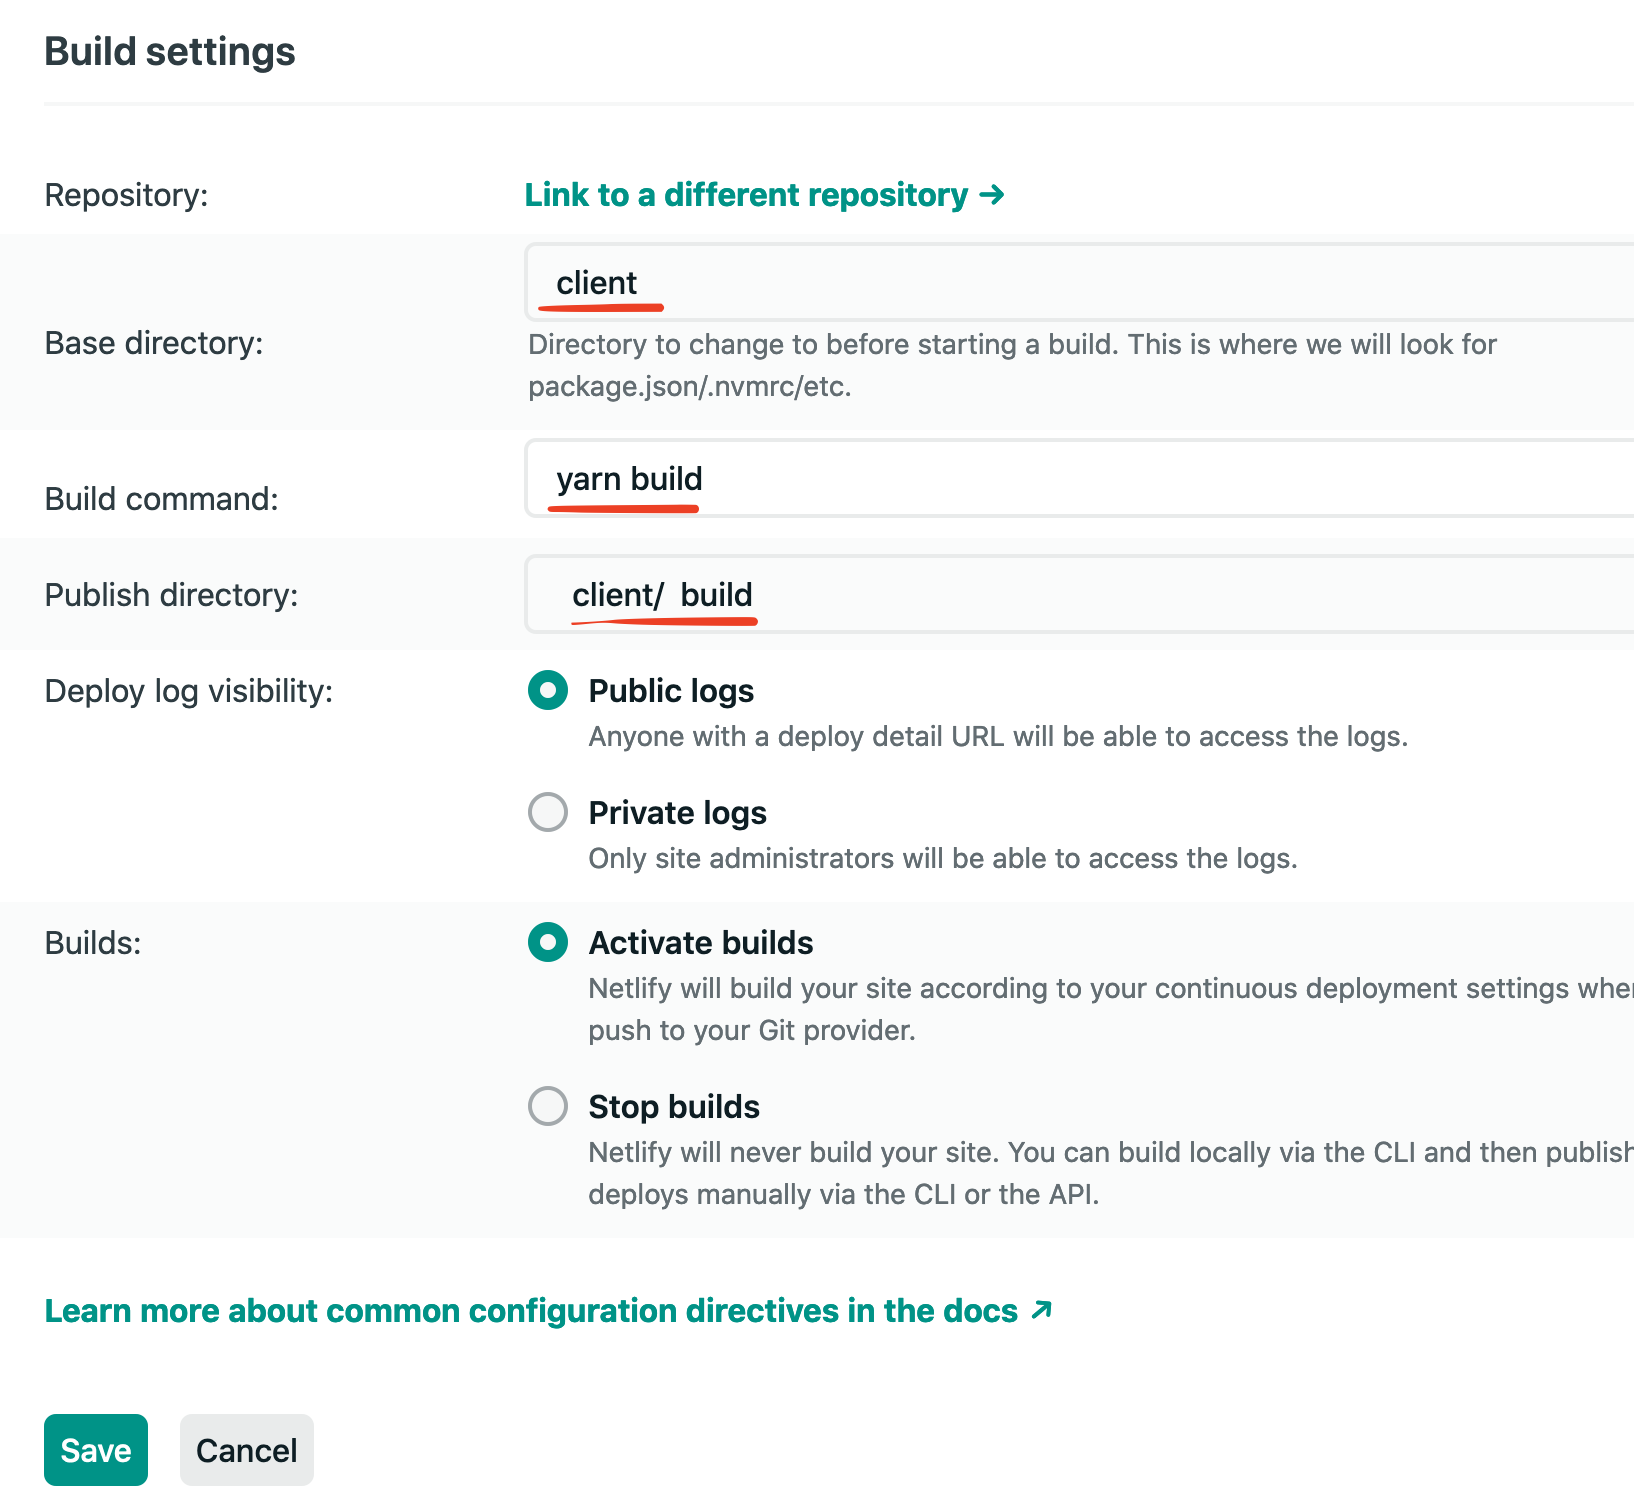
- Change your `Base directory` to `client`, change your `Build command` to `yarn build`, and change your `Publish directory` to `client/build`. Then click the `Save` button on the bottom left.
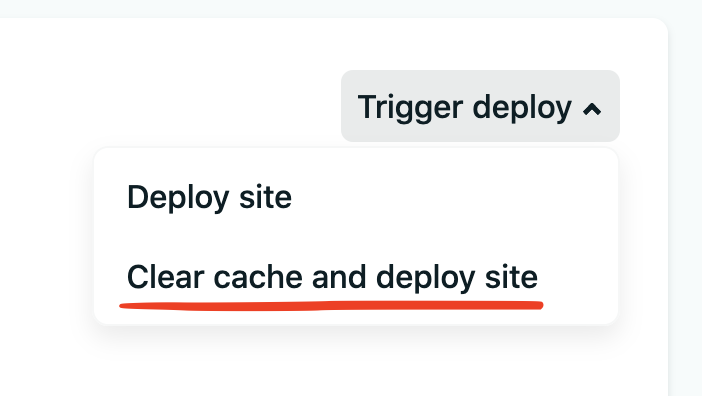
To ensure this all redeploys after we change these settings I like to explicity trigger a redeploy.
- Near the top in the tabs located right under your team name and site name click on `Deploys`

- Then click the `Trigger deploy` button which has a drop down with two options. I always use `clear cache and deploy site` to ensure a fresh build that has all changes I've made.
13. **LASTLY** after we deploy our front-end React code we must ensure _any requests_ we're sending from the client-side is changed to use our Heroku URL now instead of localhost.
- In my structure the requests were being made from `client/api/index.js` so navigate to that file and *any request that contains* `http://localhost:5000` must be replaced by your Heroku URL.
```js
// Before
const res = await fetch('http://localhost:5000/scores/'
// After
const res = await fetch('https://my-project.herokuapp.com/scores/')
// 'my-project' in the URL will either be the auto-generated
// name from Netlify or if you changed the name it will
// be the name you gave it
确保将这些更改推送到 GitHub。当 Netlify 检测到你的分支发生更改时,它会触发重新部署master。因此,为了实现此功能,你必须让 Netlify 能够识别这些更改。
现在,任何请求都不会转到您在开发时运行的本地服务器,而是转到您刚刚部署到 Heroku 的托管服务器,并且所有 Express Routes 仍然完好无损且正常运行。
你做到了!
毫无疑问,这是一个漫长的过程。但重要的是,这是可以做到的!
看到我们在本地机器上开发的东西真是太棒了。之后,你可以把实时链接发送给你的朋友、同事等等,让他们也来体验一下!
对于任何正在求职的人来说,拥有一个实时示例真是太棒了。不仅能够在简历或作品集网站上添加 GitHub 代码的链接,而且对于招聘人员、经理等所有人来说,都能看到项目的实际运行,这真是太棒了!
请在评论中让我知道...
... 你喜欢如何部署!给我发一篇文章链接,给我一个简短的概述,或者任何你想说的。我很想听听开发者们是如何将他们的项目发布到全世界,让全世界看到和享受的!
文章来源:https://dev.to/stlnick/how-to-deploy-a-full-stack-mern-app-with-heroku-netlify-ncb