React 中拖放的终极指南
作者:Paramananham Harrison✏️
拖放式 UI 已成为大多数现代应用程序不可或缺的一部分。它提供了丰富的 UI,同时又不影响用户体验。
拖放式 UI 有很多用例。最常见的用例包括:
- 使用浏览器中的拖放功能上传文件。Gmail、WordPress、Invision 等产品都将此作为其核心功能之一。
- 在多个列表之间移动项目。Trello、Asana 和许多生产力产品都提供此功能
- 重新排列图片或素材。大多数视频编辑器都提供此功能,像 Invision 这样的产品也提供此功能,可以在各个部分之间重新定位设计素材。
今天,我们将通过在 React 中构建一个简单的项目来了解一些拖放功能的用例。如果你想了解这个项目的具体内容,可以在这里找到。
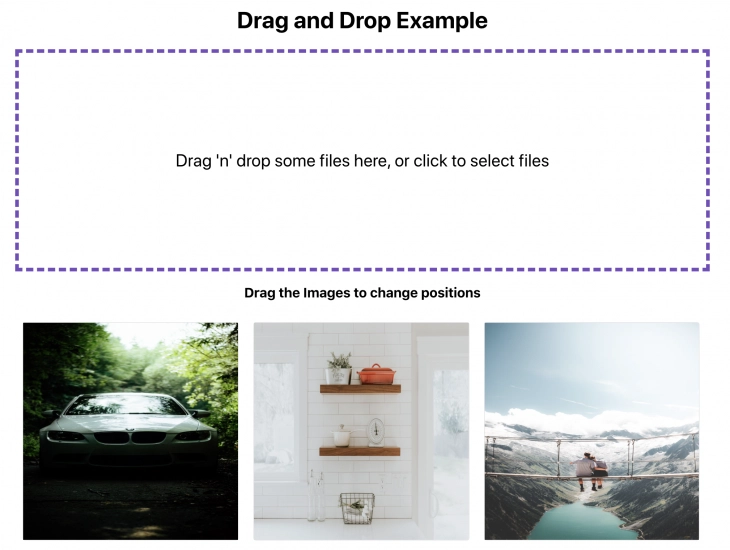
我们的简单应用程序将具有以下功能:
- 通过将文件拖放到浏览器中来上传图像文件
- 以网格形式显示这些图像的预览
- 通过拖放重新排序这些图像
让我们开始使用 引导一个 React 应用程序create-react-app,如下所示:
npx create-react-app logrocket-drag-and-drop
cd logrocket-drag-and-drop
yarn start
使用拖放功能上传文件
我们不会自己重新发明轮子,创建所有逻辑和组件。相反,我们将在项目中使用最标准、最知名的库。
对于拖放上传功能,我们将使用 React 中最著名的库之一react-dropzone。它在 Github 上拥有超过6000 个 star,并且支持最新的 React Hooks。您可以在此处阅读文档。它是一个非常强大的库,可以帮助您在 React 中创建自定义组件。
我们先来安装它:
yarn add react-dropzone
安装完成后,我们来创建一个名为 的新文件Dropzone.js。该组件负责将一个简单的内容区域变成一个可以放置文件的拖放区域。
工作原理react-dropzone:
react-dropzone隐藏文件输入并显示漂亮的自定义拖放区域- 当我们拖放文件时,
react-dropzone使用 HTMLonDrag事件并根据文件是否被拖放到 dropzone 区域内来捕获事件中的文件 - 如果我们点击该区域,
react-dropzone库将使用 React 通过隐藏输入启动文件选择对话框ref,并允许我们选择文件并上传它们
让我们创建名为的组件Dropzone:
/*
  filename: Dropzone.js
*/

import React from "react";
// Import the useDropzone hooks from react-dropzone
import { useDropzone } from "react-dropzone";

const Dropzone = ({ onDrop, accept }) => {
  // Initializing useDropzone hooks with options
  const { getRootProps, getInputProps, isDragActive } = useDropzone({
    onDrop,
    accept
  });

  /*
    useDropzone hooks exposes two functions called getRootProps and getInputProps
    and also exposes isDragActive boolean
  */

  return (
    <div {...getRootProps()}>
      <input className="dropzone-input" {...getInputProps()} />
      <div className="text-center">
        {isDragActive ? (
          <p className="dropzone-content">Release to drop the files here</p>
        ) : (
          <p className="dropzone-content">
            Drag 'n' drop some files here, or click to select files
          </p>
        )}
      </div>
    </div>
  );
};

export default Dropzone;
该组件很简单。让我们仔细看看这段代码。
useDropzone公开了一些方法和变量,用于创建自定义的dropzone区域。对于我们的项目,我们最感兴趣的是以下三个不同的属性:
getRootProps– 这是将根据 dropzone 区域的父元素设置的属性。因此,该元素决定了 dropzone 区域的宽度和高度。getInputProps– 这是传递给输入元素的 props。我们需要它来支持点击事件和拖拽事件来获取文件。- 我们传递给 的所有与文件相关的选项都
useDropzone将设置到此输入元素中。例如,如果您只想支持单个文件,则可以传递multiple: false。它将自动要求dropzone只允许接受一个文件 isDragActive如果文件被拖拽到dropzone区域上方,则会被设置。这对于基于此变量进行样式设置非常有用。
以下是如何根据值设置样式/类名的示例isDragActive:
const getClassName = (className, isActive) => {
  if (!isActive) return className;
  return `${className} ${className}-active`;
};

...
<div className={getClassName("dropzone", isDragActive)} {...getRootProps()}>
...
在我们的示例中,我们只使用了两个 props。该库支持许多 props,可以dropzone根据您的需求自定义区域。
我们使用了acceptprops 来只允许图片文件。App.js看起来应该是这样的:
/*
filename: App.js
*/

import React, { useCallback } from "react";
// Import the dropzone component
import Dropzone from "./Dropzone";

import "./App.css";

function App() {
  // onDrop function
  const onDrop = useCallback(acceptedFiles => {
    // this callback will be called after files get dropped, we will get the acceptedFiles. If you want, you can even access the rejected files too
    console.log(acceptedFiles);
  }, []);

  // We pass onDrop function and accept prop to the component. It will be used as initial params for useDropzone hook
  return (
    <main className="App">
      <h1 className="text-center">Drag and Drop Example</h1>
      <Dropzone onDrop={onDrop} accept={"image/*"} />
    </main>
  );
}

export default App;
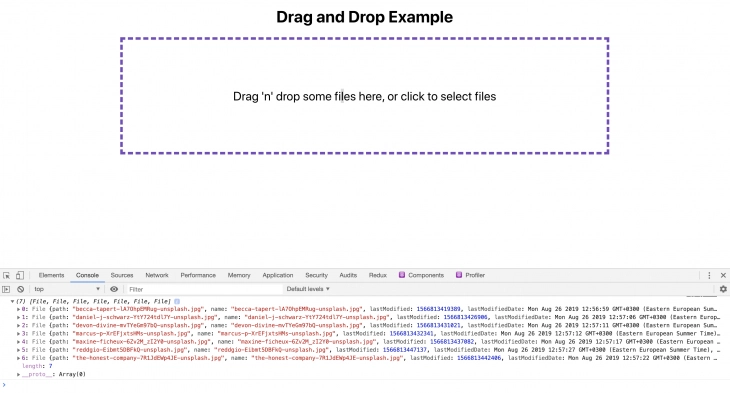
我们已经dropzone在主页中添加了该组件。现在,如果您拖放文件,它将控制拖放的图像文件。
acceptedFiles是一个值数组File。您可以读取文件或将文件发送到服务器并上传。无论您想执行什么操作,都可以在那里进行- 即使您点击该区域并上传,
onDrop也会调用相同的回调 acceptprops 接受 mime 类型。您可以查看文档了解所有支持的 mime 类型。它支持所有标准 mime 类型,并匹配模式。如果您只想允许 pdf 格式,则accept={'application/pdf'}。如果您同时需要图像类型和 pdf 格式,则它支持accept={'application/pdf, image/*'}onDrop函数被封装在一个 中useCallback。目前为止,我们还没有进行任何繁重的计算,也没有将文件发送到服务器。我们只是控制了acceptedFiles。但稍后,我们将读取文件并设置为在浏览器中显示图像的状态。建议对useCallback开销较大的函数使用 ,并避免不必要的重新渲染。在我们的示例中,它是完全可选的。
让我们读取图像文件并将其添加到状态中App.js:
/*
filename: App.js
*/
import React, { useCallback, useState } from "react";
// cuid is a simple library to generate unique IDs
import cuid from "cuid";

function App() {
  // Create a state called images using useState hooks and pass the initial value as empty array
  const [images, setImages] = useState([]);

  const onDrop = useCallback(acceptedFiles => {
    // Loop through accepted files
    acceptedFiles.map(file => {
      // Initialize FileReader browser API
      const reader = new FileReader();
      // onload callback gets called after the reader reads the file data
      reader.onload = function(e) {
        // add the image into the state. Since FileReader reading process is asynchronous, its better to get the latest snapshot state (i.e., prevState) and update it.
        setImages(prevState => [
          ...prevState,
          { id: cuid(), src: e.target.result }
        ]);
      };
      // Read the file as Data URL (since we accept only images)
      reader.readAsDataURL(file);
      return file;
    });
  }, []);

  ...
}
我们状态的数据结构images是:
const images = [
  {
    id: 'abcd123',
    src: 'data:image/png;dkjds...',
  },
  {
    id: 'zxy123456',
    src: 'data:image/png;sldklskd...',
  }
]
让我们以网格布局显示图像预览。为此,我们将创建另一个名为 的组件ImageList。
import React from "react";

// Rendering individual images
const Image = ({ image }) => {
  return (
    <div className="file-item">
      <img alt={`img - ${image.id}`} src={image.src} className="file-img" />
    </div>
  );
};

// ImageList Component
const ImageList = ({ images }) => {

  // render each image by calling Image component
  const renderImage = (image, index) => {
    return (
      <Image
        image={image}
        key={`${image.id}-image`}
      />
    );
  };

  // Return the list of files
  return <section className="file-list">{images.map(renderImage)}</section>;
};

export default ImageList;
现在,我们可以将此 ImageList 组件添加到 App.js 并显示图像的预览。
function App() {
  ...

  // Pass the images state to the ImageList component and the component will render the images
  return (
    <main className="App">
      <h1 className="text-center">Drag and Drop Example</h1>
      <Dropzone onDrop={onDrop} accept={"image/*"} />
      <ImageList images={images} />
    </main>
  );
}
我们已经成功完成了一半的申请。我们将能够使用拖放功能上传文件,并查看图片预览。
接下来,我们将使用拖放功能重新排序预览图像。在此之前,我们将了解一些用于此类解决方案的不同库,以及如何根据我们的应用需求从中选择合适的库。
有三种不同的 React 包在拖放功能方面非常流行:
react-beautiful-dnd,Github 上有 15k 个星标(由 Atlasssian 支持)react-dnd,Github 上有 11k 个 starsreact-grid-layout,Github 上有 9k 个 stars
所有库在 React 开发人员中都同样受欢迎,并且都有活跃的贡献者,但每个库都有优点和缺点。
我列出了每个库的优缺点:
React 漂亮的 DND
优点
- 它非常适合一维布局(即列表),并且如果您的拖放需要水平移动或垂直移动
- 例如,类似 Trello 的布局和待办事项列表等,可以立即使用
react-beautiful-dnd
- 例如,类似 Trello 的布局和待办事项列表等,可以立即使用
- API 非常简洁,任何人都可以轻松上手。即使增加了代码库的复杂性,开发者的体验也非常好,令人愉悦。
缺点
react-beautiful-dnd不适用于网格,因为当你向各个方向移动元素时,react-beautiful-dnd无法同时计算 x 轴和 y 轴的位置。因此,在网格上拖动元素时,内容会随机移动,直到你放下元素为止。
反应网格布局
优点
- 它适用于网格。网格本身覆盖了所有内容,因此从技术上讲,它也适用于一维运动
- 它适用于需要拖放的复杂网格布局
- 例如,具有完全自定义和调整大小功能的仪表板(即,观察器、数据可视化产品等)
- 对于大规模应用的需求来说,这是值得的
缺点
- 它的 API 非常丑陋——很多计算必须由我们自己完成
- 所有布局结构都必须通过其组件 API 在 UI 中定义,这在您动态创建动态元素时会带来额外的复杂性
反应 DND
优点
- 它适用于几乎所有用例(网格、一维列表等)
- 它具有非常强大的 API,可以通过拖放进行任何自定义
缺点
- 对于小型示例来说,API 很容易上手。但一旦你的应用需要自定义功能,实现起来就会变得非常棘手。学习曲线比 React-beautiful-dnd 更高,也更复杂。
- 我们需要做很多事情来支持网页和触摸设备
对于我们的用例,我选择react-dnd。react-beautiful-dnd如果我们的布局仅包含一个项目列表,我会选择 。但在我们的示例中,我们有一个图像网格。因此,实现拖放功能的下一个最简单的 API 是react-dnd。
使用 React 进行列表拖放
在深入研究拖放代码之前,我们需要先了解react-dnd它的工作原理。React DND 可以使任何元素可拖动,也可以使任何元素可放置。为了实现这一点,React DND 做了一些假设:
- 它需要有所有可丢弃物品的引用
- 它需要有所有可拖动项目的引用
- 所有可拖放的元素都需要包含在
react-dnd的上下文提供程序中。此提供程序用于初始化和管理内部状态
我们不需要太担心它如何管理状态。它有简洁易用的 API 来暴露这些状态,我们可以使用它来计算和更新本地状态。
让我们开始编写代码。安装软件包:
yarn add react-dnd
首先,我们将 ImageList 组件封装在 DND 上下文提供程序中,如下所示:
/*
  filename: App.js
*/

import { DndProvider } from "react-dnd";
import HTML5Backend from "react-dnd-html5-backend";

function App() {
  ...
  return (
    <main className="App">
      ...
      <DndProvider backend={HTML5Backend}>
        <ImageList images={images} onUpdate={onUpdate} />
      </DndProvider>
    </main>
  );
}
很简单,我们只需导入DNDProvider并使用后端道具初始化它。
backend– 正如我之前提到的,这个变量有助于选择用于拖放的 API。
它支持:
- HTML5 拖放 API(仅在网络上支持,不支持触摸设备)
- 触摸拖放 API(触摸设备支持)
目前,我们使用 HTML5 API 来启动,一旦功能完成,我们将编写一个简单的实用程序来为触摸设备提供基本支持。
现在我们需要将这些项目添加为可拖放项目。在我们的应用中,可拖放项目和可拖放项目是相同的。我们将Image组件拖放到另一个组件上Image。这样我们的工作就轻松多了。
让我们来实现它,像这样:
import React, { useRef } from "react";
// import useDrag and useDrop hooks from react-dnd
import { useDrag, useDrop } from "react-dnd";

const type = "Image"; // Need to pass which type element can be draggable, its a simple string or Symbol. This is like an Unique ID so that the library know what type of element is dragged or dropped on.

const Image = ({ image, index }) => {
  const ref = useRef(null); // Initialize the reference

  // useDrop hook is responsible for handling whether any item gets hovered or dropped on the element
  const [, drop] = useDrop({
    // Accept will make sure only these element type can be droppable on this element
    accept: type,
    hover(item) {
      ...
    }
  });

  // useDrag will be responsible for making an element draggable. It also expose, isDragging method to add any styles while dragging
  const [{ isDragging }, drag] = useDrag({
    // item denotes the element type, unique identifier (id) and the index (position)
    item: { type, id: image.id, index },
    // collect method is like an event listener, it monitors whether the element is dragged and expose that information
    collect: monitor => ({
      isDragging: monitor.isDragging()
    })
  });

  /*
    Initialize drag and drop into the element using its reference.
    Here we initialize both drag and drop on the same element (i.e., Image component)
  */
  drag(drop(ref));

  // Add the reference to the element
  return (
    <div
      ref={ref}
      style={{ opacity: isDragging ? 0 : 1 }}
      className="file-item"
    >
      <img alt={`img - ${image.id}`} src={image.src} className="file-img" />
    </div>
  );
};

const ImageList = ({ images }) => {
  ...
};

export default ImageList;
现在,我们的图片已经可以拖动了。但是如果我们放下它,图片就会回到原来的位置。因为useDrag和useDrop会一直处理这个问题,直到我们放下它为止。除非我们改变本地状态,否则它会回到原来的位置。
为了更新本地状态,我们需要知道两件事:
- 拖动元素
- 悬停元素(拖动元素悬停的元素)
useDrag通过该hover方法公开此信息。让我们在代码中看一下:
const [, drop] = useDrop({
    accept: type,
    // This method is called when we hover over an element while dragging
    hover(item) { // item is the dragged element
      if (!ref.current) {
        return;
      }
      const dragIndex = item.index;
      // current element where the dragged element is hovered on
      const hoverIndex = index;
      // If the dragged element is hovered in the same place, then do nothing
      if (dragIndex === hoverIndex) {
        return;
      }
      // If it is dragged around other elements, then move the image and set the state with position changes
      moveImage(dragIndex, hoverIndex);
      /*
        Update the index for dragged item directly to avoid flickering
        when the image was half dragged into the next
      */
      item.index = hoverIndex;
    }
});
hover每当元素被拖动并悬停在该元素上时,都会触发该方法。这样,当我们开始拖动元素时,我们会获取该元素的索引以及我们悬停在其上的元素的索引。我们将传递此参数dragIndex并hoverIndex更新图像状态。
您现在可能有两个问题:
- 为什么我们需要在悬停时更新状态?
- 为何在删除时不更新它?
可以边拖放边更新。这样拖放操作也能正常工作,并重新排列位置。但用户体验不太好。
例如,如果你将一张图片拖到另一张图片上,如果我们立即改变位置,就能给拖动图片的用户一个很好的反馈。否则,他们可能直到将图片拖放到某个位置才知道拖动功能是否有效。
这就是我们在每次鼠标悬停时更新状态的原因。当鼠标悬停在另一张图片上时,我们会设置状态并更改位置。用户将看到一个漂亮的动画。您可以在我们的演示页面中查看。
到目前为止,我们仅展示了更新状态的代码moveImage。让我们看看具体实现:
/*
  filename: App.js
*/

import update from "immutability-helper";

const moveImage = (dragIndex, hoverIndex) => {
    // Get the dragged element
    const draggedImage = images[dragIndex];
    /*
      - copy the dragged image before hovered element (i.e., [hoverIndex, 0, draggedImage])
      - remove the previous reference of dragged element (i.e., [dragIndex, 1])
      - here we are using this update helper method from immutability-helper package
    */
    setImages(
      update(images, {
        $splice: [[dragIndex, 1], [hoverIndex, 0, draggedImage]]
      })
    );
};

// We will pass this function to ImageList and then to Image -> Quiet a bit of props drilling, the code can be refactored and place all the state management in ImageList itself to avoid props drilling. It's an exercise for you :)
现在,我们的应用在onDrag支持 HTML5 事件的设备上已经完全正常运行。但遗憾的是,它无法在触摸设备上运行。
正如我之前所说,我们可以使用一个实用函数来支持触屏设备。这不是最好的解决方案,但仍然有效。不过,在触屏设备上拖动的体验会不太好。它只是更新,但你不会感觉到是在拖动。也可以让它更简洁一些。
import HTML5Backend from "react-dnd-html5-backend";
import TouchBackend from "react-dnd-touch-backend";

// simple way to check whether the device support touch (it doesn't check all fallback, it supports only modern browsers)
const isTouchDevice = () => {
  if ("ontouchstart" in window) {
    return true;
  }
  return false;
};

// Assigning backend based on touch support on the device
const backendForDND = isTouchDevice() ? TouchBackend : HTML5Backend;

...
return (
  ...
  <DndProvider backend={backendForDND}>
    <ImageList images={images} moveImage={moveImage} />
  </DndProvider>
)
...
结论
好了,各位,就到这里吧。我们已经成功构建了一个小巧而强大的演示程序,用于拖放文件、上传文件以及重新排序文件。您可以点击此处查看该演示程序。
该项目的代码库在这里。你甚至可以通过查看仓库中的分支,一步步了解我是如何构建应用程序的。
我们只是粗略地介绍了 React 在拖放功能方面的功能。我们可以使用拖放库构建非常全面的功能。我们讨论了业内一些最优秀的库。希望这些内容能帮助您更快、更自信地构建下一个拖放功能。
编者注:觉得这篇文章有什么问题?您可以在这里找到正确版本。
插件:LogRocket,一个用于 Web 应用的 DVR

LogRocket是一款前端日志工具,可让您重播问题,就像它们发生在您自己的浏览器中一样。无需猜测错误发生的原因,也无需要求用户提供屏幕截图和日志转储,LogRocket 让您重播会话,快速了解问题所在。它可与任何应用程序完美兼容,不受框架限制,并且提供插件来记录来自 Redux、Vuex 和 @ngrx/store 的额外上下文。
除了记录 Redux 操作和状态外,LogRocket 还记录控制台日志、JavaScript 错误、堆栈跟踪、带有标头 + 正文的网络请求/响应、浏览器元数据以及自定义日志。它还会对 DOM 进行插桩,以记录页面上的 HTML 和 CSS,即使是最复杂的单页应用程序,也能重现像素完美的视频。
免费试用。
《React 中的拖放终极指南》一文最先出现在LogRocket 博客上。
文章来源:https://dev.to/bnevilleoneill/the-ultimate-guide-to-drag-and-drop-in-react-5955 后端开发教程 - Java、Spring Boot 实战 - msg200.com


