创造穿越太空的效果
大家好!今天我们将使用 JavaScript 和 Canvas 创建太空旅行的效果。开始吧!
理论
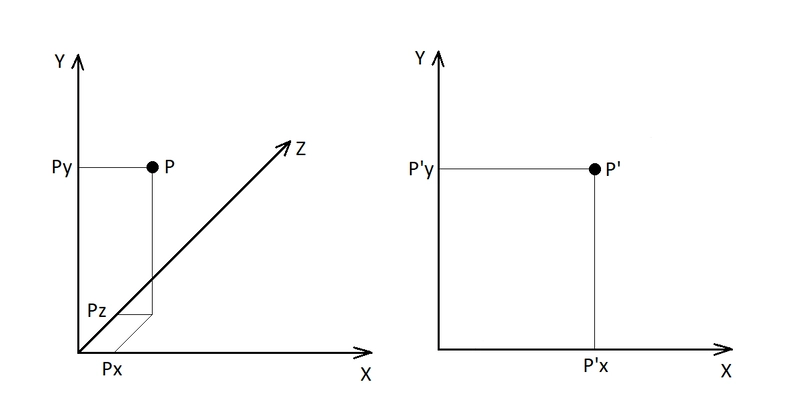
此效果基于最简单的方法,即从三维空间获取点到平面的透视投影。在我们的例子中,我们需要将三维点的 x 和 y 坐标值除以它们与原点的距离:
P'X = Px / Pz
P'Y = Py / Pz
环境设置
让我们定义一个Star用于存储星星状态的类,它有三种主要方法:更新星星的状态、在屏幕上绘制星星以及获取其在 3D 空间中的位置:
class Star {
  constructor() {}

  getPosition() {}

  update() {}

  draw(ctx) {}
}
接下来,我们需要一个类来创建和管理类的实例Star。我们调用它Space并在其构造函数中创建一个对象数组Star,每个对象代表一颗星星:
class Space {
  constructor() {
    this.stars = new Array(STARS).fill(null).map(() => new Star());
  }
}
它还包含三个方法:update、draw 和 run。run 方法会先调用 update 方法,然后使用 draw 方法绘制星形实例,以此来迭代星形实例:
class Space {
  constructor() {
    this.stars = new Array(STARS).fill(null).map(() => new Star());
  }

  update() {
    this.stars.forEach((star) => star.update());
  }

  draw(ctx) {
    this.stars.forEach((star) => star.draw(ctx));
  }

  run(ctx) {
    this.update();
    this.draw(ctx);
  }
}
接下来,我们应该定义一个名为的新类Canvas,它将创建画布元素并调用 Space 类的 run 方法:
class Canvas {
  constructor(id) {
    this.canvas = document.createElement("canvas");

    this.canvas.id = id;
    this.canvas.width = window.innerWidth;
    this.canvas.height = window.innerHeight;

    document.body.appendChild(this.canvas);
    this.ctx = this.canvas.getContext("2d");
  }


  draw() {
    const space = new Space();
    const draw = () => {
      this.ctx.clearRect(0, 0, this.canvas.width, this.canvas.height);
      space.run(this.ctx);
      requestAnimationFrame(draw);
    };
    draw();
  }
}
因此,项目的准备部分已经完成,我们可以开始实现其主要功能。
主要功能
我们需要采取的第一步是定义一个统一函数,该函数在给定的数字范围内生成随机数。为此,我们将创建一个随机对象,并使用 Math.random() 方法在其中实现该函数:
const random = {
  uniform: (min, max) => Math.random() * (max - min) + min,
};
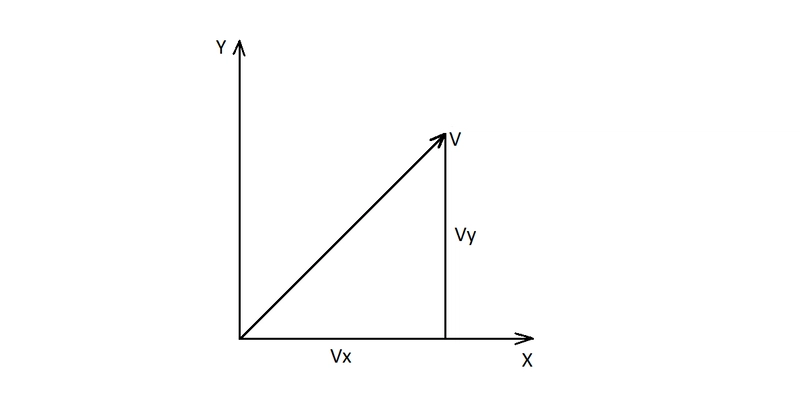
由于 JavaScript 不支持向量操作,我们需要一个类来实现空间向量Vec。什么是向量?向量是描述空间方向的数学对象。向量由构成其分量的数字构成。下图中,您可以看到一个包含两个分量的二维向量:
向量运算
考虑两个向量。针对这两个向量定义了以下基本运算:
加法:V + W = (Vx + Wx, Vy + Wy)
减法:V - W = (Vx - Wx, Vy - Wy)
除法:V / W = (Vx / Wx, Vy / Wy)
缩放:aV = (aVx, aVy)
乘法:V * W = (Vx * Wx, Vy * Wy)
基于这些信息,我们将实现未来需要的向量处理的主要方法:
class Vec {
  constructor(...components) {
    this.components = components;
  }

  add(vec) {
    this.components = this.components.map((c, i) => c + vec.components[i]);
    return this;
  }

  sub(vec) {
    this.components = this.components.map((c, i) => c - vec.components[i]);
    return this;
  }

  div(vec) {
    this.components = this.components.map((c, i) => c / vec.components[i]);
    return this;
  }

  scale(scalar) {
    this.components = this.components.map((c) => c * scalar);
    return this;
  }

  multiply(vec) {
    this.components = this.components.map((c, i) => c * vec.components[i]);
    return this;
  }
}
执行
首先,让我们将屏幕的中心定义为一个二维向量,并为我们的星星设置一组几种颜色:
const CENTER = new Vec(window.innerWidth / 2, window.innerHeight / 2);
const COLORS = ["#FF7900", "#F94E5D", "#CA4B8C"];
并引入常数 Z,它将用于指示恒星开始移动时沿 z 轴的距离:
const Z = 35;
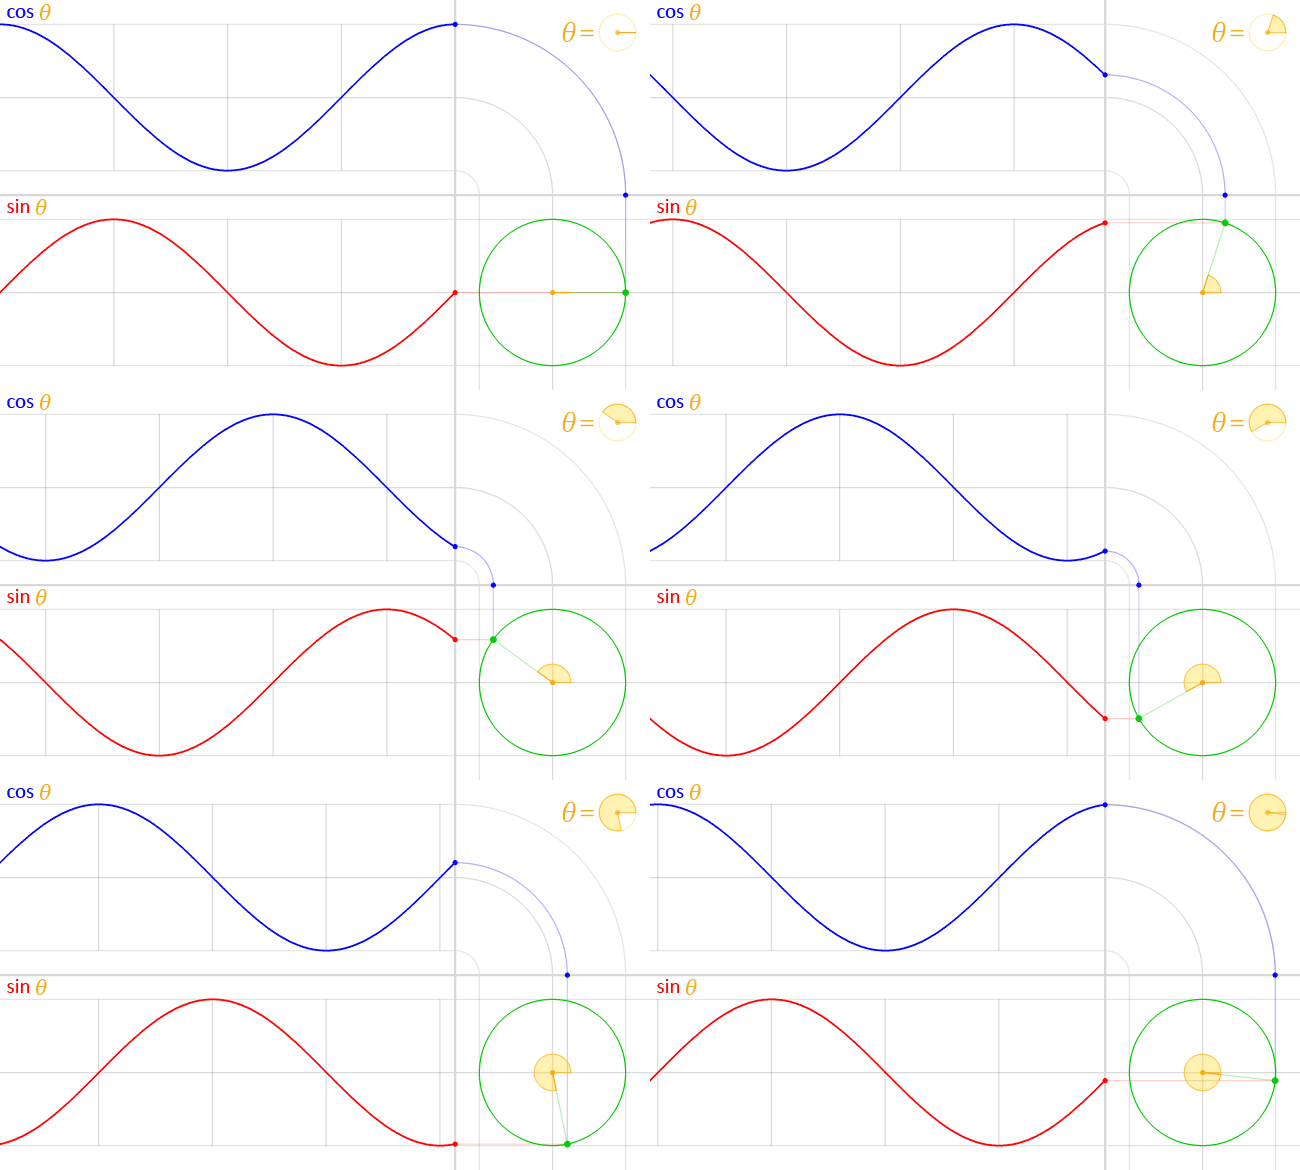
接下来,我们将把三维空间中每颗星星的位置赋给属性。我们将通过实现类中getPosition的方法来实现这一点Star。该方法使用一个半径为随机的单位圆,通过 sin 和 cos 函数生成坐标。这些函数在数学上与单位圆相关;因此它们可以用来表示三维空间中的点。
因此我们得到如下代码:
getPosition() {
  const angle = random.uniform(0, 2 * Math.PI);
  const radius = random.uniform(0, window.innerHeight);

  const x = Math.cos(angle) * radius;
  const y = Math.sin(angle) * radius;

  return new Vec(x, y, Z);
}
现在我们在类构造函数中调用它:
class Star {
  constructor() {
    this.pos = this.getPosition();
  }
}
接下来,在构造函数中,我们设置星星的速度、它在屏幕上的颜色和位置(以二维向量表示)及其大小:
class Star {
  constructor() {
    this.size = 10;
    this.pos = this.getPosition();
    this.screenPos = new Vec(0, 0);
    this.vel = random.uniform(0.05, 0.25);
    this.color = COLORS[Math.floor(Math.random() * COLORS.length)];
  }
}
接下来,我们将以设定的速度沿 Z 轴移动星星,当它达到最小值时,我们将调用 getPosition 方法来随机设置它的新位置:
update() {
  this.pos.components[2] -= this.vel;
  this.pos = this.pos.components[2] < 1 ? this.getPosition() : this.pos;
}
可以通过将 X 和 Y 坐标除以 Z 分量的值来计算屏幕上星星的坐标,同时考虑屏幕的中心:
update() {
  this.pos.components[2] -= this.vel;
  this.pos = this.pos.components[2] < 1 ? this.getPosition() : this.pos;
  this.screenPos = new Vec(this.pos.components[0], this.pos.components[1])
      .div(new Vec(this.pos.components[2], this.pos.components[2]))
      .add(CENTER);
}
接下来,我们将使用 draw 方法在屏幕上显示星星。为此,我们使用 rect 方法:
draw(ctx) {
  ctx.fillStyle = this.color;

  ctx.beginPath();
  ctx.rect(this.screenPos.components[0], this.screenPos.components[1], this.size, this.size);
  ctx.closePath();
  ctx.fill();
}
让我们实时看看星星是如何移动的。正如你所见,星星按预期移动,但它们的大小没有变化:
为了解决这个问题,我们将 Z 常数的值除以星体沿 Z 轴的当前值。结果如下:
如果仔细观察,你会发现较远的星星被绘制在了较近的星星之上。为了解决这个问题,我们将使用所谓的 Z 缓冲区,并按距离对星星进行排序,直到它们被绘制出来。让我们在类的 run 方法中执行此排序Space:
run(ctx) {
  this.update();
  this.stars.sort((a, b) => b.pos.components[2] - a.pos.components[2]);
  this.draw(ctx);
  }
此外,我们将在Star类的 getPosition 方法中引入一个比例因子,通过增加随机半径来缩放我们的可视化效果,从而创建更大的星星:
getPosition(scale = 35) {
  const angle = random.uniform(0, 2 * Math.PI);
  const radius =
      random.uniform(window.innerHeight / scale, window.innerHeight) * scale;

  const x = Math.cos(angle) * radius;
  const y = Math.sin(angle) * radius;

  return new Vec(x, y, Z);
}
并且稍微改变星投影值的函数,使之更合适:
update() {
  this.pos.components[2] -= this.vel;
  this.pos = this.pos.components[2] < 1 ? this.getPosition() : this.pos;
  this.screenPos = new Vec(this.pos.components[0], this.pos.components[1])
      .div(new Vec(this.pos.components[2], this.pos.components[2]))
      .add(CENTER);

  this.size = (Z - this.pos.components[2]) / (this.pos.components[2] * 0.2);
}
由此我们得到一幅完整的空间图景:
另外,我们可以将 XY 平面旋转一个小角度。为此,我们使用 sin 和 cos 计算 x 和 y 的新值:
rotateXY(angle) {
  const x = this.components[0] * Math.cos(angle) - this.components[1] * Math.sin(angle);
  const y = this.components[0] * Math.sin(angle) + this.components[1] * Math.cos(angle);
  this.components[0] = x;
  this.components[1] = y;
}
并在类的更新方法中调用此方法Star:
update() {
  this.pos.components[2] -= this.vel;
  this.pos = this.pos.components[2] < 1 ? this.getPosition() : this.pos;
  this.screenPos = new Vec(this.pos.components[0], this.pos.components[1])
      .div(new Vec(this.pos.components[2], this.pos.components[2]))
      .add(CENTER);

  this.size = (Z - this.pos.components[2]) / (this.pos.components[2] * 0.2);
  this.pos.rotateXY(0.003);
}
结果,我们得到如下图片:
而且,如果我们稍微改变初始参数,并以不同的方式计算随机半径,就能得到穿过隧道的效果:
结论
我们创建了空间运动的可视化,并学习了如何进行这种可视化。
其他资源
Jony Hayama为模拟创建了 UI,因此如果您想更方便地使用变量,请查看此链接 - https://jony.dev/traveling-through-space/
文章来源:https://dev.to/eyudinkov/creating-the-effect-of-traveling-through-space-mfg 后端开发教程 - Java、Spring Boot 实战 - msg200.com


