🌍🚀🎯 从本地主机到云端☁️:Next.js、Django、SSL🔒、GitHub Actions🚀、DNS| 终极网站部署教程🌟🔥✨

一个小请求
我正在努力为“ Bose ”争取 1000 个 GitHub 星标。Bose 是一个开源机器人开发框架,我刚刚上线,旨在帮助用户轻松创建基于 Selenium 的高级机器人。
您能帮忙点赞一下这个 GitHub 仓库吗?这对我们帮助很大!谢谢!https://github.com/omkarcloud/bose
介绍
想象一下:📸 你开发了一个令人惊叹的网站,现在是时候让它面向全世界开放了。但部署过程似乎很艰巨,对吧?😰
不用担心,因为 Kubernetes 可以帮您解决这一难题。🦸♂️ 凭借其强大的功能和智能容器管理,Kubernetes 消除了网站部署的复杂性。
在本教程中,我们将揭开 Kubernetes 的神秘面纱,并指导您轻松完成网站部署。准备好解锁 Kubernetes 的魔力,见证您的网站在云端蓬勃发展。✨🌐
我们将做什么
我们将指导您完成将网站从本地主机本地运行部署到云端的过程。
该网站将是一个全栈网站,具有前端和后端,并通过 SSL 提供 SQLite 数据库。
我们还将创建一个 CI 管道,以将提交的代码部署到主分支。
为了实现此目的,我们将执行以下步骤:
- 将 Next.js 前端和 Django 后端 Docker 化。
- 为前端和后端服务器编写 Kubernetes 清单,包括 Django SQLite 数据库的持久卷以及使用 Cert Manager 获取 SSL 证书。
- 在 GCP 中创建 Kubernetes 集群。
- 配置域的 DNS。
- 编写 GitHub Actions YAML 来构建应用程序并将其部署到 GCP。
- 将代码推送到 GitHub 进行部署。
本教程涉及多种技术,如果您遇到任何不熟悉的概念,请不要担心。随着您学习本教程的进度,您将更好地理解每种技术及其在部署过程中的作用。
先决条件
要成功完成本教程,您需要:
- GCP 帐户
- 域名
如果您还没有购买域名,我建议您使用 Namecheap,因为我亲自使用过它们并且体验良好。
我强烈建议您在自行部署之前先阅读本教程 2-3 遍。
Docker化
对于本教程,已创建由两个文件夹组成的存储库:frontend和backend。
该frontend文件夹包含基于 Next.js 的应用程序的代码,而该backend文件夹包含基于 Django 的应用程序的代码。
首先,您需要克隆启动代码:
git clone https://github.com/omkarcloud/kubernetes-website-deployment-tutorial-starter
通过运行以下命令在 Visual Studio Code 中打开项目:
code kubernetes-website-deployment-tutorial-starter/
Docker化前端
要将使用 Next.js 构建的前端代码 Docker 化,请在 frontend 文件夹中创建一个包含以下内容的 Dockerfile:
frontend/Dockerfile
FROM node:16-alpine

COPY package.json .
RUN rm -rf node_modules/ .next/* && npm install --legacy-peer-deps
COPY . .

RUN npm run build

CMD ["npm", "run", "start"]
此外,通过运行以下命令在前端文件夹中创建一个与 .gitignore 内容相同的 .dockerignore 文件:
cp frontend/.gitignore frontend/.dockerignore
Docker 化后端
Dockerfile现在,让我们通过在文件夹中创建backend以下内容来Dockerize 基于 Django 的后端代码:
backend/Dockerfile
FROM python:3.9
ENV PYTHONBUFFERED 1

COPY requirements.txt .
RUN python -m pip install -r requirements.txt

RUN mkdir app
WORKDIR /app
COPY . /app

CMD gunicorn --workers 3 -b 0.0.0.0:8000 config.wsgi
接下来,通过运行以下命令在后端文件夹中创建一个与 .gitignore 内容相同的 .dockerignore 文件:
cp backend/.gitignore backend/.dockerignore
为后端创建 PVC
为了确保 Django 应用程序中使用的 SQLite 数据库文件的持久性,让我们通过创建具有以下内容的pvc.yaml文件来创建持久卷声明 (PVC) ,该文件在 GCP 中提供 4GB 的存储空间:k8s/volumes/
k8s/volumes/pvc.yaml
apiVersion: v1
kind: PersistentVolumeClaim
metadata:
  name: csi-pvc
spec:
  accessModes:
    - ReadWriteOnce
  resources:
    requests:
      storage: 4Gi
  storageClassName: standard-rwo
为后端和前端创建服务
为了使后端和前端 pod 在集群内可访问,请创建以下清单文件:
- 后端部署(
k8s/app/backend-depl.yaml):```yaml
apiVersion:apps/v1
kind:Deployment
metadata:
name:backend-depl
spec:
replicas:1
selector:
matchLabels:
app:backend
template:
metadata:
labels:
app:backend
spec:
volumes:
-name:app-data
persistentVolumeClaim:
claimName:csi-pvc
container:
-name:backend
image:placeholder/backend:1.0.5volumeMounts
:
-mountPath:/app-data
名称:应用数据
apiVersion:v1
类型:服务
元数据:
名称:backend-srv
规范:
选择器:
应用程序:后端
端口:
-名称:后端
协议:TCP
端口:8000
目标端口:8000
2.  Frontend Deployment (`k8s/app/frontend-depl.yaml`):
```yaml


apiVersion: apps/v1
kind: Deployment
metadata:
  name: frontend-depl
spec:
  replicas: 1
  selector:
    matchLabels:
      app: frontend
  template:
    metadata:
      labels:
        app: frontend
    spec:
      containers:
        - name: frontend
          resources:
            requests:
              ephemeral-storage: "800Mi"
            limits:
              ephemeral-storage: "800Mi"
          image: placeholder/frontend:1.0.4
---
apiVersion: v1
kind: Service
metadata:
  name: frontend-srv
spec:
  selector:
    app: frontend
  ports:
    - name: frontend
      protocol: TCP
      port: 3000
      targetPort: 3000
创建负载均衡器
要通过服务公开我们的 Pod,我们需要创建一个 Ingress 资源。创建一个名为ingress.yamlin的文件k8s/app/,内容如下,将“ www.your-domain.com ”替换为您的域名:
k8s/app/ingress.yaml
apiVersion: networking.k8s.io/v1
kind: Ingress
metadata:
  name: ingress-service
  annotations:
    kubernetes.io/ingress.class: nginx
    cert-manager.io/issuer: "letsencrypt-prod"
    nginx.ingress.kubernetes.io/proxy-body-size: 80m
    nginx.ingress.kubernetes.io/proxy-connect-timeout: "30"
    nginx.ingress.kubernetes.io/proxy-send-timeout: "600"
    nginx.ingress.kubernetes.io/proxy-read-timeout: "600"
spec:
  rules:
    - host: "www.your-domain.com"
      http:
        paths:
          - path: /backend
            pathType: Prefix
            backend:
              service:
                name: backend-srv
                port:
                  number: 8000
          - path: /
            pathType: Prefix
            backend:
              service:
                name: frontend-srv
                port:
                  number: 3000

  tls:
    - hosts:
        - "www.your-domain.com"
      secretName: ssl-certificate
获取 SSL 证书
要为您的域获取 SSL 证书,您可以创建一个名为certificates.yaml该k8s/certificates目录的 YAML 文件。
替换www.your-domain.com为您的实际域名,并可选择替换youremail@gmail.com为您的电子邮件地址,以接收来自 Let's Encrypt(我们的 SSL 提供商)的 SSL 相关电子邮件。
k8s/certificates/certificates.yaml
apiVersion: cert-manager.io/v1
kind: Issuer
metadata:
  name: letsencrypt-prod
spec:
  acme:
    server: https://acme-v02.api.letsencrypt.org/directory
    email: youremail@gmail.com
    privateKeySecretRef:
      name: letsencrypt-prod
    solvers:
      - http01:
          ingress:
            class: nginx
        selector:
          dnsNames:
            - "www.your-domain.com"
创建 Github Actions
为了在每次提交到主分支时自动执行应用程序的部署过程,您可以使用 GitHub Actions。
以下工作流程定义了使用 Google Cloud Platform (GCP) 进行身份验证、构建 Docker 镜像、将其推送到 Google Container Registry 以及将应用程序部署到 Google Kubernetes Engine (GKE) 集群的必要步骤。
请注意,部署包括删除以前的后端部署,这将导致每当您通过推送到 Github 部署代码时出现 4 到 5 分钟的暂时停机时间。
我们还利用各种 Google Cloud Platform (GCP) 环境变量进行部署,稍后我们会将这些变量安全地存储在我们的 GitHub 存储库的机密中。
要使用此工作流程,请deploy.yaml在.github/workflows目录中创建一个名为的文件。以下是该文件的内容deploy.yaml:
.github/workflows/deploy.yaml
name: Build and Deploy to GKE

on:
  push:
    branches:
      - master

env:
  PROJECT_ID: ${{ secrets.GKE_PROJECT }}
  GKE_CLUSTER: my-application-cluster
  GKE_PROJECT: ${{ secrets.GKE_PROJECT }}
  GKE_CLUSTER_NAME: my-application-cluster
  GKE_ZONE: asia-south1-a
  GKE_EMAIL: ${{ secrets.GKE_EMAIL }}
  GKE_KEY: ${{ secrets.GKE_KEY }}
  GITHUB_SHA: ${{ github.sha }}
  ACTIONS_ALLOW_UNSECURE_COMMANDS: "true"
  USE_GKE_GCLOUD_AUTH_PLUGIN: "True"

jobs:
  setup-build-publish-deploy:
    name: Setup, Build, Publish, and Deploy
    runs-on: ubuntu-latest
    environment: production
    permissions:
      contents: 'read'
      id-token: 'write'

    steps:
      - name: Checkout
        uses: actions/checkout@v3

      - name: Set Images as enviroment variables
        run: |
          echo "FRONTEND=$(echo "gcr.io/""$GKE_PROJECT""/frontend:""$GITHUB_SHA")" >> $GITHUB_ENV
          echo "BACKEND=$(echo "gcr.io/""$GKE_PROJECT""/backend:""$GITHUB_SHA")" >> $GITHUB_ENV

      - name: update images
        run: |
          FRONTEND_ESCAPE=$(printf '%s\n' "$FRONTEND" | sed -e 's/[\/&]/\\&/g')
          sed -i -e 's/placeholder\/frontend:1.0.4/'"$FRONTEND_ESCAPE"'/g' frontend-depl.yaml
          cat frontend-depl.yaml
          BACKEND_ESCAPE=$(printf '%s\n' "$BACKEND" | sed -e 's/[\/&]/\\&/g')
          sed -i -e 's/placeholder\/backend:1.0.5/'"$BACKEND_ESCAPE"'/g' backend-depl.yaml
          cat backend-depl.yaml
        working-directory: k8s/app

      - id: 'auth'
        uses: 'google-github-actions/auth@v1'
        with:
          credentials_json: '${{ secrets.GCP_CREDENTIALS }}'

      - name: Set up Cloud SDK
        uses: google-github-actions/setup-gcloud@v1

      - name: Install Gke
        run: |
          gcloud components install gke-gcloud-auth-plugin

      - name: Cluster Login
        run: |
          gcloud container clusters get-credentials $GKE_CLUSTER_NAME --zone $GKE_ZONE --project $GKE_PROJECT

      - name: Configure Docker
        run: gcloud --quiet auth configure-docker

      - run: docker build --tag "$FRONTEND" .
        working-directory: frontend

      - run: docker build --tag "$BACKEND" .
        working-directory: backend

      - name: Push Images
        run: |
          docker push "$FRONTEND"
          docker push "$BACKEND"

      - name: Deploy
        run: |
          kubectl delete deployment backend-depl || true
          kubectl apply --recursive -f k8s/
          deploy=$(kubectl get deploy -o name) &&  for i in $deploy; do kubectl rollout status $i -w --timeout=30s; done || true
          kubectl get pods
GCP 设置
现在,我们将设置 GCP 集群。
我会告诉您何时需要更改一些变量。请仅修改我指定的变量,并保持其他变量不变,例如集群名称和区域等。
由于它们是硬编码的,并且将在本教程的命令中多次使用。一旦您熟悉了本教程,请根据您的喜好随意重命名它们。
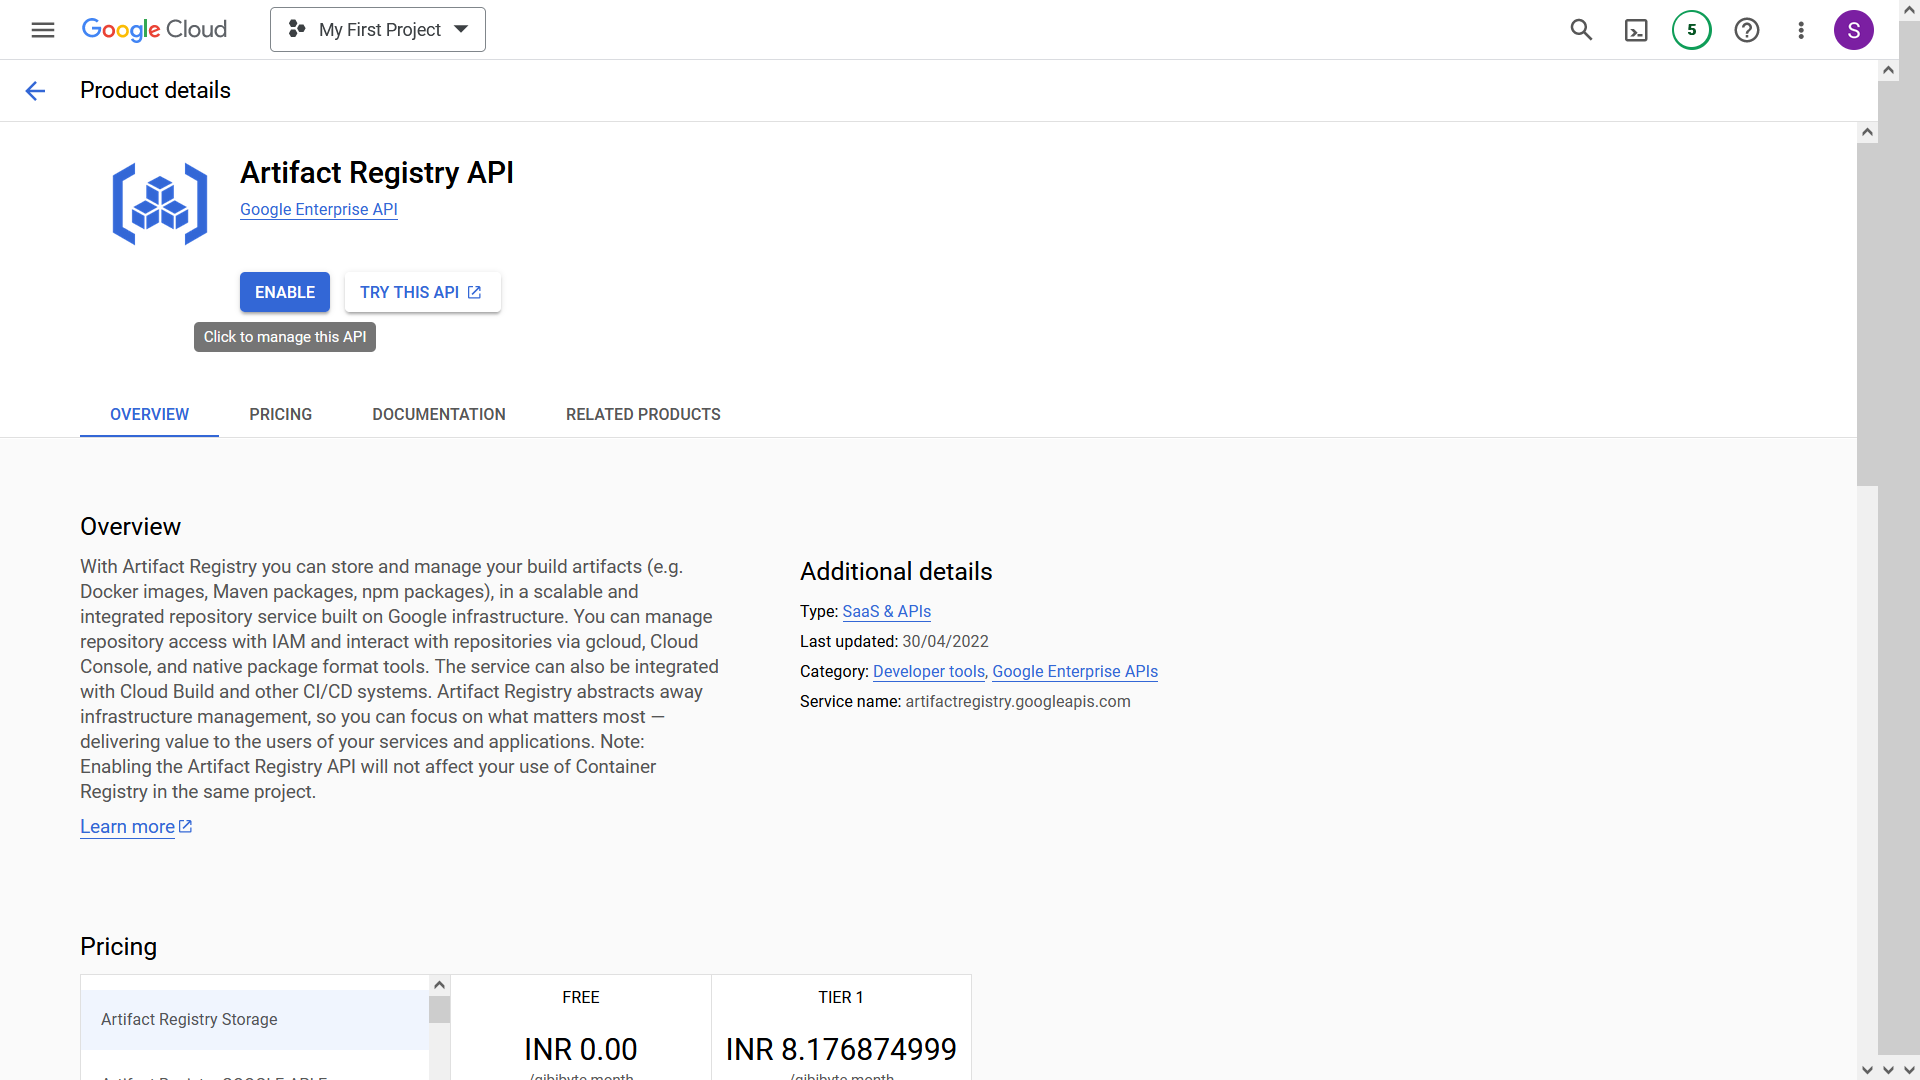
- 为您的项目启用以下 API 来创建 GKE 集群:```bash
Artifact Registry:https://console.cloud.google.com/marketplace/product/google/artifactregistry.googleapis.com
Kubernetes Engine:https://console.cloud.google.com/marketplace/product/google/container.googleapis.com
Compute Engine:https: //console.cloud.google.com/marketplace/product/google-cloud-platform/compute-engine
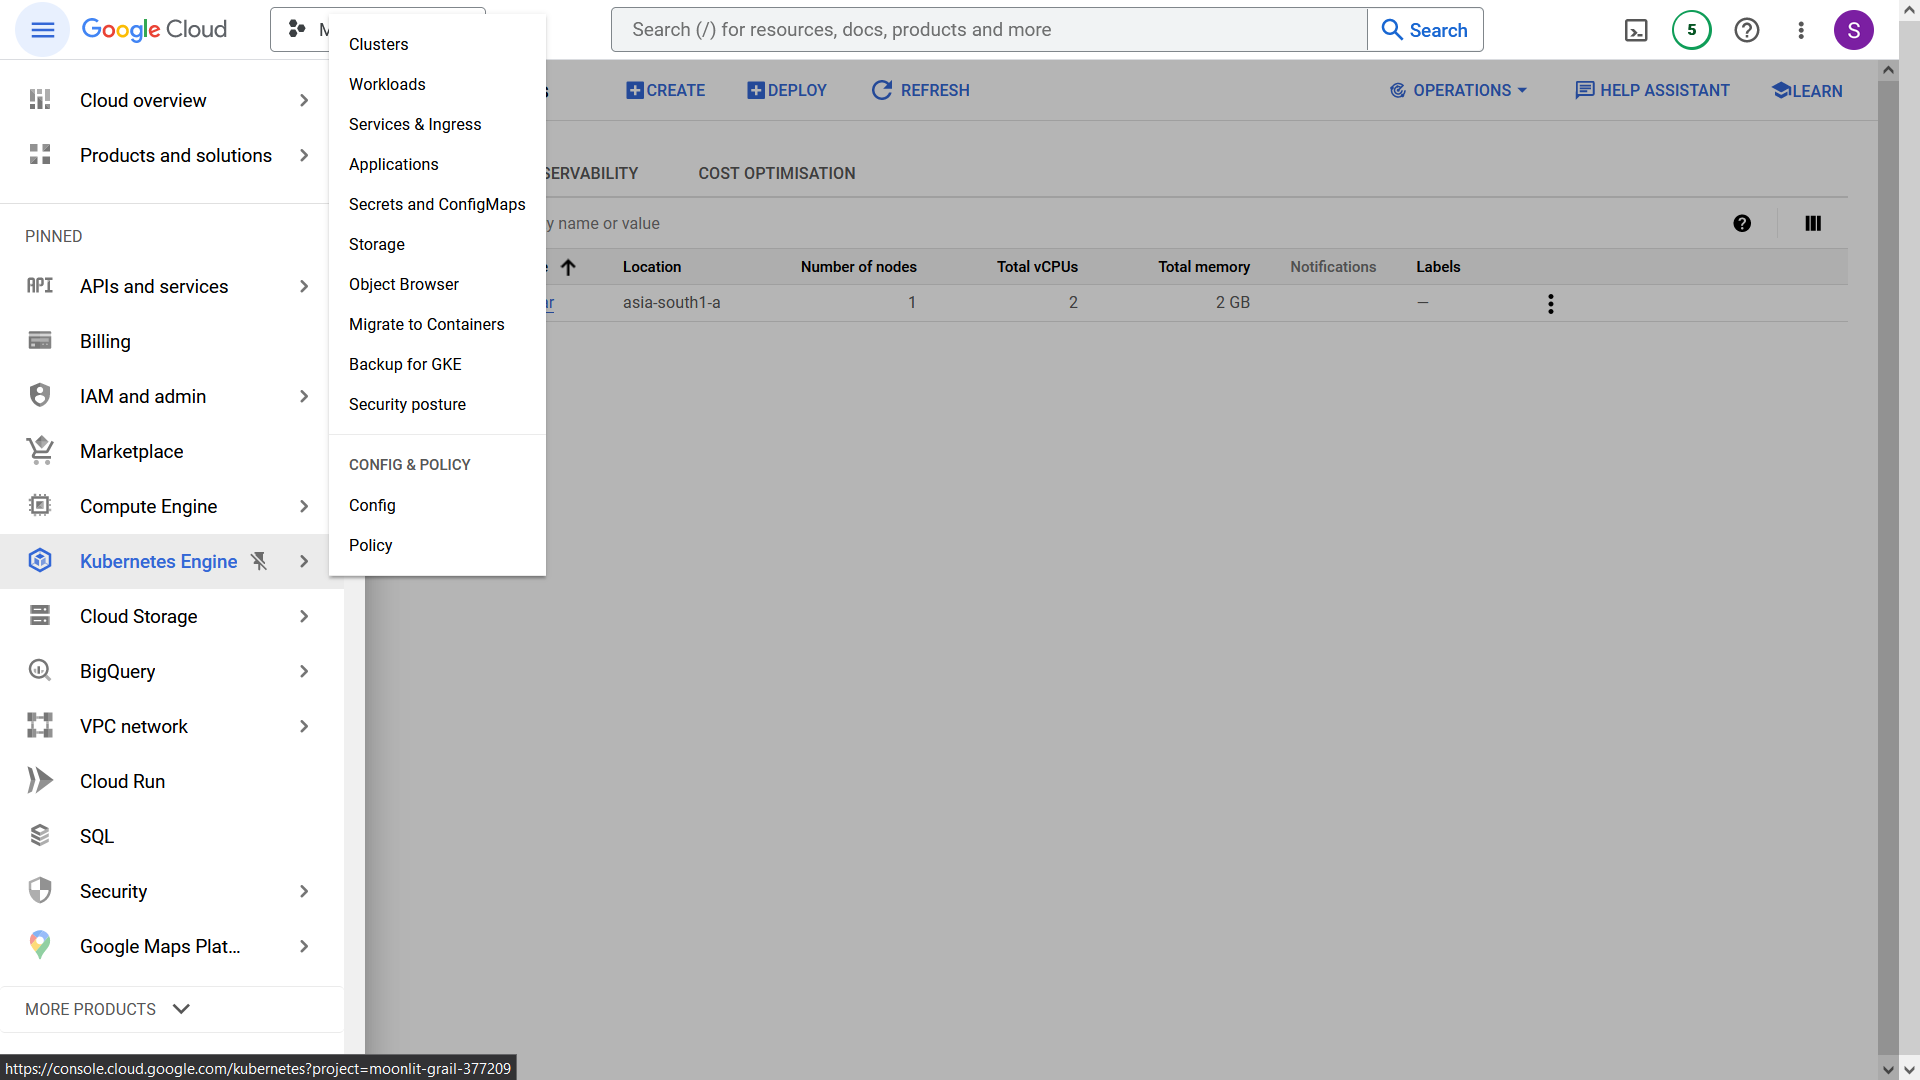
2. In the sidebar, click on the "Kubernetes Engine" button.
3. Click on the "Create" button to create a new cluster. Configure the "Standard Mode" Cluster, as it is more cost-effective.
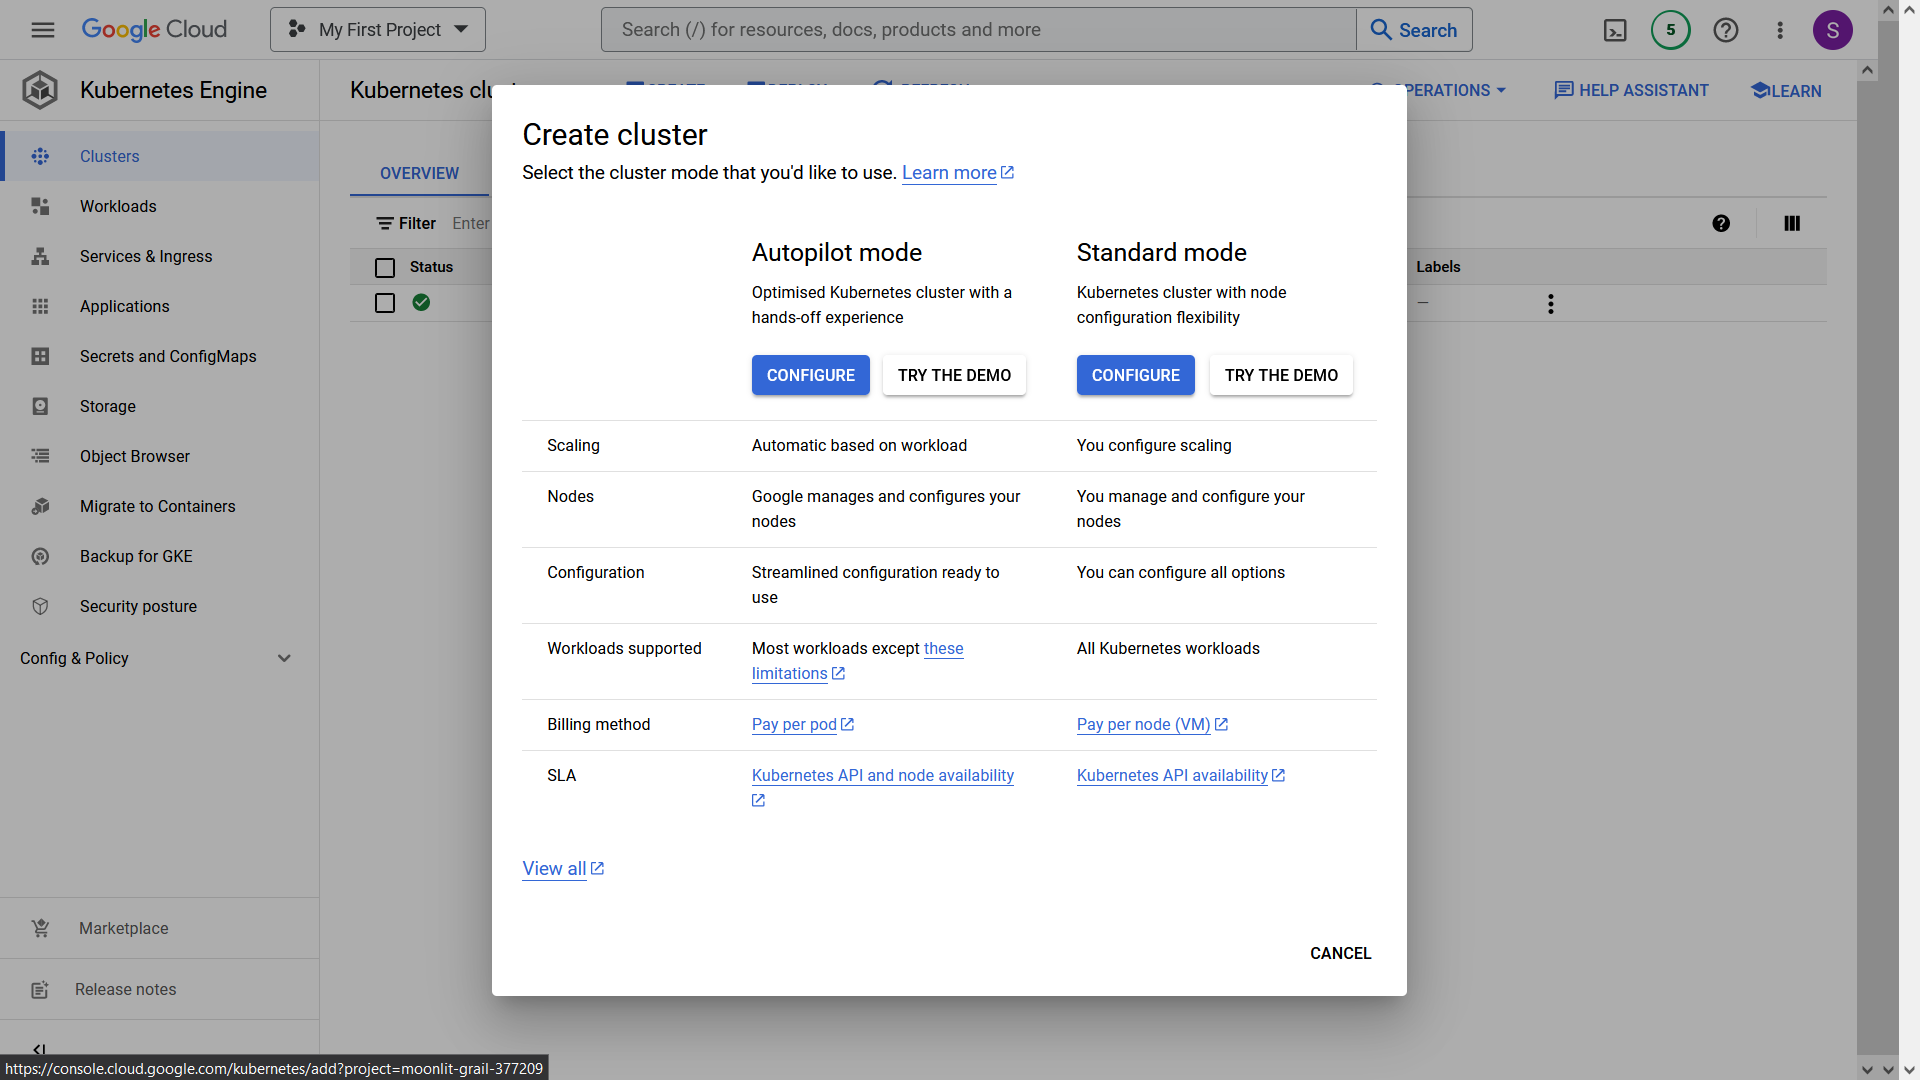
4. Provide the following details for the cluster:
```bash
Cluster Name: my-application-cluster
Location Type: zonal
Zone: asia-south1-a

- 在侧边栏中,选择“default-pool”,并将节点数更改为 1 而不是 3,以节省成本。

- 在侧边栏中,选择“节点”并使用以下设置来节省成本:
Machine Type: e2-small
Boot Disk Size: 20 GB

预计费用约为 90 美元。如果这是您在 GCP 中的第一个集群,则 1 个月的折扣后费用约为 27 美元(第一个集群可享受 73 美元的折扣)。
-
点击“创建”按钮,大约5-6分钟即可创建集群。
-
单击右上角的 shell 图标打开 GCP Shell。

- 通过运行以下命令在您的集群中进行身份验证。将“clear-world-31478”替换为您的 GCP 项目名称。
gcloud container clusters get-credentials my-application-cluster --zone asia-south1-a --project clear-world-31478
- 通过运行以下命令创建 IP 地址:```bash
gcloud 计算地址创建 my-application-cluster-ip --region asia-south1
11. Note the created IP address by running the command:

```bash


gcloud compute addresses describe my-application-cluster-ip --region asia-south1
- 在您的域名服务 (DNS) 提供商(例如 Namecheap)中,添加以下记录。将“31.91.11.253”替换为上一步获得的 IP 地址。
A @ 31.91.11.253
A www 31.91.11.253
确保将 TTL(生存时间)设置为尽可能低的值,例如 1 分钟,以允许快速 DNS 传播。
如果您使用 Namecheap,请选择 1 分钟 TTL 选项,这将需要 1 分钟来传播 DNS 更改。
- 执行以下命令安装
ingress-nginx并cert-manager获取执行负载均衡所需的 SSL 证书。在以下命令中,将 31.91.11.253 替换为您之前创建的 IP 地址。
helm repo add ingress-nginx https://kubernetes.github.io/ingress-nginx
helm upgrade --install ingress-nginx-chart ingress-nginx/ingress-nginx --set controller.service.loadBalancerIP=31.91.11.253 --set controller.service.externalTrafficPolicy=Local

helm repo add jetstack https://charts.jetstack.io
helm repo update
kubectl apply -f https://github.com/cert-manager/cert-manager/releases/download/v1.8.0/cert-manager.crds.yaml
helm install cert-manager jetstack/cert-manager --namespace cert-manager --create-namespace --version v1.8.0
Github 设置
这是最后一步,我们将为部署工作流程配置 GitHub Secrets 并推送代码。
-
创建 Github 存储库
-
访问https://console.cloud.google.com/iam-admin/serviceaccounts创建服务帐户 JSON 文件。该服务帐户将拥有 Google Cloud (GCP) 中所有资源(所有者)的完全访问权限。请妥善保管此 JSON 文件,因为部署到 Google Kubernetes Engine (GKE) 时需要用到它。将文件保存为 account.json。

- 通过转到存储库 GitHub 设置 > 机密 > 操作并创建具有以下名称和值的三个机密来创建在工作流中使用的 Github 机密:```
GKE_PROJECT="clear-world-31478"
GKE_EMAIL=" owner-709@project.iam.gserviceaccount.com "
GKE_KEY="JodHRWCzov...L3D3dy5n"
Here,
  - `GKE_PROJECT` is your project name.
  - `GKE_EMAIL` is email located in the `account.json` file.
  - `GKE_KEY` is your service account encoded as base64. You can obtain it by running `cat account.json | base64`.

4. Now, push the code to the repository. Once pushed, the site will be ready 4-5 minutes after the GitHub Action is completed. It takes 4-5 minutes as it will obtain SSL certificates etc.

You can view status of your actions by visiting Action Tabs of your Github Repository.

After Action is Completed, you can access the website at your domain.

## Delete the Resources

Remember to delete the GCP resources to avoid incurring charges. Follow these steps to delete the GCP resources:

1. Delete the created IP address by running the following command. In this command, replace "clear-world-31478" with your GCP project name.
gcloud 计算地址删除我的应用程序集群 ip --region asia-south1 --project clear-world-31478
2. Use the GKE Dashboard to delete the cluster using the graphical user interface.


## FAQ

**Q: How can I connect PostgreSQL to Django in Kubernetes?**

A: If you are just starting out, I highly recommend using SQLite to save both money and development time. However, if you prefer to use PostgreSQL, you can follow the tutorial at https://cloud.google.com/python/django/kubernetes-engine.


**Q: Where is the final Code?**

A: You can find the final code at https://github.com/omkarcloud/kubernetes-website-deployment-tutorial-finished.


## Final Words

Congratulations on successfully deploying your website! You have accomplished website deployment with SSL, DNS, GitHub Actions, etc.

If you have any questions, feel free to ask them in the comments.

---

Also, this article is licensed under MIT, so you are free to use it as you wish.

If you are a YouTuber, I encourage you to create a video of this article on your channel. By doing so, you can potentially help thousands of developers solve their deployment problems and earn great amounts of punya. Additionally, you can send me your Video URL and I will feature your video at the top of the article, boosting its views.

---
Did you enjoy this article or need an experienced Kubernetes Developer for a remote contract-based role? Feel free to contact me.

[WhatsApp](https://www.omkar.cloud/l/whatsapp)

<!--
Some of my brilliant Creations, that you don’t want to miss out are:

1.  Bose Framework: An Open Source Framework that is Swiss Army Knife for Selenium. Read the docs at https://www.omkar.cloud/bose/

2.  Free Tools: Simplify your daily tasks with the Free Omkar Tools, an all-in-one dashboard that offers a range of free utilities. Whether it's formatting JSON, comparing text, or testing RegExp, these tools have got you covered. Say goodbye to unreliable websites and use it at https://www.omkar.cloud/tools/.

3.  Omkar Cloud: My Samurai Lead Generation Software allows you to access over 200M+ LinkedIn leads, enabling you to win clients. It's like Sales Navigator with superpowers. You can use it at https://www.omkar.cloud/.

4.  Omkar Cloud Datasets: Enhance your analysis with meticulously scraped datasets from Stack Overflow, G2, and many more reputable sources. These fresh datasets are readily available for your data analysis at https://www.omkar.cloud/datasets/.

5.  Kubernetes Consultation: Take your DevOps practices to the next level with our team of Ninja Developers. Through our Kubernetes Consultation service, we can help you turbocharge your DevOps processes and enable you to move at the speed of light. Whatsapp us for a consultation at .

-->

Dhanyawad 🙏! Vande Mataram!