如何创建和发布 npm 模块
介绍
在本教程中,您将创建自己的 npm 包并将其发布到 npm 存储库。
通过这样做,您将了解:
- 如何创建 npm 包
- 如何在发布之前在本地安装以测试其功能
- 如何使用 ES6 import 语法或 Node.js require 语句安装和使用已发布的包
- 如何管理包的语义版本
- 如何使用新版本更新软件包并再次发布
准确地说,您将构建一个包,它将返回指定用户名的 GitHub 存储库列表,并按每个存储库的星号排序。
先决条件
您需要以下内容来完成本教程:
- Git 版本控制的有效安装
- Node.js 已在本地安装,您可以按照本页的说明进行操作
本教程已使用 Node v13.14.0、npm v6.14.4 和 axios v0.20.0 进行验证
步骤 1 — 初始设置
创建一个名为的新文件夹github-repos-search并初始化一个package.json文件
mkdir github-repos-search
cd github-repos-search
npm init -y
通过从文件夹运行以下命令将当前项目初始化为 git 存储库github-repos-search:
git init .
创建一个.gitignore文件来排除该文件夹。在文件node_modules中添加以下内容.gitignore
node_modules
安装axios将用于调用 GitHub API 的包。
npm install axios@0.20.0
你的package.json遗嘱现在看起来是这样的:
{
  "name": "github-repos-search",
  "version": "1.0.0",
  "description": "",
  "main": "index.js",
  "dependencies": {
    "axios": "^0.20.0"
  },
  "devDependencies": {},
  "scripts": {
    "test": "echo \"Error: no test specified\" && exit 1"
  },
  "keywords": [],
  "author": "",
  "license": "ISC"
}
在文件中
package.json,name 的值为github-repos-search。因此,发布到 npm 仓库后的包名称将变为github-repos-search。此外,该名称在 npm 仓库中必须是唯一的,因此首先请通过 来检查该 npm 仓库是否已存在https://www.npmjs.com/package/<your_repository_name_from_package_json>。否则,如果该名称已存在,则在将包发布到 npm 仓库时会出错。
第 2 步 — 编写代码
创建一个名为的新文件index.js并在其中添加以下内容:
const axios = require('axios');
const getRepos = async ({
  username = 'myogeshchavan97',
  page = 1,
  per_page = 30
} = {}) => {
  try {
    const repos = await axios.get(
      `https://api.github.com/users/${username}/repos?page=${page}&per_page=${per_page}&sort=updated`
    );
    return repos.data
      .map((repo) => {
        return {
          name: repo.name,
          url: repo.html_url,
          description: repo.description,
          stars: repo.stargazers_count
        };
      })
      .sort((first, second) => second.stars - first.stars);
  } catch (error) {
    return [];
  }
};

getRepos().then((repositories) => console.log(repositories));
我们先来了解一下代码。
- 您已经创建了一个接受具有、和属性
getRepos的可选对象的函数。usernamepageper_page - 然后使用对象解构语法从对象中获取这些属性。
- 将对象传递给函数是可选的,因此如果对象未传递给函数,我们将其初始化为默认值,如下所示:
{
  username = 'myogeshchavan97',
  page = 1,
  per_page = 30
} = {}
- 赋值空对象的原因是为了避免在对象未传递
{}时解构时出错。查看我之前的文章,详细了解解构。username - 然后在函数内部,通过传递所需的参数来调用 GitHub API,以获取按更新日期排序的指定用户的存储库。
const repos = await axios.get(
      `https://api.github.com/users/${username}/repos?page=${page}&per_page=${per_page}&sort=updated`
    );
- 在这里,您使用 async/await 语法,因此该
getRepos函数被声明为异步。 map然后使用 Array方法从响应中仅选择必需的字段
repos.data
  .map((repo) => {
    return {
      name: repo.name,
      url: repo.html_url,
      description: repo.description,
      stars: repo.stargazers_count
    };
  })
然后按星级降序对结果进行排序,因此列表中的第一个元素将具有最高的星级
.sort((first, second) => second.stars - first.stars);
- 如果有任何错误,您将在 catch 块中返回一个空数组。
- 由于该
getRepos函数被声明为async,您将得到一个承诺,因此您可以使用.then处理程序来获取函数调用的结果getRepos并打印到控制台。
getRepos().then((repositories) => console.log(repositories));
步骤 3 — 执行代码
现在,通过从命令行执行以下命令来运行 index.js 文件:
node index.js
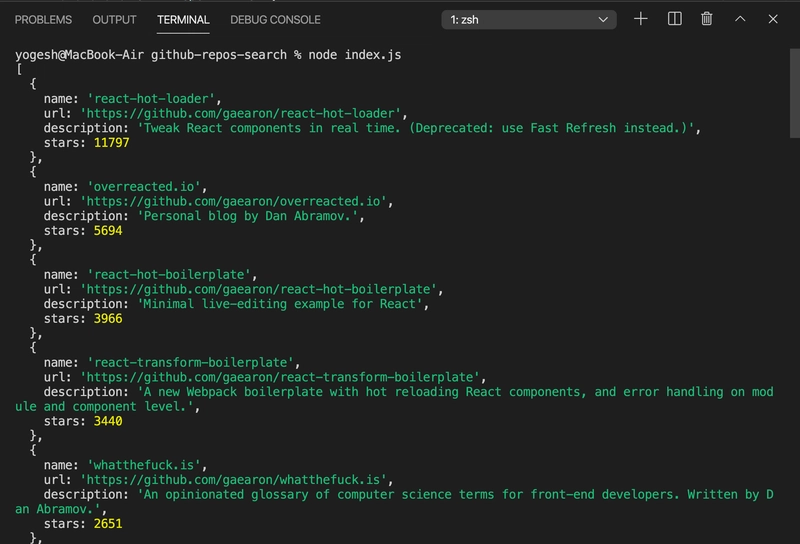
您将看到包含前 30 个存储库的以下输出:
在文件中,您没有提供用户名,因此默认显示我的存储库。
让我们将其更改为以下代码:
getRepos({
  username: 'gaearon'
}).then((repositories) => console.log(repositories));
通过执行命令再次运行该文件node index.js,您将看到以下输出:
您可以选择传递page和per_page属性来更改响应以获取前 50 个存储库。
getRepos({
  username: 'gaearon',
  page: 1,
  per_page: 50
}).then((repositories) => console.log(repositories));
现在,您知道该功能已正常运行。让我们导出此模块,以便您可以getRepos从任何其他文件调用此方法。
因此从文件中删除以下代码
getRepos({
  username: 'gaearon',
  page: 1,
  per_page: 50
}).then((repositories) => console.log(repositories));
并添加以下行
module.exports = { getRepos };
在这里,您将getRepos函数作为对象的属性导出,因此以后如果您想导出任何其他函数,您可以轻松地将其添加到对象中。
所以上面这行代码等同于
module.exports = { getRepos: getRepos };
步骤 4 — 使用 require 语句测试创建的 npm 包
现在,您已完成 npm 包的创建,但在将其发布到 npm 存储库之前,您需要确保在使用require或import语句时它能够正常工作。
有一个简单的方法可以检查这一点。在文件夹内部的命令行中执行以下命令github-repos-search:
npm link
执行npm link命令会在全局 npm 文件夹内为当前包创建一个符号链接node_modules(与安装全局 npm 依赖项的文件夹相同)
所以现在您可以在任何项目中使用您创建的 npm 包。
现在,在您的桌面上创建一个新文件夹,例如,使用任意名称test-repos-library-node并初始化一个package.json文件,以便您可以确认该包已正确安装:
cd ~/Desktop
mkdir test-repos-library-node
cd test-repos-library-node
npm init -y
如果您还记得的话,我们的包文件中的名称属性package.json是github-repos-search这样的,所以您需要使用相同的名称来要求包。
现在,从文件夹内部执行以下命令test-repos-library-node以使用您创建的包:
npm link github-repos-search
创建一个名为的新文件index.js并在其中添加以下代码:
const { getRepos } = require('github-repos-search');

getRepos().then((repositories) => console.log(repositories));
在这里,您已直接从文件夹导入了包node_modules(这仅仅是因为您使用 npm link 链接了它才成为可能)
现在,通过从命令行执行来运行该文件:
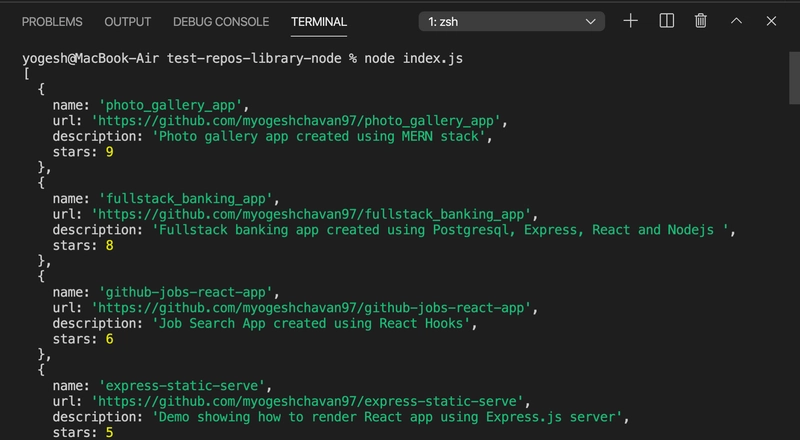
node index.js
您将看到显示正确的输出:
这证明当你在 npm 存储库上发布 npm 包时,任何人都可以通过安装它并使用 require 语句来使用它。
步骤 5 — 使用 import 语句测试创建的 npm 包
您已使用 require 语句验证了包的有效性。让我们使用 ES6 import 语句来验证一下。
通过从桌面文件夹执行以下命令来创建一个新的 React 项目:
cd ~/Desktop
npx create-react-app test-repos-library-react
现在,从文件夹内部执行以下命令test-repos-library-react以使用您创建的包:
npm link github-repos-search
现在,打开src/App.s文件并将其替换为以下内容:
import { getRepos } from 'github-repos-search';
import React from 'react';
import './App.css';

function App() {
  getRepos().then((repositories) => console.log(repositories));

  return (
    <div className="App">
      <h2>Open browser console to see the output.</h2>
    </div>
  );
}
export default App;
通过从终端执行以下命令来启动 React 应用程序:
yarn start
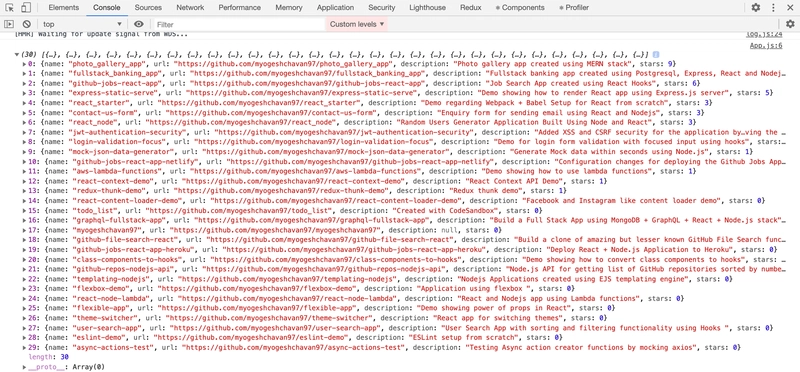
如果您检查浏览器控制台,您将看到预期的输出:
这证明当你在 npm 存储库上发布 npm 包时,任何人都可以通过安装它并使用 import 语句来使用它。
第 6 步 — 发布到 npm 仓库
现在,您已验证该包运行正常。
是时候将其发布到 npm 仓库了。
切换回github-repos-search创建 npm 包的项目文件夹。
让我们在package.json文件中添加一些元数据来显示有关包的更多信息
这是最终package.json文件:
{
  "name": "github-repos-search",
  "version": "1.0.0",
  "description": "",
  "main": "index.js",
  "homepage": "https://github.com/myogeshchavan97/github-repos-search",
  "repository": {
    "type": "git",
    "url": "git+https://github.com/myogeshchavan97/github-repos-search.git"
  },
  "dependencies": {
    "axios": "^0.20.0"
  },
  "devDependencies": {},
  "scripts": {
    "test": "echo \"Error: no test specified\" && exit 1"
  },
  "keywords": [
    "github",
    "repos",
    "repositories",
    "sort",
    "stars"
  ],
  "author": "Yogesh Chavan <myogeshchavan97@gmail.com>",
  "license": "ISC"
}
您已添加homepage、repository和keywords以author获取更多信息(这些是可选的)。请根据您的 GitHub 存储库进行更改。
在此处创建一个新的 GitHub 仓库,并将github-repos-search仓库推送到 GitHub。如果您还没有账户,
请导航至https://www.npmjs.com/并创建一个新账户。
打开终端并从github-repos-search文件夹内执行以下命令:
npm login
并输入您的 npm 凭据进行登录。
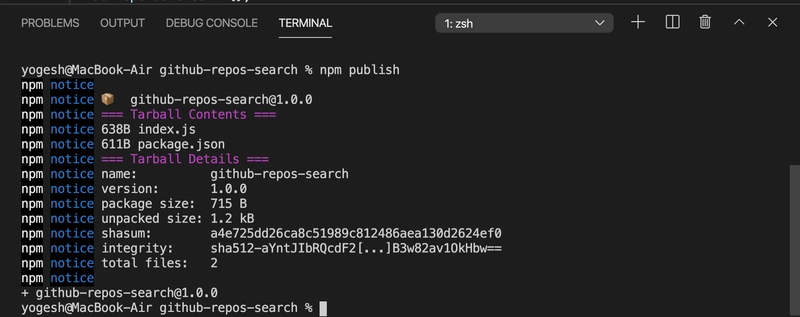
现在,要将其发布到 npm 存储库,请运行以下命令:
npm publish
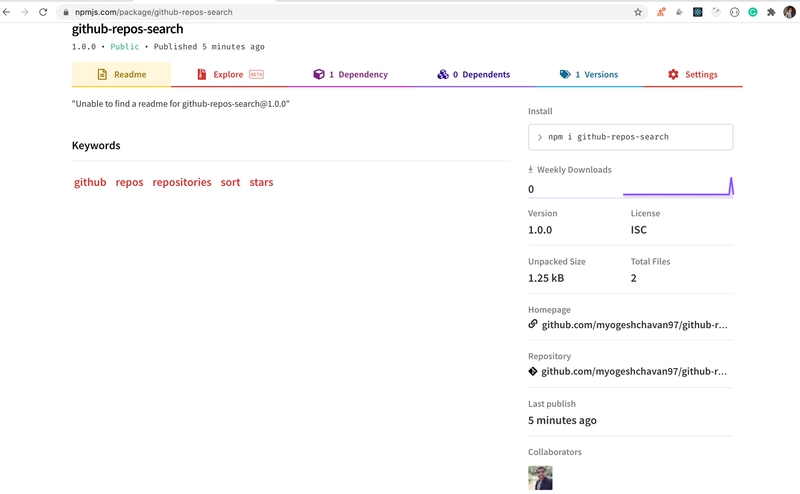
如果您在浏览器中导航到https://www.npmjs.com/package/github-repos-search,您将看到已发布的包:
现在,让我们添加一个readme.md文件来显示有关该包的一些信息。
readme.md在文件夹中创建一个新文件,文件名称与此处github-repos-search的内容相同
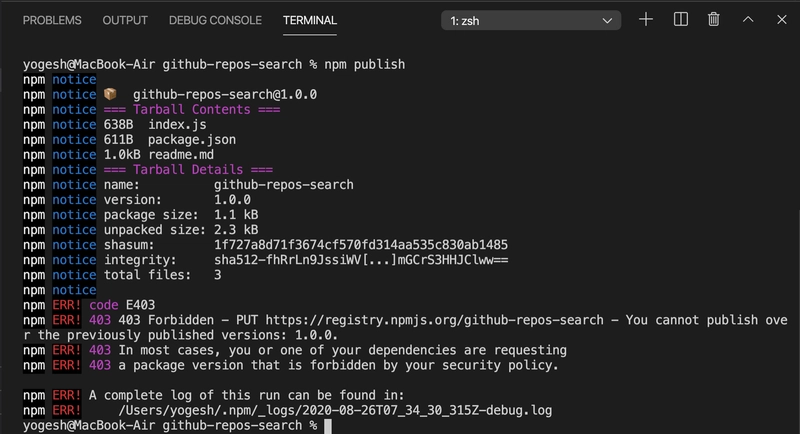
让我们尝试使用 npm publish 命令再次发布它。
您将收到上述错误。这是因为您再次发布了相同版本的模块。
如果你查看我们的package.json文件,你会发现,文件中提到的版本号是:1.0.0每次发布新的变更时,都需要增加版本号。那么,应该增加到多少呢?为此,你需要理解语义版本控制的概念。
步骤 7 — npm 中的语义版本控制
版本值是由 3 位数字组成的,以dot运算符分隔。假设版本为a.b.c
- 第一个值(
aina.b.c)指定包的主要版本 - 这意味着此版本具有重大代码更改,并且可能包含破坏性的 API 更改。 - 第二个值(
bina.b.c)指定次要版本,该版本包含次要更改,但不会包含重大 API 更改。 - 第三个值(
cina.b.c)指定补丁版本,通常包含错误修复。
在我们的例子中,您刚刚添加了一个readme.md不是 API 更改的文件,因此您可以将补丁版本(最后一位数字)增加 1。
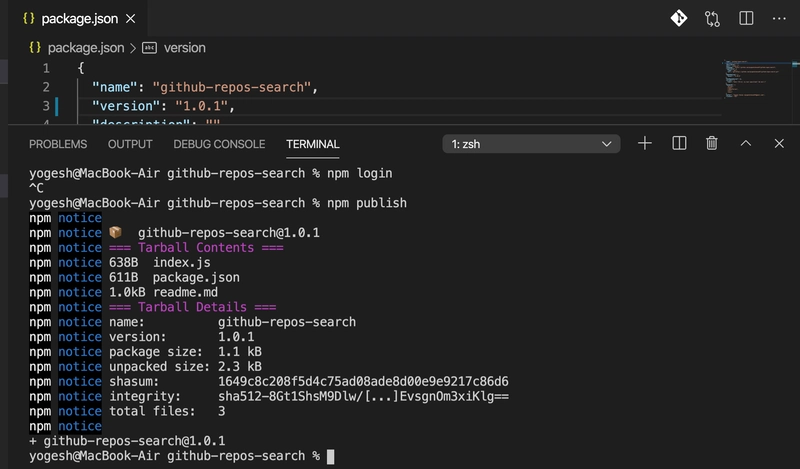
package.json因此将文件中的版本从1.0.0更改为1.0.1并再次运行该npm publish命令。
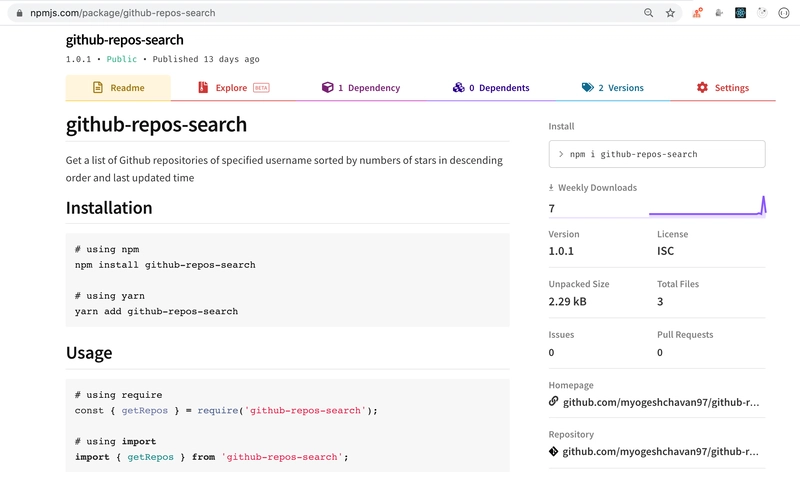
如果你现在检查 npm 包,你将在这里看到更新的 npm 包
要详细了解semantic versioning请查看我之前的文章
结论
在本教程中,您创建了一个 npm 包并将其发布到 npm 存储库。
本教程的完整源代码,请查看GitHub 上的github-repos-search仓库。您也可以在此处查看已发布的 npm 模块。
不要忘记订阅我的每周新闻通讯,其中包含精彩的提示、技巧和文章,直接发送到您的收件箱中。
文章来源:https://dev.to/myogeshchavan97/how-to-create-and-publish-an-npm-package-20ln 后端开发教程 - Java、Spring Boot 实战 - msg200.com

