Go + TypeScript 全栈 Web 应用程序,带有 nextjs、PostgreSQL 和 Docker
最后,您将理解并使用以下内容创建一个简单但完整的全栈应用程序:
- Next.js 14(TypeScript)
- Tailwind CSS
- 去
- PostgreSQL
- Docker
- Docker Compose
有很多技术,但我们会尽可能保持示例的基本性,以使其易于理解。
我们将采用自下而上的方法,从数据库开始,以前端结束。
如果您更喜欢视频版本
所有代码均可在GitHub上免费获取(链接见视频说明)。
建筑学
在我们开始之前,这里有一个简单的架构来解释应用程序的架构。
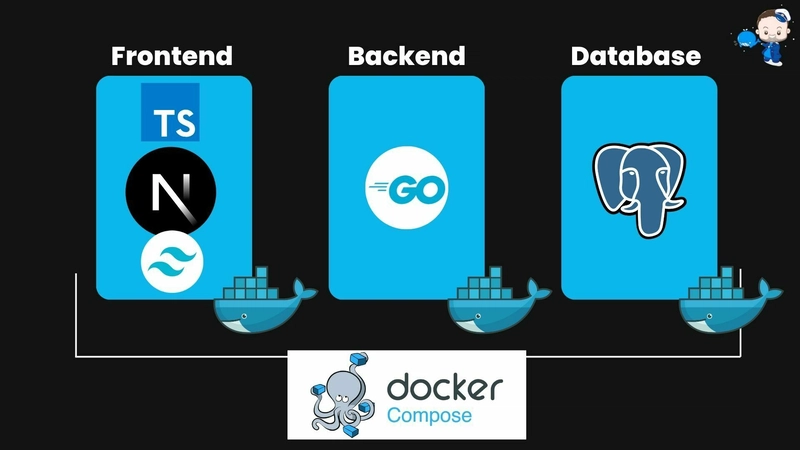
前端是一个带有 TypeScript 和 Tailwind CSS 的 Next.js 应用程序。
后端是用 Go 编写的。
数据库是 PostgreSQL。我们将使用 Docker 运行数据库、后端以及前端(您也可以使用 Vercel)。我们将使用 Docker Compose 来同时运行前端、后端和数据库。
先决条件
- 关于前端、后端、API 和数据库的基本知识
- 您的机器上安装了 Docker
- Go(我将使用 1.20.1 版本)
- (可选)Postman 或任何其他用于发出 HTTP 请求的工具
1.准备
创建您想要的任何文件夹,然后使用您最喜欢的代码编辑器打开它。
mkdir <YOUR_FOLDER>
cd <YOUR_FOLDER>
code .
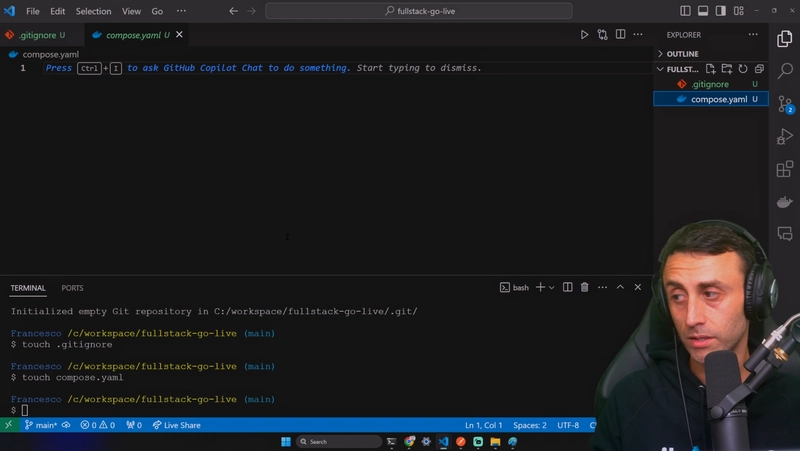
初始化 git 存储库。
git init
touch .gitignore
.gitignore使用以下内容填充文件:
*node_modules
compose.yaml在项目根目录中创建一个名为的文件。
touch compose.yaml
您的项目应该如下所示:
我们准备创建全栈应用程序并从数据库开始自下而上构建它。
每一步之后,我们都会测试应用程序的当前状态,以确保一切按预期运行。
2.数据库
我们将使用 Postgres,但不会将其安装在我们的机器上。相反,我们将使用 Docker 在容器中运行它。这样,我们就可以轻松地启动和停止数据库,而无需将其安装在我们的机器上。
打开文件compose.yaml并添加以下内容:
services:
  db:
    container_name: db
    image: postgres:13
    environment:
      POSTGRES_USER: postgres
      POSTGRES_PASSWORD: postgres
      POSTGRES_DB: postgres
    ports:
      - 5432:5432
    volumes:
      - pgdata:/var/lib/postgresql/data

volumes:
  pgdata: {}
然后在终端中输入
docker compose up -d
这将从 Docker Hub 拉取 Postgres 镜像并启动容器。该-d标志表示容器将以分离模式运行,以便我们可以继续使用终端。
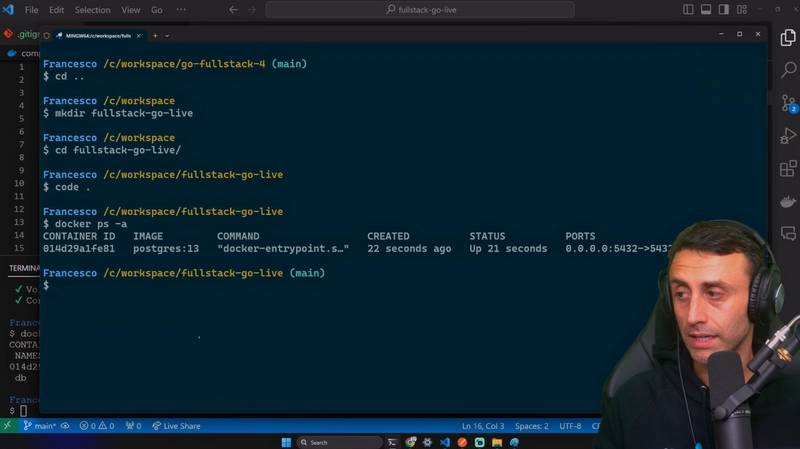
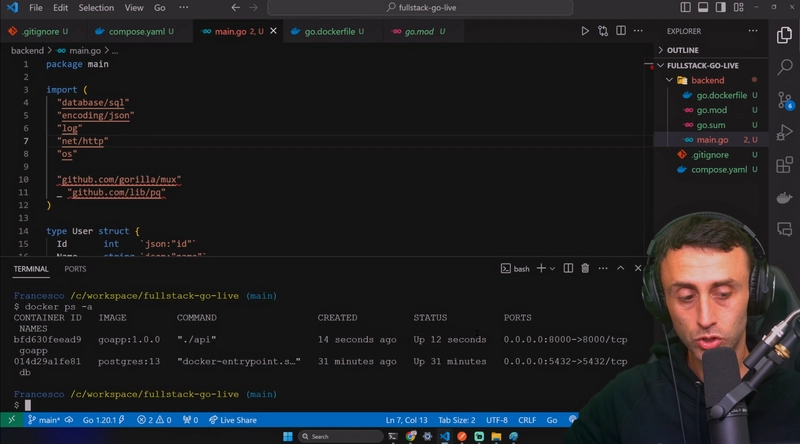
检查容器是否正在运行:
docker ps -a
您应该看到容器正在运行。
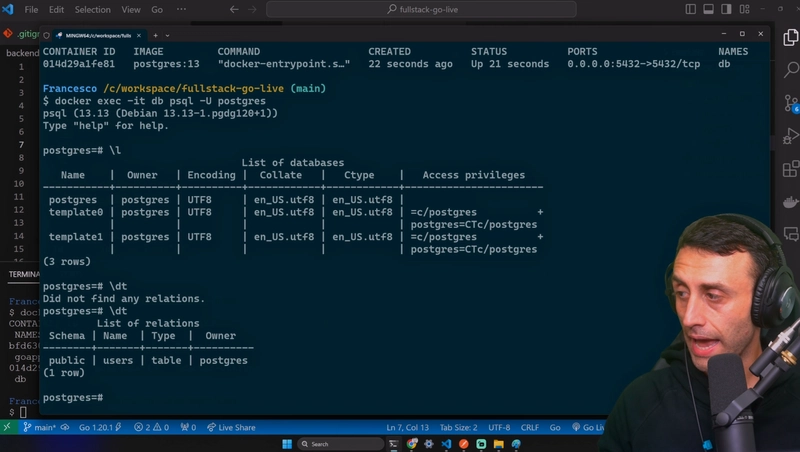
进入 db 容器
docker exec -it db psql -U postgres
现在您已进入 Postgres 容器,您可以输入:
\l
\dt
您应该看不到任何关系。

您可以让该选项卡保持打开状态。我们稍后会用到它。
3. 后端
第一步已经完成。现在,我们将创建后端。我们将使用 Go 和 Mux。
创建新文件夹:
mkdir backend
进入文件夹:
cd backend
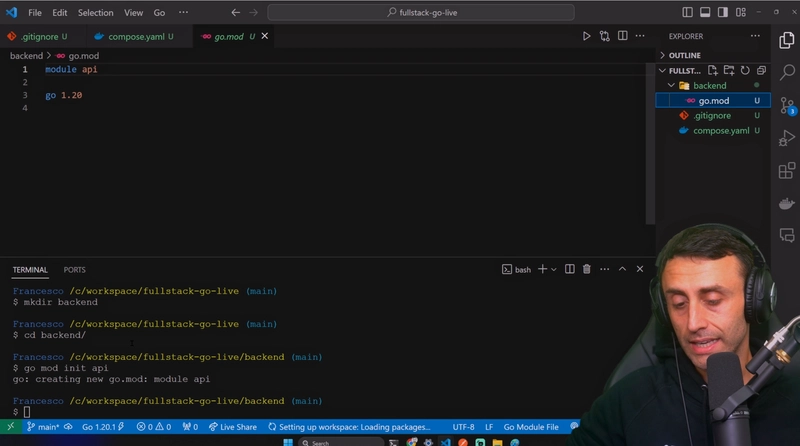
使用以下命令初始化一个新的 Go 模块:
go mod init api
该go.mod文件应如下所示:
安装依赖项:
go get github.com/gorilla/mux github.com/lib/pq
对于 Go 应用程序,我们只需要另外 2 个文件,包括容器化。
您可以通过不同的方式创建这些文件。其中一种是手动创建,另一种是使用命令行创建:
touch main.go go.dockerfile
🗒️main.go 文件
main.go 文件是应用程序的主文件:它包含应用程序的所有端点和逻辑。
按如下方式填充 main.go 文件:
package main

import (
    "database/sql"
    "encoding/json"
    "log"
    "net/http"
    "os"

    "github.com/gorilla/mux"
    _ "github.com/lib/pq"
)

type User struct {
    Id    int    `json:"id"`
    Name  string `json:"name"`
    Email string `json:"email"`
}

// main function
func main() {
    // connect to database
    db, err := sql.Open("postgres", os.Getenv("DATABASE_URL"))
    if err != nil {
        log.Fatal(err)
    }
    defer db.Close()

    // create table if it doesn't exist
    _, err = db.Exec("CREATE TABLE IF NOT EXISTS users (id SERIAL PRIMARY KEY, name TEXT, email TEXT)")
    if err != nil {
        log.Fatal(err)
    }

    // create router
    router := mux.NewRouter()
    router.HandleFunc("/api/go/users", getUsers(db)).Methods("GET")
    router.HandleFunc("/api/go/users", createUser(db)).Methods("POST")
    router.HandleFunc("/api/go/users/{id}", getUser(db)).Methods("GET")
    router.HandleFunc("/api/go/users/{id}", updateUser(db)).Methods("PUT")
    router.HandleFunc("/api/go/users/{id}", deleteUser(db)).Methods("DELETE")

    // wrap the router with CORS and JSON content type middlewares
    enhancedRouter := enableCORS(jsonContentTypeMiddleware(router))
    // start server
    log.Fatal(http.ListenAndServe(":8000", enhancedRouter))
}

func enableCORS(next http.Handler) http.Handler {
    return http.HandlerFunc(func(w http.ResponseWriter, r *http.Request) {
        // Set CORS headers
        w.Header().Set("Access-Control-Allow-Origin", "*") // Allow any origin
        w.Header().Set("Access-Control-Allow-Methods", "GET, POST, PUT, DELETE, OPTIONS")
        w.Header().Set("Access-Control-Allow-Headers", "Content-Type, Authorization")

        // Check if the request is for CORS preflight
        if r.Method == "OPTIONS" {
            w.WriteHeader(http.StatusOK)
            return
        }

        // Pass down the request to the next middleware (or final handler)
        next.ServeHTTP(w, r)
    })
}

func jsonContentTypeMiddleware(next http.Handler) http.Handler {
    return http.HandlerFunc(func(w http.ResponseWriter, r *http.Request) {
        // Set JSON Content-Type
        w.Header().Set("Content-Type", "application/json")
        next.ServeHTTP(w, r)
    })
}

// get all users
func getUsers(db *sql.DB) http.HandlerFunc {
    return func(w http.ResponseWriter, r *http.Request) {
        rows, err := db.Query("SELECT * FROM users")
        if err != nil {
            log.Fatal(err)
        }
        defer rows.Close()

        users := []User{} // array of users
        for rows.Next() {
            var u User
            if err := rows.Scan(&u.Id, &u.Name, &u.Email); err != nil {
                log.Fatal(err)
            }
            users = append(users, u)
        }
        if err := rows.Err(); err != nil {
            log.Fatal(err)
        }

        json.NewEncoder(w).Encode(users)

    }

}

// get user by id
func getUser(db *sql.DB) http.HandlerFunc {
    return func(w http.ResponseWriter, r *http.Request) {
        vars := mux.Vars(r)
        id := vars["id"]

        var u User
        err := db.QueryRow("SELECT * FROM users WHERE id = $1", id).Scan(&u.Id, &u.Name, &u.Email)
        if err != nil {
            w.WriteHeader(http.StatusNotFound)
            return
        }

        json.NewEncoder(w).Encode(u)
    }
}

// create user
func createUser(db *sql.DB) http.HandlerFunc {
    return func(w http.ResponseWriter, r *http.Request) {
        var u User
        json.NewDecoder(r.Body).Decode(&u)

        err := db.QueryRow("INSERT INTO users (name, email) VALUES ($1, $2) RETURNING id", u.Name, u.Email).Scan(&u.Id)
        if err != nil {
            log.Fatal(err)
        }

        json.NewEncoder(w).Encode(u)
    }
}

// update user
func updateUser(db *sql.DB) http.HandlerFunc {
    return func(w http.ResponseWriter, r *http.Request) {
        var u User
        json.NewDecoder(r.Body).Decode(&u)

        vars := mux.Vars(r)
        id := vars["id"]

        // Execute the update query
        _, err := db.Exec("UPDATE users SET name = $1, email = $2 WHERE id = $3", u.Name, u.Email, id)
        if err != nil {
            log.Fatal(err)
        }

        // Retrieve the updated user data from the database
        var updatedUser User
        err = db.QueryRow("SELECT id, name, email FROM users WHERE id = $1", id).Scan(&updatedUser.Id, &updatedUser.Name, &updatedUser.Email)
        if err != nil {
            log.Fatal(err)
        }

        // Send the updated user data in the response
        json.NewEncoder(w).Encode(updatedUser)
    }
}

// delete user
func deleteUser(db *sql.DB) http.HandlerFunc {
    return func(w http.ResponseWriter, r *http.Request) {
        vars := mux.Vars(r)
        id := vars["id"]

        var u User
        err := db.QueryRow("SELECT * FROM users WHERE id = $1", id).Scan(&u.Id, &u.Name, &u.Email)
        if err != nil {
            w.WriteHeader(http.StatusNotFound)
            return
        } else {
            _, err := db.Exec("DELETE FROM users WHERE id = $1", id)
            if err != nil {
                //todo : fix error handling
                w.WriteHeader(http.StatusNotFound)
                return
            }

            json.NewEncoder(w).Encode("User deleted")
        }
    }
}
有关解释,请查看https://youtu.be/429-r55KFmM
我们正在导入:database/sql作为 Postgres db 的连接器,encoding/json以便轻松处理 json 格式的对象,log记录错误,net/http处理 http 请求,os处理环境变量
定义的结构适用于具有 ID(由数据库自动增加)、姓名和电子邮件的用户。
在main function做一些事情:
- 我们连接到 Postgres 数据库并设置环境变量
- 何时启用 CORS 和 JSON Content-Type 中间件
- 如果不存在,我们将在数据库中创建一个表
- 我们使用 Mux 来处理 5 个端点
- 我们在端口 8000 上监听服务器
- 该函数
jsonContentTypeMiddleware是一个中间件函数,用于为所有响应添加标头 (application/json)。很高兴能将响应格式化,并准备好供最终前端使用。 - 然后有 5 个控制器来创建、读取、更新和删除用户。
🗒️ go.dockerfile 文件
go.dockerfile 文件是用于容器化 Go 应用程序的文件。
按如下方式填充 go.dockerfile 文件:
# use official Golang image
FROM golang:1.16.3-alpine3.13

# set working directory
WORKDIR /app

# Copy the source code
COPY . .

# Download and install the dependencies
RUN go get -d -v ./...

# Build the Go app
RUN go build -o api .

#EXPOSE the port
EXPOSE 8000

# Run the executable
CMD ["./api"]
有关解释,请查看https://youtu.be/429-r55KFmM
🐙 更新 compose.yaml 文件
更新compose.yaml项目根目录中的文件,添加goapp服务。
以下是更新后的版本:
services:
goapp:
container_name: goapp
image: francescoxx/goapp:1.0.0
build:
context: ./backend
dockerfile: go.dockerfile
environment:
DATABASE_URL: 'postgres://postgres:postgres@db:5432/postgres?sslmode=disable'
ports:
- '8000:8000'
depends_on:
- db
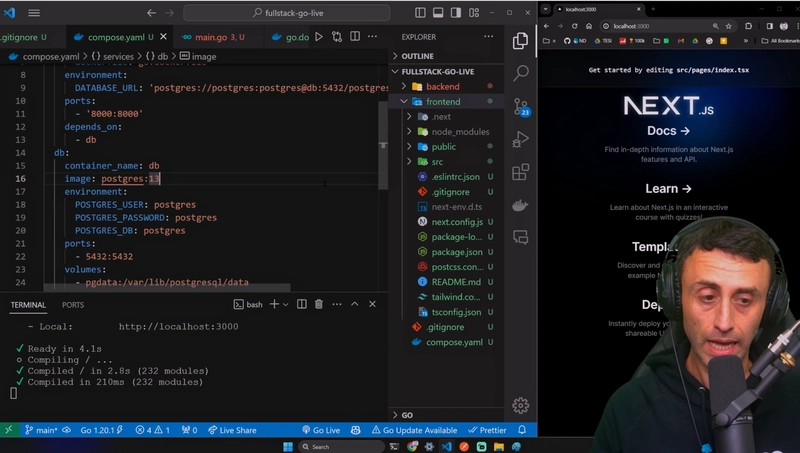
db:
container_name: db
image: postgres:13
restart: always
environment:
POSTGRES_USER: postgres
POSTGRES_PASSWORD: postgres
POSTGRES_DB: postgres
ports:
- 5432:5432
volumes:
- pgdata:/var/lib/postgresql/data
volumes:
pgdata:
有关解释,请查看:https://youtu.be/429-r55KFmM?si =Lr-B65Hmej-jh5Nb&t=1807
构建镜像并运行容器
现在,让我们构建镜像并运行容器:
docker compose build
docker compose up -d goapp
docker ps -a
此后,您可以在上一个选项卡上检查数据库是否仍在运行以及表是否已创建。
我们现在准备测试后端。
🧪 测试后端
我们现在准备测试后端。
您可以使用 Postman 或任何其他工具发出 HTTP 请求。
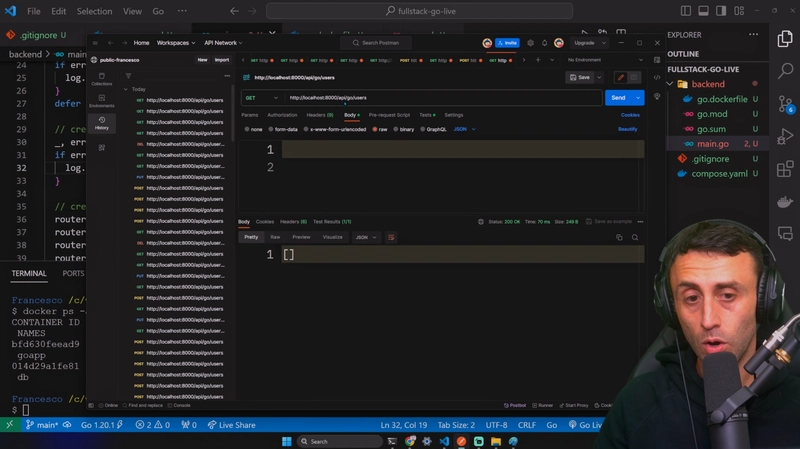
获得全部
Yoy 可以获取所有用户,但发出 GET 请求http://localhost:8000/api/go/users
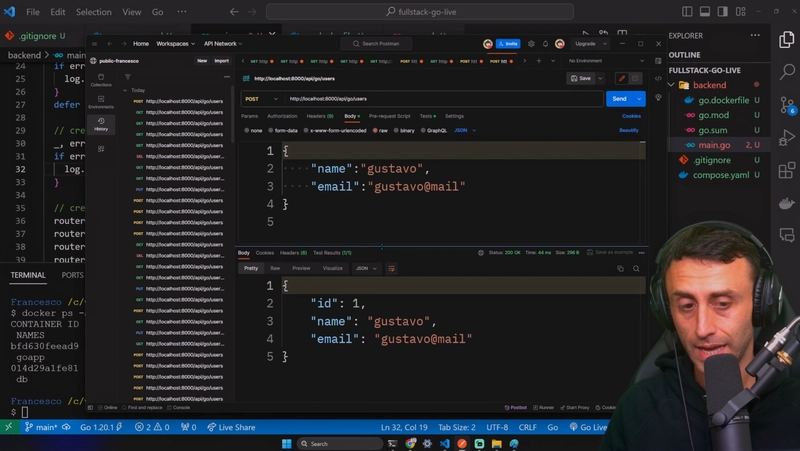
创建新用户
您可以创建一个新用户,但要发出 POST 请求http://localhost:8000/api/go/users
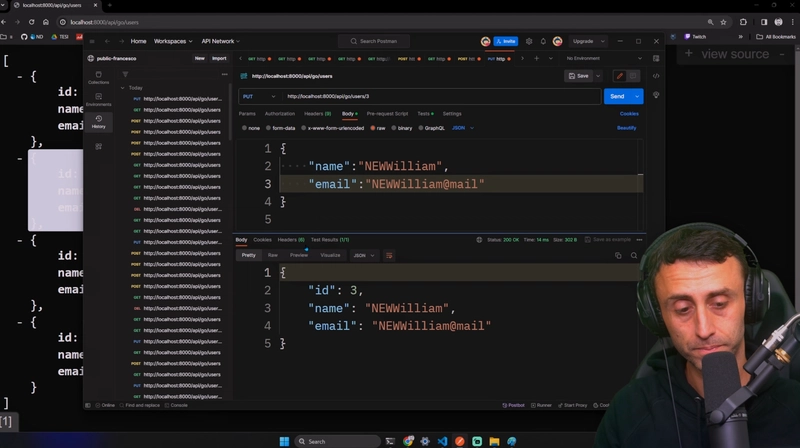
更新用户
您可以更新用户,但发出 PUT 请求http://localhost:8000/api/go/users/3
我们可以使用以下命令检查数据库的内容:
docker exec -it db psql -U postgres
\dt
select * from users;
我们也可以在浏览器中查看http://localhost:8000/api/go/users
4. 前端
现在我们已经启动并运行了后端,我们可以继续处理前端。
我们将使用带有 TypeScript 和 Tailwind 的 Next.js 14。
从项目的根文件夹,
cd ..
从项目的根文件夹运行以下命令:
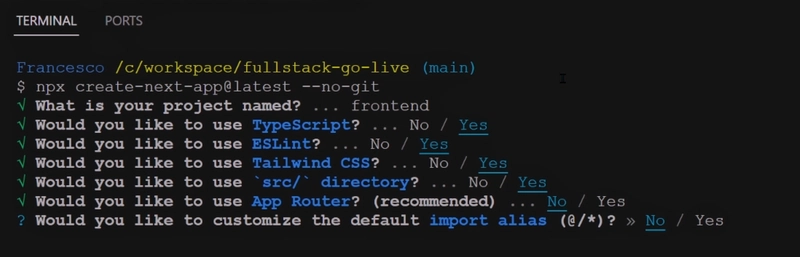
npx create-next-app@latest --no-git
我们使用 --no-git 标志,因为我们已经在项目的根目录初始化了一个 git 存储库。
作为选项:
- 您的项目叫什么名字?
frontend - TypeScript?
Yes - EsLint?
Yes - Tailwind CSS?
Yes - 使用默认目录结构?
Yes - 应用路由器?
No(本项目不需要) - 自定义默认导入别名?
No
这将在大约一分钟内创建一个新的 Next.js 项目。
进入前端文件夹:
cd frontend
安装 Axios,我们将使用它来发出 HTTP 请求(确保在frontend文件夹中):
npm i axios
在我们继续之前,尝试运行该项目:
npm run dev
然后打开浏览器http://localhost:3000。您应该会看到默认的 Next.js 页面。
🖋️ 修改styles/global.css文件
在src/frontend/src/styles/globals.css文件中,用以下内容替换内容(以避免 Tailwind 出现一些问题):
@tailwind base;
@tailwind components;
@tailwind utilities;

:root {
  --foreground-rgb: 0, 0, 0;
  --background-start-rgb: 214, 219, 220;
  --background-end-rgb: 255, 255, 255;
}

body {
  color: rgb(var(--foreground-rgb));
  background: linear-gradient(to bottom, transparent, rgb(var(--background-end-rgb))) rgb(var(--background-start-rgb));
}
创建新组件
在该/frontend/src文件夹中,创建一个名为 的新文件夹components,并在其中创建一个名为 的新文件CardComponent.tsx并添加以下内容:
import React from 'react';

interface Card {
  id: number;
  name: string;
  email: string;
}

const CardComponent: React.FC<{ card: Card }> = ({ card }) => {
  return (
    <div className="bg-white shadow-lg rounded-lg p-2 mb-2 hover:bg-gray-100">
      <div className="text-sm text-gray-600">Id: {card.id}</div>
      <div className="text-lg font-semibold text-gray-800">{card.name}</div>
      <div className="text-md text-gray-700">{card.email}</div>
    </div>
  );
};

export default CardComponent;
创建一个 UserInterface 组件
在该/frontend/src/components文件夹中,创建一个名为的文件UserInterface.tsx并添加以下内容:
import React, { useState, useEffect } from 'react';
import axios from 'axios';
import CardComponent from './CardComponent';
interface User {
id: number;
name: string;
email: string;
}
interface UserInterfaceProps {
backendName: string;
}
const UserInterface: React.FC<UserInterfaceProps> = ({ backendName }) => {
const apiUrl = process.env.NEXT_PUBLIC_API_URL || 'http://localhost:8000';
const [users, setUsers] = useState<User[]>([]);
const [newUser, setNewUser] = useState({ name: '', email: '' });
const [updateUser, setUpdateUser] = useState({ id: '', name: '', email: '' });
// Define styles based on the backend name
const backgroundColors: { [key: string]: string } = {
go: 'bg-cyan-500',
};
const buttonColors: { [key: string]: string } = {
go: 'bg-cyan-700 hover:bg-blue-600',
};
const bgColor = backgroundColors[backendName as keyof typeof backgroundColors] || 'bg-gray-200';
const btnColor = buttonColors[backendName as keyof typeof buttonColors] || 'bg-gray-500 hover:bg-gray-600';
// Fetch users
useEffect(() => {
const fetchData = async () => {
try {
const response = await axios.get(`${apiUrl}/api/${backendName}/users`);
setUsers(response.data.reverse());
} catch (error) {
console.error('Error fetching data:', error);
}
};
fetchData();
}, [backendName, apiUrl]);
// Create a user
const createUser = async (e: React.FormEvent<HTMLFormElement>) => {
e.preventDefault();
try {
const response = await axios.post(`${apiUrl}/api/${backendName}/users`, newUser);
setUsers([response.data, ...users]);
setNewUser({ name: '', email: '' });
} catch (error) {
console.error('Error creating user:', error);
}
};
// Update a user
const handleUpdateUser = async (e: React.FormEvent<HTMLFormElement>) => {
e.preventDefault();
try {
await axios.put(`${apiUrl}/api/${backendName}/users/${updateUser.id}`, { name: updateUser.name, email: updateUser.email });
setUpdateUser({ id: '', name: '', email: '' });
setUsers(
users.map((user) => {
if (user.id === parseInt(updateUser.id)) {
return { ...user, name: updateUser.name, email: updateUser.email };
}
return user;
})
);
} catch (error) {
console.error('Error updating user:', error);
}
};
// Delete a user
const deleteUser = async (userId: number) => {
try {
await axios.delete(`${apiUrl}/api/${backendName}/users/${userId}`);
setUsers(users.filter((user) => user.id !== userId));
} catch (error) {
console.error('Error deleting user:', error);
}
};
return (
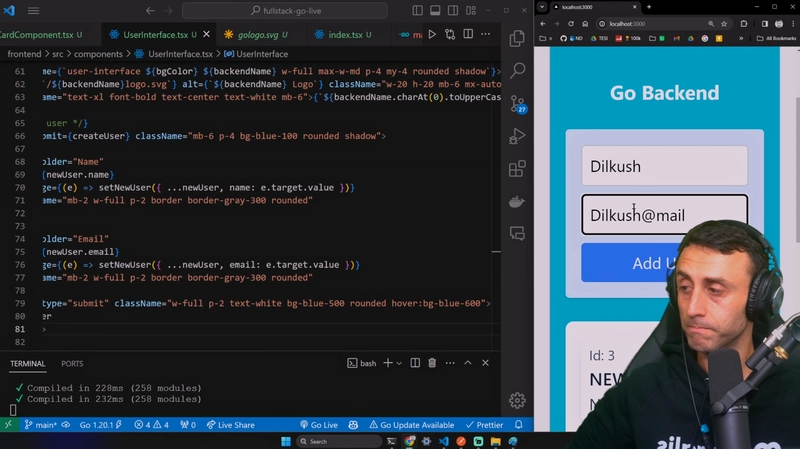
<div className={`user-interface ${bgColor} ${backendName} w-full max-w-md p-4 my-4 rounded shadow`}>
<img src={`/${backendName}logo.svg`} alt={`${backendName} Logo`} className="w-20 h-20 mb-6 mx-auto" />
<h2 className="text-xl font-bold text-center text-white mb-6">{`${backendName.charAt(0).toUpperCase() + backendName.slice(1)} Backend`}</h2>
{/* Form to add new user */}
<form onSubmit={createUser} className="mb-6 p-4 bg-blue-100 rounded shadow">
<input
placeholder="Name"
value={newUser.name}
onChange={(e) => setNewUser({ ...newUser, name: e.target.value })}
className="mb-2 w-full p-2 border border-gray-300 rounded"
/>
<input
placeholder="Email"
value={newUser.email}
onChange={(e) => setNewUser({ ...newUser, email: e.target.value })}
className="mb-2 w-full p-2 border border-gray-300 rounded"
/>
<button type="submit" className="w-full p-2 text-white bg-blue-500 rounded hover:bg-blue-600">
Add User
</button>
</form>
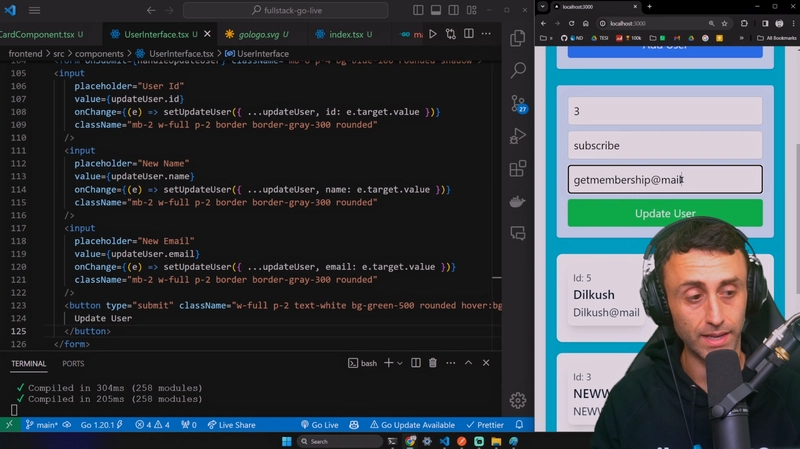
{/* Form to update user */}
<form onSubmit={handleUpdateUser} className="mb-6 p-4 bg-blue-100 rounded shadow">
<input
placeholder="User Id"
value={updateUser.id}
onChange={(e) => setUpdateUser({ ...updateUser, id: e.target.value })}
className="mb-2 w-full p-2 border border-gray-300 rounded"
/>
<input
placeholder="New Name"
value={updateUser.name}
onChange={(e) => setUpdateUser({ ...updateUser, name: e.target.value })}
className="mb-2 w-full p-2 border border-gray-300 rounded"
/>
<input
placeholder="New Email"
value={updateUser.email}
onChange={(e) => setUpdateUser({ ...updateUser, email: e.target.value })}
className="mb-2 w-full p-2 border border-gray-300 rounded"
/>
<button type="submit" className="w-full p-2 text-white bg-green-500 rounded hover:bg-green-600">
Update User
</button>
</form>
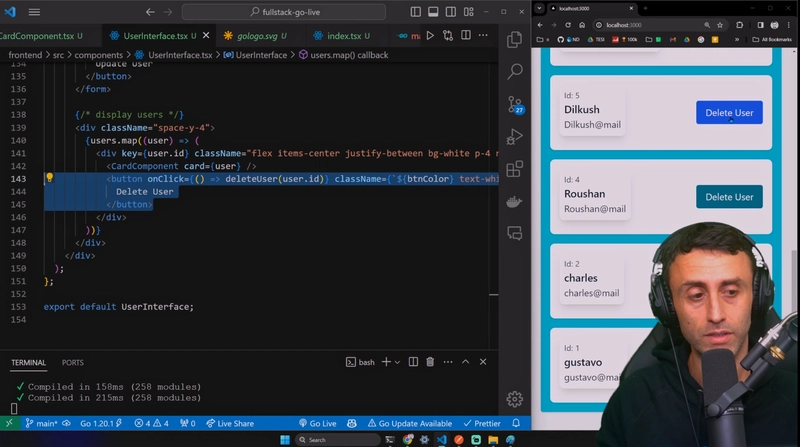
{/* Display users */}
<div className="space-y-4">
{users.map((user) => (
<div key={user.id} className="flex items-center justify-between bg-white p-4 rounded-lg shadow">
<CardComponent card={user} />
<button onClick={() => deleteUser(user.id)} className={`${btnColor} text-white py-2 px-4 rounded`}>
Delete User
</button>
</div>
))}
</div>
</div>
);
};
export default UserInterface;
有关解释,请查看:https://youtu.be/429-r55KFmM
修改index.tsx文件
打开index.tsx文件并将内容替换为以下内容:
import React from 'react';
import UserInterface from '../components/UserInterface';

const Home: React.FC = () => {
  return (
    <main className="flex flex-wrap justify-center items-start min-h-screen bg-gray-100">
      <div className="m-4">
        <UserInterface backendName="go" />
      </div>
    </main>
  );
};

export default Home;
有关解释,请查看:https://youtu.be/429-r55KFmM
添加 Go 徽标
在/frontend/public文件夹中,添加gologo.svg文件。
刷新页面,您应该会看到 Go 徽标。
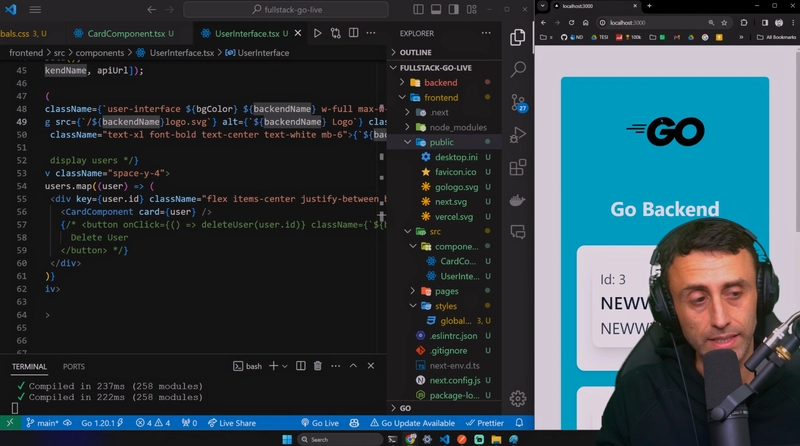
🧪 测试前端
我们现在准备测试前端。
您可以使用 UI 插入、更新和删除用户。
您可以直接从 UI 创建用户
您还可以更新用户
最后,您可以删除用户,只需单击“删除用户”按钮即可
您可以使用以下命令检查数据库的内容:
docker exec -it db psql -U postgres
select * from users;

Docker化前端
使用 Docker 部署 Next.js 应用程序。
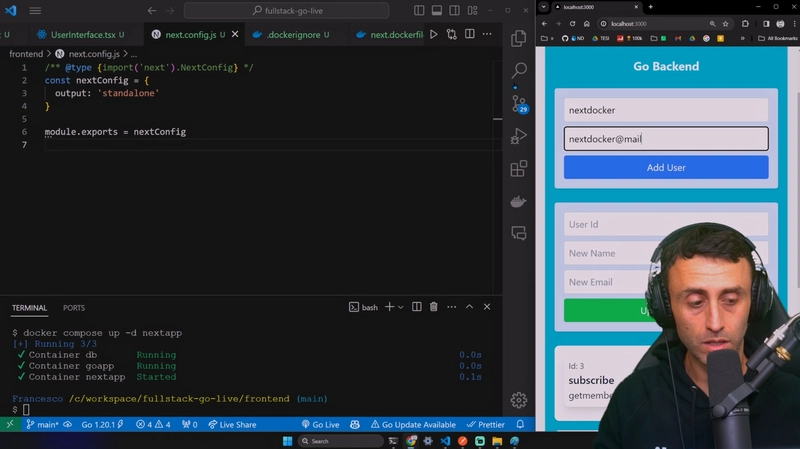
更改文件夹next.config.js中的文件frontend,将其替换为以下内容:
/** @type {import('next').NextConfig} */
const nextConfig = {
  output: 'standalone',
};

module.exports = nextConfig;
.dockerignore在文件夹中创建一个名为的文件frontend并添加以下内容:
**/node_modules
为了将 Next.js 应用程序 docker 化,我们将使用 Vercel 提供的官方 Dockerfile:
您可以在这里找到它:https://github.com/vercel/next.js/blob/canary/examples/with-docker/Dockerfile
next.dockerfile在文件夹中创建一个名为的文件frontend并添加以下内容(它直接来自vercel官方docker示例)
FROM node:18-alpine AS base

# Install dependencies only when needed
FROM base AS deps
# Check https://github.com/nodejs/docker-node/tree/b4117f9333da4138b03a546ec926ef50a31506c3#nodealpine to understand why libc6-compat might be needed.
RUN apk add --no-cache libc6-compat
WORKDIR /app

# Install dependencies based on the preferred package manager
COPY package.json yarn.lock* package-lock.json* pnpm-lock.yaml* ./
RUN \
  if [ -f yarn.lock ]; then yarn --frozen-lockfile; \
  elif [ -f package-lock.json ]; then npm ci; \
  elif [ -f pnpm-lock.yaml ]; then yarn global add pnpm && pnpm i --frozen-lockfile; \
  else echo "Lockfile not found." && exit 1; \
  fi


# Rebuild the source code only when needed
FROM base AS builder
WORKDIR /app
COPY --from=deps /app/node_modules ./node_modules
COPY . .

# Next.js collects completely anonymous telemetry data about general usage.
# Learn more here: https://nextjs.org/telemetry
# Uncomment the following line in case you want to disable telemetry during the build.
# ENV NEXT_TELEMETRY_DISABLED 1

RUN yarn build && ls -l /app/.next


# If using npm comment out above and use below instead
# RUN npm run build

# Production image, copy all the files and run next
FROM base AS runner
WORKDIR /app

ENV NODE_ENV production
# Uncomment the following line in case you want to disable telemetry during runtime.
# ENV NEXT_TELEMETRY_DISABLED 1

RUN addgroup --system --gid 1001 nodejs
RUN adduser --system --uid 1001 nextjs

COPY --from=builder /app/public ./public

# Set the correct permission for prerender cache
RUN mkdir .next
RUN chown nextjs:nodejs .next

# Automatically leverage output traces to reduce image size
# https://nextjs.org/docs/advanced-features/output-file-tracing
COPY --from=builder --chown=nextjs:nodejs /app/.next/standalone ./
COPY --from=builder --chown=nextjs:nodejs /app/.next/static ./.next/static

USER nextjs

EXPOSE 3000

ENV PORT 3000
# set hostname to localhost
ENV HOSTNAME "0.0.0.0"

# server.js is created by next build from the standalone output
# https://nextjs.org/docs/pages/api-reference/next-config-js/output
CMD ["node", "server.js"]
现在,让我们更新compose.yaml项目根目录中的文件,添加nextapp服务。
以下是更新后的版本:
services:
  nextapp:
    container_name: nextapp
    image: nextapp:1.0.0
    build:
      context: ./frontend
      dockerfile: next.dockerfile
    ports:
      - "3000:3000"
    environment:
      - NEXT_PUBLIC_API_URL=http://localhost:8000
    depends_on:
      - goapp
  goapp:
    container_name: goapp
    image: francescoxx/goapp:1.0.0
    build:
      context: ./backend
      dockerfile: go.dockerfile
    environment:
      DATABASE_URL: "postgres://postgres:postgres@db:5432/postgres?sslmode=disable"
    ports:
      - "8000:8000"
    depends_on:
      - db
  db:
    container_name: db
    image: postgres:13
    restart: always
    environment:
      POSTGRES_USER: postgres
      POSTGRES_PASSWORD: postgres
      POSTGRES_DB: postgres
    ports:
      - 5432:5432
    volumes:
      - pgdata:/var/lib/postgresql/data

volumes:
  pgdata:
现在,让我们构建镜像并运行容器:
docker compose build
docker compose up -d nextapp
您可以检查这 3 个容器是否正在运行:
docker ps -a
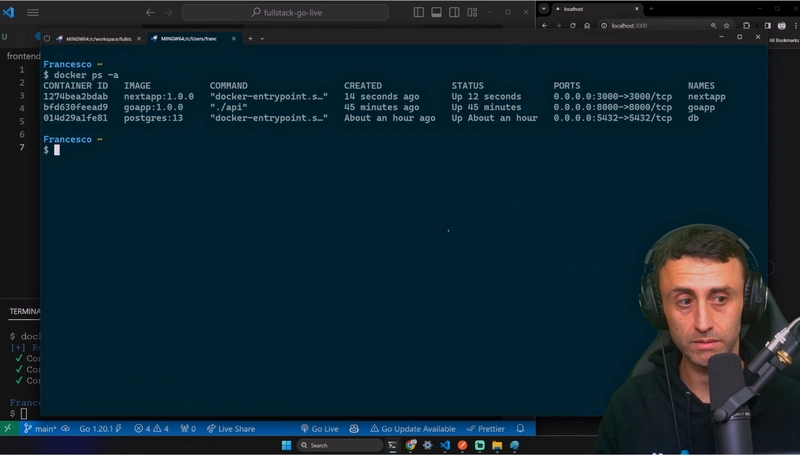
如果您已经运行了这 3 项服务,那么一切就都正常了。
在结束之前,让我们使用 UI 进行最后的测试。
🧪 测试前端
作为最后的测试,我们可以检查前端是否正常工作。
要创建新用户,请添加姓名和电子邮件
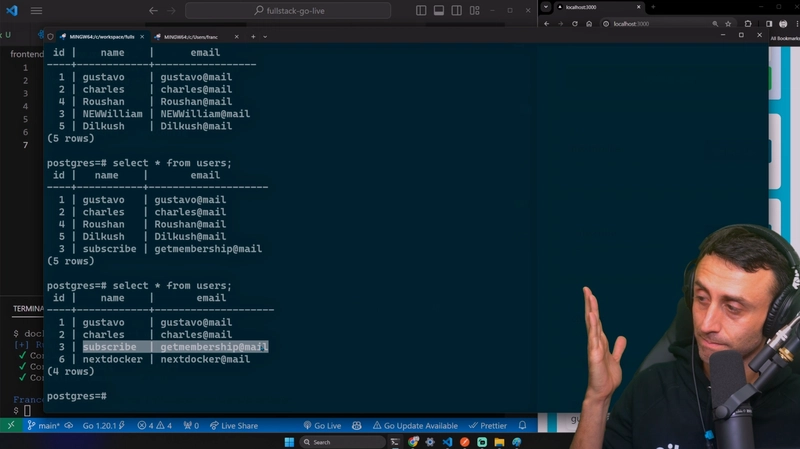
我们可以从 UI 或直接从数据库检查用户列表:
docker exec -it db psql -U postgres
\dt
select * from users;
📝 回顾
我们使用 GO API、Next.js 14、Postgres、Docker、docker Compose 构建了一个简单但完整的全栈 Web 应用程序。
我们使用 Go 和 Mux 作为框架来构建后端 API,使用 Next.js 14 来构建前端,使用 Postgres 作为数据库,使用 Docker 来容器化应用程序,并使用 docker Compose 来运行应用程序。
如果您更喜欢视频版本
所有代码均可在GitHub上免费获取(链接见视频说明)。
如果您有任何疑问,请在下方或在视频评论中发表评论
你可以在这里找到我:
Francesco