101 个 React 技巧和窍门,适合初学者和专家✨
过去5 年多来,我一直从事 React 的专业工作。
在本文中,我分享了多年来学到的 101 个最佳技巧和窍门。
准备好了吗?快来开始吧💪!
ℹ️备注:
- 本指南假设您熟悉 React 并理解术语
props、、等state。context- 为了保持简洁,我尝试在大多数示例中使用 Vanilla JS。如果您使用 TypeScript,则可以轻松调整代码。
- 该代码尚未投入生产。请自行决定是否使用。
目录(点击展开)↕️
- 类别 #1:组件组织
- 1. 使用自闭合标签保持代码紧凑
- 2. 优先
fragments使用 DOM 节点(例如 div、span 等)来对元素进行分组
- 3. 使用 React fragment 简写
<></>(除非需要设置键)
- 4. 分散使用 props,而不是单独访问每个 props
- 5. 设置 props 的默认值时,在解构时进行
- 6. 传递
string类型属性时删除花括号。
value7.使用前确保它是一个布尔值value && <Component {...props}/>,以防止在屏幕上显示意外的值。- 8. 使用函数(内联或非内联)来避免中间变量污染你的范围
- 9. 使用柯里化函数来重用逻辑(并正确记忆回调函数)
- 10. 将不依赖组件 props/state 的数据移到组件外部,以获得更干净(更高效)的代码
- 11. 存储列表中选定的项目时,存储项目 ID,而不是整个项目
- 12. 如果你在做某事之前经常检查 prop 的值,那么引入一个新的组件
- 13. 使用 CSS
:empty伪类隐藏没有子元素的元素
- 14. 将所有状态和上下文分组到组件顶部
- 类别 #2:有效的设计模式与技巧🛠️
- 类别 #3:键和引用🗝️
- 类别 #4:组织 React 代码
- Category #5: Efficient State Management 🚦
- 28. Never create a state for a value that can be derived from other state or props
- 29. Keep the state at the lowest level necessary to minimize re-renders
- 30. Clarify the distinction between the initial state and the current state
- 31. Update state based on the previous state, especially when memoizing with
useCallback
- 32. Use functions in
useState for lazy initialization and performance gains, as they are invoked only once.
- 33. Use react context for broadly needed, static state to prevent prop drilling
- 34. React Context: Split your context into parts that change frequently and those that change infrequently to enhance app performance
- 35. React Context: Introduce a
Provider component when the value computation is not straightforward
- 36. Consider using the
useReducer hook as a lightweight state management solution
- 37. Simplify state updates with
useImmer or useImmerReducer
- 38. Use Redux (or another state management solution) for complex client-side state accessed across multiple components
- 39. Redux: Use Redux DevTools to debug your state
- Category #6: React Code Optimization 🚀
- 40. Prevent unnecessary re-renders with
memo
- 41. Specify an equality function with
memo to instruct React on how to compare the props.
- 42. Prefer named functions over arrow functions when declaring a memoized component
- 43. Cache expensive computations or preserve references with
useMemo
- 44. Use
useCallback to memoize functions
- 45. Memoize callbacks or values returned from utility hooks to avoid performance issues
- 46. Leverage lazy loading and
Suspense to make your apps load faster
- 47. Throttle your network to simulate a slow network
- 48. Use
react-window or react-virtuoso to efficiently render lists
- Category #7: Debugging React code 🐞
-
- Category #8: Testing React code 🧪
- Category #9: React hooks 🎣
- 59. Make sure you perform any required cleanup in your
useEffect hooks
- 60. Use
refs for accessing DOM elements
- 61. Use
refs to preserve values across re-renders
- 62. Prefer named functions over arrow functions within hooks such as
useEffect to easily find them in React Dev Tools
- 63. Encapsulate logic with custom hooks
- 64. Prefer functions over custom hooks
- 65. Prevent visual UI glitches by using the
useLayoutEffect hook
- 66. Generate unique IDs for accessibility attributes with the
useId hook
- 67. Use the
useSyncExternalStoreto subscribe to an external store
- 68. Use the
useDeferredValue hook to display the previous query results until the new results become available
- Category #10: Must-known React Libraries/Tools 🧰
- 69. Incorporate routing into your app with
react-router
- 70. Implement first-class data fetching in your app with
swr or React Query
- 71. Simplify form state management with libraries like
formik, React Hook Form, or TanStack Form
- 72. Internationalize your app using
Format.js, Lingui, or react-i18next.
- 73. Effortlessly create impressive animations with
framer-motion
- 74. Tired of re-inventing the wheel with custom hooks? Check out https://usehooks.com/
- 75. Streamline app development by leveraging UI libraries like Shadcdn or Headless UI
- 76. Check your website's accessibility with the
axe-core-npm library
- 77. Refactor React code effortlessly with
react-codemod
- 78. Transform your app into a Progressive Web Application (PWA) using vite-pwa
- Category #11: React & Visual Studio Code 🛠️
- Category #12: React & TypeScript 🚀
- 82. Use
ReactNode instead of JSX.Element | null | undefined | ... to keep your code more compact
- 83. Simplify the typing of components expecting children props with
PropsWithChildren
- 84. Access element props efficiently with
ComponentProps, ComponentPropsWithoutRef,…
- 85. Leverage types like
MouseEventHandler, FocusEventHandler and others for concise typings
- 86. Specify types explicitly in useState, useRef, etc., when the type can't be or shouldn't be inferred from the initial value
- 87. Leverage the
Record type for cleaner and more extensible code
- 88. Use the
as const trick to accurately type your hook return values
- 89. Redux: Ensure proper typing by referring to https://react-redux.js.org/using-react-redux/usage-with-typescript to correctly type your Redux state and helpers
- 90. Simplify your types with
ComponentType
- 91. Make your code more reusable with TypeScript generics
- 92. Ensure precise typing with the
NoInfer utility type
- 93. Effortlessly type refs with the
ElementRef type helper
- Category #13: Miscellaneous Tips 🎉
- 94. Boost your code's quality and safety with
eslint-plugin-react and Prettier.
- 95. Log and monitor your app with tools like Sentry or Grafana Cloud Frontend Observability.
- 96. Start coding quickly with online IDEs like Code Sandbox or Stackblitz
- 97. 想要学习 React 高级技能?看看这些书👇
- 98. 准备 React 面试?查看 reactjs-interview-questions
- 99. 向 Nadia、Dan、Josh、Kent 等专家学习 React 最佳实践。
- 100. 订阅《本周 React》或 ui.dev 等新闻通讯,随时了解 React 生态系统的最新动态
- 101. 在 r/reactjs 等平台上与 React 社区互动
目录(点击展开)↕️
- 类别 #1:组件组织
- 1. 使用自闭合标签保持代码紧凑
- 2. 优先
fragments使用 DOM 节点(例如 div、span 等)来对元素进行分组 - 3. 使用 React fragment 简写
<></>(除非需要设置键) - 4. 分散使用 props,而不是单独访问每个 props
- 5. 设置 props 的默认值时,在解构时进行
- 6. 传递
string类型属性时删除花括号。 value7.使用前确保它是一个布尔值value && <Component {...props}/>,以防止在屏幕上显示意外的值。- 8. 使用函数(内联或非内联)来避免中间变量污染你的范围
- 9. 使用柯里化函数来重用逻辑(并正确记忆回调函数)
- 10. 将不依赖组件 props/state 的数据移到组件外部,以获得更干净(更高效)的代码
- 11. 存储列表中选定的项目时,存储项目 ID,而不是整个项目
- 12. 如果你在做某事之前经常检查 prop 的值,那么引入一个新的组件
- 13. 使用 CSS
:empty伪类隐藏没有子元素的元素 - 14. 将所有状态和上下文分组到组件顶部
- 类别 #2:有效的设计模式与技巧🛠️
- 类别 #3:键和引用🗝️
- 类别 #4:组织 React 代码
- Category #5: Efficient State Management 🚦
- 28. Never create a state for a value that can be derived from other state or props
- 29. Keep the state at the lowest level necessary to minimize re-renders
- 30. Clarify the distinction between the initial state and the current state
- 31. Update state based on the previous state, especially when memoizing with
useCallback - 32. Use functions in
useStatefor lazy initialization and performance gains, as they are invoked only once. - 33. Use react context for broadly needed, static state to prevent prop drilling
- 34. React Context: Split your context into parts that change frequently and those that change infrequently to enhance app performance
- 35. React Context: Introduce a
Providercomponent when the value computation is not straightforward - 36. Consider using the
useReducerhook as a lightweight state management solution - 37. Simplify state updates with
useImmeroruseImmerReducer - 38. Use Redux (or another state management solution) for complex client-side state accessed across multiple components
- 39. Redux: Use Redux DevTools to debug your state
- Category #6: React Code Optimization 🚀
- 40. Prevent unnecessary re-renders with
memo - 41. Specify an equality function with
memoto instruct React on how to compare the props. - 42. Prefer named functions over arrow functions when declaring a memoized component
- 43. Cache expensive computations or preserve references with
useMemo - 44. Use
useCallbackto memoize functions - 45. Memoize callbacks or values returned from utility hooks to avoid performance issues
- 46. Leverage lazy loading and
Suspenseto make your apps load faster - 47. Throttle your network to simulate a slow network
- 48. Use
react-windoworreact-virtuosoto efficiently render lists
- 40. Prevent unnecessary re-renders with
- Category #7: Debugging React code 🐞
- Category #8: Testing React code 🧪
- Category #9: React hooks 🎣
- 59. Make sure you perform any required cleanup in your
useEffecthooks - 60. Use
refsfor accessing DOM elements - 61. Use
refsto preserve values across re-renders - 62. Prefer named functions over arrow functions within hooks such as
useEffectto easily find them in React Dev Tools - 63. Encapsulate logic with custom hooks
- 64. Prefer functions over custom hooks
- 65. Prevent visual UI glitches by using the
useLayoutEffecthook - 66. Generate unique IDs for accessibility attributes with the
useIdhook - 67. Use the
useSyncExternalStoreto subscribe to an external store - 68. Use the
useDeferredValuehook to display the previous query results until the new results become available
- 59. Make sure you perform any required cleanup in your
- Category #10: Must-known React Libraries/Tools 🧰
- 69. Incorporate routing into your app with
react-router - 70. Implement first-class data fetching in your app with
swrorReact Query - 71. Simplify form state management with libraries like
formik,React Hook Form, orTanStack Form - 72. Internationalize your app using
Format.js,Lingui,orreact-i18next. - 73. Effortlessly create impressive animations with
framer-motion - 74. Tired of re-inventing the wheel with custom hooks? Check out https://usehooks.com/
- 75. Streamline app development by leveraging UI libraries like Shadcdn or Headless UI
- 76. Check your website's accessibility with the
axe-core-npmlibrary - 77. Refactor React code effortlessly with
react-codemod - 78. Transform your app into a Progressive Web Application (PWA) using vite-pwa
- 69. Incorporate routing into your app with
- Category #11: React & Visual Studio Code 🛠️
- Category #12: React & TypeScript 🚀
- 82. Use
ReactNodeinstead ofJSX.Element | null | undefined | ...to keep your code more compact - 83. Simplify the typing of components expecting children props with
PropsWithChildren - 84. Access element props efficiently with
ComponentProps,ComponentPropsWithoutRef,… - 85. Leverage types like
MouseEventHandler,FocusEventHandlerand others for concise typings - 86. Specify types explicitly in useState, useRef, etc., when the type can't be or shouldn't be inferred from the initial value
- 87. Leverage the
Recordtype for cleaner and more extensible code - 88. Use the
as consttrick to accurately type your hook return values - 89. Redux: Ensure proper typing by referring to https://react-redux.js.org/using-react-redux/usage-with-typescript to correctly type your Redux state and helpers
- 90. Simplify your types with
ComponentType - 91. Make your code more reusable with TypeScript generics
- 92. Ensure precise typing with the
NoInferutility type - 93. Effortlessly type refs with the
ElementReftype helper
- 82. Use
- Category #13: Miscellaneous Tips 🎉
- 94. Boost your code's quality and safety with
eslint-plugin-reactand Prettier. - 95. Log and monitor your app with tools like Sentry or Grafana Cloud Frontend Observability.
- 96. Start coding quickly with online IDEs like Code Sandbox or Stackblitz
- 97. 想要学习 React 高级技能?看看这些书👇
- 98. 准备 React 面试?查看 reactjs-interview-questions
- 99. 向 Nadia、Dan、Josh、Kent 等专家学习 React 最佳实践。
- 100. 订阅《本周 React》或 ui.dev 等新闻通讯,随时了解 React 生态系统的最新动态
- 101. 在 r/reactjs 等平台上与 React 社区互动
- 94. Boost your code's quality and safety with
类别 #1:组件组织
1. 使用自闭合标签保持代码紧凑
// ❌ Bad: too verbose
<MyComponent></MyComponent>

// ✅ Good
<MyComponent/>
返回顶部⬆️
2. 优先fragments使用 DOM 节点(例如 div、span 等)来对元素进行分组
在 React 中,每个组件必须返回单个元素。与其将多个元素包裹在<div>或 中<span>,不如使用<Fragment>来保持DOM 的整洁。
❌ 缺点:使用div会使你的 DOM 变得混乱,并且可能需要更多的 CSS 代码。
function Dashboard() {
  return (
    <div>
      <Header />
      <Main />
    </div>
  );
}
✅ 好: <Fragment>包装元素而不影响 DOM 结构。
function Dashboard() {
  return (
    <Fragment>
      <Header />
      <Main />
    </Fragment>
  );
}
返回顶部⬆️
3. 使用 React fragment 简写<></>(除非需要设置键)
❌ 缺点:下面的代码不必要地冗长。
<Fragment>
   <FirstChild />
   <SecondChild />
</Fragment>
✅ 好:除非你需要一个key,<></>否则更简洁。
<>
   <FirstChild />
   <SecondChild />
</>

// Using a `Fragment` here is required because of the key.
function List({ users }) {
  return (
    <div>
      {users.map((user) => (
        <Fragment key={user.id}>
          <span>{user.name}</span>
          <span>{user.occupation}</span>
        </Fragment>
      ))}
    </div>
  );
}
返回顶部⬆️
4. 分散使用 props,而不是单独访问每个 props
❌ 缺点:下面的代码更难阅读(尤其是在规模较大时)。
// We do `props…` all over the code.
function TodoList(props) {
  return (
    <div>
      {props.todos.map((todo) => (
        <div key={todo}>
          <button
            onClick={() => props.onSelectTodo(todo)}
            style={{
              backgroundColor: todo === props.selectedTodo ? "gold" : undefined,
            }}
          >
            <span>{todo}</span>
          </button>
        </div>
      ))}
    </div>
  );
}
✅ 好:下面的代码更简洁。
function TodoList({ todos, selectedTodo, onSelectTodo }) {
  return (
    <div>
      {todos.map((todo) => (
        <div key={todo}>
          <button
            onClick={() => onSelectTodo(todo)}
            style={{
              backgroundColor: todo === selectedTodo ? "gold" : undefined,
            }}
          >
            <span>{todo}</span>
          </button>
        </div>
      ))}
    </div>
  );
}
返回顶部⬆️
5. 设置 props 的默认值时,在解构时进行
❌ 缺点:您可能需要在多个地方定义默认值并引入新的变量。
function Button({ onClick, text, small, colorScheme }) {
  let scheme = colorScheme || "light";
  let isSmall = small || false;
  return (
    <button
      onClick={onClick}
      style={{
        color: scheme === "dark" ? "white" : "black",
        fontSize: isSmall ? "12px" : "16px",
      }}
    >
      {text ?? "Click here"}
    </button>
  );
}
✅ 优点:你可以在顶部集中设置所有默认设置。这样方便其他人查找。
function Button({
  onClick,
  text = "Click here",
  small = false,
  colorScheme = "light",
}) {
  return (
    <button
      onClick={onClick}
      style={{
        color: colorScheme === "dark" ? "white" : "black",
        fontSize: small ? "12px" : "16px",
      }}
    >
      {text}
    </button>
  );
}
返回顶部⬆️
6. 传递string类型属性时删除花括号。
// ❌ Bad: curly braces are not needed
<Button text={"Click me"} colorScheme={"dark"} />

// ✅ Good
<Button text="Click me" colorScheme="dark" />
返回顶部⬆️
value7.使用前确保它是一个布尔值value && <Component {...props}/>,以防止在屏幕上显示意外的值。
❌ 不好:当列表为空时,0将会打印在屏幕上。
export function ListWrapper({ items, selectedItem, setSelectedItem }) {
  return (
    <div className="list">
      {items.length && ( // `0` if the list is empty
        <List
          items={items}
          onSelectItem={setSelectedItem}
          selectedItem={selectedItem}
        />
      )}
    </div>
  );
}
✅好:当没有物品时,屏幕上不会打印任何内容。
export function ListWrapper({ items, selectedItem, setSelectedItem }) {
  return (
    <div className="list">
      {items.length > 0 && (
        <List
          items={items}
          onSelectItem={setSelectedItem}
          selectedItem={selectedItem}
        />
      )}
    </div>
  );
}
返回顶部⬆️
8. 使用函数(内联或非内联)来避免中间变量污染你的范围
❌缺点:变量gradeSum和gradeCount使组件的范围变得混乱。
function Grade({ grades }) {
  if (grades.length === 0) {
    return <>No grades available.</>;
  }

  let gradeSum = 0;
  let gradeCount = 0;

  grades.forEach((grade) => {
    gradeCount++;
    gradeSum += grade;
  });

  const averageGrade = gradeSum / gradeCount;

  return <>Average Grade: {averageGrade}</>;
}
✅好:变量gradeSum和gradeCount作用域在computeAverageGrade函数内。
function Grade({ grades }) {
  if (grades.length === 0) {
    return <>No grades available.</>;
  }

  const computeAverageGrade = () => {
    let gradeSum = 0;
    let gradeCount = 0;
    grades.forEach((grade) => {
      gradeCount++;
      gradeSum += grade;
    });
    return gradeSum / gradeCount;
  };

  return <>Average Grade: {computeAverageGrade()}</>;
}
💡 注意:你也可以
computeAverageGrade在组件外部定义一个函数并在组件内部调用它。
返回顶部⬆️
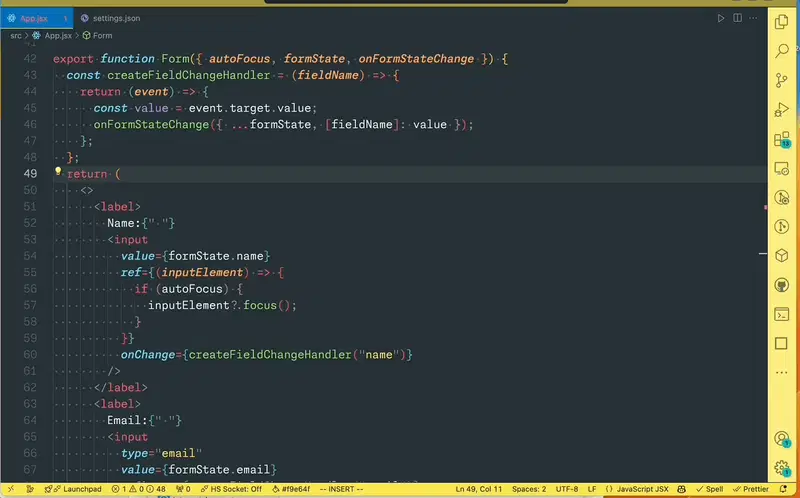
9. 使用柯里化函数来重用逻辑(并正确记忆回调函数)
❌ 缺点:更新字段的逻辑非常重复。
function Form() {
  const [{ name, email }, setFormState] = useState({
    name: "",
    email: "",
  });

  return (
    <>
      <h1>Class Registration Form</h1>
      <form>
        <label>
          Name:{" "}
          <input
            type="text"
            value={name}
            onChange={(evt) =>
              setFormState((formState) => ({
                ...formState,
                name: evt.target.value,
              }))
            }
          />
        </label>
        <label>
          Email:{" "}
          <input
            type="email"
            value={email}
            onChange={(evt) =>
              setFormState((formState) => ({
                ...formState,
                email: evt.target.value,
              }))
            }
          />
        </label>
      </form>
    </>
  );
}
✅ 好:引入createFormValueChangeHandler返回每个字段的正确处理程序。
注意:如果你启用了 ESLint 规则jsx-no-bind ,这个技巧会特别有用。你只需将柯里化函数包装进去
useCallback,就大功告成了!
function Form() {
  const [{ name, email }, setFormState] = useState({
    name: "",
    email: "",
  });

  const createFormValueChangeHandler = (field) => {
    return (event) => {
      setFormState((formState) => ({
        ...formState,
        [field]: event.target.value,
      }));
    };
  };

  return (
    <>
      <h1>Class Registration Form</h1>
      <form>
        <label>
          Name:{" "}
          <input
            type="text"
            value={name}
            onChange={createFormValueChangeHandler("name")}
          />
        </label>
        <label>
          Email:{" "}
          <input
            type="email"
            value={email}
            onChange={createFormValueChangeHandler("email")}
          />
        </label>
      </form>
    </>
  );
}
返回顶部⬆️
10. 将不依赖组件 props/state 的数据移到组件外部,以获得更干净(更高效)的代码
❌ 缺点: OPTIONS不需要renderOption位于组件内部,因为它们不依赖于任何 props 或 state。
此外,将它们保留在内部意味着每次组件渲染时我们都会获得新的对象引用。如果我们将它们传递renderOption给包装在 中的子组件memo,则会破坏记忆机制。
function CoursesSelector() {
  const OPTIONS = ["Maths", "Literature", "History"];
  const renderOption = (option: string) => {
    return <option>{option}</option>;
  };

  return (
    <select>
      {OPTIONS.map((opt) => (
        <Fragment key={opt}>{renderOption(opt)}</Fragment>
      ))}
    </select>
  );
}
✅ 好:将它们移出组件,以保持组件清洁和引用稳定。
const OPTIONS = ["Maths", "Literature", "History"];
const renderOption = (option: string) => {
  return <option>{option}</option>;
};

function CoursesSelector() {
  return (
    <select>
      {OPTIONS.map((opt) => (
        <Fragment key={opt}>{renderOption(opt)}</Fragment>
      ))}
    </select>
  );
}
💡 注意:在此示例中,您可以通过使用内联选项元素进一步简化。
const OPTIONS = ["Maths", "Literature", "History"];

function CoursesSelector() {
  return (
    <select>
      {OPTIONS.map((opt) => (
        <option key={opt}>{opt}</option>
      ))}
    </select>
  );
}
返回顶部⬆️
11. 存储列表中选定的项目时,存储项目 ID,而不是整个项目
❌ 缺点:如果选择了某个项目但随后它发生了变化(即,我们收到相同 ID 的全新对象引用),或者该项目不再存在于列表中,selectedItem则将保留过时的值或变得不正确。
function ListWrapper({ items }) {
  // We are referencing the entire item
  const [selectedItem, setSelectedItem] = useState<Item | undefined>();

  return (
    <>
      {selectedItem != null && <div>{selectedItem.name}</div>}
      <List
        items={items}
        selectedItem={selectedItem}
        onSelectItem={setSelectedItem}
      />
    </>
  );
}
✅ 好:我们通过 ID 来存储选中项(该 ID 应该是稳定的)。这样可以确保即使该项从列表中移除或其某个属性发生变化,UI 也能够正常显示。
function ListWrapper({ items }) {
  const [selectedItemId, setSelectedItemId] = useState<number | undefined>();
  // We derive the selected item from the list
  const selectedItem = items.find((item) => item.id === selectedItemId);

  return (
    <>
      {selectedItem != null && <div>{selectedItem.name}</div>}
      <List
        items={items}
        selectedItemId={selectedItemId}
        onSelectItem={setSelectedItemId}
      />
    </>
  );
}
返回顶部⬆️
12. 如果你在做某事之前经常检查 prop 的值,那么引入一个新的组件
❌ 缺点:由于所有检查,代码变得混乱user == null。
这里,由于hooks 的规则,我们不能提前返回。
function Posts({ user }) {
  // Due to the rules of hooks, `posts` and `handlePostSelect` must be declared before the `if` statement.
  const posts = useMemo(() => {
    if (user == null) {
      return [];
    }
    return getUserPosts(user.id);
  }, [user]);

  const handlePostSelect = useCallback(
    (postId) => {
      if (user == null) {
        return;
      }
      // TODO: Do something
    },
    [user]
  );

  if (user == null) {
    return null;
  }

  return (
    <div>
      {posts.map((post) => (
        <button key={post.id} onClick={() => handlePostSelect(post.id)}>
          {post.title}
        </button>
      ))}
    </div>
  );
}
✅ 好:我们引入了一个新组件,UserPosts它采用定义的用户并且更加清晰。
function Posts({ user }) {
  if (user == null) {
    return null;
  }

  return <UserPosts user={user} />;
}

function UserPosts({ user }) {
  const posts = useMemo(() => getUserPosts(user.id), [user.id]);

  const handlePostSelect = useCallback(
    (postId) => {
      // TODO: Do something
    },
    [user]
  );

  return (
    <div>
      {posts.map((post) => (
        <button key={post.id} onClick={() => handlePostSelect(post.id)}>
          {post.title}
        </button>
      ))}
    </div>
  );
}
返回顶部⬆️
13. 使用 CSS:empty伪类隐藏没有子元素的元素
在下面的示例中👇,包装器接收子项并在它们周围添加红色边框。
function PostWrapper({ children }) {
  return <div className="posts-wrapper">{children}</div>;
}
.posts-wrapper {
  border: solid 1px red;
}
❌ 问题:null即使子项为空(即等于、undefined等),边框仍然在屏幕上可见。

✅ 解决方案:使用:emptyCSS 伪类确保包装器为空时不会显示。
.posts-wrapper:empty {
  display: none;
}
返回顶部⬆️
14. 将所有状态和上下文分组到组件顶部
当所有状态和上下文都位于顶部时,很容易发现什么可以触发组件重新渲染。
❌ 缺点:状态和上下文分散,难以追踪。
function App() {
  const [email, setEmail] = useState("");
  const onEmailChange = (event) => {
    setEmail(event.target.value);
  };
  const [password, setPassword] = useState("");
  const onPasswordChange = (event) => {
    setPassword(event.target.value);
  };
  const theme = useContext(ThemeContext);

  return (
    <div className={`App ${theme}`}>
      <h1>Welcome</h1>
      <p>
        Email: <input type="email" value={email} onChange={onEmailChange} />
      </p>
      <p>
        Password:{" "}
        <input type="password" value={password} onChange={onPasswordChange} />
      </p>
    </div>
  );
}
✅ 优点:所有状态和上下文都集中在顶部,易于发现。
function App() {
  const theme = useContext(ThemeContext);
  const [email, setEmail] = useState("");
  const [password, setPassword] = useState("");
  const onEmailChange = (event) => {
    setEmail(event.target.value);
  };
  const onPasswordChange = (event) => {
    setPassword(event.target.value);
  };

  return (
    <div className={`App ${theme}`}>
      <h1>Welcome</h1>
      <p>
        Email: <input type="email" value={email} onChange={onEmailChange} />
      </p>
      <p>
        Password:{" "}
        <input type="password" value={password} onChange={onPasswordChange} />
      </p>
    </div>
  );
}
返回顶部⬆️
类别 #2:有效的设计模式与技巧🛠️
15. 利用childrenprops 获得更简洁的代码(以及性能优势)
使用children道具有几个好处:
- 好处 1:您可以通过将 props 直接传递给子组件而不是通过父组件进行路由来避免 prop 钻孔。
- 好处 2:您的代码更具可扩展性,因为您可以轻松修改子组件而无需更改父组件。
- 好处#3:您可以使用此技巧来避免重新渲染“慢速”组件(参见下面的示例👇)。
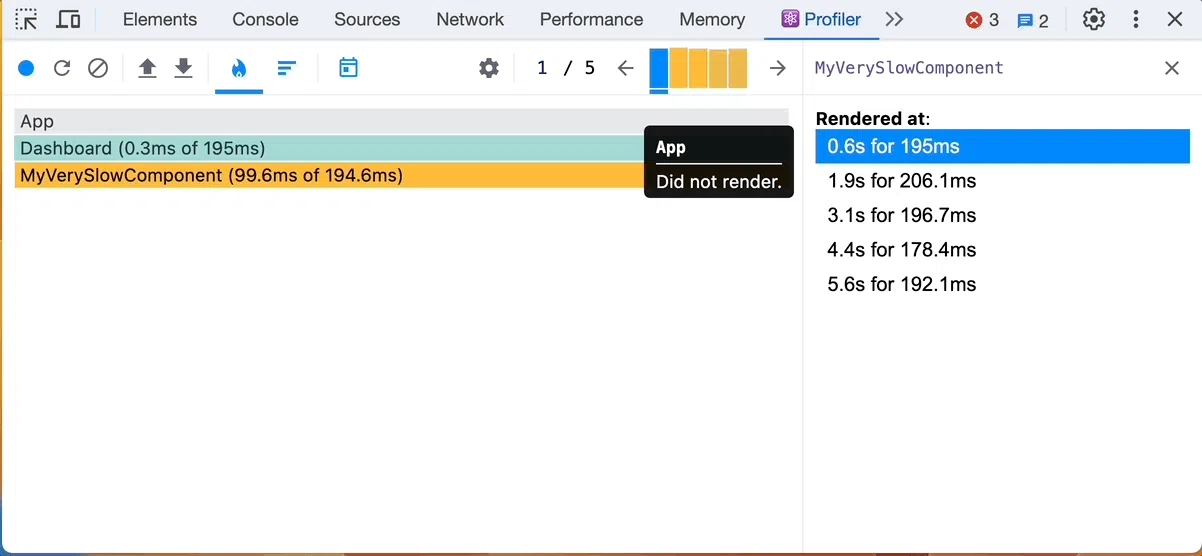
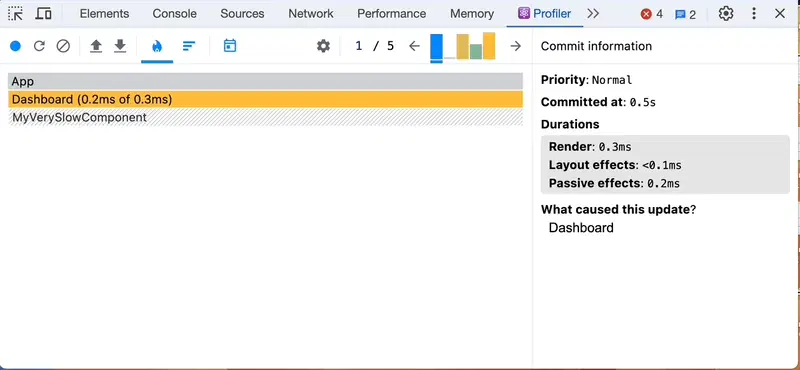
❌ 缺点: MyVerySlowComponent渲染时渲染Dashboard,也就是每次当前时间更新时都会渲染。你可以在下图中看到,我使用了React Developer Tool 的分析器。
function App() {
  // Some other logic…
  return (
    <Dashboard />
  );
}

function Dashboard() {
  const [currentTime, setCurrentTime] = useState(new Date());
  useEffect(() => {
    const intervalId = setInterval(() => {
      setCurrentTime(new Date());
    }, 1_000);
    return () => clearInterval(intervalId);
  }, []);

  return (
    <>
      <h1>{currentTime.toTimeString()}</h1>
      <MyVerySlowComponent />  {/* Renders whenever `Dashboard` renders */}
    </>
  );
}
✅ 好: MyVerySlowComponent渲染时不渲染Dashboard。
function App() {
  return (
    <Dashboard >
      <MyVerySlowComponent />
    </Dashboard>
  );
}

function Dashboard({ children }) {
  const [currentTime, setCurrentTime] = useState(new Date());
  useEffect(() => {
    const intervalId = setInterval(() => {
      setCurrentTime(new Date());
    }, 1_000);
    return () => clearInterval(intervalId);
  }, []);

  return (
    <>
      <h1>{currentTime.toTimeString()}</h1>
      {children}
    </>
  );
}
返回顶部⬆️
16. 使用以下代码构建可组合代码compound components
将复合组件视为乐高积木。
您可以将组件组合在一起,创建自定义的 UI。这些组件在创建库时表现出色,能够生成富有表现力且高度可扩展的代码。
您可以在这里进一步探索这种模式👉复合模式
来自reach.ui的示例(Menu、MenuButton、MenuList、MenuLink是复合组件)
<Menu>
  <MenuButton>
    Actions <span aria-hidden>▾</span>
  </MenuButton>
  <MenuList>
    <MenuItem onSelect={() => alert("Download")}>Download</MenuItem>
    <MenuItem onSelect={() => alert("Copy")}>Create a Copy</MenuItem>
    <MenuLink as="a" href="https://reacttraining.com/workshops/">
    Attend a Workshop
    </MenuLink>
  </MenuList>
</Menu>
返回顶部⬆️
render functions17. 使用orcomponent functions属性让你的代码更具扩展性
假设我们想要显示各种列表,例如消息、个人资料或帖子,并且每个列表都应该可排序。
为了实现这一点,我们引入了一个List可重用的组件。有两种方法可以解决这个问题:
❌ 缺点:方案 1List负责渲染每个项目并进行排序。这很麻烦,因为它违反了开放封闭原则。每当添加新的项目类型时,这段代码都将被修改。
✅ 好:选项 2List采用渲染函数或组件函数,仅在需要时调用它们。
您可以在下面的沙盒中找到一个示例👇:
返回顶部⬆️
18. 处理不同情况时,使用value === case && <Component />避免保留旧状态
❌ 问题:Posts在下面的沙盒中,在和之间切换时,计数器不会重置Snippets。发生这种情况的原因是,在渲染同一个组件时,其状态在类型更改后仍然保持不变。
✅ 解决方案:根据渲染组件selectedType,或者在类型改变时使用键强制重置。
function App() {
  const [selectedType, setSelectedType] = useState<ResourceType>("posts");
  return (
    <>
      <Navbar selectedType={selectedType} onSelectType={setSelectedType} />
      {selectedType === "posts" && <Resource type="posts" />}
      {selectedType === "snippets" && <Resource type="snippets" />}
    </>
  );
}

// We use the `selectedType` as a key
function App() {
  const [selectedType, setSelectedType] = useState<ResourceType>("posts");
  return (
    <>
      <Navbar selectedType={selectedType} onSelectType={setSelectedType} />
      <Resource type={selectedType} key={selectedType} />
    </>
  );
}
返回顶部⬆️
19. 始终使用错误边界
默认情况下,如果您的应用程序在渲染过程中遇到错误,整个 UI 就会崩溃💥。
为了防止这种情况,请使用错误边界来:
- 即使发生错误,应用程序的某些部分仍能正常运行。
- 显示用户友好的错误消息并可选择跟踪错误。
💡 提示:您可以使用react-error-boundary库。
返回顶部⬆️
类别 #3:键和引用🗝️
20. 使用crypto.randomUUID或Math.random生成密钥
调用内的 JSX 元素map()始终需要键。
假设您的元素还没有键。在这种情况下,您可以使用crypto.randomUUID、Math.random或uuid库生成唯一 ID。
注意:请注意,
crypto.randomUUID在旧版浏览器中未定义。
返回顶部⬆️
21. 确保列表项 ID 稳定(即,它们在渲染之间不会改变)
密钥/ID 应尽可能保持稳定。
否则,React 可能会无用地重新渲染一些组件,或者选择将不再有效,如下例所示。
❌ 缺点: selectedQuoteId每次App渲染都会发生变化,因此永远没有有效的选择。
function App() {
  const [quotes, setQuotes] = useState([]);
  const [selectedQuoteId, setSelectedQuoteId] = useState(undefined);

  // Fetch quotes
  useEffect(() => {
    const loadQuotes = () =>
      fetchQuotes().then((result) => {
        setQuotes(result);
      });
    loadQuotes();
  }, []);

  // Add ids: this is bad!!!
  const quotesWithIds = quotes.map((quote) => ({
    value: quote,
    id: crypto.randomUUID(),
  }));

  return (
    <List
      items={quotesWithIds}
      selectedItemId={selectedQuoteId}
      onSelectItem={setSelectedQuoteId}
    />
  );
}
✅ 好:IDs当我们收到报价时,就会添加它们。
function App() {
  const [quotes, setQuotes] = useState([]);
  const [selectedQuoteId, setSelectedQuoteId] = useState(undefined);

  // Fetch quotes and save with ID
  useEffect(() => {
    const loadQuotes = () =>
      fetchQuotes().then((result) => {
        // We add the `ids` as soon as we get the results
        setQuotes(
          result.map((quote) => ({
            value: quote,
            id: crypto.randomUUID(),
          }))
        );
      });
    loadQuotes();
  }, []);

  return (
    <List
      items={quotes}
      selectedItemId={selectedQuoteId}
      onSelectItem={setSelectedQuoteId}
    />
  );
}
返回顶部⬆️
22. 策略性地使用key属性来触发组件重新渲染
想要强制组件从头开始重新渲染吗?只需更改它的key。
在下面的示例中,我们使用这个技巧在切换到新选项卡时重置错误边界。
返回顶部⬆️
23. 使用 来ref callback function完成诸如监视尺寸变化和管理多个节点元素等任务。
您是否知道可以将函数传递给ref属性而不是 ref 对象?
工作原理如下:
- 当 DOM 节点添加到屏幕时,React 会以 DOM 节点作为参数调用该函数。
- 当 DOM 节点被移除时,React 会使用 调用该函数
null。
在下面的例子中,我们使用这个技巧来跳过useEffect
❌ 之前:用于useEffect聚焦输入
function App() {
  const ref = useRef();

  useEffect(() => {
    ref.current?.focus();
  }, []);

  return <input ref={ref} type="text" />;
}
✅ 之后:一旦有输入,我们就会立即关注它。
function App() {
  const ref = useCallback((inputNode) => {
    inputNode?.focus();
  }, []);

  return <input ref={ref} type="text" />;
}
返回顶部⬆️
类别 #4:组织 React 代码
24. 将 React 组件与其资源(例如样式、图像等)放在一起
始终将每个 React 组件与相关资产(如样式和图像)放在一起。
- 当不再需要该组件时,这样可以更轻松地将其移除。
- 它还简化了代码导航,因为您需要的一切都集中在一个地方。

返回顶部⬆️
25. 限制组件文件大小
包含大量组件和导出内容的大文件可能会令人困惑。
此外,随着更多东西的添加,它们往往会变得更大。
因此,请以合理的文件大小为目标,并在合理的情况下将组件拆分为单独的文件。
返回顶部⬆️
26. 限制功能组件文件中的返回语句数量
功能组件中的多个return语句使得很难看清组件返回的内容。
对于我们可以搜索术语的类组件来说,这不是问题render。
一个方便的技巧是尽可能使用不带括号的箭头函数(VSCode 对此有一个操作😀)。
❌ 缺点:组件返回语句更难发现
function Dashboard({ posts, searchTerm, onPostSelect }) {
  const filteredPosts = posts.filter((post) => {
    return post.title.includes(searchTerm);
  });
  const createPostSelectHandler = (post) => {
    return () => {
      onPostSelect(post.id);
    };
  };
  return (
    <>
      <h1>Posts</h1>
      <ul>
        {filteredPosts.map((post) => {
          return (
            <li key={post.id} onClick={createPostSelectHandler(post)}>
              {post.title}
            </li>
          );
        })}
      </ul>
    </>
  );
}
✅ 好:组件有一个返回语句
function Dashboard({ posts, searchTerm, onPostSelect, selectedPostId }) {
  const filteredPosts = posts.filter((post) => post.title.includes(searchTerm));
  const createPostSelectHandler = (post) => () => {
    onPostSelect(post.id);
  };
  return (
    <>
      <h1>Posts</h1>
      <ul>
        {filteredPosts.map((post) => (
          <li
            key={post.id}
            onClick={createPostSelectHandler(post)}
            style={{ color: post.id === selectedPostId ? "red" : "black" }}
          >
            {post.title}
          </li>
        ))}
      </ul>
    </>
  );
}
返回顶部⬆️
27. 优先使用命名导出,而不是默认导出
我到处都能看到默认导出,这让我很难过🥲。
让我们比较一下这两种方法:
/// `Dashboard` is exported as the default component
export default function Dashboard(props) {
 /// TODO
}

/// `Dashboard` export is named
export function Dashboard(props) {
 /// TODO
}
我们现在像这样导入组件:
/// Default export
import Dashboard from "/path/to/Dashboard"


/// Named export
import { Dashboard } from "/path/to/Dashboard"
这些是默认导出的问题:
- 如果组件被重命名,IDE 将不会自动重命名导出。
例如,如果Dashboard重命名为Console,我们将得到以下内容:
/// In the default export case, the name is not changed
import Dashboard from "/path/to/Console"


/// In the named export case, the name is changed
import { Console } from "/path/to/Console"
- 很难看出从具有默认导出的文件中导出了什么。
例如,在命名导入的情况下,一旦我输入import { } from "/path/to/file",当我将光标设置在括号内时就会获得自动完成功能。
- 默认导出更难重新导出。
例如,如果我想Dashboard从一个index文件重新导出组件,我必须这样做:
export { default as Dashboard } from "/path/to/Dashboard"
使用命名导出的解决方案更加直接。
export { Dashboard } from "/path/to/Dashboard"
因此,请默认使用命名导出🙏。
💡 注意:即使你使用了 React lazy,你仍然可以使用命名导出。查看此处的示例。
返回顶部⬆️
类别 #5:高效的状态管理🚦
28. 永远不要为可以从其他状态或属性派生的值创建状态
状态越多=麻烦越多。
每个状态都可能触发重新渲染,并使重置状态变得麻烦。
因此,如果可以从状态或道具中获得值,则跳过添加新状态。
❌ 不好: filteredPosts不需要处于该状态。
function App({ posts }) {
  const [filters, setFilters] = useState();
  const [filteredPosts, setFilteredPosts] = useState([]);

  useEffect(
    () => {
      setFilteredPosts(filterPosts(posts, filters));
    },
    [posts, filters]
  );

  return (
    <Dashboard>
      <Filters filters={filters} onFiltersChange={setFilters} />
      {filteredPosts.length > 0 && <Posts posts={filteredPosts} />}
    </Dashboard>
  );
}
✅ 好: filteredPosts源自posts和filters.
function App({ posts }) {
  const [filters, setFilters] = useState({});
  const filteredPosts = filterPosts(posts, filters)

  return (
    <Dashboard>
      <Filters filters={filters} onFiltersChange={setFilters} />
      {filteredPosts.length > 0 && <Posts posts={filteredPosts} />}
    </Dashboard>
  );
}
返回顶部⬆️
29. 将状态保持在最低水平,以尽量减少重新渲染
每当组件内部的状态发生变化时,React 都会重新渲染该组件及其所有子组件(包裹在memo中的子组件除外)。
即使这些子组件不使用更改后的状态,也会发生这种情况。为了最大限度地减少重新渲染,请将状态尽可能地移到组件树的下方。
❌ 缺点:当sortOrder发生变化时,都会LeftSidebar重新RightSidebar渲染。
function App() {
  const [sortOrder, setSortOrder] = useState("popular");
  return (
    <div className="App">
      <LeftSidebar />
      <Main sortOrder={sortOrder} setSortOrder={setSortOrder} />
      <RightSidebar />
    </div>
  );
}

function Main({ sortOrder, setSortOrder }) {
  return (
    <div>
      <Button
        onClick={() => setSortOrder("popular")}
        active={sortOrder === "popular"}
      >
        Popular
      </Button>
      <Button
        onClick={() => setSortOrder("latest")}
        active={sortOrder === "latest"}
      >
        Latest
      </Button>
    </div>
  );
}
✅ 好: sortOrder改变只会影响Main。
function App() {
  return (
    <div className="App">
      <LeftSidebar />
      <Main />
      <RightSidebar />
    </div>
  );
}

function Main() {
  const [sortOrder, setSortOrder] = useState("popular");
  return (
    <div>
      <Button
        onClick={() => setSortOrder("popular")}
        active={sortOrder === "popular"}
      >
        Popular
      </Button>
      <Button
        onClick={() => setSortOrder("latest")}
        active={sortOrder === "latest"}
      >
        Latest
      </Button>
    </div>
  );
}
返回顶部⬆️
30.明确初始状态和当前状态的区别
❌ 缺点:不清楚 sortOrder 只是初始值,这可能会导致状态管理中的混乱或错误。
function Main({ sortOrder }) {
  const [internalSortOrder, setInternalSortOrder] = useState(sortOrder);
  return (
    <div>
      <Button
        onClick={() => setInternalSortOrder("popular")}
        active={internalSortOrder === "popular"}
      >
        Popular
      </Button>
      <Button
        onClick={() => setInternalSortOrder("latest")}
        active={internalSortOrder === "latest"}
      >
        Latest
      </Button>
    </div>
  );
}
✅ 好:命名清楚地表明了什么是初始状态,什么是当前状态。
function Main({ initialSortOrder }) {
  const [sortOrder, setSortOrder] = useState(initialSortOrder);
  return (
    <div>
      <Button
        onClick={() => setSortOrder("popular")}
        active={sortOrder === "popular"}
      >
        Popular
      </Button>
      <Button
        onClick={() => setSortOrder("latest")}
        active={sortOrder === "latest"}
      >
        Latest
      </Button>
    </div>
  );
}
返回顶部⬆️
31. 根据先前状态更新状态,尤其是在使用useCallback
React 允许您将更新函数传递给set函数useState。
此更新函数使用当前状态来计算下一个状态。
每当我需要根据先前的状态更新状态时,我都会使用这种行为,尤其是在包装的函数内部useCallback.,事实上,这种方法可以避免将状态作为钩子依赖项之一的需要。
❌ 缺点: 随时handleAddTodo变化。handleRemoveTodotodos
function App() {
  const [todos, setToDos] = useState([]);
  const handleAddTodo = useCallback(
    (todo) => {
      setToDos([...todos, todo]);
    },
    [todos]
  );

  const handleRemoveTodo = useCallback(
    (id) => {
      setToDos(todos.filter((todo) => todo.id !== id));
    },
    [todos]
  );

  return (
    <div className="App">
      <TodoInput onAddTodo={handleAddTodo} />
      <TodoList todos={todos} onRemoveTodo={handleRemoveTodo} />
    </div>
  );
}
✅ 好: handleAddTodo即使改变也handleRemoveTodo保持不变todos。
function App() {
  const [todos, setToDos] = useState([]);
  const handleAddTodo = useCallback((todo) => {
    setToDos((prevTodos) => [...prevTodos, todo]);
  }, []);

  const handleRemoveTodo = useCallback((id) => {
    setToDos((prevTodos) => prevTodos.filter((todo) => todo.id !== id));
  }, []);

  return (
    <div className="App">
      <TodoInput onAddTodo={handleAddTodo} />
      <TodoList todos={todos} onRemoveTodo={handleRemoveTodo} />
    </div>
  );
}
返回顶部⬆️
32. 使用函数进行useState延迟初始化并提高性能,因为它们只被调用一次。
在 useState 中使用函数可确保初始状态仅计算一次。
这可以提高性能,特别是当初始状态来自“昂贵”的操作(例如从本地存储读取)时。
❌ 缺点:每次组件渲染时,我们都会从本地存储中读取主题
const THEME_LOCAL_STORAGE_KEY = "101-react-tips-theme";

function PageWrapper({ children }) {
  const [theme, setTheme] = useState(
    localStorage.getItem(THEME_LOCAL_STORAGE_KEY) || "dark"
  );

  const handleThemeChange = (theme) => {
    setTheme(theme);
    localStorage.setItem(THEME_LOCAL_STORAGE_KEY, theme);
  };

  return (
    <div
      className="page-wrapper"
      style={{ background: theme === "dark" ? "black" : "white" }}
    >
      <div className="header">
        <button onClick={() => handleThemeChange("dark")}>Dark</button>
        <button onClick={() => handleThemeChange("light")}>Light</button>
      </div>
      <div>{children}</div>
    </div>
  );
}
✅ 好:我们仅在组件安装时从本地存储读取。
function PageWrapper({ children }) {
  const [theme, setTheme] = useState(
    () => localStorage.getItem(THEME_LOCAL_STORAGE_KEY) || "dark"
  );

  const handleThemeChange = (theme) => {
    setTheme(theme);
    localStorage.setItem(THEME_LOCAL_STORAGE_KEY, theme);
  };

  return (
    <div
      className="page-wrapper"
      style={{ background: theme === "dark" ? "black" : "white" }}
    >
      <div className="header">
        <button onClick={() => handleThemeChange("dark")}>Dark</button>
        <button onClick={() => handleThemeChange("light")}>Light</button>
      </div>
      <div>{children}</div>
    </div>
  );
}
返回顶部⬆️
33. 使用 React 上下文来实现广泛需要的静态状态,以防止 prop 钻取
每当我有以下数据时,我就会使用 React context:
- 在多个地方都需要(例如主题、当前用户等)
- 大部分是静态或只读的(即用户不能/不会经常更改数据)
这种方法有助于避免 prop 钻取(即通过组件层次结构的多层传递数据或状态)。
请参阅下面沙箱中的示例👇。
返回顶部⬆️
34. React Context:将上下文拆分为经常变化的部分和不经常变化的部分,以提高应用程序性能
React 上下文的一个挑战是,只要上下文数据发生变化,所有使用上下文的组件都会重新渲染,即使它们不使用发生变化的上下文部分🤦♀️。
解决方案?使用单独的上下文。
在下面的例子中,我们创建了两个上下文:一个用于动作(恒定),另一个用于状态(可以改变)。
返回顶部⬆️
35. React Context:Provider当值计算不直接时引入组件
❌ 缺点:里面有太多逻辑App来管理主题。
const THEME_LOCAL_STORAGE_KEY = "101-react-tips-theme";
const DEFAULT_THEME = "light";

const ThemeContext = createContext({
  theme: DEFAULT_THEME,
  setTheme: () => null,
})

function App() {
  const [theme, setTheme] = useState(
    () => localStorage.getItem(THEME_LOCAL_STORAGE_KEY) || DEFAULT_THEME
  );
  useEffect(() => {
    if(theme !== "system") {
      updateRootElementTheme(theme)
      return;
    }

    // We need to get the class to apply based on the system theme
    const systemTheme = window.matchMedia("(prefers-color-scheme: dark)")
        .matches
        ? "dark"
        : "light"

    updateRootElementTheme(systemTheme)

    // Then watch for changes in the system theme and update the root element accordingly
    const darkThemeMq = window.matchMedia("(prefers-color-scheme: dark)");
    const listener = (event) => {
      updateRootElementTheme(event.matches ? "dark" : "light")
    };
    darkThemeMq.addEventListener("change", listener);
    return () => darkThemeMq.removeEventListener("change", listener);
  }, [theme]);

  const themeContextValue = {
    theme,
    setTheme: (theme) => {
      localStorage.setItem(THEME_LOCAL_STORAGE_KEY, theme);
      setTheme(theme);
    }
  }

  const [selectedPostId, setSelectedPostId] = useState(undefined);
  const onPostSelect = (postId) => {
    // TODO: some logging
    setSelectedPostId(postId);
  };

  const posts = useSWR("/api/posts", fetcher);

  return (
    <div className="App">
      <ThemeContext.Provider value={themeContextValue}>
        <Dashboard
          posts={posts}
          onPostSelect={onPostSelect}
          selectedPostId={selectedPostId}
        />
      </ThemeContext.Provider>
    </div>
  );
}
✅ 好:主题逻辑被封装在ThemeProvider
function App() {
  const [selectedPostId, setSelectedPostId] = useState(undefined);
  const onPostSelect = (postId) => {
    // TODO: some logging
    setSelectedPostId(postId);
  };

  const posts = useSWR("/api/posts", fetcher);

  return (
    <div className="App">
      <ThemeProvider>
        <Dashboard
          posts={posts}
          onPostSelect={onPostSelect}
          selectedPostId={selectedPostId}
        />
      </ThemeProvider>
    </div>
  );
}


function ThemeProvider({ children }) {
  const [theme, setTheme] = useState(
    () => localStorage.getItem(THEME_LOCAL_STORAGE_KEY) || DEFAULT_THEME
  );
  useEffect(() => {
    if (theme !== "system") {
      updateRootElementTheme(theme);
      return;
    }

    // We need to get the class to apply based on the system theme
    const systemTheme = window.matchMedia("(prefers-color-scheme: dark)")
      .matches
      ? "dark"
      : "light";

    updateRootElementTheme(systemTheme);

    // Then watch for changes in the system theme and update the root element accordingly
    const darkThemeMq = window.matchMedia("(prefers-color-scheme: dark)");
    const listener = (event) => {
      updateRootElementTheme(event.matches ? "dark" : "light");
    };
    darkThemeMq.addEventListener("change", listener);
    return () => darkThemeMq.removeEventListener("change", listener);
  }, [theme]);

  const themeContextValue = {
    theme,
    setTheme: (theme) => {
      localStorage.setItem(THEME_LOCAL_STORAGE_KEY, theme);
      setTheme(theme);
    },
  };

  return (
    <div className="App">
      <ThemeContext.Provider value={themeContextValue}>
        {children}
      </ThemeContext.Provider>
    </div>
  );
}
返回顶部⬆️
36. 考虑使用useReducer钩子作为轻量级状态管理解决方案
每当我的状态或复杂状态中有太多值并且不想依赖外部库时,我就会使用useReducer。
当与更广泛的状态管理需求相结合时,它特别有效。
例如:参见#Tip 34。
返回顶部⬆️
37. 使用useImmer或简化状态更新useImmerReducer
useState对于像和 这样的钩子useReducer,状态必须是不可变的(即,所有更改都需要创建新状态,而不是修改当前状态)。
这通常比较困难。
这时useImmer和useImmerReducer提供了一个更简单的替代方案。它们允许你编写“可变”代码,并自动将其转换为不可变更新。
❌ 繁琐:我们必须仔细确保我们正在创建一个新的状态对象。
export function App() {
  const [{ email, password }, setState] = useState({
    email: "",
    password: "",
  });
  const onEmailChange = (event) => {
    setState((prevState) => ({ ...prevState, email: event.target.value }));
  };
  const onPasswordChange = (event) => {
    setState((prevState) => ({ ...prevState, password: event.target.value }));
  };

  return (
    <div className="App">
      <h1>Welcome</h1>
      <p>
        Email: <input type="email" value={email} onChange={onEmailChange} />
      </p>
      <p>
        Password:{" "}
        <input type="password" value={password} onChange={onPasswordChange} />
      </p>
    </div>
  );
}
✅更直接:我们可以直接修改draftState。
import { useImmer } from "use-immer";

export function App() {
  const [{ email, password }, setState] = useImmer({
    email: "",
    password: "",
  });
  const onEmailChange = (event) => {
    setState((draftState) => {
      draftState.email = event.target.value;
    });
  };
  const onPasswordChange = (event) => {
    setState((draftState) => {
      draftState.password = event.target.value;
    });
  };

  /// Rest of logic
}
返回顶部⬆️
38. 使用 Redux(或其他状态管理解决方案)来跨多个组件访问复杂的客户端状态
每当我遇到以下情况时,我都会使用Redux:
- 我有一个复杂的 FE 应用程序,其中包含许多共享的客户端状态(例如,仪表板应用程序)
- 我希望用户能够回到过去并恢复更改
- 我不希望我的组件像 React context 那样不必要地重新渲染
- 我有太多开始失控的情况
为了获得简化的体验,我建议使用redux-tooltkit。
返回顶部⬆️
39. Redux:使用 Redux DevTools 调试状态
Redux DevTools 浏览器扩展是调试 Redux 项目的有用工具。
它允许您实时地可视化您的状态和操作,在刷新时保持状态持久性等等。
要了解它的用途,请观看这个精彩的YouTube 视频。
返回顶部⬆️
类别 #6:React 代码优化
40. 防止不必要的重新渲染memo
当处理渲染成本高昂且其父组件频繁更新的组件时,将它们包装在备忘录中可能会改变游戏规则。
memo确保组件仅在其 props 发生变化时重新渲染,而不是仅仅因为其父级重新渲染。
在下面的例子中,我通过 从服务器获取了一些数据useGetDashboardData。如果posts没有变化,则包装ExpensiveList将memo阻止它在数据其他部分更新时重新渲染。
export function App() {
  const { profileInfo, posts } = useGetDashboardData();
  return (
    <div className="App">
      <h1>Dashboard</h1>
      <Profile data={profileInfo} />
      <ExpensiveList posts={posts} />
    </div>
  );
}

const ExpensiveList = memo(
  ({ posts }) => {
    /// Rest of implementation
  }
);
💡:一旦React 编译器稳定下来,这个提示可能就不再适用了😅。
返回顶部⬆️
41. 指定一个相等函数来memo指示 React 如何比较 props。
默认情况下,memo使用Object.is将每个 prop 与其先前的值进行比较。
但是,对于更复杂或更具体的场景,指定自定义相等函数比默认比较或重新渲染更有效。
示例👇
const ExpensiveList = memo(
  ({ posts }) => {
    return <div>{JSON.stringify(posts)}</div>;
  },
  (prevProps, nextProps) => {
    // Only re-render if the last post or the list size changes
    const prevLastPost = prevProps.posts[prevProps.posts.length - 1];
    const nextLastPost = nextProps.posts[nextProps.posts.length - 1];
    return (
      prevLastPost.id === nextLastPost.id &&
      prevProps.posts.length === nextProps.posts.length
    );
  }
)
返回顶部⬆️
42. 声明记忆组件时,优先使用命名函数而不是箭头函数
定义记忆组件时,使用命名函数而不是箭头函数可以提高 React DevTools 的清晰度。
箭头函数通常会产生诸如这样的通用名称_c2,这会使调试和分析更加困难。
❌ 缺点:对记忆组件使用箭头函数会导致 React DevTools 中的名称信息量减少。
const ExpensiveList = memo(
  ({ posts }) => {
    /// Rest of implementation
  }
);

✅ 好:组件的名称将在 DevTools 中可见。
const ExpensiveList = memo(
  function ExpensiveListFn({ posts }) {
    /// Rest of implementation
  }
);

返回顶部⬆️
43. 缓存昂贵的计算或保留引用useMemo
我通常会useMemo:
- 当我有昂贵的计算时,这些计算不应该在每次渲染时重复。
- 如果计算值是非原始值,并且用作钩子中的依赖项,例如
useEffect。 - 计算出的非原始值将作为 prop 传递给包装在中的组件
memo;否则,这将破坏记忆,因为 React 使用Object.is来检测 props 是否发生变化。
❌ 缺点: for不能阻止重新渲染,因为每次渲染时都会重新创建样式memo。ExpensiveList
export function App() {
  const { profileInfo, posts, baseStyles } = useGetDashboardData();
  // We get a new `styles` object on every render
  const styles = { ...baseStyles, padding: "10px" };
  return (
    <div className="App">
      <h1>Dashboard</h1>
      <Profile data={profileInfo} />
      <ExpensiveList posts={posts} styles={styles} />
    </div>
  );
}

const ExpensiveList = memo(
  function ExpensiveListFn({ posts, styles }) {
    /// Rest of implementation
  }
);
✅ 好:使用useMemo确保styles仅在baseStyles更改时更改,从而memo有效防止不必要的重新渲染。
export function App() {
  const { profileInfo, posts, baseStyles } = useGetDashboardData();
  // We get a new `styles` object only if `baseStyles` changes
  const styles = useMemo(
    () => ({ ...baseStyles, padding: "10px" }),
    [baseStyles]
  );
  return (
    <div className="App">
      <h1>Dashboard</h1>
      <Profile data={profileInfo} />
      <ExpensiveList posts={posts} styles={styles} />
    </div>
  );
}
返回顶部⬆️
44. 使用useCallback记忆函数
useCallback与记忆函数类似,useMemo但专门为记忆函数而设计。
❌ 缺点:每当主题发生变化时,handleThemeChange都会被调用两次,并且我们会将日志推送到服务器两次。
function useTheme() {
  const [theme, setTheme] = useState("light");

  // `handleThemeChange` changes on every render
  // As a result, the effect will be triggered after each render
  const handleThemeChange = (newTheme) => {
    pushLog(["Theme changed"], {
      context: {
        theme: newTheme,
      },
    });
    setTheme(newTheme);
  };

  useEffect(() => {
    const dqMediaQuery = window.matchMedia("(prefers-color-scheme: dark)");
    handleThemeChange(dqMediaQuery.matches ? "dark" : "light");
    const listener = (event) => {
      handleThemeChange(event.matches ? "dark" : "light");
    };
    dqMediaQuery.addEventListener("change", listener);
    return () => {
      dqMediaQuery.removeEventListener("change", listener);
    };
  }, [handleThemeChange]);

  return theme;
}
✅ 好:包装handleThemeChangeuseCallback 可确保仅在必要时重新创建它,从而减少不必要的执行。
const handleThemeChange = useCallback((newTheme) => {
    pushLog(["Theme changed"], {
      context: {
        theme: newTheme,
      },
    });
    setTheme(newTheme);
  }, []);
返回顶部⬆️
45. 记住回调或实用程序钩子返回的值以避免性能问题
当您创建自定义钩子与他人共享时,记住返回的值和函数至关重要。
这种做法使你的钩子更加高效,并避免了任何使用它的人出现不必要的性能问题。
❌ 缺点: loadData没有被记忆并产生性能问题。
function useLoadData(fetchData) {
  const [result, setResult] = useState({
    type: "notStarted",
  });

  async function loadData() {
    setResult({ type: "loading" });
    try {
      const data = await fetchData();
      setResult({ type: "loaded", data });
    } catch (err) {
      setResult({ type: "error", error: err });
    }
  }

  return { result, loadData };
}
✅ 好:我们记住所有内容,因此不会出现意外的性能问题。
function useLoadData(fetchData) {
  const [result, setResult] = useState({
    type: "notStarted",
  });

  // Wrap in `useRef` and use the `ref` value so the function never changes
  const fetchDataRef = useRef(fetchData);
  useEffect(() => {
    fetchDataRef.current = fetchData;
  }, [fetchData]);

  // Wrap in `useCallback` and use the `ref` value so the function never changes
  const loadData = useCallback(async () => {
    setResult({ type: "loading" });
    try {
      const data = await fetchDataRef.current();
      setResult({ type: "loaded", data });
    } catch (err) {
      setResult({ type: "error", error: err });
    }
  }, []);

  return useMemo(() => ({ result, loadData }), [result, loadData])
}
返回顶部⬆️
46. 利用延迟加载Suspense让你的应用加载更快
构建应用程序时,请考虑使用延迟加载和Suspense以下代码:
- 加载成本高昂。
- 仅与部分用户相关(如高级功能)。
- 对于初始用户交互来说并非立即需要。
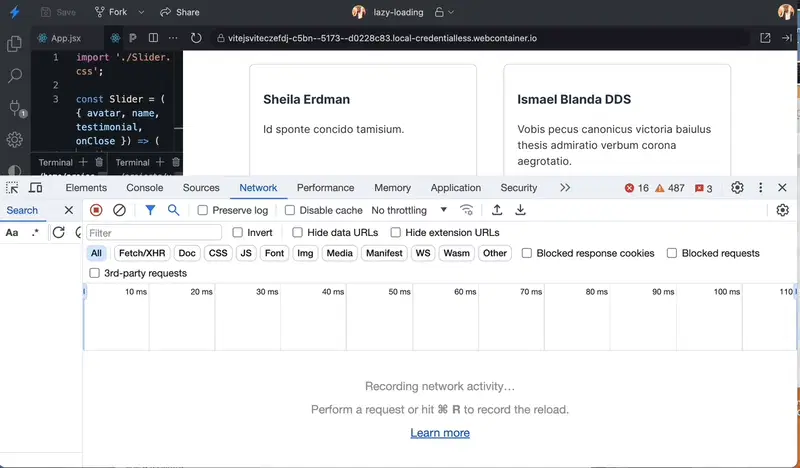
在下面的沙盒👇中,只有在您单击卡片后才会加载滑块资产(JS + CSS)。

返回顶部⬆️
47. 限制网络速度,模拟慢速网络
您知道您可以在 Chrome 中直接模拟慢速互联网连接吗?
这在以下情况下尤其有用:
- 客户反映加载时间很慢,而您无法在更快的网络上复制这种现象。
- 您正在实现延迟加载,并希望观察文件在较慢条件下的加载方式,以确保适当的加载状态。
返回顶部⬆️
48. 使用react-windoworreact-virtuoso高效渲染列表
切勿一次性渲染一长串项目列表 - 例如聊天消息、日志或无限列表。
这样做可能会导致浏览器冻结。
相反,应该虚拟化列表。这意味着只渲染用户可能看到的子集。
诸如react-window、react-virtuoso或@tanstack/react-virtual 之类的库就是为此目的而设计的。
❌ 缺点: NonVirtualList同时呈现所有 50,000 条日志行,即使它们不可见。
function NonVirtualList({ items }) {
  return (
    <div style={{ height: "100%" }}>
      {items.map((log, index) => (
        <div
          key={log.id}
          style={{
            padding: "5px",
            borderBottom:
              index === items.length - 1 ? "none" : "1px solid #ccc",
          }}
        >
          <LogLine log={log} index={index} />
        </div>
      ))}
    </div>
  );
}
✅ 好: VirtualList仅渲染可能可见的项目。
function VirtualList({ items }) {
  return (
    <Virtuoso
      style={{ height: "100%" }}
      data={items}
      itemContent={(index, log) => (
        <div
          key={log.id}
          style={{
            padding: "5px",
            borderBottom:
              index === items.length - 1 ? "none" : "1px solid #ccc",
          }}
        >
          <LogLine log={log} index={index} />
        </div>
      )}
    />
  );
}
您可以在下面的沙箱中在两个选项之间切换,并注意应用程序在NonVirtualList使用时的表现有多糟糕👇。
返回顶部⬆️
类别 #7:调试 React 代码🐞
49.StrictMode在将组件部署到生产环境之前,用于捕获其中的错误
使用StrictMode是一种在开发过程中主动检测应用程序中潜在问题的方法。
它有助于识别以下问题:
- 清理不彻底的效果,比如忘记释放资源。
- React 组件中的杂质,确保它们在给定相同输入(props、state 和 context)的情况下返回一致的 JSX。
下面的示例显示了一个错误,因为clearInterval从未被调用。StrictMode通过运行两次效果来帮助捕获此问题,从而创建两个间隔。
返回顶部⬆️
50. 安装 React Developer Tools 浏览器扩展来查看/编辑组件并检测性能问题
React Developer Tools 是必备的扩展(Chrome、Firefox)。
此扩展程序可让您:
- 可视化并深入研究 React 组件的细节,检查从道具到状态的所有内容。
- 直接修改组件的状态或道具,看看变化如何影响行为和渲染。
- 分析您的应用程序以确定组件重新渲染的时间和原因,帮助您发现性能问题。
- ETC。
💡 通过本精彩指南学习如何使用它。
返回顶部⬆️
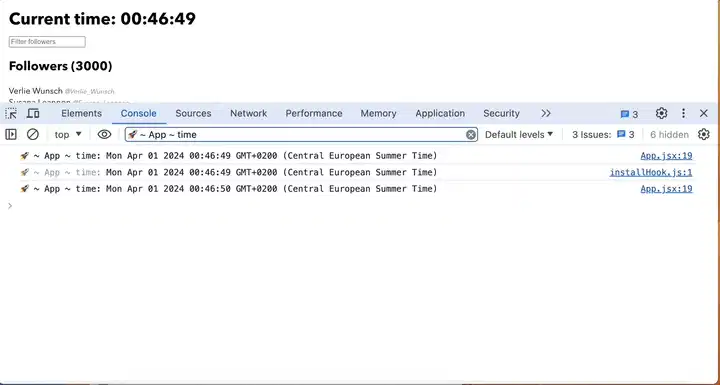
51. React DevTools 组件:突出显示渲染的组件以识别潜在问题
每当我怀疑我的应用存在性能问题时,我都会使用这个技巧。你可以高亮显示正在渲染的组件,以检测潜在的问题(例如,渲染次数过多)。
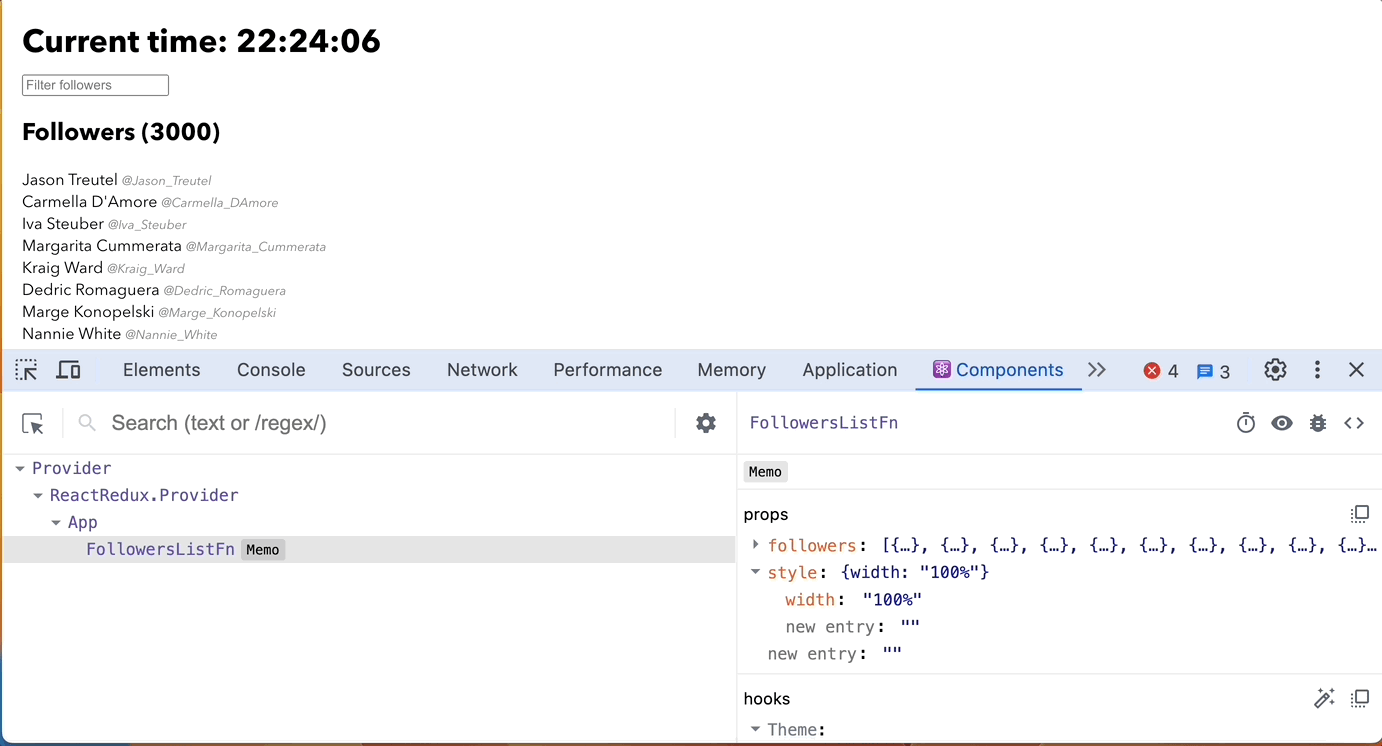
下面的 gif 显示FollowersListFn每当时间改变时组件就会重新渲染,这是错误的。
返回顶部⬆️
52. 利用useDebugValue自定义钩子在 React DevTools 中获得更好的可视性
useDebugValue可以成为一个方便的工具,用于在 React DevTools 中为自定义钩子添加描述性标签。
这使得直接从 DevTools 界面监控它们的状态变得更加容易。
例如,考虑一下我用来获取和显示当前时间的这个自定义钩子,每秒更新一次:
function useCurrentTime(){
  const [time, setTime] = useState(new Date());

  useEffect(() => {
    const intervalId = setInterval(() => {
      setTime(new Date());
    }, 1_000);
    return () => clearInterval(intervalId);
  }, [setTime]);

  return time;
}
❌ 缺点:如果没有useDebugValue,实际时间值不会立即可见;您需要扩展 CurrentTime 钩子:

✅ 优点:使用useDebugValue,可以一目了然地看到当前时间:
useDebugValue(time)

注意:请
useDebugValue谨慎使用。最好将其保留用于共享库中复杂的钩子,因为了解内部状态至关重要。
返回顶部⬆️
53. 使用why-did-you-render库跟踪组件渲染并识别潜在的性能瓶颈
有时,组件会重新渲染,但原因尚不清楚🤦♀️。
虽然 React DevTools 很有用,但在大型应用程序中,它可能只会提供诸如“钩子#1 已渲染”之类的模糊解释,这可能是无用的。

在这种情况下,你可以使用why-did-you-render库。它提供了关于组件重新渲染原因的更详细见解,有助于更有效地查明性能问题。
我在下面的沙盒👇中创建了一个示例。多亏了这个库,我们才能找到组件的问题FollowersList。

返回顶部⬆️
54. 在严格模式下第二次渲染时隐藏日志
StrictMode有助于在应用程序开发早期发现错误。
但是,由于它会导致组件渲染两次,这可能会导致重复的日志,从而使您的控制台变得混乱。
您可以在严格模式下的第二次渲染期间隐藏日志来解决这个问题。
查看下面的 gif 中如何操作👇:
返回顶部⬆️
类别 #8:测试 React 代码
55. 使用React Testing Library来有效地测试你的 React 组件
想要测试你的 React 应用程序吗?
您可以在此处找到一个最小示例。
返回顶部⬆️
56. React 测试库:使用测试环境轻松创建查询
难以决定在测试中使用哪些查询?
考虑使用测试场地从组件的 HTML 快速生成它们。
以下是利用它的两种方法:
选项 1:在测试中使用screen.logTestingPlaygroundURL()。此函数会生成一个 URL,用于打开测试平台工具,其中已加载组件的 HTML。

选项 2:安装Testing Playground Chrome 扩展程序。此扩展程序允许您直接在浏览器中将鼠标悬停在应用中的元素上,以找到用于测试它们的最佳查询。

返回顶部⬆️
Cypress57. 使用或进行端到端测试Playwright
需要进行端到端测试吗?
请务必查看Cypress或Playwright。
注意:在撰写本文时,Playwright 对组件的支持尚处于实验阶段。
返回顶部⬆️
58.MSW在测试中模拟网络请求
有时,您的测试需要发出网络请求。
不要实现自己的模拟(或者,上帝保佑,发出实际的网络请求😅),考虑使用MSW(Mock Service Worker)来处理您的 API 响应。
MSW 允许您在测试中直接拦截和操纵网络交互,为模拟服务器响应而不影响实时服务器提供强大而直接的解决方案。
这种方法有助于维持受控且可预测的测试环境,从而提高测试的可靠性。
返回顶部⬆️
类别 #9:React Hooks 🎣
59. 确保在useEffect钩子中执行所有必要的清理
useEffect如果您设置了任何需要稍后清理的内容,请始终在钩子中返回清理函数。
这可以是任何事情,从结束聊天会话到关闭数据库连接。
忽略这一步可能会导致资源使用不当和潜在的内存泄漏。
❌ 不好:这个例子设置了一个间隔。但我们从未清除它,这意味着即使组件被卸载后它仍然会继续运行。
function Timer() {
  const [time, setTime] = useState(new Date());
  useEffect(() => {
    setInterval(() => {
      setTime(new Date());
    }, 1_000);
  }, []);

  return <>Current time {time.toLocaleTimeString()}</>;
}
✅ 好:组件卸载时间隔被正确清除。
function Timer() {
  const [time, setTime] = useState(new Date());
  useEffect(() => {
    const intervalId = setInterval(() => {
      setTime(new Date());
    }, 1_000);
    // We clear the interval
    return () => clearInterval(intervalId);
  }, []);

  return <>Current time {time.toLocaleTimeString()}</>;
}
返回顶部⬆️
60.refs用于访问 DOM 元素
您永远不应该使用 React 直接操作 DOM。
由于 React 应该访问/操作 DOM,因此禁止使用诸如document.getElementById和之类的方法。document.getElementsByClassName
那么,当您需要访问 DOM 元素时应该怎么做?
您可以使用useRef钩子,就像下面的例子一样,我们需要访问画布元素。
注意:我们可以向画布添加一个 ID 并使用
document.getElementById,但不建议这样做。
返回顶部⬆️
61. 用于refs在重新渲染时保留值
如果您的 React 组件中有未存储在状态中的可变值,您会注意到这些值的更改不会在重新渲染后保留。
除非您全局保存它们,否则就会发生这种情况。
您可能会考虑将这些值放入状态中。但是,如果它们与渲染无关,这样做可能会导致不必要的重新渲染,从而浪费性能。
这也是useRef闪耀光芒的地方。
在下面的例子中,我想在用户点击某个按钮时停止计时器。为此,我需要将 intervalId 存储在某个地方。
❌ 缺点:下面的示例无法按预期工作,因为intervalId每次组件重新渲染时都会重置。
function Timer() {
  const [time, setTime] = useState(new Date());
  let intervalId;

  useEffect(() => {
    intervalId = setInterval(() => {
      setTime(new Date());
    }, 1_000);
    return () => clearInterval(intervalId);
  }, []);

  const stopTimer = () => {
    intervalId && clearInterval(intervalId);
  };

  return (
    <>
      <>Current time: {time.toLocaleTimeString()} </>
      <button onClick={stopTimer}>Stop timer</button>
    </>
  );
}
✅ 好:通过使用useRef,我们确保在渲染之间保留间隔 ID。
function Timer() {
  const [time, setTime] = useState(new Date());
  const intervalIdRef = useRef();
  const intervalId = intervalIdRef.current;

  useEffect(() => {
    const interval = setInterval(() => {
      setTime(new Date());
    }, 1_000);
    intervalIdRef.current = interval;
    return () => clearInterval(interval);
  }, []);

  const stopTimer = () => {
    intervalId && clearInterval(intervalId);
  };

  return (
    <>
      <>Current time: {time.toLocaleTimeString()} </>
      <button onClick={stopTimer}>Stop timer</button>
    </>
  );
}
返回顶部⬆️
62. 在 Hooks 中使用命名函数而不是箭头函数,以便useEffect在 React Dev Tools 中轻松找到它们
如果您有许多钩子,那么在 React DevTools 中找到它们可能会很困难。
一个技巧是使用命名函数,这样您就可以快速发现它们。
❌ 缺点:在众多钩子中很难找到具体的效果。
function HelloWorld() {
  useEffect(() => {
    console.log("🚀 ~ Hello, I just got mounted")
  }, []);

  return <>Hello World</>;
}

✅ 好:您可以快速发现效果。
function HelloWorld() {
  useEffect(function logOnMount() {
    console.log("🚀 ~ Hello, I just got mounted");
  }, []);

  return <>Hello World</>;
}

返回顶部⬆️
63. 使用自定义钩子封装逻辑
假设我有一个组件,它从用户的暗模式偏好中获取主题并在应用程序内使用它。
最好将返回主题的逻辑提取到自定义钩子中(以重复使用并保持组件清洁)。
❌ 缺点: App过于拥挤
function App() {
  const [theme, setTheme] = useState("light");

  useEffect(() => {
    const dqMediaQuery = window.matchMedia("(prefers-color-scheme: dark)");
    setTheme(dqMediaQuery.matches ? "dark" : "light");
    const listener = (event) => {
      setTheme(event.matches ? "dark" : "light");
    };
    dqMediaQuery.addEventListener("change", listener);
    return () => {
      dqMediaQuery.removeEventListener("change", listener);
    };
  }, []);

  return (
    <div className={`App ${theme === "dark" ? "dark" : ""}`}>Hello Word</div>
  );
}
✅ 优点: App简单得多,而且我们可以重用逻辑
function App() {
  const theme = useTheme();

  return (
    <div className={`App ${theme === "dark" ? "dark" : ""}`}>Hello Word</div>
  );
}

// Custom hook that can be reused
function useTheme() {
  const [theme, setTheme] = useState("light");

  useEffect(() => {
    const dqMediaQuery = window.matchMedia("(prefers-color-scheme: dark)");
    setTheme(dqMediaQuery.matches ? "dark" : "light");
    const listener = (event) => {
      setTheme(event.matches ? "dark" : "light");
    };
    dqMediaQuery.addEventListener("change", listener);
    return () => {
      dqMediaQuery.removeEventListener("change", listener);
    };
  }, []);

  return theme;
}
返回顶部⬆️
64. 优先使用函数而不是自定义钩子
当可以使用函数时,切勿将逻辑放入钩子中🛑。
有效:
- 钩子只能在其他钩子或组件内部使用,而函数可以在任何地方使用。
- 函数比钩子更简单。
- 功能更易于测试。
- ETC。
❌ 缺点:这个useLocale钩子没有必要,因为它本来就没必要。它没有使用其他钩子useEffect,比如useState、 等等。
function App() {
  const locale = useLocale();
  return (
    <div className="App">
      <IntlProvider locale={locale}>
        <BlogPost post={EXAMPLE_POST} />
      </IntlProvider>
    </div>
  );
}

function useLocale() {
  return window.navigator.languages?.[0] ?? window.navigator.language;
}
✅ 好:getLocale创建一个函数
function App() {
  const locale = getLocale();
  return (
    <div className="App">
      <IntlProvider locale={locale}>
        <BlogPost post={EXAMPLE_POST} />
      </IntlProvider>
    </div>
  );
}

function getLocale() {
  return window.navigator.languages?.[0] ?? window.navigator.language;
}
返回顶部⬆️
65. 使用useLayoutEffect钩子防止视觉 UI 故障
当效果不是由用户交互引起时,用户将在效果运行之前看到 UI(通常很短暂)。
因此,如果效果修改了 UI,用户将在看到更新后的 UI 版本之前很快看到初始 UI 版本,从而造成视觉故障。
使用useLayoutEffect可确保效果在所有 DOM 变异之后同步运行,从而防止初始渲染故障。
在下面的沙箱中,我们希望宽度在各列之间均匀分布(我知道这可以在 CSS 中完成,但我需要一个例子😅)。
使用useEffect,您可以在开始时简要地看到表格的变化。列会以其默认大小呈现,然后调整为正确的大小。
如果您正在寻找其他出色的用途,请查看这篇文章。
返回顶部⬆️
useId66. 使用钩子为可访问性属性生成唯一 ID
厌倦了想出各种 ID 或让它们发生冲突吗?
您可以使用useId钩子在 React 组件内生成唯一 ID 并确保您的应用程序可访问。
例子
function Form() {
  const id = useId();
  return (
    <div className="App">
      <div>
        <label>
          Name{" "}
          <input type="text" aria-describedby={id} />
        </label>
      </div>
      <span id={id}>Make sure to include full name</span>
    </div>
  );
}
返回顶部⬆️
67. 使用useSyncExternalStore订阅外部商店
这是一个很少需要但功能超级强大的钩子💪。
如果出现以下情况,请使用此钩子:
- 有一些状态在 React 树中无法访问(即,在状态或上下文中不存在)
- 状态可能会发生变化,你需要通知你的组件状态发生变化
在下面的例子中,我想要一个Logger 单例来记录整个应用程序中的错误、警告、信息等。
这些是要求:
- 我需要能够在我的 React 应用程序中的任何地方调用它(甚至在非 React 组件内),所以我不会将它放在状态/上下文中。
Logs我想在组件内向用户显示所有日志
👉 我可以useSyncExternalStore在我的组件内部使用它Logs来访问日志并监听更改。
function createLogger() {
  let logs = [];
  let listeners = [];

  const pushLog = (log) => {
    logs = [...logs, log];
    listeners.forEach((listener) => listener());
  };

  return {
    getLogs: () => Object.freeze(logs),
    subscribe: (listener) => {
      listeners.push(listener);
      return () => {
        listeners = listeners.filter((l) => l !== listener);
      };
    },
    info: (message) => {
      pushLog({ level: "info", message });
      console.info(message);
    },
    error: (message) => {
      pushLog({ level: "error", message });
      console.error(message);
    },
    warn: (message) => {
      pushLog({ level: "warn", message });
      console.warn(message);
    },
  };
}

export const Logger = createLogger();
返回顶部⬆️
68. 使用useDeferredValue钩子显示之前的查询结果,直到新的结果可用
想象一下,您正在构建一个在地图上表示国家的应用程序。
用户可以筛选查看特定人口规模的国家。
每次maxPopulationSize更新时,地图都会重新渲染(参见下面的沙盒)。
因此,当你移动滑块太快时,你会发现滑块有多么不流畅。这是因为每次滑块移动时,地图都会重新渲染。
为了解决这个问题,我们可以使用useDeferredValue钩子,以便滑块平滑更新。
<Map
    maxPopulationSize={deferredMaxPopulationSize}
    // …
/>
如果您正在寻找其他出色的用途,请查看这篇文章。
返回顶部⬆️
类别 #10:必知的 React 库 / 工具
69. 将路由功能集成到你的应用中react-router
如果您需要您的应用支持多个页面,请查看react-router。
您可以在此处找到一个最小示例。
返回顶部⬆️
swr70. 使用或在你的应用中实现一流的数据获取React Query
数据获取可能非常棘手。
然而,像swr或React Query这样的库使它变得容易得多。
对于简单的用例,我建议使用swr ;对于更复杂的用例,我建议使用 React Query 。
返回顶部⬆️
formik71. 使用诸如、React Hook Form或之类的库来简化表单状态管理TanStack Form
我以前很讨厌 React 中的表单管理🥲。
直到我发现了如下库:
因此,如果您在填写表格时遇到困难,请务必检查这些内容。
返回顶部⬆️
72. 使用Format.js, Lingui,或国际化你的应用react-i18next.
如果您的应用需要支持多种语言,则应该将其国际化。
您可以使用如下库来实现这一点:
返回顶部⬆️
73. 轻松创建令人印象深刻的动画framer-motion
动画可以让你的应用脱颖而出🔥。
您可以使用framer-motion轻松创建它们。
返回顶部⬆️
74. 厌倦了用自定义 hooks 重复造轮子?查看https://usehooks.com/
如果您像我一样,那么您会一遍又一遍地写相同的钩子。
因此,请先检查usehooks.com,看看是否有人已经为您完成这项工作。
返回顶部⬆️
75. 利用 Shadcdn 或 Headless UI 等 UI 库简化应用程序开发
构建可访问、响应迅速且美观的大规模 UI 非常困难。
Shadcdn或Headless UI等库使这一切变得更容易。
-
Shadcdn 提供了一组可访问、可重用且可组合的 React 组件,您可以将其复制粘贴到您的应用中。在撰写本文时,它需要 Tailwind CSS。
-
Headless UI 提供无样式、完全可访问的 UI 组件,您可以使用它们来构建自己的 UI 组件。
返回顶部⬆️
axe-core-npm76. 与图书馆一起检查网站的可访问性
网站应该对所有人开放。
然而,很容易忽视可访问性问题。
axe-core-npm是一种快速、安全且可靠的方法,可在开发网站时检查网站的可访问性。
💡 提示:如果您是 VSCode 用户,您可以安装相关扩展:axe Accessibility Linter。
返回顶部⬆️
77. 使用以下方法轻松重构 React 代码react-codemod
Codemods 是以编程方式在您的代码库上运行的转换💻。
它们使重构代码库变得容易。
例如,React codemods可以帮助您从代码库中删除所有 React 导入,更新代码以使用最新的 React 功能等等。
因此,在手动重构代码之前,请务必检查这些内容。
返回顶部⬆️
78. 使用 vite-pwa 将你的应用转换为渐进式 Web 应用程序 (PWA)
渐进式 Web 应用程序 (PWA) 的加载方式与常规网页类似,但提供离线工作、推送通知和设备硬件访问等功能。
您可以使用vite-pwa在 React 中轻松创建 PWA 。
返回顶部⬆️
类别 #11:React 与 Visual Studio Code 🛠️
79. 使用 Simple React Snippets 代码片段扩展来提高你的工作效率
引导一个新的 React 组件可能会很繁琐😩。
Simple React Snippets扩展中的代码片段让这一切变得更容易。
返回顶部⬆️
80.设置editor.stickyScroll.enabled为true快速定位当前组件
我喜欢这个功能❤️。
如果您有一个大文件,可能很难找到当前组件。
通过设置editor.stickyScroll.enabled为true,当前组件将始终位于屏幕顶部。
- ❌ 无粘性滚动
- ✅ 带粘性滚动条

返回顶部⬆️
81. 使用 VSCode Glean 或 VSCode React Refactor 等扩展简化重构
如果您需要频繁重构代码(例如,将 JSX 提取到新组件中),请务必查看VSCode Glean或VSCode React Refactor等扩展。
返回顶部⬆️
类别 #12:React 和 TypeScript 🚀
82. 使用ReactNodeinstead ofJSX.Element | null | undefined | ...使代码更紧凑
我经常看到这种错误。
而不是像这样输入leftElement和道具:rightElement
const Panel = ({ leftElement, rightElement }: {
  leftElement:
    | JSX.Element
    | null
    | undefined
    // | ...;
  rightElement:
    | JSX.Element
    | null
    | undefined
    // | ...
}) => {
  //   …
};
您可以使用它ReactNode来保持代码更紧凑。
const MyComponent = ({ leftElement, rightElement }: { leftElement: ReactNode; rightElement: ReactNode }) => {
  //   …
};
返回顶部⬆️
83. 简化需要 child props 的组件的输入PropsWithChildren
您不必children手动输入道具。
事实上,您可以使用它PropsWithChildren来简化打字。
// 🟠 Ok
const HeaderPage = ({ children,...pageProps }: { children: ReactNode } & PageProps) => {
  //   …
};

// ✅ Better
const HeaderPage = ({ children, ...pageProps } : PropsWithChildren<PageProps>) => {
//   …
};
返回顶部⬆️
84. 使用ComponentProps、ComponentPropsWithoutRef、…高效访问元素 props
在某些情况下,您需要弄清楚组件的道具。
例如,假设您想要一个按钮,单击该按钮时会记录到控制台。
您可以使用它ComponentProps来访问元素的道具button,然后覆盖该click道具。
const ButtonWithLogging = (props: ComponentProps<"button">) => {
  const handleClick: MouseEventHandler<HTMLButtonElement> = (e) => {
    console.log("Button clicked"); //TODO: Better logging
    props.onClick?.(e);
  };
  return <button {...props} onClick={handleClick} />;
};
此技巧也适用于自定义组件。
const MyComponent = (props: { name: string }) => {
  //   …
};

const MyComponentWithLogging = (props: ComponentProps<typeof MyComponent>) => {
  //   …
};
返回顶部⬆️
85. 利用诸如MouseEventHandler、FocusEventHandler等类型来实现简洁的类型
您无需手动输入事件处理程序,而是可以使用类似的类型MouseEventHandler来使代码更简洁、更易读。
// 🟠 Ok
const MyComponent = ({ onClick, onFocus, onChange }: {
  onClick: (e: MouseEvent<HTMLButtonElement>) => void;
  onFocus: (e: FocusEvent<HTMLButtonElement>) => void;
  onChange: (e: ChangeEvent<HTMLInputElement>) => void;
}) => {
  //   …
};

// ✅ Better
const MyComponent = ({ onClick, onFocus, onChange }: {
  onClick: MouseEventHandler<HTMLButtonElement>;
  onFocus: FocusEventHandler<HTMLButtonElement>;
  onChange: ChangeEventHandler<HTMLInputElement>;
}) => {
  //   …
};
返回顶部⬆️
86. 当无法或不应从初始值推断类型时,请在 useState、useRef 等中明确指定类型
当无法从初始值推断出类型时,不要忘记指定类型。
例如,在下面的例子中,selectedItemId状态中存储了 。它应该是string或undefined。
由于未指定类型,TypeScript 将推断类型为undefined,这不是我们想要的。
// ❌ Bad: `selectedItemId` will be inferred as `undefined`
const [selectedItemId, setSelectedItemId] = useState(undefined);

// ✅ Good
const [selectedItemId, setSelectedItemId] = useState<string | undefined>(undefined);
💡 注意:与此相反,当 TypeScript 可以为您推断类型时,您不需要指定类型。
返回顶部⬆️
87. 利用Record类型实现更清晰、更易扩展的代码
我喜欢这种助手类型。
假设我有一个代表日志级别的类型。
type LogLevel = "info" | "warn" | "error";
对于每个日志级别,我们都有一个相应的函数来记录消息。
const logFunctions = {
  info: (message: string) => console.info(message),
  warn: (message: string) => console.warn(message),
  error: (message: string) => console.error(message),
};
您可以使用 Record 类型,而不必手动输入 logFunctions。
const logFunctions: Record<LogLevel, (message: string) => void> = {
  info: (message) => console.info(message),
  warn: (message) => console.warn(message),
  error: (message) => console.error(message),
};
使用该Record类型使得代码更加简洁和可读。
此外,如果添加或删除新的日志级别,它有助于捕获任何错误。
例如,如果我决定添加debug日志级别,TypeScript 就会抛出错误。

返回顶部⬆️
88. 使用as const技巧准确输入钩子返回值
假设我们有一个钩子useIsHovered来检测 div 元素是否悬停。
该钩子返回一个ref与 div 元素一起使用的布尔值,指示 div 是否处于悬停状态。
const useIsHovered = () => {
  const ref = useRef<HTMLDivElement>(null);
  const [isHovered, setIsHovered] = useState(false);
  // TODO : Rest of implementation
  return [ref, isHovered]
};
目前,TypeScript 无法正确推断函数返回类型。

您可以通过明确输入返回类型来解决此问题,如下所示:
const useIsHovered = (): [RefObject<HTMLDivElement>, boolean] => {
  // TODO : Rest of implementation
  return [ref, isHovered]
};
或者您可以使用as const技巧来准确输入返回值:
const useIsHovered = () => {
  // TODO : Rest of implementation
  return [ref, isHovered] as const;
};
返回顶部⬆️
89. Redux:参考https://react-redux.js.org/using-react-redux/usage-with-typescript确保输入正确,以正确输入 Redux 状态和帮助程序
我喜欢使用 Redux 来管理繁重的客户端状态。
它也与 TypeScript 配合良好。
您可以在此处找到有关如何将 Redux 与 TypeScript 结合使用的精彩指南。
返回顶部⬆️
90. 使用以下方法简化你的类型ComponentType
假设你正在设计一个像 Figma 这样的应用程序(我知道,你很有野心😅)。
该应用程序由小部件组成,每个小部件都接受一个size。
为了重用逻辑,我们可以定义一个共享组件,该组件采用如下定义的WidgetWrapper类型的小部件:Widget
interface Size {
  width: number;
  height: number
};

interface Widget {
  title: string;
  Component: ComponentType<{ size: Size }>;
}
该WidgetWrapper组件将呈现小部件并将相关尺寸传递给它。
const WidgetWrapper = ({ widget }: { widget: Widget }) => {
  const { Component, title } = widget;
  const { onClose, size, onResize } = useGetProps(); //TODO: better name but you get the idea 😅
  return (
    <Wrapper onClose={onClose} onResize={onResize}>
      <Title>{title}</Title>
      {/* We can render the component below with the size */}
      <Component size={size} />
    </Wrapper>
  );
};
返回顶部⬆️
91. 使用 TypeScript 泛型提高代码的可重用性
如果您不使用 TypeScript 泛型,则只会发生两件事:
- 您要么编写非常简单的代码,要么
- 你错过了😅
TypeScript 泛型使您的代码更具可重用性和灵活性。
例如,假设我的博客上有不同的项目(例如Post,,Follower等),并且我想要一个通用列表组件来显示它们。
export interface Post {
  id: string;
  title: string;
  contents: string;
  publicationDate: Date;
}

export interface User {
  username: string;
}

export interface Follower extends User {
  followingDate: Date;
}
每个列表都应该可排序。
实现这一目标有好方法,也有坏方法。
❌ 缺点:我创建了一个接受项目联合的单一列表组件。
这很糟糕,因为:
- 每次添加新项目时,都必须更新功能/类型。
- 该函数不是完全类型安全的(见
This shouldn't happen注释)。 - 此代码依赖于其他文件(例如:
FollowerItem,PostItem)。 - ETC。
import { FollowerItem } from "./FollowerItem";
import { PostItem } from "./PostItem";
import { Follower, Post } from "./types";

type ListItem = { type: "follower"; follower: Follower } | { type: "post"; post: Post };

function ListBad({
  items,
  title,
  vertical = true,
  ascending = true,
}: {
  title: string;
  items: ListItem[];
  vertical?: boolean;
  ascending?: boolean;
}) {
  const sortedItems = [...items].sort((a, b) => {
    const sign = ascending ? 1 : -1;
    return sign * compareItems(a, b);
  });

  return (
    <div>
      <h3 className="title">{title}</h3>
      <div className={`list ${vertical ? "vertical" : ""}`}>
        {sortedItems.map((item) => (
          <div key={getItemKey(item)}>{renderItem(item)}</div>
        ))}
      </div>
    </div>
  );
}

function compareItems(a: ListItem, b: ListItem) {
  if (a.type === "follower" && b.type === "follower") {
    return (
      a.follower.followingDate.getTime() - b.follower.followingDate.getTime()
    );
  } else if (a.type == "post" && b.type === "post") {
    return a.post.publicationDate.getTime() - b.post.publicationDate.getTime();
  } else {
    // This shouldn't happen
    return 0;
  }
}

function getItemKey(item: ListItem) {
  switch (item.type) {
    case "follower":
      return item.follower.username;
    case "post":
      return item.post.id;
  }
}

function renderItem(item: ListItem) {
  switch (item.type) {
    case "follower":
      return <FollowerItem follower={item.follower} />;
    case "post":
      return <PostItem post={item.post} />;
  }
}
相反,我们可以使用 TypeScript 泛型来创建更可重用且类型安全的列表组件。
我在下面的沙箱中做了一个例子👇。
返回顶部⬆️
NoInfer92. 使用实用程序类型确保输入准确
想象一下你正在开发一款视频游戏🎮。
游戏有多个地点(例如,,,LeynTir等)。ForinKarin
您想要创建一个将玩家传送到新位置的功能。
function teleportPlayer<L extends string>(
  position: Position,
  locations: L[],
  defaultLocation: L,
) : L {
  // Teleport the player and return the location
}
该函数将以如下方式调用:
const position = { x: 1, y: 2, z: 3 };
teleportPlayer(position, ["LeynTir", "Forin", "Karin"], "Forin");
teleportPlayer(position, ["LeynTir", "Karin"], "anythingCanGoHere"); // ❌ This will work, but it is wrong since "anythingCanGoHere" shouldn't be a valid location
第二个示例无效,因为anythingCanGoHere它不是一个有效位置。
L但是,TypeScript 不会抛出错误,因为它从列表和默认位置推断出类型。
要修复此问题,请使用NoInfer实用程序类型。
function teleportPlayer<L extends string>(
  position: Position,
  locations: L[],
  defaultLocation: NoInfer<L>,
) : NoInfer<L> {
  // Teleport the player and return the location
}
现在 TypeScript 会抛出一个错误:
teleportPlayer(position, ["LeynTir", "Karin"], "anythingCanGoHere"); // ❌ Error: Argument of type '"anythingCanGoHere"' is not assignable to parameter of type '"LeynTir" | "Karin"
使用NoInfer实用程序类型可确保默认位置必须是列表中提供的有效位置之一,从而防止无效输入。
返回顶部⬆️
ElementRef93. 使用类型助手轻松输入引用
有一种输入 ref 的简单方法,但又很难。
困难的方法是记住元素的类型名称并直接使用它🤣。
const ref = useRef<HTMLDivElement>(null);
简单的方法是使用ElementRef类型助手。这种方法更直接,因为你应该已经知道元素的名称。
const ref = useRef<ElementRef<"div">>(null);
返回顶部⬆️
类别 #13:其他提示🎉
eslint-plugin-react94. 使用Prettier提高代码的质量和安全性。
如果您不使用eslint-plugin-react,那么您就不会认真对待 React 😅。
它可以帮助您捕获潜在的错误并实施最佳实践。
因此,请确保为您的项目安装并配置它。
您还可以使用Prettier自动格式化您的代码并确保您的代码库一致。
返回顶部⬆️
95. 使用 Sentry 或 Grafana Cloud Frontend Observability 等工具记录和监控您的应用程序。
你无法改进你没有测量的东西📏。
如果您正在寻找用于生产应用程序的监控工具,请查看Sentry或Grafana Cloud Frontend Observability。
返回顶部⬆️
96. 使用Code Sandbox或Stackblitz等在线 IDE 快速开始编码
建立本地开发环境可能很麻烦。
尤其是作为初学者🐣。
因此,从Code Sandbox或Stackblitz等在线 IDE 开始。
这些工具使您能够快速开始编码,而无需担心设置环境。
返回顶部⬆️
97. 想要学习 React 高级技能?看看这些书👇
如果你正在寻找高级 React 书籍📚,我推荐:
返回顶部⬆️
98. 准备 React 面试?查看 reactjs-interview-questions
React 面试⚛️可能会很棘手。
幸运的是,您可以通过检查这个 repo来为它们做好准备。
返回顶部⬆️
99. 向 Nadia、Dan、Josh、Kent 等专家学习 React 最佳实践。
如果您想了解最佳实践并学习技巧,请务必关注以下专家:
- @adevnadia : https://x.com/adevnadia提供高级 React 技巧
- @joshwcomeau : https://x.com/joshwcomeau
- @kentcdodds:https://x.com/kentcdodds
- @mattpocockuk : https://x.com/mattpocockuk提供 TypeScript 技巧
- @tejaskumar_:https://x.com/TejasKumar_
- @housecor:https://x.com/housecor
- 或者我😅:https://x.com/_ndeyefatoudiop
返回顶部⬆️
100. 订阅《本周 React》或 ui.dev 等新闻通讯,随时了解 React 生态系统的最新动态
React 是一个快速发展的生态系统。
有许多工具、库和最佳实践需要跟进。
要保持更新,请务必订阅新闻通讯💌例如:
- 本周 React 动态,作者:@sebastienlorber
- ui.dev
- ETC。
返回顶部⬆️
101. 在 r/reactjs 等平台上与 React 社区互动
React 社区非常棒。
您可以从其他开发人员那里学到很多东西并分享您的知识。
因此,请在r/reactjs等平台上与社区互动。
就这样结束了🎉。
留下评论📩分享您最喜欢的提示(或添加一个)。
并且别忘了说一声“💖🦄🔥”。
如果您正在学习 React,请免费下载我的《101 React 技巧与窍门》一书。
如果您喜欢此类文章,请加入我的免费时事通讯FrontendJoy。
如果您需要每日提示,请在X/Twitter上找到我。
文章来源:https://dev.to/_ndeyefatoudiop/101-react-tips-tricks-for-beginners-to-experts-4m11