🤖 使用 CopilotKit、LangGraph 和 Google Maps API 构建 AI 旅行计划器 🤩
TL;DR
在这个简单易懂的教程中,我们将采用一个简单的旅行计划应用程序,并使用CopilotKit通过 AI 对其进行增强。
阅读完本文后,您将了解到:
- 什么是代理副驾驶以及如何使用它为您的应用程序添加 AI。
- 如何让副驾驶实时更新应用程序状态并渲染变化。
- 如何用于
useCoAgentStateRender人机交互工作流程。
💁 喜欢通过视频学习?看看这个视频教程。
以下是我们将要构建的应用程序的预览:👇
💁 访问此链接与旅行计划器演示进行互动。
查看存储库
为了进行此演示,我们将从一个包含不具备 AI 支持的基本功能应用程序的分支开始,我们将使用 CopilotKit 对其进行增强。🚀
查看起始分支
我们将从分支开始coagents-travel-tutorial-start,其中包含我们的旅行应用程序的启动代码:
git clone -b coagents-travel-tutorial-start https://github.com/CopilotKit/CopilotKit.git
cd CopilotKit
教程代码位于examples/coagents-travel目录中,该目录包含两个不同的目录:
-
ui/:它包含一个 Next.js 应用程序,我们将在其中集成 LangGraph 代理。 -
agent/:它拥有一个基于 Python 的 LangGraph 代理。
导航到examples/coagents-travel目录:
cd examples/coagents-travel
安装依赖项
让我们设置 Next.js 应用程序。请确保您已pnpm在系统上安装它,因为我们的启动代码使用它作为包管理器:
npm install -g pnpm@latest-10
现在,转到ui目录并安装项目所需的所有依赖项:
cd ui
pnpm install
检索 API 密钥
在目录中创建一个.env文件ui并使用必要的环境变量填充它:
# 👇 ui/.env

OPENAI_API_KEY=<your_openai_api_key>
NEXT_PUBLIC_CPK_PUBLIC_API_KEY=<your_public_copilotkit_api_key>
如果您需要 CopilotKit API 密钥,可以在这里获取。🔑
启动项目
现在,我们已经安装了所有依赖项,启动开发服务器:
pnpm run dev
如果一切设置正确,请访问http://localhost:3000来查看旅行应用程序的运行情况。😻
现在,我们将研究 LangGraph 代理并了解其工作原理。
LangGraph代理
在深入研究集成 LangGraph 代理之前,让我们花点时间了解一下它的工作原理。
在本教程中,我们不会从头构建 LangGraph 代理。相反,我们将使用agent目录中的预构建版本。
💁 想要了解如何构建 LangGraph 代理的详细分步指南吗?请查看LangGraph 快速入门指南。
在添加到我们的应用程序之前,让我们先了解一下 LangGraph 代理,以了解其内部工作原理。
安装 LangGraph Studio
💡 LangGraph Studio 是一款出色的工具,可用于可视化和调试 LangGraph 工作流程。虽然它并非使用 CopilotKit 的必需工具,但强烈建议使用它来理解 LangGraph 的运作方式。
要安装 LangGraph Studio,请参阅LangChain Studio 安装指南。
检索 API 密钥
在目录中创建一个.env文件agent并使用以下环境变量填充它:
# 👇 agent/.env

OPENAI_API_KEY=<your_openai_api_key>
GOOGLE_MAPS_API_KEY=<your_google_maps_api_key>
需要 Google 地图 API 密钥?请按照本指南获取。🔑
可视化 LangGraph 代理
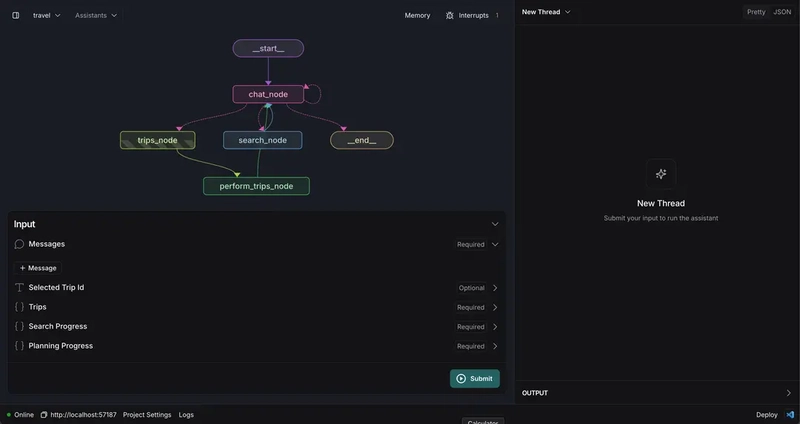
安装 LangGraph Studio 后,打开examples/coagents-travel/agent工作室中的目录以加载和可视化 LangGraph 代理。
💡提示:可能需要一点时间来完成所有设置,但一旦安装完成并且您导航到
agent文件夹,可视化效果将如下所示:
测试 LangGraph 代理
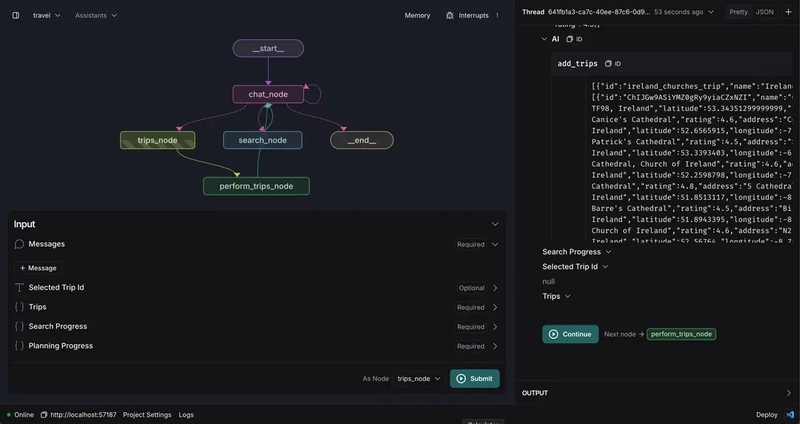
要测试 LangGraph 代理,只需向messages状态变量添加一条消息并点击“提交”。
代理将处理输入,在聊天中做出回应,并通过连接的节点遵循定义的工作流程。
在此示例中,代理触发search_node执行搜索。检索到响应后,它会trips_node根据结果使用 更新状态,添加新的行程。🎯
理解断点
让我们来讨论一下代理副驾驶中的一个关键概念:人在回路中。
想象一下,你的智能体渴望提供帮助,但有时又过于急切。断点就像一个友好的暂停按钮,让用户在智能体失控(或犯错)之前介入并批准其决策。LangGraph 的断点功能让这一切变得简单。
工作原理如下:
-
单击
trips_node并启用该interrupt_after选项。 -
尝试让代理创建新行程。这次,它会在操作过程中停止并请求您的批准。
看到了吗?连人工智能都能学会礼貌。🙃
保持 LangGraph Studio 运行
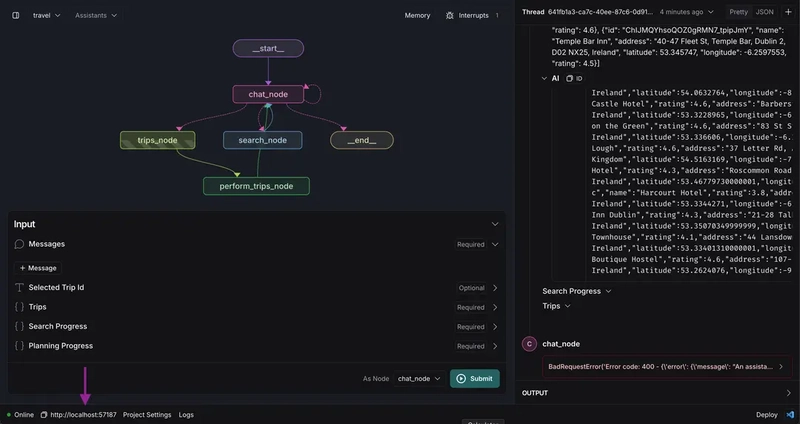
您的代理需要一个家,目前,LangGraph Studio 就是它的所在地。让 Studio 在本地运行;您会在应用程序的左下角看到它的 URL。
我们稍后将使用此 URL 将我们的 CopilotKit 设置连接到 LangGraph 代理。
到目前为止,我们已经做得很好了,现在让我们将 LangGraph 代理作为代理副驾驶集成到我们的旅行应用程序中,将所有这些付诸实践。🤖
设置 CopilotKit
现在到了最有趣的部分——让我们添加 CopilotKit 来整合所有内容。由于应用程序和代理都已运行,因此距离将 CopilotKit 集成到我们的应用程序中仅一步之遥。
对于本教程,我们将安装以下依赖项:
-
@copilotkit/react-core:CopilotKit 的核心库,其中包含 CopilotKit 提供程序和有用的钩子。 -
@copilotkit/react-ui:CopilotKit 的 UI 库,其中包含侧边栏、聊天弹出窗口、文本区域等 CopilotKit UI 组件。
安装依赖项
首先,ui如果您尚未进入该目录,请导航至该目录:
cd ../ui
然后,安装 CopilotKit 包:
pnpm add @copilotkit/react-core @copilotkit/react-ui
只需这两个包即可在 React 应用程序中安装 CopilotKit。@copilotkit/react-core包含核心 CopilotKit 功能,@copilotkit/react-ui包含一些预构建的 UI 组件供我们直接插入。
添加 CopilotKit
有两种方法可以设置 CopilotKit:
-
Copilot Cloud:速度快、超级容易上手、并且完全管理。
-
自托管:控制力更强,但复杂性也更高。
本教程将采用云服务(毕竟现在还不用考虑那么多复杂的问题),但如果您感兴趣,也可以自行搭建。如果您感兴趣,可以查看自托管指南。
设置 Copilot Cloud
您可以按照以下步骤开始使用 Copilot Cloud:
- 创建一个帐户
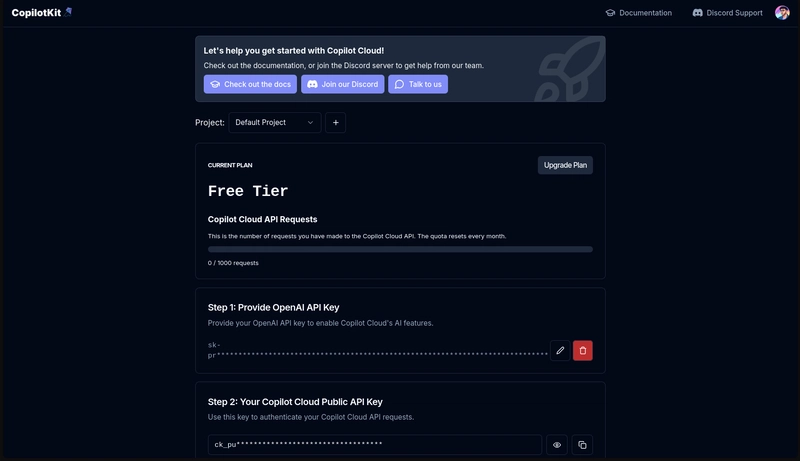
前往Copilot Cloud并注册。只需一分钟左右。
- 获取您的 API 密钥
登录后,请按照屏幕上显示的步骤获取您的Copilot Cloud 公共 API 密钥。您还需要一个 OpenAI API 密钥。
设置您的 OpenAI API 密钥,单击复选标记,就这样,您将获得您的公钥。
- 将 API 密钥添加到您的
.env
使用您的 Copilot Cloud API 密钥更新目录.env中的文件:ui
# 👇 ui/.env

# Rest of the env variables...
NEXT_PUBLIC_CPK_PUBLIC_API_KEY=<your_copilotkit_public_key>
- 配置 CopilotKit 提供程序
现在,要将CopilotKit集成到您的应用程序中,请将您的应用程序包装在CopilotKit提供程序中。
通过使用提供程序包装我们的应用程序,我们确保从组件添加的其他 UI 组件@copilotkit/react-ui可以与 CopilotKit SDK 交互。
ui/app/page.tsx使用以下代码行编辑:
// 👇 ui/app/page.tsx

"use client";

// Rest of the imports...
import { CopilotKit } from "@copilotkit/react-core";

// Rest of the code...

export default function Home() {
  return (
    <CopilotKit
      publicApiKey={process.env.NEXT_PUBLIC_CPK_PUBLIC_API_KEY}
    >
      <TooltipProvider>
        <TripsProvider>
          <main className="h-screen w-screen">
            <MapCanvas />
          </main>
        </TripsProvider>
      </TooltipProvider>
    </CopilotKit>
  );
}
- CopilotKit UI 组件
CopilotKit 附带几个可立即使用的组件,例如<CopilotPopup />、<CopilotSidebar />。只需放置这些组件,它们就会看起来非常漂亮。
如果你不想使用内置组件,没问题!CopilotKit 还支持无头模式,所以如果你有创意,useCopilotChat可以完全DIY。😉
在本教程中,我们将使用<CopilotSidebar />组件来显示聊天侧边栏。不过,该方法与其他任何预构建的 UI 组件相同。
编辑ui/app/page.tsx文件以包含<ChatSidebar />组件,并确保 CSS 样式已导入。
// 👇 ui/app/page.tsx

"use client";

// Rest of the imports...

import { TasksList } from "@/components/TasksList";
import { TasksProvider } from "@/lib/hooks/use-tasks";
import { CopilotKit } from "@copilotkit/react-core";
import { CopilotSidebar } from "@copilotkit/react-ui";
import "@copilotkit/react-ui/styles.css";

// Rest of the code...

export default function Home() {
  return (
    <CopilotKit
      publicApiKey={process.env.NEXT_PUBLIC_CPK_PUBLIC_API_KEY}
    >
      <CopilotSidebar
        defaultOpen={true}
        clickOutsideToClose={false}
        labels={{
          title: "Travel Planner",
          initial: "Hi! 👋 I'm here to plan your trips. I can help you manage your trips, add places to them, or just generally work with you to plan a new one.",
        }}
      />
      <TooltipProvider>
        <TripsProvider>
          <main className="h-screen w-screen">
            <MapCanvas />
          </main>
        </TripsProvider>
      </TooltipProvider>
    </CopilotKit>
  );
}
首先,我们导入所需的模块和自定义样式,让侧边栏开箱即用,看起来很棒👌。然后,放入<CopilotSidebar />组件。
在<CopilotSidebar />组件中,您可以传递标签道具来更改标题和来自 AI 的初始聊天消息。
现在,回到你的应用。向右看,瞧!一个闪亮的新聊天侧边栏已经准备好了,只需几行代码即可使用。😻
但我们缺少了一点,那就是副驾驶获得决策能力的能力。我们将借助asset目录中的 LangGraph 来添加这项功能。
让你的副驾驶更具代理性
我们在 LangGraph Studio 中运行了一个 LangGraph 代理,以及一个非代理的副驾驶,虽然可以运行,但……智能程度略逊一筹。让我们赋予副驾驶真正的决策能力吧!😎
快速了解 React State
让我们快速回顾一下应用程序的状态是如何工作的。打开lib/hooks/use-trips.tsx文件。
你会发现这里是TripsProvider,它定义了很多有用的东西。最精彩的是什么?对象state,由类型塑造AgentState。
整个应用程序都可以使用useTrips钩子访问此状态,该钩子为 、 和 等组件TripCard提供TripContent信息TripSelect。
如果您以前使用过 React 应用程序,那么这应该会感觉很熟悉——通过上下文或库管理状态是非常标准的东西。
合并代理与状态
现在到了最重要的部分:将我们的 LangGraph 代理与其状态连接起来。为此,我们将设置一个远程端点,并使用useCoAgent钩子来实现这个神奇的效果。🌟
- 设置隧道
还记得之前的 LangGraph Studio 端点吗?你现在就需要它!如果你正在使用 Copilot Cloud,那么一切就绪了。
如果您已选择自托管路线,请按照此处概述的步骤操作
为了连接本地运行的 LangGraph 代理和 Copilot Cloud,我们将使用 CopilotKit CLI。获取 LangGraph Studio 端点的端口号。
💁 LangGraph Studio 端口:您会在 Studio 界面的左下角找到它。
现在,启动你的终端并运行以下命令:
# Replace <port_number> placeholder with the actual port number
npx @copilotkit/cli tunnel <port_number>
轰!你创建了一条隧道。🎉它会向你展示以下内容:
✔ Tunnel created successfully!
Tunnel Information:
Local: localhost:54209
Public URL: https://light-pandas-argue.loca.lt
Press Ctrl+C to stop the tunnel
保存该公共 URL。🔖 这将成为我们本地运行的 LangGraph 代理和 CopilotKit Cloud 之间的网关。
💁 现在,下一步我们需要LangSmith API Key。请按照本指南获取。
- 将隧道连接至 Copilot Cloud
前往Copilot Cloud,滚动到远程端点部分,然后点击+ Add New按钮。
- 选择
LangGraph平台。 - 添加公共 URL。(从 CopilotKit CLI 生成的 URL)并添加您的 LangSmith API 密钥。
- 单击“创建”。
🎉 完成!您的代理端点现已列出,并且 CopilotKit 确切地知道在调用代理时将请求发送到何处。
- 锁定代理
由于这里只有一个代理,因此请确保锁定<CopilotKit />提供程序,以便将所有请求锁定到该特定代理。要添加代理,只需修改 props 以包含 的名称即可agent。
💁 对处理多个代理感到好奇?查看多代理概念指南。
// 👇 ui/app/page.tsx

// Rest of the code...
<CopilotKit
  // Rest of the code...
  agent="travel"
>
    {/* Rest of the code... */}
</CopilotKit>
我们提供代理的名称,travel因为我们已经在agent/langgraph.json文件中定义了它。
就这样,副驾驶现在真正拥有了自主性。它不仅能对话,还能做决定。很酷吧?🤯
连接代理和状态
此时,我们需要将 LangGraph 代理的状态与应用的状态连接起来。这样我们就可以添加实时动态交互了!
LangGraph 代理会跟踪自己的状态,正如您已经在 LangGraph 工作室的左下角看到的那样。
🤔现在有什么想法?
我们希望在这些状态之间实现双向连接。为此,useCoAgentCopilotKit 提供了一个友好的钩子来帮助我们实现这一点。
ui/lib/hooks/use-trips.tsx使用以下代码行编辑文件以添加useCoAgent钩子。
// 👇 ui/lib/hooks/use-trips.tsx

// Rest of the imports...
import { AgentState, defaultTrips} from "@/lib/trips";
import { useCoAgent } from "@copilotkit/react-core";

export const TripsProvider = ({ children }: { children: ReactNode }) => {
  const { state, setState } = useCoAgent<AgentState>({
    name: "travel",
    initialState: {
      trips: defaultTrips,
      selected_trip_id: defaultTrips[0].id,
    },
  });

  // Rest of the code...
是的,你没看错。这就是同步双向状态所需的全部步骤。😯
现在,让我们逐行分解代码:
💡 该
useCoAgent钩子是通用的,这意味着您可以指定一个反映 LangGraph 代理状态的类型。
在本例中,我们使用AgentState来保持一致性。您可以将其类型转换为any,但这通常不是一个好习惯。因此,大多数情况下应避免这样做。
该name参数将所有内容与图表的名称联系起来agent/langgraph.json。请确保正确命名,因为它可以确保代理和我们的应用程序始终保持一致。
对于initialState,我们使用defaultTrips(尽管不是必需的)来自@/lib/types.ts。
我们添加了一些初始行程,以便我们可以立即测试它的运行情况。
defaultTrips初始状态即的排列方式如下:
// 👇 ui/lib/types.ts

export const defaultTrips: Trip[] = [
  {
    id: "1",
    name: "Business Trip to NYC",
    center_latitude: 40.7484,
    center_longitude: -73.9857,
    places: [
      {
        id: "1",
        name: "Central Park",
        address: "New York, NY 10024",
        description: "A famous park in New York City",
        latitude: 40.785091,
        longitude: -73.968285,
        rating: 4.7,
      },
      {
        id: "3",
        name: "Times Square",
        address: "Times Square, New York, NY 10036",
        description: "A famous square in New York City",
        latitude: 40.755499,
        longitude: -73.985701,
        rating: 4.6,
      },
    ],
    zoom_level: 14,
  },
  // Rest of the trips...
];
测试时间到了!
启动您的应用程序并向副驾驶询问一些有关您的行程的问题。
How many trips do I have?
看看代理是如何从应用状态中提取数据的?很神奇吧?😻
状态在应用程序和代理之间共享,因此请尝试手动删除/编辑行程,再次询问问题,它应该会做出相应的答复:
What trips do I have now?
代理知道发生了什么。更好的是,你可以直接给代理分配任务:
Add some hotels to my Paris trip
瞧!状态更新了,你的 UI 也反映了这些变化。
目前,该应用的核心功能已经完成。我们只需要添加流式文本和其他功能来提升用户体验,以便为用户提供实时响应。
在 UI 中流式传输响应
既然我们可以与代理交互、检索和更新数据,为什么不通过添加文本流功能来提升用户体验呢?
这就像在代理工作时观察实时进度,类似于您看到许多其他流行的人工智能(如ChatGPT响应)的方式。
在此步骤中,我们将copilotkit_emit_state在 LangGraph 代理中实现 SDK 功能,以便代理在工作时发出进度。🔥
安装 CopilotKit SDK
首先,让我们安装CopilotKit SDK。由于我们在这里使用基于 Python 的代理(并使用poetry进行管理),因此我们将安装 Python SDK。
💁 不确定如何安装 Poetry?您可以在这里找到安装指南。
poetry add copilotkit==0.1.31a4
因为我们将要编辑search_node,所以我们将直接跳转到该search.py文件。
手动发出代理的状态
使用 CoAgents,当节点发生变化(例如,遍历边时)时,代理的状态就会发出。但是,如果我们想在操作过程中显示进度怎么办?好消息!我们可以使用 手动发出状态copilotkit_emit_state。
让我们添加一个自定义配置,search_node以便我们可以发出中间状态。
打开agent/travel/search.py并添加以下代码行:
# 👇 agent/travel/search.py

# Rest of the imports...
from copilotkit.langchain import copilotkit_emit_state, copilotkit_customize_config

async def search_node(state: AgentState, config: RunnableConfig):
    """
    The search node is responsible for searching the for places.
    """
    ai_message = cast(AIMessage, state["messages"][-1])


    config = copilotkit_customize_config(
        config,
        emit_intermediate_state=[{
            "state_key": "search_progress",
            "tool": "search_for_places",
            "tool_argument": "search_progress",
        }],
    )

    # Rest of the code...
发射中间状态
现在,让我们copilotkit_emit_state在搜索过程中手动发出状态。您将看到我们发送的每个查询的更新。
让我们agent/travel/search.py再次编辑以在搜索开始时和结果出现时发出状态。
agent/travel/search.py使用以下代码行编辑:
# 👇 agent/travel/search.py

# Rest of the code...
async def search_node(state: AgentState, config: RunnableConfig):
    """
    The search node is responsible for searching the for places.
    """
    ai_message = cast(AIMessage, state["messages"][-1])

    config = copilotkit_customize_config(
        config,
        emit_intermediate_state=[{
            "state_key": "search_progress",
            "tool": "search_for_places",
            "tool_argument": "search_progress",
        }],
    )

    # ^ Previous code

    state["search_progress"] = state.get("search_progress", [])
    queries = ai_message.tool_calls[0]["args"]["queries"]

    for query in queries:
        state["search_progress"].append({
            "query": query,
            "results": [],
            "done": False
        })

    await copilotkit_emit_state(config, state)

    # Rest of the code...
更新和发布进度
现在是时候实时显示结果了。搜索完成后,我们将更新进度。
最后,agent/travel/search.py使用以下代码行更新:
# 👇 agent/travel/search.py

# Rest of the code...
async def search_node(state: AgentState, config: RunnableConfig):
    """
    The search node is responsible for searching the for places.
    """
    ai_message = cast(AIMessage, state["messages"][-1])

    config = copilotkit_customize_config(
        config,
        emit_intermediate_state=[{
            "state_key": "search_progress",
            "tool": "search_for_places",
            "tool_argument": "search_progress",
        }],
    )

    state["search_progress"] = state.get("search_progress", [])
    queries = ai_message.tool_calls[0]["args"]["queries"]

    for query in queries:
        state["search_progress"].append({
            "query": query,
            "results": [],
            "done": False
        })

    await copilotkit_emit_state(config, state)

    # ^ Previous code

    places = []
    for i, query in enumerate(queries):
        response = gmaps.places(query)
        for result in response.get("results", []):
            place = {
                "id": result.get("place_id", f"{result.get('name', '')}-{i}"),
                "name": result.get("name", ""),
                "address": result.get("formatted_address", ""),
                "latitude": result.get("geometry", {}).get("location", {}).get("lat", 0),
                "longitude": result.get("geometry", {}).get("location", {}).get("lng", 0),
                "rating": result.get("rating", 0),
            }
            places.append(place)
        state["search_progress"][i]["done"] = True
        await copilotkit_emit_state(config, state)

    state["search_progress"] = []
    await copilotkit_emit_state(config, state)

    # Rest of the code...
在 UI 中渲染进度
为了在 UI 中显示进度,我们将使用useCoAgentStateRender钩子。此钩子将有条件地渲染状态search_progress。
我们需要做的就是告诉 CopilotKitsearch_progress通过useCoAgentStateRender钩子有条件地渲染状态键。
现在我们修改一下ui/lib/hooks/use-trips.tsx,显示搜索进度:
// 👇 ui/lib/hooks/use-trips.tsx

// Rest of the imports...
import { useCoAgent, useCoAgentStateRender } from "@copilotkit/react-core";
import { SearchProgress } from "@/components/SearchProgress";

export const TripsProvider = ({ children }: { children: ReactNode }) => {
  // Rest of the code...

  useCoAgentStateRender<AgentState>({
    name: "travel",
    render: ({ state }) => {
      if (state.search_progress) {
        return <SearchProgress progress={state.search_progress} />
      }
      return null;
    },
  });

  // Rest of the code...
}
该<SearchProgress />组件已为您设置完毕。如果您感兴趣,欢迎随时查看 中的实现ui/components/SearchProgress.tsx。🙌
💁奖励:状态键在类型
search_progress中是预先定义的,因此无需担心从头开始创建它!AgentStateui/lib/types.ts
现在就试用一下吧!向客服提问,就能实时看到进度更新。🤩
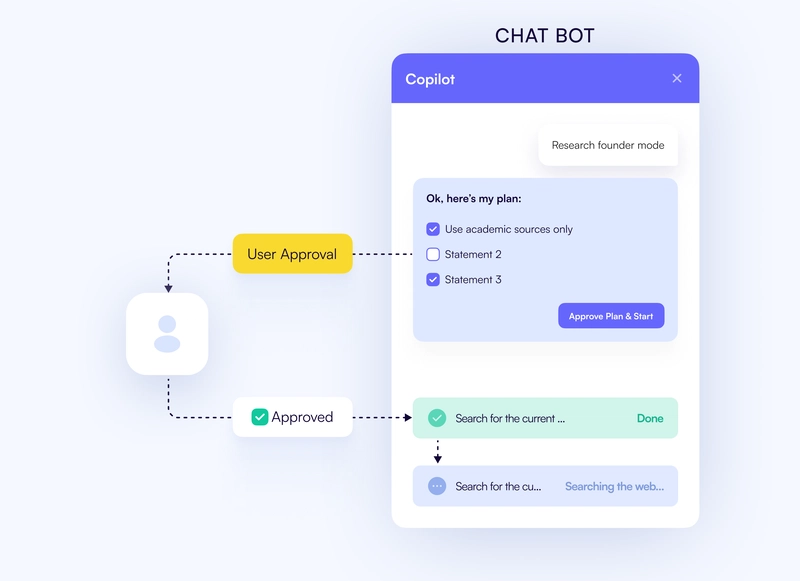
通过增加人机交互来增强控制
好了,是时候来点现实世界的魔法了。如果代理即将做出一个你不同意的决定怎么办?
人机交互 (HITL)可让您批准、拒绝或修改代理想要执行的操作。
在此步骤中,我们将在代理的流程中设置一个“断点”,强制其暂停并等待您的批准后再继续。
💁 对断点感到好奇?您可以在这里了解更多信息。
一旦断点被触发,我们会将其发送到前端,用户将在那里批准或拒绝该操作。然后,代理将根据用户的决策继续执行。
总的来说,这个过程如下:
查看下面的信息图,了解整个流程如何运作:👇
- 为人机循环添加断点
使用我们的 LangGraph,添加人机交互功能非常简单。trips_node函数作为 的中介perform_trips_node,让我们可以trips_node通过设置断点在 处暂停执行。
在这个agent/travel/agent.py文件中,我们只需要告诉代理在哪里按下暂停键。我们在compile函数中执行此操作:
# 👇 agent/travel/agent.py

# Rest of the code...

graph = graph_builder.compile(
    checkpointer=MemorySaver(),
    # Pause right here and wait for the user!
    interrupt_after=["trips_node"],
)
现在,只要这样做,经纪人就会问“我应该继续吗?”而不是盲目地继续工作。
- 处理用户的决定
当用户点击暂停按钮时,我们需要检查他们想要做什么。他们是否同意了这个操作?还是点击了“取消”并重新开始?
在中perform_trips_node,我们将抓取工具消息并检查用户的决定:
# 👇 agent/travel/trips.py

# Rest of the code...

async def perform_trips_node(state: AgentState, config: RunnableConfig):
    """Execute trip operations"""
    ai_message = cast(AIMessage, state["messages"][-2])
    tool_message = cast(ToolMessage, state["messages"][-1])

    # Rest of the code...
现在,这里的条件将检查用户的决定并采取相应的行动。
如果用户选择“取消”,我们会停止所有操作,并返回自定义消息。否则,对于任何其他响应,系统将继续工作。
# 👇 agent/travel/trips.py

# Rest of the code...
async def perform_trips_node(state: AgentState, config: RunnableConfig):
    """Execute trip operations"""
    ai_message = cast(AIMessage, state["messages"][-2])
    tool_message = cast(ToolMessage, state["messages"][-1])


    if tool_message.content == "CANCEL":
      return {
        "messages": AIMessage(content="Cancelled operation of trip."),
      }

    # handle the edge case where the AI message is not an AIMessage or does not have tool calls, should never happen.
    if not isinstance(ai_message, AIMessage) or not ai_message.tool_calls:
        return state

    # Rest of the code...
- 渲染决策 UI
现在,是时候更新前端来渲染工具调用并捕获用户的决策,并将其传回给代理了。为此,我们将为useCopilotAction每个工具调用使用带有renderAndWait选项的钩子。
ui/lib/hooks/use-trips.tsx使用以下代码行编辑:
// 👇 ui/lib/hooks/use-trips.tsx

// Rest of the imports...
import { AddTrips, EditTrips, DeleteTrips } from "@/components/humanInTheLoop";
import { useCoAgent, useCoAgentStateRender, useCopilotAction } from "@copilotkit/react-core";

// Rest of the code...

export const TripsProvider = ({ children }: { children: ReactNode }) => {
  // Rest of the code...

  useCoAgentStateRender<AgentState>({
    name: "travel",
    render: ({ state }) => {
      return <SearchProgress progress={state.search_progress} />
    },
  });


  useCopilotAction({
    name: "add_trips",
    description: "Add some trips",
    parameters: [
      {
        name: "trips",
        type: "object[]",
        description: "The trips to add",
        required: true,
      },
    ],
    renderAndWait: AddTrips,
  });

  useCopilotAction({
    name: "update_trips",
    description: "Update some trips",
    parameters: [
      {
        name: "trips",
        type: "object[]",
        description: "The trips to update",
        required: true,
      },
    ],
    renderAndWait: EditTrips,
  });

  useCopilotAction({
    name: "delete_trips",
    description: "Delete some trips",
    parameters: [
      {
        name: "trip_ids",
        type: "string[]",
        description: "The ids of the trips to delete",
        required: true,
      },
    ],
    renderAndWait: (props) => DeleteTrips({ ...props, trips: state.trips }),
  });

  // Rest of the code...
通过此设置,前端已准备好渲染工具调用并捕获用户的决策。但是,还有一件重要的事情我们尚未涉及:如何处理用户的输入并将其发送回代理?
- 可选:了解
humanInTheLoop组件
让我们快速了解一下前端是如何处理的。我们将以DeleteTrips组件为例,但同样的逻辑也适用于AddTrips和EditTrips。
// 👇 ui/lib/components/humanInTheLoop/DeleteTrips.tsx

import { Trip } from "@/lib/types";
import { PlaceCard } from "@/components/PlaceCard";
import { X, Trash } from "lucide-react";
import { ActionButtons } from "./ActionButtons";
import { RenderFunctionStatus } from "@copilotkit/react-core";

export type DeleteTripsProps = {
  args: any;
  status: RenderFunctionStatus;
  handler: any;
  trips: Trip[];
};

export const DeleteTrips = ({ args, status, handler, trips }: DeleteTripsProps) => {
  const tripsToDelete = trips.filter((trip: Trip) => args?.trip_ids?.includes(trip.id));

  return (
    <div className="space-y-4 w-full bg-secondary p-6 rounded-lg">
    <h1 className="text-sm">The following trips will be deleted:</h1>
      {status !== "complete" && tripsToDelete?.map((trip: Trip) => (
        <div key={trip.id} className="flex flex-col gap-4">
          <>
            <hr className="my-2" />
            <div className="flex flex-col gap-4">
            <h2 className="text-lg font-bold">{trip.name}</h2>
            {trip.places?.map((place) => (
              <PlaceCard key={place.id} place={place} />
            ))}
            </div>
          </>
        </div>
      ))}
      { status !== "complete" && (

        <ActionButtons
          status={status}
          handler={handler}
          approve={<><Trash className="w-4 h-4 mr-2" /> Delete</>}
          reject={<><X className="w-4 h-4 mr-2" /> Cancel</>}
        />
      )}
    </div>
  );
};
这里的关键部分是ActionButtons组件,它允许用户批准或拒绝该操作。这就是我们捕捉用户决定的方式:
// 👇 ui/lib/components/humanInTheLoop/ActionButtons.tsx

import { RenderFunctionStatus } from "@copilotkit/react-core";
import { Button } from "../ui/button";

export type ActionButtonsProps = {
    status: RenderFunctionStatus;
    handler: any;
    approve: React.ReactNode;
    reject: React.ReactNode;
}

export const ActionButtons = ({ status, handler, approve, reject }: ActionButtonsProps) => (
  <div className="flex gap-4 justify-between">
    <Button
      className="w-full"
      variant="outline"
      disabled={status === "complete" || status === "inProgress"}
      onClick={() => handler?.("CANCEL")}
    >
      {reject}
    </Button>
    <Button
      className="w-full"
      disabled={status === "complete" || status === "inProgress"}
      onClick={() => handler?.("SEND")}
    >
      {approve}
    </Button>
  </div>
);
handler?.("CANCEL")当用户点击“取消”和“删除”时,这里的按钮会调用handler?.("SEND")。这会将用户的决定(“取消”或“发送”)发送回代理。
这里最重要的一点是onClick处理程序将用户的决定发回给代理。
💡 如果您希望允许用户在将工具调用参数发送回代理之前对其进行编辑,则可以通过修改
onClick处理程序并调整代理处理工具调用的方式来实现这一点。
就这样。😮💨 我们成功添加了人机交互功能。现在它可以提示用户批准或拒绝添加、编辑或删除行程等操作,并将这些决定反馈给客服人员。
结论
我们在本教程中涵盖了很多内容。😴希望您了解如何使用 CopilotKit 向您的应用程序添加代理副驾驶,并了解了如何实时执行状态更改并实现人机交互概念。
完整源代码:源代码
💁 您还可以参考该项目的原始文档。
非常感谢你的阅读!🎉 🫡
文章来源:https://dev.to/copilotkit/build-an-ai-travel-planner-with-copilotkit-langgraph-google-maps-api-32fm在下面的评论区分享你的想法!👇
 后端开发教程 - Java、Spring Boot 实战 - msg200.com
