使用 Python、Django 构建聊天机器人
聊天机器人已成为现代 Web 应用程序的必备功能之一。它在客户服务领域扮演着重要角色,而这曾经是传统上由人类完成的。通过聊天机器人,您可以利用不同的机器学习技术自动生成对用户输入的响应。
注意:-如果您在整个教程中遇到任何问题,您可以查看 GitHub 存储库中的代码。
目录
- 先决条件
- 项目配置
- 使用 Django 通道的 WebSocket
- Tailwind CSS 配置
- 前端 - 创建 WebSocket 连接
- 启用通道层
- 后端 - WebSocket 消费者
- ChatterBot - 生成自动回复
- ChatterBot 培训
- 将自动响应生成卸载到 Celery
- 结论
先决条件
本指南假设您具有中级 Django 知识。
项目配置
为了实现ChatBot,将使用以下技术:
- ChatterBot 库- 根据用户输入生成自动响应。
- Celery - 从机器学习对话引擎获取自动响应需要一段时间。因此,我们将使用 Celery 在后台执行此任务。
- 使用 Django Channels 的 WebSockets - 在机器学习模型可用时立即将其生成的自动响应发送给客户端。
- Redis - 将用作 Celery 的消息代理和结果后端。此外,它还将用作 WebSocket 通信的通道层。
- TailwindCSS——创建用户界面。
我们将深入探讨每个细节,但首先,让我们先设置一下项目。我已经创建了一个包含所有配置的 Docker 入门模板,这样我们就可以快速进行开发,而不会浪费时间。
在本地机器上创建一个文件夹 >cd进入该文件夹 > 克隆模板:
mkdir chatbot
cd chatbot
git clone https://github.com/earthcomfy/blog-template .
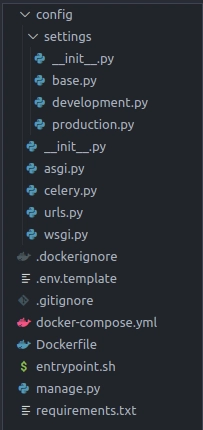
这将在您的项目中生成以下文件夹和文件:
web除了在 Docker 中使用、db、redis和服务进行基本的 Django 设置外,没有太多需要做的事情celery。请参阅本文,了解更多关于如何在 Docker 中设置 Django 项目的信息。如果您不想使用 Docker,也可以按照以下步骤在计算机上设置虚拟环境并运行必要的服务。
在您的项目的根目录中,有一个名为的文件.env.template,将其重命名为.env并相应地更新环境变量。
太好了,现在通过运行以下命令来构建镜像并启动容器:
docker-compose up --build
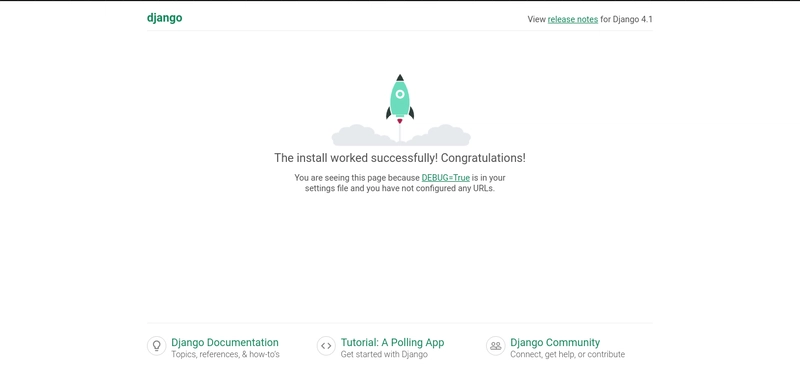
转到http://0.0.0.0:8000/检查一切是否正常。
太棒了,一切正常。现在按下关闭 Docker,ctrl + c并创建一个名为“Django 应用”的 Django 应用chat
docker-compose run --rm web python manage.py startapp chat
将其添加到已安装的应用程序列表中settings/base.py
# settings/base.py

INSTALLED_APPS = [
    "django.contrib.admin",
    "django.contrib.auth",
    "django.contrib.contenttypes",
    "django.contrib.sessions",
    "django.contrib.messages",
    "django.contrib.staticfiles",
    # Local apps
    "chat"
]
好棒!让我们进入下一节,乐趣就从这里开始。
使用 Django 通道的 WebSocket
毋庸置疑,在典型的 Django 项目中,客户端发出 HTTP 请求 > Django 调用负责管理此请求的视图并将响应返回给客户端。
这种通信方式非常标准。然而,自从 Django 引入 ASGI 并开始原生支持它以来,使用异步代码编写 Django 应用程序已经成为可能。ASGI 不仅允许您运行异步应用程序,而且还支持使用更高级的协议,例如 WebSockets。
基于 ASGI 构建的Django Channels超越了 HTTP,并支持其他协议,例如 WebSockets。Django Channels 的底层实现与常规 HTTP 视图非常相似。
话虽如此,在项目中设置频道需要以下包:
channelsdaphne
它们都被添加到requirements.txt文件中,因此在构建 Docker 镜像时它们一定已经安装好了。
Daphne 是一个用于 ASGI 的 HTTP、HTTP2 和 WebSocket 协议服务器,旨在支持 Django Channels。需要将此服务器添加到已安装应用列表中,以便它能够接管runserver管理命令。
# settings/base.py

INSTALLED_APPS = [
    "daphne", # here
    "django.contrib.admin",
    "django.contrib.auth",
    "django.contrib.contenttypes",
    "django.contrib.sessions",
    "django.contrib.messages",
    "django.contrib.staticfiles",
    # Local apps
    "chat"
]
注意:请谨慎使用任何其他需要重载或替换命令的第三方应用
runserver。Daphne 提供了一个单独的runserver命令,可能会与其冲突。为了解决此类问题,请daphne确保INSTALLED_APPS
接下来,转到项目 asgi.py文件并按如下方式调整以包装 Django ASGI 应用程序:
# asgi.py

import os

from channels.auth import AuthMiddlewareStack
from channels.routing import ProtocolTypeRouter, URLRouter
from channels.security.websocket import AllowedHostsOriginValidator
from decouple import config
from django.core.asgi import get_asgi_application

os.environ.setdefault("DJANGO_SETTINGS_MODULE", config("DJANGO_SETTINGS_MODULE"))

# Initialize Django ASGI application early to ensure the AppRegistry
# is populated before importing code that may import ORM models.
django_asgi_app = get_asgi_application()

application = ProtocolTypeRouter(
    {
        "http": django_asgi_app,
        # We will add WebSocket protocol later. For now, it's just HTTP.
    }
)
最后,设置您的 ASGI_APPLICATION设置以指向该路由对象作为您的根应用程序:
# settings/base.py

ASGI_APPLICATION = "config.asgi.application"
完美!从现在开始,daphne开发服务器将运行。为了确保这一点,请运行以下命令启动容器:
docker-compose up
注意ASGI/Daphne 版本 4.0.0 开发服务器
好了,这个应用程序需要一个单一视图,方便用户和 ChatBot 进行交互。为此,我们首先在项目中设置 Tailwind CSS。
Tailwind CSS 配置
在 Django 中设置 Tailwind CSS 的方法有很多种。其中一种方法是使用名为django-tailwind的包。此包提供了一种在 Django 项目中使用 Tailwind CSS 的简便方法。
此包已包含在内,requirements.txt因此在创建 Docker 镜像时它必须已经安装。
安装后,tailwind在设置中添加到已安装的应用程序列表中:
# settings/base.py

INSTALLED_APPS = [
    "daphne",
    "django.contrib.admin",
    "django.contrib.auth",
    "django.contrib.contenttypes",
    "django.contrib.sessions",
    "django.contrib.messages",
    "django.contrib.staticfiles",
    # Third-party apps
    "tailwind",
    # Local apps
    "chat",
]
现在,创建一个兼容 TailwindCSS 的 Django 应用。当系统提示输入应用名称时,你可以随意命名,也可以使用默认名称。theme
docker-compose run --rm web python manage.py tailwind init
将应用程序 - 添加theme到设置中已安装的应用程序列表中:
# settings/base.py

INSTALLED_APPS = [
    # ...
    # Local apps
    "chat",
    "theme",
]
通过将生成的应用程序theme添加到设置中来注册它,如下所示:
# settings/base.py

# Tailwind
TAILWIND_APP_NAME = "theme"
通过运行以下命令安装 Tailwind CSS 依赖项:
docker-compose run --rm web python manage.py tailwind install
完美!现在,转到theme/templates/base.html此文件将用作基础模板,以在所有其他模板中包含 Tailwind 的样式表。我们对其进行如下修改:
{% comment %} theme/templates/base.html {% endcomment %}

{% load static tailwind_tags %}
<!DOCTYPE html>
<html lang="en">
  <head>
    <title>{% block title %}Django Chatbot{% endblock %}</title>
    <meta charset="UTF-8" />
    <meta name="viewport" content="width=device-width, initial-scale=1.0" />
    <meta http-equiv="X-UA-Compatible" content="ie=edge" />
    {% tailwind_css %}
  </head>

  <body>
    {% block body %} {% endblock %}
  </body>
  {% block scripts%}{% endblock %}
</html>
然后,转到chat之前创建的应用程序并创建一个templates目录。在该templates目录中,创建另一个名为 的目录 chat,并在其中创建一个名为 的文件chat.html
将以下代码片段放入文件中:
{% comment %} chat/templates/chat/chat.html {% endcomment %}

{% extends 'base.html' %} {% block body %}
<div class="p-6 w-[800px]">
  <h1 class="text-3xl tracking-tight font-light" id="chat-header"></h1>
  <div
    id="chat-log"
    class="mt-4 w-full relative p-6 overflow-y-auto h-[30rem] bg-gray-50 border border-gray-200"
  ></div>
  <div class="mt-4">
    <input
      id="chat-message-input"
      class="py-2 outline-none bg-gray-50 border border-gray-300 text-gray-900 text-sm focus:border-blue-500"
      type="text"
      placeholder="Write your message here."
    />
    <button
      id="chat-message-submit"
      class="py-2 px-4 ml-2 border border-transparent text-sm font-medium rounded-md text-white bg-blue-800 hover:bg-blue-900"
      type="submit"
    >
      Send
    </button>
  </div>
</div>
{% endblock %}
上面是一个基本的 Django HTML 文件,其中div将显示聊天历史记录,以及一个input带有按钮的供用户输入的框submit。
接下来,创建一个将呈现上述模板的视图:
# chat/views.py

from django.views.generic import TemplateView

class ChatView(TemplateView):
    template_name: str = "chat/chat.html"
然后, urls.py在聊天应用程序内创建模块并将其映射 ChatView到 URL 模式。
# chat/urls.py

from django.urls import path
from .views import ChatView

app_name = "chat"

urlpatterns = [path("", ChatView.as_view(), name="chat_view")]
最后,转到项目 urls.py 文件并包含聊天应用程序的 URL:
# config/urls.py

from django.contrib import admin
from django.urls import include, path

urlpatterns = [
    path("admin/", admin.site.urls),
    path("", include("chat.urls", namespace="chat")),
]
完成了!现在,确保样式应用正确,并且目前为止所做的一切正常。
开始顺风:
docker-compose run web python manage.py tailwind start
在另一个终端启动容器:
docker-compose run web python manage.py tailwind start
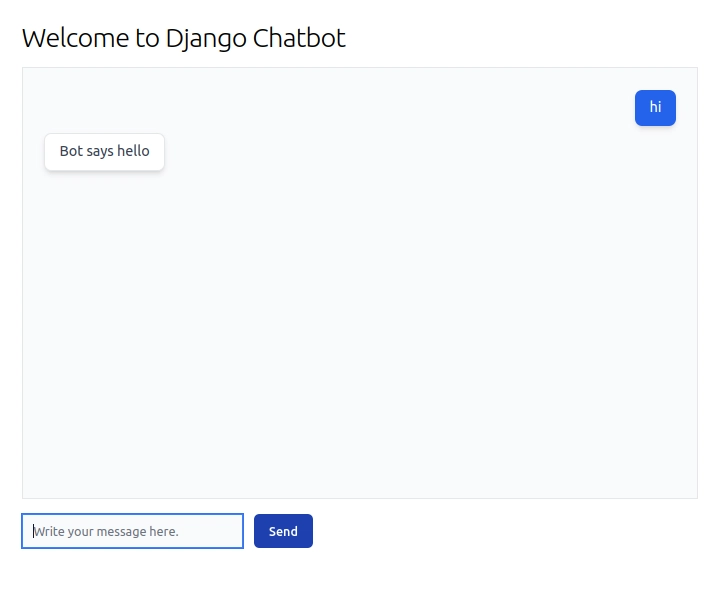
转到http://localhost:8000/你将看到以下内容🎉
注意:-如果未应用样式,请确保已启动 tailwind 并重新启动容器。
前端 - 创建 WebSocket 连接
在里面chat.html,您需要编写一个脚本,打开与 Django 服务器的 WebSocket 连接并监听已建立的连接以发送和接收数据。
打开文件并在块 iechat.html下方添加以下脚本body{% endblock %}
{% block scripts %}
<script>
  var wss_protocol = window.location.protocol == "https:" ? "wss://" : "ws://";
  var chatSocket = new WebSocket(
    wss_protocol + window.location.host + "/ws/chat/"
  );
  var messages = [];

  chatSocket.onopen = function (e) {
    document.querySelector("#chat-header").innerHTML =
      "Welcome to Django Chatbot";
  };

  chatSocket.onmessage = function (e) {
    var data = JSON.parse(e.data);
    var message = data["text"];
    messages.push(message);

    var str = '<ul class="space-y-2">';
    messages.forEach(function (msg) {
      str += `<li class="flex ${
        msg.source == "bot" ? "justify-start" : "justify-end"
      }">
      <div class="relative max-w-xl px-4 py-2 rounded-lg shadow-md
        ${
          msg.source == "bot"
            ? "text-gray-700 bg-white border border-gray-200"
            : "bg-blue-600 text-white"
        }">
        <span className="block font-normal">${msg.msg}</span></div></li>`;
    });
    str += "</ul>";
    document.querySelector("#chat-log").innerHTML = str;
  };

  chatSocket.onclose = function (e) {
    alert("Socket closed unexpectedly, please reload the page.");
  };

  document.querySelector("#chat-message-input").focus();
  document.querySelector("#chat-message-input").onkeyup = function (e) {
    if (e.keyCode === 13) {
      // enter, return
      document.querySelector("#chat-message-submit").click();
    }
  };

  document.querySelector("#chat-message-submit").onclick = function (e) {
    var messageInputDom = document.querySelector("#chat-message-input");
    var message = messageInputDom.value;
    chatSocket.send(
      JSON.stringify({
        text: message,
      })
    );

    messageInputDom.value = "";
  };
</script>
{% endblock %}
- 上述脚本创建到
/ws/chat/路径的 WebSocket 连接 > 监听不同的事件并操作 DOM。 - 根据消息来源(用户或机器人),应用不同的对齐方式和样式(请参阅下文
chatsocket.onmessage)
如果此时运行服务器,输入任何消息并点击提交,WebSocket 连接将会打开,但您会在 JavaScript 控制台中看到错误,因为我们还没有接受 WebSocket 连接的消费者。
启用通道层
Channel 层为多个消费者提供了一个抽象,使他们能够彼此通信,并与 Django 的其他部分进行通信。它是将消息从发送者传递到接收者的中间人。本指南中使用的 Channel 层是 Redis。除了用作 WebSocket 通信之外,Redis 还可以用作:
- Celery 的消息代理和结果后端。
- 缓存。
它是一个多功能工具!
我们已经在 Docker 中配置了 Redis 服务。Django Channels 还需要知道如何与 Redis 交互。这由一个名为channels_redis
channels_redis是一个官方维护的通道层,使用 Redis 作为其后备存储。它已包含在 Docker 镜像中,requirements.txt因此在构建 Docker 镜像时必须已安装。
接下来添加 Channel 层设置:
# settings/base.py

# Django Channels
CHANNEL_LAYERS = {
    "default": {
        "BACKEND": "channels_redis.core.RedisChannelLayer",
        "CONFIG": {
            "hosts": [config("REDIS_BACKEND")],
        },
    },
}
通道层具有以下内容:
1) 频道 -一个可以发送消息的邮箱。每个频道都有一个名称。任何知道频道名称的人都可以向该频道发送消息。
2) 群组 -一组相关频道。每个群组都有一个名称。任何知道群组名称的人都可以通过名称向群组添加/删除频道,并向群组中的所有频道发送消息。
后端 - WebSocket 消费者
当 WebSocket API 打开连接时,需要通知 Channels 去哪里接收并处理该连接。这时,Consumer 就派上用场了。Consumer 相当于普通 Django HTTP 请求中的 Views。
当客户端发送消息时,该消息会被另一端监听组或频道的消费者接收。
创建一个名为consumers.py“聊天应用程序内部”的文件并添加以下内容:
# chat/consumers.py

import json

from asgiref.sync import async_to_sync
from channels.generic.websocket import WebsocketConsumer

class ChatConsumer(WebsocketConsumer):
    def receive(self, text_data):
        text_data_json = json.loads(text_data)

        # The consumer ChatConsumer is synchronous while the channel layer
        # methods are asynchronous. Therefore wrap the methods in async-to-sync
        async_to_sync(self.channel_layer.send)(
            self.channel_name,
            {
                "type": "chat_message",
                "text": {"msg": text_data_json["text"], "source": "user"},
            },
        )

        # We will later replace this call with a celery task that will
        # use a Python library called ChatterBot to generate an automated
        # response to a user's input.
        async_to_sync(self.channel_layer.send)(
            self.channel_name,
            {
                "type": "chat.message",
                "text": {"msg": "Bot says hello", "source": "bot"},
            },
        )

    # Handles the chat.mesage event i.e. receives messages from the channel layer
    # and sends it back to the client.
    def chat_message(self, event):
        text = event["text"]
        self.send(text_data=json.dumps({"text": text}))
- 上述消费者接受路径上的 WebSocket 连接
/ws/chat/,接收消息,并向客户端发送响应(目前响应只是一条简单的消息“ Bot says hello ”)。 - 任何消费者都有一个
self.channel_layerandself.channel_name属性,它分别包含指向通道层实例(在我们的例子中是 Redis)的指针和通道名称。
与 Channels 类似,urls.py使用路由配置来路由到消费者。在chat应用程序内部,创建一个名为的文件routing.py并添加以下内容:
# chat/routing.py

from django.urls import re_path

from . import consumers

websocket_urlpatterns = [
    re_path(r"ws/chat/$", consumers.ChatConsumer.as_asgi()),
]
接下来,转到 asgi.py 并进行如下修改:
# config/asgi.py

"""
ASGI config for config project.

It exposes the ASGI callable as a module-level variable named ``application``.

For more information on this file, see
https://docs.djangoproject.com/en/4.1/howto/deployment/asgi/
"""

import os

from channels.auth import AuthMiddlewareStack
from channels.routing import ProtocolTypeRouter, URLRouter
from channels.security.websocket import AllowedHostsOriginValidator
from django.core.asgi import get_asgi_application
from decouple import config

os.environ.setdefault("DJANGO_SETTINGS_MODULE", config("DJANGO_SETTINGS_MODULE"))

# Initialize Django ASGI application early to ensure the AppRegistry
# is populated before importing code that may import ORM models.
django_asgi_app = get_asgi_application()

import chat.routing

application = ProtocolTypeRouter(
    {
        "http": django_asgi_app,
        "websocket": AllowedHostsOriginValidator(
            AuthMiddlewareStack(URLRouter(chat.routing.websocket_urlpatterns))
        ),
    }
)
- 上述代码将根路由配置指向
chat.routing模块。这意味着当连接到开发服务器(渠道的开发服务器)时,ProtocolTypeRouter会检查它是普通的 HTTP 请求还是 WebSocket 请求。 - 如果它是 WebSocket,
AuthMiddlewareStack将从那里获取它并使用对当前经过身份验证的用户的引用填充连接的范围,类似于 Django 如何 使用当前经过身份验证的用户AuthenticationMiddleware填充 函数request的对象 。view - 接下来,
URLRouter将根据提供的 URL 模式将连接路由到特定的消费者。
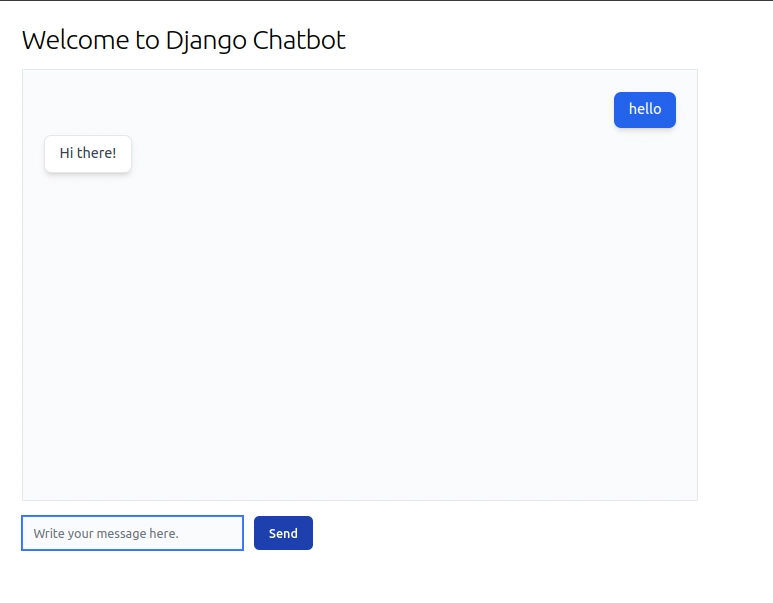
现在,如果您访问http://localhost:8000/并输入任何消息,您将收到一条回复“ Bot says hello ”
太棒了!现在,我们需要自动响应用户的输入。下一部分我们将使用 ChatterBot 来实现。
ChatterBot - 生成自动回复
ChatterBot 是一个 Python 库,可以轻松生成对用户输入的自动响应。要在你的项目中使用它,请将其添加到设置中的已安装应用列表中:
# settings/base.py

INSTALLED_APPS = [
    # ...
    # Third-party apps
    "tailwind",
    "chatterbot.ext.django_chatterbot",
    # Local apps
    "chat",
    "theme",
]
ChatterBot 在底层使用逻辑适配器来确定如何响应给定的输入语句。您的机器人可以配置多个逻辑适配器。大多数逻辑适配器使用朴素贝叶斯分类算法来确定输入语句是否满足特定条件集,并据此生成响应。朴素贝叶斯分类算法基于条件概率。点击此处了解更多信息。
您可以查看此处查看逻辑适配器列表。在本教程中,我们将使用一个名为“最佳匹配适配器”的适配器。顾名思义,该 BestMatch逻辑适配器会根据给定语句的最佳匹配来选择响应。让我们将其添加到设置中:
# settings/base.py

# Chatterbot
CHATTERBOT = {
    "name": "User Support Bot",
    "logic_adapters": [
        "chatterbot.logic.BestMatch",
    ],
}
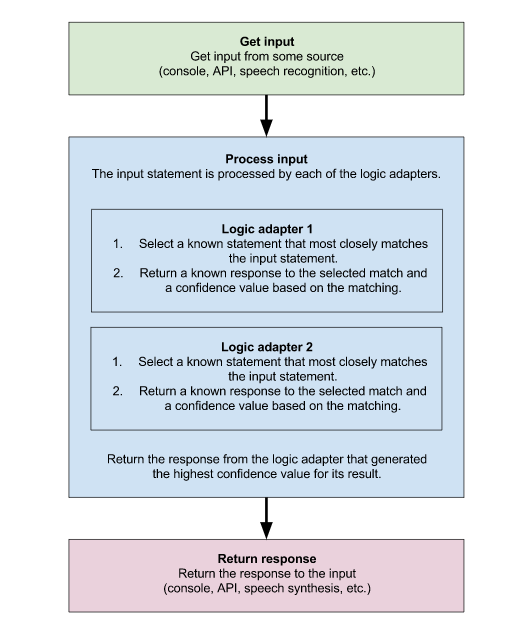
如果您使用多个适配器,则计算出的置信度得分最高的响应将被视为对输入的有效响应。每个逻辑适配器返回的置信度得分决定了响应对输出的有效性或接近程度。
ChatterBot文档中的下图很好地展示了幕后流程。
ChatterBot 培训
起初,ChatterBot 实例就像一张白纸。这意味着它从一个空的数据库开始。您可以用语句(表示可以表达的内容的单字符串文本)填充它,它会逐渐学会以更高的准确率回复您的输入。这个训练过程需要一些时间。为了简化这个过程,ChatterBot 提供了多种初始训练机器人的方法。在本教程中,您将学习如何使用示例列表数据来训练您的机器人。
让我们创建一个简单的自定义管理命令,我们将在其中传递一系列语句。转到chat应用程序并创建一个management目录。在该management目录中,创建另一个名为 的目录commands,并在其中创建 2 个文件__init__.py和train.py
将以下脚本放入其中train.py
# chat/management/commands/train.py

from django.core.management.base import BaseCommand
from chatterbot import ChatBot
from chatterbot.ext.django_chatterbot import settings
from chatterbot.trainers import ListTrainer

class Command(BaseCommand):
    help = "Training the chatbot"

    def handle(self, *args, **options):
        chatterbot = ChatBot(**settings.CHATTERBOT)
        trainer = ListTrainer(chatterbot)
        trainer.train(
            [
                "Hello",
                "Hi there!",
                "How are you doing?",
                "I'm doing great.",
                "That is good to hear",
                "Thank you.",
                "You're welcome.",
            ]
        )
        self.stdout.write(self.style.SUCCESS("Successfull!"))
接下来,运行以下命令将示例对话框加载到项目的数据库中。
docker-compose run --rm web python manage.py train
现在,创建一个超级用户:
docker-compose exec web python manage.py createsuperuser
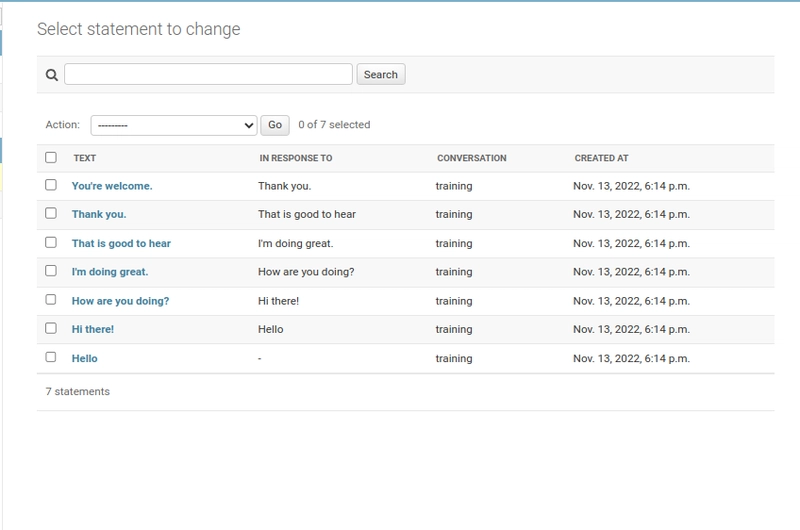
然后转到管理面板http://localhost:8000/admin/转到statements选项卡,瞧,您将看到带有其回复的文本列表。
将自动响应生成卸载到 Celery
毋庸置疑,ChatterBot 生成响应非常耗时。这时 Celery 就能派上用场了。Celery 会挑选队列中的任务,并管理一个单独的服务器在后台运行它们。如前所述,我们将使用 Redis 作为消息代理。它已经在 Docker 中设置好了,让我们继续定义任务。
tasks.py在应用程序内部创建一个名为的文件chat并放入以下 Celery 任务:
# chat/tasks.py

from asgiref.sync import async_to_sync
from celery import shared_task
from channels.layers import get_channel_layer
from chatterbot import ChatBot
from chatterbot.ext.django_chatterbot import settings

channel_layer = get_channel_layer()

@shared_task
def get_response(channel_name, input_data):
    chatterbot = ChatBot(**settings.CHATTERBOT)
    response = chatterbot.get_response(input_data)
    response_data = response.serialize()

    async_to_sync(channel_layer.send)(
        channel_name,
        {
            "type": "chat.message",
            "text": {"msg": response_data["text"], "source": "bot"},
        },
    )
最后更新consumers.py以下内容:
# chat/consumers.py

import json

from asgiref.sync import async_to_sync
from channels.generic.websocket import WebsocketConsumer

from .tasks import get_response

class ChatConsumer(WebsocketConsumer):
    def receive(self, text_data):
        text_data_json = json.loads(text_data)
        get_response.delay(self.channel_name, text_data_json)

        async_to_sync(self.channel_layer.send)(
            self.channel_name,
            {
                "type": "chat_message",
                "text": {"msg": text_data_json["text"], "source": "user"},
            },
        )

    def chat_message(self, event):
        text = event["text"]
        self.send(text_data=json.dumps({"text": text}))
您必须重新启动容器,以便 Celery 可以接收该任务并将其添加到队列中。按下ctrl + c并运行:
docker-compose up
转到http://localhost:8000/并输入 hello 您将收到响应🚀
结论
本教程旨在帮助您入门。ChatterBot 的文档非常简洁,因此请务必查阅以实现更多功能。例如,您可以使用语料库数据训练数据。您可以使用多个逻辑适配器,甚至可以创建自己的逻辑适配器。此外,您还可以查看 Django Channel 的文档,了解更多关于消费者、通道层等的信息。
祝你编码愉快!🖤
文章来源:https://dev.to/documatic/build-a-chatbot-using-python-django-46hb 后端开发教程 - Java、Spring Boot 实战 - msg200.com
