使用 Dev.to 后端开始你的博客
为什么?!
启动项目
感谢 Dev.to,我们开发者不用自己建博客,就能拥有一个利基平台来写作。这很棒,但你专门创建了一个作品集来展示和整合你的作品,所以留下一个 Dev.to 个人资料链接,指望有人点击,远不如一张带有文章预览的精美卡片有效(点击诱饵,做好你自己的事)。接下来我会讲解我决定用 Dev.to 后端搭建博客的原因和过程。
为什么?!
为什么不使用 Vuepress 或 Gridsome?

如果我从头开始创建我的网站,Gridsome 将是显而易见的选择,但我已经用 vanila VueJs 构建了我的网站,完全符合我的要求。
我的确认真考虑过 Vuepress,但最终觉得它无法满足我的需求。我不担心 SEO,也不需要在自己的管理面板上写代码。简而言之,我只想让我的作品集成为我所有开发相关作品的集中存储库。
为什么选择 Dev.to?
我决定使用 Dev.to 有几个原因。
1.) 这全是技术,这意味着我直接与我的同行互动,而如果我使用 Medium,我就会陷入一个非常深的困境,无法轻松完成我想要的互动。
2.) 无需担心 SEO 或广告。使用 Dev.to 托管我的内容,我完全无需担心 SEO。我会vue-meta从 Dev.to 的 API 获取一些数据,以帮助我的博客进行 SEO。
3.) 对打包的影响极小,兼容 Netlify,速度超快。Gridsome 的性能数据确实非常惊人,但必须将更改推送到整个代码库的流程远不如在 Dev.to 上编写并知道帖子会自动发布到我的网站上那么优雅。
4.) Dev.to 的 API 提供了我期望从其他 CMS 获得的所有数据。当然也有一些需要注意的地方,但值得注意的是,他们的 API 仍处于测试阶段,所以谁也不知道接下来会有什么新东西。
以下是本文中的一个示例响应(我将省略键body_html&body_markdown以避免发生初始级别的灾难):
{
  "type_of": "article",
  "id": 203240,
  "title": "Start your blog with a Dev.to backend",
  "description": "",
  "cover_image": "https://res.cloudinary.com/practicaldev/image/fetch/s--x1wXDXOK--/c_imagga_scale,f_auto,fl_progressive,h_420,q_auto,w_1000/https://res.cloudinary.com/practicaldev/image/fetch/s--A1UtFhw3--/c_imagga_scale%2Cf_auto%2Cfl_progressive%2Ch_420%2Cq_auto%2Cw_1000/https://thepracticaldev.s3.amazonaws.com/i/1mj5i26wfcagzuisquc7.png",
  "readable_publish_date": "Nov 11",
  "social_image": "https://res.cloudinary.com/practicaldev/image/fetch/s--r6RM1gMz--/c_imagga_scale,f_auto,fl_progressive,h_500,q_auto,w_1000/https://res.cloudinary.com/practicaldev/image/fetch/s--A1UtFhw3--/c_imagga_scale%2Cf_auto%2Cfl_progressive%2Ch_420%2Cq_auto%2Cw_1000/https://thepracticaldev.s3.amazonaws.com/i/1mj5i26wfcagzuisquc7.png",
  "tag_list": "beginners, vue, javascript",
  "tags": [
    "beginners",
    "vue",
    "javascript"
  ],
  "slug": "start-your-blog-with-a-dev-to-backend-13e2",
  "path": "/codespent/start-your-blog-with-a-dev-to-backend-13e2",
  "url": "https://dev.to/codespent/start-your-blog-with-a-dev-to-backend-13e2",
  "canonical_url": "https://dev.to/codespent/start-your-blog-with-a-dev-to-backend-13e2",
  "comments_count": 0,
  "positive_reactions_count": 0,
  "collection_id": null,
  "created_at": "2019-11-11T02:43:22Z",
  "edited_at": "2019-11-11T04:35:47Z",
  "crossposted_at": null,
  "published_at": "2019-11-11T04:09:07Z",
  "last_comment_at": "2019-11-11T04:09:07Z",
  "published_timestamp": "2019-11-11T04:09:07Z",
  "user": {
    "name": "CodeSpent",
    "username": "codespent",
    "twitter_username": "CodeSpent",
    "github_username": null,
    "website_url": "https://codespent.dev/",
    "profile_image": "https://res.cloudinary.com/practicaldev/image/fetch/s--mT1TUP7B--/c_fill,f_auto,fl_progressive,h_640,q_auto,w_640/https://thepracticaldev.s3.amazonaws.com/uploads/user/profile_image/178244/de976252-7575-4822-aff1-bbffa007fe24.jpg",
    "profile_image_90": "https://res.cloudinary.com/practicaldev/image/fetch/s--gp1VBpDB--/c_fill,f_auto,fl_progressive,h_90,q_auto,w_90/https://thepracticaldev.s3.amazonaws.com/uploads/user/profile_image/178244/de976252-7575-4822-aff1-bbffa007fe24.jpg"
  }
}
我们有足够的数据来创建一个时尚的博客,并vue-meta添加一些功能。以后甚至可以添加 slug 路由。
启动项目
我从一个现有项目开始,所以这篇文章会从它开始的地方开始。如果你需要帮助来启动你的 Vue 应用,请查看@therealdanvega的这篇精彩文章。
正在获取文章
警告:在本用例中,我们将公开使用 Dev.to 的 API,且不提供 API_KEY。目前没有只读的 api_key,您的所有机密信息将被嵌入到应用程序中,并可通过浏览器访问,从而使攻击者能够以您的名义向 Dev.to 发送消息。请勿在前端使用您的 Dev.to api_key。
我们首先/services/在你的文件夹中创建一个目录/src/。在这个目录中,创建一个名为 的文件,blogService.js该文件将包含用于收集文章的 API 方法。首先创建一个 axios 实例,并将其baseUrl指向 Dev.to 的 API https://dev.to/api/。
import axios from 'axios'

const api = axios.create({
  baseURL: 'https://dev.to/api/',
  timeout: 5000,
  headers: {
    'Content-Type': 'application/json',
  }
})
这为我们提供了一个可复用的 axios 实例,可用于我们的博客服务。我们想用它来获取文章,这在/articles/端点上很合理,所以让我们将该方法添加到我们的blogService.
export default {
  async fetchArticles() {
    try {
      return await api.get(`articles`)
    }
    catch(e) {
      return e.response
    }
  },
}
在任何组件中,通过导入并调用方法继续测试它fetchArticles()。
import blogService from '@/services/blogService'
你会发现这不太对劲,它会拉取所有 Dev.to 文章,所以我们需要添加一个查询参数来筛选我们自己的文章。在你的fetchArticles()方法中,只需将其附加?username=<your_username>到 url 参数即可。
export default {
  async fetchArticles() {
    try {
      return await api.get(`articles?username=codespent`)
    }
    catch(e) {
      return e.response
    }
  },
}
一切就绪!现在我们可以获取所有文章了!
博客组件
我们需要创建 3 个组件:
- 博客组件——容纳
<router-view>我们嵌套的博客路线。 - 博客主页提要——在这里我们将看到所有博客文章的概览。
- 博客文章——名称恰当,这里可以阅读单篇文章。
博客.vue
<template>
    <div class="container text-center p-4 min-w-full">
      <h1 class="text-white text-5xl">CodeSpent.dev</h1>
      <h3 class="text-gray-600 text-sm font-black italic">This blog is powered by </h3>
      <a href="https://dev.to/" class="text-center text-white"><font-awesome-icon size="2x" :icon="['fab', 'dev']" /></a>
      <router-view></router-view>
    </div>
</template>
Blog 组件相当简单,只有一个标题和一个Powered by Dev.to徽章。重要的部分来自我们的组件<router-view></router-view>,它将根据路由渲染另外两个组件。
路由
我的网站主页位于/,博客地址也位于/blog。这就需要使用嵌套路由。
我的博客路线看起来像这样。
/blog                                /blog/post/:articleId
+------------------+                  +-----------------+
| Blog             |                  | Blog            |
| +--------------+ |                  | +-------------+ |
| | BlogHome     | |  +------------>  | | BlogPost    | |
| |              | |                  | |             | |
| +--------------+ |                  | +-------------+ |
+------------------+                  +-----------------+
/blog/我们可以通过首先为我们的组件创建一个路由来轻松实现这一点Blog.vue。
export default new Router({
  mode: 'history',
  routes: [
    {
      path: '/',
      component: Home,
      name: 'home'
    },
    {
      path: '/blog/',
      component: Blog,
      name: 'blog'
    }
/blog/我们需要将两个嵌套路由 BlogHome 和 BlogPost 放在下面,这样它们就会在路由children下方传递/blog/。以下是我完整的router.js嵌套路由示例,仅供参考。
import Vue from 'vue'
import Router from 'vue-router'

import Home from '@/components/home/Home'
import Blog from '@/components/blog/Blog'
import BlogHome from '@/components/blog/BlogHome'
import BlogPost from '@/components/blog/BlogPost'

Vue.use(Router)

export default new Router({
  mode: 'history',
  routes: [
    {
      path: '/',
      component: Home,
      name: 'home'
    },
    {
      path: '/blog/',
      component: Blog,
      name: 'blog',
      children: [
        {
          path: '/',
          component: BlogHome,
          name: 'blog-home'
        },
        {
          path: '/blog/post/:articleId/',
          component: BlogPost,
          name: 'blog-post'
        }
      ]
    },
  ]
})
现在我们已经准备好所有路由来处理 BlogHome 和 BlogPost 组件了。你会注意到:articleId/BlogPost 路径末尾的 ,它稍后会用来从 url 参数中获取 Dev.to 的文章 ID!
博客首页
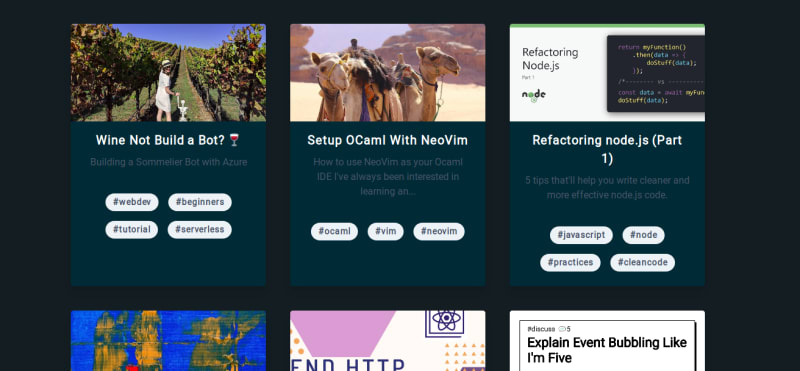
BlogHome 组件用于展示所有文章,包括一些描述文字、标签和封面图片。我自己也刚开始使用 Dev.to,所以您看到的这张截图是其他优秀开发者的文章,用于测试。如果您也是新手,为了方便测试/设计,您可以在fetchArticles()方法中blogService.js删除username用于从 Dev.to 获取所有文章的查询参数。
<template>
  <div class="container text-center p-4">
      <div class="container flex flex-row flex-wrap m-8 p-8 min-h-screen">
        <h3 v-if="articles.length < 1" class="text-gray-600">No posts yet, stay tuned!</h3>
        <div
          v-for="article in articles"
          :key="article.id"
          @click="openArticle(article.id)"
          class="max-w-xs m-5 rounded overflow-hidden shadow-lg bg-terminal"
        >
        <img class="w-full" :src="article.social_image" :alt="article.description">
        <div
          class="px-6 py-4"
        >
          <div class="font-bold text-xl mb-2 text-white">{{ article.title }}</div>
          <p class="text-gray-700 text-base">{{ article.description }}</p>
        </div>
        <div class="px-6 py-4">
          <span
            class="inline-block bg-gray-200 rounded-full px-3 py-1 text-sm font-semibold text-gray-700 m-2"
            v-for="tag in article.tag_list"
            :key="tag"
          >
          #{{ tag }}
          </span>
        </div>
      </div>
    </div>
  </div>
</template>

<script>
import blogService from '@/services/blogService'

  export default {
    data() {
      return {
        articles: []
      }
    },
    methods: {
      async fetchArticles() {
        await blogService.fetchArticles()
        .then((response) => {
          switch(response.status) {
            case 200: {
              this.articles = response.data
              break
            }
            default: {
              this.articles = false
              break
            }
          }
        })
      },
      openArticle(articleId) {
        this.$router.push('post/' + articleId)
      }
    },
    mounted() {
      this.fetchArticles()
    }
  }
</script>
我在这里使用 TailwindCSS 构建卡片对象的布局,然后使用v-for指令循环遍历钩子上调用的方法articles中设置的值。欢迎您自行使用此模板,我不太擅长设计,但它包含了我认为必要的基本元素:标题、描述、封面图片和标签。fetchArticles()beforeMount()
你会注意到,在@clickcard div 的指令中,我们有一个名为 的方法,openArticle()它将路由推送到blog/post/:articleId。这里我们将使用之前传入的 url 参数。让我们继续,转到BlogPost组件。
BlogPost.vue
当然,这部分工作还在进行中。Dev.to API 在文章数据中确实提供了body_markdown&body_html键,但我们仍然需要根据这些数据进行样式设置。考虑到我目前处理的文章数量很少,所以我还没有找到很多样式设置所需的条件。
<template>
  <div class="container flex flex-col items-center m-5 min-h-screen">
    <h1 v-if="!article" class="text-gray-600">That post can't be found.</h1>
    <img :src="article.cover_image" class="rounded max-h-30" width="1000px" />
    <h1 class="text-white text-3xl font-black mt-4">{{ article.title }}</h1>
    <div class="article text-left" v-html="article.body_html"></div>
  </div>
</template>

<script>
import blogService from '@/services/blogService'

export default {
  data() {
    return {
      article: {}
    }
  },
  beforeMount() {
    this.fetchArticle()
  },
  methods: {
    async fetchArticle() {
      const articleId = this.$route.params.articleId
      await blogService.fetchArticleById(articleId)
      .then((response => {
        switch(response.status) {
          case 200: {
            this.article = response.data
            break
          }
          default: {
            this.article = false
            break
          }
        }
      }))
    }
  }
}
</script>
div另一个非常基础的布局,与 BlogHome 组件有一些非常类似的功能。请注意模板中的final 部分。在这里我们使用v-html指令将文章中的 HTML 代码“注入”到其中div。您会注意到,默认情况下,它看起来非常丑陋,所以我们需要对其进行样式设置。现在这部分对我来说仍然处于开发阶段,因为我还没有看过足够多的文章,所以无法对其进行样式设置,但我确实想对选择器进行一些说明/deep/ >>>。以下是我目前的样式。
<style scoped>
  .article {
    padding: 4em;
  }
  .article >>> {
    color: #fff !important;
  }
  .article >>> h1 {
    font-size: 2.2em;
  }

  .article >>> p {
    font-size: 1.2em;
    margin: 1,2 0 1.8em;
  }

  .article >>> li {
    margin: 0.3em auto;
    list-style: square;
  }
</style>
选择>>>器不久前就被弃用了,但有了scoped样式,这才是我唯一能在指令中应用样式的方法v-html。你有没有更好的处理方法?欢迎留言!
Netlify 重定向
我只是想快速解决这个问题,因为很多人在使用 vue-router 和 Netlify 时都遇到过这个问题。为了保持良好的语法 URL,我们需要history在 vue-router 上使用模式,但这仅在服务器处理路由重定向时有效。由于我们无法在 Netlify 上访问 Nginx/Apache,因此我们需要在 .js 文件中创建一个重定向netlify.toml。
在项目根目录中创建一个名为 的文件netlify.toml。此文件的目的是在使用 Netlify 部署时向构建机器人发送一条消息,让它们知道需要一些额外的配置。
在此文件中,添加以下内容:
[[redirects]]
  from = "/*"
  to = "/index.html"
  status = 200
这样做的目的是将所有路由重定向回index.html您的 Vue 应用程序,从而允许 vue-router 处理路由。
注意:如果重定向最初不起作用,请不要使用 force = true 参数,这也会强制重定向到 /static /assets 路由(也就是你的 js 文件所在的位置)。请清除缓存并重新部署。
演示
您可以在https://CodeSpent.dev/上看到现场演示,也可以在https://www.codespent.dev/blog/post/203240/上看到这篇具体文章。

结论
好了,差不多就是这样了,现在你可以像往常一样在 Dev.to 上撰写博客文章,但你的网站仍然会包含一个美观的博客,用于集中管理你的所有工作。当然,我绝不是 Vue 或 JavaScript 专家,所以如果你发现任何问题或发现可以改进的地方,请留言!
欢迎提出建议
当然,非常欢迎对这篇文章、其中的内容或所提供的代码提出任何建议或批评!
问题
我目前正在解决的一些问题:
- 添加 Prism/Highlightjs 语法高亮
- 实现评论和点赞计数(只读)
您还可以在 GitHub 上找到我的作品集/博客代码以供参考。
文章来源:https://dev.to/codespent/start-your-blog-with-a-dev-to-backend-13e2