如何使用 GraphQL .Net Core 和 Entity Framework 构建 Web API
使用 GraphQL .Net Core 和 Entity Framework 构建 Web Api
使用 GraphQL .Net Core 和 Entity Framework 构建 Web Api
在本文中我们将了解:
- 构建 Web Api,我们将学习如何使用 .Net Core CLI 搭建 Web Api,以及不同的类如何响应不同的请求
- 集成 GraphQL,我们将创建必要的辅助类来创建 Schema、解析器等。此外,我们还将学习如何使用可视化环境 GraphiQL。
- 设置实体框架 ( EF)并将类映射到表。在这里,我们将创建一个包含实体的类,该类将在数据库中创建相应的表和列。我们还将把 EF 与我们的 API 集成。
这是这篇文章的 repo:
资源
-
在 .Net Core 中构建你的第一个 GraphQL 应用
教你如何使用 GraphQL 在 .Net Core 中创建你的第一个应用。本教程将讨论查询、修改、解析器等基本主题。 -
在 .Net Core 中使用 GraphQL 构建无服务器 API
这介绍如何使用底层 GraphQL API 构建无服务器 API。 -
我基于这篇文章撰写了这篇文章,
这篇文章在很多方面都非常优秀。它确实使用了一种不同的、更冗长的方式来设置 GraphQL。至于使用哪种方法,则完全取决于你。 -
将 .Net Core 应用部署到云
这将教您如何从 VS Code 进行部署 -
免费 Azure 帐户
要部署无服务器 Azure 函数,您需要一个免费的 Azure 帐户)
构建我们的 Web Api
我们要做的第一件事是搭建一个 .Net Core 项目。我们将使用一个名为 的模板webapi。命令如下:
dotnet new webapp -o aspnetcoreapp
这将在文件夹中创建一个 Web Api 项目aspnetcoreapp。标志-o指示目录的名称。因此,您可以将其替换aspnetcoreapp为您选择的名称。
如果您之前从未在 .Net Core 中构建过 Web API,我建议您查看 中提到的 Web API 链接Resources。不过,我还是要说一下。其核心思想是创建一个与控制器匹配的路由概念。在一个普通的 Web API 中,通常会有一个api/Products由类处理的路由ProductsController。在实现 GraphQL 部分时,我们会更深入地探讨这一点。
集成 GraphQL
我们将采取以下步骤来集成 GraphQL:
- 从 NuGet安装依赖项
- 使用自定义类型、查询类型和突变定义模式
- 创建响应请求的解析器函数
- 添加 Web Api 路由来响应来自 GraphiQL(我们的可视化环境)的请求
安装依赖项
首先确保我们位于项目目录中:
cd aspnetcoreapp
现在像这样安装依赖项:
dotnet add package GraphQL --version 2.4.0
dotnet add package graphiql --version 1.2.0
该包GraphQL将为我们提供设置模式和定义解析器所需的核心库。graphiql包是一个可视化环境,我们将使用它来展示开发人员的体验有多么出色。
设置架构
Graphql像这样创建一个目录:
mkdir Graphql
现在创建一个文件Schema.cs并赋予它以下内容:
using GraphQL.Types;
using GraphQL;
using Api.Database;

namespace Api.Graphql
{
  public class MySchema
  {
    private ISchema _schema { get; set; }
    public ISchema GraphQLSchema
    {
      get
      {
        return this._schema;
      }
    }

    public MySchema()
    {
      this._schema = Schema.For(@"
          type Book {
            id: ID
            name: String,
            genre: String,
            published: Date,
            Author: Author
          }

          type Author {
            id: ID,
            name: String,
            books: [Book]
          }

          type Mutation {
            addAuthor(name: String): Author
          }

          type Query {
              books: [Book]
              author(id: ID): Author,
              authors: [Author]
              hello: String
          }
      ", _ =>
      {
        _.Types.Include<Query>();
        _.Types.Include<Mutation>();
      });
    }

  }
}
让我们分解一下我们刚才的操作。Query和Mutation是保留字。Query是我们的公共 API,我们在这里输入的任何内容都可以被查询。Mutation也是公共 API 的一部分,但它表示我们想要更改数据。我们唯一的条目是,addAuthor这将允许我们创建一个 Author。Author和Book是我们刚刚定义的自定义类型,它们具有一些合适的属性。
查询
如果你还没有读过我其他关于 GraphQL 的文章,我建议你先看看资源部分,不过这里还是简单介绍一下如何在 GraphQL 中进行查询。根据上面的模式,我们可以查询books。它看起来可能像这样:
{
  books {
    name,
    genre,
    published
  }
}
这将给出如下响应:
{
  "data": {
    "books" : [{
      "name": "IT",
      "genre": "Horror",
      "published": "1994"
    }]
  }
}
GraphQL 的一大优点是它允许我们深入了解并请求更多数据,因此我们可以要求它在上面的查询中列出作者,如下所示:
{
  books {
    name,
    genre,
    published,
    author {
      name
    }
  }
}
并给出相应的答案:
{
  "data": {
    "books" : [{
      "name": "IT",
      "genre": "Horror",
      "published": "1994",
      "author": {
        "name": "Stephen King"
      }
    }]
  }
}
定义解析器
在定义解析器之前,我们需要几种类型。我们需要创建Author和Book。
创建类型
Author.cs首先在目录下创建一个文件Database。赋予它以下内容:
// Database/Author.cs

using System.Collections.Generic;

namespace Api.Database
{
  public class Author
  {
    public int Id { get; set; }
    public string Name { get; set; }
    public List<Book> Books { get; set; }
  }
}
现在在目录Book.cs下创建那个Database:
// Database/Book.cs

namespace Api.Database
{
  public class Book
  {
    public string Id { get; set; }

    public string Name { get; set; }

    public bool Published { get; set; }

    public string Genre { get; set; }

    public int AuthorId { get; set; }

    public Author Author { get; set; }
  }
}
创建查询解析器
现在让我们定义相应的解析器。我们在 Schema.cs 中提到了Query和Mutation,但我们还没有定义这些类。让我们首先创建Query.cs并赋予它以下内容:
// Graphql/Query.cs

using System.Collections.Generic;
using GraphQL;
using System.Linq;
using Api.Database;
using System;
using Microsoft.Extensions.DependencyInjection;
using Microsoft.EntityFrameworkCore;

namespace Api.Graphql
{
  public class Query
  {

    [GraphQLMetadata("books")]
    public IEnumerable<Book> GetBooks()
    {
      return Enumerable.Empty<Books>();
    }

    [GraphQLMetadata("authors")]
    public IEnumerable<Author> GetAuthors()
    {
      return Enumerable.Empty<Authors>();
    }

    [GraphQLMetadata("author")]
    public Author GetAuthor(int id)
    {
      return null;
    }

    [GraphQLMetadata("hello")]
    public string GetHello()
    {
      return "World";
    }
  }
}
我们在上面创建了一个类,用于处理模式中的每个查询请求。我们还创建了一个方法,用于对应所有可查询的内容。装饰器GraphQLMetadata帮助我们将模式中的内容映射到一个方法,即解析器。例如,我们可以看到它author(id: ID): Author是如何映射到类中的以下代码的Query:
[GraphQLMetadata("author")]
public Author GetAuthor(int id)
{
  return null;
}
创建突变解析器
我们还需要定义一个解析器,即Mutation。让我们Mutation.cs使用以下内容创建:
using Api.Database;
using GraphQL;

namespace Api.Graphql
{
  [GraphQLMetadata("Mutation")]
  public class Mutation
  {
    [GraphQLMetadata("addAuthor")]
    public Author Add(string name)
    {
      return null;
    }
  }
}
添加 GraphQL 路由
对于 GraphQL 来说,关键在于只使用一条路由/graphql,并由前端和后端协商返回什么内容。我们将做两件事:
- 将 GraphiQL 映射到
/graphql - 创建一个控制器来响应
/graphql
地图 GraphiQL
GraphiQL 是一个可视化环境,我们从 NuGet 安装。为了使用它,我们需要打开它Startup.cs,并在方法中Configure()添加以下代码:
app.UseGraphiQl("/graphql");
注意,请确保在之前添加上述行app.UseMvc();
创建 GraphQL 控制器
在目录下Controllers创建一个文件GraphqlController.cs。让我们逐步建立这个文件。让我们从类定义开始:
// GraphqlController.cs

using System.Threading.Tasks;
using GraphQL;
using Microsoft.AspNetCore.Mvc;
using Api.Graphql;

[Route("graphql")]
[ApiController]
public class GraphqlController: ControllerBase
{
}
通过使用装饰器,Route我们可以将特定路由映射到类,而无需依赖默认约定。如您所见,我们为其提供了参数graphql以确保其匹配/graphql。我们还为该类添加了装饰器ApiController,我们需要对所有 API 控制器执行此操作,以便它们能够响应请求。
接下来,我们需要一个方法来处理请求。关于 GraphQL 的一个好处是,所有请求都使用动词POST,因此,我们需要像这样设置一个方法:
[HttpPost]
public async Task<ActionResult> Post([FromBody] GraphQLQuery query)
{
  return null;
}
装饰器HttpPost确保我们能够响应POST请求。让我们仔细看看输入参数query。它使用装饰器FromBody从发布的 Body 中解析出值,并尝试将其转换为类型GraphQLQuery。
我想到两个问题:它是什么?GraphQLQuery为什么我们需要它?
GraphQLQuery是我们需要定义的类,因此让我们通过创建来实现/Graphql/GraphQLQuery.cs:
using Newtonsoft.Json.Linq;

namespace Api.Graphql
{
  public class GraphQLQuery
  {
    public string OperationName { get; set; }
    public string NamedQuery { get; set; }
    public string Query { get; set; }
    public JObject Variables { get; set; }
  }
}
第二个问题:我们为什么需要它?它需要看起来像这样,因为我们要将它与我们的可视化环境 GraphiQL 集成。一旦我们开始使用 GraphiQL,我们就有理由回到这个结构,看看上面的结构是如何填充的。
让我们为控制器添加其余的实现:
// GraphqlController.cs

using System.Threading.Tasks;
using Api.Graphql;
using GraphQL;
using Microsoft.AspNetCore.Mvc;

namespace graphql_ef.Controllers
{
  [Route("graphql")]
  [ApiController]
  public class GraphqlController: ControllerBase
  {
    [HttpPost]
    public async Task<ActionResult> Post([FromBody] GraphQLQuery query)
    {
      var schema = new MySchema();
      var inputs = query.Variables.ToInputs();

      var result = await new DocumentExecuter().ExecuteAsync(_ =>
      {
        _.Schema = schema.GraphQLSchema;
        _.Query = query.Query;
        _.OperationName = query.OperationName;
        _.Inputs = inputs;
      });

      if (result.Errors?.Count > 0)
      {
        return BadRequest();
      }

      return Ok(result);
    }
  }
}
上面我们从输入中读取我们需要的内容query并将其传递给DocumentExecuter最终得到结果。
现在我们已经准备好一切,可以开始尝试我们的 Api 了Debug/Start Debugging。接下来,你应该会看到以下内容:
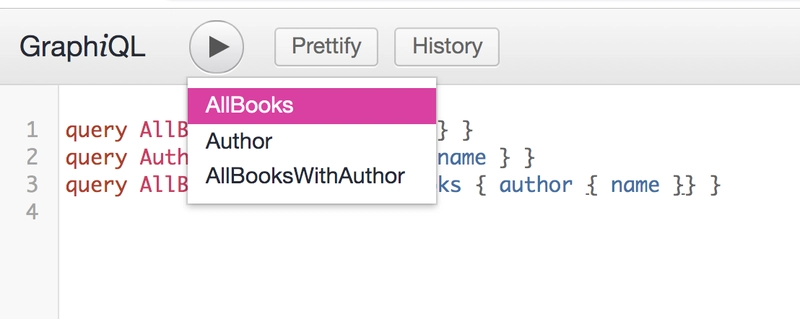
这里我们创建了三个查询AllBooks,Author和AllBooksWithAuthor。
我们可以轻松运行其中一个查询,点击Play按钮,这使我们能够选择一个特定的查询:
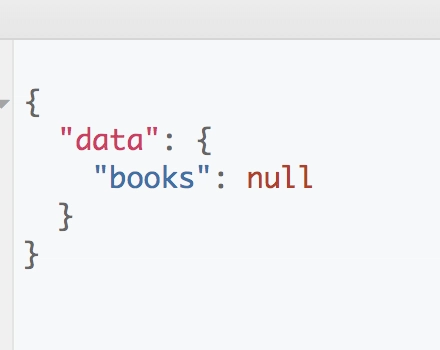
运行查询我们得到以下结果:
不过我们并不感到惊讶,因为我们只是把答案去掉了,返回了一个空数组。在修复这个问题并连接数据库之前,我们先来谈谈我们的 GraphiQL 环境。
我没有提到的一件很棒的事情是,我们在编写查询或变异时具有自动完成支持,因此我们可以在输入可用的资源和列时轻松获取信息:
显然,我们可以编写多个查询,然后选择所需的查询。此外,我们可以查看右侧窗格,查看我们的模式定义是否可浏览:
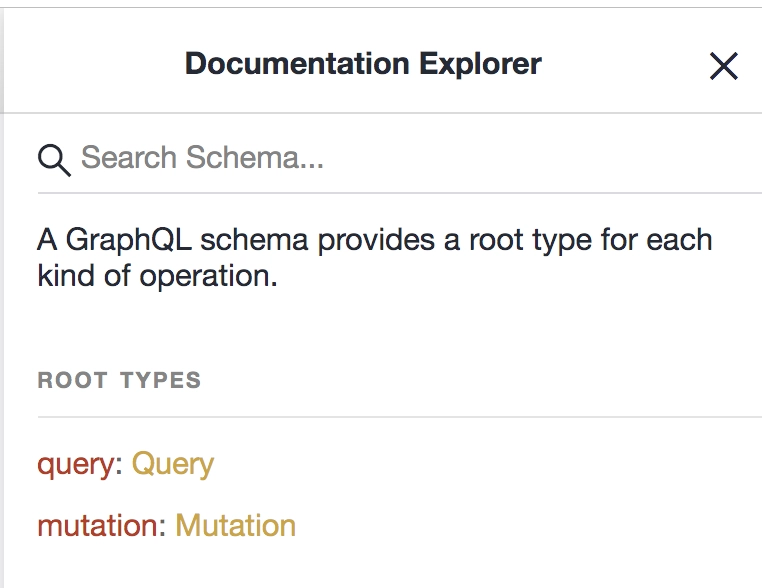
单击Docs链接将显示从顶层开始的所有类型:
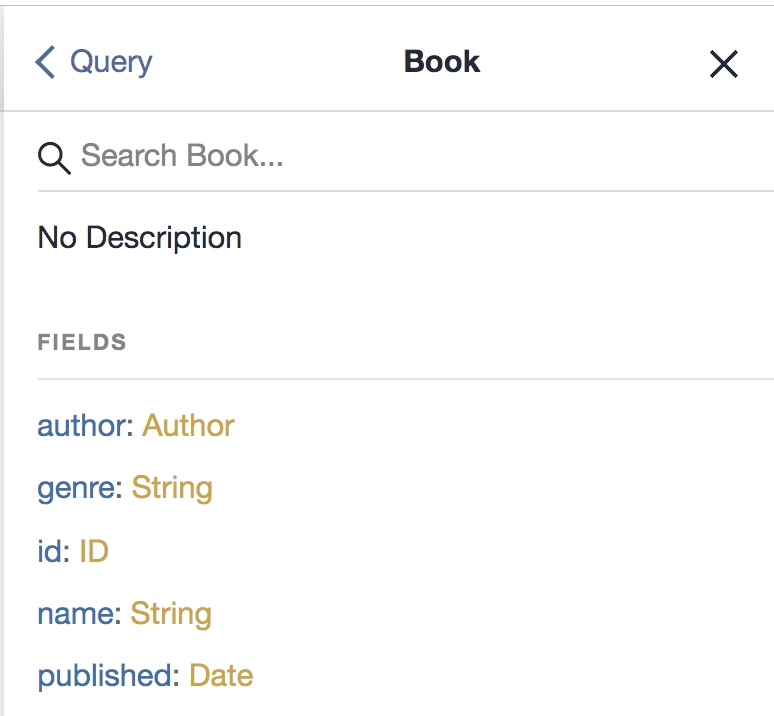
然后,我们可以根据需要进行深入研究,看看我们可以查询什么、我们有哪些自定义类型等等:
使用实体框架添加数据库
现在一切已正常运行,让我们定义数据库并用数据库调用替换解析器方法中的存根答案。
为了实现这一切,我们将采取以下措施:
- 在代码中定义一个数据库,我们通过创建一个继承自的类来实现
DbContext,并确保它具有以下类型的字段DbSet - 定义我们想要在数据库中使用的模型,实际上我们在创建
Author和时已经完成了这一步Book。 - 设置并配置数据库类型,我们将使用内存数据库类型,但稍后我们绝对可以将其更改为 Sql Server 或 MySql 或我们需要的任何数据库类型
- 为数据库提供种子,为了这个例子,我们需要一些初始数据,以便在查询时得到一些返回
- 将解析器方法中的存根代码替换为对数据库的实际调用
在代码中定义数据库
我们使用一种称为“代码优先”的方法。这意味着我们创建一个带有字段的类,这些字段将成为数据库中的表。让我们创建一个文件StoreContext.cs并为其添加以下内容:
using Microsoft.EntityFrameworkCore;

namespace Api.Database
{

  public class StoreContext : DbContext
  {
    public StoreContext(){}
    public StoreContext(DbContextOptions<StoreContext> options)
      : base(options)
    { }

    protected override void OnConfiguring(DbContextOptionsBuilder optionsBuilder) {
      optionsBuilder.UseInMemoryDatabase("BooksDb");
    }

    public DbSet<Book> Books { get; set; }
    public DbSet<Author> Authors { get; set; }
  }
}
这两个字段Books的Authors类型分别为DbSet<Book>和DbSet<Author>,它们将成为我们数据库中的表。方法OnConfiguring()是我们设置数据库的地方BooksDb,并且我们还指定要使用方法 将其存储在内存数据库中UseInMemoryDatabase()。如果我们希望它持久化到实际的数据库中,我们可以将其更改为其他类型。
种子数据库
现在这不是我们必须要做的步骤,但在开始查询时有一些数据总是好的。为此,我们将打开Program.cs并向方法中添加以下内容Main():
using(var db = new StoreContext())
{
    var authorDbEntry = db.Authors.Add(
        new Author
        {
            Name = "Stephen King",
        }
    );

    db.SaveChanges();

    db.Books.AddRange(
    new Book
    {
        Name = "IT",
        Published = true,
        AuthorId = authorDbEntry.Entity.Id,
        Genre = "Mystery"
    },
    new Book
    {
        Name = "The Langoleers",
        Published = true,
        AuthorId = authorDbEntry.Entity.Id,
        Genre = "Mystery"
    }
    );

    db.SaveChanges();
}
以上将创建一位作者和两本书。
替换存根代码
现在到了有趣的部分。我们将用对数据库和实体框架的实际调用替换我们的存根代码。
我们需要更改两个文件,Query.cs和Mutation.cs。让我们从开始吧Query.cs。
查询.cs
打开Query.csGraphql 目录下的文件并将其内容替换为以下内容:
// Graphql/Query.cs

using System.Collections.Generic;
using GraphQL;
using System.Linq;
using Api.Database;
using Microsoft.EntityFrameworkCore;

namespace Api.Graphql
{
  public class Query
  {

    [GraphQLMetadata("books")]
    public IEnumerable<Book> GetBooks()
    {
      using(var db = new StoreContext())
      {
        return db.Books
        .Include(b => b.Author)
        .ToList();
      }
    }

    [GraphQLMetadata("authors")]
    public IEnumerable<Author> GetAuthors()
    {
      using (var db = new StoreContext())
      {
        return db.Authors
        .Include(a => a.Books)
        .ToList();
      }
    }

    [GraphQLMetadata("author")]
    public Author GetAuthor(int id)
    {
      using (var db = new StoreContext())
      {
        return db.Authors
        .Include(a => a.Books)
        .SingleOrDefault(a => a.Id == id);
      }
    }

    [GraphQLMetadata("hello")]
    public string GetHello()
    {
      return "World";
    }
  }
}
上面我们用对数据库的调用替换了所有存根代码。让我们来看看相关的方法:
获取图书
[GraphQLMetadata("books")]
public IEnumerable<Book> GetBooks()
{
  using(var db = new StoreContext())
  {
    return db.Books
    .Include(b => b.Author)
    .ToList();
  }
}
上面我们从数据库中选取了所有图书,并确保包含该Author属性。这样我们就可以支持如下查询:
{
  books {
    name,
    author {
      name
    }
  }
}
获取作者
[GraphQLMetadata("authors")]
public IEnumerable<Author> GetAuthors()
{
  using (var db = new StoreContext())
  {
    return db.Authors
    .Include(a => a.Books)
    .ToList();
  }
}
这里我们从数据库中选取了所有作者,并包含了该作者撰写的所有书籍。这样我们就可以支持如下查询:
{
  authors {
    name,
    books {
      name,
      published
    }
  }
}
突变.cs
打开Mutation.cs并将其存根代码替换为:
using Api.Database;
using GraphQL;

namespace Api.Graphql
{
  [GraphQLMetadata("Mutation")]
  public class Mutation
  {
    [GraphQLMetadata("addAuthor")]
    public Author Add(string name)
    {
      using(var db = new StoreContext())
      {
        var author = new Author(){ Name = name };
        db.Authors.Add(author);
        db.SaveChanges();
        return author;
      }
    }
  }
}
addAuthor(name: String): Author正如您上面看到的,我们通过创建新作者、将其保存到数据库然后返回实体来支持变异。
在 GraphiQL 中测试
最后一件事就是在可视化界面上测试一下。点击一下Debug/Start Debugging,看看会发生什么:
看起来我们的书籍列表查询工作正常,它为我们提供了数据库中的标题。
接下来,我们尝试进行变异:
从上面的结果来看,一切似乎进展顺利,太棒了!:)
概括
这是一篇相当雄心勃勃的文章。我们成功地在 Web API 中创建了一个 GraphQL API。我们还成功地引入了一个使用 Entity Framework 访问的数据库。
最大的收获不仅在于设置简单,还在于 GraphiQL 出色的可视化环境。它不仅帮助我们实现了自动补全,还记录了我们的架构,帮助我们验证查询等等。
尽管这篇文章有点长,但希望您觉得它有用。
最后,我想说的是,webapi项目类型自带了依赖注入,但我没能用上。主要原因是,这种设置 GraphQL 的方式意味着我们无法控制实例化Query和Mutation。你可以在参考资料部分看到,我引用了一篇文章,它实现了我们今天在这里做的事情,并成功地使用了依赖注入 (DI)。然而,你必须以一种截然不同的方式设置 GraphQL 模式,在我看来,这种方式要冗长得多。
 后端开发教程 - Java、Spring Boot 实战 - msg200.com


