适用于 MacOS 的 Neovim
什么是 Neovim?
让我们开始吧:
大家好,这是我的第一篇博文,我将帮助大家在 MacOS 上安装 Neovim。本次安装的插件主要涉及后端开发(Python 和 Go)。
为什么选择 Neovim?
就我个人而言,尝试 Neovim 的主要动机是:
- 减少我的机器的负载。
- 有使用 Vim/NeoVim 作为 IDE 的经验。
- 好奇为什么 Vim/Neovim 如此特别。
什么是 Neovim?
Neovim 是一个旨在积极重构 Vim 源代码以实现以下目标的项目:
- 简化维护以提高错误修复和功能合并的速度。
- 将工作分配给多个开发人员。
- 无需对核心源进行任何修改即可实现新的/现代的用户界面。
- 使用基于协同进程的全新插件架构,提升扩展能力。插件可以使用任何编程语言编写,无需编辑器的明确支持。
让我们开始吧:
设置:
-
从以下位置安装 Neovim:
安装 Neovim · neovim/neovim Wiki -
你需要安装 brew
- Brew 是 macOS 的软件包管理器
- 打开终端并粘贴以下代码行:
/bin/bash -c "$(curl -fsSL https://raw.githubusercontent.com/Homebrew/install/HEAD/install.sh)"
- 复制并粘贴此命令来安装 neovim
brew install neovim
- 然后转到这个文件
<username>/.config/nvim/init.vim- 如果文件/目录不存在,只需手动创建它们。
- 打开文件并设置您的配置文件:
- 在控制台上使用 nvim init.vim 打开配置文件或任何文本编辑器。
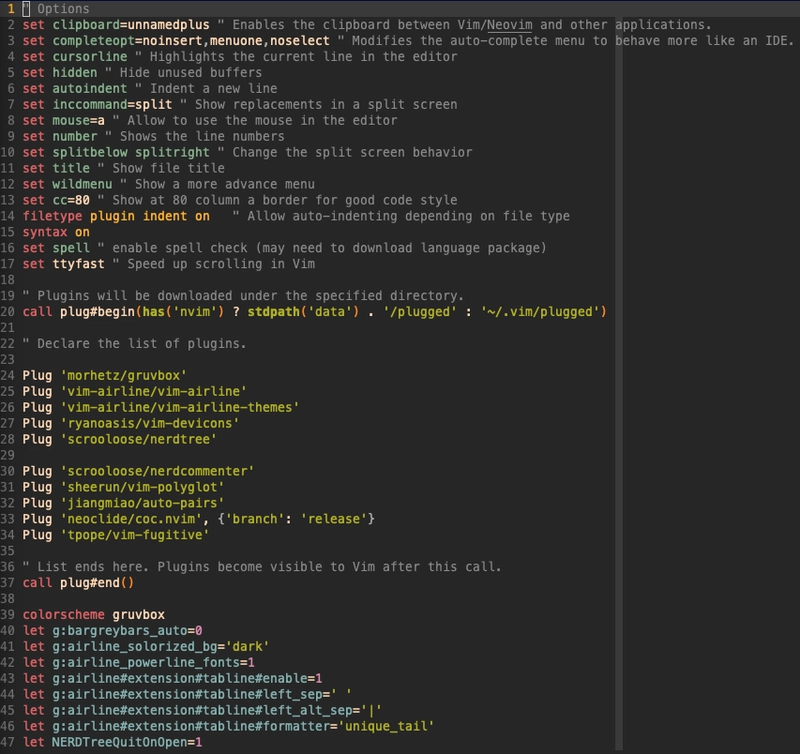
- 您可以使用以下配置:
" Options
set clipboard=unnamedplus " Enables the clipboard between Vim/Neovim and other applications.
set completeopt=noinsert,menuone,noselect " Modifies the auto-complete menu to behave more like an IDE.
set cursorline " Highlights the current line in the editor
set hidden " Hide unused buffers
set autoindent " Indent a new line
set inccommand=split " Show replacements in a split screen
set mouse=a " Allow to use the mouse in the editor
set number " Shows the line numbers
set splitbelow splitright " Change the split screen behavior
set title " Show file title
set wildmenu " Show a more advance menu
set cc=80 " Show at 80 column a border for good code style
filetype plugin indent on   " Allow auto-indenting depending on file type
syntax on
set spell " enable spell check (may need to download language package)
set ttyfast " Speed up scrolling in Vim
- 如果配置正确,当您打开文件时它应该看起来像这样。

-
下一步我们需要安装一个插件管理器。在本例中,我们使用 vim-plug,链接如下。
https://github.com/junegunn/vim-plug
- 因为我们使用的是 neovim,所以我们需要使用这个命令
sh -c 'curl -fLo "${XDG_DATA_HOME:-$HOME/.local/share}"/nvim/site/autoload/plug.vim --create-dirs \
           https://raw.githubusercontent.com/junegunn/vim-plug/master/plug.vim'
    ```
{% endraw %}

- After installing vim-plug, is necessary to add these couple of lines on init.vim, so we can use :PlugInstall command.
 - The Plug command is to install the plugins we want to install in our configuration.
{% raw %}

```bash
call plug#begin(has('nvim') ? stdpath('data') . '/plugged' : '~/.vim/plugged')
Plug 'Example'
call plug#end()
- 插件列表:
Plug 'morhetz/gruvbox'
Plug 'vim-airline/vim-airline'
Plug 'vim-airline/vim-airline-themes'
Plug 'ryanoasis/vim-devicons'
Plug 'scrooloose/nerdtree'
Plug 'scrooloose/nerdcommenter'
Plug 'sheerun/vim-polyglot'
Plug 'jiangmiao/auto-pairs'
Plug 'neoclide/coc.nvim', {'branch': 'release'}
Plug 'tpope/vim-fugitive'
- 在“Call plug#end()”之后,您需要添加配置行以使用主题、航空公司扩展和 NERDTree
colorscheme gruvbox
let g:bargreybars_auto=0
let g:airline_solorized_bg='dark'
let g:airline_powerline_fonts=1
let g:airline#extension#tabline#enable=1
let g:airline#extension#tabline#left_sep=' '
let g:airline#extension#tabline#left_alt_sep='|'
let g:airline#extension#tabline#formatter='unique_tail'
let NERDTreeQuitOnOpen=1
- 安装插件后,您的 neovim 配置应如下所示:
链接:
好了,希望这篇文章能对你有所帮助。点赞并分享给你的朋友吧。
如果您需要帮助或有任何疑问,可以发表评论。
文章来源:https://dev.to/dafloresdiaz/neovim-for-macos-3nk0