让我们从头开始构建一个网络广播播放器🌐📻
视频杀死了广播明星,互联网杀死了视频明星,通过本教程,我将向您展示如何实现这一切!
您可能知道,我喜欢将对音乐的热爱与编码结合起来,因此,今天我不会制作完整的乐器,而是专注于一种传输音乐的方式:广播!
等等,收音机还存在吗?
确实如此!流媒体服务将听众与主持人、编辑和艺术家分离。在广播节目中,主持人实际上可以与听众互动:想想看,采访艺术家,回答听众的问题,或者进行智力竞赛节目!
与普通的流媒体服务相比,广播电台具有更多优势:
- 编辑内容
- 各种主题的节目
- 本地新闻
- 能够时不时地随机发现一首新的朗朗上口的歌曲
- 不必关心接下来要听什么
如今,许多人仍在收听广播,但他们通常不再使用那些笨重的老式机器了。就像大多数任务一样,如今的听众使用电脑,更具体地说,使用浏览器。
虽然这篇文章没有介绍如何设置您自己的流(那是另一次),但我会向您展示如何以一种易于理解且视觉上吸引人的方式向您的听众呈现流!
没有流,好的 - 但是我们如何测试界面呢?
好问题。有很多电台可以用来测试播放器。
所以第一步是找到一个流媒体,最好是一个能提供当前正在播放歌曲的 API 端点。一个流行的搜索引擎™会提供大量不同的电台供我们测试,所以我选择了一个我个人喜欢的。
流准备好了,接下来我们来讨论设计。
这个东西会是什么样子的?
选项多种多样。它可以在弹出窗口中运行,也可以放置在导航栏、侧边栏或顶部栏中,并随内容滚动。让我们来看一些网络上的广播播放器示例。
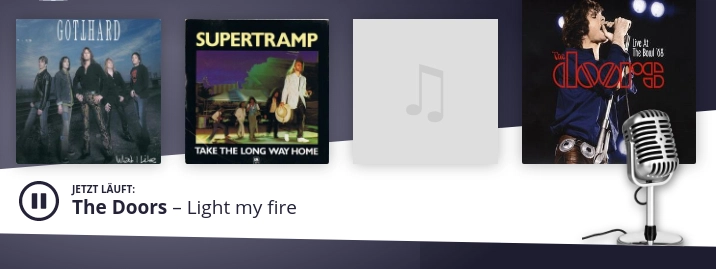
汉堡摇滚天线
第一个例子是“Rock Antenne Hamburg”的播放器,它很好地展现了视觉线索(专辑封面、“Jetzt läuft”(正在播放)的文字)如何极大地提升了电台播放器的用户体验。它的焦点似乎集中在音乐上,这正是我想要的。
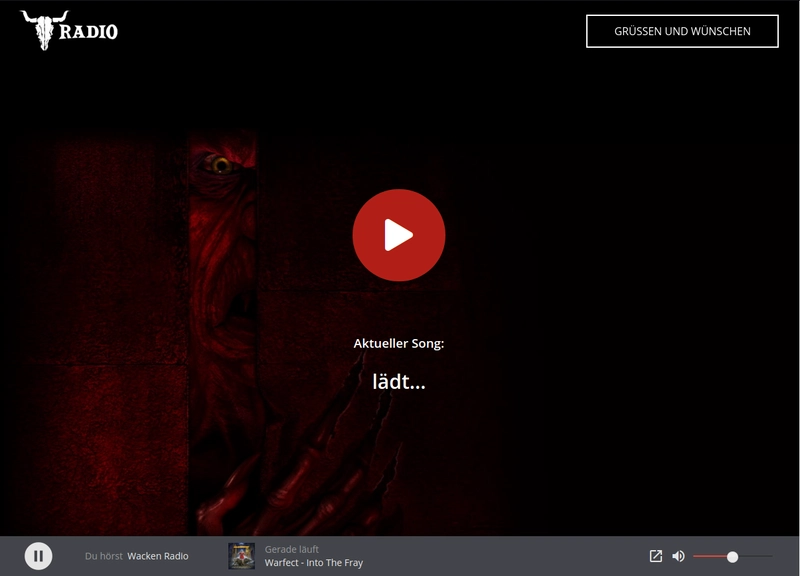
瓦肯电台
我想看的下一个例子是 Wacken Radio,它是 Wacken Open Air 音乐节的专用广播电台:
播放器给人的第一印象是覆盖了整个屏幕,但实际上,播放器本身只是底部的灰色条。实际上,页面上还有更多内容(新闻、即将播放的歌曲等),滚动时会显示出来。灰色条是粘性的,固定在视口的底部。这与其他将播放器固定在屏幕顶部的网站类似。
与 Rock Antenne Hamburg 类似,它有当前播放歌曲的标签和专辑封面。不过,由于我使用的流媒体不提供专辑封面,所以这实际上不是一个选项。
可能的设计
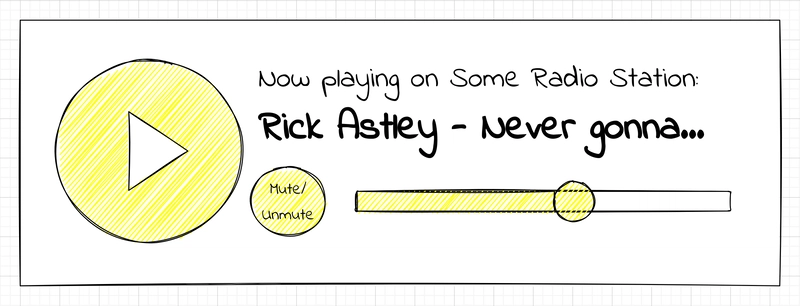
我可能会选择一些简单的东西。目前没有网站可以放这个例子,所以我会把它做得比较独立。
右下角的滑块用于控制音量。静音/取消静音按钮会显示一个图标,大致指示当前音量。点击该按钮可将音量切换至 0,并恢复至上次设置。
配色方案显然(至少据我所知)在经常播放爵士乐的电台里很流行:黄色、黑色和白色。如果有人知道他们为什么喜欢用黄色,请留言!
HTML 部分
首先,我需要进行一些设置。我创建了一个空的 CSS 文件、一个空的 JS 文件和一个名为 的 HTML 文件player.html。我打算使用Fontawesome来制作图标,所以我也添加了一个它的 CDN 版本。
<!-- player.html -->
<!DOCTYPE html>
<html>
<head>
  <meta charset="utf8">
  <link rel="stylesheet" type="text/css" href="//fonts.googleapis.com/css?family=Open+Sans" />
  <link rel="stylesheet" href="https://pro.fontawesome.com/releases/v5.10.0/css/all.css" integrity="sha384-AYmEC3Yw5cVb3ZcuHtOA93w35dYTsvhLPVnYs9eStHfGJvOvKxVfELGroGkvsg+p" crossorigin="anonymous"/>
  <link rel="stylesheet" href="player.css">
</head>
<body>
  <div class="radio-player">
  <!-- Player goes here -->
  </div>
  <script src="player.js"></script>
</body>
</html>
接下来,我为播放器添加一个 div,并为流添加一个音频元素。
<div class="radio-player">
  <audio src="..." class="visually-hidden" id="stream">
  <!-- More stuff here -->
</audio>
现在,我将控件添加到音频元素的正下方。我还添加了一些容器,以便稍后使用 Flexbox 布局。
<div class="player-controls">
  <button name="play-pause" class="button play-pause-button" aria-label="Play/pause">
    <i class="fas fa-play" aria-hidden></i>
  </button>

  <div class="volume-and-title">
    <div class="currently-playing" aria-label="Currently playing">
      <span class="currently-playing-label">Now playing on Some Radio Station</span>
      <span class="currently-playing-title">Listen to Some Radio Station</span>
    </div>

    <div class="volume-controls">
      <button name="mute" class="button mute-button" aria-label="Mute/unmute">
        <i class="fas fa-volume-down" aria-hidden></i>
      </button>

      <input type="range" name="volume" class="volume" min="0" max="1" step="0.05" value="0.2" aria-label="Volume">
    </div>
  </div>
</div>
到目前为止一切顺利!现在开始造型。
让它看起来很漂亮
第一步,我想让按钮看起来更美观。我还给整个播放器留了一些边距,这样它就不会卡在视口的角落里。
.radio-player {
  margin: 30px;
}
.button {
  vertical-align: middle;
  display: flex;
  align-items: center;
  justify-content: center;
  cursor: pointer;
  border: none;
  background-color: #F59E0B;
  color: #fff;
  border-radius: 100%;
}
.play-pause-button {
  width: 70px;
  height: 70px;
  font-size: 25px;
  margin-right: 24px;
}
.mute-button {
  width: 30px;
  height: 30px;
  margin-right: 12px;
}
看起来像这样:
接下来,我将元素与 flexbox 对齐,使整个事物具有我想要的结构。
.player-controls {
  display: flex;
  align-items: center;
}
.currently-playing {
  display: flex;
  flex-direction: column;
  margin-bottom: 12px;
}
.volume-controls {
  display: flex;
  align-items: center;
}
有点进展了!然后我稍微调整了一下字体大小和字重,让标题更有视觉重量:
.currently-playing-label {
    font-size: 12px;
    font-weight: 300;
}
.currently-playing-title {
    font-size: 22px;
}
接下来是有趣的部分:<input type="range">为音量设计样式。
我重新设置了一些样式appearance,并根据粗略的设计开始设计它:
.volume {
  -webkit-appearance: none;
  appearance: none;
  border: 1px solid #000;
  border-radius: 50px;
  overflow: hidden; /* This will help with styling the thumb */
}
不过,在设计缩略图样式时,我遇到了一个问题:我需要使用非标准特性。这意味着需要使用供应商前缀。我会使用框阴影来使缩略图左侧部分的颜色与右侧部分不同。
input[type="range"]::-webkit-slider-thumb {
  -webkit-appearance: none;
  appearance: none;

  height: 15px;
  width: 15px;

  cursor: ew-resize;
  background: #F59E0B;
  box-shadow: -400px 0 0 390px #FDE68A;
  border-radius: 50%;
}
input[type="range"]::-moz-range-thumb {
  /* same as above */
}
input[type="range"]::-ms-thumb {
  /* same as above */
}
input[type="range"]:focus {
  border-radius: 50px;
  box-shadow: 0 0 15px -4px #F59E0B;
}
看起来更像是这样的设计:
添加功能
现在我可以将按钮与流连接起来了。首先,我收集所需的所有 DOM 元素,并初始化一些变量:
const audio = document.querySelector('#stream')
const playPauseButton = document.querySelector('[name="play-pause"]')
const playPauseButtonIcon = playPauseButton.querySelector('i.fas')
const volumeControl = document.querySelector('[name="volume"]')
const currentlyPlaying = document.querySelector('.currently-playing-title')
const volumeButton = document.querySelector('[name="mute"]')
const volumeButtonIcon = volumeButton.querySelector('i.fas')

let isPlaying = false
let fetchInterval = null
let currentVolume = 0.2

audio.volume = currentVolume
获取和应用当前播放歌曲的功能很大程度上取决于所使用的端点如何构造信息。在我的示例中,我假设一个包含单个键的简单 JSON 对象,其格式为{ currentSong: "..." }。我用它fetch来获取信息。
/**
 * Fetches the currently playing
 * @returns {Promise<any>}
 */
const fetchCurrentlyPlaying = () => fetch('...')
  .then(response => response.json())
  .then(data => currentlyPlaying.innerText = data.currentSong)
我添加的下一个功能是调整静音按钮的图标,使其反映当前音量。如果音量降至0,它应该显示一个静音图标;音量越高,“扬声器发出的声波”就越多。至少形象地说是这样。
/**
 * Adjusts the icon of the "mute" button based on the given volume.
 * @param volume
 */
const adjustVolumeIcon = volume => {
  volumeButtonIcon.classList.remove('fa-volume-off')
  volumeButtonIcon.classList.remove('fa-volume-down')
  volumeButtonIcon.classList.remove('fa-volume-up')
  volumeButtonIcon.classList.remove('fa-volume-mute')

  if (volume >= 0.75) {
    volumeButtonIcon.classList.add('fa-volume-up')
  }

  if (volume < 0.75 && volume >= 0.2) {
    volumeButtonIcon.classList.add('fa-volume-down')
  }

  if (volume < 0.2 && volume > 0) {
    volumeButtonIcon.classList.add('fa-volume-off')
  }

  if (volume === 0) {
    volumeButtonIcon.classList.add('fa-volume-mute')
  }
}
现在来看看静音按钮和音量控制的功能。我希望它能记住静音和取消静音时的上次音量。这样,用户就可以快速静音,之后再取消静音,而无需再次调节音量。我把它与音量控制和<audio>音量控制连接起来:
volumeControl.addEventListener('input', () => {
  const volume = parseFloat(volumeControl.value)

  audio.volume = currentVolume = volume
  currentVolume = volume

  adjustVolumeIcon(volume)
})

volumeButton.addEventListener('click', () => {
  if (audio.volume > 0) {
    adjustVolumeIcon(0)
    audio.volume = 0
    volumeControl.value = 0
  } else {
    adjustVolumeIcon(currentVolume)
    audio.volume = currentVolume
    volumeControl.value = currentVolume
  }
})
最后一步是播放/暂停按钮。启动流媒体时,我设置了每 3 秒获取当前播放歌曲的间隔。这个间隔足够接近实时播放,但又不会太长,以免造成太多不必要的请求。我还切换了图标。
playPauseButton.addEventListener('click', () => {
  if (isPlaying) {
    audio.pause()

    playPauseButtonIcon.classList.remove('fa-pause')
    playPauseButtonIcon.classList.add('fa-play')

    clearInterval(fetchInterval)
    currentlyPlaying.innerText = 'Listen to Some Radio Station'
  } else {
    audio.play()

    playPauseButtonIcon.classList.remove('fa-play')
    playPauseButtonIcon.classList.add('fa-pause')

    fetchCurrentlyPlaying()
    fetchInterval = setInterval(fetchCurrentlyPlaying, 3000)
  }

  isPlaying = !isPlaying
})
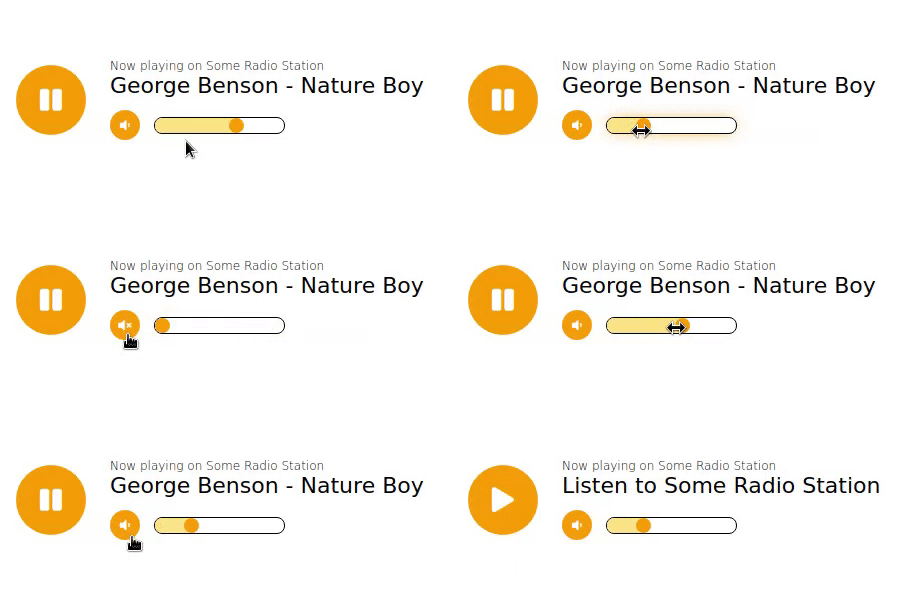
好了,大功告成!我们来看看具体功能:
希望你喜欢阅读这篇文章,就像我喜欢写它一样!如果喜欢,请留下❤️或🦄 !我空闲时间会写科技文章,偶尔也喜欢喝咖啡。
如果您想支持我的努力, 请给我买杯咖啡☕ 或 在 Twitter 上关注我🐦 !您也可以通过 Paypal直接支持我和我的写作!
文章来源:https://dev.to/thormeier/let-s-build-a-web-radio-player-from-scratch-2poo 后端开发教程 - Java、Spring Boot 实战 - msg200.com


