如何使用 React 测试库 Jest 构建基于 TDD 的稳定 React 应用
使用 TDD 和 React 测试库构建 React 应用程序
入门
使用 TDD 构建评论提要
添加评论表单
点赞评论
不喜欢评论
总结
使用 TDD 和 React 测试库构建 React 应用程序
“沙滩上并排摆放着几颗菠萝。” Pineapple Supply Co. 在 Unsplash 上发布
刚开始学习 React 时,我遇到的一个难题是如何以实用且直观的方式测试我的 Web 应用。每次测试组件时,我基本上都会使用 Enzyme 和 Jest 进行浅渲染,这完全滥用了快照功能。
好吧,至少我确实写了一个测试,对吧?
你可能听说过,编写单元测试和集成测试可以提高软件的质量。然而,糟糕的测试反而会滋生错误的信心。
最近,我参加了@kentcdodds的研讨会,他教我们如何正确地为 React 应用程序编写集成测试。他还建议我们使用他的新测试库,强调以用户实际使用的方式测试应用程序。
在这篇文章中,我们将创建一个使用 React 构建的评论提要。
入门
我们将从运行create-react-app和安装依赖项开始。我的假设是,如果您足够敏锐,能够阅读一篇关于测试应用程序的文章,那么您可能已经熟悉安装和启动 JavaScript 项目。在这里,我将使用yarn而不是npm。
create-react-app comment-feed
cd comment-feed
yarn
src就目前情况而言,我们可以删除目录中除 index.js 之外的所有文件。然后,在该src文件夹内,创建一个名为 的新文件夹components,以及一个名为 的文件夹containers。
为了测试实用工具,我将使用 Kent C Dodds 的react-testing-library构建此应用。它是一个轻量级的测试工具,鼓励开发人员以与实际使用相同的方式测试其应用。
与 Enzyme 类似,它导出一个渲染函数,但这个渲染函数始终会执行组件的完整挂载。它导出辅助方法,允许您通过标签、文本甚至测试 ID 来定位元素。Enzyme 的mountAPI 也实现了这一点,但它创建的抽象实际上提供了更多选项,其中许多选项允许您避免测试实现细节。
我们不想再那样做了。我们想渲染一个组件,看看点击或更改某些内容时是否发生了正确的操作。就是这样!不再需要直接检查 props、state 或 class 名称。
让我们安装它们并开始工作。
yarn add react-testing-library
使用 TDD 构建评论提要
让我们用 TDD 风格来做第一个组件。启动你的测试运行器。
yarn test --watch
在该containers文件夹中,我们将添加一个名为 CommentFeed.js 的文件。同时,添加一个名为 CommentFeed.test.js 的文件。作为第一个测试,我们来验证用户是否可以创建评论。太快了?好吧,因为我们还没有代码,所以我们先从一个小测试开始。让我们检查一下是否可以渲染 feed。
// containers/CommentFeed.test.js
import { render } from 'react-testing-library'
import CommentFeed from './CommentFeed'

describe('CommentFeed', () => {
  it('renders the CommentFeed', () => {
    const { queryByText } = render(<CommentFeed />)
    const header = queryByText('Comment Feed')
    expect(header.innerHTML).toBe('Comment Feed')
  })
})
关于 react-testing-library 的一些说明
react-dom首先,我们来看一下 render 函数。它与将组件渲染到 DOM 的方式非常相似,但它返回一个对象,我们可以解构该对象来获取一些简洁的测试辅助函数。在本例中,我们得到了queryByText,它根据我们期望在 DOM 上看到的文本,返回相应的 HTML 元素。
React Testing Library 文档有一个层次结构,可以帮助您决定使用哪个查询或获取方法。通常,顺序如下:
- getByLabelText(表单输入)
- getByPlaceholderText(仅当您的输入没有标签时 - 不太容易访问!)
- getByText(按钮和标题)
- getByAltText(图像)
- getByTestId(用于测试动态文本或其他奇怪的元素)
它们每个都有一个关联的queryByFoo,功能相同,但即使找不到元素也不会导致测试失败。如果您只是测试元素是否存在,请使用它们。
如果这些都不能准确地满足您的要求,该render方法还会返回映射到该属性的 DOM 元素container,因此您可以像 一样使用它container.querySelector('body #root')。
第一部实施法典
现在,实现看起来相当简单,我们只需要确保“评论提要”在组件中。
import React, { Component } from 'react'

export default class CommentFeed extends Component {
  render() {
    const { header } = this.props
    return (
      <div>
        <h2>{header}/h2>
      </div>
    )
  }
}
情况可能会更糟,我的意思是,我本来打算用样式组件来写整篇文章。幸运的是,测试不太在意样式,所以我们可以专注于应用逻辑。下一个测试将验证我们是否可以渲染注释。但是我们甚至没有任何注释,所以让我们也添加这个组件。
不过,测试结束后,我还将创建一个 props 对象来存储我们可能在这些测试中重复使用的数据。
// containers/CommentFeed.test.js
import { render } from 'react-testing-library'
import CommentFeed from './CommentFeed'

describe('CommentFeed', () => {
  const props = { header: 'Comment Feed', comments: [] }

  it('renders the CommentFeed', () => {
    const { queryByText } = render(<CommentFeed {...props} />)
    const header = queryByText(props.header)
    expect(header.innerHTML).toBe(props.header)
  })

  it('renders the comment list', () => {
    const { container } = render(<CommentFeed {...props} />)
    const commentNodes = container.querySelectorAll('.Comment')
    expect(commentNodes.length).toBe(props.comments.length)
  })
})
在本例中,我检查了评论数量是否等于输入到 CommentFeed 中的数量。这很简单,但测试失败给了我们创建 Comment.js 文件的机会。
import React from 'react'

const Comment = props => {
  return (
    <div className="Comment">
      <h4>{props.author}</h4>
      <p>{props.text}</p>
    </div>
  )
}

export default Comment
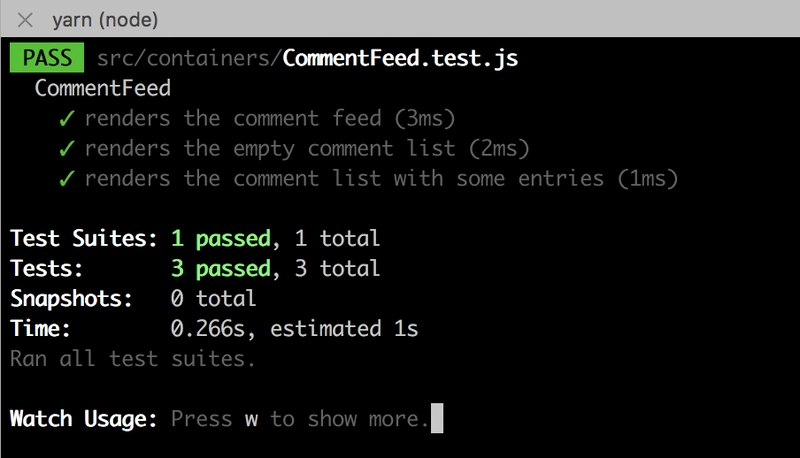
这让我们的测试套件亮起了绿灯,可以放心地继续下去了。TDD 真是我们的救星!当然,当我们传入一个空数组时,它就能正常工作。但如果我们真的传入一些内容呢?
describe('CommentFeed', () => {
  /* ... */

  it('renders the comment list with some entries', () => {
    let comments = [
      {
        author: 'Ian Wilson',
        text: 'A boats a boat but a mystery box could be anything.',
      },
      {
        author: 'Max Powers Jr',
        text: 'Krypton sucks.',
      },
    ]
    props = { header: 'Comment Feed', comments }
    const { container } = render(<CommentFeed {...props} />)
    const commentNodes = container.querySelectorAll('.Comment')
    expect(commentNodes.length).toBe(props.comments.length)
  })
})
我们现在必须更新实现才能真正渲染内容。现在知道该怎么做了吧?很简单,对吧?
import React, { Component } from 'react'
import Comment from '../components/Comment'

export default class CommentFeed extends Component {
  renderComments() {
    return this.props.comments.map((comment, i) => (
      <Comment key={i} {...comment} />
    ))
  }

  render() {
    const { header } = this.props
    return (
      <div className="CommentFeed">
        <h2>{header}</h2>
        <div className="comment-list">{this.renderComments()}</div>
      </div>
    )
  }
}
啊,看那,我们的测试又通过了。这是一张漂亮的照片,展现了它的美。
注意,我从来没有说过我们应该用 来启动程序yarn start?我们会保持这种状态一段时间。重点是,你必须用心去感受代码。
造型只是外在的,内在才是最重要的。;)
如果您想启动该应用程序,请将 index.js 更新为以下内容:
import React from 'react'
import ReactDOM from 'react-dom'
import CommentFeed from './containers/CommentFeed'

const comments = [
  {
    author: 'Ian Wilson',
    text: 'A boats a boat but a mystery box could be anything.',
  },
  {
    author: 'Max Powers Jr',
    text: 'Krypton sucks.',
  },
  {
    author: 'Kent Beck',
    text: 'Red, Green, Refactor.',
  },
]

ReactDOM.render(
  <CommentFeed comments={comments} />,
  document.getElementById('root')
)
添加评论表单
事情从这里开始变得有趣起来。我们从睡眼惺忪地检查 DOM 节点是否存在,到真正地处理这些节点并验证其行为。其他的都只是热身。
首先描述一下我希望这个表单能实现什么功能。它应该:
- 包含作者的文本输入
- 包含用于评论本身的文本输入
- 有一个提交按钮
- 最终调用 API 或任何处理创建和存储评论的服务。
我们可以在一次集成测试中完成这份清单。之前的测试用例我们进展得比较慢,但现在我们要加快速度,争取一次性完成。
注意到我们的测试套件是如何开发的吗?我们从在测试用例中硬编码 props 到为它们创建一个工厂。
安排、行动、主张
import React from 'react'
import { render, Simulate } from 'react-testing-library'
import CommentFeed from './CommentFeed'

// props factory to help us arrange tests for this component
const createProps = props => ({
  header: 'Comment Feed',
  comments: [
    {
      author: 'Ian Wilson',
      text: 'A boats a boat but a mystery box could be anything.',
    },
    {
      author: 'Max Powers Jr',
      text: 'Krypton sucks.',
    },
  ],
  createComment: jest.fn(),
  ...props,
})

describe('CommentFeed', () => {
  /* ... */

  it('allows the user to add a comment', () => {
    // Arrange - create props and locate elements
    const newComment = { author: 'Socrates', text: 'Why?' }
    let props = createProps()
    const { container, getByLabelText } = render(<CommentFeed {...props} />)

    const authorNode = getByLabelText('Author')
    const textNode = getByLabelText('Comment')
    const formNode = container.querySelector('form')

    // Act - simulate changes to elements
    authorNode.value = newComment.author
    textNode.value = newComment.text

    Simulate.change(authorNode)
    Simulate.change(textNode)

    Simulate.submit(formNode)

    // Assert - check whether the desired functions were called
    expect(props.createComment).toHaveBeenCalledTimes(1)
    expect(props.createComment).toHaveBeenCalledWith(newComment)
  })
})
这个测试可以分为三个部分:arrange、act 和 assert。代码中有一些假设,比如标签的命名,或者我们会有一个createCommentprop。
在查找输入框时,我们希望尝试通过它们的标签来查找,这在构建应用程序时优先考虑了可访问性。获取表单最简单的方法是使用container.querySelector。
接下来,我们必须为输入赋值,并模拟变化以更新它们的状态。这一步可能感觉有点奇怪,因为通常我们一次输入一个字符,并为每个新字符更新组件的状态。这更像是复制/粘贴的行为,从空字符串到“Socrates”。
提交表单后,我们可以对哪些 props 被调用以及使用了哪些参数等信息进行断言。我们还可以利用这个机会来验证表单输入是否已被清除。
是不是有点吓人?孩子,别害怕,往这边走。先把表单添加到渲染函数里。
render() {
        const { header } = this.props
        return (
            <div className="CommentFeed">
                <h2>{header}</h2>

                <form
                    className="comment-form"
                    onSubmit={this.handleSubmit}
                >
                    <label htmlFor="author">
                        Author
                        <input
                            id="author"
                            type="text"
                            onChange={this.handleChange}
                        />
                    </label>
                    <label htmlFor="text">
                        Comment
                        <input
                            id="text"
                            type="text"
                            onChange={this.handleChange}
                        />
                    </label>

          <button type="submit">Submit Comment</button>
                </form>

                <div className="comment-list">
                    {this.renderComments()}
                </div>
            </div>
        )
    }
我可以把这个表单拆分成一个独立的组件,但目前我先不这么做。我会把它添加到我放在办公桌旁的“重构愿望清单”里。这就是 TDD 的运作方式。当某些东西看起来可以重构时,就记下来,然后继续下一步。只有当抽象的存在对你有利并且你觉得没有必要时,才进行重构。
还记得我们通过创建工厂来重构测试套件createProps吗?就像这样。我们也可以重构测试。
现在,我们添加handleChange和handleSubmit类方法。当我们更改输入或提交表单时,这些方法就会被触发。我还会初始化我们的状态。
export default class CommentFeed extends Component {
  state = {
    author: '',
    text: '',
  }

  handleSubmit = event => {
    event.preventDefault()
    const { author, text } = this.state
    this.props.createComment({ author, text })
  }

  handleChange = event => {
    this.setState({ [event.target.id]: event.target.value })
  }

  /* ... */
}
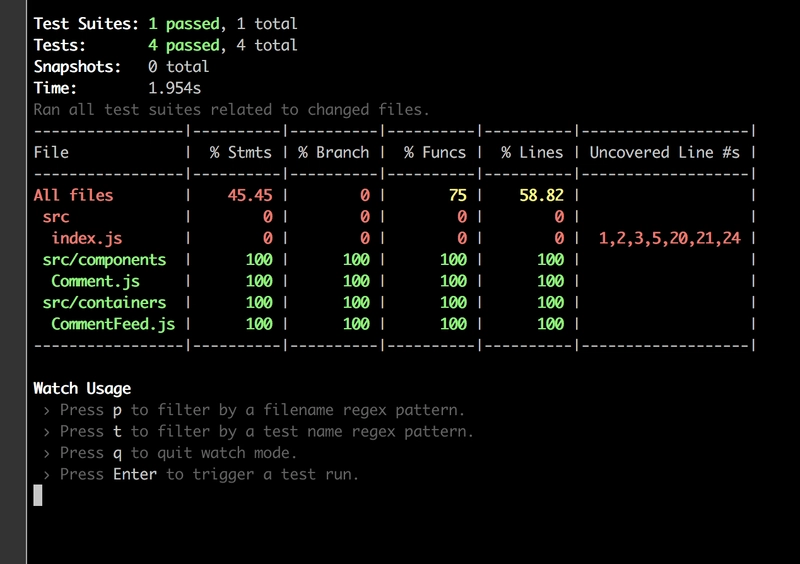
就这样,我们的测试通过了,现在我们得到了一个类似于真实应用程序的东西。我们的覆盖率怎么样?
还不错,如果我们忽略 index.js 内部的所有设置,那么我们就有一个完全覆盖执行行的 Web 应用程序。
当然,我们可能还需要测试其他情况,以验证应用程序是否按预期运行。这个覆盖率数字只是你的老板在与其他同事交谈时可以炫耀的东西。
点赞评论
我们如何检查是否可以点赞评论?现在或许是在我们的应用程序中建立一些身份验证概念的好时机。但我们暂时不会深入探讨。首先,让我们更新 props 工厂,auth为我们生成的评论添加一个包含 ID 的字段。
const createProps = props => ({
  auth: {
    name: 'Ian Wilson',
  },
  comments: [
    {
      id: 'comment-0',
      author: 'Ian Wilson',
      text: 'A boats a boat but a mystery box could be anything.',
    },
    {
      id: 'comment-1',
      author: 'Max Powers Jr',
      text: 'Krypton sucks.',
    },
  ],
  /*...*/
})
已“验证”的用户将通过应用程序传递其 auth 属性,任何与他们是否已验证相关的操作都将被记录。
在许多应用程序中,此属性可能包含某种访问令牌或 Cookie,这些令牌或 Cookie 在向服务器发出请求时被发送。在客户端,此属性的存在让应用程序知道他们可以让用户查看其个人资料或其他受保护的路由。
不过,在这个测试示例中,我们不会过多地处理身份验证。想象一下这样的场景:当你进入聊天室时,你会输入你的昵称。从那时起,无论其他人是否也用这个昵称登录,你都将负责所有使用此昵称的评论。
虽然这不是一个很好的解决方案,但即使在这个设计示例中,我们也只关心测试 CommentFeed 组件是否正常运行。我们不关心用户如何登录。
换句话说,我们可能有一个完全不同的登录组件来处理特定用户的身份验证,从而让他们经历火与怒的考验,以获得让auth他们能够在我们的应用程序中肆虐的全能属性。
让我们“点赞”一条评论。添加下一个测试用例,然后更新 props 工厂以包含likeComment。
const createProps = props => ({
  createComment: jest.fn(),
    likeComment: jest.fn(),
  ..props
})

describe('CommentFeed', () => {
  /* ... */

  it('allows the user to like a comment', () => {
    let props = createProps()
    let id = props.comments[1].id
    const { getByTestId } = render(<CommentFeed {...props} />)

    const likeNode = getByTestId(id)
    Simulate.click(likeNode)

    expect(props.likeComment).toHaveBeenCalledTimes(1)
    expect(props.likeComment).toHaveBeenCalledWith(id, props.auth.name)
  })
})
现在进行实现,我们首先更新评论组件,使其具有“喜欢”按钮以及data-testid属性,以便我们可以找到它。
const Comment = props => {
  return (
    <div className="Comment">
      <h4>{props.author}</h4>
      <p>{props.text}</p>
      <button
        data-testid={props.id}
        onClick={() => props.onLike(props.id, props.author)}
      >
        Like
      </button>
    </div>
  )
}
我将测试 ID 直接放在按钮上,这样我们就可以立即模拟点击,而无需嵌套查询选择器。我还onClick为按钮附加了一个处理程序,以便它调用onLike传递给它的函数。
现在我们只需将此类方法添加到我们的 CommentFeed 中:
handleLike = (id, author) => {
  this.props.likeComment(id, author)
}
你可能会想,为什么我们不likeComment直接把 prop 传递给 Comment 组件,而要把它变成一个类属性?因为这样很简单,我们不需要构建这个抽象。将来,我们可能会添加其他onClick处理程序,例如处理分析事件。
能够在handleLike这个容器组件的方法中捆绑多个不同的函数调用有其优势。如果我们愿意,我们也可以在“赞”成功后使用此方法来更新组件的状态。
不喜欢评论
至此,我们已经完成了渲染、创建和点赞评论的测试。当然,我们还没有实现实际的逻辑——我们还没有更新 store 或写入数据库。
您可能还会注意到,我们正在测试的逻辑很脆弱,不太适用于现实世界的评论推送。例如,如果我们尝试点赞一条已经点赞过的评论,会怎么样?它会无限增加点赞数,还是会取消点赞?
组件功能的扩展留给大家发挥想象力,但一个好的开始是编写一个新的测试用例。以下是假设我们想要实现“取消点赞”一个已经点赞的评论的功能:
const createProps = props => ({
  header: 'Comment Feed',
  comments: [
    {
      id: 'comment-0',
      author: 'Ian Wilson',
      text: 'A boats a boat but a mystery box could be anything.',
      likes: ['user-0'],
    },
    {
      id: 'comment-1',
      author: 'Max Powers Jr',
      text: 'Krypton sucks.',
      likes: [],
    },
  ],
  auth: {
    id: 'user-0',
    name: 'Ian Wilson',
  },
  createComment: jest.fn(),
  likeComment: jest.fn(),
  unlikeComment: jest.fn(),
  ...props,
})

describe('CommentFeed', () => {
  /* ... */

  it('allows the user to unlike a comment', () => {
    let props = createProps()
    let id = props.comments[0].id
    const { getByTestId } = render(<CommentFeed {...props} />)

    const likeNode = getByTestId(id)
    Simulate.click(likeNode)

    expect(props.unlikeComment).toHaveBeenCalledTimes(1)
    expect(props.unlikeComment).toHaveBeenCalledWith(id, props.auth)
  })
})
请注意,我们正在构建的评论提要允许我点赞自己的评论。谁会这么做?
我已经使用一些逻辑更新了评论组件,以确定当前用户是否喜欢该评论。
const Comment = props => {
  const isLiked = props.likes.includes(props.currentUser.id)
  const onClick = isLiked
    ? () => props.onDislike(props.id)
    : () => props.onLike(props.id)
  return (
    <div className="Comment">
      <h4>{props.author}</h4>
      <p>{props.text}</p>

      <button data-testid={props.id} onClick={onClick}>
        {isLiked ? 'Unlike' : 'Like'}
      </button>
    </div>
  )
}
好吧,我稍微作弊了一点,之前传递author给onLike函数的地方,我改成了currentUser,也就是auth传递给 Comment 组件的 prop。我之所以意识到这一点,是因为我当时正在全力编写测试——如果只是碰巧写代码,我可能会忽略这一点,直到我的一位同事因为我的无知而斥责我!
但这里并非无知,只是测试和后续的代码。请务必更新 CommentFeed,使其能够传递 auth 属性。对于处理程序,我们实际上可以省略传递 auth 属性,因为我们可以从父级方法onClick中的 auth 属性中派生出该属性。handleLikehandleDislike
handleLike = id => {
        this.props.likeComment(id, this.props.auth)
    }

handleDislike = id => {
  this.props.dislikeComment(id, this.props.auth)
}

renderComments() {
  return this.props.comments.map((comment, i) => (
    <Comment
      key={i}
      {...comment}
      currentUser={this.props.auth}
      onDislike={this.handleDislike}
      onLike={this.handleLike}
    />
  ))
}
总结
希望您的测试套件看起来像一棵未点亮的圣诞树。
我们可以采取很多不同的方法来实现这一点,可能会有点不知所措。每当你想到什么,就把它写下来,要么写在纸上,要么写在一个新的测试块上。
例如,假设你实际上想在一个类方法中实现handleLike和handleDislike,但现在你还有其他优先事项。你可以通过在测试用例中记录来实现,如下所示:
it('combines like and dislike methods', () => {})
这并不意味着你需要编写一个全新的测试,你也可以更新前两个用例。但重点是,你可以将测试运行器用作应用程序更紧迫的“待办事项”列表。
有用的链接
有一些很棒的内容涉及广泛的测试。
- Kent C Dodds 的《React 测试库介绍》。了解这个测试库背后的理念是一个不错的主意。
- Kostis Kapelonis 撰写的《软件测试反模式》。这是一篇极其深入的文章,探讨了单元测试和集成测试,以及如何避免这些测试。
- Kent Beck 的《测试驱动开发实例》。这是一本探讨 TDD 模式的纸质书。篇幅不长,而且以对话式的语言写成,易于理解。
我希望这能帮你渡过一段时间。
想看更多文章或妙语?请在Medium、Github和Twitter上关注我!
文章来源:https://dev.to/iwilsonq/how-to-build-sturdy-react-apps-with-tdd-using-jest-the-react-testing-library-52cn 后端开发教程 - Java、Spring Boot 实战 - msg200.com

