如何使用 Flowbite 构建 Tailwind CSS 分页组件
Tailwind CSS 是发展最快的框架之一,它因其在处理类时实用优先的方法而广受欢迎。
Tailwind CSS 的缺点之一是它没有提供一套现成的 UI 组件,如按钮、导航栏和模式,您必须从头开始构建它们。
这就是我开始一系列教程的原因,向您展示如何使用 Tailwind CSS 和 Flowbite 构建最常用的 UI 组件。
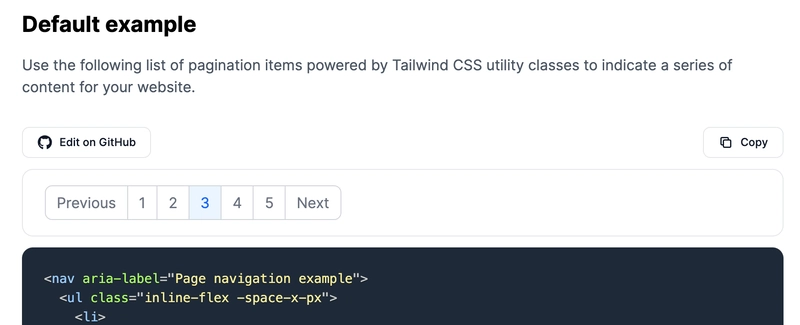
今天我将向你展示如何构建一个分页组件。以下是它的外观预览:
让我们开始吧!
Tailwind CSS 分页
首先,我们需要准备好 HTML 标签,以便能够正常访问。<ul>为此,我们将使用一个元素:
<nav aria-label="Page navigation example">
  <ul>
    <li>
      <a href="#">Previous</a>
    </li>
    <li>
      <a href="#">1</a>
    </li>
    <li>
      <a href="#">2</a>
    </li>
    <li>
      <a href="#">3</a>
    </li>
    <li>
      <a href="#">4</a>
    </li>
    <li>
      <a href="#">5</a>
    </li>
    <li>
      <a href="#">Next</a>
    </li>
  </ul>
</nav>
现在我们应该使用 Tailwind CSS 中的实用程序类来设置分页元素和其中的链接的样式:
<nav aria-label="Page navigation example">
  <ul class="inline-flex -space-x-px">
    <li>
      <a href="#" class="py-2 px-3 ml-0 leading-tight text-gray-500 bg-white rounded-l-lg border border-gray-300">Previous</a>
    </li>
    <li>
      <a href="#" class="py-2 px-3 leading-tight text-gray-500 bg-white border border-gray-300">1</a>
    </li>
    <li>
      <a href="#" class="py-2 px-3 leading-tight text-gray-500 bg-white border border-gray-300">2</a>
    </li>
    <li>
      <a href="#" aria-current="page" class="py-2 px-3 text-blue-600 bg-blue-50 border border-gray-300">3</a>
    </li>
    <li>
      <a href="#" class="py-2 px-3 leading-tight text-gray-500 bg-white border border-gray-300">4</a>
    </li>
    <li>
      <a href="#" class="py-2 px-3 leading-tight text-gray-500 bg-white border border-gray-300">5</a>
    </li>
    <li>
      <a href="#" class="py-2 px-3 leading-tight text-gray-500 bg-white rounded-r-lg border border-gray-300">Next</a>
    </li>
  </ul>
</nav>
看起来不错!我们再添加一下悬停状态的样式:
<nav aria-label="Page navigation example">
  <ul class="inline-flex -space-x-px">
    <li>
      <a href="#" class="py-2 px-3 ml-0 leading-tight text-gray-500 bg-white rounded-l-lg border border-gray-300 hover:bg-gray-100 hover:text-gray-700">Previous</a>
    </li>
    <li>
      <a href="#" class="py-2 px-3 leading-tight text-gray-500 bg-white border border-gray-300 hover:bg-gray-100 hover:text-gray-700">1</a>
    </li>
    <li>
      <a href="#" class="py-2 px-3 leading-tight text-gray-500 bg-white border border-gray-300 hover:bg-gray-100 hover:text-gray-700">2</a>
    </li>
    <li>
      <a href="#" aria-current="page" class="py-2 px-3 text-blue-600 bg-blue-50 border border-gray-300 hover:bg-blue-100 hover:text-blue-700">3</a>
    </li>
    <li>
      <a href="#" class="py-2 px-3 leading-tight text-gray-500 bg-white border border-gray-300 hover:bg-gray-100 hover:text-gray-70">4</a>
    </li>
    <li>
      <a href="#" class="py-2 px-3 leading-tight text-gray-500 bg-white border border-gray-300 hover:bg-gray-100 hover:text-gray-700">5</a>
    </li>
    <li>
      <a href="#" class="py-2 px-3 leading-tight text-gray-500 bg-white rounded-r-lg border border-gray-300 hover:bg-gray-100 hover:text-gray-700">Next</a>
    </li>
  </ul>
</nav>
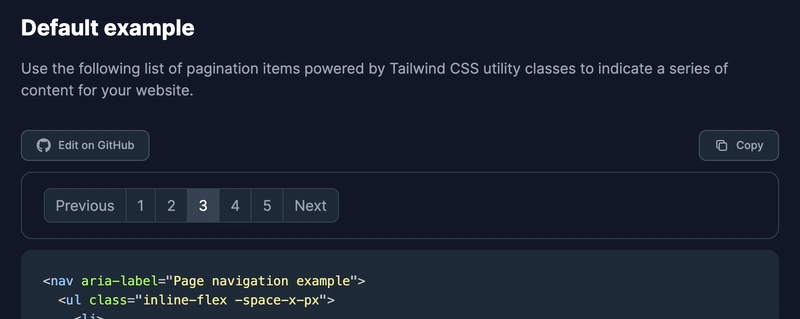
最后,我们还要为这个分页组件添加暗黑模式样式。查看此页面,了解如何为 Tailwind CSS 添加暗黑模式。
<nav aria-label="Page navigation example">
  <ul class="inline-flex -space-x-px">
    <li>
      <a href="#" class="py-2 px-3 ml-0 leading-tight text-gray-500 bg-white rounded-l-lg border border-gray-300 hover:bg-gray-100 hover:text-gray-700 dark:bg-gray-800 dark:border-gray-700 dark:text-gray-400 dark:hover:bg-gray-700 dark:hover:text-white">Previous</a>
    </li>
    <li>
      <a href="#" class="py-2 px-3 leading-tight text-gray-500 bg-white border border-gray-300 hover:bg-gray-100 hover:text-gray-700 dark:bg-gray-800 dark:border-gray-700 dark:text-gray-400 dark:hover:bg-gray-700 dark:hover:text-white">1</a>
    </li>
    <li>
      <a href="#" class="py-2 px-3 leading-tight text-gray-500 bg-white border border-gray-300 hover:bg-gray-100 hover:text-gray-700 dark:bg-gray-800 dark:border-gray-700 dark:text-gray-400 dark:hover:bg-gray-700 dark:hover:text-white">2</a>
    </li>
    <li>
      <a href="#" aria-current="page" class="py-2 px-3 text-blue-600 bg-blue-50 border border-gray-300 hover:bg-blue-100 hover:text-blue-700 dark:border-gray-700 dark:bg-gray-700 dark:text-white">3</a>
    </li>
    <li>
      <a href="#" class="py-2 px-3 leading-tight text-gray-500 bg-white border border-gray-300 hover:bg-gray-100 hover:text-gray-700 dark:bg-gray-800 dark:border-gray-700 dark:text-gray-400 dark:hover:bg-gray-700 dark:hover:text-white">4</a>
    </li>
    <li>
      <a href="#" class="py-2 px-3 leading-tight text-gray-500 bg-white border border-gray-300 hover:bg-gray-100 hover:text-gray-700 dark:bg-gray-800 dark:border-gray-700 dark:text-gray-400 dark:hover:bg-gray-700 dark:hover:text-white">5</a>
    </li>
    <li>
      <a href="#" class="py-2 px-3 leading-tight text-gray-500 bg-white rounded-r-lg border border-gray-300 hover:bg-gray-100 hover:text-gray-700 dark:bg-gray-800 dark:border-gray-700 dark:text-gray-400 dark:hover:bg-gray-700 dark:hover:text-white">Next</a>
    </li>
  </ul>
</nav>
太棒了!启用暗黑模式后,分页组件应该如下所示:
这款Tailwind CSS 分页组件隶属于一个规模更大的开源 Tailwind CSS 组件库,名为 Flowbite。如果您想使用更多分页组件的变体或浏览其他组件,请务必查看其文档。
链接:https://dev.to/themesberg/how-to-build-a-tailwind-css-pagination-component-with-flowbite-19mb 后端开发教程 - Java、Spring Boot 实战 - msg200.com

