React 和 PDF 渲染
便携式文档格式 (PDF) ——30 年前开发的技术至今仍然存在,并且是最广泛使用的文档格式之一。人们仍然喜欢使用它们的原因有很多,例如,这种广泛支持的文档格式与许多设备和应用程序兼容,并且内容始终保持相同的格式。
什么是 React-PDF?
React-pdf 允许我们在服务器和 Web 上渲染文档。
它导出一组 React 原语,可用于轻松地将内容渲染到文档中,并且我们可以使用 CSS 属性进行样式设置,并使用 flexbox 进行布局。支持的原语列表可在此处找到。它支持渲染文本、图像、SVG 等多种内容。
我们要建造什么?
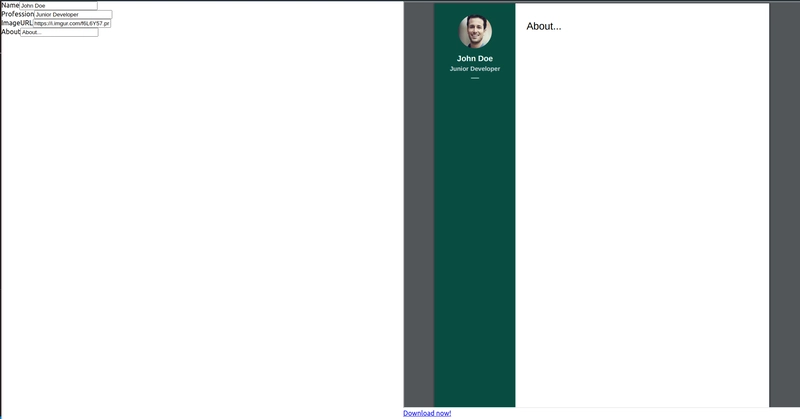
今天我们将学习如何使用 React-pdf 渲染器创建并设置 PDF 样式。React-pdf 包让我们能够使用 React 创建外观精美的 PDF。它使用简单,文档也对开发者友好。我们将创建一个简单的应用程序,用于动态更新在 DOM 中渲染的 PDF 样式模板。
此示例将展示如何在 DOM 中呈现文档以及如何直接将文档保存到文件中而无需显示它。
1. 设置
npx create-react-app app && cd app && yarn add @react-pdf/renderer
正如在编写教程时一样,react-pdf render 需要一些额外的依赖项和 craco 配置。
yarn add process browserify-zlib stream-browserify util buffer assert @craco/craco
将 package.json 中的脚本部分更改如下:
  "scripts": {
    "start": "craco start",
    "build": "craco build",
    "test": "craco test",
    "eject": "react-scripts eject"
  },
接下来,在项目根目录中创建一个新文件
craco.config.js
const webpack = require("webpack");

module.exports = {
  webpack: {
    configure: {
      resolve: {
        fallback: {
          process: require.resolve("process/browser"),
          zlib: require.resolve("browserify-zlib"),
          stream: require.resolve("stream-browserify"),
          util: require.resolve("util"),
          buffer: require.resolve("buffer"),
          asset: require.resolve("assert"),
        },
      },
      plugins: [
        new webpack.ProvidePlugin({
          Buffer: ["buffer", "Buffer"],
          process: "process/browser",
        }),
      ],
    },
  },
};
mkdir Components && cd Components && mkdir PDF && cd PDF && touch Preview.js && touch LeftSection.js && touch RightSection.js
├── App.css
├── App.js
├── index.js
├── PDF
│   ├── LeftSection.js
│   ├── Preview.js
│   └── RightSection.js
└── styles
    └── index.js
在我们的系统中,App.js我们将创建一个状态,当检测到变化时,该状态会根据用户输入进行更新,我们将重新渲染我们的页面。
 javascript
import Preview from './PDF/Preview'
import React, { useState } from 'react'
function App() {
  const [profile, setProfile] = useState({
    type: 'Profile',
    name: 'John Doe',
    profession: 'Junior Developer',
    profileImageURL: 'https://i.imgur.com/f6L6Y57.png',
    display: true,
    about: 'About...',
  })

  const handleChange = (name, value) => {
    setProfile({ ...profile, [name]: value })
  }

  return (
    <div
      style={{
        width: '100%',
        height: '100vh',
        display: 'flex',
      }}
    >
      <div style={{ width: '50%' }}>
        <div>
          <label>Name</label>
          <input
            name='name'
            defaultValue={profile.name}
            onChange={(e) => {
              handleChange(e.target.name, e.target.value)
            }}
          />
        </div>
        <div>
          <label>Profession</label>
          <input
            name='profession'
            defaultValue={profile.profession}
            onChange={(e) => {
              handleChange(e.target.name, e.target.value)
            }}
          />
        </div>
        <div>
          <label>ImageURL</label>
          <input
            name='profileImageURL'
            defaultValue={profile.profileImageURL}
            onChange={(e) => {
              handleChange(e.target.name, e.target.value)
            }}
          />
        </div>
        <div>
          <label>About</label>
          <input
            name='about'
            defaultValue={profile.about}
            onChange={(e) => {
              handleChange(e.target.name, e.target.value)
            }}
          />
        </div>
      </div>
      <Preview profile={profile} />
    </div>
  )
}

export default App
Preview.js
这将允许我们在页面的一半区域渲染预览,并嵌入我们即将创建的模板文档。
我们还有 PDFDownloadLink,它可以用来下载 PDF,而无需在 DOM 中渲染。
import React from 'react'
import { Document, Page, PDFViewer, PDFDownloadLink } from '@react-pdf/renderer'
import LeftSection from './LeftSection'
import { RightSection } from './RightSection'
import styles from '../styles'

const Preview = ({ profile }) => {
  return (
    <div style={{ flexGrow: 1 }}>
      <PDFViewer
        showToolbar={false}
        style={{
          width: '100%',
          height: '95%',
        }}
      >
        <Template profile={profile} />
      </PDFViewer>
      <PDFDownloadLink
        document={<Template profile={profile} />}
        fileName='somename.pdf'
      >
        {({ loading }) => (loading ? 'Loading document...' : 'Download now!')}
      </PDFDownloadLink>
    </div>
  )
}
// Create Document Component
const Template = ({ profile }) => {
  return (
    <Document>
      <Page size='A4' style={styles.page}>
        // We will divide our document into 2 columns
        <LeftSection profile={profile} />
        <RightSection about={profile.about} />
      </Page>
    </Document>
  )
}

export default Preview
我们还将创建包含样式的文件夹,用于保存用于 react-render 原语的样式表。
mkdir styles && cd styles && mkdir index.js
样式
import { StyleSheet } from '@react-pdf/renderer'

export default StyleSheet.create({
  page: {
    display: 'flex',
    flexDirection: 'row',
  },
  section_right: {
    margin: 10,
    padding: 10,
    paddingTop: 20,
    width: '75%',
  },
  section_left: {
    width: '25%',
    height: '100%',
    backgroundColor: '#084c41',
  },
  profile_container: {
    display: 'flex',
    flexDirection: 'column',
    alignItems: 'center',
    marginTop: '20',
    marginBottom: '20px',
    height: '150',
    fontFamily: 'Helvetica-Bold',
  },
  name_text: {
    paddingTop: '10px',
    paddingBottom: '5px',
    fontSize: '14px',
    fontWeight: '900',
    color: 'white',
  },
  profession_text: {
    color: '#d1d5db',
    fontSize: '11px',
  },
  profile_img: {
    width: '60px',
    height: '60px',
    borderRadius: '90',
  },
  profile_line: {
    marginTop: '10px',
    width: '10%',
    height: '1px',
    backgroundColor: '#FFF',
    textAlign: 'center',
  },
})
LeftSection.js
import { View, Text, Image } from '@react-pdf/renderer'
import styles from '../styles'

export const Profile = ({ profile }) => {
  return (
    <View style={styles.profile_container}>
      <Image style={styles.profile_img} src={profile.profileImageURL} />

      <View
        style={{
          justifyContent: 'center',
        }}
      >
        <Text style={styles.name_text}>{profile.name}</Text>
      </View>
      <Text style={styles.profession_text}>{profile.profession}</Text>
      <View style={styles.profile_line} />
    </View>
  )
}

const LeftSection = ({ profile }) => {
  return (
    <View style={styles.section_left}>
      <Profile profile={profile} />
    </View>
  )
}

export default LeftSection
RightSection.js
import styles from '../styles'
import { View, Text } from '@react-pdf/renderer'

export const RightSection = ({ about }) => {
  return (
    <View style={styles.section_right}>
      <Text>{about}</Text>
    </View>
  )
}
现在您知道它有效了,您可以自己创建一些东西。
我构建的简历生成器的更多功能示例在这里。
简历生成器
总而言之,这只是一个简单的演示,用于演示如何将 PDF 渲染器与 React 结合使用。React PDF 包是一个非常酷的工具,可以用来创建简历生成器、发票模板、票据或收据等。这些内容可以基于现有数据生成,也可以像我们的简单演示一样根据用户输入动态更新。
希望本文对大家有所帮助。感谢阅读!
Github 仓库
 后端开发教程 - Java、Spring Boot 实战 - msg200.com
