创建一个交互式的 3D 作品集网站!

点击此处查看项目:0xFloyd Portfolio
源代码可在文章底部找到。
编辑于 2020 年 8 月 25 日 --> 经过多方建议,更新了镜头运动!谢谢大家!
使用 Three.js 构建 3D 世界
你的简历之后,别人很可能第一个访问你的作品集网站,所以留下良好的第一印象至关重要!我利用隔离期间的一部分时间,用 Three.js 和 Ammo.js 库创建了一个新的 3D 交互式作品集网站。
随着全国范围内转向远程办公,科技领域比以往任何时候都更向自学成才的开发者开放。难就难在如何脱颖而出。你如何向潜在雇主展现你的热情和能力?
在探索Google Experiments 的过程中,我发现了令人惊叹的 3D 网络世界。许多实验都是使用three.js构建的,这是一个旨在简化在网页上创建 3D 图形的库。该库由Ricardo Cabello (Mr.doob)于 2010 年创建,目前是 Github 上 Stars 排名第 38 的仓库,拥有超过 1,300 名贡献者。在被展示的项目所震撼之后,我知道自己接下来想学什么了!
Three.js 如何工作?
实时 3D 应用程序的组件,取自discoverthreejs.com
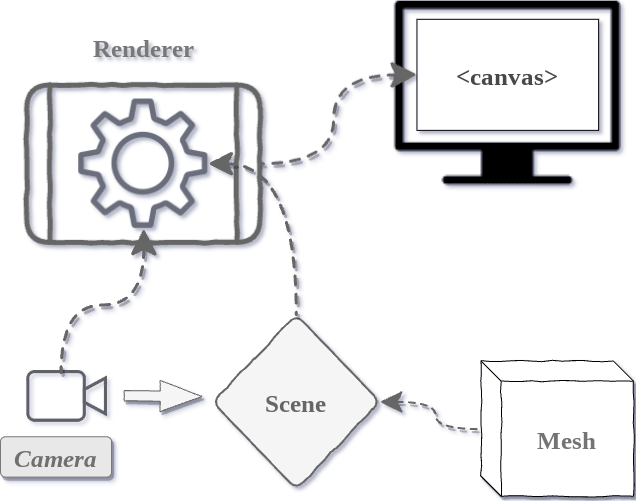
Three.js 可用于在浏览器中轻松显示 3D 图形。它底层利用了 WebGL,这是一种将浏览器连接到显卡并在网页画布上进行绘制的 API。WebGL 本身只能绘制点、线和三角形,因此 Three.js 将 WebGL 的细节抽象出来,使创建对象、纹理、3D 数学运算等变得非常容易。使用 Three.js,您可以将所有这些对象添加到“场景”中,然后将其传递给“渲染器”,渲染器将场景“绘制”到<canvas>要在网页上显示的 HTML 元素上。

Three.js 应用程序的结构,取自threejsfundamentals.org
Three.js 应用的核心是场景对象。上图是一个“场景图”的示例。在 3D 引擎中,场景图是一种具有节点层次结构的数据结构,每个节点代表一个局部空间。场景图就是逻辑的排列方式,也是场景在空间上的呈现方式。它类似于 DOM 树型结构,但 Three.js 的场景功能类似于虚拟 DOM(类似于 React),它只更新和渲染场景中发生的变化。Three.jsWebGLRenderer类是渲染背后的魔法,它将你的代码转换为 GPU 内存中的数值,供浏览器使用。
场景中的对象被称为“网格”,网格由几何体(描述如何绘制网格对象)和材质(定义网格的“外观”)组成。这些网格随后被添加到场景中。最后一个主要元素是相机,它决定了场景渲染后在画布上的位置和显示方式。
为了计算动画,渲染器每次刷新场景(通常每秒 60 次)时都会绘制到画布上。场景中发生的任何变化都需要在渲染循环期间使用浏览器requestAnimationFrame()方法进行更新。MDN文档解释了浏览器如何更新它。
首先,我们来看看一个简单的示例场景,它取自three.js 官方文档,用于创建旋转的 3D 立方体。输出结果可以在这里查看。
例子
<html>
  <head>
    <title>My first three.js app</title>
    <style>
      body {
        margin: 0;
      }
      canvas {
        display: block;
      }
    </style>
  </head>
  <body>
    <script src="js/three.js"></script>
    <script>
      //create new three.js scene and camera with dimensions of the user's window
      var scene = new THREE.Scene();
      var camera = new THREE.PerspectiveCamera(
        75,
        window.innerWidth / window.innerHeight,
        0.1,
        1000
      );

      //create new renderer, set size to the window size, and add it to the HMTL body
      var renderer = new THREE.WebGLRenderer();
      renderer.setSize(window.innerWidth, window.innerHeight);
      document.body.appendChild(renderer.domElement);

      //create a new Mesh, a green 3D cube, and add it to the scene
      var geometry = new THREE.BoxGeometry();
      var material = new THREE.MeshBasicMaterial({ color: 0x00ff00 });
      var cube = new THREE.Mesh(geometry, material);
      scene.add(cube);

      //set the camera position to correctly look at the scene
      camera.position.z = 5;

      //renderer animation loop to redraw the scene with the cube rotated every time
      var animate = function () {
        requestAnimationFrame(animate);

        cube.rotation.x += 0.01;
        cube.rotation.y += 0.01;

        renderer.render(scene, camera);
      };

      animate();
    </script>
  </body>
</html>
使用 Ammo.js 进行物理
Ammo.js是一个物理引擎,它直接将Bullet 物理引擎移植到了 JavaScript 上,由Alon Zakai开发。我对物理引擎的底层工作原理了解甚少,但本质上,物理引擎会创建一个连续的循环,根据创建它的参数(比如重力)模拟物理定律,然后根据这些参数计算运动和碰撞。
然后,在这个循环中添加被称为“刚体”的对象,这些对象可以施加力、质量、惯性、摩擦力等。该循环通过不断检查所有对象的位置、状态和运动来跟踪碰撞和相互作用。如果发生相互作用,则根据经过的时间和对象的物理特性更新对象的位置。下面是我的代码片段,展示了如何创建物理引擎循环以及如何将物理特性添加到 Three.js 网格球体对象。
Ammo.js 示例物理世界示例
//Library imports
import * as THREE from "three";
import * as Ammo from "./builds/ammo";
import {scene} from "./resources/world";

//Initiate Ammo.js physics engine
Ammo().then((Ammo) => {

    //function to create physics world
    function createPhysicsWorld() {

        //algorithms for full collision detection
        let collisionConfiguration = new Ammo.btDefaultCollisionConfiguration();

        //dispatch calculations for overlapping pairs/ collisions.
        let dispatcher = new Ammo.btCollisionDispatcher(collisionConfiguration);

        //broadphase collision detection list of all possible colliding pairs
        let overlappingPairCache = new Ammo.btDbvtBroadphase();

        //causes the objects to interact properly, like gravity, forces, collisions
        let constraintSolver = new Ammo.btSequentialImpulseConstraintSolver();

        // create physics world from these parameters. See bullet physics docs for info
        let physicsWorld = new Ammo.btDiscreteDynamicsWorld(
            dispatcher,
            overlappingPairCache,
            constraintSolver,
            collisionConfiguration
        );

        // add gravity
        physicsWorld.setGravity(new Ammo.btVector3(0, -9.8, 0));
    }

    //function to create a solid ball object
    function createBall(){
        //Ball parameters
        let pos = {x: 0, y: 0, z: 0};
        let radius = 2;
        let quat = {x: 0, y: 0, z: 0, w: 1};
        let mass = 3;

        //three.js Section

        //Create ball and add to scene
        let ball = new THREE.Mesh(new THREE.SphereBufferGeometry(radius), new THREE.MeshStandardMaterial({color: 0xffffff}));
        ball.position.set(pos.x, pos.y, pos.z);
        scene.add(ball);

        //Ammo.js section

        //create new transform for position and rotation
        let transform = new Ammo.btTransform();
        transform.setOrigin(new Ammo.btVector3(pos.x, pos.y, pos.z));
        transform.setRotation(
            new Ammo.btQuaternion(quat.x, quat.y, quat.z, quat.w)
        );

        //set object motion
        let motionState = new Ammo.btDefaultMotionState(transform);

        //setup bounding box for collisions
        let collisionShape = new Ammo.btSphereShape(radius);
        collisionShape.setMargin(0.05);

        //setup inertia
        let localInertia = new Ammo.btVector3(0, 0, 0);
        collisionShape.calculateLocalInertia(mass, localInertia);

        //provides structure information to create a solid object
        let rigidBodyStructure = new Ammo.btRigidBodyConstructionInfo(
            mass,
            motionState,
            collisionShape,
            localInertia
        );

        //create solid body from the body structure
        let body = new Ammo.btRigidBody(rigidBodyStructure);

        //add ball friction since it moves
        body.setFriction(10);
        body.setRollingFriction(10);

        // add to physical world as a solid object so the engine can update its physics
        physicsWorld.addRigidBody(body);
    }

    createPhysicsWorld();
    createBall()
}
运动与互动
在 Ammo.js 模拟世界中,交互是基于属性和力来计算的。物体周围有一个边界(有时称为边界框或碰撞箱),物理引擎将其用作物体的位置。在每个动画循环中,引擎都会检查所有物体的边界框,如果任何两个物体的边界框位于同一位置,则引擎会记录“碰撞”,并相应地更新对象。对于固体物体,这意味着防止这两个物体位于同一位置,模拟固体物质。下面是我的代码片段,展示了渲染循环和世界物理是如何更新的。
渲染循环
//function to render frame
function renderFrame() {

    //time since last render
    let deltaTime = clock.getDelta();

    //apply vector force and velocity to ball Mesh based on user input
    moveBall();

    //update objects physics based on time elapsed
    updatePhysics(deltaTime);

    //re-render the scene and update the camera
    renderer.render(scene, camera);

    // tells browser theres animation, update before the next repaint
    requestAnimationFrame(renderFrame);
}

//function to update physics world
function updatePhysics(deltaTime) {

    // Step world based on elapsed time
    physicsWorld.stepSimulation(deltaTime, 10);

    //Loop through rigid bodies list, and update all rigid bodies in the world
    for (let i = 0; i < rigidBodies.length; i++) {

        //variables for Three.js Mesh and Ammo Rigid Body data
        let meshObject = rigidBodies[i];
        let ammoObject = meshObject.userData.physicsBody;

        //get objects current motion
        let objectMotion = ammoObject.getMotionState();

        //If the object is moving, get current position and rotation
        if (objectMotion) {
            objectMotion.getWorldTransform(transform);
            let mPosition = transform.getOrigin();
            let mQuaternion = transform.getRotation();

            // update object position and rotation
            meshObject.position.set(mPosition.x(), mPosition.y(), mPosition.z());
            meshObject.quaternion.set(mQuaternion.x(), mQuaternion.y(), mQuaternion.z(), mQuaternion.w());
        }
    }
}
用户输入
我希望用户能够在桌面设备和触摸屏移动设备上的 3D 世界中移动球体。对于键盘事件,我使用了“keydown”和“keyup”事件监听器,当按下方向键时,将相应的方向力施加到球体上。对于触摸屏,我在屏幕上创建了一个操纵杆控制器叠加层。然后,我向 div 控制器元素添加了“touchstart”、“touchmove”和“touchend”事件监听器。控制器叠加层会跟踪用户手指移动的起始、当前和结束坐标,并在每次渲染时相应地更新球体力。
以下代码片段仅展示了完整操纵杆叠加层的部分功能,用于展示基本概念。完整代码请见文章底部的源代码。
// object to keep tracking of current ball movement on x-y coordinate plane
let moveDirection = { left: 0, right: 0, forward: 0, back: 0 };

//coordinates of div's position on the screen
let coordinates = { x: 0, y: 0 };

//variable to hold starting coordinates for touch event
let dragStart = null;

//create joystick div element
const stick = document.createElement("div");

//event handler function to get x-y coordinate change in user's touch position on the screen
function handleMove(event) {
    //no touch change, return
    if (dragStart === null) return;

    //touch position changed, get new x-y coordinates
    if (event.changedTouches) {
        event.clientX = event.changedTouches[0].clientX;
        event.clientY = event.changedTouches[0].clientY;
    }

    //calculates div position change on the screen and translates change into x-y coordinates
    const xDiff = event.clientX - dragStart.x;
    const yDiff = event.clientY - dragStart.y;
    const angle = Math.atan2(yDiff, xDiff);
    const distance = Math.min(maxDiff, Math.hypot(xDiff, yDiff));
    const xNew = distance * Math.cos(angle);
    const yNew = distance * Math.sin(angle);
    coordinates = { x: xNew, y: yNew };

    //apply CSS style changes to "move" joystick div based on new coordinates
    stick.style.transform = `translate3d(${xNew}px, ${yNew}px, 0px)`;

    //pass coordinates to function to compute movement directional forces
    touchEvent(coordinates);
}

//function to apply directional forces to ball based on change in user touch coordinates
function touchEvent(coordinates) {

    // move ball right
    if (coordinates.x > 30) {
        moveDirection.right = 1;
        moveDirection.left = 0;
    //move ball left
    } else if (coordinates.x < -30) {
        moveDirection.left = 1;
        moveDirection.right = 0;
    //no change, don't apply X movement forces
    } else {
        moveDirection.right = 0;
        moveDirection.left = 0;
    }

    //move ball backwards
    if (coordinates.y > 30) {
        moveDirection.back = 1;
        moveDirection.forward = 0;
    //move ball forward
    } else if (coordinates.y < -30) {
        moveDirection.forward = 1;
        moveDirection.back = 0;
    //no change, don't apply Y movement forces
    } else {
        moveDirection.forward = 0;
        moveDirection.back = 0;
    }
}
现在,你已经拥有了所有基础模块,可以使用实时物理引擎和用户控制系统来创建你自己的 3D 世界!你只需要你的智慧和学习的动力,就能创造出精彩的作品。互联网拥有你所需的一切资源!任何人都能学习任何东西!
这个项目的源代码可以在我的Github上找到!如果你有任何反馈或疑问,请随时给我留言或在Twitter 上关注我 @0xfloyd!
文章来源:https://dev.to/0xfloyd/create-an-interactive-3d-portfolio-website-that-stands-out-to-employers-47gc